steering wheel BMW 530XI TOURING 2008 E61 Owner's Manual
[x] Cancel search | Manufacturer: BMW, Model Year: 2008, Model line: 530XI TOURING, Model: BMW 530XI TOURING 2008 E61Pages: 292, PDF Size: 9.33 MB
Page 12 of 292
Cockpit
10
Cockpit
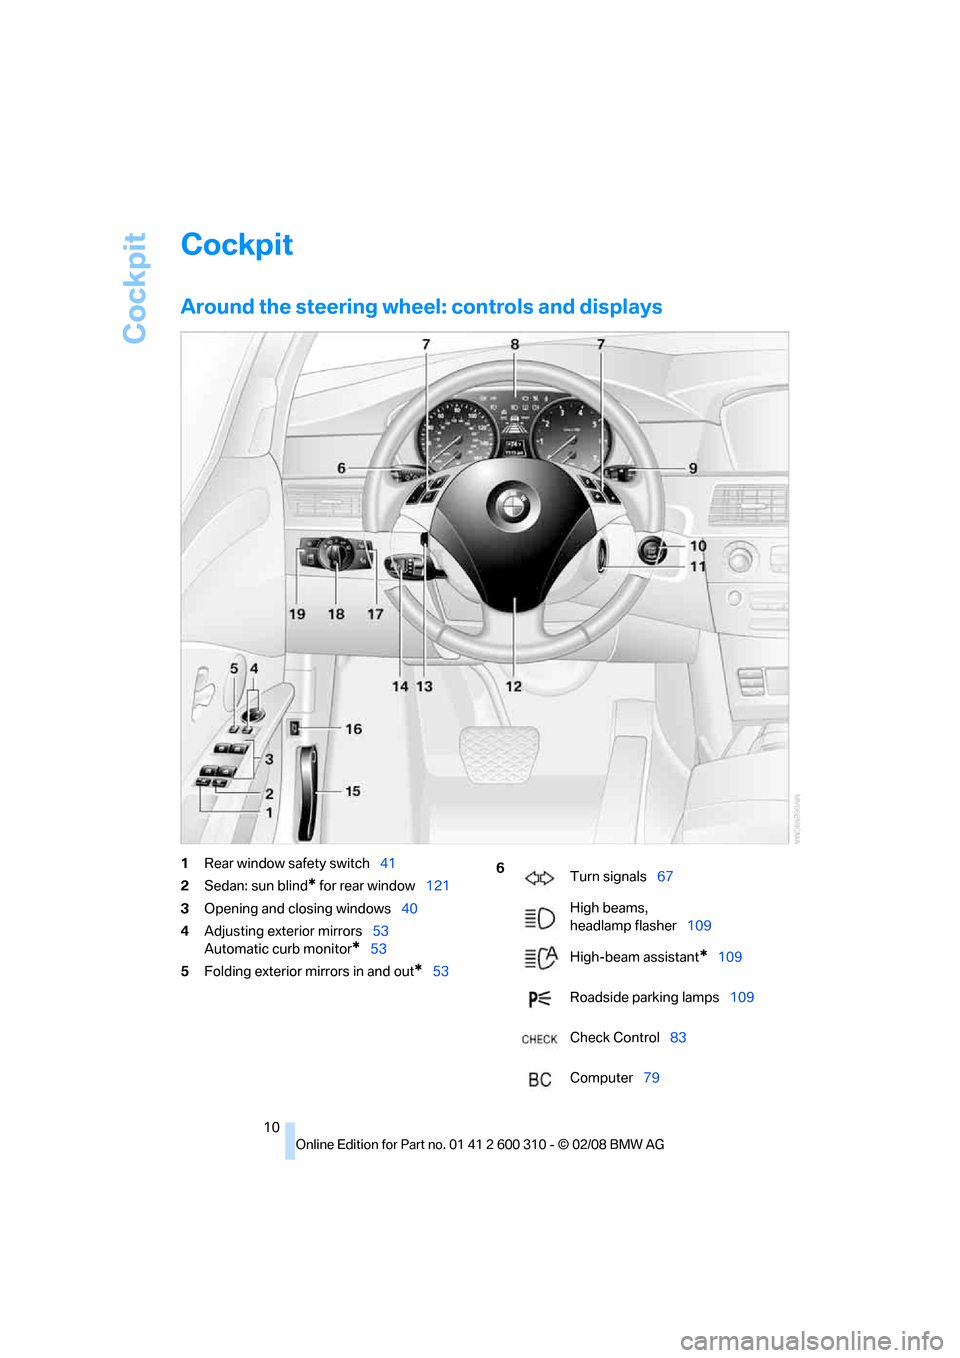
Around the steering wheel: controls and displays
1Rear window safety switch41
2Sedan: sun blind
* for rear window121
3Opening and closing windows40
4Adjusting exterior mirrors53
Automatic curb monitor
*53
5Folding exterior mirrors in and out
*53
6
Turn signals67
High beams,
headlamp flasher109
High-beam assistant
*109
Roadside parking lamps109
Check Control83
Computer79
Page 13 of 292
At a glance
11Reference
Controls
Driving tips
Communications
Navigation
Entertainment
Mobility
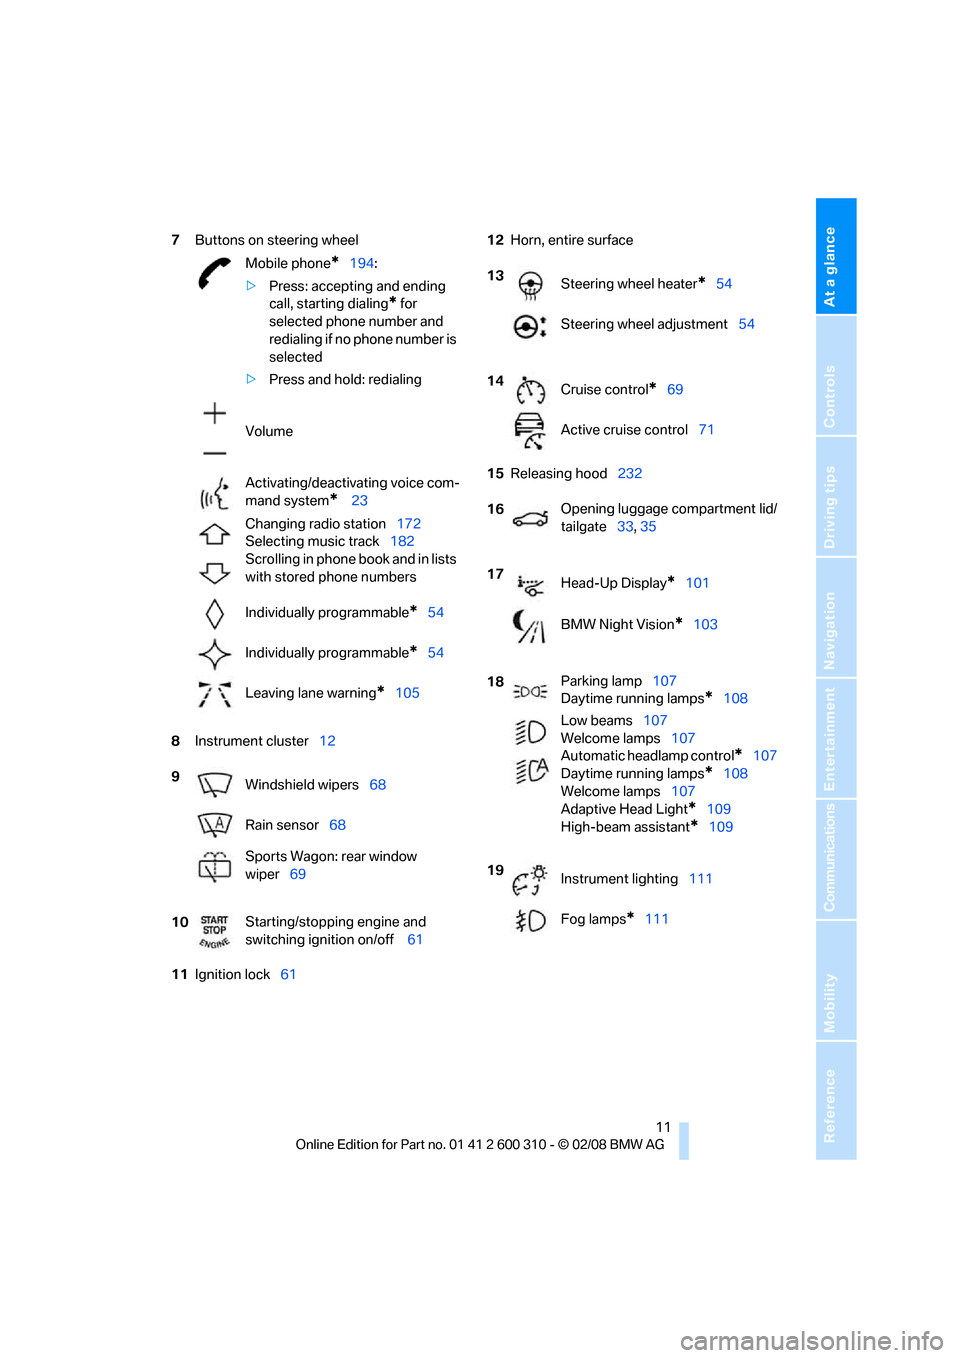
7Buttons on steering wheel
8Instrument cluster12
11Ignition lock6112Horn, entire surface
15Releasing hood232 Mobile phone
*194:
>Press: accepting and ending
call, starting dialing
* for
selected phone number and
redialing if no phone number is
selected
>Press and hold: redialing
Volume
Activating/deactivating voice com-
mand system
* 23
Changing radio station172
Selecting music track182
Scrolling in phone book and in lists
with stored phone numbers
Individually programmable
*54
Individually programmable
*54
Leaving lane warning
*105
9
Windshield wipers68
Rain sensor68
Sports Wagon: rear window
wiper69
10Starting/stopping engine and
switching ignition on/off 61
13
Steering wheel heater*54
Steering wheel adjustment54
14
Cruise control
*69
Active cruise control71
16Opening luggage compartment lid/
tailgate33, 35
17
Head-Up Display
*101
BMW Night Vision
*103
18Parking lamp107
Daytime running lamps
*108
Low beams107
Welcome lamps107
Automatic headlamp control
*107
Daytime running lamps
*108
Welcome lamps107
Adaptive Head Light
*109
High-beam assistant
*109
19
Instrument lighting111
Fog lamps
*111
Page 25 of 292
At a glance
23Reference
Controls
Driving tips
Communications
Navigation
Entertainment
Mobility
Voice command system
The concept
The voice command system allows you to con-
trol operation of various vehicle systems with-
out taking your hands off the steering wheel.
Individual menu items on the Control Display
can be spoken as commands. This frees you of
having to use the controller.
The voice command system transforms your
oral commands into control signals for the
selected systems and provides support in the
form of instructions or questions.
The voice command system uses a special
microphone located in the area of the interior
rearview mirror, refer to page14.
Precondition
Via iDrive, set the language that applies for the
voice command system in order to enable iden-
tification of the spoken commands. To set the
language of iDrive, refer to page88.
Symbols in Owner's Manual
Voice commands
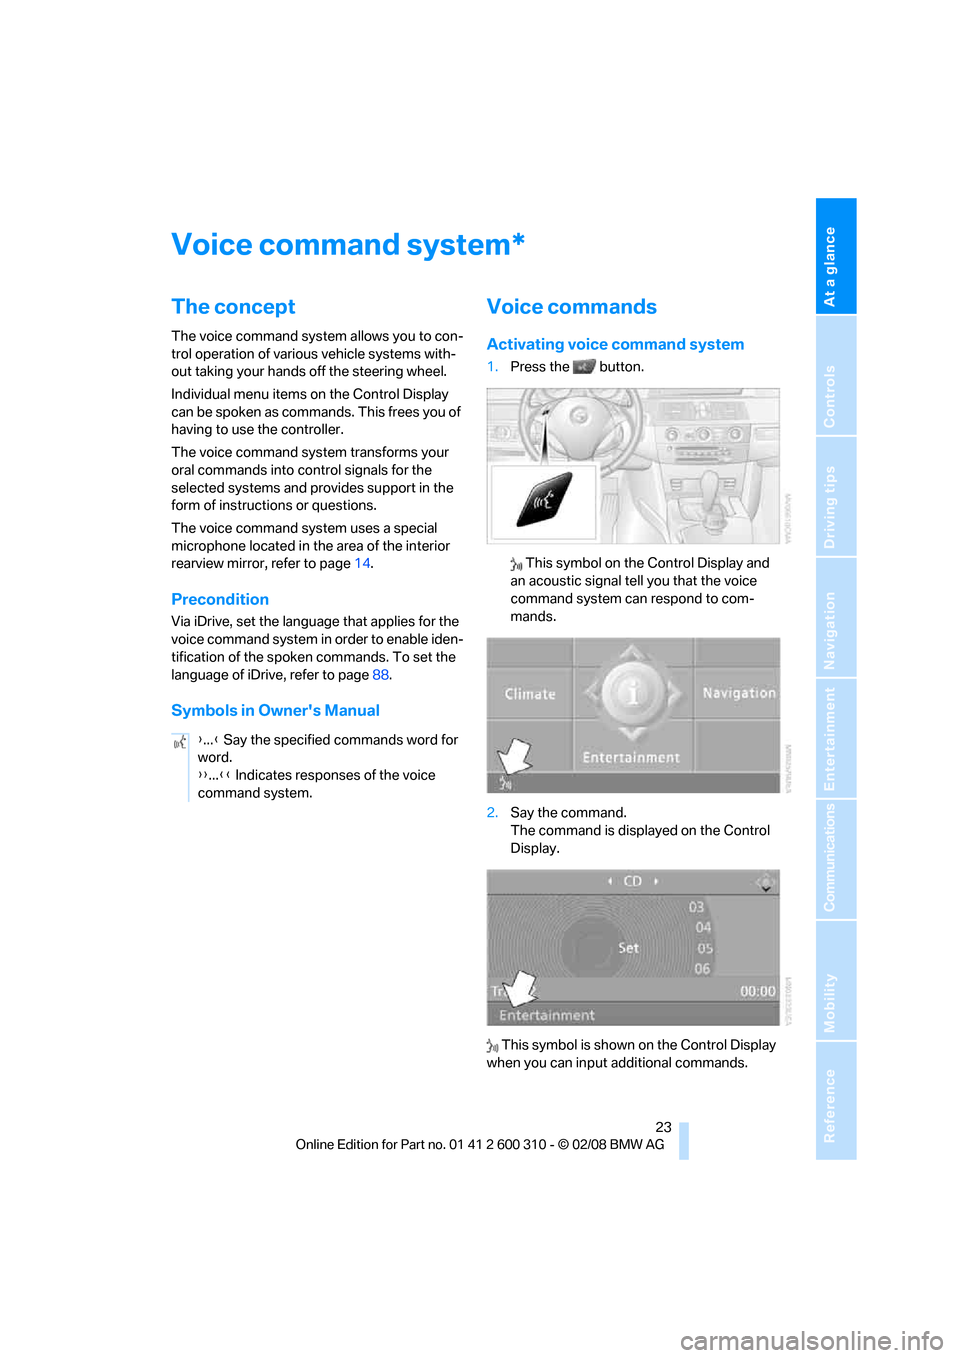
Activating voice command system
1.Press the button.
This symbol on the Control Display and
an acoustic signal tell you that the voice
command system can respond to com-
mands.
2.Say the command.
The command is displayed on the Control
Display.
This symbol is shown on the Control Display
when you can input additional commands.
*
{...} Say the specified commands word for
word.
{{...}} Indicates responses of the voice
command system.
Page 26 of 292
Voice command system
24 If no other commands are possible, then oper-
ate the equipment via iDrive.
Terminating or canceling voice
command system
Press the button on the steering wheel
or
Commands
Having possible commands read aloud
You can have the system read aloud the possi-
ble commands related to the selected menu
item on the Control Display.
To have the system list the possible com-
mands:
For example, if you have selected "CD", the
system will read aloud the possible commands
for operating the CD player and the CD
changer
*.
Opening help
Using alternative commands
There are often a number of commands to run a
function, e.g.:
Running functions directly with short
commands
With short commands you can run certain func-
tions directly, regardless of which menu item is
selected, refer to page265.
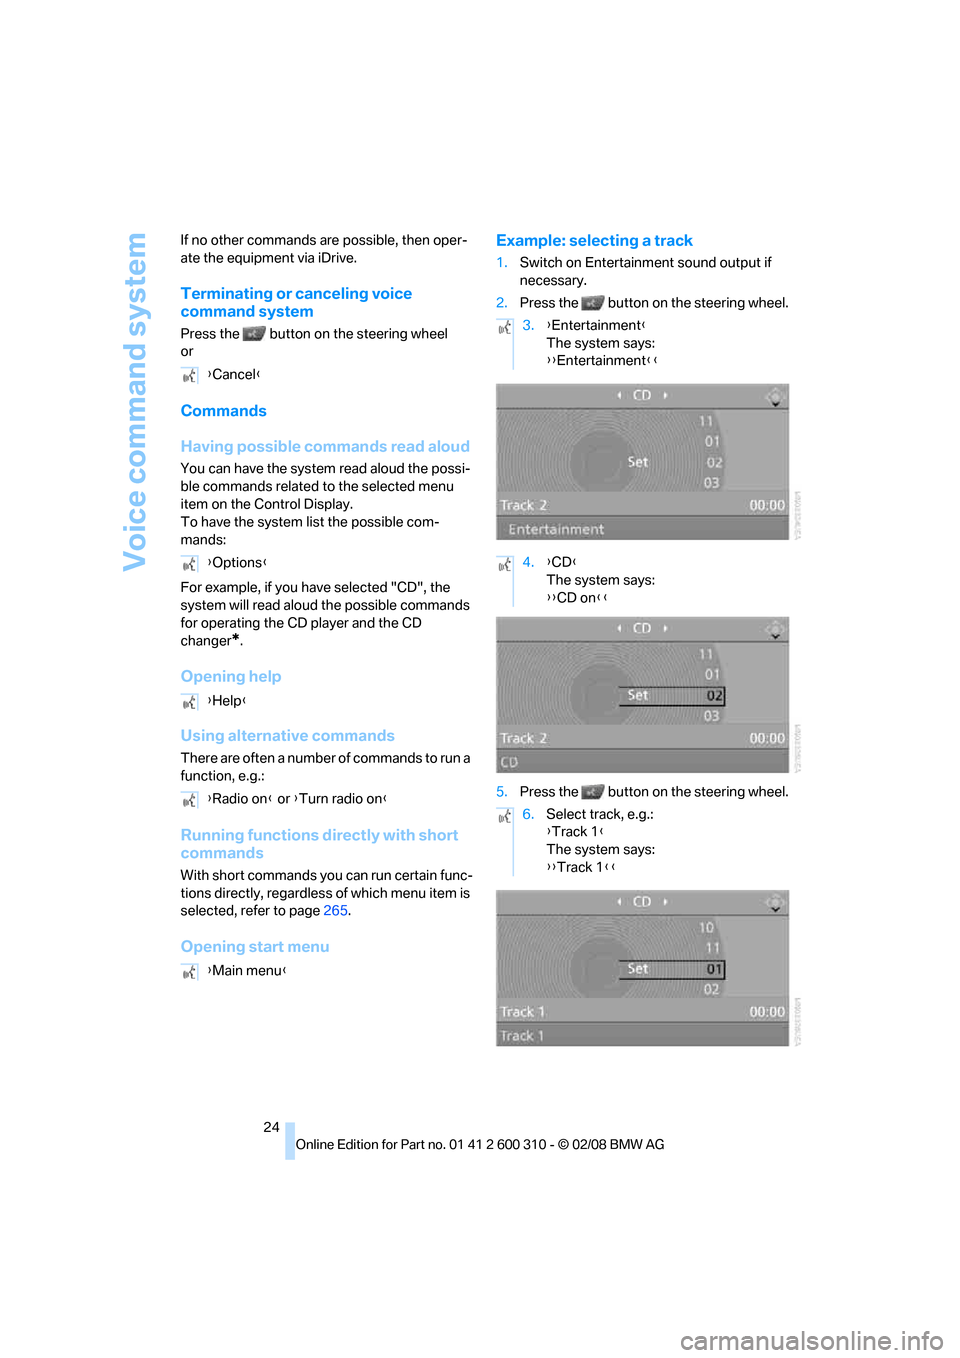
Opening start menuExample: selecting a track
1.Switch on Entertainment sound output if
necessary.
2.Press the button on the steering wheel.
5.Press the button on the steering wheel. {Cancel}
{Options}
{Help}
{Radio on} or {Turn radio on}
{Main menu}
3.{Entertainment}
The system says:
{{Entertainment}}
4.{CD}
The system says:
{{CD on}}
6.Select track, e.g.:
{Track 1}
The system says:
{{Track 1}}
Page 31 of 292
Controls
29Reference
At a glance
Driving tips
Communications
Navigation
Entertainment
Mobility
Personal Profile ensures that most of these set-
tings are stored for the remote control currently
in use without you having to do anything. When
the vehicle is unlocked, the corresponding
remote control is detected and the settings
stored for it are called up and carried out.
This means that you will always find your BMW
set to your own personal settings even if
another person with his/her own remote control
and settings has used the vehicle since the last
time you drove it. The individual settings are
stored for a maximum of four remote controls,
for two with comfort access
*.
Personal Profile settings
Details on the settings are provided on the
specified pages.
>Behavior of the central locking system
when unlocking vehicle, refer to page30
>Automatic locking of the vehicle, refer to
page32
>Programming buttons
* on steering wheel,
refer to page54
>Displays on Control Display:
>Brightness of the Control Display, refer
to page87
>Measuring units for consumption, route/
distances, temperature, and pressure,
refer to page88
>12h/24h clock format, refer to page87
>Date format, refer to page87
>Language on Control Display, refer to
page88
>Lighting settings:
>Triple turn signal activation, refer to
page67
>Welcome lamps, refer to page107
>Pathway lighting, refer to page108
>Daytime running lamps
*, refer to
page108
>High-beam assistant
*, refer to page109>PDC Park Distance Control
*: optical warn-
ing, refer to page89
>Head-Up Display
*: selection and bright-
ness of display, refer to page101
>BMW Night Vision
*: display settings, refer
to page104
>Automatic climate control: AUTO program
and intensity, cooling function, and auto-
matic recirculated air control/recirculated
air mode, temperature, air distribution, tem-
perature in the upper body region, refer to
text starting on page114
>Navigation system
*: voice instructions for
destination guidance, refer to page159
In addition, the following, most recently
selected settings are recalled during unlocking:
>Programmable memory buttons: selecting
stored functions, refer to page21
>Positions of driver's seat, outside mirrors,
and steering wheel
*, refer to page47
>Audio sources: volume and tone settings,
refer to page169
>Radio:
>Display of stored stations, refer to
page172
>Switching RDS Radio Data System
on/off
*, refer to page175
>Phone: volume setting, refer to
pages200,206
Central locking system
The concept
The central locking system functions when the
driver's door is closed.
The system simultaneously engages and
releases the locks on the following:
>Doors
>Luggage compartment lid or tailgate and
rear window
>Fuel filler door
Page 47 of 292
Controls
45Reference
At a glance
Driving tips
Communications
Navigation
Entertainment
Mobility
Adjusting
Sitting safely
The ideal sitting position can make a vital con-
tribution to relaxed, fatigue-free driving. In the
interaction with the safety belts, the head
restraints and the airbags, the sitting position
plays an important role in an accident. To
ensure that the safety systems operate with
optimal efficiency, we strongly urge you to
observe the instructions contained in the fol-
lowing section.
For additional information on transporting chil-
dren safely, refer to page56.
Airbags
Always maintain an adequate distance
between yourself and the airbags. Always
hold the steering wheel by its rim with hands at
the 9 o'clock and 3 o'clock positions, to mini-
mize the risk of injuries to your hands and arms
in the event of airbag deployment.
No one and nothing is to come between the air-
bags and the seat occupant.
Do not use the cover of the front airbag on the
front passenger side as a storage area. Make
sure that the front passenger is sitting correctly
and does not rest feet or legs on the instrument
panel, otherwise leg injuries can occur if the
front airbags are triggered.
Make sure that occupants do not rest their head
on the side or head airbags, otherwise injuries
can occur if the airbags are triggered.<
Even if you adhere to all the instructions, inju-
ries resulting from contact with airbags cannot
be fully excluded, depending on the circum-
stances. The ignition and inflation noise may
provoke a mild hearing loss in extremely sensi-
tive individuals. This effect is usually only tem-
porary.
For airbag locations and additional information
on airbags, refer to page99.
Head restraints
A correctly adjusted head restraint reduces the
risk of spinal injury in the event of an accident.
Adjust the head restraint so that its center
is approx. at ear level. Otherwise there is
increased danger of injury in the event of an
accident.<
Head restraints, refer to page49.
Safety belts
Before every drive, make sure that safety belts
are being worn at all of the occupied seats. Air-
bags complement the safety belt as an addi-
tional safety device, but they do not represent a
substitute.
Your vehicle is provided with five seats, which
are all equipped with a safety belt.
Never allow more than one person to
wear a single safety belt. Never allow
infants or small children to ride in a passenger's
lap. Make sure that the belt lies low around the
hips in the lap area and does not press on the
abdomen. The safety belt must not lie across
the neck, rub against sharp edges, be routed
over solid or breakable objects or be pinched.
Wear the safety belt without twisting, snugly
across the lap and shoulders, as close to the
body as possible. Otherwise the belt can slip
over the hips in the lap area in a frontal impact
and injure the abdomen. Avoid wearing clothing
that prevents the belt from fitting properly and
pull the belt in the upper body area periodically
to readjust the tension, in order to avoid a
reduction in the restraint of the safety belt.
Sports Wagon: if the center safety belt in the
rear is used, the larger backrest half must be
locked, refer to page127, otherwise the middle
safety belt has no restraining action.<
Safety belts, refer to page50.
Page 49 of 292
Controls
47Reference
At a glance
Driving tips
Communications
Navigation
Entertainment
Mobility
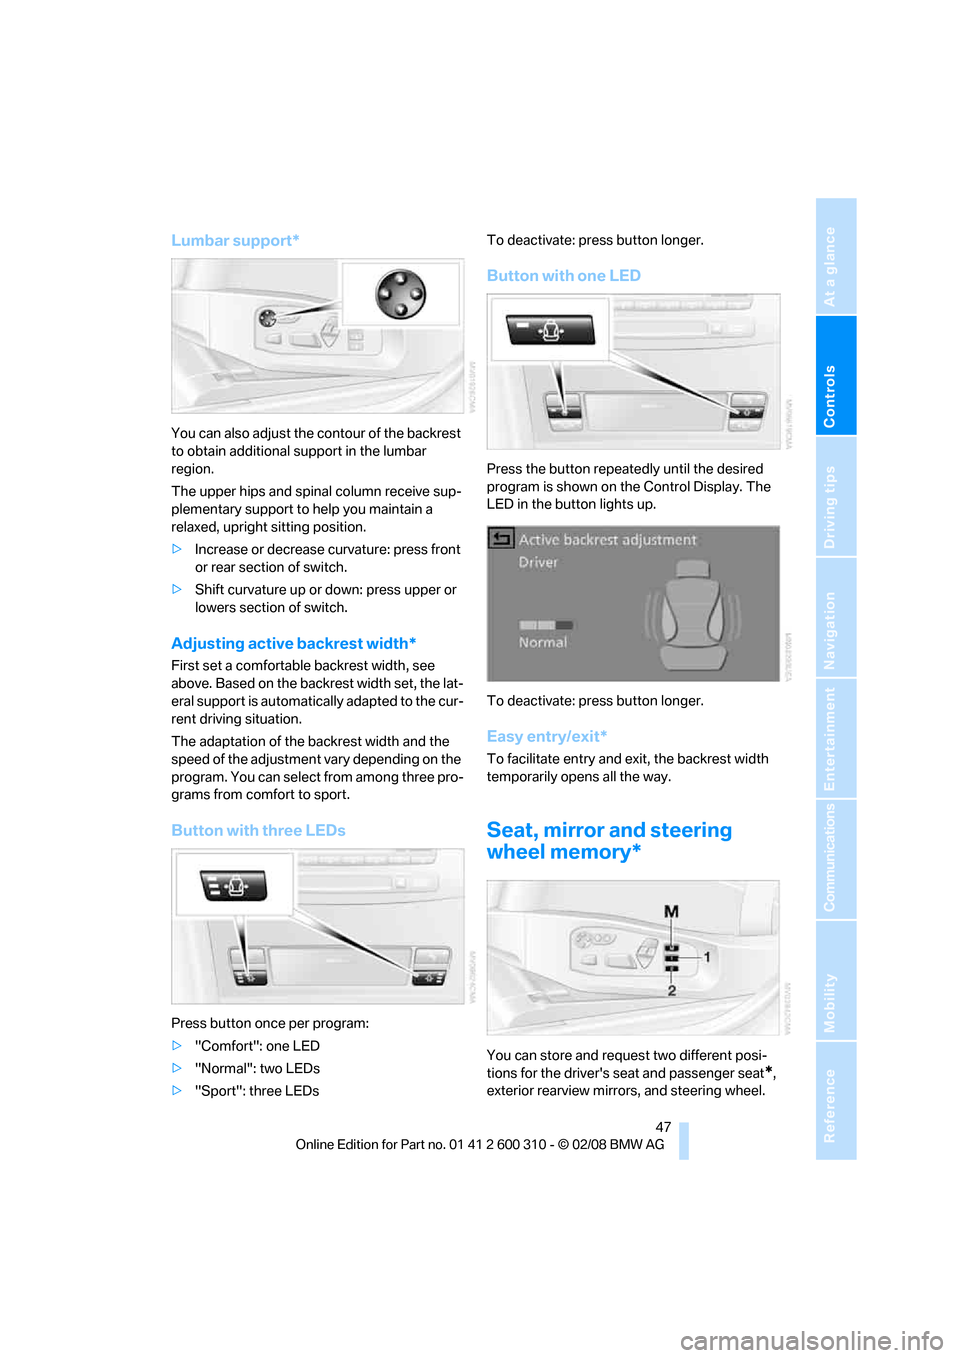
Lumbar support*
You can also adjust the contour of the backrest
to obtain additional support in the lumbar
region.
The upper hips and spinal column receive sup-
plementary support to help you maintain a
relaxed, upright sitting position.
>Increase or decrease curvature: press front
or rear section of switch.
>Shift curvature up or down: press upper or
lowers section of switch.
Adjusting active backrest width*
First set a comfortable backrest width, see
above. Based on the backrest width set, the lat-
eral support is automatically adapted to the cur-
rent driving situation.
The adaptation of the backrest width and the
speed of the adjustment vary depending on the
program. You can select from among three pro-
grams from comfort to sport.
Button with three LEDs
Press button once per program:
>"Comfort": one LED
>"Normal": two LEDs
>"Sport": three LEDsTo deactivate: press button longer.
Button with one LED
Press the button repeatedly until the desired
program is shown on the Control Display. The
LED in the button lights up.
To deactivate: press button longer.
Easy entry/exit*
To facilitate entry and exit, the backrest width
temporarily opens all the way.
Seat, mirror and steering
wheel memory*
You can store and request two different posi-
tions for the driver's seat and passenger seat
*,
exterior rearview mirrors, and steering wheel.
Page 50 of 292
Adjusting
48 The adjustment of the lumbar support is not
stored in the memory.
Storing
1.Switch on radio readiness or ignition, refer
to page61.
2.Set the desired seat, exterior mirror and
steering wheel positions.
3.Press the button:
The LED in the button lights up.
4.Press the desired memory button1 or2:
The LED goes out.
Requesting
Do not request a position from the mem-
ory while the vehicle is moving. There is a
risk of accident from unexpected movement of
the seat or steering wheel.<
Comfort mode
1.Open the driver's door after unlocking or
switch on radio readiness.
2.Briefly press the desired memory button1
or2.
The system cancels the adjustment procedure
when you briefly press one of the seat adjust-
ment switches or one of the memory buttons.
Safety feature
1.Close the driver's door and switch the igni-
tion on or off.
2.Press the desired memory button1 or2
and maintain pressure until the adjustment
process has been completed.
If the button was pressed inadvertently:
press the button again; the LED goes out.
Requesting with remote control
The last positions of the driver's seat, the exte-
rior rearview mirrors, and steering wheel are
stored for the remote control currently in use.
You can choose when the position is requested:
>Request when unlocking vehicle
>Request when opening driver's doorWhen using this feature, always make
sure that the footwell behind the driver's
seat is empty and unobstructed. Failure to do
so could cause injury to persons or damage to
objects behind the seat as a result of a rearward
movement of the seat.<
The system cancels the adjustment procedure
when you briefly press one of the seat adjust-
ment switches or one of the memory buttons.
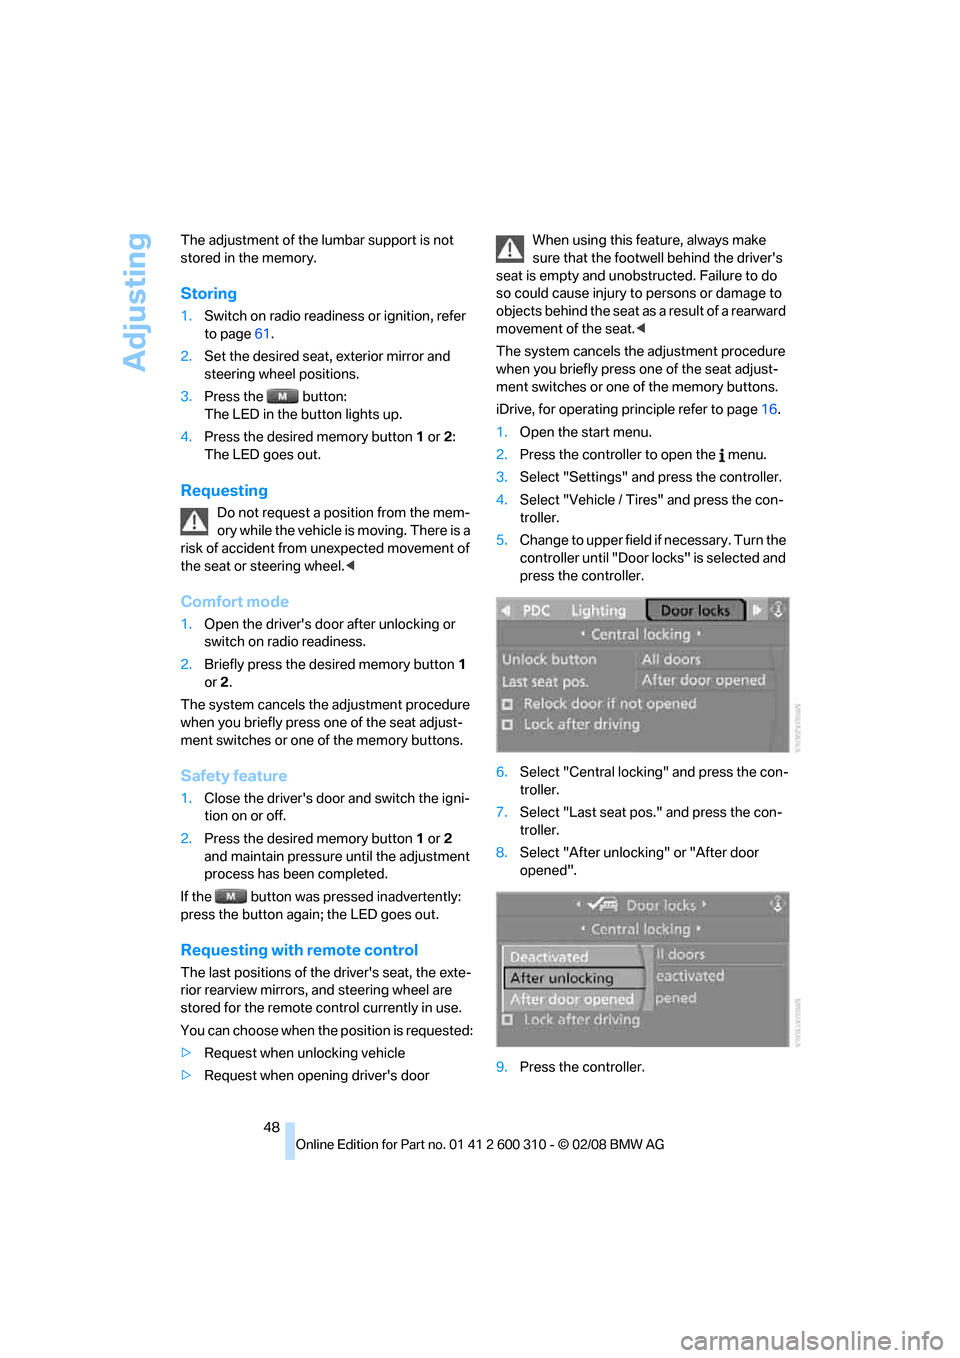
iDrive, for operating principle refer to page16.
1.Open the start menu.
2.Press the controller to open the menu.
3.Select "Settings" and press the controller.
4.Select "Vehicle / Tires" and press the con-
troller.
5.Change to upper field if necessary. Turn the
controller until "Door locks" is selected and
press the controller.
6.Select "Central locking" and press the con-
troller.
7.Select "Last seat pos." and press the con-
troller.
8.Select "After unlocking" or "After door
opened".
9.Press the controller.
Page 55 of 292
Controls
53Reference
At a glance
Driving tips
Communications
Navigation
Entertainment
Mobility
Mirrors
Exterior mirrors
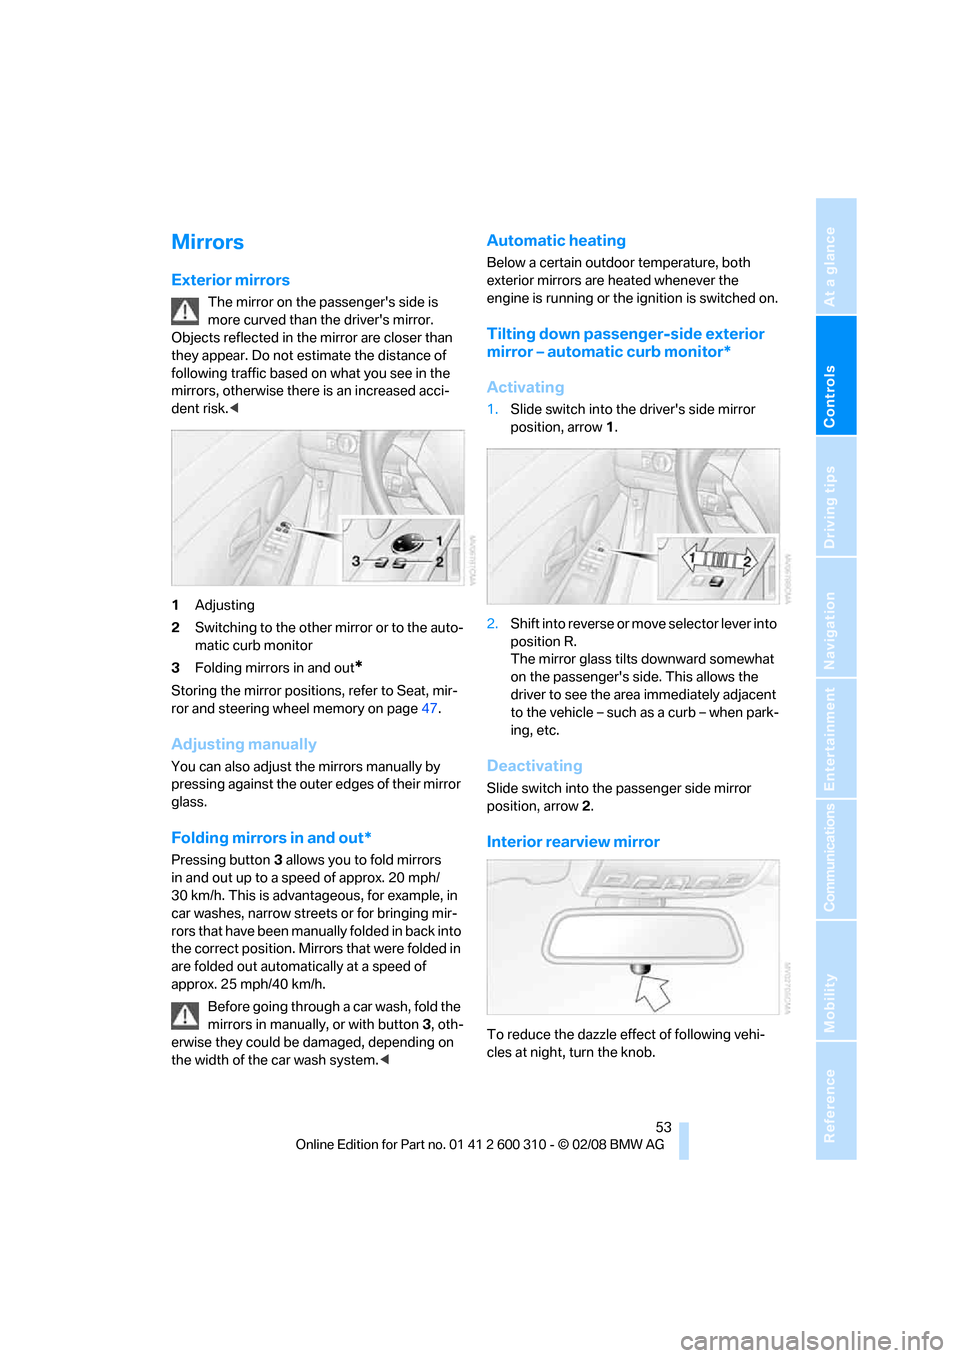
The mirror on the passenger's side is
more curved than the driver's mirror.
Objects reflected in the mirror are closer than
they appear. Do not estimate the distance of
following traffic based on what you see in the
mirrors, otherwise there is an increased acci-
dent risk.<
1Adjusting
2Switching to the other mirror or to the auto-
matic curb monitor
3Folding mirrors in and out
*
Storing the mirror positions, refer to Seat, mir-
ror and steering wheel memory on page47.
Adjusting manually
You can also adjust the mirrors manually by
pressing against the outer edges of their mirror
glass.
Folding mirrors in and out*
Pressing button3 allows you to fold mirrors
in and out up to a speed of approx. 20 mph/
30 km/h. This is advantageous, for example, in
car washes, narrow streets or for bringing mir-
r o rs t h a t h a v e b e e n m a n u a l ly f o l d e d in b a c k i n t o
the correct position. Mirrors that were folded in
are folded out automatically at a speed of
approx. 25 mph/40 km/h.
Before going through a car wash, fold the
mirrors in manually, or with button 3, oth-
erwise they could be damaged, depending on
the width of the car wash system.<
Automatic heating
Below a certain outdoor temperature, both
exterior mirrors are heated whenever the
engine is running or the ignition is switched on.
Tilting down passenger-side exterior
mirror – automatic curb monitor*
Activating
1.Slide switch into the driver's side mirror
position, arrow 1.
2.Shift into reverse or move selector lever into
position R.
The mirror glass tilts downward somewhat
on the passenger's side. This allows the
driver to see the area immediately adjacent
to the vehicle – such as a curb – when park-
ing, etc.
Deactivating
Slide switch into the passenger side mirror
position, arrow 2.
Interior rearview mirror
To reduce the dazzle effect of following vehi-
cles at night, turn the knob.
Page 56 of 292
Adjusting
54
Interior and exterior mirrors,
automatic dimming feature*
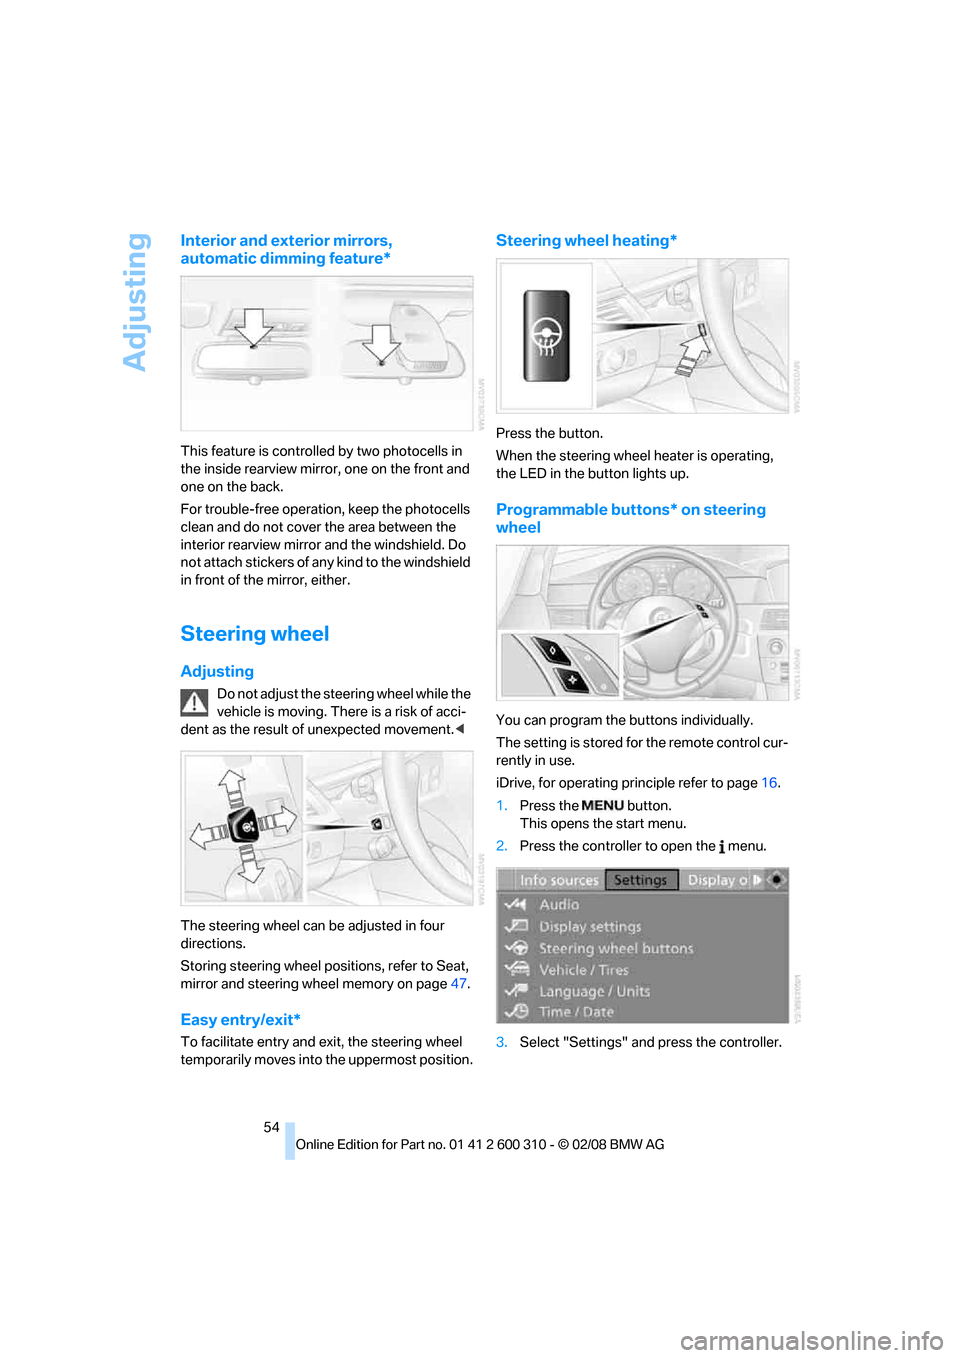
This feature is controlled by two photocells in
the inside rearview mirror, one on the front and
one on the back.
For trouble-free operation, keep the photocells
clean and do not cover the area between the
interior rearview mirror and the windshield. Do
not attach stickers of any kind to the windshield
in front of the mirror, either.
Steering wheel
Adjusting
Do not adjust the steering wheel while the
vehicle is moving. There is a risk of acci-
dent as the result of unexpected movement.<
The steering wheel can be adjusted in four
directions.
Storing steering wheel positions, refer to Seat,
mirror and steering wheel memory on page47.
Easy entry/exit*
To facilitate entry and exit, the steering wheel
temporarily moves into the uppermost position.
Steering wheel heating*
Press the button.
When the steering wheel heater is operating,
the LED in the button lights up.
Programmable buttons* on steering
wheel
You can program the buttons individually.
The setting is stored for the remote control cur-
rently in use.
iDrive, for operating principle refer to page16.
1.Press the button.
This opens the start menu.
2.Press the controller to open the menu.
3.Select "Settings" and press the controller.