steering BMW 760LI 2007 E66 Owner's Guide
[x] Cancel search | Manufacturer: BMW, Model Year: 2007, Model line: 760LI, Model: BMW 760LI 2007 E66Pages: 254, PDF Size: 7.98 MB
Page 95 of 254

Controls
93Reference
At a glance
Driving tips
Communications
Navigation
Entertainment
Mobility
ing driving. The tires are displayed in green on
the Control Display.
If a flat tire is detected during the reset-
ting and adoption of the tire inflation pres-
sures, all tires are shown in yellow on the Con-
trol Display. The message "Status: Tire low!" is
displayed.<
Low tire pressure message
The warning lamp lights up yellow. A
message appears on the Control Dis-
play. In addition, a signal sounds. A flat
tire or a major air loss has occurred.
1.Reduce speed and stop the vehicle care-
fully. Avoid sudden braking and steering
maneuvers.
2.Check whether your vehicle is equipped
with standard tires or run-flat tires.
You will recognize run-flat tires by a
circular symbol containing the letters
RSC on the side of the tire, refer to
page205.<
Standard tires
1.If all four wheels are shown in yellow, iden-
tify the damaged tire on the vehicle.
2.Replace the damaged wheel or wheels,
refer to Changing wheels on page215.
The spare wheel is equipped with the neces-
sary TPM electronics and when mounted, will
also be monitored once the system has been
reset.
Have the tire replaced by a BMW center or a
workshop that is familiar with handling TPM and
works according to BMW repair procedures
with correspondingly trained personnel.
Run-flat tires*
1.Cautiously reduce speed to below 50 mph/
80 km/h. Avoid hard braking and steering
maneuvers and do not exceed 50 mph/
80 km/h.
If the vehicle is not equipped with run-
flat tires, refer to page205, do not
continue to drive. Continued driving after a
flat tire can result in serious accidents.<2.In the event of complete tire pressure loss,
0 psi/0 kPa, you can estimate the possible
distance for continued driving on the basis
of the following guide values:
>With a light load:
1 to 2 persons without luggage:
approx. 155 miles/250 km
>With a medium load:
2 persons, luggage compartment full, or
4 persons without luggage:
approx. 95 miles/150 km
>With a full load:
4 or more persons, luggage compart-
ment full:
approx. 30 miles/50 km
Drive reservedly and do not exceed a
speed of 50 mph/80 km/h. In the event of
pressure loss, vehicle handling changes. This
includes reduced tracking stability in braking,
extended braking distance and altered natural
steering characteristics.
If unusual vibrations occur while the vehicle is
being driven, this can indicate final failure of the
damaged tire. Reduce speed and stop as soon
as possible; otherwise, pieces of the tire could
come loose and cause an accident. Do not con-
tinue driving, contact your BMW center.<
Malfunction
The yellow warning light flashes and
then lights up continuously. The tires
are shown in gray on the Control Dis-
play and a message is displayed. No flat tire can
be detected. Have system checked.
A message like this is displayed in the following
situations:
>When a malfunction is occurring.
Have the system checked.
>When a wheel without TPM electronics is
mounted.
>When TPM is experiencing temporary inter-
ference from other systems or devices that
use the same radio frequency.
Page 97 of 254

Controls
95Reference
At a glance
Driving tips
Communications
Navigation
Entertainment
Mobility
Airbags
The following airbags are located under the
marked covers:
1Front airbags
2Head airbags
3Side airbags in front and rear
*
4Knee airbags
Protective action
To ensure that the safety systems con-
tinue to provide optimized protection,
please follow the adjustment instructions on
page43.<
The front airbags help protect the driver and
front passenger by responding to frontal
impacts in which safety belts alone cannot pro-
vide adequate restraint. When needed, the
head and side airbags help provide protection in
the event of side impact. The relevant side air-
bag supports the side upper body area. The
head air bag supports the head. The knee air-
bags help protect the legs against impact
against the cockpit.
The airbags are deliberately not triggered in
every impact situation, e.g. less severe acci-
dents or rear-end collisions.
Do not apply adhesive materials to the
cover panels of the airbags, cover them or
modify them in any other way.
Do not attempt to remove the airbag retention
system from the vehicle. Never modify or
tamper with either the wiring or the individual
components in the airbag system. This cate-
gory includes the upholstery in the center of the
steering wheel, on the instrument panel, the
doors and the roof pillars along with the sides of the headliner. Do not attempt to remove or dis-
mantle the steering wheel.
Do not touch the individual components
directly after the system has been triggered,
because there is a danger of burns. In the event
of malfunctions, deactivation, or triggering of
the airbag restraint system, have the testing,
repair, removal, and disposal of airbag genera-
tors executed only by a BMW center or a work-
shop that works according to BMW repair
procedures with correspondingly trained per-
sonnel and has the required explosives
licenses. Unprofessional attempts to service
the system could lead to failure in an emer-
gency or undesired airbag activation, either of
which could result in personal injury.<
Warnings and information about the airbags is
also provided on the sun visors.
Automatic deactivation of front
passenger airbags
The occupation of the seat is detected by eval-
uating the impression on the occupied seat sur-
face of the front passenger seat. The system
appropriately activates or deactivates the front,
knee, and side airbag on the front passenger
side.
The current status of the front passenger
airbag, i.e. deactivated or activated, is
indicated by the indicator lamp over the interior
rearview mirror, refer to Operating state of front
passenger airbags in the following.<
Before transporting a child on the front
passenger seat, pay attention to the
safety information and follow the handling
instructions under Transporting children safely,
Page 100 of 254

Technology for comfort, convenience and safety
98 BMW Night Vision is not a substitute or replace-
ment for driver responsibility or for adapting to
the visibility conditions and the traffic situation.
The forward view illuminated by the headlamps
must always be the basis for making safe driv-
ing decisions; otherwise, a safety risk will
result.<
Activating BMW Night Vision
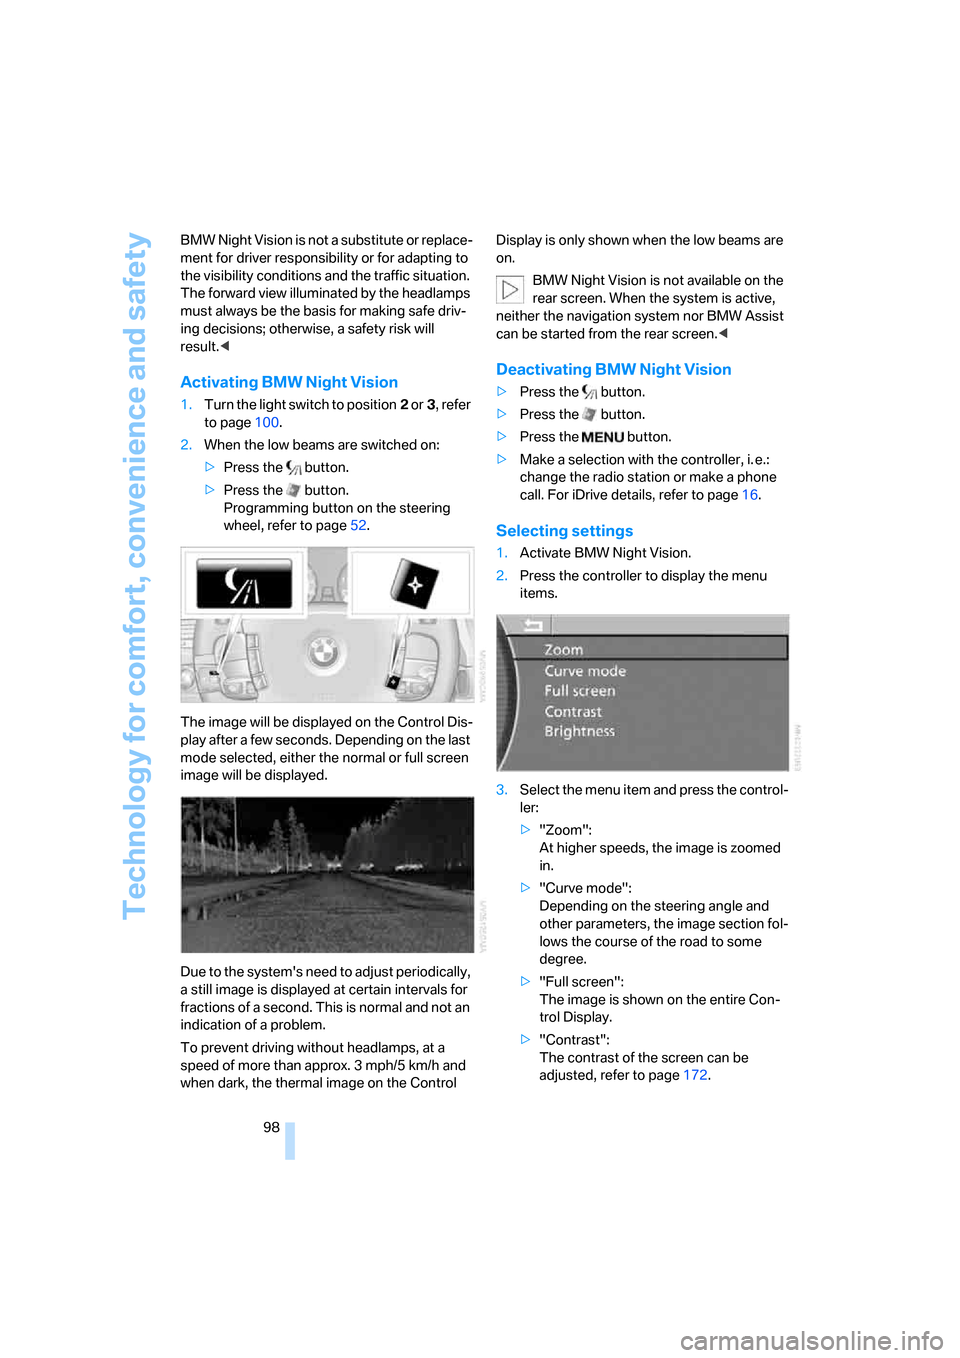
1.Turn the light switch to position2 or3, refer
to page100.
2.When the low beams are switched on:
>Press the button.
>Press the button.
Programming button on the steering
wheel, refer to page52.
The image will be displayed on the Control Dis-
play after a few seconds. Depending on the last
mode selected, either the normal or full screen
image will be displayed.
Due to the system's need to adjust periodically,
a still image is displayed at certain intervals for
fractions of a second. This is normal and not an
indication of a problem.
To prevent driving without headlamps, at a
speed of more than approx. 3 mph/5 km/h and
when dark, the thermal image on the Control Display is only shown when the low beams are
on.
BMW Night Vision is not available on the
rear screen. When the system is active,
neither the navigation system nor BMW Assist
can be started from the rear screen.<
Deactivating BMW Night Vision
>Press the button.
>Press the button.
>Press the button.
>Make a selection with the controller, i. e.:
change the radio station or make a phone
call. For iDrive details, refer to page16.
Selecting settings
1.Activate BMW Night Vision.
2.Press the controller to display the menu
items.
3.Select the menu item and press the control-
ler:
>"Zoom":
At higher speeds, the image is zoomed
in.
>"Curve mode":
Depending on the steering angle and
other parameters, the image section fol-
lows the course of the road to some
degree.
>"Full screen":
The image is shown on the entire Con-
trol Display.
>"Contrast":
The contrast of the screen can be
adjusted, refer to page172.
Page 102 of 254

Lamps
100
Lamps
Parking lamps/low beams
0Lamps off and daytime running lamps*
1Parking lamps and daytime running lamps*
2Low beams
3Automatic headlamp control, daytime run-
ning lamps
* and Adaptive Head Light*
If you open the driver's door when the ignition is
switched off, then the exterior lighting is
switched off if the light switch is in position0, 2
or3.
Parking lamps
In switch position1, the front, rear and side
vehicle lighting is switched on. You can use the
parking lamps for parking.
The parking lamps drain the battery. Do
not leave them switched on for long peri-
ods of time; otherwise, it may no longer be pos-
sible to start the engine. It is preferable to
switch on the left-hand or right-hand roadside
parking lamps, refer to page101.<
Low beams
The low beams light up when the light switch is
in position 2 and the ignition is on.
Automatic headlamp control
In the switch position3, the system activates
the low beams and switches them on or off in
response to changes in ambient light condi-
tions, for example in a tunnel, at dawn and dusk,
and in case of precipitation. The LED next to the symbol is illuminated when the low beams are
on.
The low beams may be switched on when the
sun is low on the horizon in a clear sky.
The low beams remain switched on
regardless of the ambient light when you
switch on the front fog lamps.<
The automatic headlamp control cannot
serve as a substitute for your personal
judgment in determining when the lamps
should be switched on in response to ambient
lighting conditions. For example, the sensors
cannot detect fog or hazy weather. To avoid
safety risks, you should always switch on the
lamps manually under these conditions.<
Pathway lighting
After parking the vehicle and switching off the
headlamps, you can use the headlamp flasher
control to activate the low beams for a period of
roughly 40 seconds.
Pressing the button on the remote control,
refer to page32, also switches on the low
beams for approx. 40 seconds. In addition, the
door handle and interior lamps are switched on
for approx. 10 seconds.
Daytime running lamps*
The daytime running lamps light up in posi-
tion0, 1 or3. The light output is lower than with
the low-beam headlamps.
If the light switch remains in position1, then the
parking lamps are lit after the ignition is
switched off.
Adaptive Head Light*
The concept
Adaptive Head Light is a variable headlamp
control system that enables dynamic illumina-
tion of the road surface. Depending on the
steering angle and other parameters, the light
Page 125 of 254

Driving tips
123Reference
At a glance
Controls
Communications
Navigation
Entertainment
Mobility
Hydroplaning
When driving on wet or slushy roads,
reduce road speed. If you do not, a wedge
of water can form between tires and road sur-
face. This phenomenon is referred to as hydro-
planing, and is characterized by a partial or
complete loss of contact between tires and
road surface, ultimately undermining your abil-
ity to steer and brake the vehicle.<
Driving through water
Only drive through water with a maximum
depth of 1 ft/30 cm and then, at no more
than walking speed. Otherwise, you run the risk
of damaging the vehicle's engine, electrical sys-
tems, and transmission.<
Safe braking
Your BMW is equipped with ABS as standard
equipment. In situations that require it, it is best
to apply the brakes fully. Since the vehicle
maintains steering responsiveness, you can
nevertheless avoid possible obstacles with a
minimum of steering effort.
Pulsation at the brake pedal combines with
sounds from the hydraulic circuits to indicate to
the driver that ABS is in its active mode.
Driving in wet conditions
When driving in wet conditions and in heavy
rain, it is a good idea to apply light pressure to
the brake pedal every few miles. Monitor traffic
conditions to ensure that this maneuver does
not endanger other road users. The heat gener-
ated helps dry the pads and rotors to ensure
that full braking efficiency will then be available
when you need it.
Hills
To prevent overheating and reduced effi-
ciency of the brake system, drive long or
steep downhill grades in the gear that requires
the least amount of braking. Otherwise, even
light but consistent pedal pressure can lead to
high temperatures, brake wear, and possibly
even failure of the brake system.
transmission's manual mode, downshifting as
far as first gear on extremely steep stretches,
refer to page63. This strategy helps you avoid
placing excessive loads on the brake system.
Do not drive in idle or with the engine
switched off; otherwise, there will be no
engine braking action or power-assist for the
brakes and steering.
Never allow floor mats, carpets or any other
objects to protrude into the area of movement
of the pedals and impair their operation.<
Corrosion on brake rotors
When the vehicle is driven only occasionally,
during extended periods when the vehicle is not
used at all, and in operating conditions where
brake applications are less frequent, there is an
increased tendency for corrosion to form on
rotors, while contaminants accumulate on the
brake pads. This occurs because the minimal
pressure that must be exerted by the pads dur-
ing brake applications to clean the rotors is not
reached.
Should corrosion form on the brake rotors, the
brakes will tend to respond with a pulsating
effect that even extended application will fail to
cure.
When vehicle is parked
Condensation forms in the automatic climate
control during operation, and then exits under
the vehicle. Traces of condensed water under
the vehicle are therefore normal.
Before driving into a car wash
1.Fold in the exterior mirrors, refer to page50;
otherwise, they could be damaged due to
the width of the vehicle.
To permit the vehicle to roll, follow the
instructions on page58.
2.Release the parking brake, especially when
you have activated Automatic Hold. Refer to
page59.
Page 127 of 254

Driving tips
125Reference
At a glance
Controls
Communications
Navigation
Entertainment
Mobility
Securing cargo
>Use the luggage net* or securing straps to
secure small and lightweight luggage and
cargo.
>Heavy-duty straps
* for securing larger and
heavier objects are available at your BMW
center. Four lashing eyes for attaching
these heavy-duty straps are provided in the
luggage compartment, refer to illustration.
>Please follow the special instructions sup-
plied with the heavy-duty straps.
Always position and secure the load as
described above. If you do not, it can
endanger the passengers, for example during
braking or evasive maneuvers.
Attach heavy-duty straps only to the lashing
eyes, refer to illustration, otherwise, the heavy-
duty straps could come loose or the vehicle
could be damaged.
Never exceed either the approved gross vehicle
weight or either of the approved axle loads, refer
to page228, as excessive loads can impair the
operational safety of the vehicle and may also
put you in violation of highway safety laws.
You should never transport unsecured heavy or
hard objects in the passenger compartment, as
they could fly around and pose a safety hazard
to the vehicle's occupants during abrupt brak-
ing or evasive maneuvers .<
Roof-mounted luggage rack*
A special rack system is available as an option
for your BMW. Please comply with the precau-
tions included with the installation instructions.
Anchorage points
The anchorage points are located inside the
door openings.
Loading roof rack
Because roof racks raise the vehicle's center of
gravity when loaded, they have a major effect on
its handling and steering response.
You should therefore always remember not to
exceed the approved roof load capacity, the
approved gross vehicle weight or the axle loads
when loading the rack.
You can find this information under Weights on
page228.
The roof load must be uniformly distributed and
should not be too large in area. Always load the
heaviest pieces on the bottom. Be sure that
adequate clearance is maintained for raising the
glass sunroof, and that objects do not project
into the opening path of the luggage compart-
ment lid.
Secure roof-mounted cargo correctly and
securely to prevent it from shifting or falling off
as you drive.
Drive smoothly. Avoid sudden acceleration and
braking maneuvers. Take corners gently.
Page 148 of 254

Route guidance
146
Displaying streets or towns on the
route
You can have the names of the streets and
towns/cities on your route displayed whenever
the route guidance is active.
The display also shows the distances to be trav-
eled on each individual road.
1.Press the controller as needed.
2.Select "View" and press the controller.
3.Select "Route" and press the controller.
To exit the menu:
Select the arrow and press the controller.
Route guidance by voice
instructions
Switching voice instructions on/off
1.During route guidance, press the controller.
2.Select the symbol and press the control-
ler.
The setting is stored for the remote control cur-
rently in use.
Using the voice command system:
Repeating voice instructions
1.During route guidance, press the controller.
2.Select the symbol and confirm your
selection to repeat the last route instruction
when the voice output is switched on.
It is also possible to request a repetition of
the spoken instructions via the program-
mable buttons on the steering wheel and next
to the controller, refer to page52.<
Adjusting volume
The volume can only be adjusted during a voice
instruction.
1.Repeat the last voice instruction if neces-
sary.
2.Wait until the voice instruction is being
issued, then turn the knob to select the
desired volume.
This volume is independent of the volume
selected for the audio and video sources.
The setting is stored for the remote control cur-
rently in use.
Changing route
Avoiding route sections
From a list, you can select and bypass certain
sections that you do not wish to travel on the
planned route. The route is recalculated.
1.Press the controller.
2.Select "New route" and press the control-
ler.
{Message on} or
{Message off}.
Page 154 of 254

On/off and settings
152
On/off and settings
The following audio and video sources share
the same controls and adjustment options.
>Radio
>CD player
*
>CD changer*
>DVD changer*
The CD changer can play CDs with com-
pressed audio files, such as MP3s.<
Controls
The audio and video sources can be operated
using:
>Buttons on the CD player
>iDrive
>Buttons on steering wheel, refer to page11
Buttons on the CD player
1Entertainment sound output on/off, volume
>Press: switching on/off
When switching on, the most recently
selected radio station or CD track is
selected.
>Turn: adjusting volume
2 button
Selecting radio, CD player, and CD changer
3 button
>Press briefly: selecting AM or FM wave-
band
>Press and hold: Autostore, updating
selection of stations in range4CD slot
5 button
Eject CD
6 button
Station scan/track search
>Select radio station
>Fast forward/reverse
>Change track for CD player,
change chapter for DVD changer
Operating via iDrive
iDrive, for principle details, refer to page16.
1.Press the button to open the start
menu.
2.Move the controller toward "Entertain-
ment".
3.You have the choice of:
>"FM" and "AM": select radio reception.
>"WB": select Weather Band.
>"SAT": select satellite radio.
>"CD" and "CDC": select CD player or
CD changer.
>"AUX": select external audio device
>"DVD": select DVD changer
*.
>"Picture": adjust picture
*.
>"Tone": tone control, e.g. treble and
bass.
You can also control the radio, CD player, CD
changer, external audio devices, and the DVD
changer using the buttons on the steering
Page 180 of 254

Telephone overview
178
Telephone overview
The concept
Your BMW is equipped with a mobile phone
preparation package. After a suitable mobile
phone has been paired with the vehicle once,
you can operate the mobile phone via iDrive, via
the button on the steering wheel, via the phone
keypad and by voice
*.
A mobile phone that has been paired with the
vehicle once is automatically detected again
with the engine running or the ignition switched
on as soon as it is brought inside the vehicle.
The logon data of up to four mobile phones can
be stored simultaneously. If several mobile
phones are detected simultaneously, then the
vehicle can be used to operate the mobile
phone that was most recently paired with it.
Using a phone in your vehicle
Using snap-in adapter*
The so-called snap-in adapter, a cradle for your
mobile phone, is inserted into the center arm-
rest. If the mobile phone is inserted into the
snap-in adapter, the battery is charged and the
mobile phone is connected to the external
antenna of the vehicle whenever the ignition
key is in the radio ready state or higher. This
assures better network reception and uniform
sound quality. Ask your BMW center which
mobile phones snap-in adapters are offered for.
To use the snap-in adapter, refer to page181.
BMW discourages the use of mobile
phones or other mobile communications
devices inside the vehicle without a direct con-
nection to an outside antenna. Otherwise, the
vehicle electronics and mobile communications
device can interfere with each other. In addition,
there is no assurance that the radiation gener-
ated during transmission will be discharged
from the vehicle interior.
phone; otherwise, malfunctions can occur.
The mobile phone can be operated by means
of:
>the button on the steering wheel, refer to
page11
>the retracting telephone keypad, refer to
page179
>iDrive, refer to Initiating communication,
page184
>the voice command system
*, refer to
page23
For information on operating your mobile
phone, please consult the separate operating
instructions.
For your safety
Only make entries when the traffic situa-
tion allows you to do so. Do not hold the
mobile phone in your hand while you are driving;
use the hands-free system instead. If you do
not comply with this precaution, your being dis-
tracted can endanger vehicle occupants and
other road users.<
Suitable mobile phones
Ask your BMW center which mobile phones
with a Bluetooth interface are supported by the
mobile phone preparation package or which
mobile phones snap-in adapters are available
for. These mobile phones support the functions
described in this Owner's Manual with a certain
software version. Malfunctions can occur with
other mobile phones.
*
Page 181 of 254

179
Entertainment
Reference
At a glance
Controls
Driving tips Communications
Navigation
Mobility
Hands-free system
The hands-free microphone is located on the
left-hand side on the headliner.
The hands-free system is activated whenever
you establish or receive a call using the follow-
ing:
>the button on the steering wheel, refer to
page11
>the retracting telephone keypad
>iDrive, refer to Initiating communication,
page184
>the voice command system
*, refer to
page23, except for incoming calls
Volume adjustment
You can set the volume for the hands-free sys-
tem and the ring tone separately:
>Turn knob during a call.
>Turn knob during an incoming call.
The volume can also be adjusted using
the buttons on the steering wheel.<
This volume is maintained, even if the other
audio sources are set to minimum volume.
The setting is stored for the remote control cur-
rently in use.
Retracting telephone keypad
The telephone keypad allows you to use all of
the basic mobile phone functions without ever
picking up the handset.
Calls are automatically routed through the
hands-free system.
Sliding out
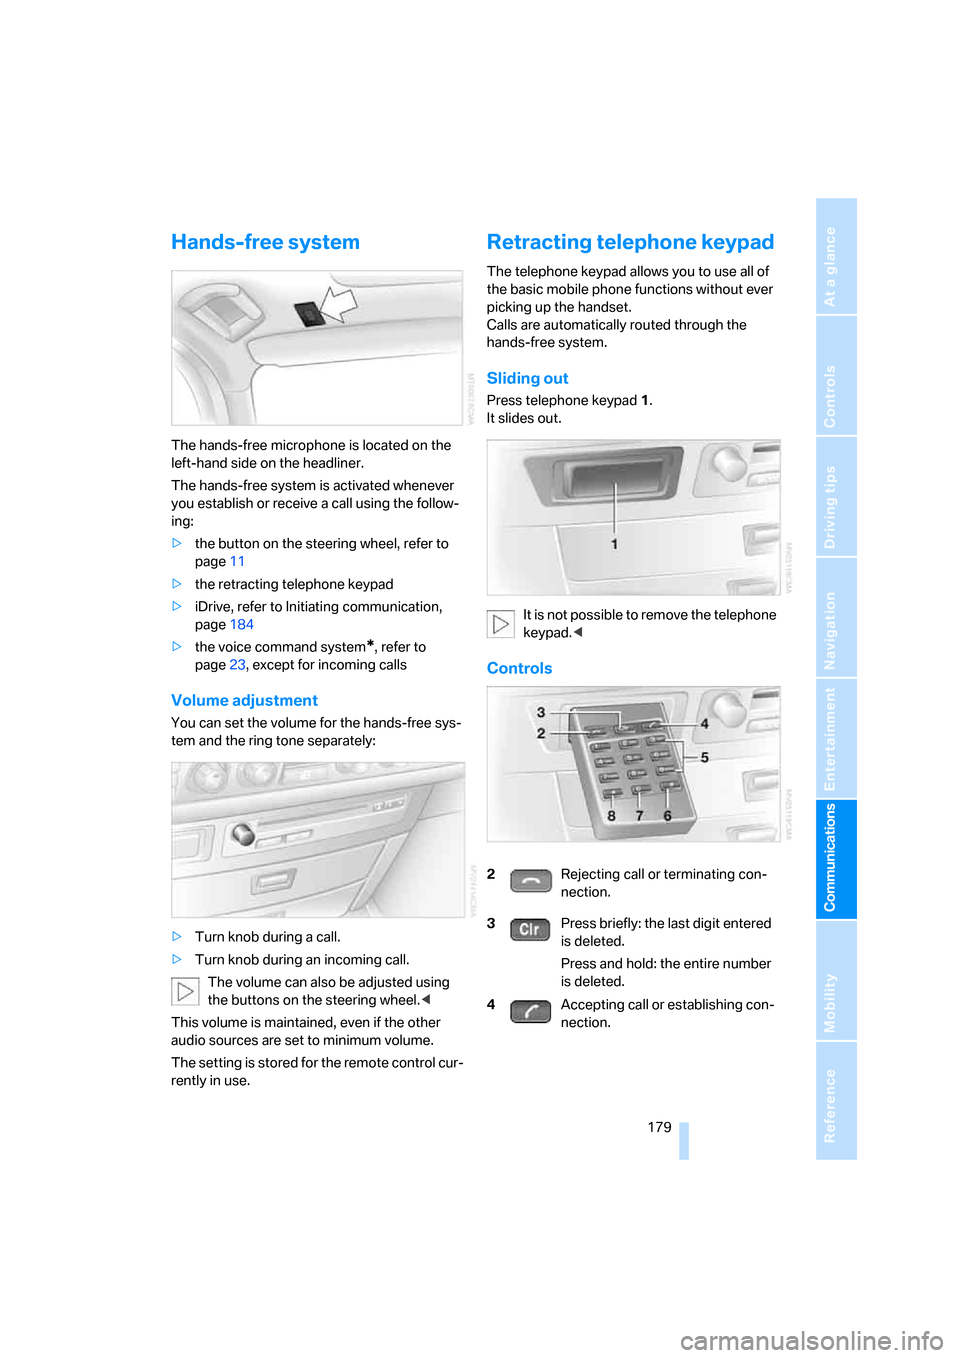
Press telephone keypad1.
It slides out.
It is not possible to remove the telephone
keypad.<
Controls
2Rejecting call or terminating con-
nection.
3Press briefly: the last digit entered
is deleted.
Press and hold: the entire number
is deleted.
4Accepting call or establishing con-
nection.