Piston NISSAN PATROL 1998 Y61 / 5.G Engine Mechanical Workshop Manual
[x] Cancel search | Manufacturer: NISSAN, Model Year: 1998, Model line: PATROL, Model: NISSAN PATROL 1998 Y61 / 5.GPages: 65, PDF Size: 2.4 MB
Page 4 of 65
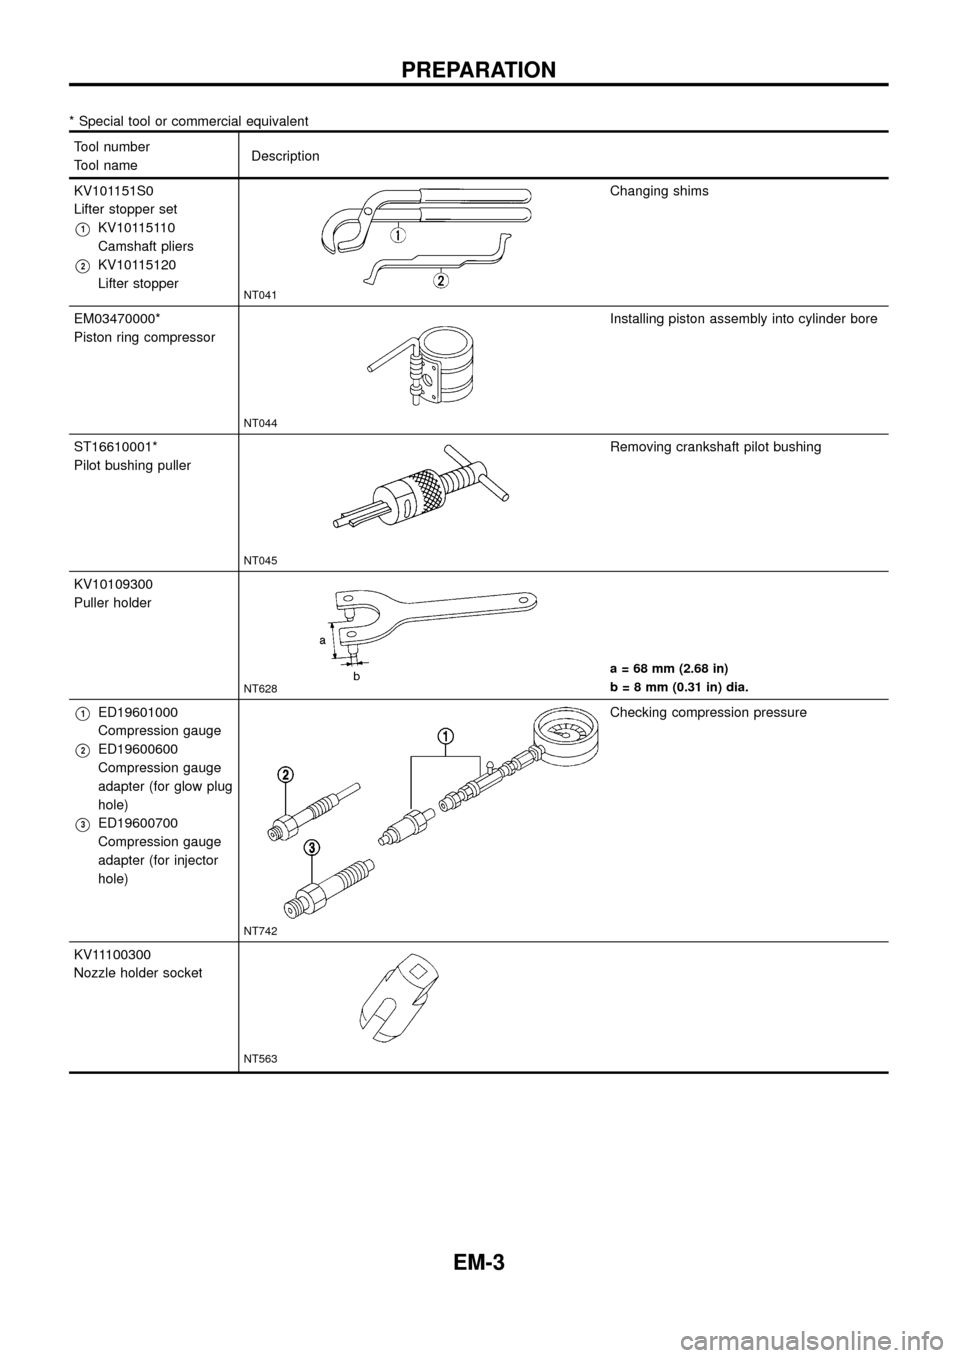
* Special tool or commercial equivalent
Tool number
Tool nameDescription
KV101151S0
Lifter stopper set
V1KV10115110
Camshaft pliers
V2KV10115120
Lifter stopper
NT041
Changing shims
EM03470000*
Piston ring compressor
NT044
Installing piston assembly into cylinder bore
ST16610001*
Pilot bushing puller
NT045
Removing crankshaft pilot bushing
KV10109300
Puller holder
NT628
a = 68 mm (2.68 in)
b = 8 mm (0.31 in) dia.
V1ED19601000
Compression gauge
V2ED19600600
Compression gauge
adapter (for glow plug
hole)
V3ED19600700
Compression gauge
adapter (for injector
hole)
NT742
Checking compression pressure
KV11100300
Nozzle holder socket
NT563
PREPARATION
EM-3
Page 6 of 65
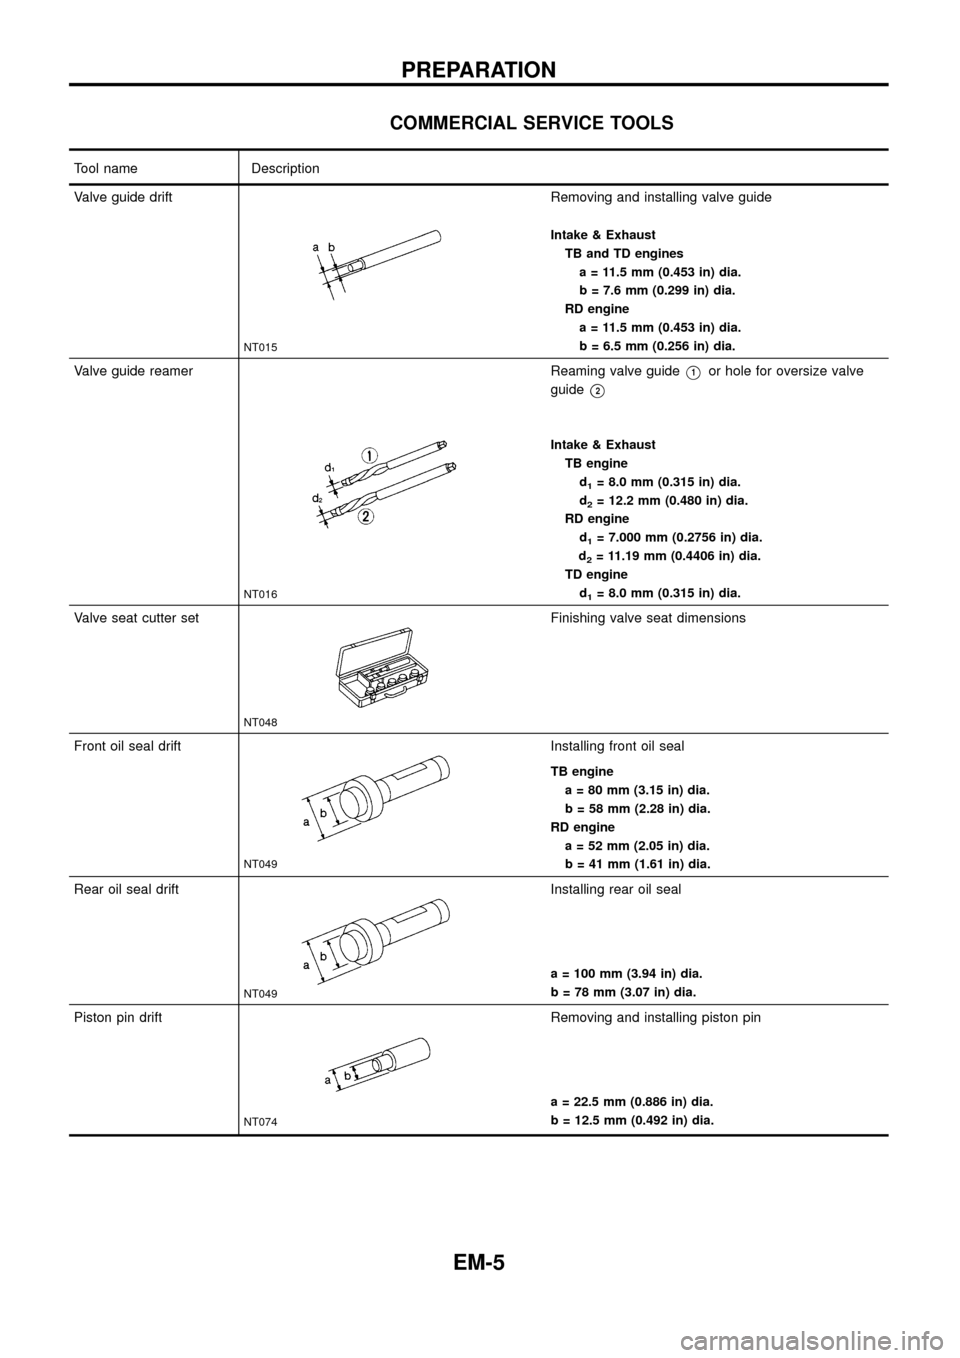
COMMERCIAL SERVICE TOOLS
Tool name Description
Valve guide drift
NT015
Removing and installing valve guide
Intake & Exhaust
TB and TD engines
a = 11.5 mm (0.453 in) dia.
b = 7.6 mm (0.299 in) dia.
RD engine
a = 11.5 mm (0.453 in) dia.
b = 6.5 mm (0.256 in) dia.
Valve guide reamer
NT016
Reaming valve guideV1or hole for oversize valve
guide
V2
Intake & Exhaust
TB engine
d
1= 8.0 mm (0.315 in) dia.
d
2= 12.2 mm (0.480 in) dia.
RD engine
d
1= 7.000 mm (0.2756 in) dia.
d
2= 11.19 mm (0.4406 in) dia.
TD engine
d
1= 8.0 mm (0.315 in) dia.
Valve seat cutter set
NT048
Finishing valve seat dimensions
Front oil seal drift
NT049
Installing front oil seal
TB engine
a = 80 mm (3.15 in) dia.
b = 58 mm (2.28 in) dia.
RD engine
a = 52 mm (2.05 in) dia.
b = 41 mm (1.61 in) dia.
Rear oil seal drift
NT049
Installing rear oil seal
a = 100 mm (3.94 in) dia.
b = 78 mm (3.07 in) dia.
Piston pin drift
NT074
Removing and installing piston pin
a = 22.5 mm (0.886 in) dia.
b = 12.5 mm (0.492 in) dia.
PREPARATION
EM-5
Page 7 of 65
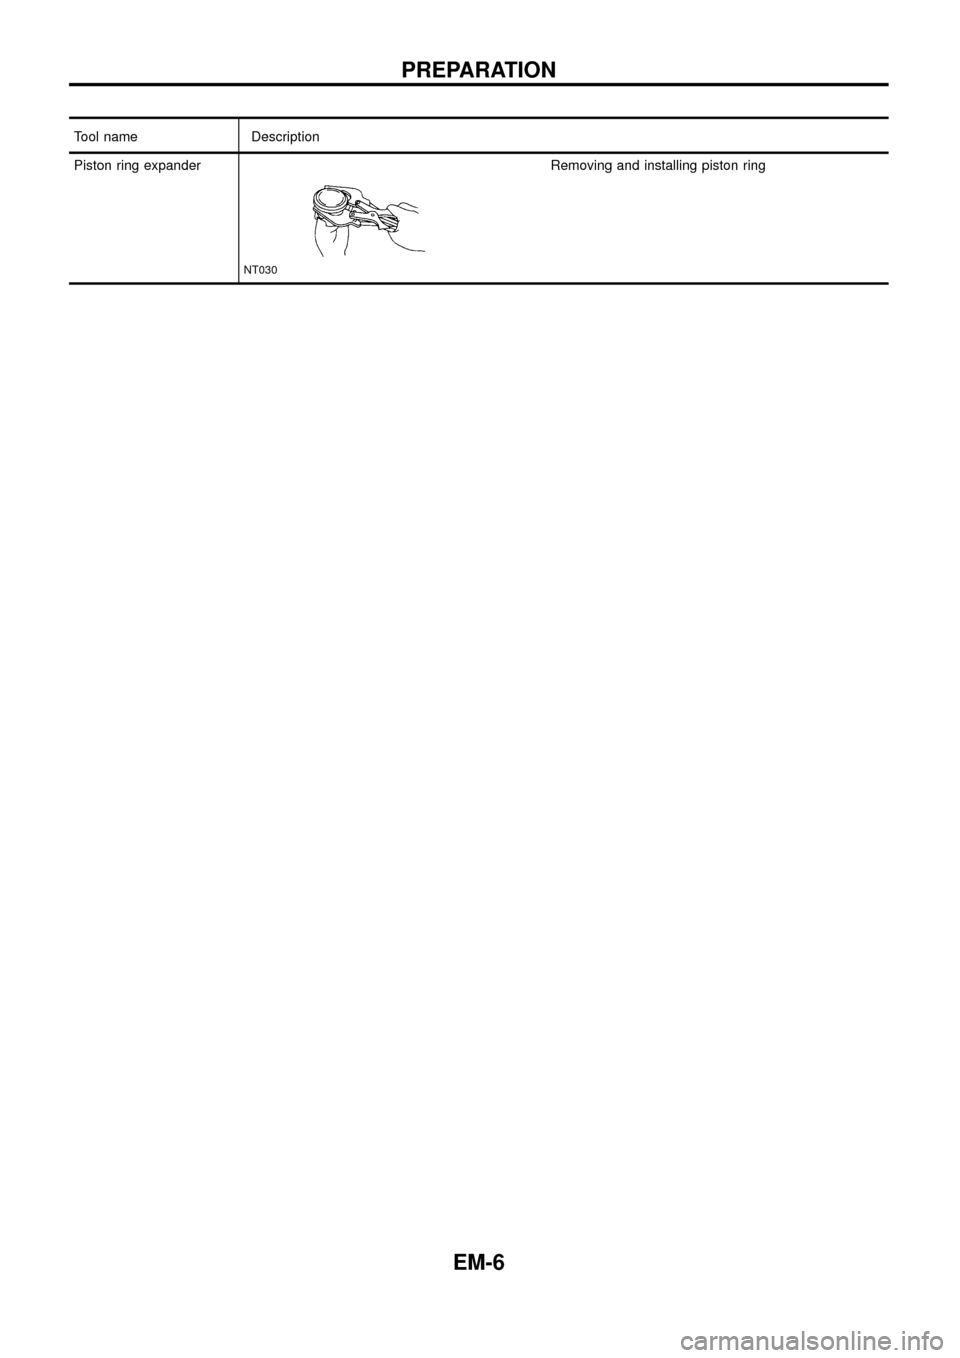
Tool name Description
Piston ring expander
NT030
Removing and installing piston ring
PREPARATION
EM-6
Page 9 of 65
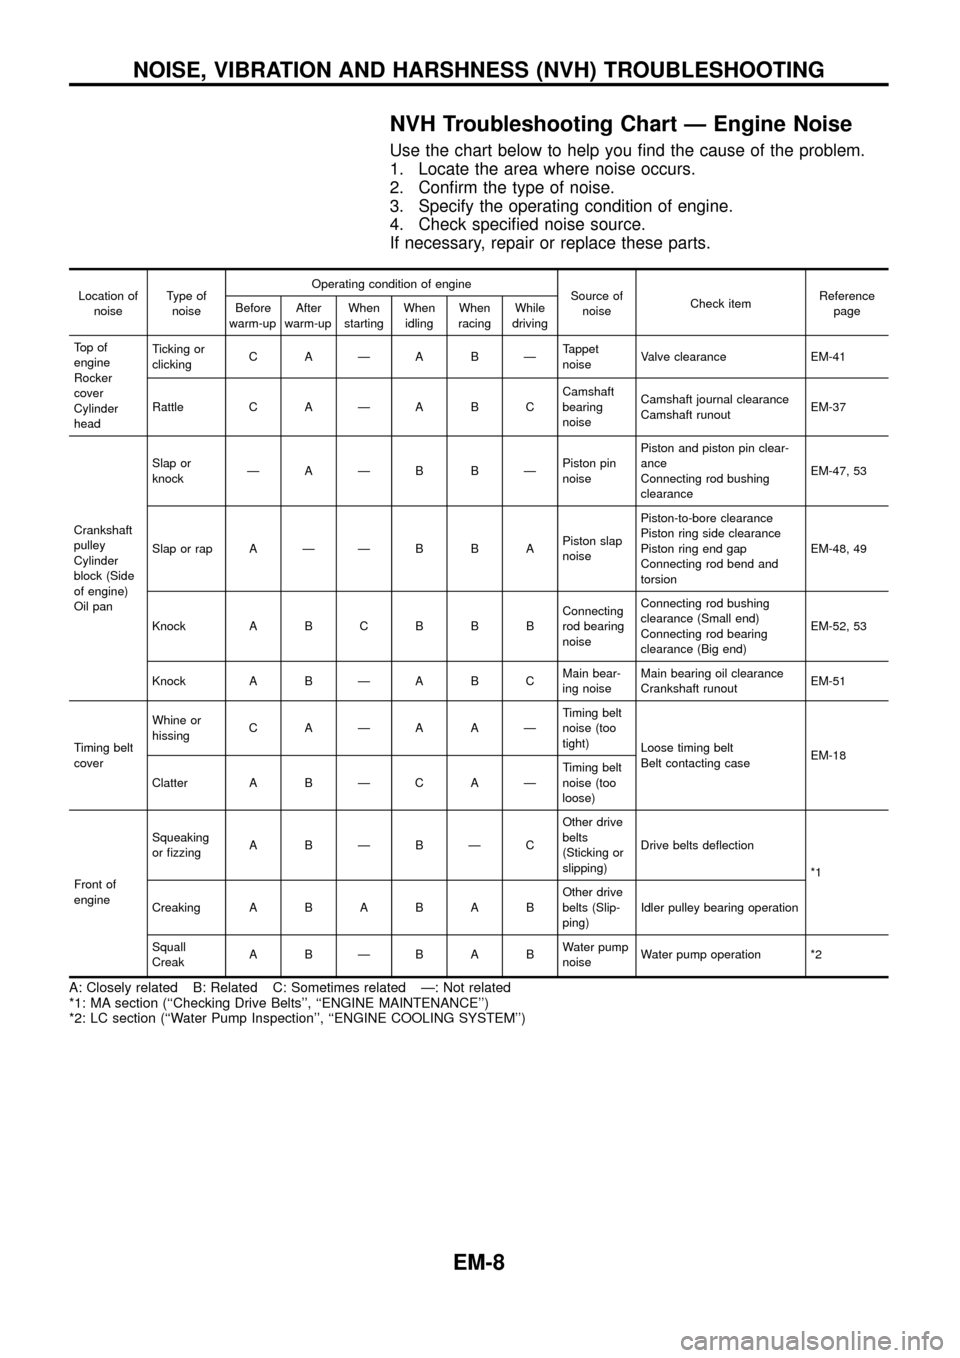
NVH Troubleshooting Chart Ð Engine Noise
Use the chart below to help you ®nd the cause of the problem.
1. Locate the area where noise occurs.
2. Con®rm the type of noise.
3. Specify the operating condition of engine.
4. Check speci®ed noise source.
If necessary, repair or replace these parts.
Location of
noiseType of
noiseOperating condition of engine
Source of
noiseCheck itemReference
page Before
warm-upAfter
warm-upWhen
startingWhen
idlingWhen
racingWhile
driving
To p o f
engine
Rocker
cover
Cylinder
headTicking or
clickingCAÐABÐTappet
noiseValve clearance EM-41
Rattle C A Ð A B CCamshaft
bearing
noiseCamshaft journal clearance
Camshaft runoutEM-37
Crankshaft
pulley
Cylinder
block (Side
of engine)
Oil panSlap or
knockÐAÐB BÐPiston pin
noisePiston and piston pin clear-
ance
Connecting rod bushing
clearanceEM-47, 53
Slap or rap A Ð Ð B B APiston slap
noisePiston-to-bore clearance
Piston ring side clearance
Piston ring end gap
Connecting rod bend and
torsionEM-48, 49
Knock A B C B B BConnecting
rod bearing
noiseConnecting rod bushing
clearance (Small end)
Connecting rod bearing
clearance (Big end)EM-52, 53
Knock A B Ð A B CMain bear-
ing noiseMain bearing oil clearance
Crankshaft runoutEM-51
Timing belt
coverWhine or
hissingCAÐAAÐTiming belt
noise (too
tight)
Loose timing belt
Belt contacting caseEM-18
Clatter A B Ð C A ÐTiming belt
noise (too
loose)
Front of
engineSqueaking
or ®zzingABÐBÐCOther drive
belts
(Sticking or
slipping)Drive belts de¯ection
*1
CreakingABABABOther drive
belts (Slip-
ping)Idler pulley bearing operation
Squall
CreakABÐBABWater pump
noiseWater pump operation *2
A: Closely related B: Related C: Sometimes related Ð: Not related
*1: MA section (``Checking Drive Belts'', ``ENGINE MAINTENANCE'')
*2: LC section (``Water Pump Inspection'', ``ENGINE COOLING SYSTEM'')
NOISE, VIBRATION AND HARSHNESS (NVH) TROUBLESHOOTING
EM-8
Page 13 of 65
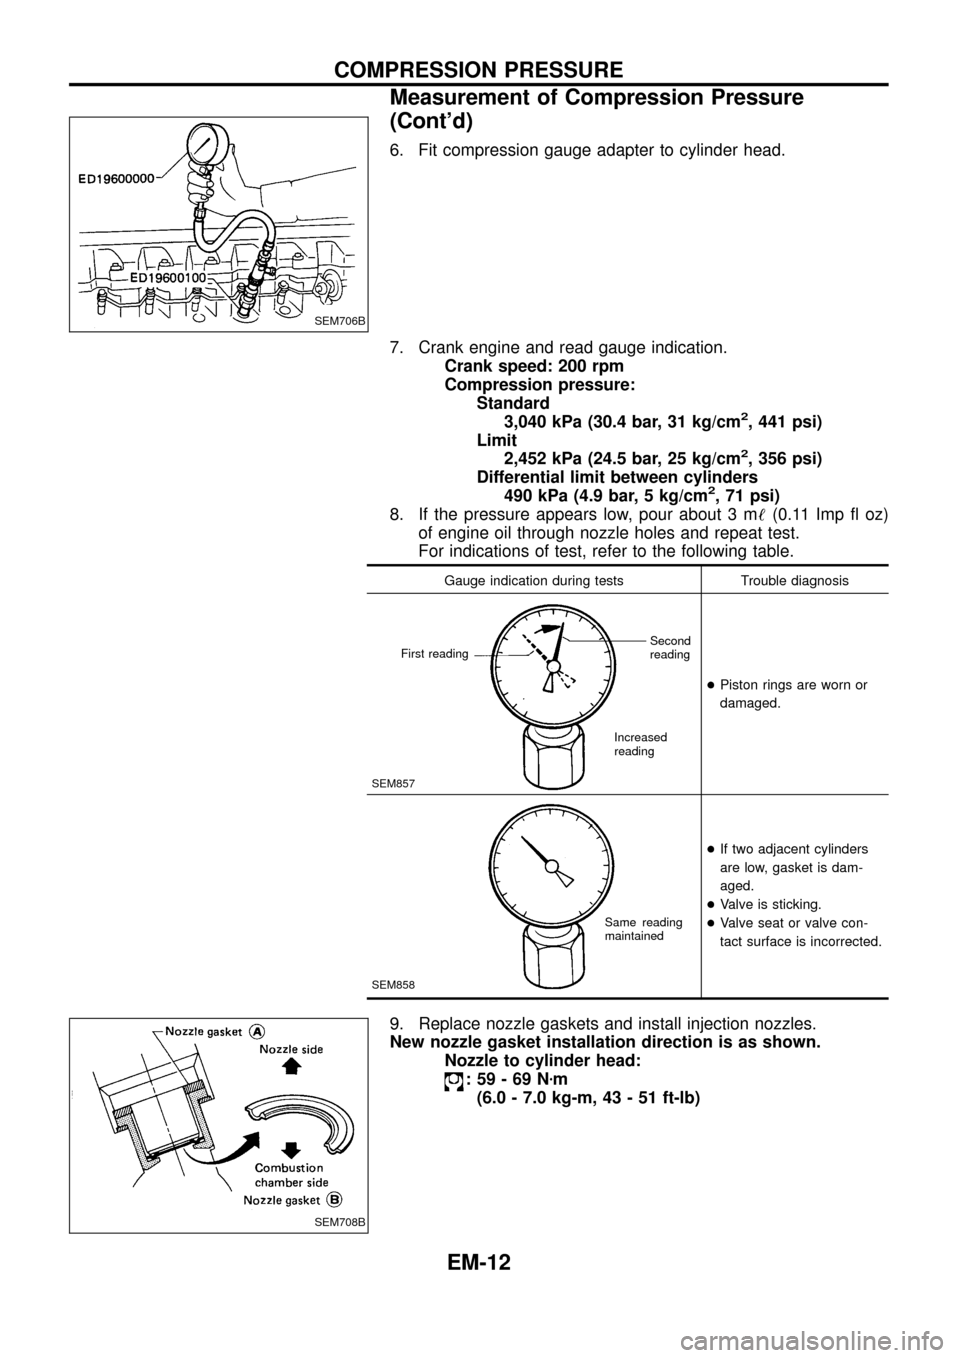
6. Fit compression gauge adapter to cylinder head.
7. Crank engine and read gauge indication.
Crank speed: 200 rpm
Compression pressure:
Standard
3,040 kPa (30.4 bar, 31 kg/cm
2, 441 psi)
Limit
2,452 kPa (24.5 bar, 25 kg/cm
2, 356 psi)
Differential limit between cylinders
490 kPa (4.9 bar, 5 kg/cm
2, 71 psi)
8. If the pressure appears low, pour about 3 m!(0.11 Imp ¯ oz)
of engine oil through nozzle holes and repeat test.
For indications of test, refer to the following table.
Gauge indication during tests Trouble diagnosis
SEM857
+Piston rings are worn or
damaged.
SEM858
+If two adjacent cylinders
are low, gasket is dam-
aged.
+Valve is sticking.
+Valve seat or valve con-
tact surface is incorrected.
9. Replace nozzle gaskets and install injection nozzles.
New nozzle gasket installation direction is as shown.
Nozzle to cylinder head:
:59-69Nzm
(6.0 - 7.0 kg-m, 43 - 51 ft-lb)
SEM706B
SEM708B
COMPRESSION PRESSURE
Measurement of Compression Pressure
(Cont'd)
EM-12
First readingSecond
reading
Increased
reading
Same reading
maintained
Page 17 of 65
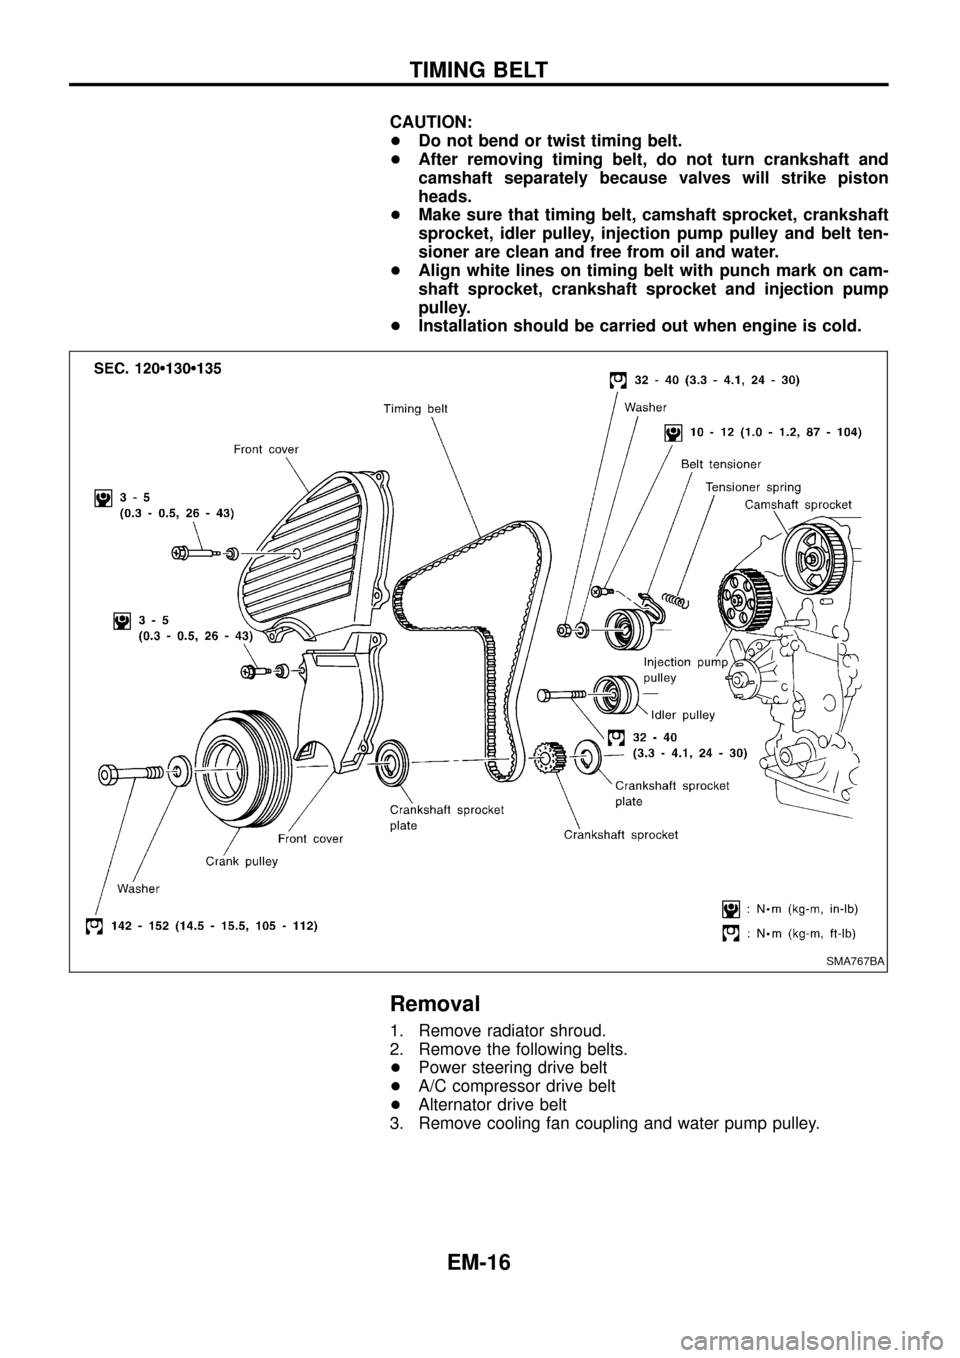
CAUTION:
+Do not bend or twist timing belt.
+After removing timing belt, do not turn crankshaft and
camshaft separately because valves will strike piston
heads.
+Make sure that timing belt, camshaft sprocket, crankshaft
sprocket, idler pulley, injection pump pulley and belt ten-
sioner are clean and free from oil and water.
+Align white lines on timing belt with punch mark on cam-
shaft sprocket, crankshaft sprocket and injection pump
pulley.
+Installation should be carried out when engine is cold.
Removal
1. Remove radiator shroud.
2. Remove the following belts.
+Power steering drive belt
+A/C compressor drive belt
+Alternator drive belt
3. Remove cooling fan coupling and water pump pulley.
SMA767BA
TIMING BELT
EM-16
Page 18 of 65
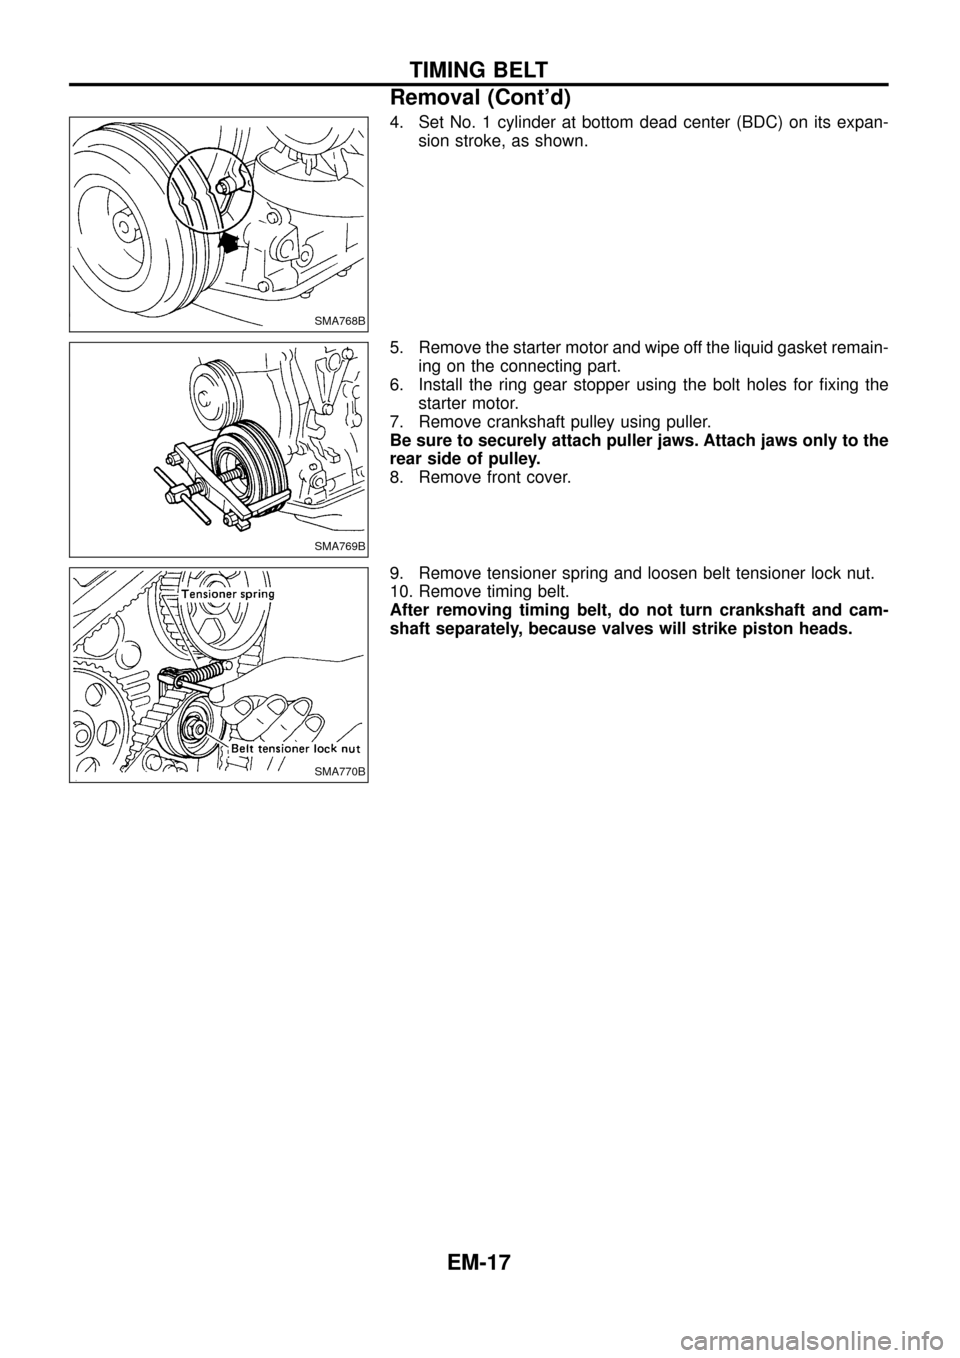
4. Set No. 1 cylinder at bottom dead center (BDC) on its expan-
sion stroke, as shown.
5. Remove the starter motor and wipe off the liquid gasket remain-
ing on the connecting part.
6. Install the ring gear stopper using the bolt holes for ®xing the
starter motor.
7. Remove crankshaft pulley using puller.
Be sure to securely attach puller jaws. Attach jaws only to the
rear side of pulley.
8. Remove front cover.
9. Remove tensioner spring and loosen belt tensioner lock nut.
10. Remove timing belt.
After removing timing belt, do not turn crankshaft and cam-
shaft separately, because valves will strike piston heads.
SMA768B
SMA769B
SMA770B
TIMING BELT
Removal (Cont'd)
EM-17
Page 22 of 65
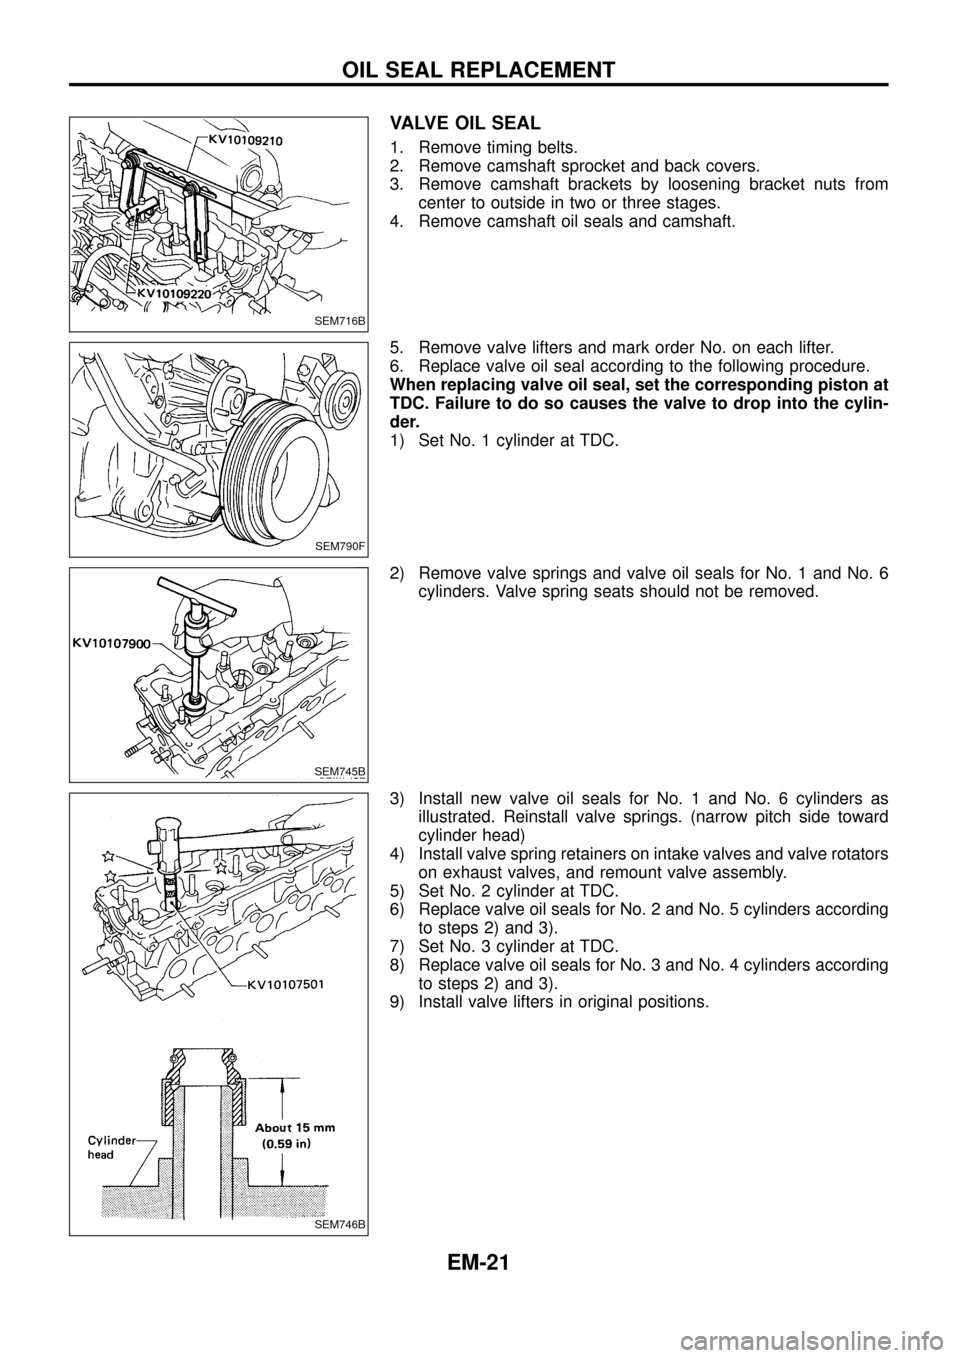
VALVE OIL SEAL
1. Remove timing belts.
2. Remove camshaft sprocket and back covers.
3. Remove camshaft brackets by loosening bracket nuts from
center to outside in two or three stages.
4. Remove camshaft oil seals and camshaft.
5. Remove valve lifters and mark order No. on each lifter.
6. Replace valve oil seal according to the following procedure.
When replacing valve oil seal, set the corresponding piston at
TDC. Failure to do so causes the valve to drop into the cylin-
der.
1) Set No. 1 cylinder at TDC.
2) Remove valve springs and valve oil seals for No. 1 and No. 6
cylinders. Valve spring seats should not be removed.
3) Install new valve oil seals for No. 1 and No. 6 cylinders as
illustrated. Reinstall valve springs. (narrow pitch side toward
cylinder head)
4) Install valve spring retainers on intake valves and valve rotators
on exhaust valves, and remount valve assembly.
5) Set No. 2 cylinder at TDC.
6) Replace valve oil seals for No. 2 and No. 5 cylinders according
to steps 2) and 3).
7) Set No. 3 cylinder at TDC.
8) Replace valve oil seals for No. 3 and No. 4 cylinders according
to steps 2) and 3).
9) Install valve lifters in original positions.
SEM716B
SEM790F
SEM745B
SEM746B
OIL SEAL REPLACEMENT
EM-21
Page 37 of 65
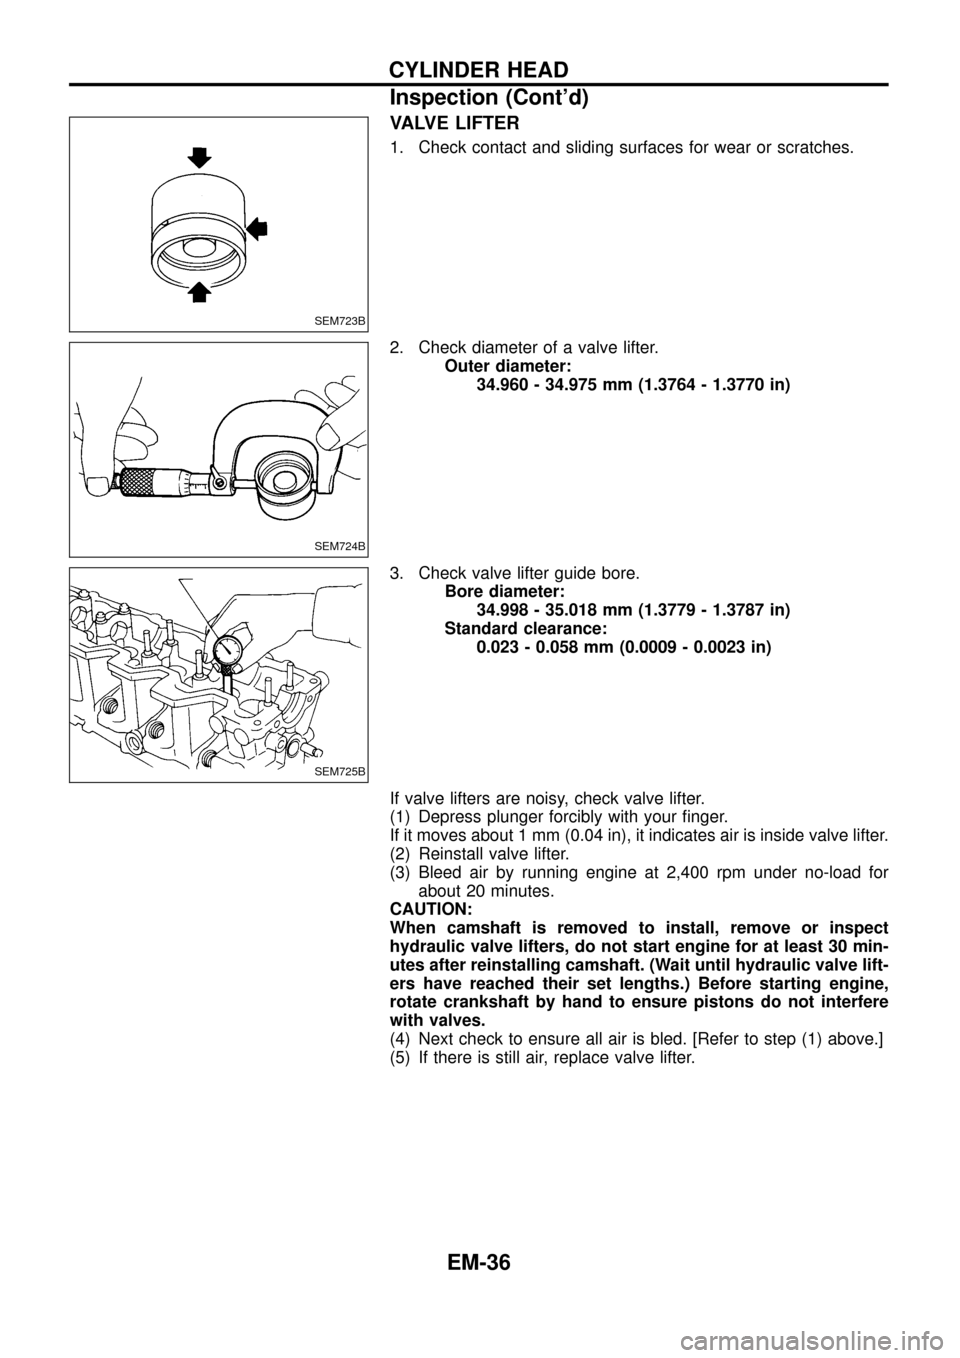
VALVE LIFTER
1. Check contact and sliding surfaces for wear or scratches.
2. Check diameter of a valve lifter.
Outer diameter:
34.960 - 34.975 mm (1.3764 - 1.3770 in)
3. Check valve lifter guide bore.
Bore diameter:
34.998 - 35.018 mm (1.3779 - 1.3787 in)
Standard clearance:
0.023 - 0.058 mm (0.0009 - 0.0023 in)
If valve lifters are noisy, check valve lifter.
(1) Depress plunger forcibly with your ®nger.
If it moves about 1 mm (0.04 in), it indicates air is inside valve lifter.
(2) Reinstall valve lifter.
(3) Bleed air by running engine at 2,400 rpm under no-load for
about 20 minutes.
CAUTION:
When camshaft is removed to install, remove or inspect
hydraulic valve lifters, do not start engine for at least 30 min-
utes after reinstalling camshaft. (Wait until hydraulic valve lift-
ers have reached their set lengths.) Before starting engine,
rotate crankshaft by hand to ensure pistons do not interfere
with valves.
(4) Next check to ensure all air is bled. [Refer to step (1) above.]
(5) If there is still air, replace valve lifter.
SEM723B
SEM724B
SEM725B
CYLINDER HEAD
Inspection (Cont'd)
EM-36
Page 39 of 65
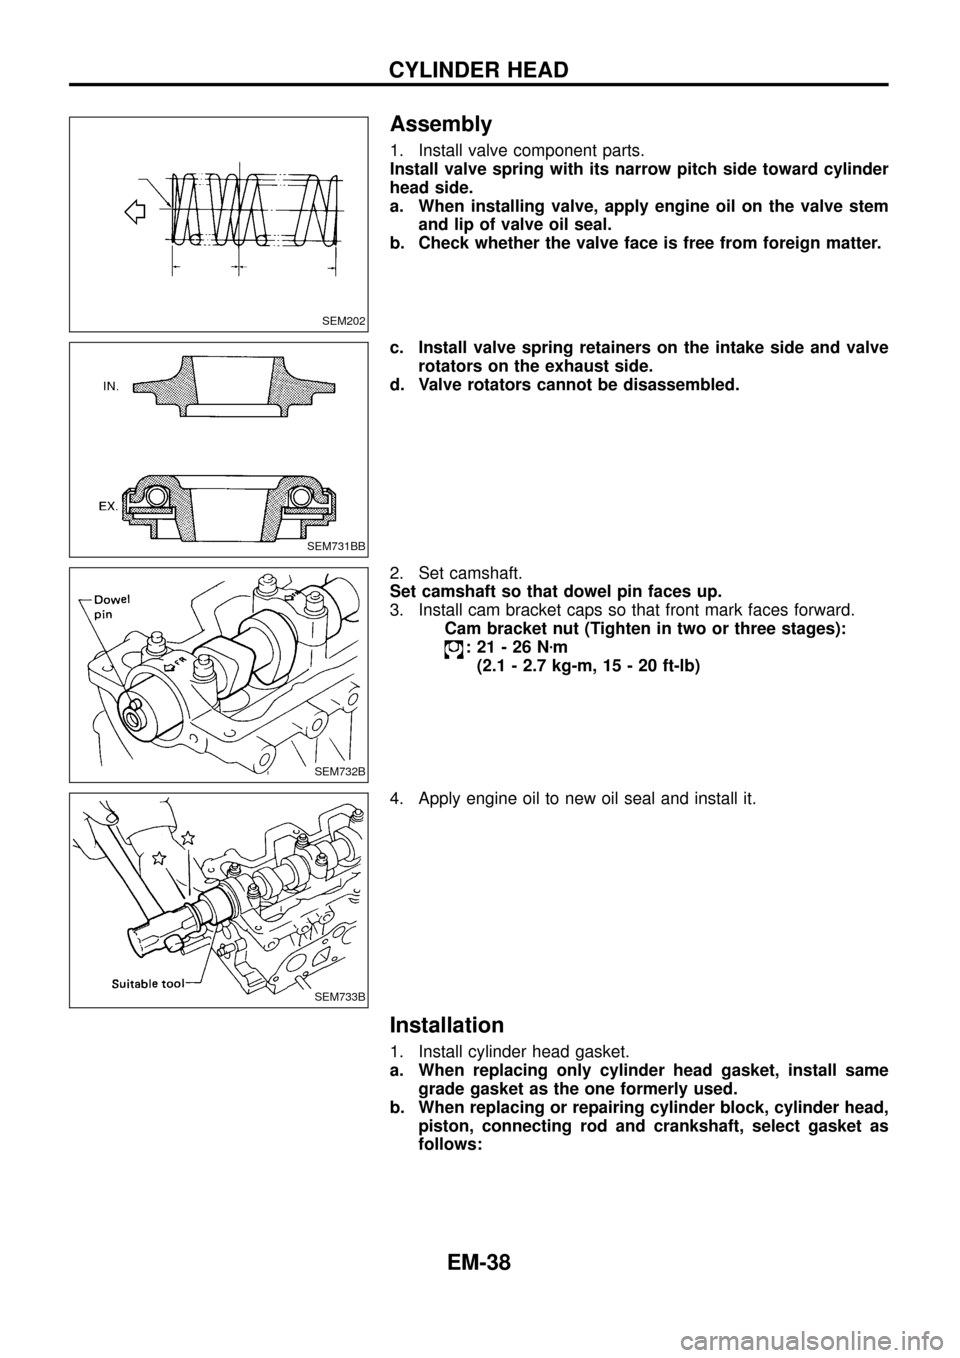
Assembly
1. Install valve component parts.
Install valve spring with its narrow pitch side toward cylinder
head side.
a. When installing valve, apply engine oil on the valve stem
and lip of valve oil seal.
b. Check whether the valve face is free from foreign matter.
c. Install valve spring retainers on the intake side and valve
rotators on the exhaust side.
d. Valve rotators cannot be disassembled.
2. Set camshaft.
Set camshaft so that dowel pin faces up.
3. Install cam bracket caps so that front mark faces forward.
Cam bracket nut (Tighten in two or three stages):
:21-26Nzm
(2.1 - 2.7 kg-m, 15 - 20 ft-lb)
4. Apply engine oil to new oil seal and install it.
Installation
1. Install cylinder head gasket.
a. When replacing only cylinder head gasket, install same
grade gasket as the one formerly used.
b. When replacing or repairing cylinder block, cylinder head,
piston, connecting rod and crankshaft, select gasket as
follows:
SEM202
SEM731BB
SEM732B
SEM733B
CYLINDER HEAD
EM-38