change wheel TOYOTA AVALON 2014 XX40 / 4.G Navigation Manual
[x] Cancel search | Manufacturer: TOYOTA, Model Year: 2014, Model line: AVALON, Model: TOYOTA AVALON 2014 XX40 / 4.GPages: 346, PDF Size: 6.47 MB
Page 124 of 346
124
1. PHONE OPERATION
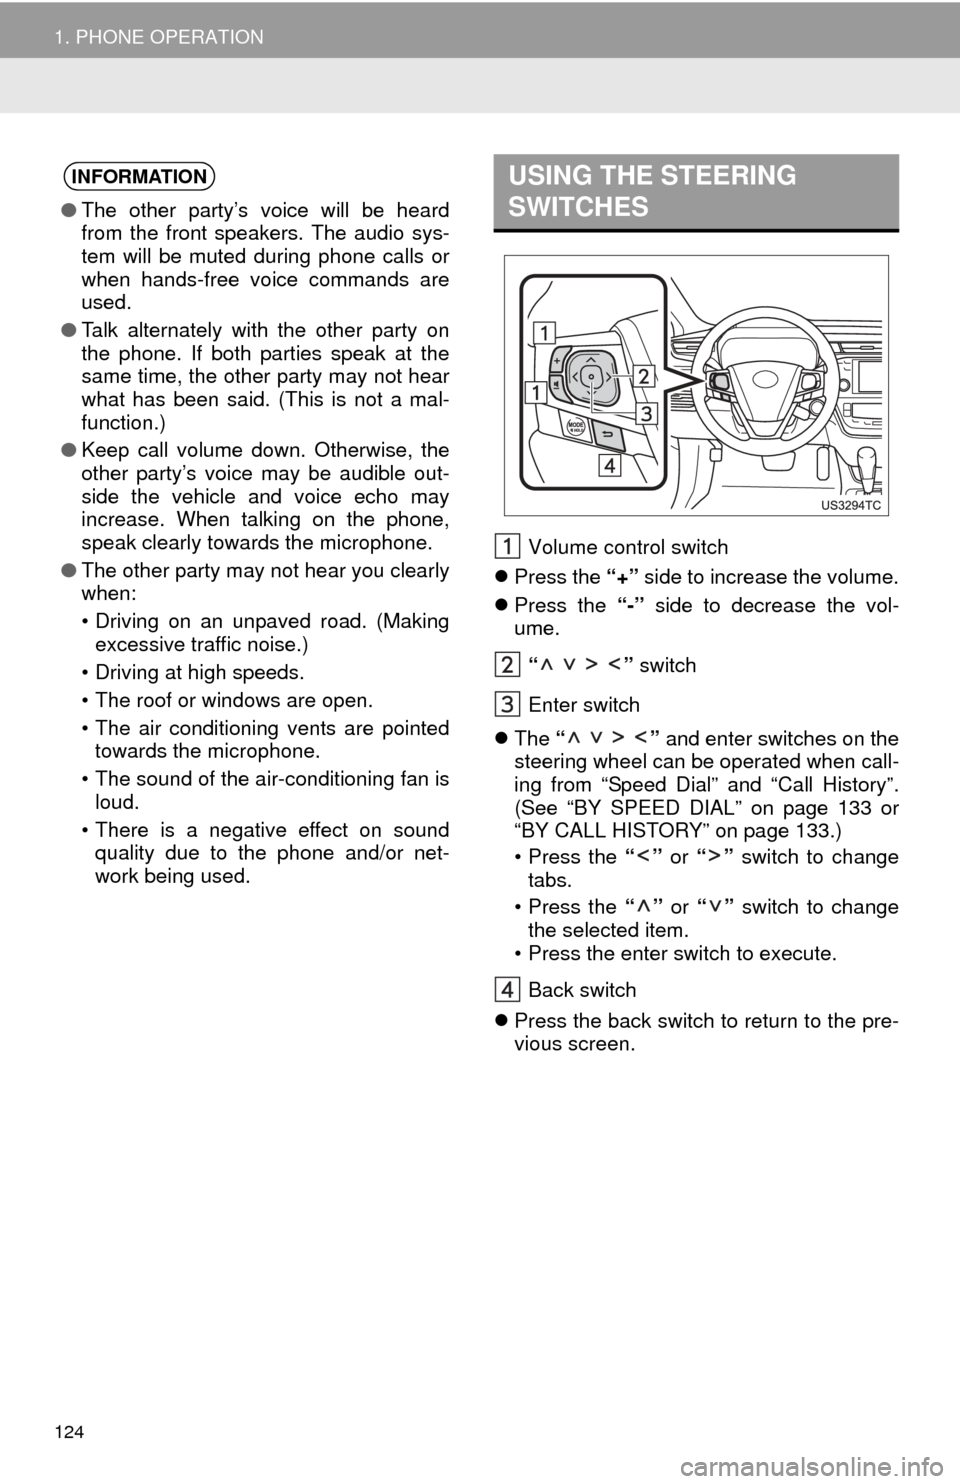
Volume control switch
яБм Press the тАЬ+тАЭ side to increase the volume.
яБм Press the тАЬ-тАЭ side to decrease the vol-
ume.
тАЬ тАЭ switch
Enter switch
яБм The тАЬ тАЭ and enter switches on the
steering wheel can be operated when call-
ing from тАЬSpeed DialтАЭ and тАЬCall HistoryтАЭ.
(See тАЬBY SPEED DIALтАЭ on page 133 or
тАЬBY CALL HISTORYтАЭ on page 133.)
тАв Press the тАЬтАЭ or тАЬтАЭ switch to change
tabs.
тАв Press the тАЬтАЭ or тАЬтАЭ switch to change
the selected item.
тАв Press the enter switch to execute.
Back switch
яБм Press the back switch to return to the pre-
vious screen.
INFORMATION
тЧПThe other partyтАЩs voice will be heard
from the front speakers. The audio sys-
tem will be muted during phone calls or
when hands-free voice commands are
used.
тЧП Talk alternately with the other party on
the phone. If both parties speak at the
same time, the other party may not hear
what has been said. (This is not a mal-
function.)
тЧП Keep call volume down. Otherwise, the
other partyтАЩs voice may be audible out-
side the vehicle and voice echo may
increase. When talking on the phone,
speak clearly towards the microphone.
тЧП The other party may not hear you clearly
when:
тАв Driving on an unpaved road. (Making
excessive traffic noise.)
тАв Driving at high speeds.
тАв The roof or windows are open.
тАв The air conditioning vents are pointed towards the microphone.
тАв The sound of the air-conditioning fan is loud.
тАв There is a negative effect on sound quality due to the phone and/or net-
work being used.
USING THE STEERING
SWITCHES
Page 131 of 346
131
1. PHONE OPERATION
4
TELEPHONE
4. CALL ON THE Bluetooth┬о PHONE
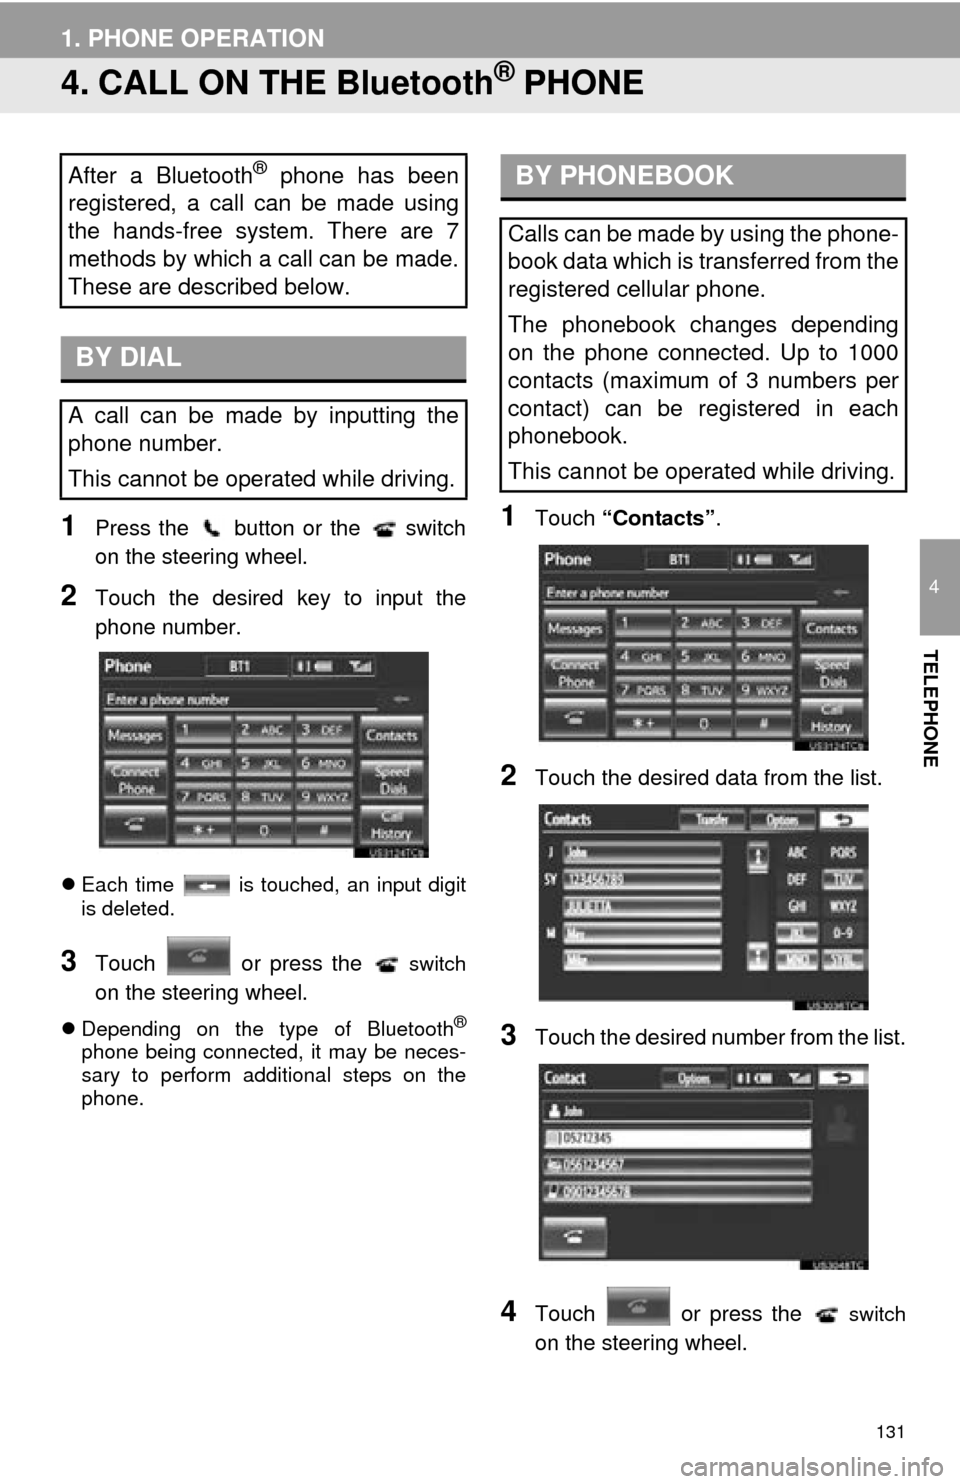
1Press the button or the switch
on the steering wheel.
2Touch the desired key to input the
phone number.
яБмEach time is touched, an input digit
is deleted.
3Touch or press the switch
on the steering wheel.
яБмDepending on the type of Bluetooth┬о
phone being connected, it may be neces-
sary to perform additional steps on the
phone.
1Touch тАЬContactsтАЭ .
2Touch the desired data from the list.
3Touch the desired number from the list.
4Touch or press the switch
on the steering wheel.
After a Bluetooth┬о phone has been
registered, a call can be made using
the hands-free system. There are 7
methods by which a call can be made.
These are described below.
BY DIAL
A call can be made by inputting the
phone number.
This cannot be operated while driving.
BY PHONEBOOK
Calls can be made by using the phone-
book data which is transferred from the
registered cellular phone.
The phonebook changes depending
on the phone connected. Up to 1000
contacts (maximum of 3 numbers per
contact) can be registered in each
phonebook.
This cannot be operated while driving.
Page 133 of 346
133
1. PHONE OPERATION
4
TELEPHONE
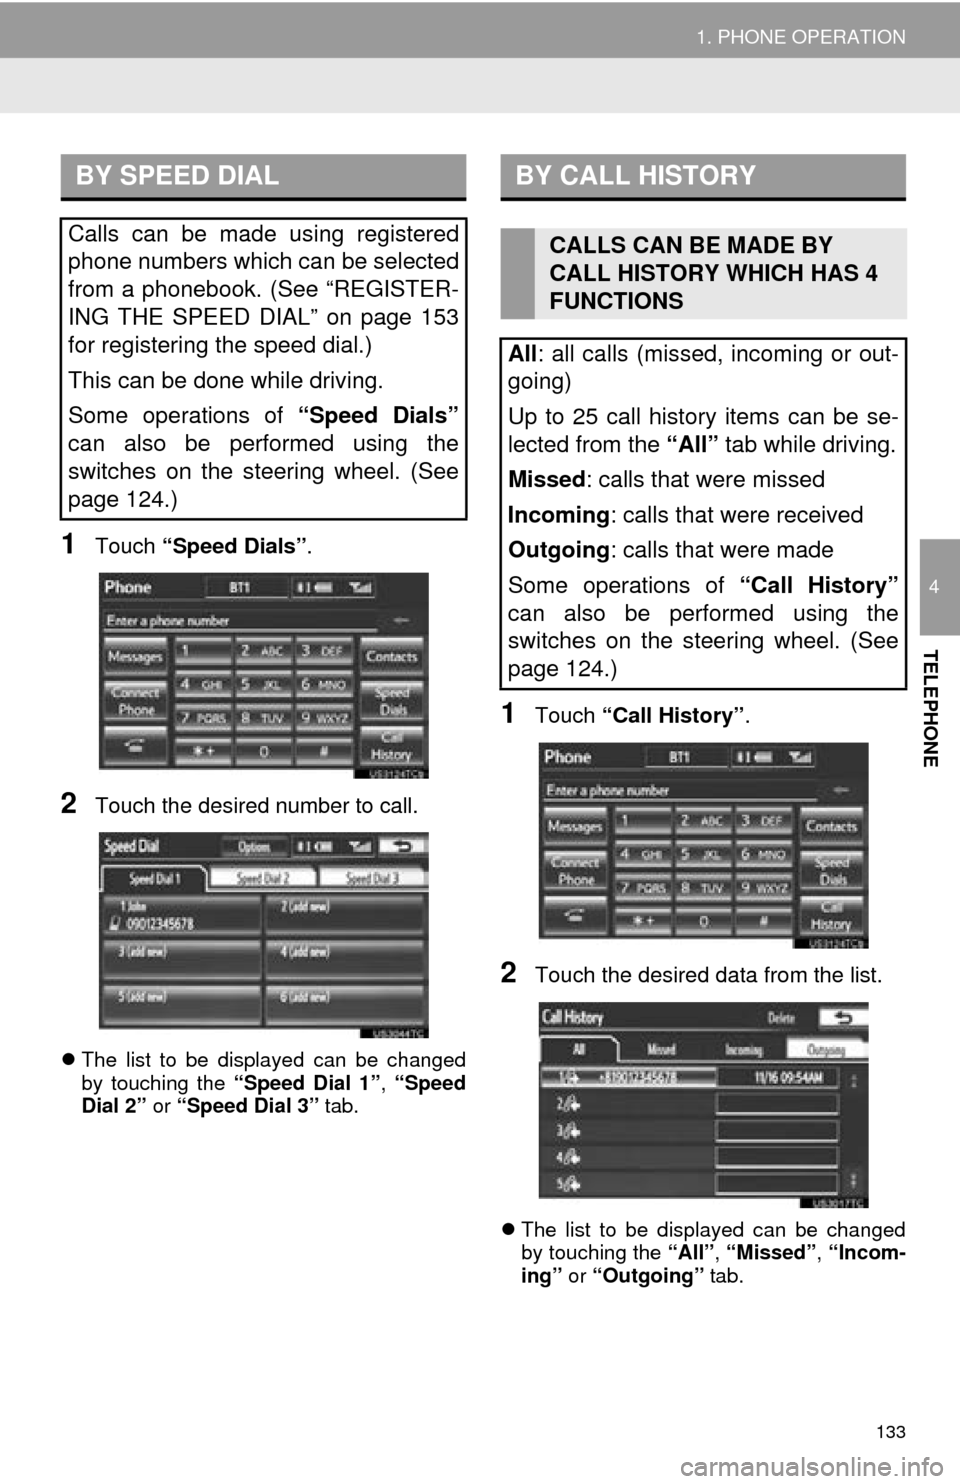
1Touch тАЬSpeed DialsтАЭ .
2Touch the desired number to call.
яБмThe list to be displayed can be changed
by touching the тАЬSpeed Dial 1тАЭ, тАЬSpeed
Dial 2тАЭ or тАЬSpeed Dial 3тАЭ tab.
1Touch тАЬCall HistoryтАЭ .
2Touch the desired data from the list.
яБмThe list to be displayed can be changed
by touching the тАЬAllтАЭ, тАЬMissedтАЭ , тАЬIncom-
ingтАЭ or тАЬOutgoingтАЭ tab.
BY SPEED DIAL
Calls can be made using registered
phone numbers which can be selected
from a phonebook. (See тАЬREGISTER-
ING THE SPEED DIALтАЭ on page 153
for registering the speed dial.)
This can be done while driving.
Some operations of тАЬSpeed DialsтАЭ
can also be performed using the
switches on the steering wheel. (See
page 124.)
BY CALL HISTORY
CALLS CAN BE MADE BY
CALL HISTORY WHICH HAS 4
FUNCTIONS
All : all calls (missed, incoming or out-
going)
Up to 25 call history items can be se-
lected from the тАЬAllтАЭ tab while driving.
Missed : calls that were missed
Incoming : calls that were received
Outgoing : calls that were made
Some operations of тАЬCall HistoryтАЭ
can also be performed using the
switches on the steering wheel. (See
page 124.)
Page 138 of 346
138
1. PHONE OPERATION
6. TALK ON THE Bluetooth┬о PHONE
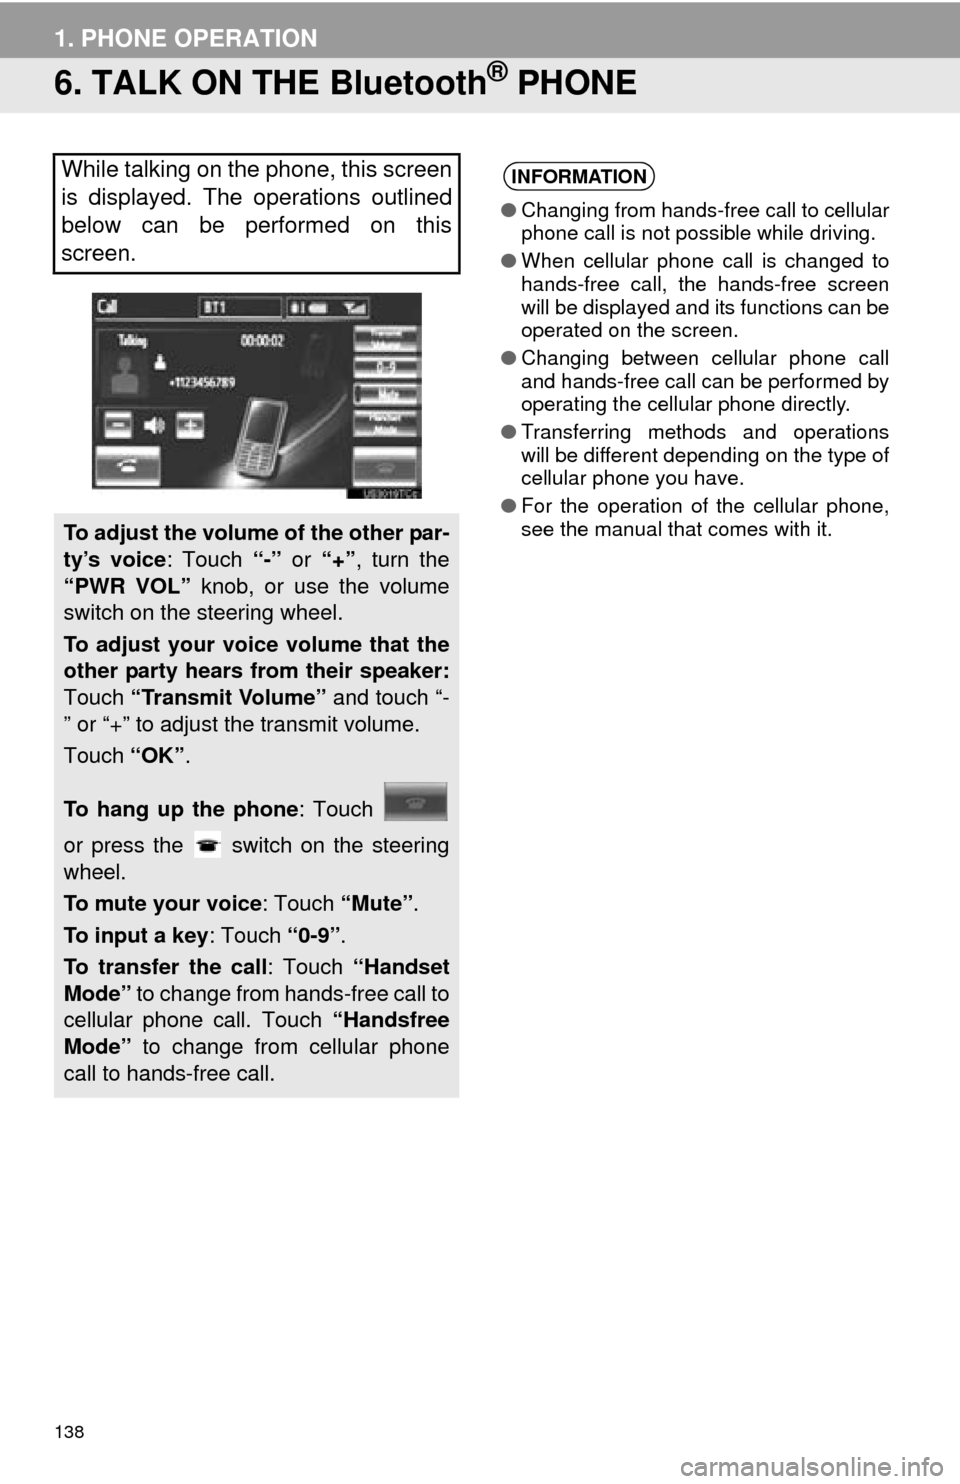
While talking on the phone, this screen
is displayed. The operations outlined
below can be performed on this
screen.
To adjust the volume of the other par-
tyтАЩs voice: Touch тАЬ-тАЭ or тАЬ+тАЭ, turn the
тАЬPWR VOLтАЭ knob, or use the volume
switch on the steering wheel.
To adjust your voice volume that the
other party hears from their speaker:
Touch тАЬTransmit VolumeтАЭ and touch тАЬ-
тАЭ or тАЬ+тАЭ to adjust the transmit volume.
Touch тАЬOKтАЭ.
To hang up the phone : Touch
or press the switch on the steering
wheel.
To mute your voice : Touch тАЬMuteтАЭ.
To input a key : Touch тАЬ0-9тАЭ.
To transfer the call : Touch тАЬHandset
ModeтАЭ to change from hands-free call to
cellular phone call. Touch тАЬHandsfree
ModeтАЭ to change from cellular phone
call to hands-free call.
INFORMATION
тЧП Changing from hands-free call to cellular
phone call is not possible while driving.
тЧП When cellular phone call is changed to
hands-free call, the hands-free screen
will be displayed and its functions can be
operated on the screen.
тЧП Changing between cellular phone call
and hands-free call can be performed by
operating the cellular phone directly.
тЧП Transferring methods and operations
will be different depending on the type of
cellular phone you have.
тЧП For the operation of the cellular phone,
see the manual that comes with it.
Page 157 of 346
157
2. SETUP
4
TELEPHONE
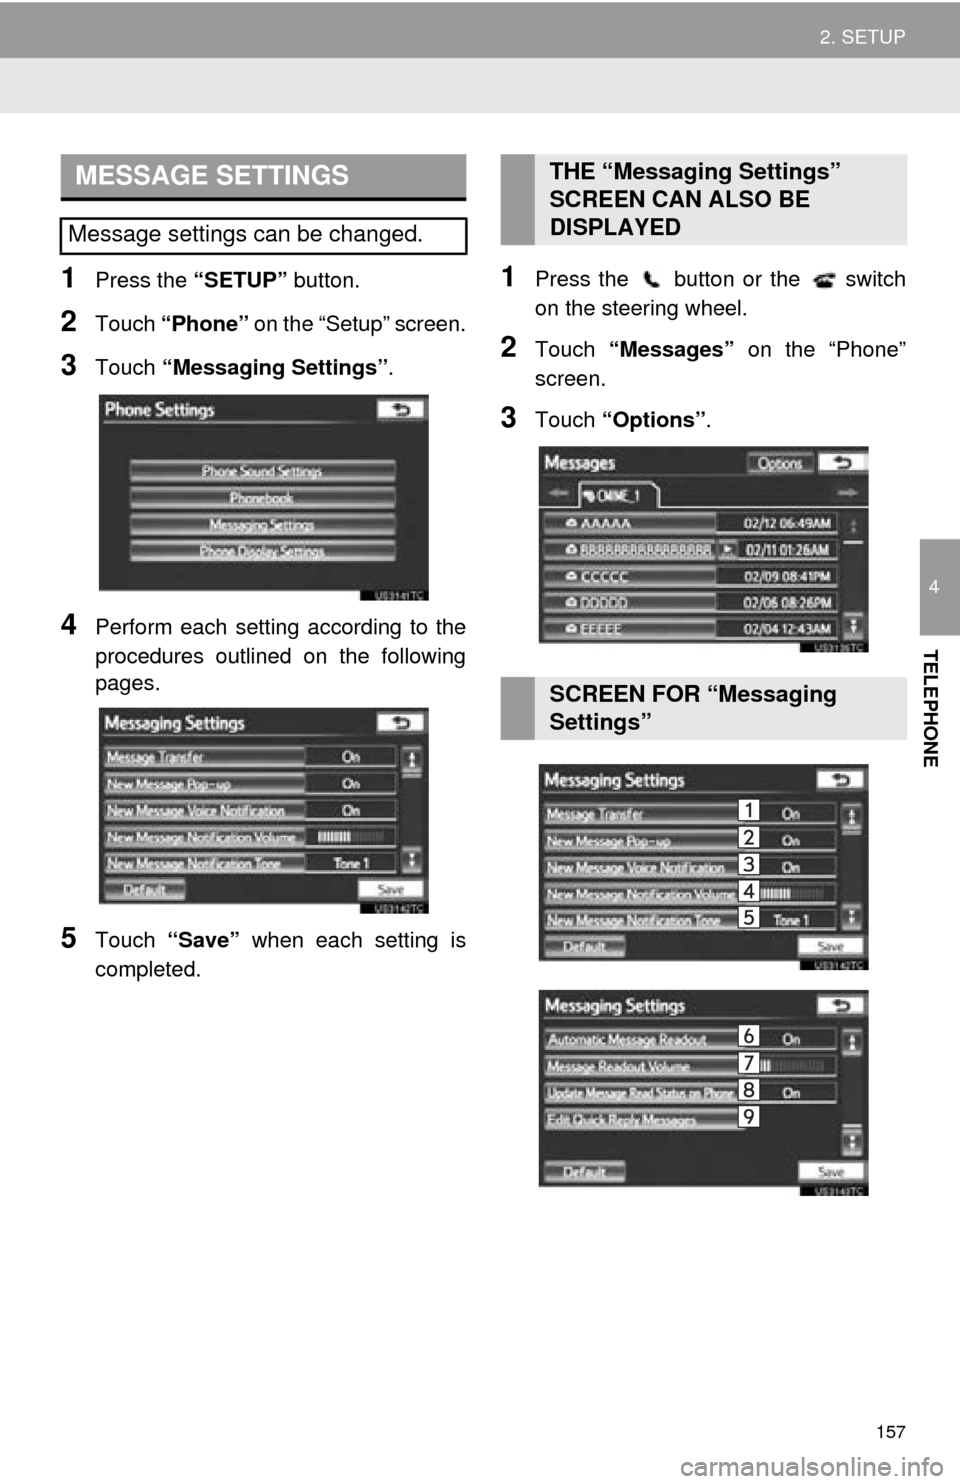
1Press the тАЬSETUPтАЭ button.
2Touch тАЬPhoneтАЭ on the тАЬSetupтАЭ screen.
3Touch тАЬMessaging SettingsтАЭ .
4Perform each setting according to the
procedures outlined on the following
pages.
5Touch тАЬSaveтАЭ when each setting is
completed.
1Press the button or the switch
on the steering wheel.
2Touch тАЬMessagesтАЭ on the тАЬPhoneтАЭ
screen.
3Touch тАЬOptionsтАЭ.
MESSAGE SETTINGS
Message settings can be changed.
THE тАЬMessaging SettingsтАЭ
SCREEN CAN ALSO BE
DISPLAYED
SCREEN FOR тАЬMessaging
SettingsтАЭ
Page 161 of 346
161
2. SETUP
4
TELEPHONE
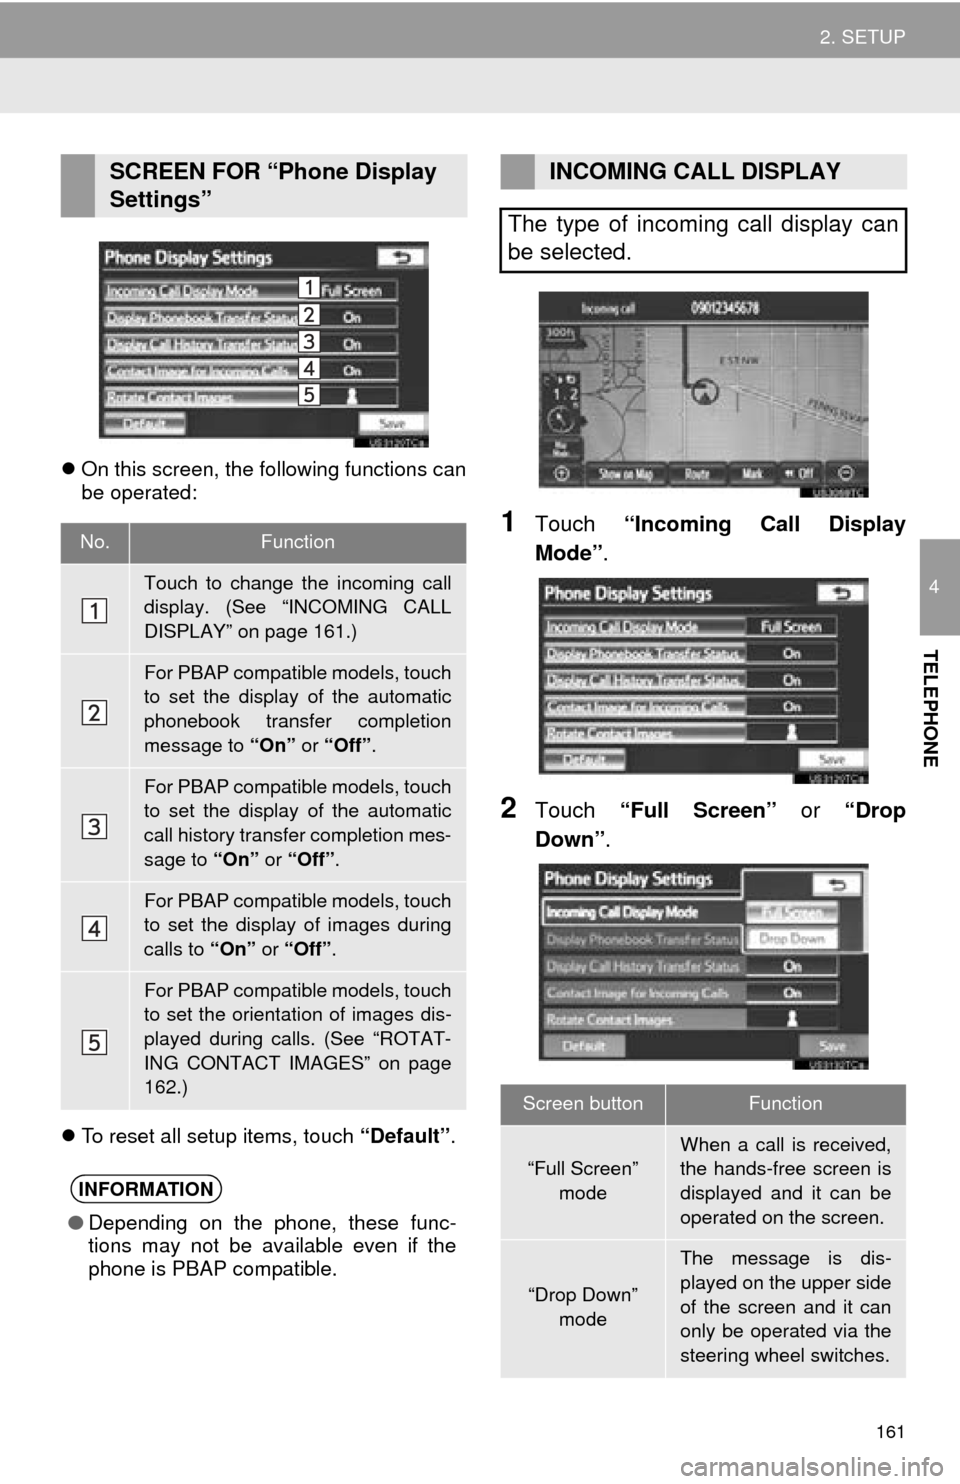
яБмOn this screen, the following functions can
be operated:
яБм To reset all setup items, touch тАЬDefaultтАЭ.
1Touch тАЬIncoming Call Display
ModeтАЭ .
2Touch тАЬFull ScreenтАЭ or тАЬDrop
DownтАЭ.
SCREEN FOR тАЬPhone Display
SettingsтАЭ
No.Function
Touch to change the incoming call
display. (See тАЬINCOMING CALL
DISPLAYтАЭ on page 161.)
For PBAP compatible models, touch
to set the display of the automatic
phonebook transfer completion
message to тАЬOnтАЭ or тАЬOffтАЭ .
For PBAP compatible models, touch
to set the display of the automatic
call history transfer completion mes-
sage to тАЬOnтАЭ or тАЬOffтАЭ .
For PBAP compatible models, touch
to set the display of images during
calls to тАЬOnтАЭ or тАЬOffтАЭ .
For PBAP compatible models, touch
to set the orientation of images dis-
played during calls. (See тАЬROTAT-
ING CONTACT IMAGESтАЭ on page
162.)
INFORMATION
тЧПDepending on the phone, these func-
tions may not be available even if the
phone is PBAP compatible.
INCOMING CALL DISPLAY
The type of incoming call display can
be selected.
Screen buttonFunction
тАЬFull ScreenтАЭ mode
When a call is received,
the hands-free screen is
displayed and it can be
operated on the screen.
тАЬDrop DownтАЭ
mode
The message is dis-
played on the upper side
of the screen and it can
only be operated via the
steering wheel switches.
Page 229 of 346
229
1. AUDIO/VIDEO SYSTEM OPERATION
5
AUDIO/VIDEO SYSTEM
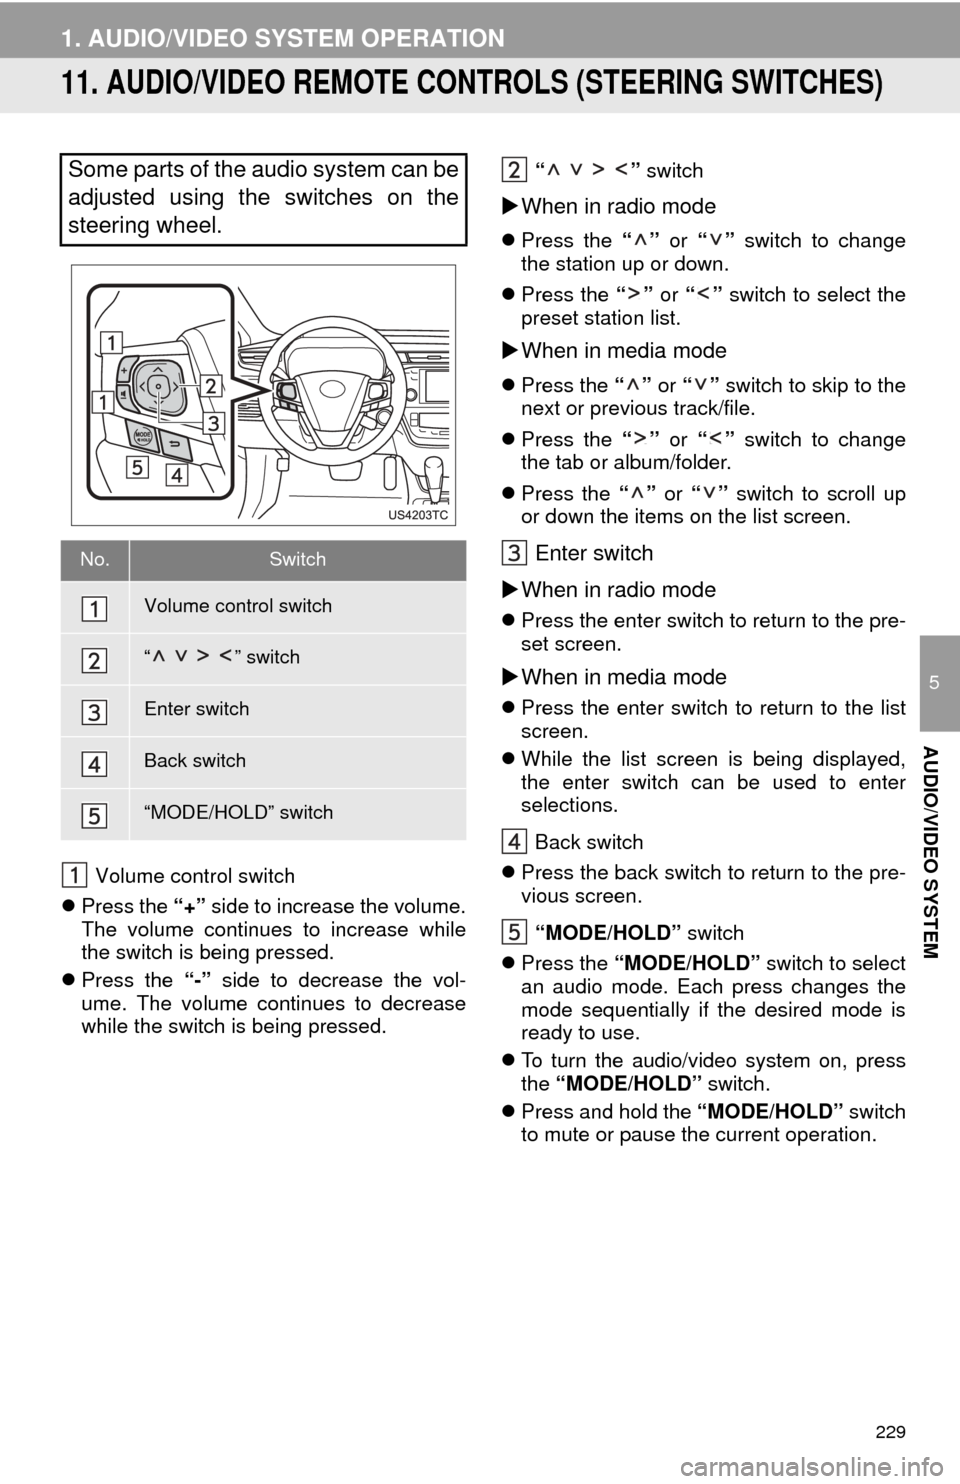
11. AUDIO/VIDEO REMOTE CONTROLS (STEERING SWITCHES)
Volume control switch
яБм Press the тАЬ+тАЭ side to increase the volume.
The volume continues to increase while
the switch is being pressed.
яБм Press the тАЬ-тАЭ side to decrease the vol-
ume. The volume continues to decrease
while the switch is being pressed. тАЬ тАЭ
switch
яБ╡When in radio mode
яБм Press the тАЬтАЭ or тАЬтАЭ switch to change
the station up or down.
яБм Press the тАЬтАЭ or тАЬтАЭ switch to select the
preset station list.
яБ╡ When in media mode
яБм Press the тАЬтАЭ or тАЬтАЭ switch to skip to the
next or previous track/file.
яБм Press the тАЬтАЭ or тАЬтАЭ switch to change
the tab or album/folder.
яБм Press the тАЬтАЭ or тАЬтАЭ switch to scroll up
or down the items on the list screen.
Enter switch
яБ╡ When in radio mode
яБм Press the enter switch to return to the pre-
set screen.
яБ╡When in media mode
яБм Press the enter switch to return to the list
screen.
яБм While the list screen is being displayed,
the enter switch can be used to enter
selections.
Back switch
яБм Press the back switch to return to the pre-
vious screen.
тАЬMODE/HOLDтАЭ switch
яБм Press the тАЬMODE/HOLDтАЭ switch to select
an audio mode. Each press changes the
mode sequentially if the desired mode is
ready to use.
яБм To turn the audio/video system on, press
the тАЬMODE/HOLDтАЭ switch.
яБм Press and hold the тАЬMODE/HOLDтАЭ switch
to mute or pause the current operation.
Some parts of the audio system can be
adjusted using the switches on the
steering wheel.
No.Switch
Volume control switch
тАЬ тАЭ switch
Enter switch
Back switch
тАЬMODE/HOLDтАЭ switch
Page 289 of 346
289
1. TOYOTA PARKING ASSIST MONITOR
9
PERIPHERAL MONITORING SYSTEM
CAUTION
тЧПThe instructions given are only guide-
lines. When and how much to turn the
steering wheel will vary according to
traffic conditions, road surface condi-
tions, vehicle condition, etc. when park-
ing. It is necessary to be fully aware of
this before using the parking assist sys-
tem.
тЧП When parking, be sure to check that the
parking space will accommodate your
vehicle before maneuvering into it.
тЧП Do not use system in the following
cases:
тАв On icy or slick road surfaces, or in
snow
тАв When using tire chains
тАв When the trunk is not closed com-
pletely
тАв On roads that are not flat or straight, such as curves or slopes.
тЧП In low temperatures, the screen may
darken or the image may become faint.
The image could distort when the vehi-
cle is moving, or you may become
unable to see the image on the screen.
Be sure to visually check all around the
vehicle both directly and using the mir-
rors before proceeding.
тЧП If the tire sizes are changed, the position
of the guide lines displayed on the
screen may change.
тЧП The camera uses a special lens. The
distances between objects and pedestri-
ans that appear in the image displayed
on the screen will differ from the actual
distances. ( яВоP.307)
Page 294 of 346
294
1. TOYOTA PARKING ASSIST MONITOR
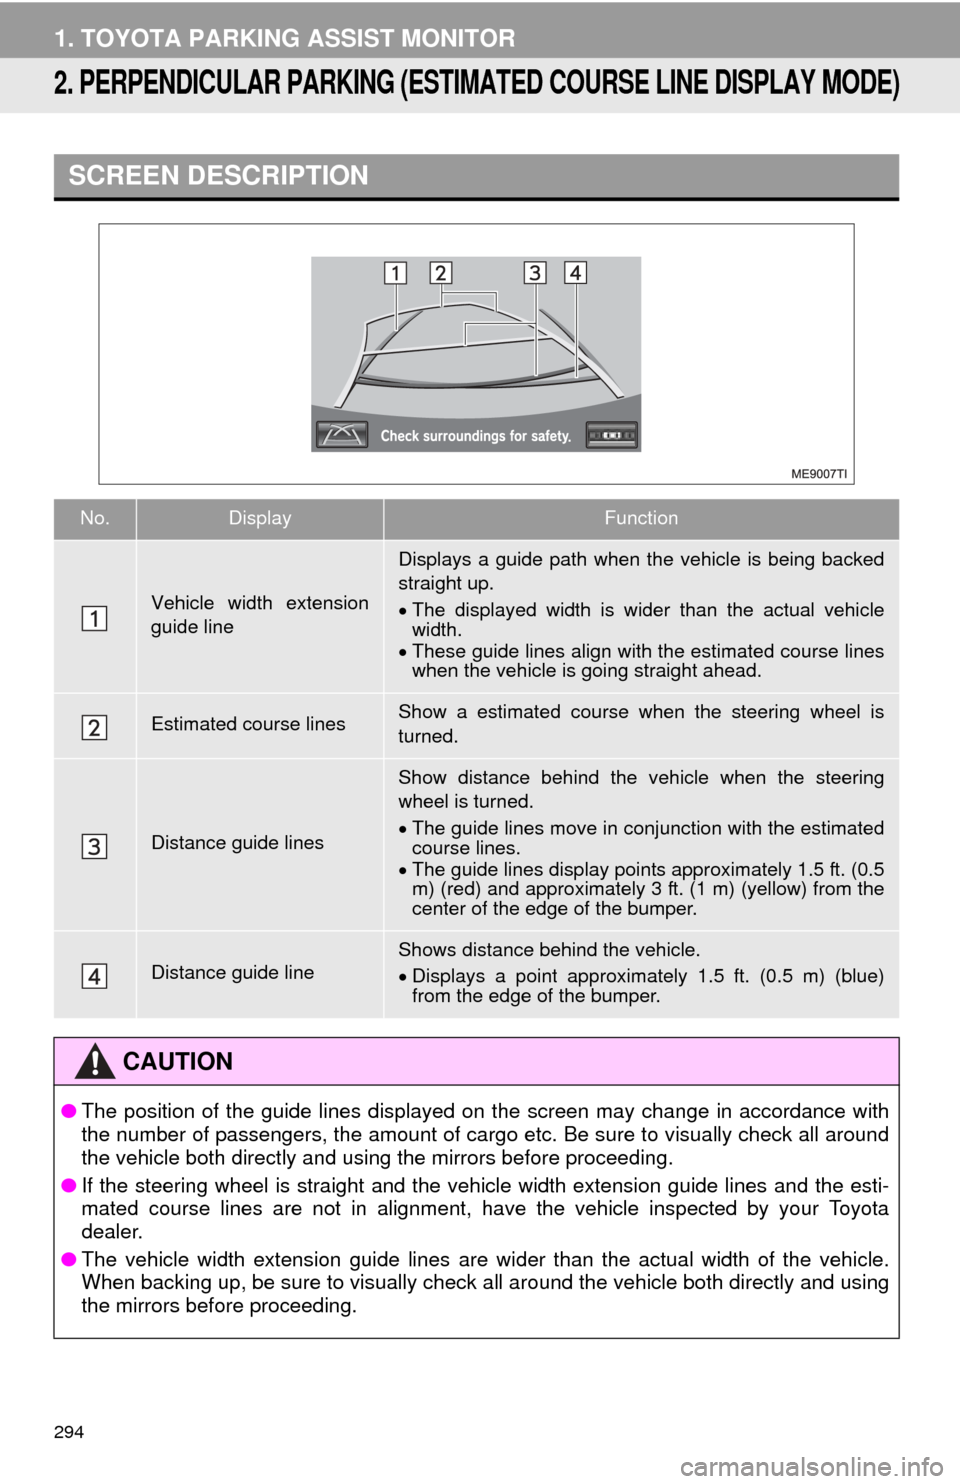
2. PERPENDICULAR PARKING (ESTIMAT ED COURSE LINE DISPLAY MODE)
SCREEN DESCRIPTION
No.DisplayFunction
Vehicle width extension
guide line
Displays a guide path when the vehicle is being backed
straight up.
яВ╖The displayed width is wider than the actual vehicle
width.
яВ╖ These guide lines align with the estimated course lines
when the vehicle is going straight ahead.
Estimated course linesShow a estimated course when the steering wheel is
turned.
Distance guide lines
Show distance behind the vehicle when the steering
wheel is turned.
яВ╖The guide lines move in conj unction with the estimated
course lines.
яВ╖ The guide lines display points approximately 1.5 ft. (0.5
m) (red) and approximately 3 ft. (1 m) (yellow) from the
center of the edge of the bumper.
Distance guide lineShows distance behind the vehicle.
яВ╖Displays a point approximately 1.5 ft. (0.5 m) (blue)
from the edge of the bumper.
CAUTION
тЧП The position of the guide lines displayed on the screen may change in accordance with
the number of passengers, the amount of cargo etc. Be sure to visually check all around
the vehicle both directly and using the mirrors before proceeding.
тЧП If the steering wheel is straight and the vehicle width extension guide lines and the esti-
mated course lines are not in alignment, have the vehicle inspected by your Toyota
dealer.
тЧП The vehicle width extension guide lines are wider than the actual width of the vehicle.
When backing up, be sure to visually check all around the vehicle both directly and using
the mirrors before proceeding.
Page 296 of 346
296
1. TOYOTA PARKING ASSIST MONITOR
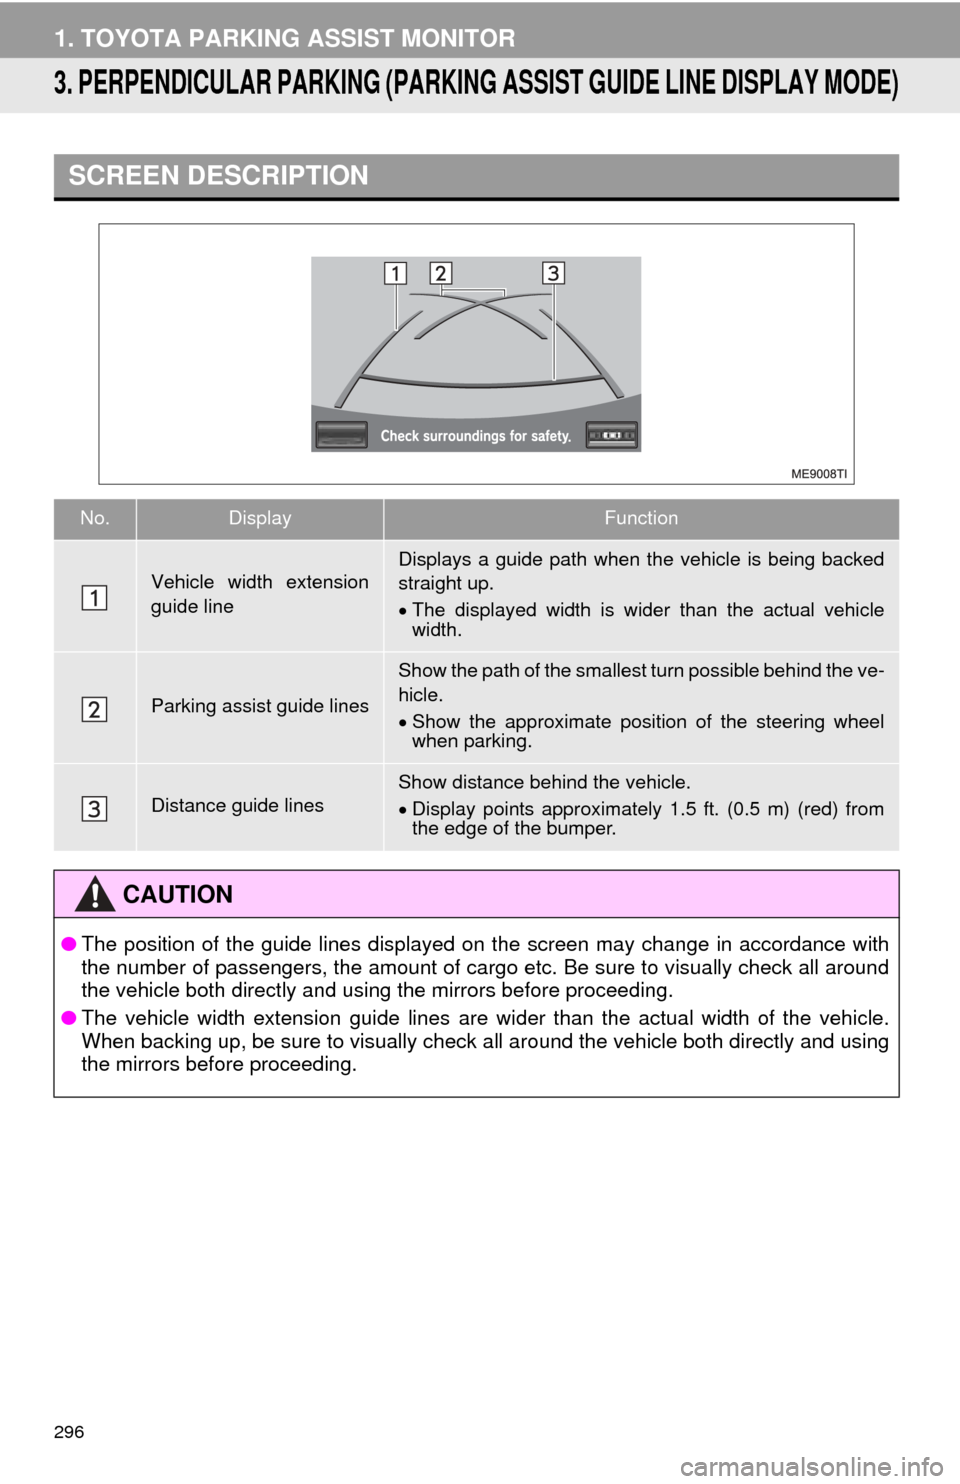
3. PERPENDICULAR PARKING (PARKING ASSIST GUIDE LINE DISPLAY MODE)
SCREEN DESCRIPTION
No.DisplayFunction
Vehicle width extension
guide lineDisplays a guide path when the vehicle is being backed
straight up.
яВ╖The displayed width is wider than the actual vehicle
width.
Parking assist guide lines
Show the path of the smallest turn possible behind the ve-
hicle.
яВ╖ Show the approximate position of the steering wheel
when parking.
Distance guide linesShow distance behind the vehicle.
яВ╖Display points approximately 1.5 ft. (0.5 m) (red) from
the edge of the bumper.
CAUTION
тЧП The position of the guide lines displayed on the screen may change in accordance with
the number of passengers, the amount of cargo etc. Be sure to visually check all around
the vehicle both directly and using the mirrors before proceeding.
тЧП The vehicle width extension guide lines are wider than the actual width of the vehicle.
When backing up, be sure to visually check all around the vehicle both directly and using
the mirrors before proceeding.