maintenance TOYOTA PROACE CITY 2020 Owners Manual
[x] Cancel search | Manufacturer: TOYOTA, Model Year: 2020, Model line: PROACE CITY, Model: TOYOTA PROACE CITY 2020Pages: 272, PDF Size: 61.18 MB
Page 1 of 272

Welcome
Thank you for choosing a Toyota Proace City.This document presents the key information and recommendations required for you to be able to explore your vehicle in complete safety. We strongly recommend familiarising yourself with this document and the Warranty and Maintenance Record.003C00470052004600580050004800510057country in which it was sold.The descriptions and illustrations are for guidance only.
0024005800570052005000520045004C004F004800560003equipment and accessories without having to update this guide.If ownership of your vehicle is transferred, please ensure this Han is passed on to the new owner.
Key
Safety warning
Additional information
Environmental protection feature
Left-hand drive vehicle
Right-hand drive vehicle
Location of the equipment / button described using a black area.
Key
This key allows you to identify the special features of your vehicle:
Va n
Crew cab
Page 3 of 272

3
Contents
Memorising speeds 128Active Safety Brake with Collision Risk Alert and Intelligent emergency braking assistance 128Active Lane Departure Warning System 131Blind Spot Monitoring System 134Active Blind Spot Monitoring System 136Distraction detection 136Parking sensors 137Reversing Camera 139Surround Rear Vision 141
7Practical information
Compatibility of fuels 144Refuelling 144Misfuel prevention (Diesel) 145Snow chains 146Towing device 147Overload indicator 149Energy economy mode 150Roof bars / Roof rack 150Bonnet 151Engine compartment 152
Checking levels 153Speed checks 155AdBlue® (Diesel engines) 157Free-wheeling 159Advice on care and maintenance 160
8In the event of a breakdown
Running out of fuel (Diesel) 162Tool kit 162
Temporary puncture repair kit 163Spare wheel 165Changing a bulb 169Changing a fuse 17412 V battery 176Towing 180
9Technical data
Dimensions 182Engine technical data and towed loads 187Identification markings 190
10Bluetooth® audio system
First steps 191Steering mounted controls 192Menus 193Radio 193DAB (Digital Audio Broadcasting) radio 194Media 195Telephone 198Frequently asked questions 201
11TOYOTA Connect Radio
First steps 204Steering mounted controls 205Menus 206Applications 207Radio 207DAB (Digital Audio Broadcasting) radio 209Media 209
Telephone 2 11
Settings 214Frequently asked questions 216
12TOYOTA Connect Nav
First steps 218Steering mounted controls 219Menus 219Voice commands 221Navigation 225Connected navigation 227Applications 230Radio 233DAB (Digital Audio Broadcasting) radio 234Media 235Telephone 236Settings 239Frequently asked questions 241
■Alphabetical index
Page 8 of 272

8
Eco mode
This mode optimises the heating and air conditioning functions to reduce fuel consumption.
Activation/Deactivation
► To activate or deactivate this mode, press this button.The indicator lamp is illuminated when the system is activated.
Eco-coaching
This function provides you with advice and information to help you adopt a more economical and environmentally friendly driving style.It takes into account multiple parameters, including braking optimisation, acceleration management, gear changes, tyre inflation and use of the heating/air conditioning systems.
Information displayed on the instrument panel
By selecting the "Eco-coaching" tab of the central display in the matrix
instrument panel, you can assess your driving in real time with the braking and acceleration indicator.
Information displayed on the touch screen
The four tabs - "Trip", "Air conditioning", "Maintenance" and "Driving" - provide tips to help you optimise your driving style.Information relating to the driving style may also be displayed in real time.The "Report" tab assesses your driving style on a daily basis and gives an overall score for the week.You can reset this report at any time by pressing "Reset".With TOYOTA Connect Radio► In the "Applications" menu, select "Eco-coaching".With TOYOTA Connect Nav► In the "Applications" menu, then the "Vehicle Apps" tab, select "Eco-coaching".
Page 58 of 272

58
NOTIC E
The protective cover may be left in place after use.
NOTIC E
Regularly check the condition of the protective cover.
When signs of wear and tear appear, contact a TOYOTA dealer to have it replaced by a protective cover that meets the specifications and qualities required by TOYOTA and your vehicle.
Heating and Ventilation
Advice
NOTIC E
Using the ventilation and air conditioning system► To ensure that air is distributed evenly, keep the external air intake grilles at the base of the windscreen, the nozzles, the vents, the air outlets and the air extractor in the boot
free from obstructions.
► Do not cover the sunshine sensor located on the dashboard; this sensor is used to regulate the automatic air conditioning system.► Operate the air conditioning system for at least 5 to 10 minutes once or twice a month to keep it in perfect working order.► If the system does not produce cold air, switch it off and contact a TOYOTA dealer or a qualified workshop.When towing the maximum load on a steep gradient in high temperatures, switching off the air conditioning increases the available engine power, enhancing the towing capacity.
WARNI NG
Avoid driving for too long with the ventilation off or with prolonged operation of interior air recirculation. Risk of misting and deterioration of the air quality!
If the interior temperature is very high after the vehicle has stood for a long time in the sunshine, air the passenger compartment for a few moments.
Put the air flow control at a setting high enough to quickly change the air in the passenger compartment.
NOTIC E
Condensation created by the air conditioning results in a discharge of water underneath the vehicle. This is perfectly normal.
NOTIC E
Servicing the ventilation and air
conditioning system► Ensure that the passenger compartment filter is in good condition and have the filter elements replaced regularly.We recommend using a composite passenger compartment filter. Thanks to its special active additive, this type of filter helps to purify the air breathed by the occupants and keep the passenger compartment clean (by reducing allergic symptoms, unpleasant odours and greasy deposits).► To ensure correct operation of the air conditioning system, have it checked according to the recommendations in the Maintenance and Warranty Guide.
Contains R134A fluorinated greenhouse gasesDepending on version and country of sale, the air conditioning system may contain R134A fluorinated greenhouse gases.
Page 73 of 272
.Wash-wipe (set duration).
Reverse gear
When reverse gear is engaged, the rear wiper will come into op")
73
Lighting and visibility
4
Off.
Intermittent wiping (proportional to the speed of the vehicle).Wash-wipe (set duration).
Reverse gear
When reverse gear is engaged, the rear wiper will come into operation automatically if the windscreen wipers are operating.
Activation/Deactivation
Activation or deactivation is set via the vehicle configuration menu.
NOTIC E
This system is activated by default.
WARNI NG
If a significant accumulation of snow or ice is present, or when using a bicycle carrier on the boot, deactivate the automatic rear wiper.
Special position of the
windscreen wipers
This maintenance position is used while cleaning or replacing the wiper blades. It can also be useful, in winter (ice, snow), to release the wiper blades from the windscreen.
NOTIC E
To maintain the effectiveness of the flat wiper blades, it is advisable to:– handle them with care,– clean them regularly using soapy water,– avoid using them to retain cardboard on the windscreen,– replace them at the first signs of wear.
Before removing a windscreen wiper blade
► Actuating the wiper control lever within one minute of switching off the ignition will position the wiper blades vertically.► Proceed with the desired operation or replace the wiper blades.
After refitting a windscreen wiper blade
► To return the wiper blades to their initial position, switch on the ignition and operate the wiper control lever.
Changing a wiper blade
Removing/refitting at the front
► Carry out these wiper blade replacement operations from the driver's side.► Starting with the wiper blade farthest from
you, hold each arm by the rigid section and raise it as far as possible.
Page 84 of 272
 warning lamp
With individual front seats
On switching on the ignition, this warning lamp
comes on if a seat belt is not fastened or is unfastened.At speeds above approximately 20")
84
Seat belt(s) warning lamp
With individual front seats
On switching on the ignition, this warning lamp
comes on if a seat belt is not fastened or is unfastened.At speeds above approximately 20 km/h (12 mph), the warning lamp flashes for 2 minutes, accompanied by an audible signal.Once these 2 minutes have elapsed, the warning lamp remains on until the driver and/or passenger fasten their seat belt.
With two-seat front bench seat (and driver’s seat)
On switching on the ignition, this warning lamp comes on if the driver’s seat belt is not fastened or is unfastened.On switching on the ignition, this warning lamp comes on if a passenger seat belt is unfastened.At speeds above approximately 20 km/h (12 mph), the warning lamp flashes for 2 minutes, accompanied by an audible signal.Once these 2 minutes have elapsed, the warning lamp remains on until the driver fastens their seat belt.
Advice
WARNI NG
The driver must ensure that passengers use the seat belts correctly and that they are all fastened before setting off.Wherever you are seated in the vehicle, always fasten your seat belt, even for short journeys.
Do not interchange the seat belt buckles, as they will not fulfil their role fully.Before and after use, ensure that the seat belt is reeled in correctly.After folding or moving a seat or rear bench seat, ensure that the seat belt is positioned and reeled in correctly.
WARNI NG
InstallationThe lower part of the strap must be positioned as low as possible on the pelvis.The upper part must be positioned in the hollow of the shoulder.In order to be effective, a seat belt must:– be tightened as close to the body as possible,– be pulled in front of you with a smooth
movement, checking that it does not twist,– be used to restrain only one person,
– not show any signs of cuts or fraying,– not be converted or modified in order not to affect its performance.
WARNI NG
Recommendations for childrenUse a suitable child seat if the passenger is less than 12 years old or shorter than one and a half metres (4 ft 11").
Never use the same seat belt to secure more than one child.Never carry a child on your lap.For more information on Child seats, refer to the corresponding section.
WARNI NG
MaintenanceIn accordance with current safety regulations, for all repairs on your vehicle's seat belts, go to a qualified workshop with the skills and equipment needed, which a TOYOTA dealer is able to provide.Have the seat belts checked regularly by a TOYOTA dealer or a qualified workshop, particularly if the straps show signs of damage.
Clean the seat belt straps with soapy water or a textile cleaning product, sold by TOYOTA dealers.
Page 107 of 272

107
Driving
6
selector in position P to allow the engine to be started.If position N is selected inadvertently while driving, allow the engine to return to idle, then select position D to accelerate.
WARNI NG
When the engine is running at idle with the brakes released, if position R, D or M is
selected, the vehicle moves even without the accelerator being pressed.Never leave children unsupervised inside the vehicle.As a safety measure, never leave the vehicle without taking your key or remote control with you, even for a short time.When carrying out maintenance with the engine running, apply the parking brake and select position P.
WARNI NG
With an automatic gearbox, never try to start the engine by pushing the vehicle.
Automatic operation
► Select position D for automatic
changing of the gears.The gearbox then operates in auto-adaptive mode, without any intervention on the part of the
driver. It continuously selects the most suitable gear according to the driving style, the road profile and the load in the vehicle.For maximum acceleration without touching the selector, press the accelerator fully down (kick-down). The gearbox changes down automatically or holds the gear selected until the maximum engine speed is reached.When braking, the gearbox changes down automatically to provide effective engine braking.If the accelerator pedal is sharply released, the gearbox will not shift to a higher gear for safety reasons.
WARNI NG
Never select position N while the vehicle is moving.Never select positions P or R unless the vehicle is completely stationary.
Temporary manual control
of gear changes
You can temporarily assume control of gear changing using the "+" et "-” steering-mounted controls. The gear change request will be executed if the engine speed permits. This function allows you to anticipate certain situations, such as overtaking another vehicle or approaching a bend in the road.
After a few seconds with no inputs via the control paddles, the gearbox reverts to automatic operation.
Creeping (moving without
using the accelerator)
This function facilitates manoeuvring of the vehicle at low speed (when parking, in traffic jams, etc.).When the engine is at idle, with the parking brake released and gear position D, M or R selected, the vehicle begins to creep forward as soon as you take your foot off the brake pedal (even without pressing the accelerator).
WARNI NG
As a safety precaution, never leave the vehicle with the engine running and the doors closed.
Manual operation
► With the selector in position D, press button M to enable 6-speed sequential gear changing.The indicator lamp for the button comes on.► Operate the "+" or "-" steering mounted controls. M appears and the engaged gears are shown in succession on the instrument panel.
Page 116 of 272
11 6
NOTIC E
MaintenanceClean the bumpers and door mirrors and the field of vision of the cameras regularly.When washing your vehicle at high pressure, direct the spray from at least 30 cm (0 ft 11") away from the sensors and cameras.
WARNI NG
MatsThe use of mats not approved by TOYOTA may interfere with the operation of the speed limiter or cruise control.To avoid any risk of jamming the pedals:► ensure that the mat is secured correctly,► never fit one mat on top of another.
NOTIC E
Units of speed
Ensure that the units of speed displayed on the instrument panel (km/h or mph) are those for the country you are driving in.If this is not the case, when the vehicle is stationary, set the display to the required units of speed so that it complies with what is authorised locally.In case of doubt, contact a TOYOTA dealer or a qualified workshop.
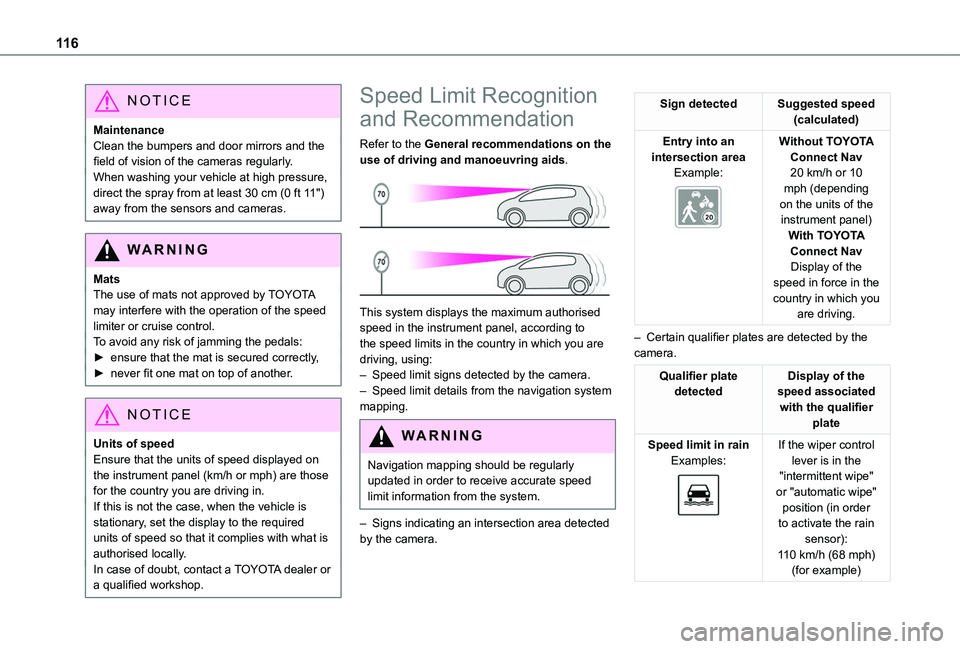
Speed Limit Recognition
and Recommendation
Refer to the General recommendations on the use of driving and manoeuvring aids.
This system displays the maximum authorised speed in the instrument panel, according to the speed limits in the country in which you are driving, using:– Speed limit signs detected by the camera.– Speed limit details from the navigation system mapping.
WARNI NG
Navigation mapping should be regularly updated in order to receive accurate speed limit information from the system.
– Signs indicating an intersection area detected by the camera.
Sign detectedSuggested speed (calculated)
Entry into an intersection areaExample:
Without TOYOTA Connect Nav20 km/h or 10 mph (depending on the units of the instrument panel)With TOYOTA
Connect NavDisplay of the speed in force in the country in which you are driving.
– Certain qualifier plates are detected by the camera.
Qualifier plate detectedDisplay of the speed associated with the qualifier plate
Speed limit in rainExamples:
If the wiper control lever is in the "intermittent wipe" or "automatic wipe" position (in order to activate the rain sensor):
110 km/h (68 mph) (for example)
Page 141 of 272

141
Driving
6
Maintenance
recommendations
In bad or wintry weather, ensure that the camera is not covered by mud, frost or snow.Check the cleanliness of the camera lens regularly.If necessary, clean the camera with a soft, dry cloth.When washing the vehicle using a high-pressure jet, keep the spray directed at least 30 cm (0 ft 11") away from the camera.
Surround Rear Vision
Refer to the General recommendations on the use of driving and manoeuvring aids.With the ignition on, in order to improve visibility of the passenger side blind spot and the rear of the vehicle, this system uses two cameras to display the views of the vehicle’s close surroundings on the reproduction screen (panel van or fitted with a solid partition).
This system has three sub-functions:
– Passenger side view: shows the area at the passenger side of the vehicle.The orange line 1 represents a distance of 5 m (16 ft 4") from the rear bumper.
– Surveillance rear view: shows a long-distance view of the area at the rear.The orange line 1 represents a distance of 5 m (16 ft 4") from the rear bumper.
– Visual reversing assistance: shows a view of the area close to the rear of the vehicle.The blue dimension lines 1 represent the width of your vehicle with the mirrors unfolded.The red line 2 represents a distance of 30 cm (0 ft 11") from the rear bumper; the two green lines 3 and 4 represent 1 m (3 ft 3") and 2 m (6 ft 6"), respectively.The blue curves 5 appear successively; they are based on the position of the steering wheel and represent the turning circle radius of your vehicle.The orange dashes 6 represent the opening radii of the rear doors.
Page 143 of 272
 and not work i")
143
Driving
6
NOTIC E
The area around the vehicle is shown by the monitoring rear view and the passenger side view only.
Operating limits
The system may be disrupted (or even damaged) and not work in the following situations:– Installation of a bicycle carrier on the tailgate or side-hinged door (depending on version).– Attachment of a trailer to the towball.– Driving with a door open.
WARNI NG
Please note, the cameras must not be obscured (by a sticker, a bicycle carrier, etc.).
NOTIC E
The field of vision of the rear camera (surveillance rear view and visual reversing aid) may vary depending on the load in the vehicle.
NOTIC E
If the side-hinged door is opened during use of the surveillance rear view or the visual aid for reversing, in forward gear or reverse gear, the output screen becomes grey.If the front passenger door is opened during use of the passenger side view, in forward gear or reverse gear, the output screen becomes grey.
NOTIC E
If a trailer is attached to the towball, when reverse gear is engaged the visual reversing aid will no longer work until the trailer is disconnected. The surveillance rear view becomes the default view.
NOTIC E
If the system develops a malfunction, go to a TOYOTA dealer to avoid any safety problems.
Maintenance
recommendations
In bad or wintry weather, ensure that the sensors and cameras are not covered with mud, ice or snow.Regularly inspect the camera lenses to check that they are clean.If necessary, clean the cameras with a soft, dry cloth.