clock YAMAHA XJ6-N 2011 Owners Manual
[x] Cancel search | Manufacturer: YAMAHA, Model Year: 2011, Model line: XJ6-N, Model: YAMAHA XJ6-N 2011Pages: 104, PDF Size: 2.86 MB
Page 23 of 104
INSTRUMENT AND CONTROL FUNCTIONS
3-8
3
EAU46765
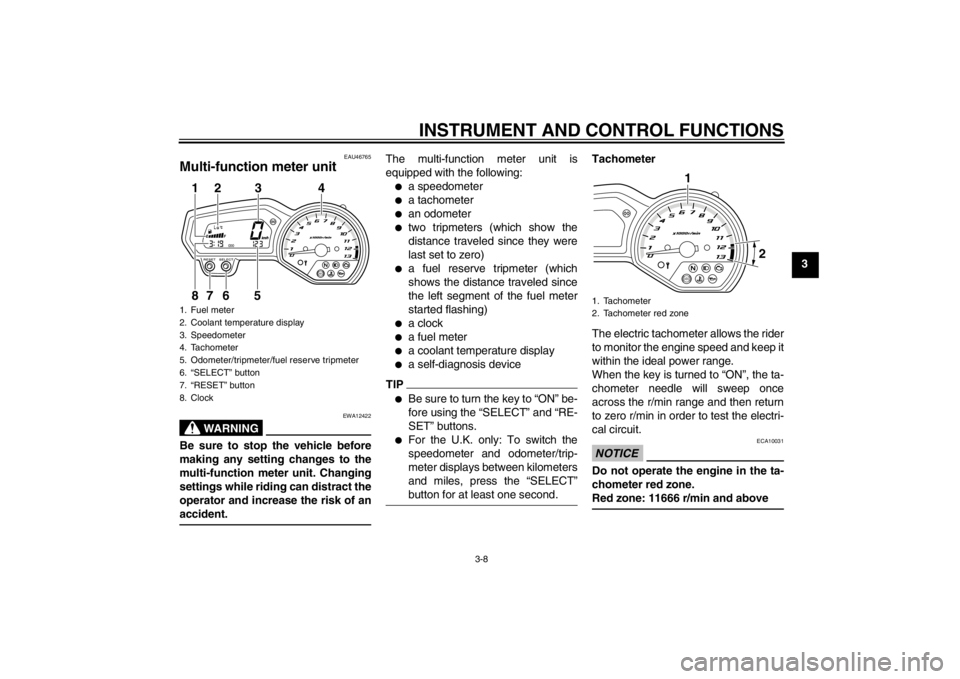
Multi-function meter unit
WARNING
EWA12422
Be sure to stop the vehicle before
making any setting changes to the
multi-function meter unit. Changing
settings while riding can distract the
operator and increase the risk of an
accident.
The multi-function meter unit is
equipped with the following:●
a speedometer
●
a tachometer
●
an odometer
●
two tripmeters (which show the
distance traveled since they were
last set to zero)
●
a fuel reserve tripmeter (which
shows the distance traveled since
the left segment of the fuel meter
started flashing)
●
a clock
●
a fuel meter
●
a coolant temperature display
●
a self-diagnosis device
TIP●
Be sure to turn the key to “ON” be-
fore using the “SELECT” and “RE-
SET” buttons.
●
For the U.K. only: To switch the
speedometer and odometer/trip-
meter displays between kilometers
and miles, press the “SELECT”
button for at least one second.
Tachometer
The electric tachometer allows the rider
to monitor the engine speed and keep it
within the ideal power range.
When the key is turned to “ON”, the ta-
chometer needle will sweep once
across the r/min range and then return
to zero r/min in order to test the electri-
cal circuit.NOTICE
ECA10031
Do not operate the engine in the ta-
chometer red zone.
Red zone: 11666 r/min and above
1. Fuel meter
2. Coolant temperature display
3. Speedometer
4. Tachometer
5. Odometer/tripmeter/fuel reserve tripmeter
6. “SELECT” button
7. “RESET” button
8. Clock
ABS
1
8
2
3
4
7
6
5
1. Tachometer
2. Tachometer red zone
ABS1 2
U20SE3E0.book Page 8 Monday, April 23, 2012 10:47 AM
Page 24 of 104
INSTRUMENT AND CONTROL FUNCTIONS
3-9
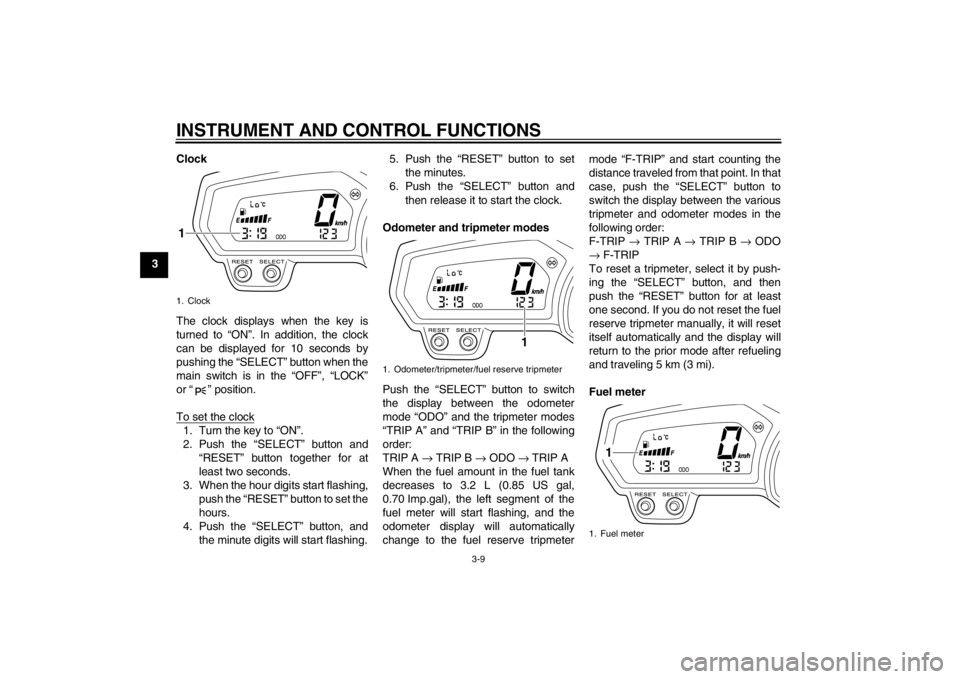
3Clock
The clock displays when the key is
turned to “ON”. In addition, the clock
can be displayed for 10 seconds by
pushing the “SELECT” button when the
main switch is in the “OFF”, “LOCK”
or “ ” position.
To set the clock
1. Turn the key to “ON”.
2. Push the “SELECT” button and
“RESET” button together for at
least two seconds.
3. When the hour digits start flashing, push the “RESET” button to set the
hours.
4. Push the “SELECT” button, and the minute digits will start flashing. 5. Push the “RESET” button to set
the minutes.
6. Push the “SELECT” button and then release it to start the clock.
Odometer and tripmeter modes
Push the “SELECT” button to switch
the display between the odometer
mode “ODO” and the tripmeter modes
“TRIP A” and “TRIP B” in the following
order:
TRIP A → TRIP B → ODO → TRIP A
When the fuel amount in the fuel tank
decreases to 3.2 L (0.85 US gal,
0.70 Imp.gal), the left segment of the
fuel meter will start flashing, and the
odometer display will automatically
change to the fuel reserve tripmeter mode “F-TRIP” and start counting the
distance traveled from that point. In that
case, push the “SELECT” button to
switch the display between the various
tripmeter and odometer modes in the
following order:
F-TRIP
→ TRIP A → TRIP B → ODO
→ F-TRIP
To reset a tripmeter, select it by push-
ing the “SELECT” button, and then
push the “RESET” button for at least
one second. If you do not reset the fuel
reserve tripmeter manually, it will reset
itself automatically and the display will
return to the prior mode after refueling
and traveling 5 km (3 mi).
Fuel meter1. Clock1
1. Odometer/tripmeter/fuel reserve tripmeter
1
1. Fuel meter
1
U20SE3E0.book Page 9 Monday, April 23, 2012 10:47 AM
Page 30 of 104
INSTRUMENT AND CONTROL FUNCTIONS
3-15
3wheel hubs may be damaged, result-
ing in improper performance of the
ABS system.
EAU13074
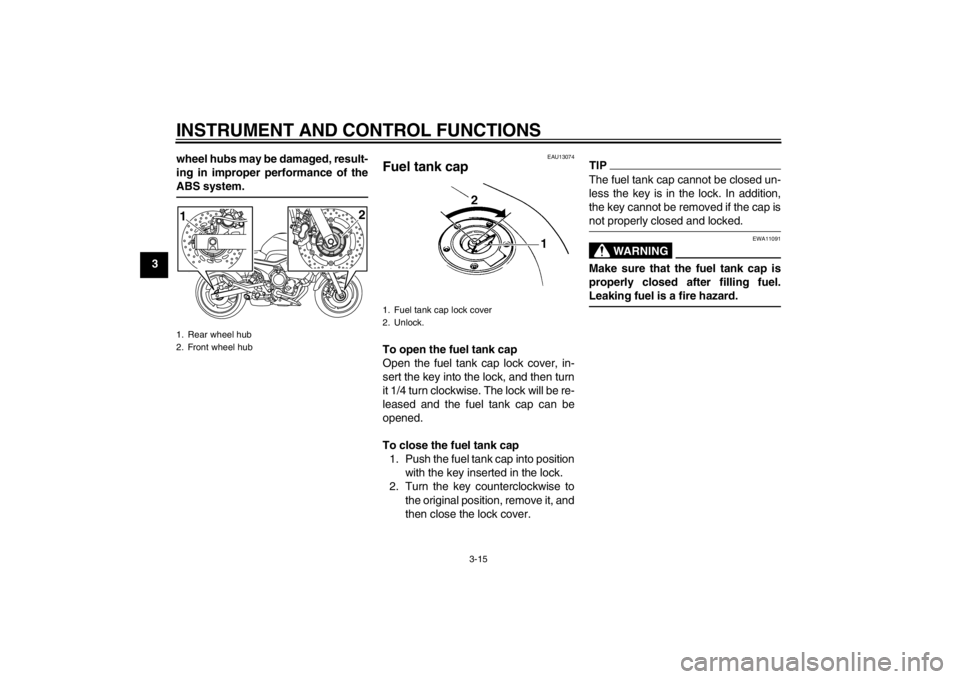
Fuel tank cap To open the fuel tank cap
Open the fuel tank cap lock cover, in-
sert the key into the lock, and then turn
it 1/4 turn clockwise. The lock will be re-
leased and the fuel tank cap can be
opened.
To close the fuel tank cap
1. Push the fuel tank cap into position with the key inserted in the lock.
2. Turn the key counterclockwise to the original position, remove it, and
then close the lock cover.
TIPThe fuel tank cap cannot be closed un-
less the key is in the lock. In addition,
the key cannot be removed if the cap is
not properly closed and locked.
WARNING
EWA11091
Make sure that the fuel tank cap is
properly closed after filling fuel.
Leaking fuel is a fire hazard.
1. Rear wheel hub
2. Front wheel hub1
2
1. Fuel tank cap lock cover
2. Unlock.
U20SE3E0.book Page 15 Monday, April 23, 2012 10:47 AM
Page 33 of 104
INSTRUMENT AND CONTROL FUNCTIONS
3-18
3
EAU32980
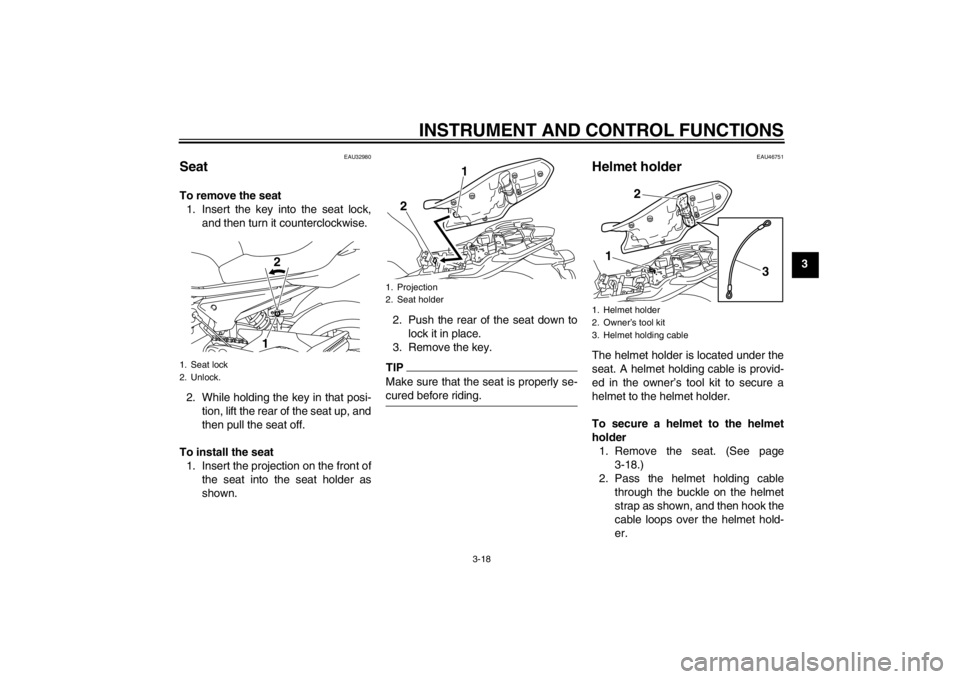
Seat To remove the seat1. Insert the key into the seat lock, and then turn it counterclockwise.
2. While holding the key in that posi- tion, lift the rear of the seat up, and
then pull the seat off.
To install the seat 1. Insert the projection on the front of the seat into the seat holder as
shown. 2. Push the rear of the seat down to
lock it in place.
3. Remove the key.
TIPMake sure that the seat is properly se-
cured before riding.
EAU46751
Helmet holder The helmet holder is located under the
seat. A helmet holding cable is provid-
ed in the owner’s tool kit to secure a
helmet to the helmet holder.
To secure a helmet to the helmet
holder 1. Remove the seat. (See page 3-18.)
2. Pass the helmet holding cable through the buckle on the helmet
strap as shown, and then hook the
cable loops over the helmet hold-
er.
1. Seat lock
2. Unlock.
12
1. Projection
2. Seat holder
1
2
1. Helmet holder
2. Owner’s tool kit
3. Helmet holding cable
2
3
1
U20SE3E0.book Page 18 Monday, April 23, 2012 10:47 AM
Page 79 of 104
![YAMAHA XJ6-N 2011 Owners Manual PERIODIC MAINTENANCE AND ADJUSTMENT
6-34
6
is turned to “OFF”, then con-
nect the positive lead before
connecting the negative lead.
[ECA16840]
4. After installation, make sure that
the battery le YAMAHA XJ6-N 2011 Owners Manual PERIODIC MAINTENANCE AND ADJUSTMENT
6-34
6
is turned to “OFF”, then con-
nect the positive lead before
connecting the negative lead.
[ECA16840]
4. After installation, make sure that
the battery le](/img/51/52587/w960_52587-78.png)
PERIODIC MAINTENANCE AND ADJUSTMENT
6-34
6
is turned to “OFF”, then con-
nect the positive lead before
connecting the negative lead.
[ECA16840]
4. After installation, make sure that
the battery leads are properly con-
nected to the battery terminals.NOTICE
ECA16530
Always keep the battery charged.
Storing a discharged battery can
cause permanent battery damage.
EAU47172
Replacing the fuses The main fuse and the fuse boxes,
which contain the fuses for the individu-
al circuits, are located under the seat.
(See page 3-18.)TIPTo access the main fuse, remove the
starter relay cover as shown.XJ6N XJ6N1. Starter relay cover
2. Main fuse
3. Spare main fuse
4. Fuse box
2
4
3
1
1. Taillight fuse
2. Spare fuse
3. Headlight fuse
4. Ignition fuse
5. Signaling system fuse
6. Backup fuse (for clock and immobilizer sys-
tem)
7. Fuel injection system fuse
8. Radiator fan fuse
1 2
3
4
5
6
7
8
U20SE3E0.book Page 34 Monday, April 23, 2012 10:47 AM
Page 80 of 104
PERIODIC MAINTENANCE AND ADJUSTMENT
6-35
6XJ6NA XJ6NA
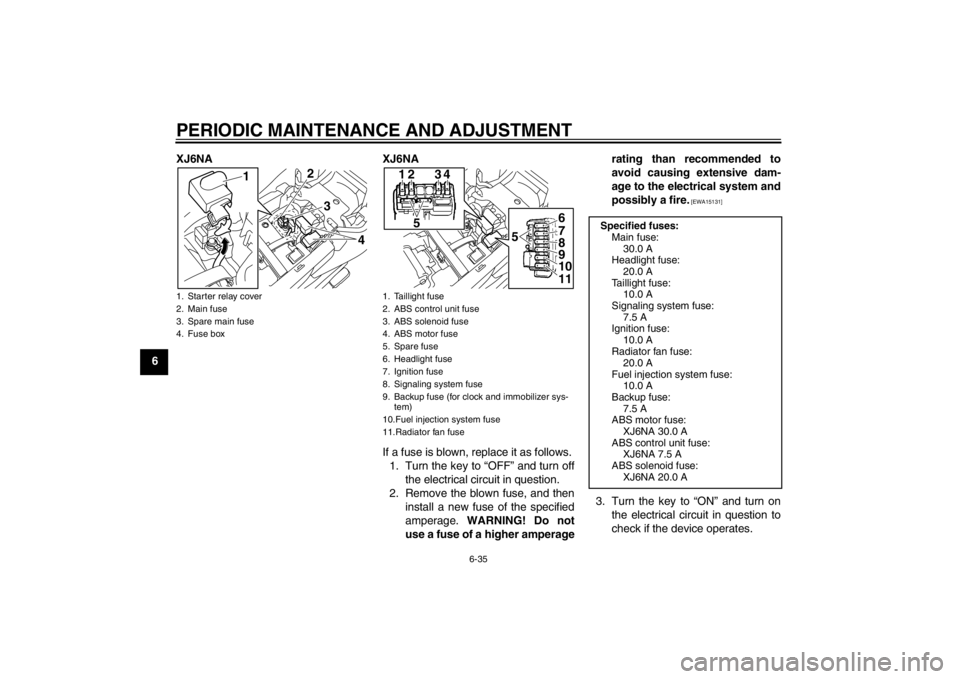
If a fuse is blown, replace it as follows.1. Turn the key to “OFF” and turn off the electrical circuit in question.
2. Remove the blown fuse, and then install a new fuse of the specified
amperage. WARNING! Do not
use a fuse of a higher amperage rating than recommended to
avoid causing extensive dam-
age to the electrical system and
possibly a fire.
[EWA15131]
3. Turn the key to “ON” and turn on
the electrical circuit in question to
check if the device operates.
1. Starter relay cover
2. Main fuse
3. Spare main fuse
4. Fuse box
2
4
3
1
1. Taillight fuse
2. ABS control unit fuse
3. ABS solenoid fuse
4. ABS motor fuse
5. Spare fuse
6. Headlight fuse
7. Ignition fuse
8. Signaling system fuse
9. Backup fuse (for clock and immobilizer sys-
tem)
10.Fuel injection system fuse
11.Radiator fan fuse
1
5 56
7
8
9
10
11
234
Specified fuses:
Main fuse:30.0 A
Headlight fuse:
20.0 A
Taillight fuse: 10.0 A
Signaling system fuse: 7.5 A
Ignition fuse:
10.0 A
Radiator fan fuse: 20.0 A
Fuel injection system fuse: 10.0 A
Backup fuse:
7.5 A
ABS motor fuse: XJ6NA 30.0 A
ABS control unit fuse: XJ6NA 7.5 A
ABS solenoid fuse:
XJ6NA 20.0 A
U20SE3E0.book Page 35 Monday, April 23, 2012 10:47 AM
Page 83 of 104
PERIODIC MAINTENANCE AND ADJUSTMENT
6-38
6
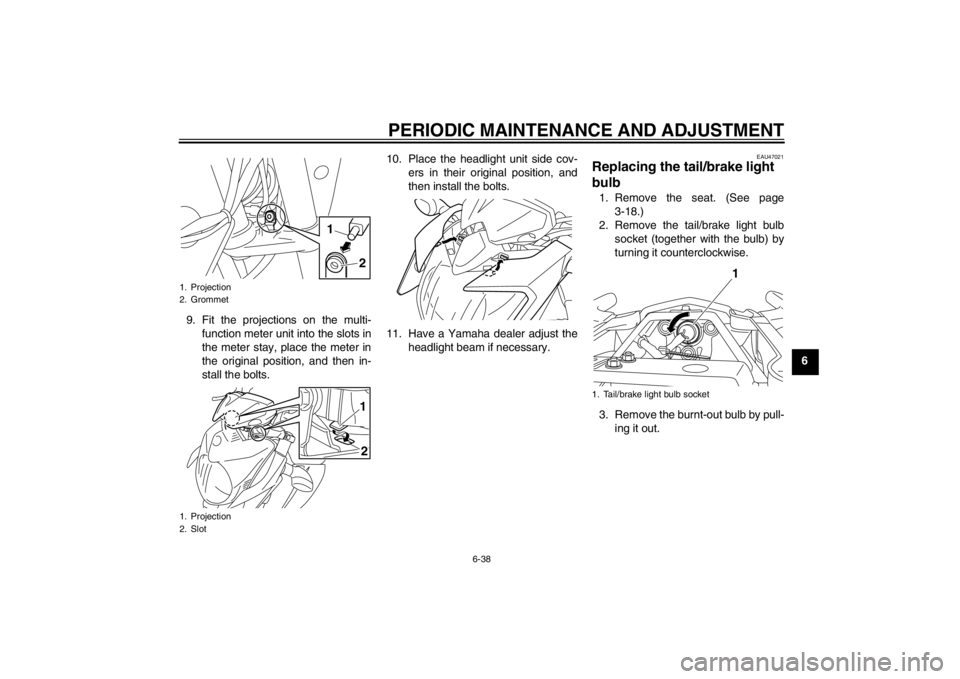
9. Fit the projections on the multi-
function meter unit into the slots in
the meter stay, place the meter in
the original position, and then in-
stall the bolts. 10. Place the headlight unit side cov-
ers in their original position, and
then install the bolts.
11. Have a Yamaha dealer adjust the headlight beam if necessary.
EAU47021
Replacing the tail/brake light
bulb 1. Remove the seat. (See page3-18.)
2. Remove the tail/brake light bulb socket (together with the bulb) by
turning it counterclockwise.
3. Remove the burnt-out bulb by pull- ing it out.
1. Projection
2. Grommet
1. Projection
2. Slot
2
1
12
1. Tail/brake light bulb socket
1
U20SE3E0.book Page 38 Monday, April 23, 2012 10:47 AM
Page 84 of 104
PERIODIC MAINTENANCE AND ADJUSTMENT
6-39
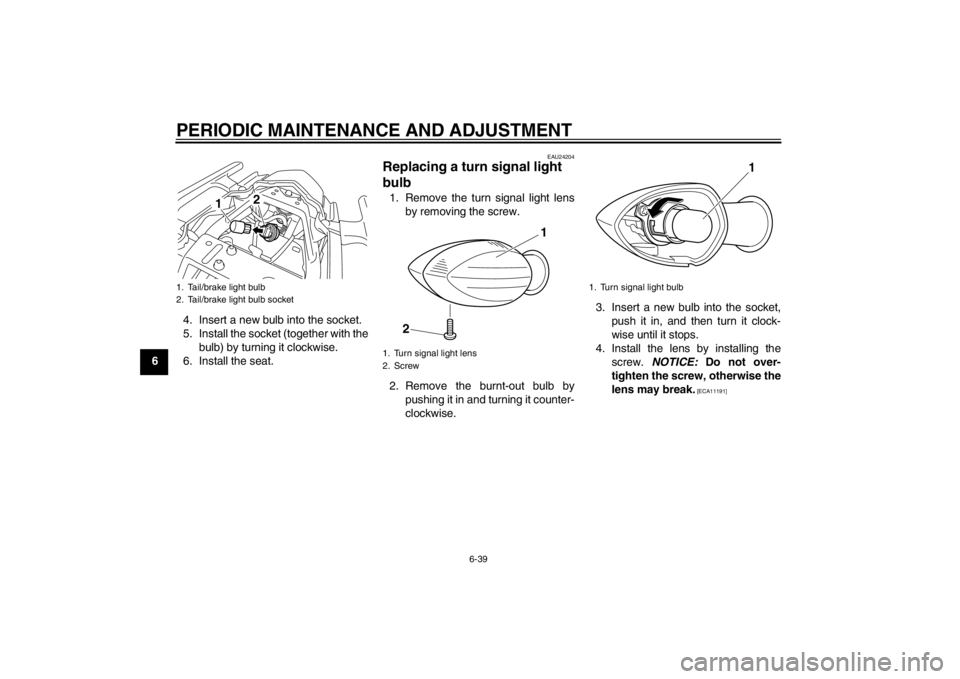
64. Insert a new bulb into the socket.
5. Install the socket (together with the
bulb) by turning it clockwise.
6. Install the seat.
EAU24204
Replacing a turn signal light
bulb 1. Remove the turn signal light lens by removing the screw.
2. Remove the burnt-out bulb by pushing it in and turning it counter-
clockwise. 3. Insert a new bulb into the socket,
push it in, and then turn it clock-
wise until it stops.
4. Install the lens by installing the screw. NOTICE: Do not over-
tighten the screw, otherwise the
lens may break.
[ECA11191]
1. Tail/brake light bulb
2. Tail/brake light bulb socket
2
1
1. Turn signal light lens
2. Screw
1
2
1. Turn signal light bulb
1
U20SE3E0.book Page 39 Monday, April 23, 2012 10:47 AM
Page 85 of 104
PERIODIC MAINTENANCE AND ADJUSTMENT
6-40
6
EAU24313
Replacing the license plate
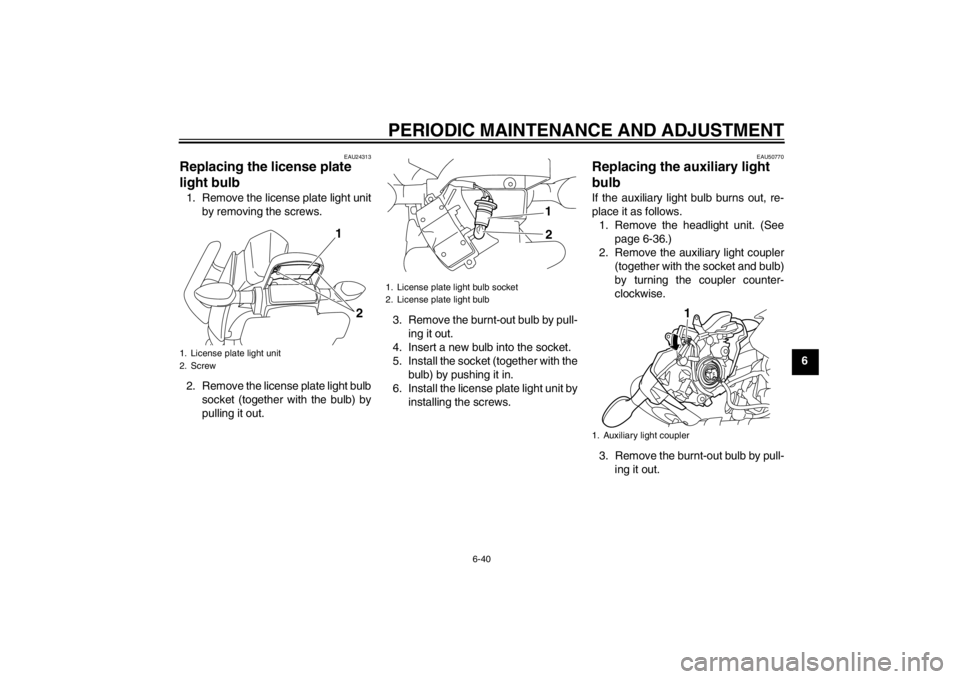
light bulb 1. Remove the license plate light unitby removing the screws.
2. Remove the license plate light bulb socket (together with the bulb) by
pulling it out. 3. Remove the burnt-out bulb by pull-
ing it out.
4. Insert a new bulb into the socket.
5. Install the socket (together with the bulb) by pushing it in.
6. Install the license plate light unit by installing the screws.
EAU50770
Replacing the auxiliary light
bulb If the auxiliary light bulb burns out, re-
place it as follows.1. Remove the headlight unit. (See page 6-36.)
2. Remove the auxiliary light coupler (together with the socket and bulb)
by turning the coupler counter-
clockwise.
3. Remove the burnt-out bulb by pull- ing it out.
1. License plate light unit
2. Screw
2
1
1. License plate light bulb socket
2. License plate light bulb
1
2
1. Auxiliary light coupler
1
U20SE3E0.book Page 40 Monday, April 23, 2012 10:47 AM
Page 86 of 104
PERIODIC MAINTENANCE AND ADJUSTMENT
6-41
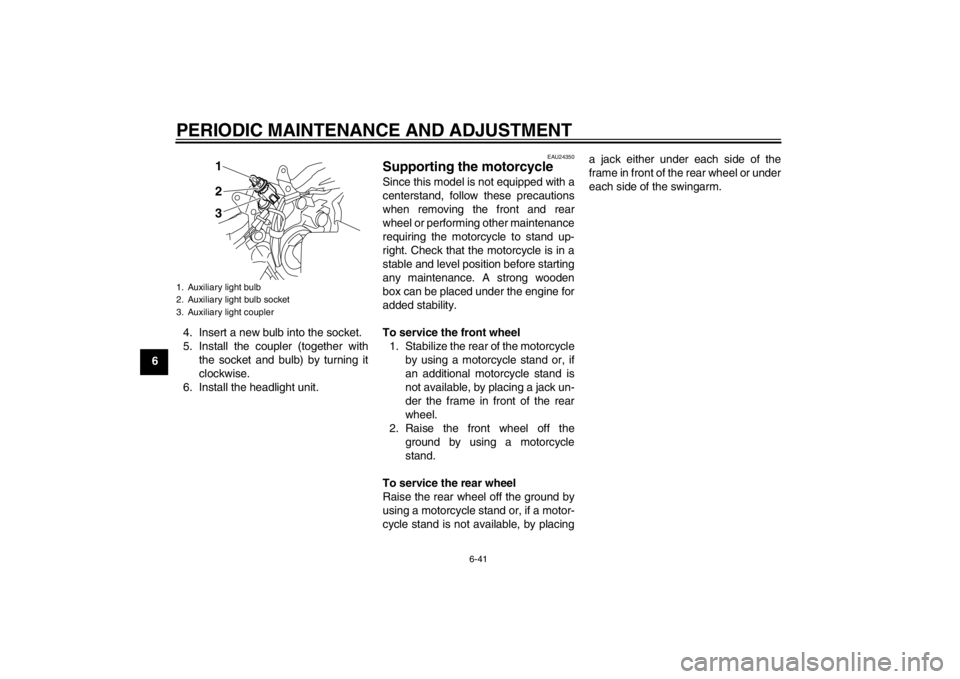
64. Insert a new bulb into the socket.
5. Install the coupler (together with
the socket and bulb) by turning it
clockwise.
6. Install the headlight unit.
EAU24350
Supporting the motorcycle Since this model is not equipped with a
centerstand, follow these precautions
when removing the front and rear
wheel or performing other maintenance
requiring the motorcycle to stand up-
right. Check that the motorcycle is in a
stable and level position before starting
any maintenance. A strong wooden
box can be placed under the engine for
added stability.
To service the front wheel 1. Stabilize the rear of the motorcycle by using a motorcycle stand or, if
an additional motorcycle stand is
not available, by placing a jack un-
der the frame in front of the rear
wheel.
2. Raise the front wheel off the ground by using a motorcycle
stand.
To service the rear wheel
Raise the rear wheel off the ground by
using a motorcycle stand or, if a motor-
cycle stand is not available, by placing a jack either under each side of the
frame in front of the rear wheel or under
each side of the swingarm.
1. Auxiliary light bulb
2. Auxiliary light bulb socket
3. Auxiliary light coupler
123
U20SE3E0.book Page 41 Monday, April 23, 2012 10:47 AM