start stop button Abarth 500 2017 Owner handbook (in English)
[x] Cancel search | Manufacturer: ABARTH, Model Year: 2017, Model line: 500, Model: Abarth 500 2017Pages: 192, PDF Size: 6.46 MB
Page 14 of 192
WARNING
1)The electronic components inside the
key may be damaged if the key is
subjected to strong shocks. In order to
ensure complete efficiency of the
electronic devices inside the keys, they
should never be exposed to direct sunlight.
2)Press button 2 fig. 3only with the key
away from your body, especially your eyes
and from objects which could get
damaged (e.g. your clothes). Do not leave
the key unattended to avoid the button
being accidentally pressed while it is being
handled, e.g. by a child.
WARNING
1)Used batteries may be harmful to the
environment if not disposed of correctly.
They must be disposed of as specified by
law in the special containers or taken to
an Abarth Dealership, which will take care
of their disposal.
IGNITION DEVICE
OPERATION
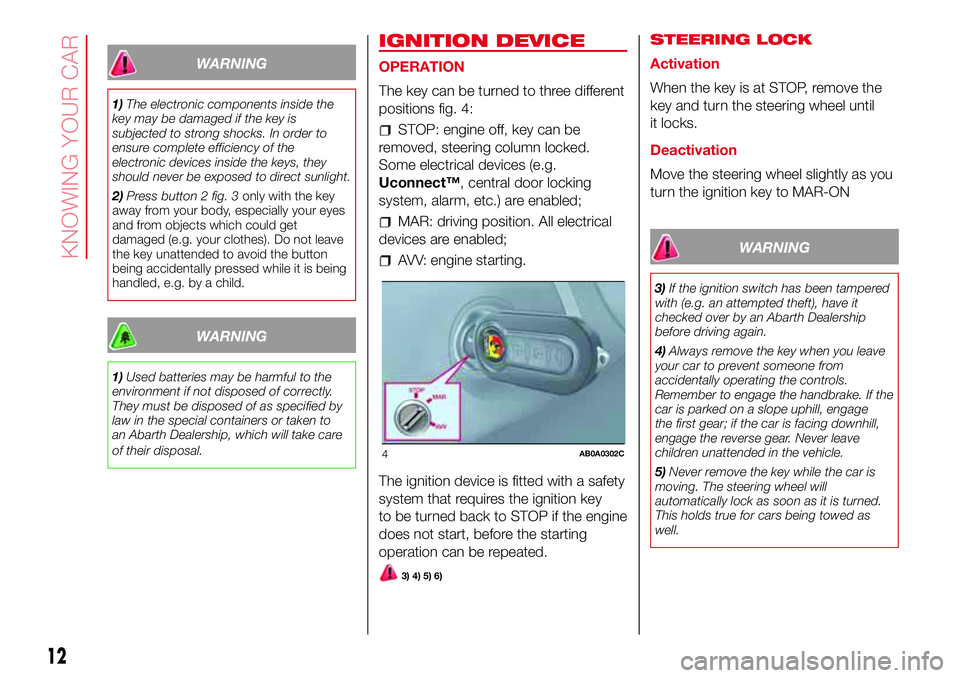
The key can be turned to three different
positions fig. 4:
STOP: engine off, key can be
removed, steering column locked.
Some electrical devices (e.g.
Uconnect™, central door locking
system, alarm, etc.) are enabled;
MAR: driving position. All electrical
devices are enabled;
AVV: engine starting.
The ignition device is fitted with a safety
system that requires the ignition key
to be turned back to STOP if the engine
does not start, before the starting
operation can be repeated.
3) 4) 5) 6)
STEERING LOCK
Activation
When the key is at STOP, remove the
key and turn the steering wheel until
it locks.
Deactivation
Move the steering wheel slightly as you
turn the ignition key to MAR-ON
WARNING
3)If the ignition switch has been tampered
with (e.g. an attempted theft), have it
checked over by an Abarth Dealership
before driving again.
4)Always remove the key when you leave
your car to prevent someone from
accidentally operating the controls.
Remember to engage the handbrake. If the
car is parked on a slope uphill, engage
the first gear; if the car is facing downhill,
engage the reverse gear. Never leave
children unattended in the vehicle.
5)Never remove the key while the car is
moving. The steering wheel will
automatically lock as soon as it is turned.
This holds true for cars being towed as
well.
4AB0A0302C
12
KNOWING YOUR CAR
Page 23 of 192
Theorwarning light will blink on
the instrument panel. The direction
indicators are switched off automatically
when the steering wheel is
straightened.
"FOLLOW ME HOME"
DEVICE
This allows the space in front of the
vehicle to be lit for a set time.
Activation
With the ignition key in the STOP
position or extracted, pull the lever
towards the steering wheel and move it
within 2 minutes of the engine switching
off.
At each single movement of the stalk,
the lights will remain on for an extra
30 seconds up to a maximum of 210
seconds: then the lights are switched
off automatically. The display shows the
time for which the functions remains
active.
The
warning light on the
instrument panel switches on when the
stalk is pulled for the first time and
stays lit until the function switches off
automatically.Deactivation
This function is deactivated turning on
again the headlights, sidelights or
pulling the left lever towards the
steering wheel (unstable position) for
more than 2 seconds, or switching the
starter to MAR.
FRONT FOG
LIGHTS/REAR FOG
LIGHTS
(where provided)
The fog lights can be activated only
when the dipped beam headlights are
on.
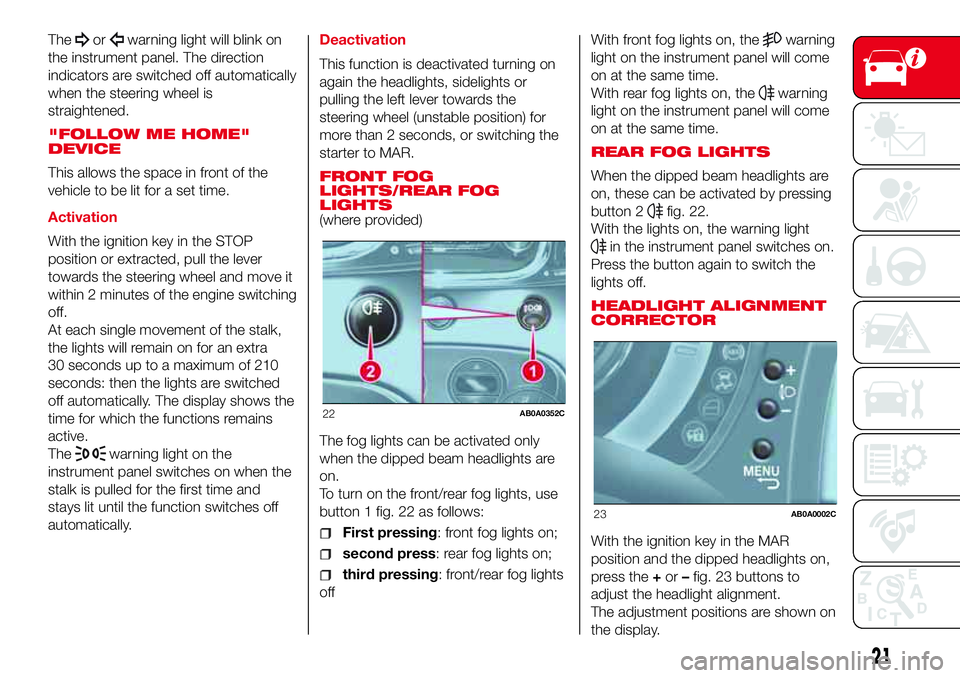
To turn on the front/rear fog lights, use
button 1 fig. 22 as follows:
First pressing: front fog lights on;
second press: rear fog lights on;
third pressing: front/rear fog lights
offWith front fog lights on, the
warning
light on the instrument panel will come
on at the same time.
With rear fog lights on, the
warning
light on the instrument panel will come
on at the same time.
REAR FOG LIGHTS
When the dipped beam headlights are
on, these can be activated by pressing
button 2
fig. 22.
With the lights on, the warning light
in the instrument panel switches on.
Press the button again to switch the
lights off.
HEADLIGHT ALIGNMENT
CORRECTOR
With the ignition key in the MAR
position and the dipped headlights on,
press the+or–fig. 23 buttons to
adjust the headlight alignment.
The adjustment positions are shown on
the display.
22AB0A0352C
23AB0A0002C
21
Page 50 of 192
Warning light What it means
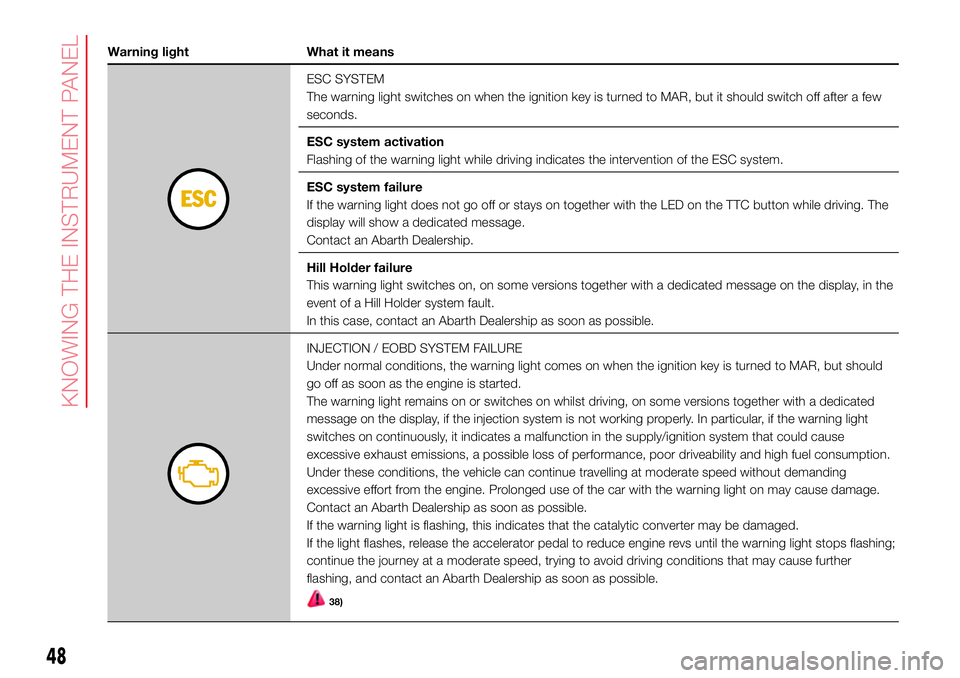
ESC SYSTEM
The warning light switches on when the ignition key is turned to MAR, but it should switch off after a few
seconds.
ESC system activation
Flashing of the warning light while driving indicates the intervention of the ESC system.
ESC system failure
If the warning light does not go off or stays on together with the LED on the TTC button while driving. The
display will show a dedicated message.
Contact an Abarth Dealership.
Hill Holder failure
This warning light switches on, on some versions together with a dedicated message on the display, in the
event of a Hill Holder system fault.
In this case, contact an Abarth Dealership as soon as possible.
INJECTION / EOBD SYSTEM FAILURE
Under normal conditions, the warning light comes on when the ignition key is turned to MAR, but should
go off as soon as the engine is started.
The warning light remains on or switches on whilst driving, on some versions together with a dedicated
message on the display, if the injection system is not working properly. In particular, if the warning light
switches on continuously, it indicates a malfunction in the supply/ignition system that could cause
excessive exhaust emissions, a possible loss of performance, poor driveability and high fuel consumption.
Under these conditions, the vehicle can continue travelling at moderate speed without demanding
excessive effort from the engine. Prolonged use of the car with the warning light on may cause damage.
Contact an Abarth Dealership as soon as possible.
If the warning light is flashing, this indicates that the catalytic converter may be damaged.
If the light flashes, release the accelerator pedal to reduce engine revs until the warning light stops flashing;
continue the journey at a moderate speed, trying to avoid driving conditions that may cause further
flashing, and contact an Abarth Dealership as soon as possible.
38)
48
KNOWING THE INSTRUMENT PANEL
Page 88 of 192
operate the “+” lever on the steering
wheel keeping the brake pedal
depressed (only for setting off in 2nd
gear);
release the brake pedal and press
the accelerator pedal (fully depressing
the pedal quickly to its end of travel and
switching off the ASR, if fitted, results
in a “lively” departure).
Engaging reverse (R)
To engage reverse gear, press the R
button on the gearbox panel instead of
the 1 button. When reverse is engaged,
the system emits an acoustic signal.
Engaging neutral (N)
Press the (N) button to engage neutral.
Neutral (N) can only be engaged with
accelerator pedal released, regardless
of the brake pedal’s state (pressed
or not). In any case, pressing the brake
pedal is recommended.
ACOUSTIC SIGNAL
For safety reasons, there is a buzzer
warning when parking the car with the
gearbox in neutral (N) (the warning is
heard when the ignition key is turned to
the STOP position).
With the car stationary, the engine
started and (1st), (2nd) or (R)
gear engaged, the system activates the
acoustic signal and automatically
places the transmission in neutral (N)
when:
the accelerator and/or brake pedal
are not operated for at least 3 minutes;
the brake pedal is pressed for longer
than 10 minutes;
the driver's door is opened and the
accelerator pedal or the brake pedal
are not operated for at least 1.5
seconds;
a fault has been detected in the
transmission.
PARKING THE CAR
The 1st or reverse gear must be
engaged with the foot on the brake
pedal and, if on a slope, the handbrake
must be operated in order to park
safely. Wait until the indication of the
gear engaged disappears on the
display before releasing the brake
pedal.
IMPORTANT NEVER leave the car with
the gearbox in neutral (N).
IMPORTANT NOTES
With car stationary and gear
engaged, always keep the brake pedal
pressed until you decide to set off,
then release the brake and accelerate
gradually.
During prolonged stops with the
engine running, it is advisable to keep
the gearbox in neutral (N).
In order to safeguard the efficiency
of the clutch, do not use the
accelerator to keep the car stationary
(e.g. when stopped on an incline); if the
clutch overheats it could be damaged.
Use the brake pedal or the handbrake
instead and use the accelerator pedal
only when you decide to set off.
Only use 2nd gear when you need
greater control when setting off for
manoeuvres on surfaces with poor grip.
If, with reverse gear (R) engaged,
you have to engage 1st gear or vice
versa, only do this when the car is
completely stationary and with
the brake pedal pressed.
Although it is strongly unadvisable, if
you are driving downhill and, for
unexpected reasons, you let the car
move forward with the transmission in
neutral (N), when there is a request
to engage a gear, depending on the
actual speed of the car, the system will
automatically engage the best gear
for the correct transmission of drive
torque to the wheels.
86
STARTING AND DRIVING
Page 107 of 192

Move the on-off button 1 fig. 100 to
the onIposition to switch on the
compressor. When the pressure gauge
indicates the right pressure for the
car, switch off the compressor by
moving the on-off button1 to the0
position. If the pressure gauge 6 fig. 99
indicates a pressure lower than 1.8
bar / 26 psi 5 minutes after starting the
compressor, switch off the compressor,
disconnect the sealing fluid tube 3
(fig. 99) from the tyre valve, retighten
the valve cap and move the car about
10 meters to distribute the sealing
fluid in the tyre. Stop the car safely and
repeat the operation above until the
required pressure is reached. If after
other 5 min. from the compressor
ignition, the pressure gauge 6
still indicates a pressure lower than 1.8
bar / 26 psi, the TYRE IS TOO
DAMAGED AND CANNOT BE
REPAIRED. Disconnect, put the kit
back in its compartment and call
roadside assistance.If the required pressure is reached,
continue driving. Do not exceed
80 km/h. Avoid sudden acceleration or
braking. After driving for about 8 km /
5 miles, position the vehicle in a safe
and suitable area and engage the
handbrake. Take the kit, ensure that the
on-off button 1 (fig. 100) is in the0
position and insert the electrical
connector in the car’s 12V socket.
Remove the repaired tyre’s valve cap,
take out the black inflation tube and
screw it firmly onto the valve. Check the
tyre pressure shown on the pressure
gauge 6.
If the pressure is lower than 1.8 bar /
26 psi, the TYRE IS TOO DAMAGED
AND CANNOT BE REPAIRED.
Disconnect, put the kit back in its
compartment and call roadside
assistance.
If the pressure is equal to or higher
than 1.8 bar / 26 psi, switch on the
compressor to reach the required
pressure. Disconnect and replace the
kit in the specific compartment. Drive
carefully to a specialist or the
manufacturer’s dealership as soon as
possible.PRESSURE RESTORING
Take out the black inflation tube and
screw it firmly onto the tyre valve.
Follow the instructions given in fig. 98.
Press the button 2 fig. 101 to adjust
any tyre overpressure.
CARTRIDGE
REPLACEMENT
Only use Fix&Go original cartridges,
which can be purchased at the Abarth
Dealership. Press the release button
3 and lift it to remove the cartridge 1 fig.
101. Insert the new cartridge and
press it firmly downwards.
12
3
101AB0A0086C
105
Page 108 of 192

“Fix&Go Automatic” KIT
The kit includes:
one tank 1 fig. 102 containing the
sealing fluid, provided with: filler tube 2
and adhesive label 3 with the writing
"Max. 80 km/h”, to be attached in
a position easily visible to the driver (eg.
on the dashboard) after repairing the
tyre;
compressor 4 complete with
pressure gauge and connectors;
an instruction leaflet, to refer to for
prompt and correct use and that must
be then given to the personnel dealing
with the tyre treated with sealant;
a pair of gloves located in the side
compartment of the compressor;
some adaptors, for inflating different
elements.TYRE REPAIRING AND
PRESSURE RESTORING
PROCEDURE
26) 27)
128)
Proceed as follows:
place the vehicle in a safe and
suitable area, engaging the parking
brake. Take the kit from the specific
compartment. Remove the adhesive
label of speed 3 fig. 102 and apply it in
a visible position. Wear the protective
gloves provided. Remove the cap from
the valve of the punctured tyre and
connect and firmly tighten the
transparent tube of the sealing fluid 1
fig. 103;
ensure that the on-off button 1 fig.
104 is in0(OFF) position. If provided,
open the compressor cover, insert
the electrical connector in the car’s 12V
socket and start the car engine;
activate the compressor moving
on-off 1 button toI(ON) position fig.
104. When the pressure gauge 2
shows the car’s required pressure (see
section “Wheels” under “Technical
data” chapter), switch off the
compressor moving on-off button 1 to
0position. If after 5 minutes from the
compressor ignition, the pressure
gauge 2 indicates a pressure less than
1.8 bar / 26 psi, switch off the
compressor, disconnect the sealing
fluid tube from the tyre valve, re-screw
the valve cap and move the car about
10 meters to allow the distribution of
sealing fluid in the tyre. Stop the car
safely and repeat the operation above
until the required pressure is reached. If
after other 5 min. from the compressor
ignition, the pressure gauge 2 still
indicates a pressure lower than 1.8 bar
/ 26 psi, the TYRE IS TOO DAMAGED
AND CANNOT BE REPAIRED. Remove
and place the kit in its compartment
and contact an Abarth Dealership;
102AB0A0369C
103AB0A0370C
106
IN AN EMERGENCY
Page 164 of 192
eco:Drive™
Theeco:Drive™application allows you
to display your driving behaviour in
real time, in order to help you reach a
more efficient driving style as far as
consumption and emissions are
concerned.
In addition, the data can be saved on a
USB flash drive, and the data analysis
can be made on your personal
computer thanks to theeco:Drive™
desktop application, available on
www.fiat.it or www.driveuconnect.eu.
Driving style is evaluated by means
of four indices which monitor the
following parameters:
Acceleration
Deceleration
Transmission
Speed
eco:Drive™ display
Press theeco:Drive™button to
interact with the function.
A screen will be displayed on the radio,
showing the 4 indices described above.
These indices are grey until the system
has enough data to evaluate the driving
style.Once sufficient data are available, the
indices will have 5 colours depending
on the evaluation: dark green (very
good), light green, yellow, orange and
red (very bad).
It represents eco-friendliness of the
driving style: from 0 (low) to 100 (high).
In the event of extended inactivity the
display will show the average of the
indices up to that moment (”Average
index”) then the indices will be coloured
again in real time as soon as the vehicle
is restarted.
To check the data average of previous
route (the "route" starts when the
ignition key is turned to MAR and stops
when it is turned to STOP), select the
"Previous Route" button.
The details of the previous trip can also
be displayed by pressing the "Details"
button, in which duration (time and
mileage) and average speed will be
shown.
Recording and transferring trip data
The trip data can be stored in the
system memory and transferred using a
suitably configured USB memory stick
or byUconnect™ LIVEApp. This
allows you to display the history of the
collected data, showing the complete
analysis of the trip data and of your
driving style.Further information is available at
www.driveuconnect.eu.
WARNING Do not remove the USB
memory stick nor unpair the
smartphone and theUconnect™ LIVE
App before the system has
downloaded the data, otherwise it
could be lost.
During the transfer of data to the
devices, messages may appear on the
radio display to guide the user correctly
through the operation; follow these
instructions. These messages are only
displayed with the ignition key at STOP
and when a delay in the system
switching off is set. The data are
automatically transferred to the devices
when the engine is switched off.
Transferred data will be deleted from
the system memory in this manner. You
can choose to store the trip data or
not, by pressing the "Settings" button
and by setting the storage activation
and the USB or Cloud transfer mode.
NOTE When the USB memory stick
is full, the warning messages are shown
on the radio display.
When theeco:Drive™data are not
transferred to USB memory stick for a
long time, the internal memory of the
Uconnect™ LIVEsystem may be
exhausted. Follow the instructions given
by the messages on the radio display.
162
MULTIMEDIA