ACURA NSX 1997 Service Repair Manual
Manufacturer: ACURA, Model Year: 1997,
Model line: NSX,
Model: ACURA NSX 1997
Pages: 1503, PDF Size: 57.08 MB
ACURA NSX 1997 Service Repair Manual
NSX 1997
ACURA
ACURA
https://www.carmanualsonline.info/img/32/56989/w960_56989-0.png
ACURA NSX 1997 Service Repair Manual
Trending: fuses, manual radio set, immobilizer, transmission fluid, service indicator, airbag, ABS
Page 1131 of 1503
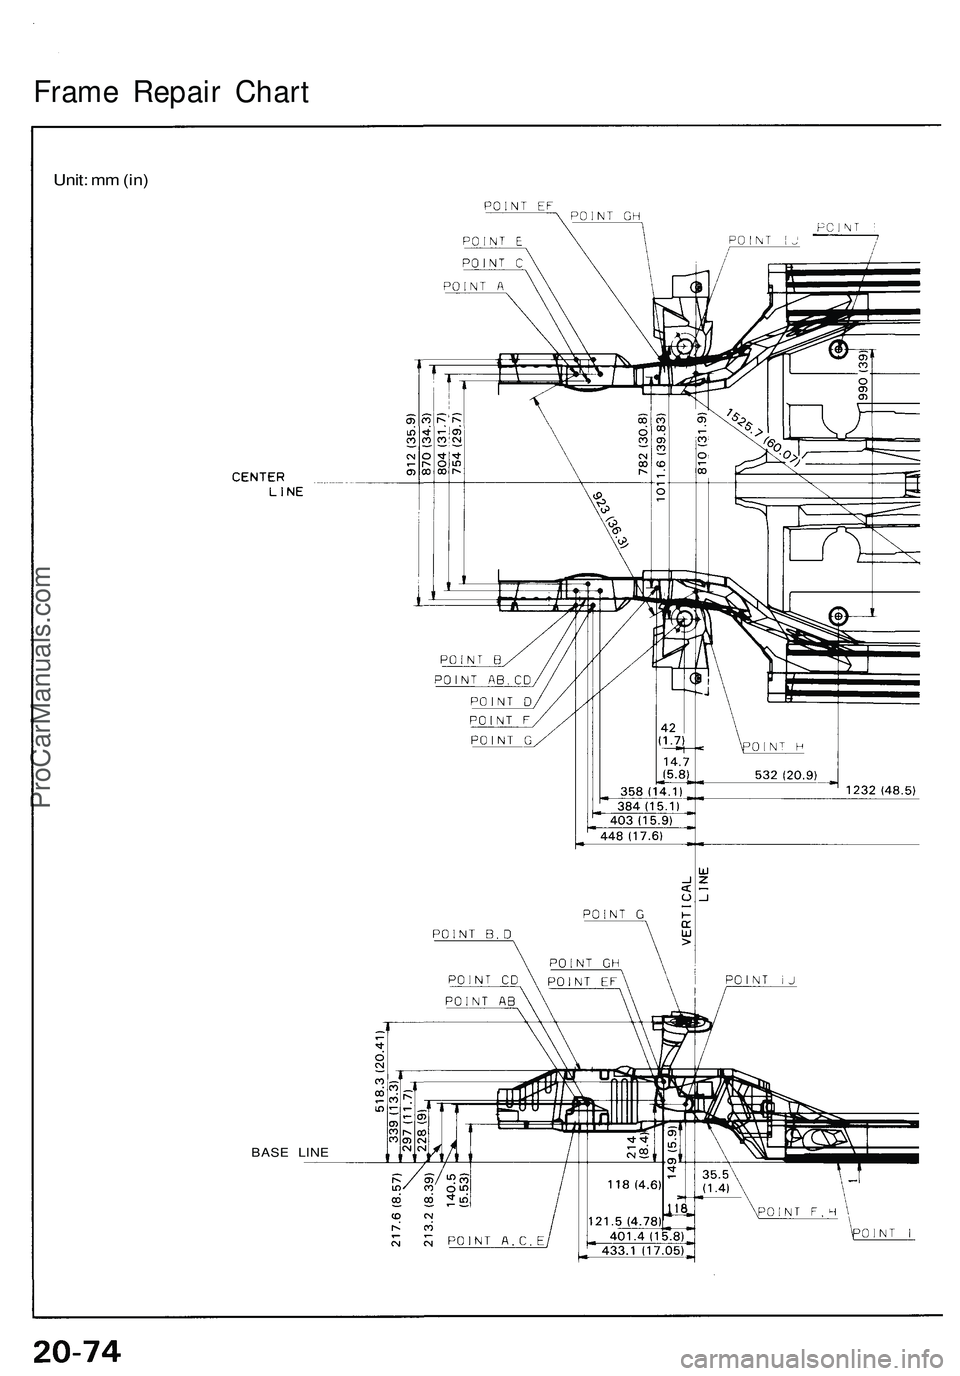
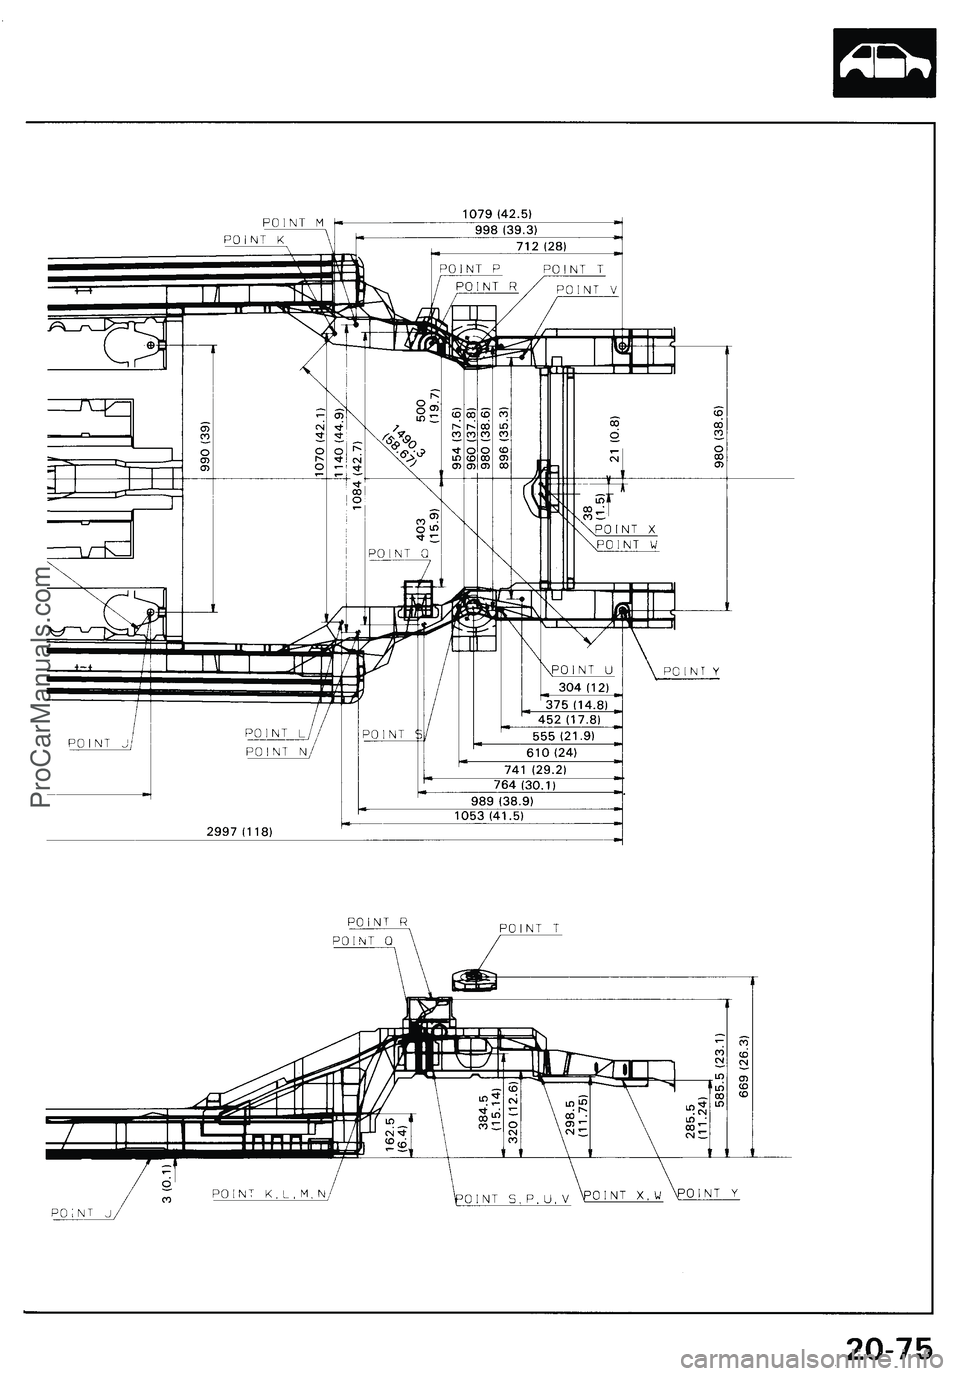
Frame Repai r Char t
Unit: m m (in )
BAS E LIN E
ProCarManuals.com
Page 1132 of 1503
Page 1133 of 1503
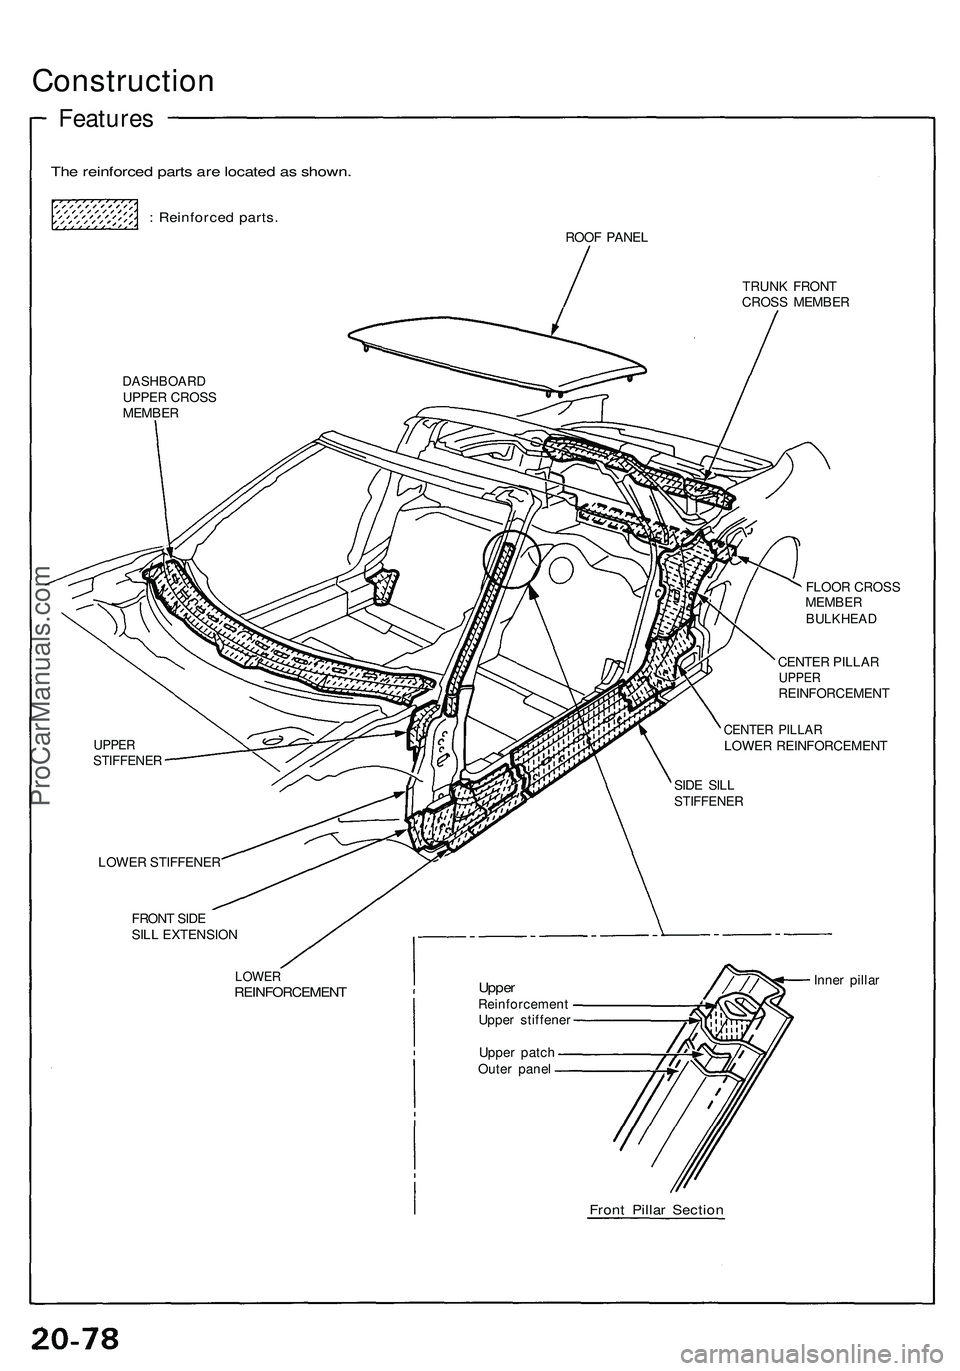
Construction
Features
The reinforce d part s ar e locate d a s shown .
: Reinforce d parts .
ROOF PANE L
TRUNK FRON T
CROS S MEMBE R
DASHBOAR DUPPER CROS S
MEMBE R
FLOOR CROS S
MEMBE R
BULKHEA D
UPPERSTIFFENE R
CENTER PILLA RUPPERREINFORCEMEN T
CENTER PILLA RLOWER REINFORCEMEN T
LOWE R STIFFENE R
FRON T SID E
SIL L EXTENSIO N
LOWERREINFORCEMEN TUpperReinforcemen t
Uppe r stiffene r
Uppe r patc h
Oute r pane l Inne
r pilla r
Front Pilla r Sectio n
SIDE SIL LSTIFFENE R
ProCarManuals.com
Page 1134 of 1503
Roof Rai l Trim , Fron t an d Rea r
Replacemen t
CAUTION:
• Wea r glove s t o remov e an d instal l th e trim .
• Whe n pryin g wit h a fla t ti p screwdriver , wra p it wit h
protectiv e tap e t o preven t damage .
NOTE:
• Tak e car e no t t o scratc h th e trim .
• Remov e th e roof .
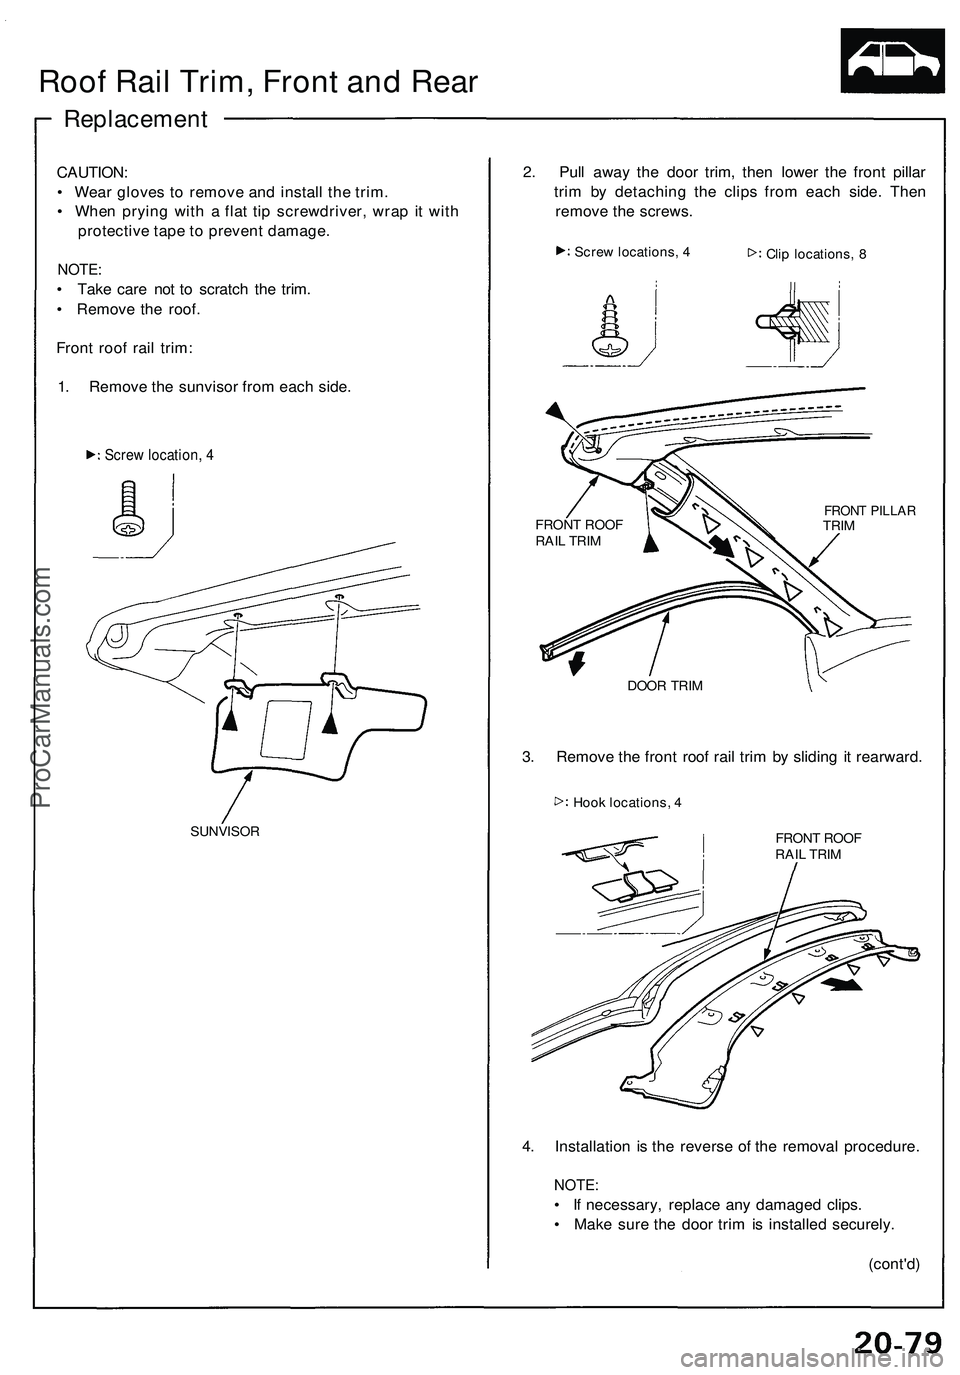
Fron t roo f rai l trim :
1 . Remov e th e sunviso r fro m eac h side .
Screw location , 4
SUNVISO R
2. Pul l awa y th e doo r trim , the n lowe r th e fron t pilla r
tri m b y detachin g th e clip s fro m eac h side . The n
remov e th e screws .
Screw locations , 4
Clip locations , 8
DOO R TRI M
3. Remov e th e fron t roo f rai l tri m b y slidin g i t rearward .
FRONT ROO F
RAI L TRI M
4. Installatio n i s th e revers e o f th e remova l procedure .
NOTE:
• I f necessary , replac e an y damage d clips .
• Mak e sur e th e doo r tri m is installe d securely .
(cont'd )
FRONT PILLA RTRIM
FRON
T ROO F
RAI L TRI M
Hoo k locations , 4
ProCarManuals.com
Page 1135 of 1503
Roof Rai l Trim , Fron t an d Rea r
Replacemen t (cont'd )
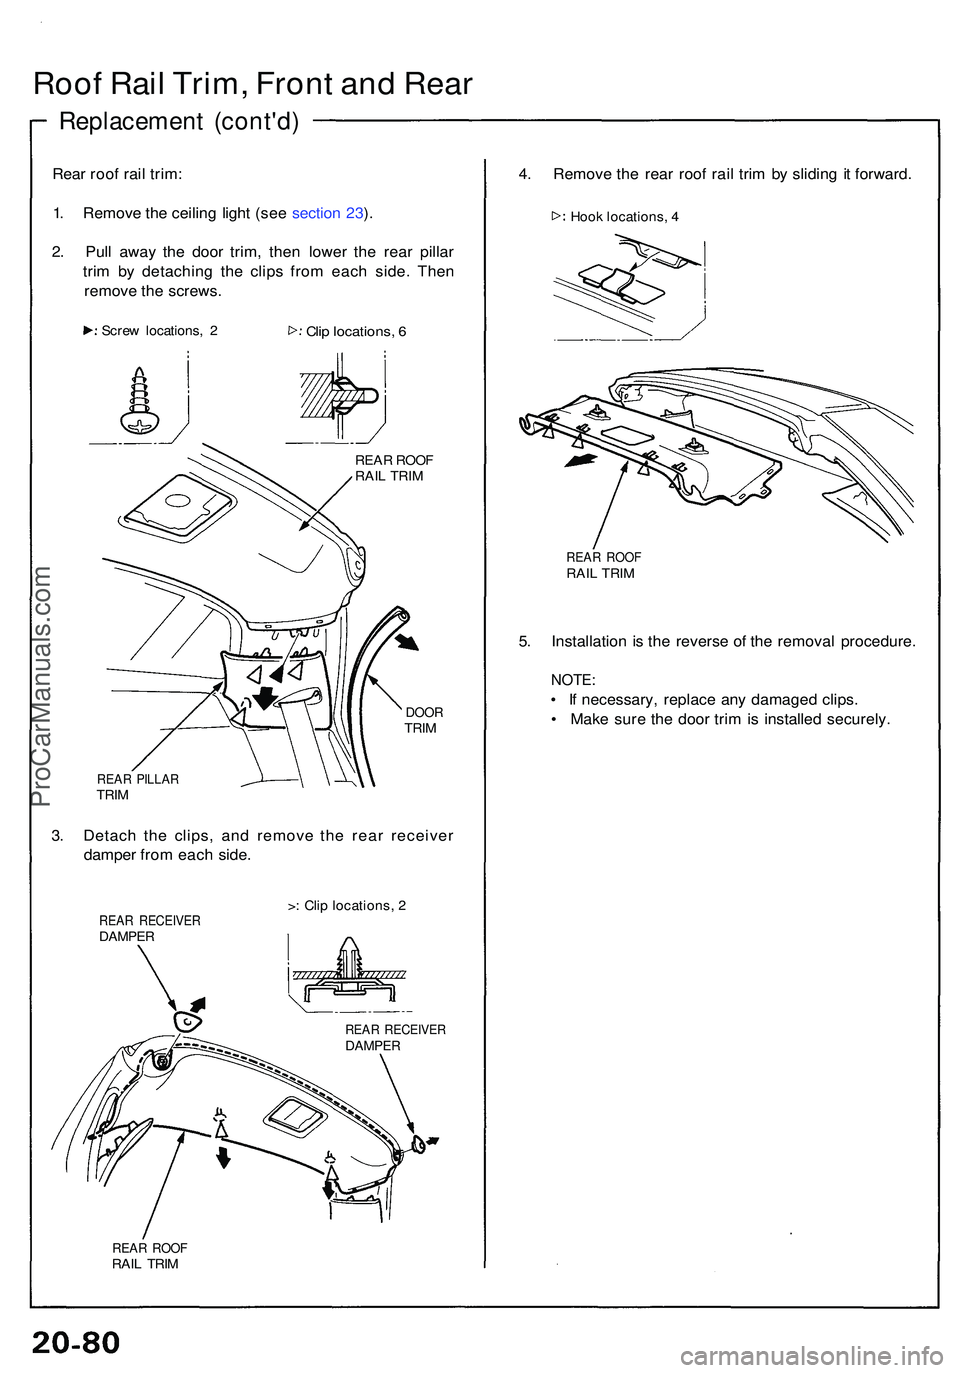
Rear roo f rai l trim :
1 . Remov e th e ceilin g ligh t (se e sectio n 23 ).
2 . Pul l awa y th e doo r trim , the n lowe r th e rea r pilla r
tri m b y detachin g th e clip s fro m eac h side . The n
remov e th e screws .
Screw locations , 2Cli p locations , 6
REA R ROO F
RAI L TRI M
DOO RTRIM
REA R PILLA RTRIM
3. Detac h th e clips , an d remov e th e rea r receive r
dampe r fro m eac h side .
REAR RECEIVE RDAMPER
>: Cli p locations , 2
REA R RECEIVE RDAMPER
REAR ROO FRAIL TRI M
4. Remov e th e rea r roo f rai l tri m b y slidin g i t forward .
REAR ROO FRAIL TRI M
5. Installatio n i s th e revers e o f th e remova l procedure .
NOTE:
• I f necessary , replac e an y damage d clips .
• Mak e sur e th e doo r tri m is installe d securely .
Hook locations , 4
ProCarManuals.com
Page 1136 of 1503
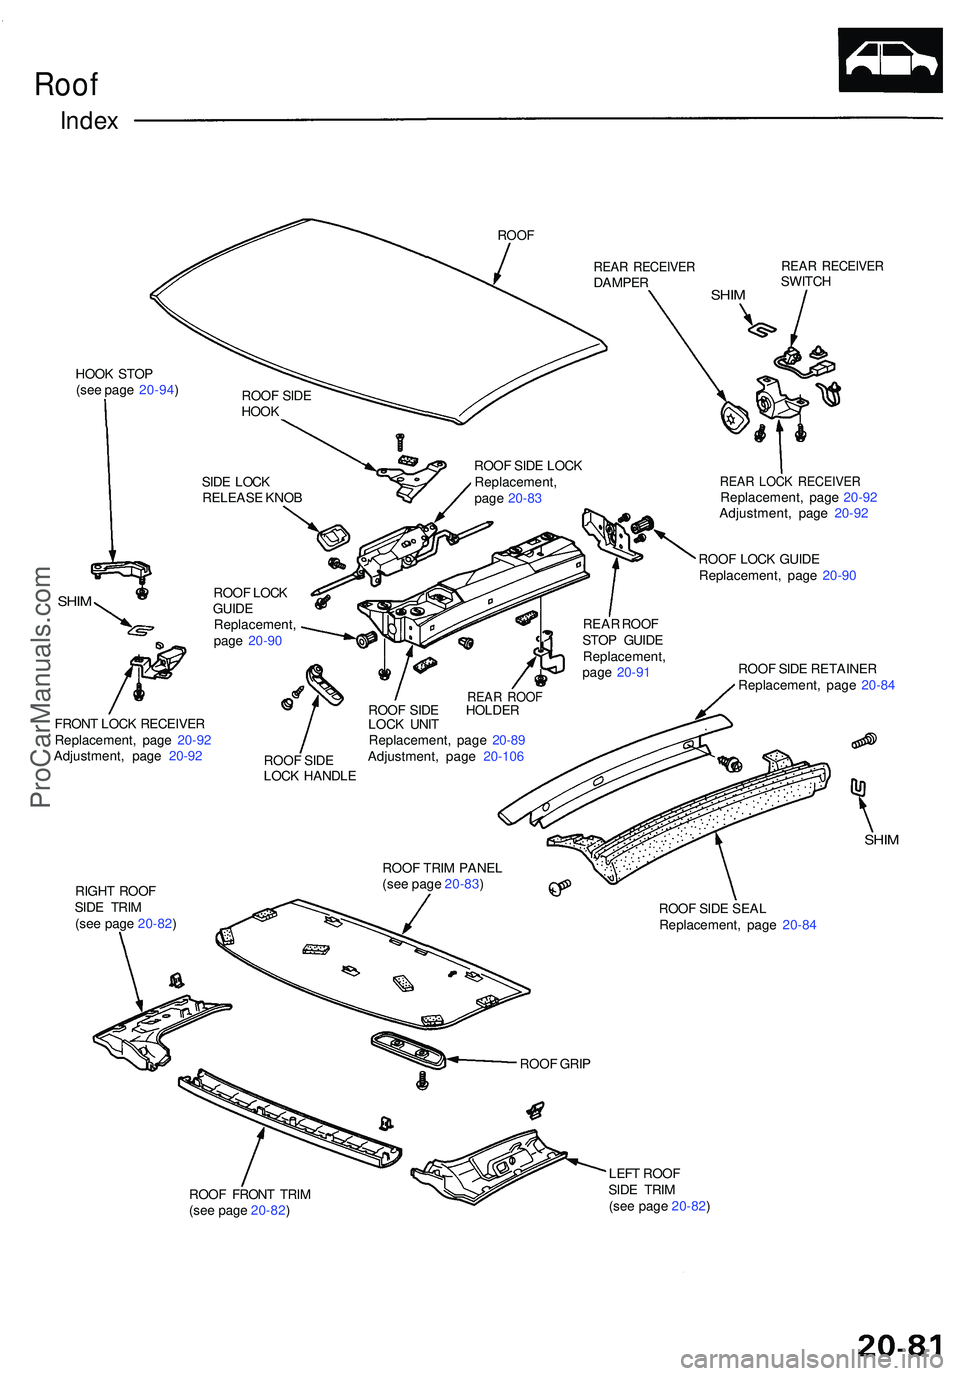
Roof
Inde x
ROO F
HOOK STO P
(se e pag e 20-94 )
REAR RECEIVE RDAMPERREAR RECEIVE RSWITCH
ROO F SID E
HOO K
SIDE LOC K
RELEAS E KNO B ROO
F SID E LOC K
Replacement ,
pag e 20-8 3
SHIMROO F LOC K
GUID E
Replacement ,
pag e 20-9 0
FRON T LOC K RECEIVE R
Replacement , pag e 20-9 2
Adjustment , pag e 20-9 2
ROOF SID E
LOC K HANDL E
REAR ROO FROOF SID E HOLDE R
LOC K UNI T
Replacement , pag e 20-8 9
Adjustment , pag e 20-10 6 REA
R ROO F
STO P GUID E
Replacement ,
pag e 20-9 1
REA R LOC K RECEIVE RReplacement , pag e 20-9 2
Adjustment , pag e 20-9 2
ROO F LOC K GUID E
Replacement , pag e 20-9 0
ROO F SID E RETAINE R
Replacement , pag e 20-8 4
RIGH T ROO F
SID E TRI M
(se e pag e 20-82 ) ROO
F TRI M PANE L
(se e pag e 20-83 )
SHIM
ROO F SID E SEA L
Replacement , pag e 20-8 4
ROO F FRON T TRI M
(se e pag e 20-82 ) LEF
T ROO F
SID E TRI M
(se e pag e 20-82 )
ROO
F GRI P
SHIM
ProCarManuals.com
Page 1137 of 1503
Roof
Roo f Trim/Pane l Replacemen t
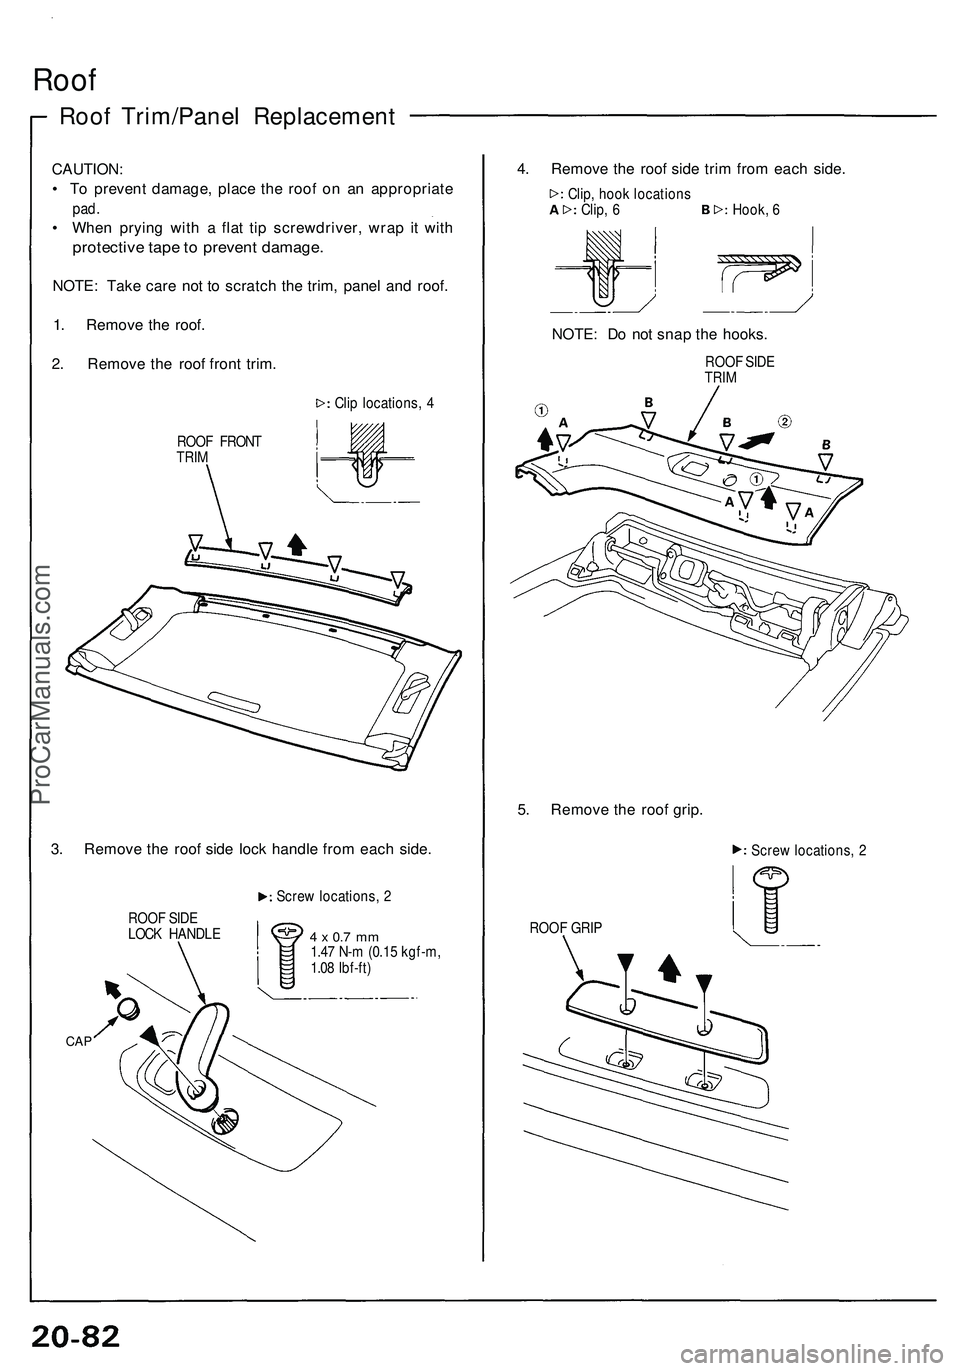
CAUTION:
• T o preven t damage , plac e th e roo f o n a n appropriat e
pad.
• Whe n pryin g wit h a fla t ti p screwdriver , wra p it wit h
protectiv e tap e to preven t damage .
NOTE: Tak e car e no t t o scratc h th e trim , pane l an d roof .
1 . Remov e th e roof .
2 . Remov e th e roo f fron t trim .
ROO F FRON T
TRI M
3. Remov e th e roo f sid e loc k handl e fro m eac h side .
ROO F SID E
LOC K HANDL E Scre
w locations , 2
4 x 0. 7 m m1.4 7 N- m (0.1 5 kgf-m ,
1.0 8 Ibf-ft )
CAP
4. Remov e th e roo f sid e tri m fro m eac h side .
NOTE : D o no t sna p th e hooks .
ROOF SID E
TRI M
5. Remov e th e roo f grip .
Scre w locations , 2
ROO F GRI P
Cli
p locations , 4 Clip
, hoo k location s
Clip , 6 Hook, 6
ProCarManuals.com
Page 1138 of 1503
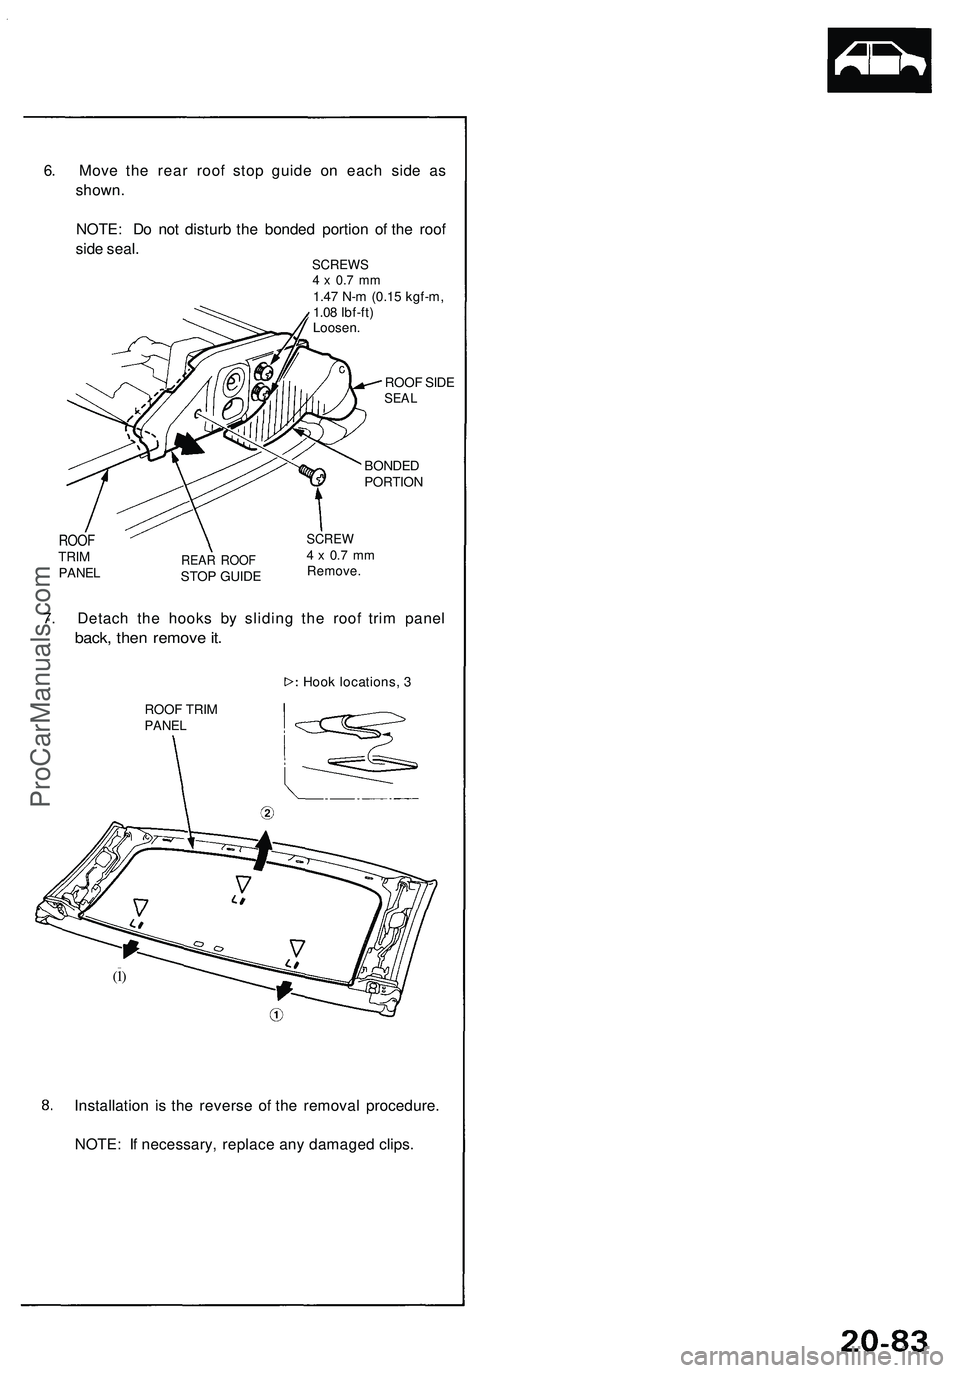
6. Move the rear roof stop guide on each side as
shown.
NOTE: Do not disturb the bonded portion of the roof
side seal.
SCREWS
4 x 0.7 mm
1.47 N-m (0.15 kgf-m,
1.08 Ibf-ft)
Loosen.
ROOF SIDE
SEAL
BONDED
PORTION
SCREW
4 x 0.7 mm
Remove.
ROOF
TRIM
PANEL
REAR ROOF
STOP GUIDE
7. Detach the hooks by sliding the roof trim panel
back, then remove it.
Hook locations, 3
ROOF TRIM
PANEL
(1)
Installation is the reverse of the removal procedure.
NOTE: If necessary, replace any damaged clips.ProCarManuals.com
Page 1139 of 1503
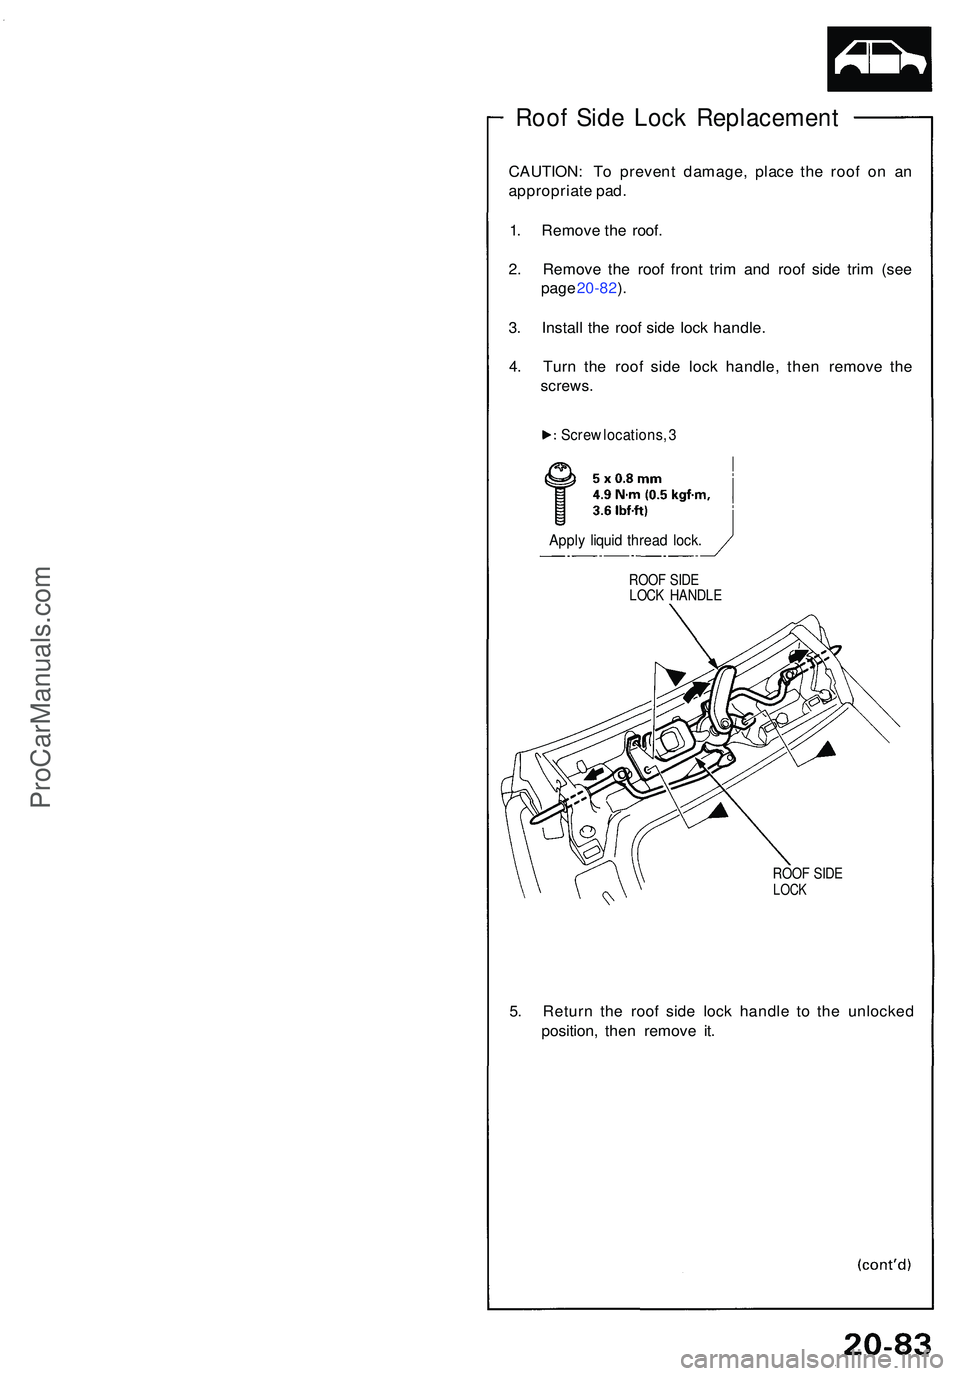
Roof Sid e Loc k Replacemen t
CAUTION: T o preven t damage , plac e th e roo f o n a n
appropriat e pad .
1 . Remov e th e roof .
2 . Remov e th e roo f fron t tri m an d roo f sid e tri m (se e
pag e 20-82 ).
3 . Instal l th e roo f sid e loc k handle .
4 . Tur n th e roo f sid e loc k handle , the n remov e th e
screws .
ROOF SID ELOC K HANDL E
ROOF SID ELOC K
5. Retur n th e roo f sid e loc k handl e t o th e unlocke d
position , the n remov e it .
Appl y liqui d threa d lock .
Scre
w locations , 3
ProCarManuals.com
Page 1140 of 1503
Roof
Roof Side Lock Replacement
(cont'd)
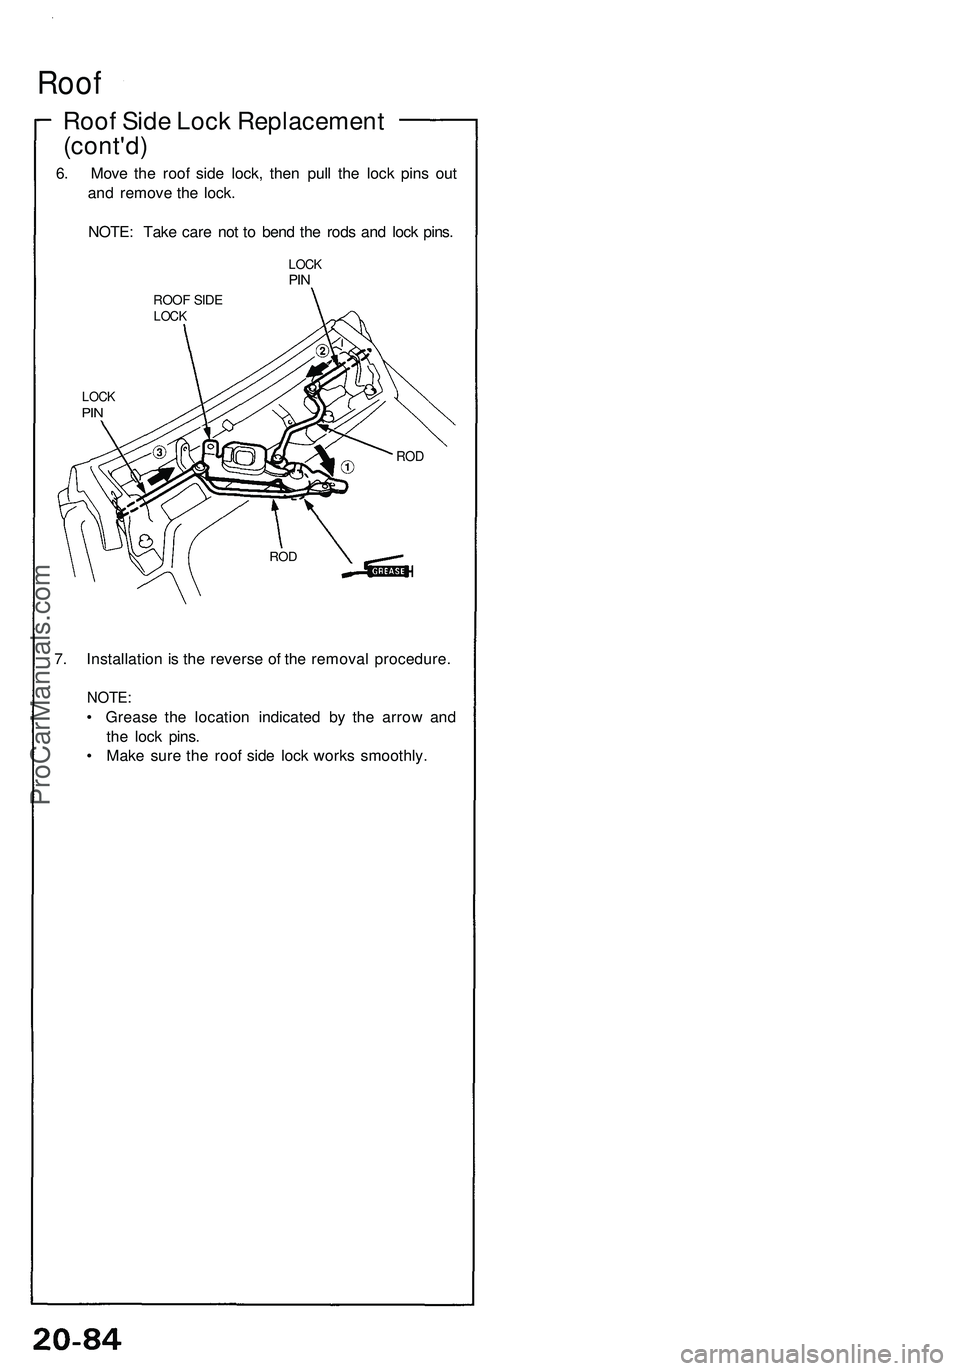
6. Move the roof side lock, then pull the lock pins out
and remove the lock.
NOTE: Take care not to bend the rods and lock pins.
ROOF SIDE
LOCK
LOCK
PIN
7. Installation is the reverse of the removal procedure.
NOTE:
• Grease the location indicated by the arrow and
the lock pins.
• Make sure the roof side lock works smoothly.
LOCK
PIN
ROD
RODProCarManuals.com
Trending: dashboard warning lights, charging, cooling, ESP, fuel tank removal, jump start, door lock
