ACURA NSX 1997 Service Repair Manual
Manufacturer: ACURA, Model Year: 1997, Model line: NSX, Model: ACURA NSX 1997Pages: 1503, PDF Size: 57.08 MB
Page 1491 of 1503
Supplemental Restrain t Syste m (SRS )
Airbag/Sea t Bel t Tensione r Disposa l
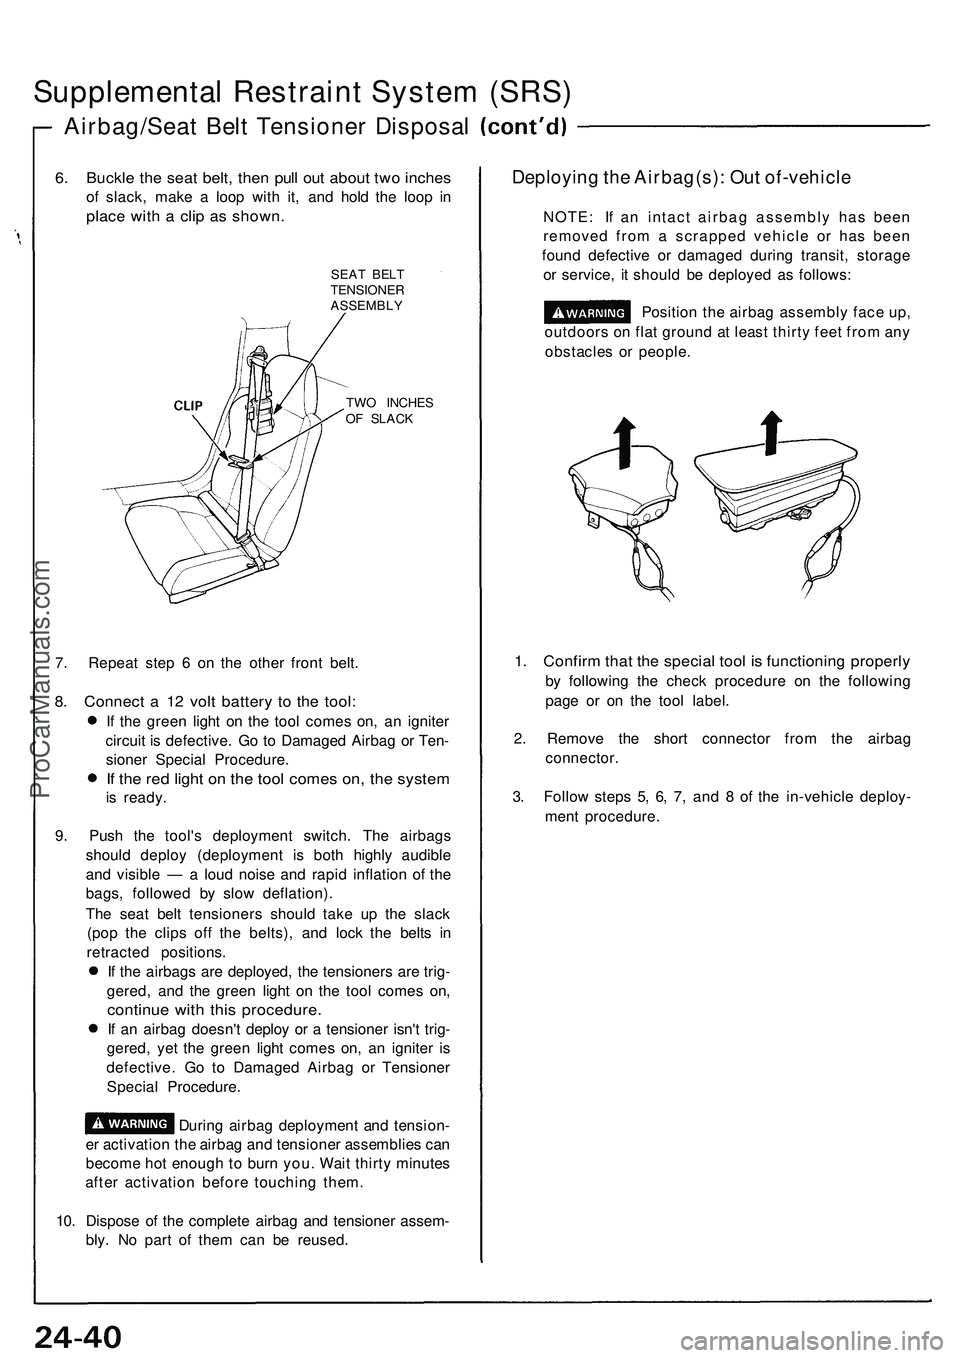
6. Buckl e th e sea t belt , the n pul l ou t abou t tw o inche s
of slack , mak e a loo p wit h it , an d hol d th e loo p i n
plac e wit h a cli p a s shown .
SEAT BEL T
TENSIONE R
ASSEMBL Y
TW O INCHE S
O F SLAC K
7. Repea t ste p 6 on th e othe r fron t belt .
8. Connec t a 1 2 vol t batter y t o th e tool :
If th e gree n ligh t o n th e too l come s on , a n ignite r
circui t i s defective . G o t o Damage d Airba g o r Ten -
sione r Specia l Procedure .
If th e re d ligh t o n th e too l come s on , th e syste m
is ready .
9 . Pus h th e tool' s deploymen t switch . Th e airbag s
shoul d deplo y (deploymen t i s bot h highl y audibl e
an d visibl e — a loud nois e an d rapi d inflatio n o f th e
bags , followe d b y slo w deflation) .
Th e sea t bel t tensioner s shoul d tak e u p th e slac k
(po p th e clip s of f th e belts) , an d loc k th e belt s i n
retracte d positions .
I f th e airbag s ar e deployed , th e tensioner s ar e trig -
gered , an d th e gree n ligh t o n th e too l come s on ,
continu e wit h thi s procedure .
If a n airba g doesn' t deplo y o r a tensione r isn' t trig -
gered , ye t th e gree n ligh t come s on , a n ignite r i s
defective . G o t o Damage d Airba g o r Tensione r
Specia l Procedure .
Durin g airba g deploymen t an d tension -
e r activatio n th e airba g an d tensione r assemblie s ca n
becom e ho t enoug h t o bur n you . Wai t thirt y minute s
afte r activatio n befor e touchin g them .
10 . Dispos e o f th e complet e airba g an d tensione r assem -
bly . N o par t o f the m ca n b e reused .
Deployin g th e Airbag(s) : Ou t of-vehicl e
NOTE: I f a n intac t airba g assembl y ha s bee n
remove d fro m a scrappe d vehicl e o r ha s bee n
foun d defectiv e o r damage d durin g transit , storag e
o r service , i t shoul d b e deploye d a s follows :
Positio n the airba g assembl y fac e up ,
outdoor s o n fla t groun d a t leas t thirt y fee t fro m an y
obstacle s o r people .
1. Confir m tha t th e specia l too l i s functionin g properl y
by followin g th e chec k procedur e o n th e followin g
pag e o r o n th e too l label .
2 . Remov e th e shor t connecto r fro m th e airba g
connector .
3 . Follo w step s 5 , 6 , 7 , an d 8 of th e in-vehicl e deploy -
men t procedure .
ProCarManuals.com
Page 1492 of 1503
Damaged Airbag or Tensioner Special Proce-
dure.
If an airbag or tensioner cannot be
deployed or triggered, it should not be treated as
normal scrap; it should still be considered a poten-
tially explosive device that can cause serious
injury.
1. If installed in a vehicle, follow the removal proce-
dures in this section.
2. Intertwine the stripped ends of the two airbag or ten-
sioner wires to make a short circuit.
3. Package the airbag or tensioner in exactly the same
packaging that the new replacement part came in.
4. Mark the outside of the box "DAMAGED AIRBAG
(or TENSIONER) NOT DEPLOYED" so it does not
get confused with your parts stock. If applicable,
also note on the box the VIN of the vehicle from
which it was removed.
5. Contact your Acura District Technical Manager for
how and where to return it for disposal.
Deployment Tool: Check Procedure.
1. Connect the yellow clips to both switch protector
handles on the tool; connect the tool to a battery.
2. Push the operation switch: green means the tool is
OK; red means the tool is faulty.
3. Disconnect the battery and the yellow clips.ProCarManuals.com
Page 1493 of 1503
Supplemental Restrain t Syste m (SRS )
Cable Ree l Remova l
Store a remove d airba g assembl y wit h th e
pa d surfac e up . I f the airba g i s improperl y store d fac e
down , accidenta l deploymen t coul d prope l th e uni t wit h
enoug h forc e t o caus e seriou s injury .
CAUTION :
Carefully inspec t th e airba g assembl y befor e install -
in g it . D o no t instal l a n airba g assembl y tha t show s
sign s o f bein g droppe d o r improperl y handled , suc h
as dents , crack s o r deformation .
Always kee p th e shor t connector s (RED ) o n th e air -
bag s whe n th e harnes s i s disconnected .
D o no t disassembl e o r tampe r wit h th e airba g
assembly .
1. Disconnec t th e batter y negativ e cabl e an d the n th e
positiv e cable .
2 . Befor e disconnectin g an y par t o f th e SR S wir e
harness , instal l th e shor t connector s (RED ) (se e pag e
24-10 ).
3 . Mak e sur e th e wheel s ar e aligne d straigh t ahead .
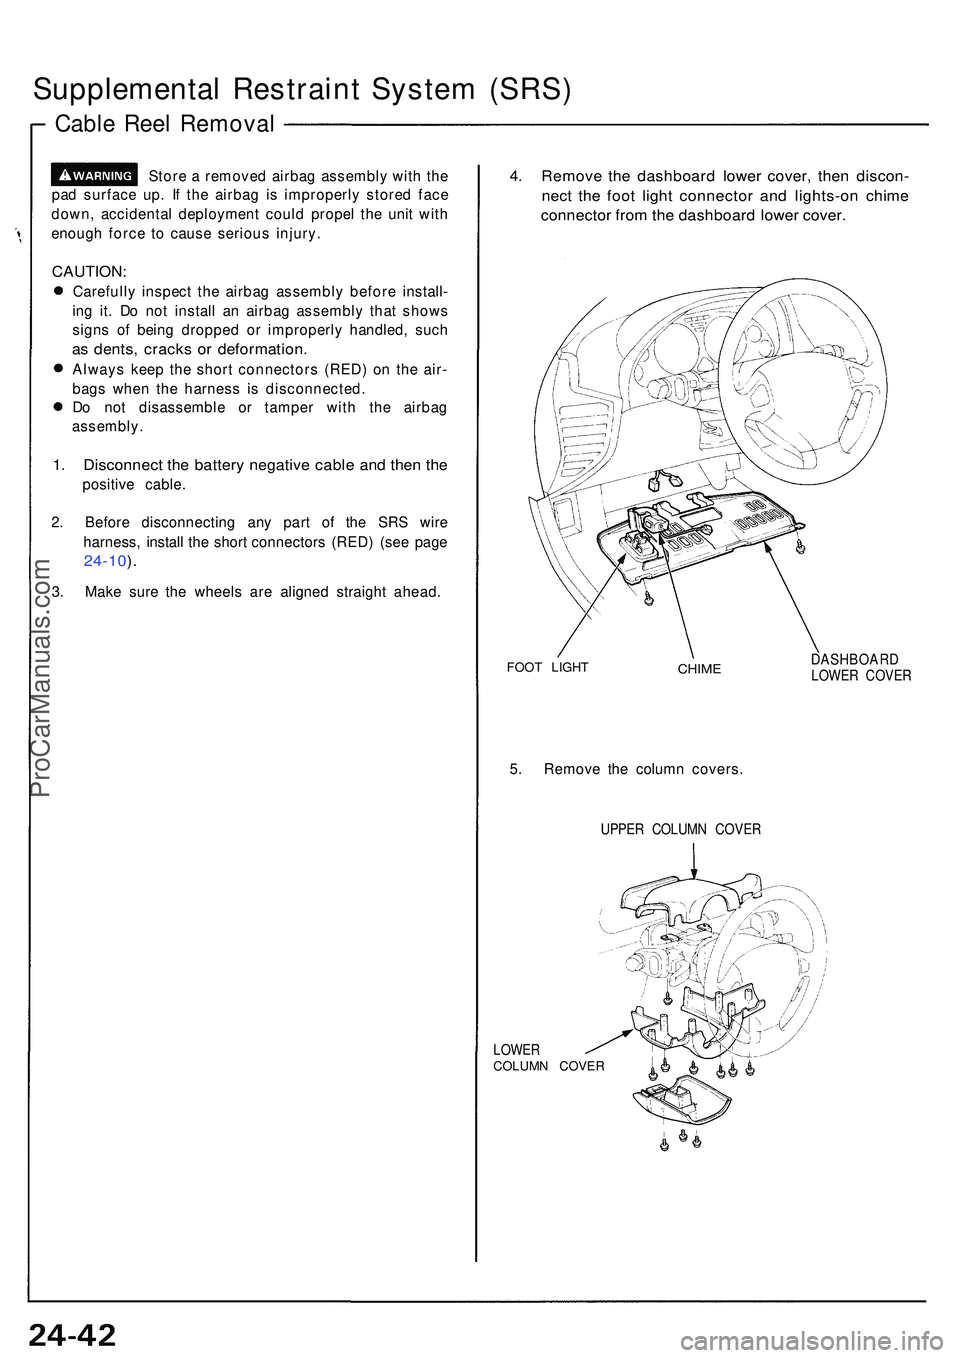
4. Remov e th e dashboar d lowe r cover , the n discon -
nect th e foo t ligh t connecto r an d lights-o n chim e
connecto r fro m th e dashboar d lowe r cover .
FOOT LIGH TCHIMEDASHBOAR DLOWER COVE R
5. Remov e th e colum n covers .
UPPER COLUM N COVE R
LOWE R
COLUM N COVE R
ProCarManuals.com
Page 1494 of 1503
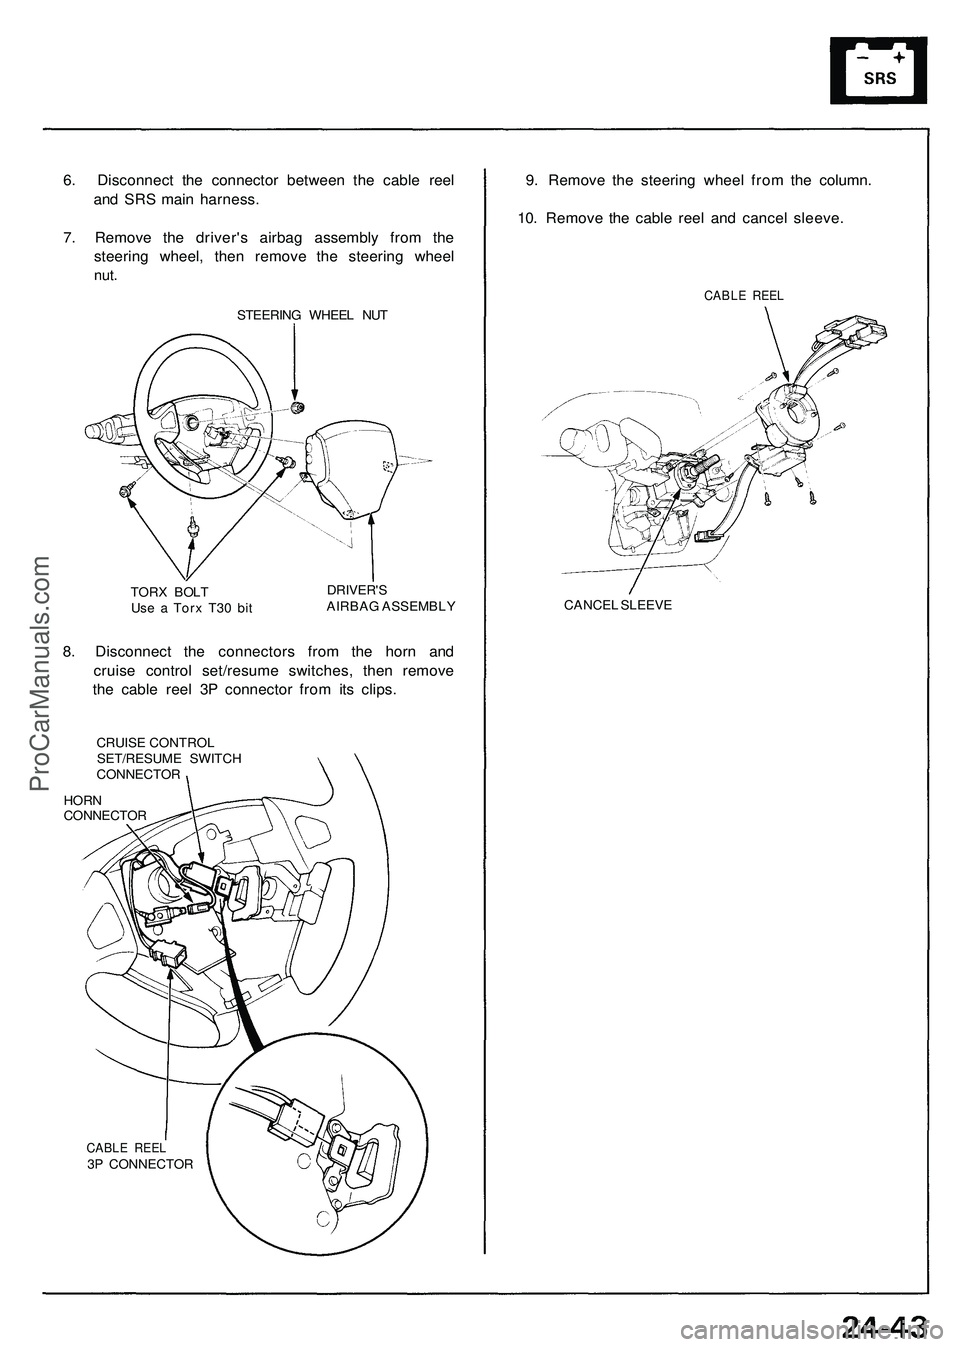
6. Disconnect the connector between the cable reel
and SRS main harness.
7. Remove the driver's airbag assembly from the
steering wheel, then remove the steering wheel
nut.
STEERING WHEEL NUT
TORX BOLT
Use a Torx T30 bit
DRIVER'S
AIRBAG ASSEMBLY
8. Disconnect the connectors from the horn and
cruise control set/resume switches, then remove
the cable reel 3P connector from its clips.
CRUISE CONTROL
SET/RESUME SWITCH
CONNECTOR
HORN
CONNECTOR
CABLE REEL
3P CONNECTOR
9. Remove the steering wheel from the column.
10. Remove the cable reel and cancel sleeve.
CABLE REEL
CANCEL SLEEVEProCarManuals.com
Page 1495 of 1503
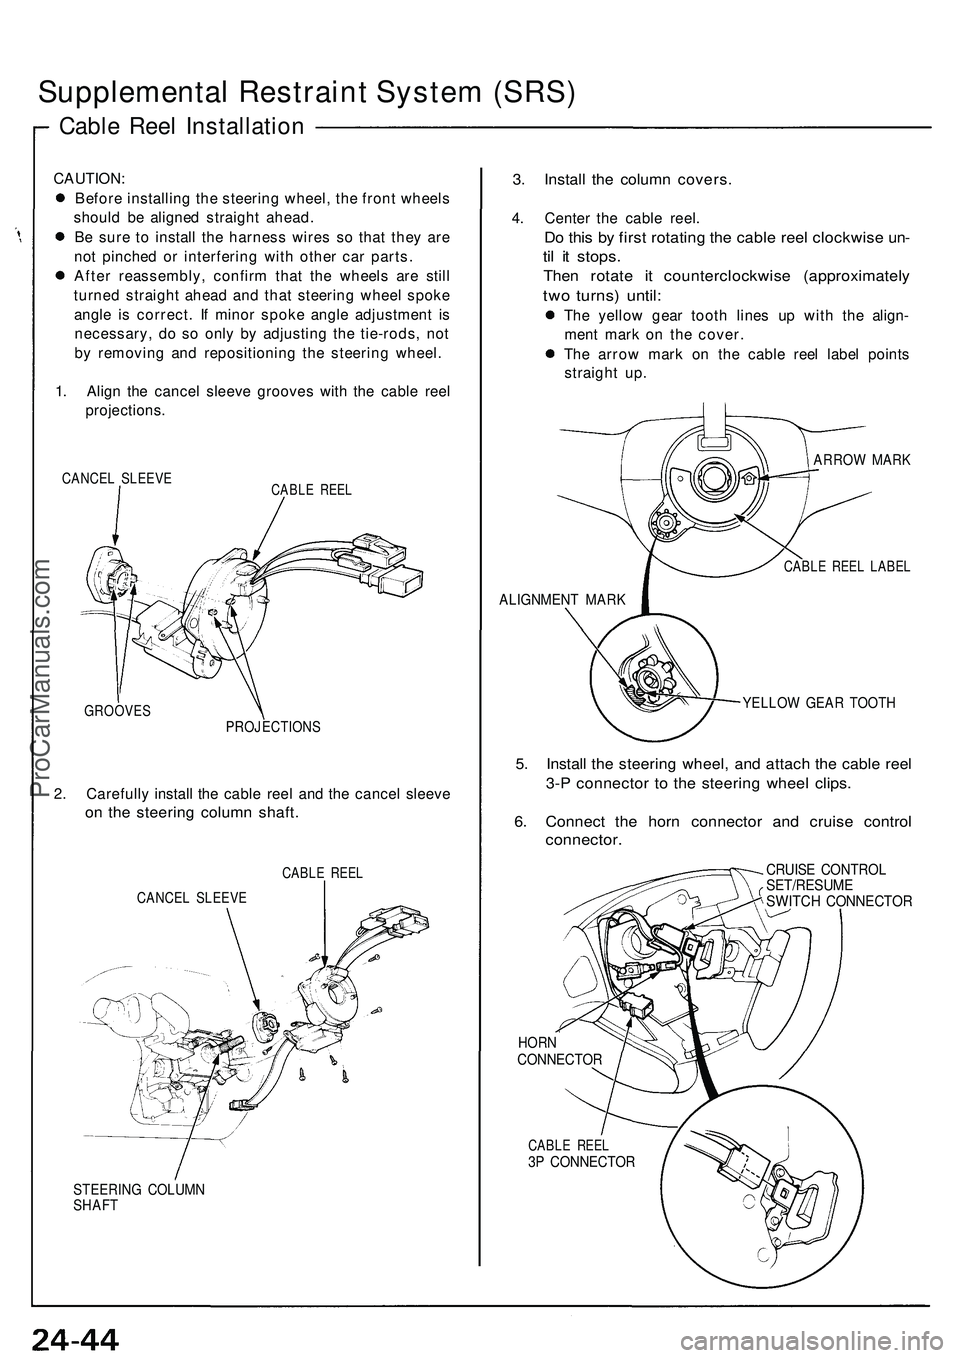
Supplemental Restraint System (SRS)
Cable Reel Installation
CAUTION:
Before installing the steering wheel, the front wheels
should be aligned straight ahead.
Be sure to install the harness wires so that they are
not pinched or interfering with other car parts.
After reassembly, confirm that the wheels are still
turned straight ahead and that steering wheel spoke
angle is correct. If minor spoke angle adjustment is
necessary, do so only by adjusting the tie-rods, not
by removing and repositioning the steering wheel.
1. Align the cancel sleeve grooves with the cable reel
projections.
CANCEL SLEEVE
CABLE REEL
GROOVES
PROJECTIONS
2. Carefully install the cable reel and the cancel sleeve
on the steering column shaft.
CABLE REEL
CANCEL SLEEVE
STEERING COLUMN
SHAFT
3. Install the column covers.
4. Center the cable reel.
Do this by first rotating the cable reel clockwise un-
til it stops.
Then rotate it counterclockwise (approximately
two turns) until:
The yellow gear tooth lines up with the align-
ment mark on the cover.
The arrow mark on the cable reel label points
straight up.
ARROW MARK
CABLE REEL LABEL
ALIGNMENT MARK
YELLOW GEAR TOOTH
5. Install the steering wheel, and attach the cable reel
3-P connector to the steering wheel clips.
6. Connect the horn connector and cruise control
connector.
CRUISE CONTROL
SET/RESUME
SWITCH CONNECTOR
HORN
CONNECTOR
CABLE REEL
3P CONNECTORProCarManuals.com
Page 1496 of 1503
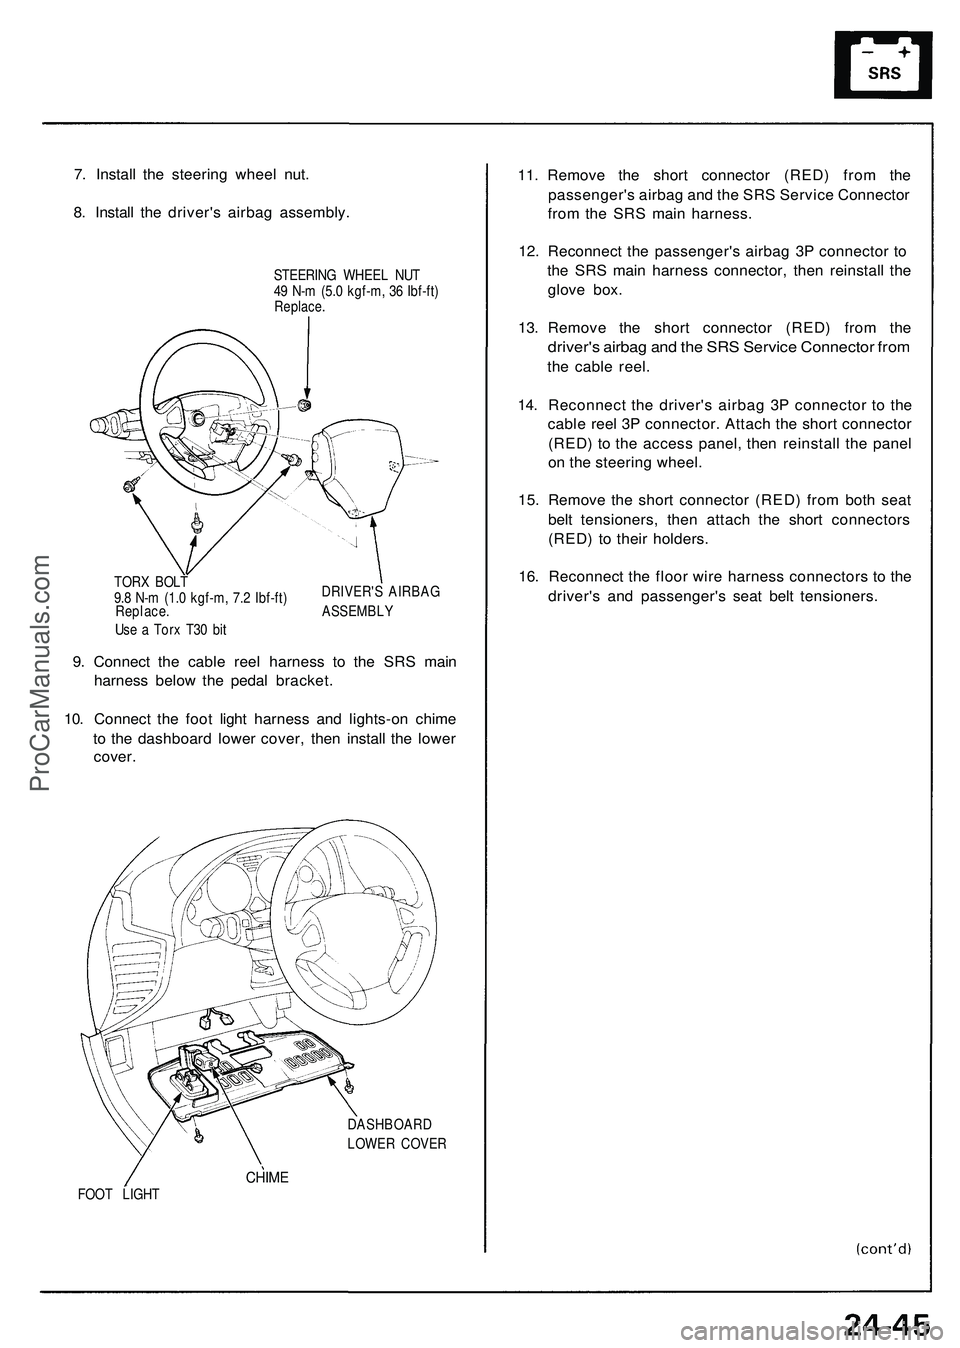
7. Instal l th e steerin g whee l nut .
8 . Instal l th e driver' s airba g assembly .
STEERING WHEE L NU T
4 9 N- m (5. 0 kgf-m , 3 6 Ibf-ft )
Replace .
DRIVER' S AIRBA G
TOR
X BOL T
9. 8 N- m (1. 0 kgf-m , 7. 2 Ibf-ft )
Replace . ASSEMBL Y
Us e a Tor x T3 0 bi t
9. Connec t th e cabl e ree l harnes s t o th e SR S mai n
harnes s belo w th e peda l bracket .
10 . Connec t th e foo t ligh t harnes s an d lights-o n chim e
t o th e dashboar d lowe r cover , the n instal l th e lowe r
cover .
DASHBOAR D
LOWE R COVE R
CHIMEFOOT LIGH T
11. Remov e th e shor t connecto r (RED ) fro m th e
passenger' s airba g an d th e SR S Servic e Connecto r
fro m th e SR S mai n harness .
1 2 . Reconnec t th e passenger' s airba g 3 P connecto r t o
th e SR S mai n harnes s connector , the n reinstal l th e
glov e box .
13 . Remov e th e shor t connecto r (RED ) fro m th e
driver' s airba g an d th e SR S Servic e Connecto r fro m
the cabl e reel .
14 . Reconnec t th e driver' s airba g 3 P connecto r t o th e
cabl e ree l 3 P connector . Attac h th e shor t connecto r
(RED ) t o th e acces s panel , the n reinstal l th e pane l
o n th e steerin g wheel .
15 . Remov e th e shor t connecto r (RED ) fro m bot h sea t
bel t tensioners , the n attac h th e shor t connector s
(RED ) t o thei r holders .
16 . Reconnec t th e floo r wir e harnes s connector s t o th e
driver' s an d passenger' s sea t bel t tensioners .
ProCarManuals.com
Page 1497 of 1503
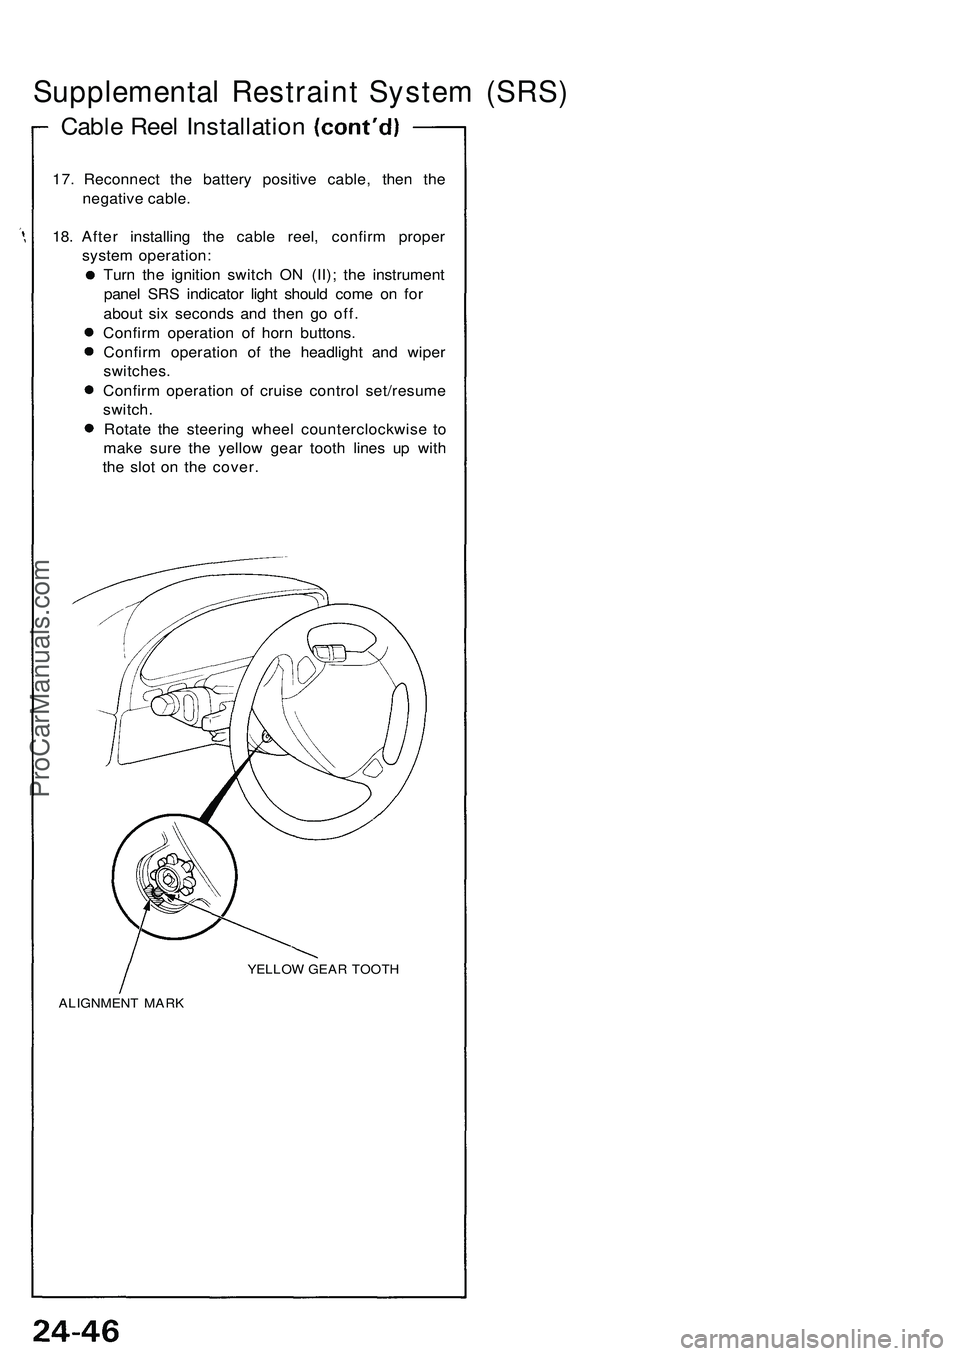
Supplemental Restrain t Syste m (SRS )
Cable Ree l Installatio n
17. Reconnec t th e batter y positiv e cable , the n th e
negativ e cable .
18 . Afte r installin g th e cabl e reel , confir m prope r
syste m operation :
Tur n th e ignitio n switc h O N (II) ; th e instrumen t
pane l SR S indicato r ligh t shoul d com e o n fo r
abou t si x second s an d the n g o off .
Confir m operatio n o f hor n buttons .
Confir m operatio n o f th e headligh t an d wipe r
switches .
Confir m operatio n o f cruis e contro l set/resum e
switch .
Rotat e th e steerin g whee l counterclockwis e t o
mak e sur e th e yello w gea r toot h line s u p wit h
th e slo t o n th e cover .
YELLO W GEA R TOOT H
ALIGNMEN T MAR K
ProCarManuals.com
Page 1498 of 1503
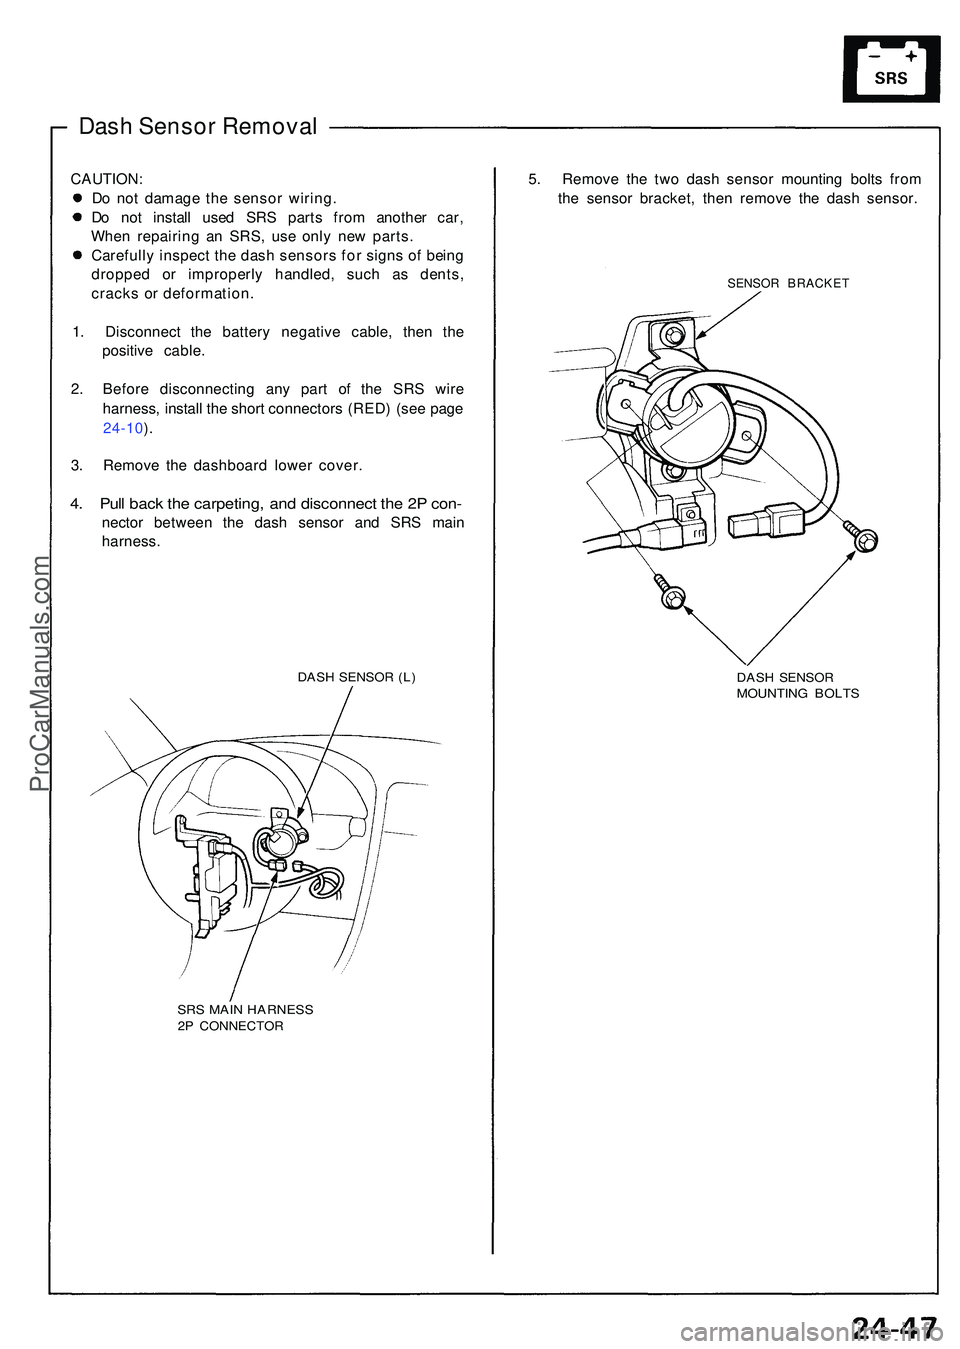
Dash Senso r Remova l
CAUTION :
D o no t damag e th e senso r wiring .
D o no t instal l use d SR S part s fro m anothe r car ,
Whe n repairin g a n SRS , us e onl y ne w parts .
Carefull y inspec t th e das h sensor s fo r sign s o f bein g
droppe d o r improperl y handled , suc h a s dents ,
crack s o r deformation .
1 . Disconnec t th e batter y negativ e cable , the n th e
positiv e cable .
2 . Befor e disconnectin g an y par t o f th e SR S wir e
harness , instal l th e shor t connector s (RED ) (se e pag e
24-10 ).
3 . Remov e th e dashboar d lowe r cover .
4. Pul l bac k th e carpeting , an d disconnec t th e 2 P con -
necto r betwee n th e das h senso r an d SR S mai n
harness .
DASH SENSO R (L )
SR S MAI N HARNES S2P CONNECTO R
5. Remov e th e tw o das h senso r mountin g bolt s fro m
th e senso r bracket , the n remov e th e das h sensor .
SENSOR BRACKE T
DASH SENSO RMOUNTIN G BOLT S
ProCarManuals.com
Page 1499 of 1503
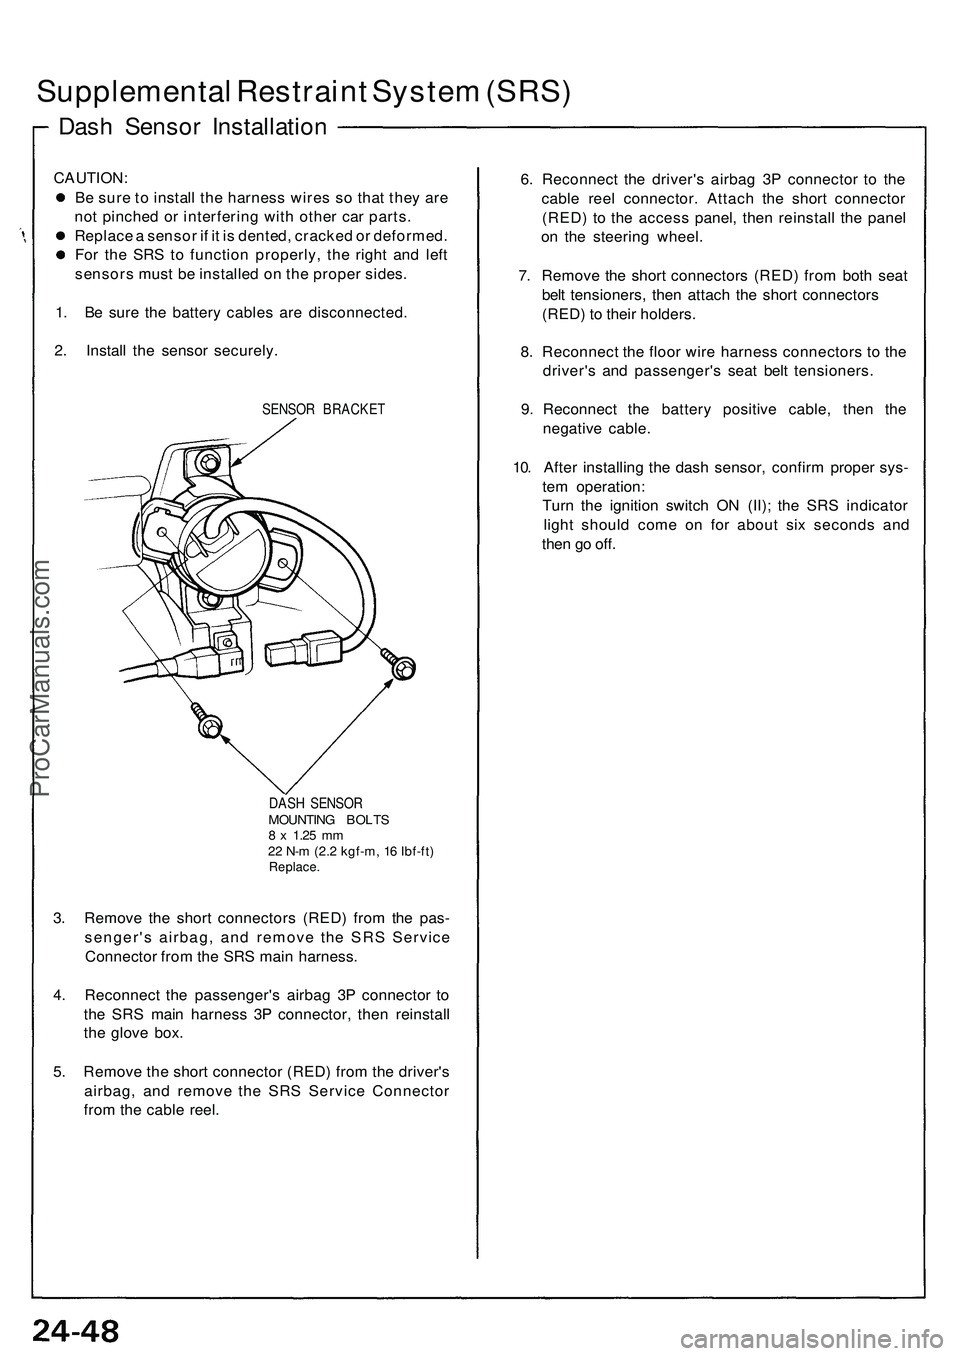
Supplemental Restrain t Syste m (SRS )
Dash Senso r Installatio n
CAUTION:
B e sur e t o instal l the harnes s wire s s o tha t the y ar e
no t pinche d o r interferin g wit h othe r ca r parts .
Replac e a senso r i f i t i s dented , cracke d o r deformed .
Fo r th e SR S t o functio n properly , th e righ t an d lef t
sensor s mus t b e installe d o n th e prope r sides .
1 . B e sur e th e batter y cable s ar e disconnected .
2 . Instal l th e senso r securely .
SENSOR BRACKE T
DAS H SENSO R
MOUNTIN G BOLT S8 x 1.2 5 mm22 N- m (2. 2 kgf-m , 1 6 Ibf-ft )Replace .
3. Remov e th e shor t connector s (RED ) fro m th e pas -
senger' s airbag , an d remov e th e SR S Servic e
Connecto r fro m th e SR S mai n harness .
4 . Reconnec t th e passenger' s airba g 3 P connecto r t o
th e SR S mai n harnes s 3 P connector , the n reinstal l
th e glov e box .
5 . Remov e th e shor t connecto r (RED ) fro m th e driver' s
airbag , an d remov e th e SR S Servic e Connecto r
fro m th e cabl e reel . 6
. Reconnec t th e driver' s airba g 3 P connecto r t o th e
cabl e ree l connector . Attac h th e shor t connecto r
(RED ) t o th e acces s panel , the n reinstal l th e pane l
o n th e steerin g wheel .
7 . Remov e th e shor t connector s (RED ) fro m bot h sea t
bel t tensioners , the n attac h th e shor t connector s
(RED ) t o their holders .
8 . Reconnec t th e floo r wir e harnes s connector s t o th e
driver' s an d passenger' s sea t bel t tensioners .
9 . Reconnec t th e batter y positiv e cable , the n th e
negativ e cable .
10 . Afte r installin g th e das h sensor , confir m prope r sys -
te m operation :
Tur n th e ignitio n switc h O N (II) ; th e SR S indicato r
ligh t shoul d com e o n fo r abou t si x second s an d
the n g o off .
ProCarManuals.com
Page 1500 of 1503
SRS Uni t Remova l
CAUTION :
Alway s kee p the shor t connector s o n th e airbag s
whe n th e harnes s i s disconnected .
D o no t damag e th e SR S uni t terminal s o r
connectors .
Do no t disassembl e th e SR S unit ; i t ha s n o ser -
viceabl e parts .
Stor e th e SR S uni t i n a clean , dr y area .
D o no t us e an y SR S uni t whic h ha s bee n subjecte d
t o wate r damag e o r show s sign s o f bein g droppe d o r
improperl y handled , suc h a s dents , crack s o r
deformation .
1 . Disconnec t th e batter y negativ e cable , the n th e
positiv e cable .
2 . Befor e disconnectin g an y par t o f th e SR S wir e
harness , instal l th e shor t connector s (RED ) (se e pag e
24-10 ).
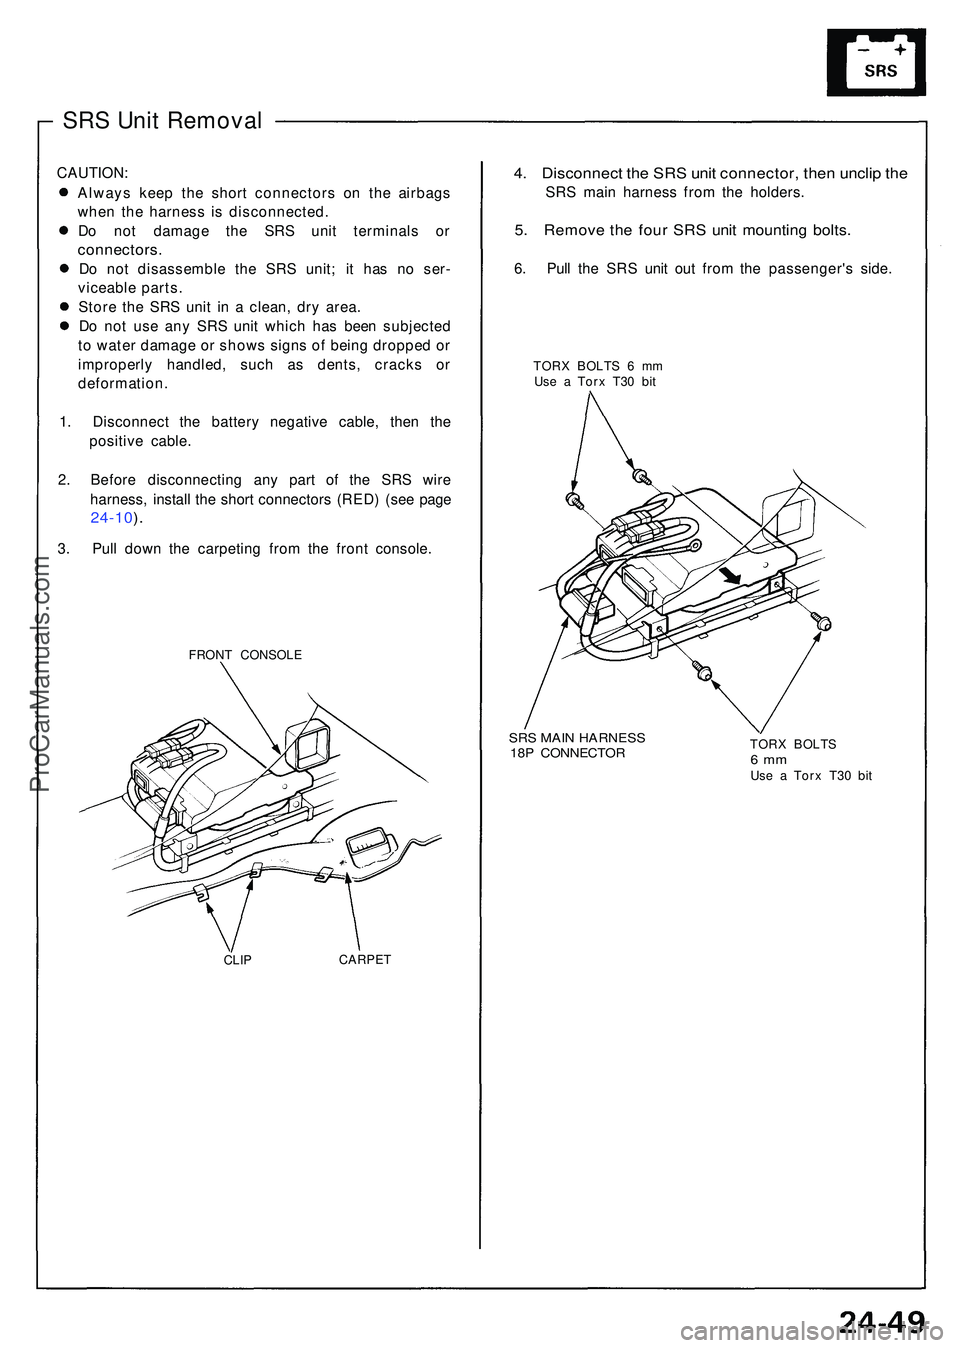
3 . Pul l dow n th e carpetin g fro m th e fron t console .
FRONT CONSOL E
CLI P CARPE
T
4. Disconnec t th e SR S uni t connector , the n uncli p th e
SR S mai n harnes s fro m th e holders .
5. Remov e th e fou r SR S uni t mountin g bolts .
6. Pul l th e SR S uni t ou t fro m th e passenger' s side .
TORX BOLT S 6 m m
Us e a Tor x T3 0 bi t
SRS MAI N HARNES S18P CONNECTO RTORX BOLT S6 m mUse a Tor x T3 0 bi t
ProCarManuals.com