Clock change Acura RDX 2012 Owner's Manual
[x] Cancel search | Manufacturer: ACURA, Model Year: 2012, Model line: RDX, Model: Acura RDX 2012Pages: 518, PDF Size: 26.43 MB
Page 169 of 518

The climate control system in your vehicle
provides a comfortable driving
environment in all weather conditions.
The standard audio system has many
features. This section describes those
features and how to use them.
Your vehicle has an anti-theft audio system
that requires a code number to enable it.
The security system helps to discourage
vandalism and theft of your vehicle.On models with navigation systemThe climate control system and the audiosystem have a voice control feature. Referto the navigation system manual for more
information.Climate Control System
....................
164
Dual Temperature Control
.............
169
Climate Control Sensors
................
171
Audio System
..................................
172
Playing the FM/AM Radio (Models without navigation system)
........
174
To Play the Radio
.........................
174
Adjusting the Sound
.....................
177
Playing the XM
®Radio (Models
without navigation system)
............
179
Playing Discs (Models without navigation system)
.......................
185 Disc Changer Error Messages
(Models without navigationsystem)
..................................
195
Playing an iPod
®(Models without
navigation system)
.......................
197
iPod
®Error Messages (Models
without navigation system)
............
203
Playing a USB Flash Memory Device (Models without navigationsystem)
..................................
204
USB Flash Memory Device Error Messages (Models without
navigation system)
...................
211
Bluetooth
®Audio System (Models
without navigation system)
............
212
Audio System (Models with navigation system)
..................................
216
Interface Dial
..............................
216
Playing the FM/AM Radio (Models
with navigation system)
.............
217
Adjusting the Sound
.....................
224
Playing the XM
®Radio (Models with
navigation system)
.......................
228
Playing Discs (Models with navigation system)
......................................
239
Disc Changer Error Messages
(Models with navigationsystem)
..................................
255 Protecting Your Discs
.......................
257
Playing an iPod
®(Models with
navigation system)
.......................
260
iPod
®Error Messages (Models with
navigation system)
.......................
269
Playing a USB Flash Memory Device (Models with navigation
system)
..................................
270
USB Flash Memory Device Error Messages (Models with navigation
system)
..................................
279
Bluetooth
®Audio System (Models with
navigation system)
.......................
280
FM/AM Radio Reception
..................
287
Remote Audio Controls
.....................
289
Auxiliary Input Jack
..........................
291
Radio Theft Protection
......................
291
Setting the Clock
.............................
293
Security System
...............................
294
Compass
........................................
295
Compass Operation
....................
295
Cruise Control
.................................
300
HomeLink
®Universal Transceiver
......
303
Bluetooth
®HandsFreeLink
®..............
306
AcuraLink
®(U.S. models only)
...........
332
Rearview Mirror with Rearview
Camera Display
...........................
348
Features
163
Features
11/06/16 17:42:51 12 ACURA RDX MMC North America Owner's M 50 31STK650 enu
Page 183 of 518
Adjusting the Sound
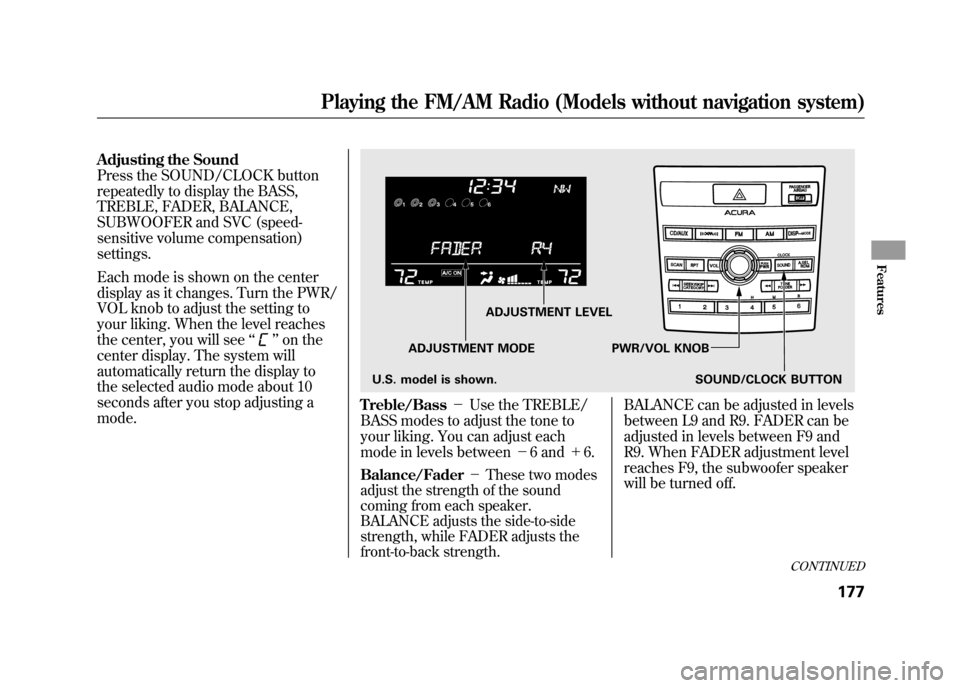
Press the SOUND/CLOCK button
repeatedly to display the BASS,
TREBLE, FADER, BALANCE,
SUBWOOFER and SVC (speed-
sensitive volume compensation)
settings.
Each mode is shown on the center
display as it changes. Turn the PWR/
VOL knob to adjust the setting to
your liking. When the level reaches
the center, you will see‘‘
’’on the
center display. The system will
automatically return the display to
the selected audio mode about 10
seconds after you stop adjusting a
mode.
Treble/Bass -Use the TREBLE/
BASS modes to adjust the tone to
your liking. You can adjust each
mode in levels between -6 and +6.Balance/Fader -These two modes
adjust the strength of the sound
coming from each speaker.
BALANCE adjusts the side-to-side
strength, while FADER adjusts the
front-to-back strength.
BALANCE can be adjusted in levels
between L9 and R9. FADER can be
adjusted in levels between F9 and
R9. When FADER adjustment level
reaches F9, the subwoofer speaker
will be turned off.
ADJUSTMENT LEVEL
ADJUSTMENT MODE PWR/VOL KNOB SOUND/CLOCK BUTTON
U.S. model is shown.
CONTINUED
Playing the FM/AM Radio (Models without navigation system)
177
Features
11/06/16 17:42:51 12 ACURA RDX MMC North America Owner's M 50 31STK650 enu
Page 206 of 518

Text Data Display FunctionEach time you press the DISP/
MODE button, the display mode
switches between the album name,
the song name, the artist name, or
name off (which turns off the text
display).
The center display shows up to about
16 characters of the selected data. If
the text data has more than 16
characters, you will see the first 16
characters and the
indicator in the
center display. Press and hold the
DISP/MODE button until the next
16 characters are shown.
To Change or Select FilesUse the SEEK/SKIP bar while an
iPod is playing to select passages and
change files.
SKIP -Each time you press and
release the
side of the SEEK/
SKIP bar, the system skips forward
to the beginning of the next file.
Press and release the
side of the
bar, to skip backward to the
beginning of the current file. Press it
again to skip to the beginning of the
previous file.
To move rapidly within a file, press
and hold either side (or
)of
the SEEK/SKIP bar.
To Select a File from iPod MenuYou can also select a file from any list
on the iPod menu: playlists, artists,
albums, and songs, by using the
SOUND/CLOCK button and PWR/
VOL knob. Press and release the
SOUND/CLOCK button to switch
the display to an iPod menu, then
turn the PWR/VOL knob to select a
desired list. Press and release the
SOUND/CLOCK button to set your
selection.
Press and release the
SOUND/CLOCK button.
Playing an iPod
®(Models without navigation system)
20011/06/16 17:42:51 12 ACURA RDX MMC North America Owner's M 50 31STK650 enu
Page 299 of 518
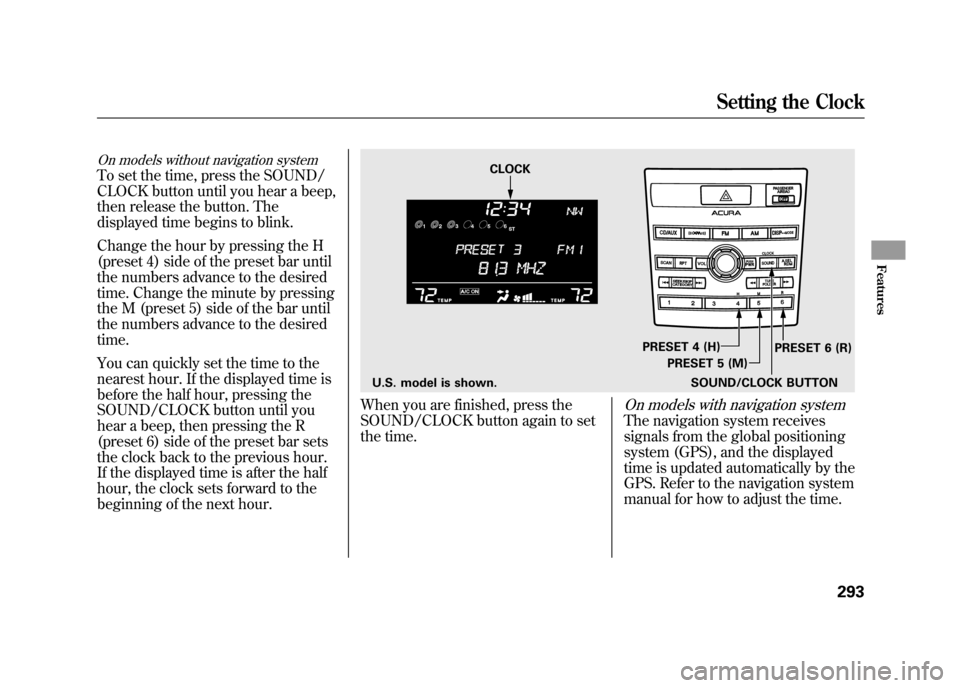
On models without navigation systemTo set the time, press the SOUND/
CLOCK button until you hear a beep,
then release the button. The
displayed time begins to blink.
Change the hour by pressing the H
(preset 4) side of the preset bar until
the numbers advance to the desired
time. Change the minute by pressing
the M (preset 5) side of the bar until
the numbers advance to the desired
time.
You can quickly set the time to the
nearest hour. If the displayed time is
before the half hour, pressing the
SOUND/CLOCK button until you
hear a beep, then pressing the R
(preset 6) side of the preset bar sets
the clock back to the previous hour.
If the displayed time is after the half
hour, the clock sets forward to the
beginning of the next hour.
When you are finished, press the
SOUND/CLOCK button again to set
the time.
On models with navigation systemThe navigation system receives
signals from the global positioning
system (GPS), and the displayed
time is updated automatically by the
GPS. Refer to the navigation system
manual for how to adjust the time.
U.S. model is shown.SOUND/CLOCK BUTTONPRESET 6 (R)
PRESET 4 (H)
PRESET 5 (M)
CLOCK
Setting the Clock
293
Features
11/06/16 17:42:51 12 ACURA RDX MMC North America Owner's M 50 31STK650 enu
Page 302 of 518
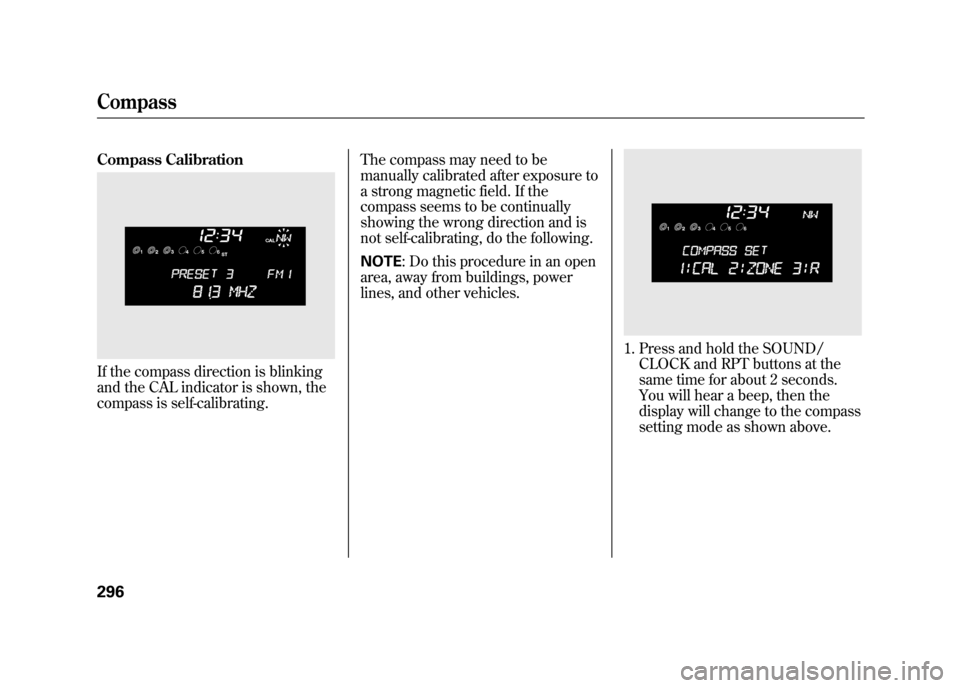
Compass CalibrationIf the compass direction is blinking
and the CAL indicator is shown, the
compass is self-calibrating.The compass may need to be
manually calibrated after exposure to
a strong magnetic field. If the
compass seems to be continually
showing the wrong direction and is
not self-calibrating, do the following.
NOTE
: Do this procedure in an open
area, away from buildings, power
lines, and other vehicles.
1. Press and hold the SOUND/ CLOCK and RPT buttons at the
same time for about 2 seconds.
You will hear a beep, then the
display will change to the compass
setting mode as shown above.
Compass29611/06/16 17:42:51 12 ACURA RDX MMC North America Owner's M 50 31STK650 enu
Page 304 of 518
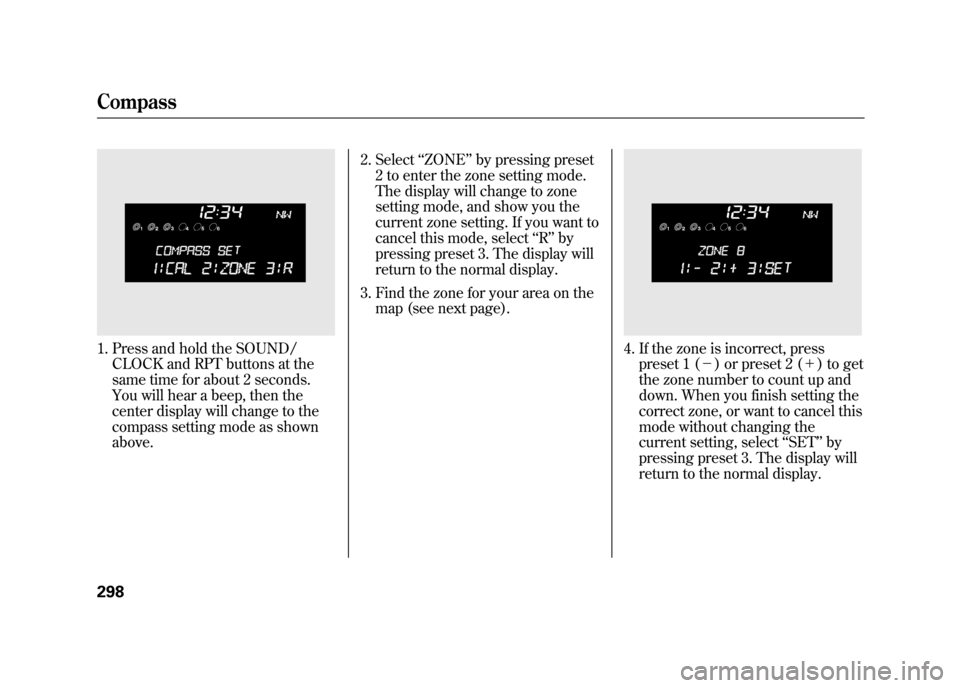
1. Press and hold the SOUND/CLOCK and RPT buttons at the
same time for about 2 seconds.
You will hear a beep, then the
center display will change to the
compass setting mode as shown
above. 2. Select
‘‘ZONE ’’by pressing preset
2 to enter the zone setting mode.
The display will change to zone
setting mode, and show you the
current zone setting. If you want to
cancel this mode, select ‘‘R ’’ by
pressing preset 3. The display will
return to the normal display.
3. Find the zone for your area on the map (see next page).
4. If the zone is incorrect, presspreset 1 (- ) or preset 2 (+ ) to get
the zone number to count up and
down. When you finish setting the
correct zone, or want to cancel this
mode without changing the
current setting, select ‘‘SET ’’by
pressing preset 3. The display will
return to the normal display.
Compass29811/06/16 17:42:51 12 ACURA RDX MMC North America Owner's M 50 31STK650 enu
Page 437 of 518
Headlight Aiming
The headlights were properly aimed
when your vehicle was new. If you
regularly carry heavy items in the
cargo area or pull a trailer,
readjustment may be required.
Adjustments should be done by your
dealer or another qualified
technician.
Low Beam Headlight Bulb
Replacement
The low beam headlight bulbs are
high voltage discharge tube. High
voltage can remain in the circuit even
with the light switch off and the key
removed. Because of this, you should
not attempt to examine or change a
low beam headlight bulb yourself. If
a low beam headlight bulb fails, take
the vehicle to your dealer to have it
replaced.Replacing a High Beam Headlight
Bulb
Your vehicle has halogen headlight
bulbs. When replacing a bulb, handle
it by its base, and protect the glass
from contact with your skin or hard
objects. If you touch the glass, clean
it with denatured alcohol and a clean
cloth.
Halogen headlight bulbs get very hot
when lit. Oil, perspiration, or a scratch
on the glass can cause the bulb to
overheat and shatter.
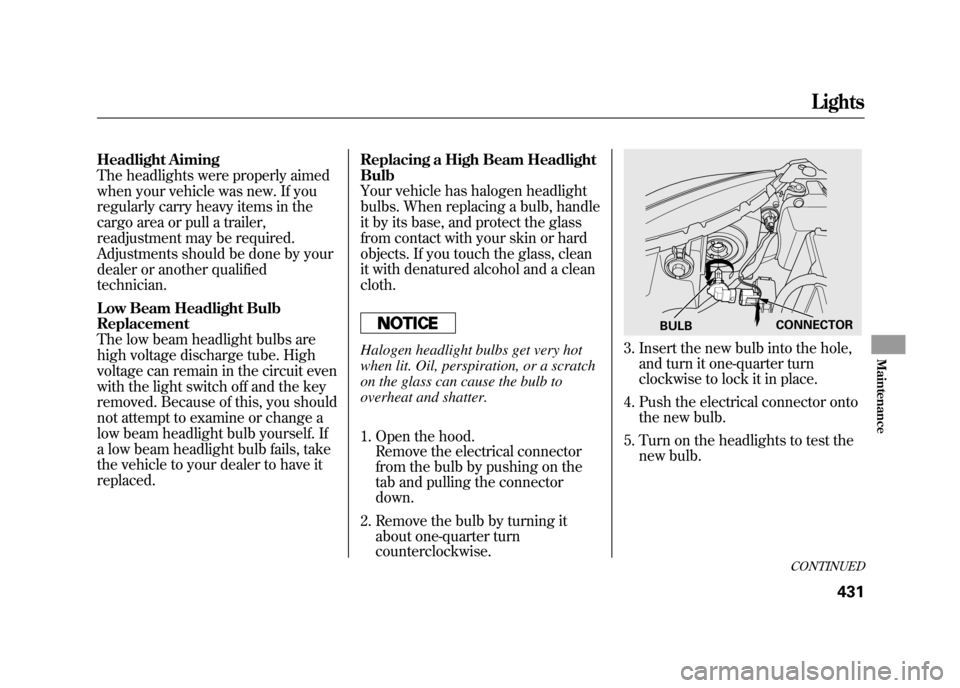
1. Open the hood.
Remove the electrical connector
from the bulb by pushing on the
tab and pulling the connector
down.
2. Remove the bulb by turning it about one-quarter turn
counterclockwise.
3. Insert the new bulb into the hole,and turn it one-quarter turn
clockwise to lock it in place.
4. Push the electrical connector onto the new bulb.
5. Turn on the headlights to test the new bulb.
BULB CONNECTOR
CONTINUED
Lights
431
Maintenance
11/06/16 17:42:51 12 ACURA RDX MMC North America Owner's M 50 31STK650 enu
Page 462 of 518
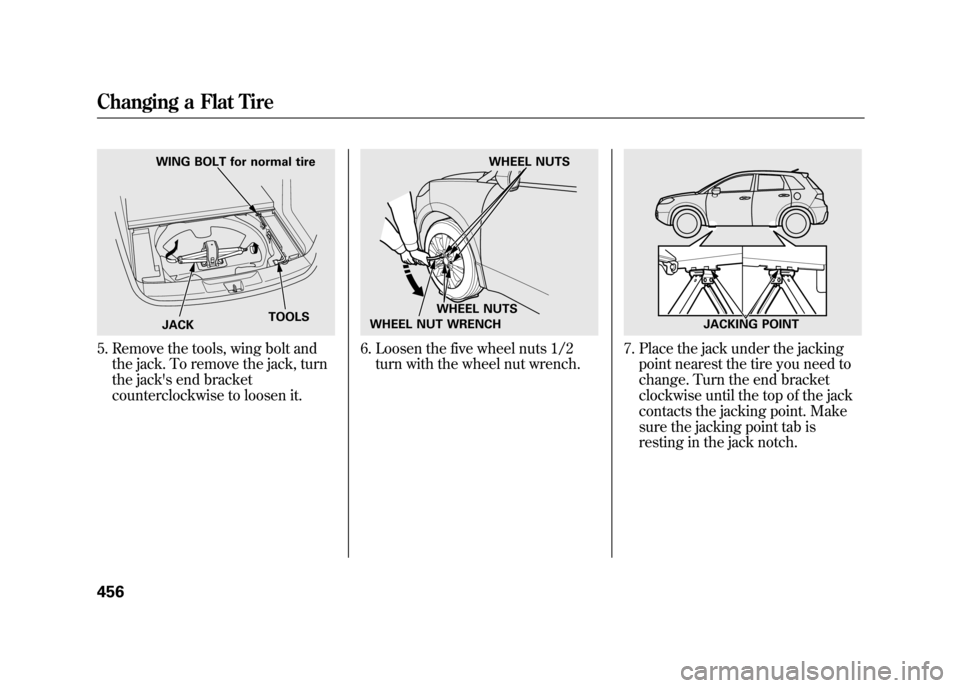
5. Remove the tools, wing bolt andthe jack. To remove the jack, turn
the jack's end bracket
counterclockwise to loosen it.
6. Loosen the five wheel nuts 1/2turn with the wheel nut wrench.
7. Place the jack under the jackingpoint nearest the tire you need to
change. Turn the end bracket
clockwise until the top of the jack
contacts the jacking point. Make
sure the jacking point tab is
resting in the jack notch.
WING BOLT for normal tire
JACK TOOLS
WHEEL NUTS
WHEEL NUTS
WHEEL NUT WRENCH
JACKING POINT
Changing a Flat Tire45611/06/16 17:42:51 12 ACURA RDX MMC North America Owner's M 50 31STK650 enu