buttons ACURA RL KA9 1996 Service User Guide
[x] Cancel search | Manufacturer: ACURA, Model Year: 1996, Model line: RL KA9, Model: ACURA RL KA9 1996Pages: 1954, PDF Size: 61.44 MB
Page 254 of 1954
Navigation Syste m
Sympto m Troubleshootin g (cont'd )
Display uni t button s d o no t wor k
NOTE :
• Alway s chec k th e connector s fo r poo r connection s o r
loos e terminals .
• Befor e troubleshooting , ge t th e navigatio n syste m
anti-thef t codes .
• Afte r troubleshooting , ente r th e navigatio n syste m
anti-thef t codes .
1. Tur n th e ignitio n switc h to AC C (I) .
2. G o int o th e Diagnosti c mod e an d us e "Touc h Panel "
diagnosti c unde r Monito r Chec k (se e pag e 23-41 )
and, i f necessary , "Display " diagnosti c unde r Uni t
Chec k (se e pag e 23-43 ).
Do the buttons work properly?
YES—System is OK .
NO—G o t o ste p 3 .
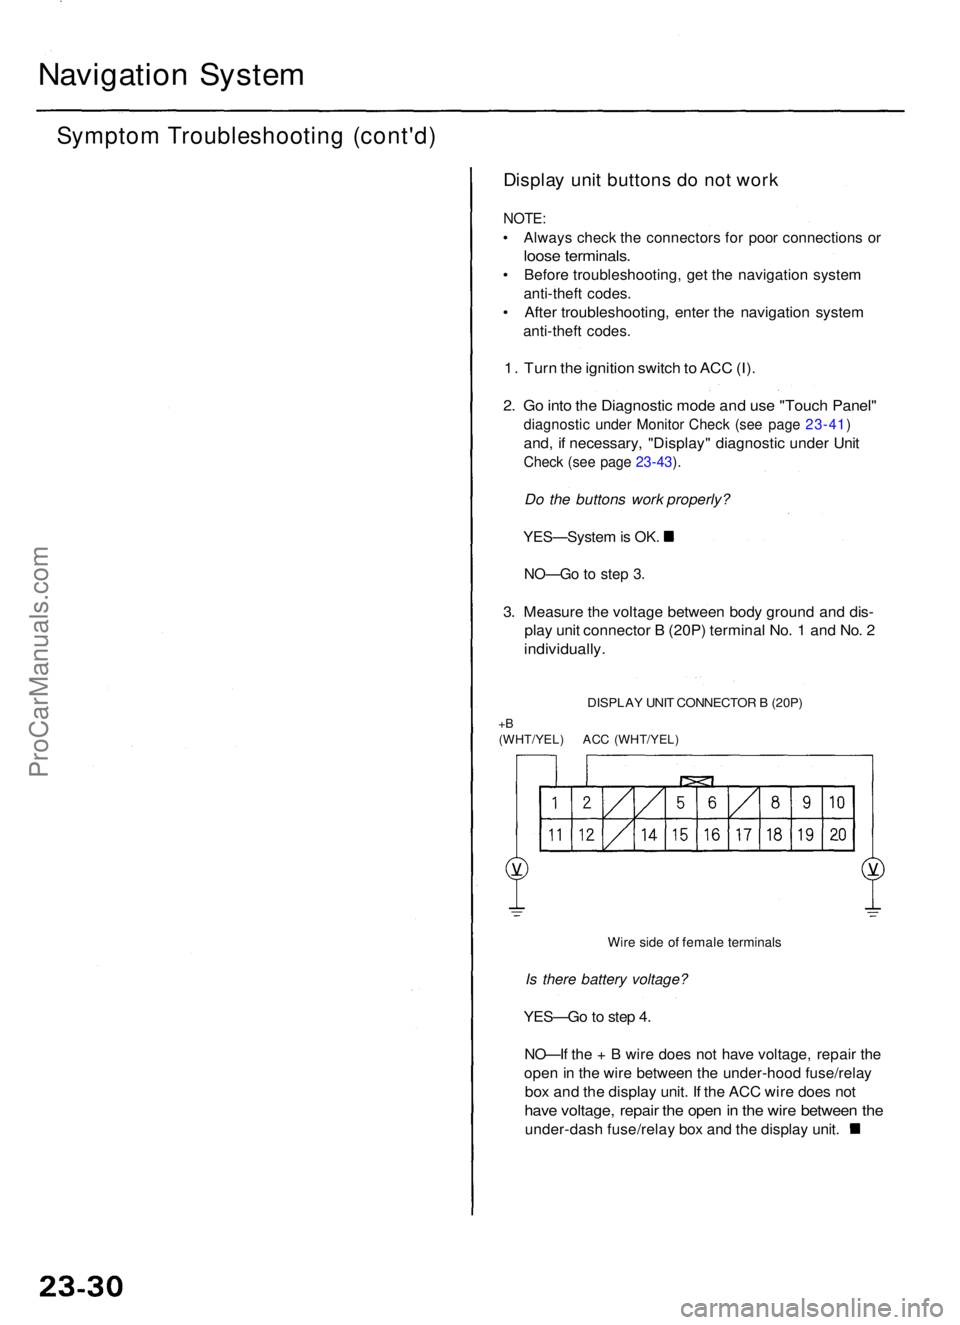
3. Measur e th e voltag e betwee n bod y groun d an d dis -
play uni t connecto r B (20P ) termina l No . 1 an d No . 2
individually .
DISPLAY UNI T CONNECTO R B (20P )
+B(WHT/YEL ) AC C (WHT/YEL )
Wire sid e o f femal e terminal s
Is there battery voltage?
YES—G o to ste p 4 .
NO—I f th e + B wir e doe s no t hav e voltage , repai r th e
ope n in th e wir e betwee n th e under-hoo d fuse/rela y
box an d th e displa y unit . I f th e AC C wir e doe s no t
hav e voltage , repai r th e ope n in th e wir e betwee n th e
under-das h fuse/rela y bo x an d th e displa y unit .
ProCarManuals.com
Page 260 of 1954
Voice contro l doe s no t wor k
Diagnosti c Test : Navigatio n Syste m Lin k an d
Functiona l Setu p
NOTE :
• Alway s chec k th e connector s fo r poo r connection s o r
loos e terminals .
• Befor e troubleshooting , writ e dow n th e customer' s
radi o statio n presets , an d ge t th e radi o an d naviga -
tio n syste m anti-thef t codes .
• Afte r troubleshooting , ente r th e radi o an d navigatio n
syste m anti-thef t codes , an d th e radi o statio n presets .
Befor e assumin g tha t a voic e contro l complain t i s
hardwar e related , ensur e tha t th e voic e contro l syste m
i s bein g operate d correctly .
• Mak e sur e yo u ar e o n th e correc t scree n whe n tryin g
t o issu e a voic e command . Fo r instance , th e com -
man d "Fin d th e neares t Italia n Restaurant " onl y
work s o n a Ma p screen . (Se e th e Navigatio n Owner' s
manua l fo r a complet e lis t o f allowe d voic e com -
mand s fo r th e informatio n bein g displayed) .
• Clos e th e window s an d sunroof .
• Se t th e fa n spee d t o lo w (1 o r 2) .
• Adjus t th e ai r flo w fro m th e dashboar d vent s s o tha t
they d o no t blo w agains t th e microphon e o n th e
celling .
• Paus e afte r pressin g th e TAL K button , the n giv e a
voic e comman d in a clear , natura l speakin g voice .
I f th e syste m canno t recogniz e you r command , spea k
louder .
• I f th e microphon e pick s u p voice s othe r tha n yours ,
th e syste m ma y no t interpre t you r voic e command s
correctly .
• I f yo u spea k a comman d wit h somethin g in you r
mouth , o r you r voic e is eithe r to o hig h o r to o husky ,
th e syste m ma y misinterpre t you r command .
1 . G o int o th e Diagnosti c mod e an d us e th e "Mi c Level "
diagnosti c th e unde r Functiona l Setu p (se e pag e 23 -48
t o chec k th e operatio n o f th e TAL K an d BAC K but -
tons.
Are the TALK and BACK buttons operational?
YES—G o to ste p 2 .
NO—Chec k fo r a n ope n o r shor t t o groun d o n naviga -
tio n uni t connecto r B (14P ) termina l No . 10 . 2
. Us e th e "Mi c Level " diagnosti c unde r Functiona l
Setu p (se e pag e 23-48 ) t o chec k th e operatio n o f th e
microphone .
Is the microphone operational?
YES—Chec k th e operatio n o f th e voic e contro l sys -
te m (Se e th e Navigatio n Syste m Owner' s Manual) .
NO—Chec k fo r a loos e o r missin g microphon e assembly .
I f OK , chec k fo r a n ope n o r shor t t o groun d o n navigatio n
uni t connecto r B (14P ) terminal s No . 6 an d No . 14 .
Curso r constantl y leave s roa d
Diagnosti c Test : Ya w Rat e an d Ca r Statu s
1 . Chec k th e GP S ico n o n th e navigatio n picture .
Is the GPS icon white?
YES—D o th e troubleshootin g fo r GP S ico n i s whit e
(see page 23-32)
NO—G o t o ste p 2 .
2 . G o int o th e Diagnosti c mod e an d us e th e "Ya w Rate "
diagnosti c (se e pag e 23-47 ) t o chec k th e ya w rat e
sensor .
3. G o int o th e Diagnosti c mod e an d us e th e "Ca r
Status " diagnosti c (se e pag e 23-45 ) t o chec k th e vehi -
cl e spee d pulse .
Are the yaw rate sensor and vehicle speed pulse OK?
YES—Th e proble m ma y b e normal . Chec k t o se e if
th e proble m occur s i n th e sam e place . I f i t does , th e
proble m coul d b e in th e database . G o to ste p 4 .
NO—I f th e proble m is th e ya w rat e sensor , replac e
the navigatio n uni t (se e pag e 23-53 ). I f th e proble m is
th e vehicl e spee d pulse , troubleshoo t th e vehicl e
spee d signa l circuit .
4 . Substitut e a known-goo d navigatio n uni t an d chec k
t o se e if th e proble m occur s i n th e sam e place .
Doe s the problem occur in the same place?
YES—Th e proble m is in th e database . Repor t th e
proble m accordin g t o th e Navigatio n Syste m
Owner' s Manua l unde r "Reportin g Errors" .
NO—Replac e th e navigatio n uni t
(se e pag e 53 ).
ProCarManuals.com
Page 266 of 1954
Monitor Chec k
Overvie w o f displa y uni t
• Th e displa y uni t communicate s wit h th e navigatio n
uni t ove r it s ow n GA-Ne t bus . Informatio n i s sen t t o
th e navigatio n uni t wheneve r th e use r activate s th e
touc h screen , o r har d buttons . Informatio n sen t b y
th e navigatio n uni t t o th e displa y uni t include s com -
mand s t o contro l th e LC D bac k light .
• Th e navigatio n uni t als o send s navigatio n informa -
tion to th e scree n usin g th e Red , Green , Blue , an d
Composit e Vide o signals .
• Th e displa y uni t i s protecte d b y th e securit y syste m
b y daisy-chainin g th e securit y signa l throug h it , an d
the n passin g th e signa l t o th e audi o unit .
• Th e illuminatio n inpu t fro m th e gaug e brightnes s
contro l provide s bac k lightin g fo r th e har d button s
surroundin g th e screen .
• Th e displa y uni t als o communicate s wit h th e climat e
contro l modul e to se t th e A/ C mode , an d fa n speed .
Thes e screen s allo w troubleshootin g o f th e displa y unit .
Touc h th e men u ite m yo u wan t t o troubleshoot , an d fol -
low the diagnosti c instructions .
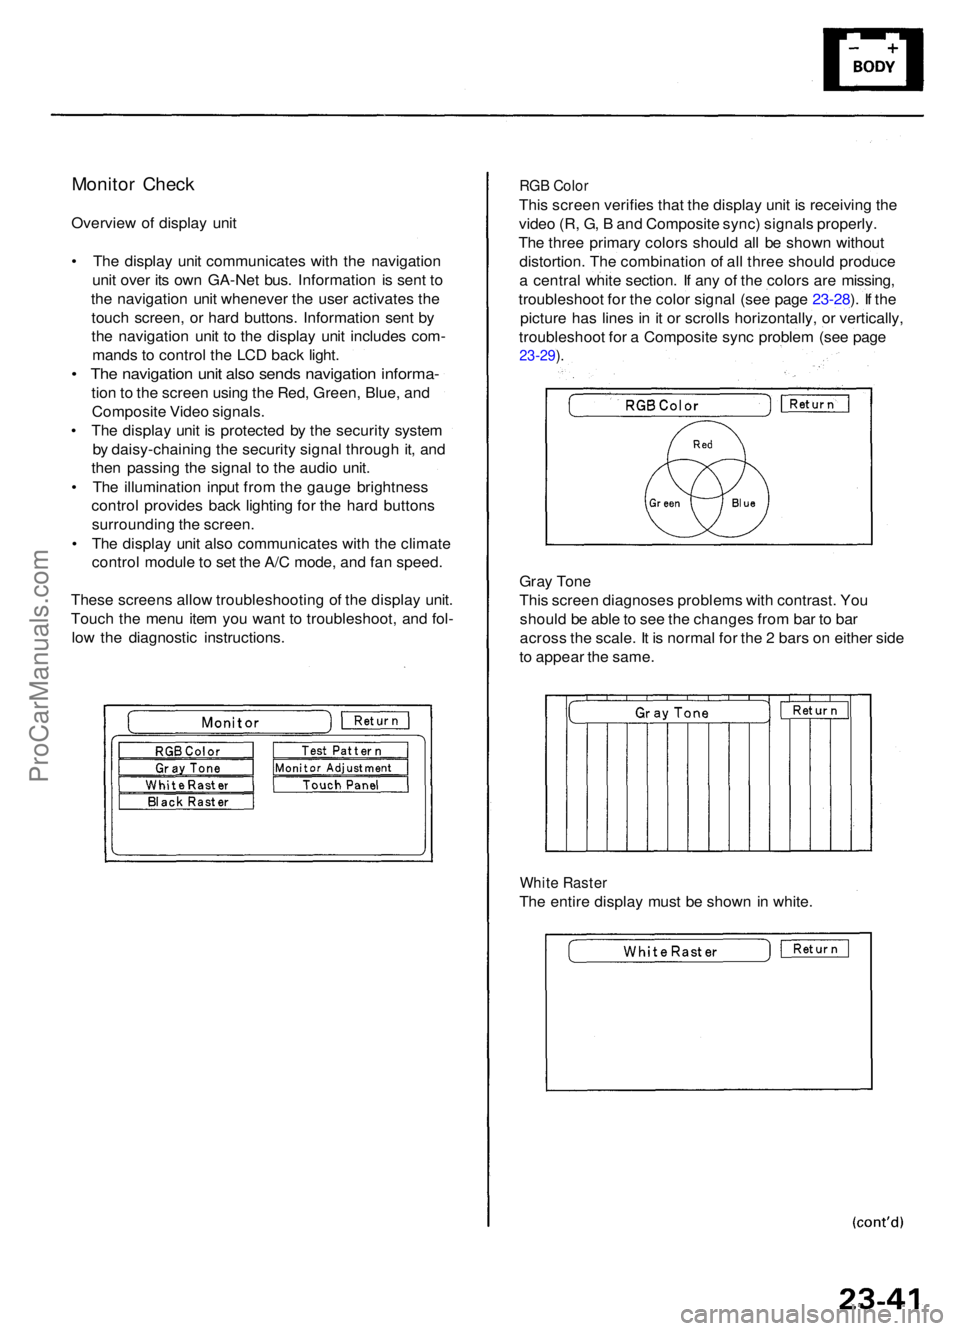
RGB Colo r
This scree n verifie s tha t th e displa y uni t i s receivin g th e
vide o (R , G , B an d Composit e sync ) signal s properly .
Th e thre e primar y color s shoul d al l b e show n withou t
distortion . Th e combinatio n o f al l thre e shoul d produc e
a centra l whit e section . I f an y o f th e color s ar e missing ,
troubleshoo t fo r th e colo r signa l (se e pag e 23-28 ). I f th e
pictur e ha s line s i n it o r scroll s horizontally , o r vertically ,
troubleshoo t fo r a Composit e syn c proble m (se e pag e
23-29 ).
Gra y Ton e
Thi s scree n diagnose s problem s wit h contrast . Yo u
shoul d b e abl e to se e th e change s fro m ba r t o ba r
acros s th e scale . I t i s norma l fo r th e 2 bar s o n eithe r sid e
t o appea r th e same .
White Raste r
The entir e displa y mus t b e show n i n white .
ProCarManuals.com
Page 275 of 1954
Navigation System
System Diagnosis Mode (cont'd)
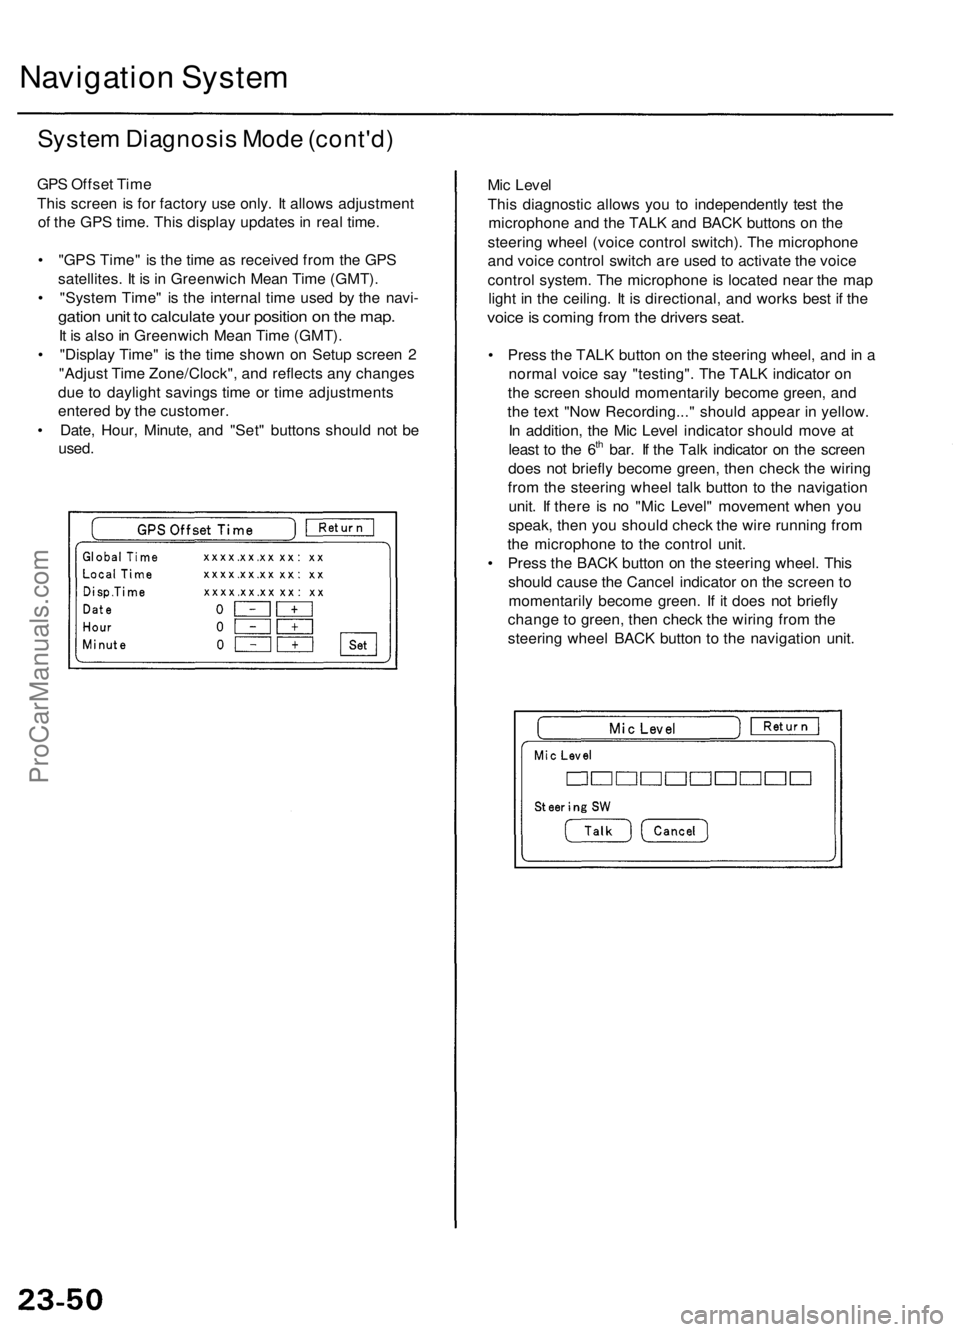
GPS Offset Time
This screen is for factory use only. It allows adjustment
of the GPS time. This display updates in real time.
• "GPS Time" is the time as received from the GPS
satellites. It is in Greenwich Mean Time (GMT).
• "System Time" is the internal time used by the navi-
gation unit to calculate your position on the map.
It is also in Greenwich Mean Time (GMT).
• "Display Time" is the time shown on Setup screen 2
"Adjust Time Zone/Clock", and reflects any changes
due to daylight savings time or time adjustments
entered by the customer.
• Date, Hour, Minute, and "Set" buttons should not be
used.
Mic Level
This diagnostic allows you to independently test the
microphone and the TALK and BACK buttons on the
steering wheel (voice control switch). The microphone
and voice control switch are used to activate the voice
control system. The microphone is located near the map
light in the ceiling. It is directional, and works best if the
voice is coming from the drivers seat.
• Press the TALK button on the steering wheel, and in a
normal voice say "testing". The TALK indicator on
the screen should momentarily become green, and
the text "Now Recording..." should appear in yellow.
In addition, the Mic Level indicator should move at
least to the 6th bar. If the Talk indicator on the screen
does not briefly become green, then check the wiring
from the steering wheel talk button to the navigation
unit. If there is no "Mic Level" movement when you
speak, then you should check the wire running from
the microphone to the control unit.
• Press the BACK button on the steering wheel. This
should cause the Cancel indicator on the screen to
momentarily become green. If it does not briefly
change to green, then check the wiring from the
steering wheel BACK button to the navigation unit.ProCarManuals.com
Page 276 of 1954
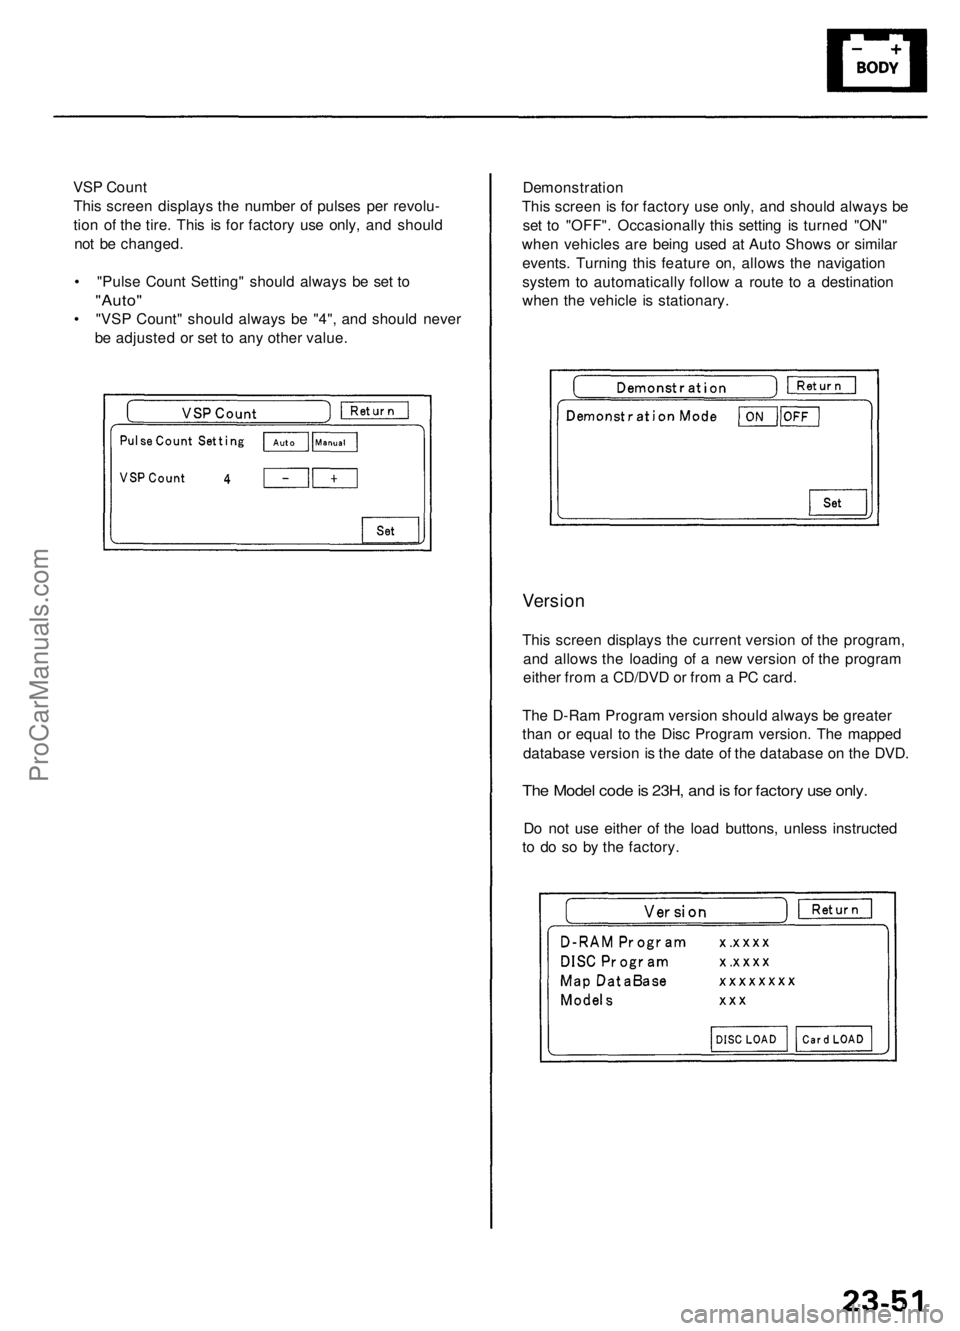
VSP Count
This screen displays the number of pulses per revolu-
tion of the tire. This is for factory use only, and should
not be changed.
• "Pulse Count Setting" should always be set to
"Auto"
• "VSP Count" should always be "4", and should never
be adjusted or set to any other value.
Demonstration
This screen is for factory use only, and should always be
set to "OFF". Occasionally this setting is turned "ON"
when vehicles are being used at Auto Shows or similar
events. Turning this feature on, allows the navigation
system to automatically follow a route to a destination
when the vehicle is stationary.
Version
This screen displays the current version of the program,
and allows the loading of a new version of the program
either from a CD/DVD or from a PC card.
The D-Ram Program version should always be greater
than or equal to the Disc Program version. The mapped
database version is the date of the database on the DVD.
The Model code is 23H, and is for factory use only.
Do not use either of the load buttons, unless instructed
to do so by the factory.ProCarManuals.com
Page 327 of 1954
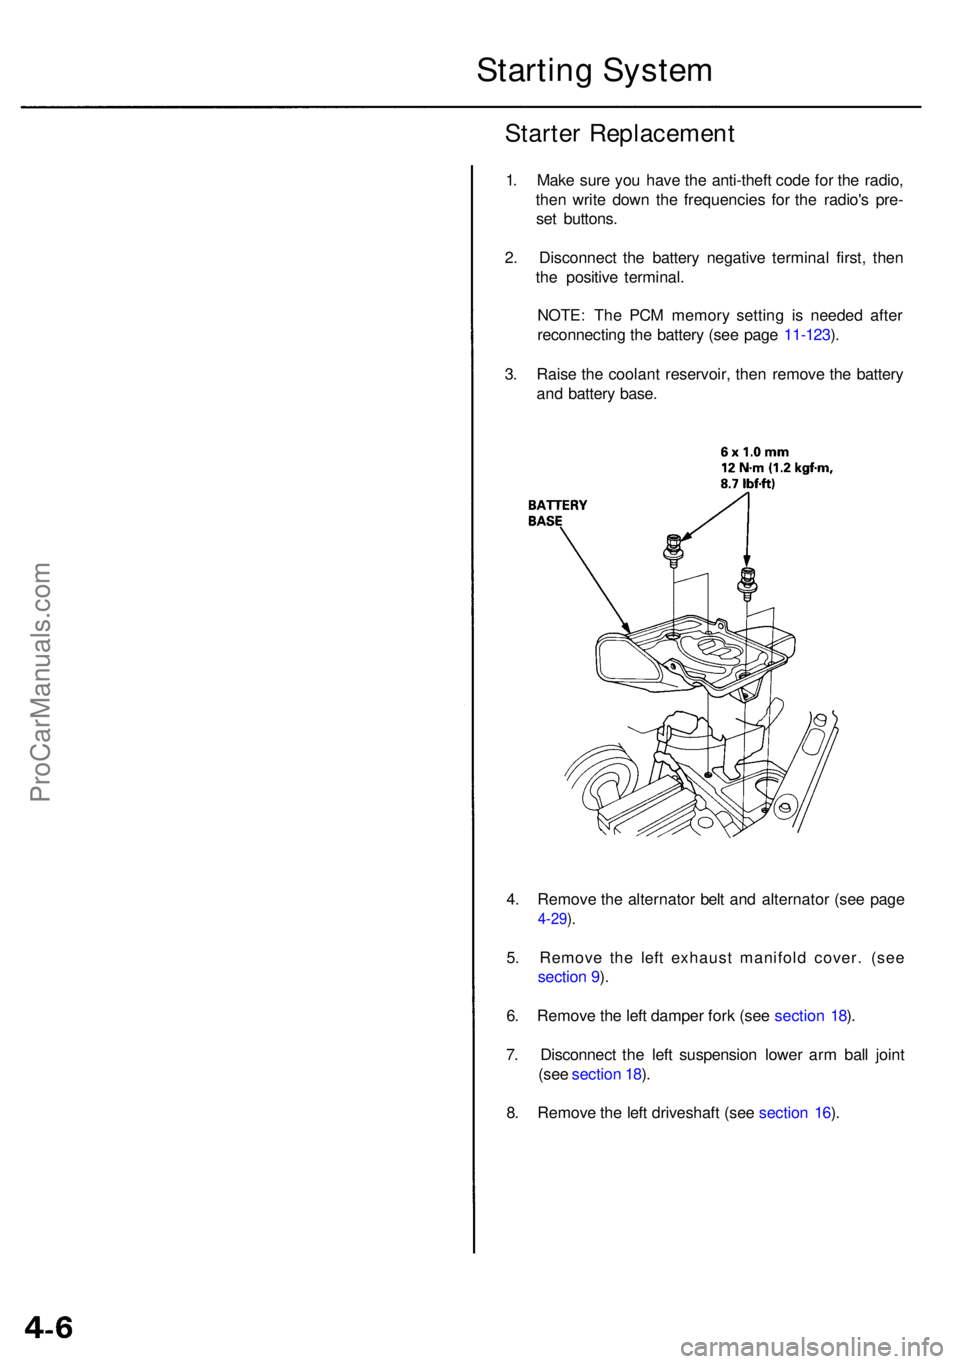
4. Remov e th e alternato r bel t an d alternato r (se e pag e
4-29).
5 . Remov e th e lef t exhaus t manifol d cover . (se e
sectio n 9 ).
6 . Remov e th e lef t dampe r for k (se e sectio n 18 ).
7 . Disconnec t th e lef t suspensio n lowe r ar m bal l join t
(se e sectio n 18 ).
8 . Remov e th e lef t driveshaf t (se e sectio n 16 ).
Starte r Replacemen t
1. Mak e sur e yo u hav e th e anti-thef t cod e fo r th e radio ,
the n writ e dow n th e frequencie s fo r th e radio' s pre -
se t buttons .
2 . Disconnec t th e batter y negativ e termina l first , the n
th e positiv e terminal .
NOTE : Th e PC M memor y settin g i s neede d afte r
reconnectin g th e batter y (se e pag e 11-123 ).
3 . Rais e th e coolan t reservoir , the n remov e th e batter y
an d batter y base .
Startin g Syste m
ProCarManuals.com
Page 348 of 1954
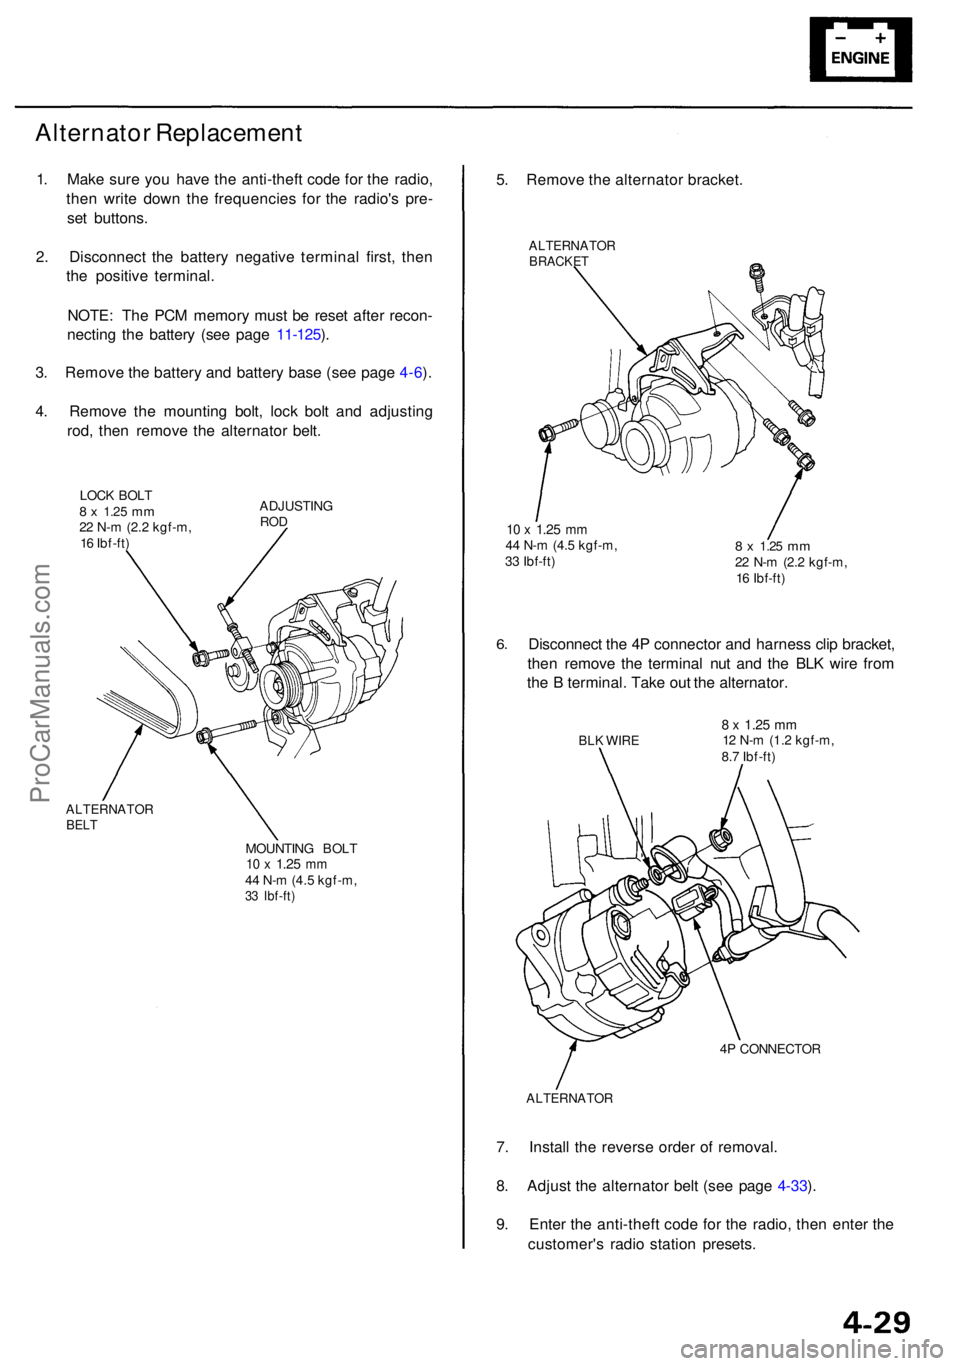
Alternator Replacemen t
1. Mak e sur e yo u hav e th e anti-thef t cod e fo r th e radio ,
the n writ e dow n th e frequencie s fo r th e radio' s pre -
se t buttons .
2 . Disconnec t th e batter y negativ e termina l first , the n
th e positiv e terminal .
NOTE : Th e PC M memor y mus t b e rese t afte r recon -
nectin g th e batter y (se e pag e 11-125 ).
3 . Remov e th e batter y an d batter y bas e (se e pag e 4-6 ).
4 . Remov e th e mountin g bolt , loc k bol t an d adjustin g
rod , the n remov e th e alternato r belt .
LOC K BOL T8 x 1.2 5 mm22 N- m (2. 2 kgf-m ,
1 6 Ibf-ft ) ADJUSTIN
GROD
ALTERNATO RBELT
MOUNTIN G BOL T10 x 1.2 5 mm44 N- m (4. 5 kgf-m ,33 Ibf-ft )
5. Remov e th e alternato r bracket .
ALTERNATO RBRACKET
10 x 1.2 5 mm44 N- m (4. 5 kgf-m ,
3 3 Ibf-ft )8 x 1.2 5 mm22 N- m (2. 2 kgf-m ,
1 6 Ibf-ft )
6.Disconnec t th e 4 P connecto r an d harnes s cli p bracket ,
the n remov e th e termina l nu t an d th e BL K wir e fro m
th e B terminal . Tak e ou t th e alternator .
BLK WIR E8 x 1.2 5 mm12 N- m (1.2 kgf-m ,
8. 7 Ibf-ft )
4 P CONNECTO R
ALTERNATO R
7. Instal l th e revers e orde r o f removal .
8 . Adjus t th e alternato r bel t (se e pag e 4-33 ).
9 . Ente r th e anti-thef t cod e fo r th e radio , the n ente r th e
customer' s radi o statio n presets .
ProCarManuals.com
Page 357 of 1954
Set/Resume/Cancel Switc h Test/Replacemen t
SRS component s ar e locate d in thi s area . Revie w th e SR S
componen t locations , precautions , an d procedure s i n th e
SR S (sectio n 24 ) befor e performin g repair s o r service .
1 . Mak e sur e yo u hav e th e anti-thef t cod e fo r th e radio ,
the n writ e dow n th e frequencie s fo r th e radio' s pre -
set buttons .
2. Disconnec t th e batter y negativ e cable , the n discon -
nec t th e positiv e cable , an d wai t a t leas t 3 minutes .
NOTE : Th e PC M memor y mus t b e rese t afte r recon -
necting th e batter y (se e pag e 11-125 ).
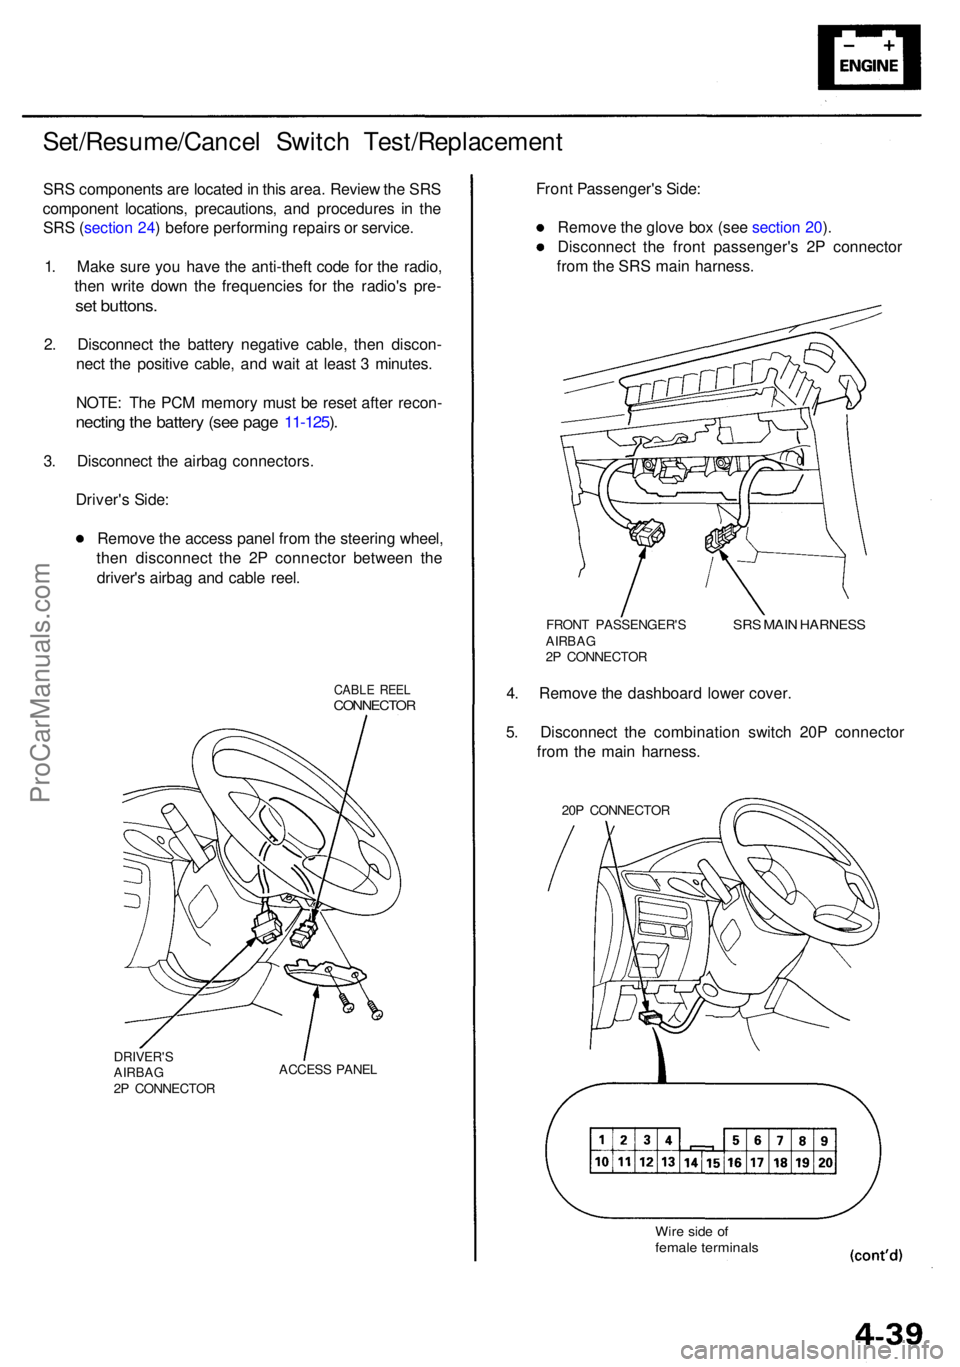
3 . Disconnec t th e airba g connectors .
Driver' s Side :
Remov e th e acces s pane l fro m th e steerin g wheel ,
the n disconnec t th e 2 P connecto r betwee n th e
driver' s airba g an d cabl e reel .
CABL E REE LCONNECTO R
DRIVER'SAIRBAG2P CONNECTO RACCES
S PANE L
Front Passenger' s Side :
Remov e th e glov e bo x (se e sectio n 20 ).
Disconnec t th e fron t passenger' s 2 P connecto r
fro m th e SR S mai n harness .
FRONT PASSENGER' SAIRBAG2P CONNECTO R
SRS MAI N HARNES S
4. Remov e th e dashboar d lowe r cover .
5 . Disconnec t th e combinatio n switc h 20 P connecto r
fro m th e mai n harness .
20P CONNECTO R
Wire sid e o ffemal e terminal s
ProCarManuals.com
Page 365 of 1954
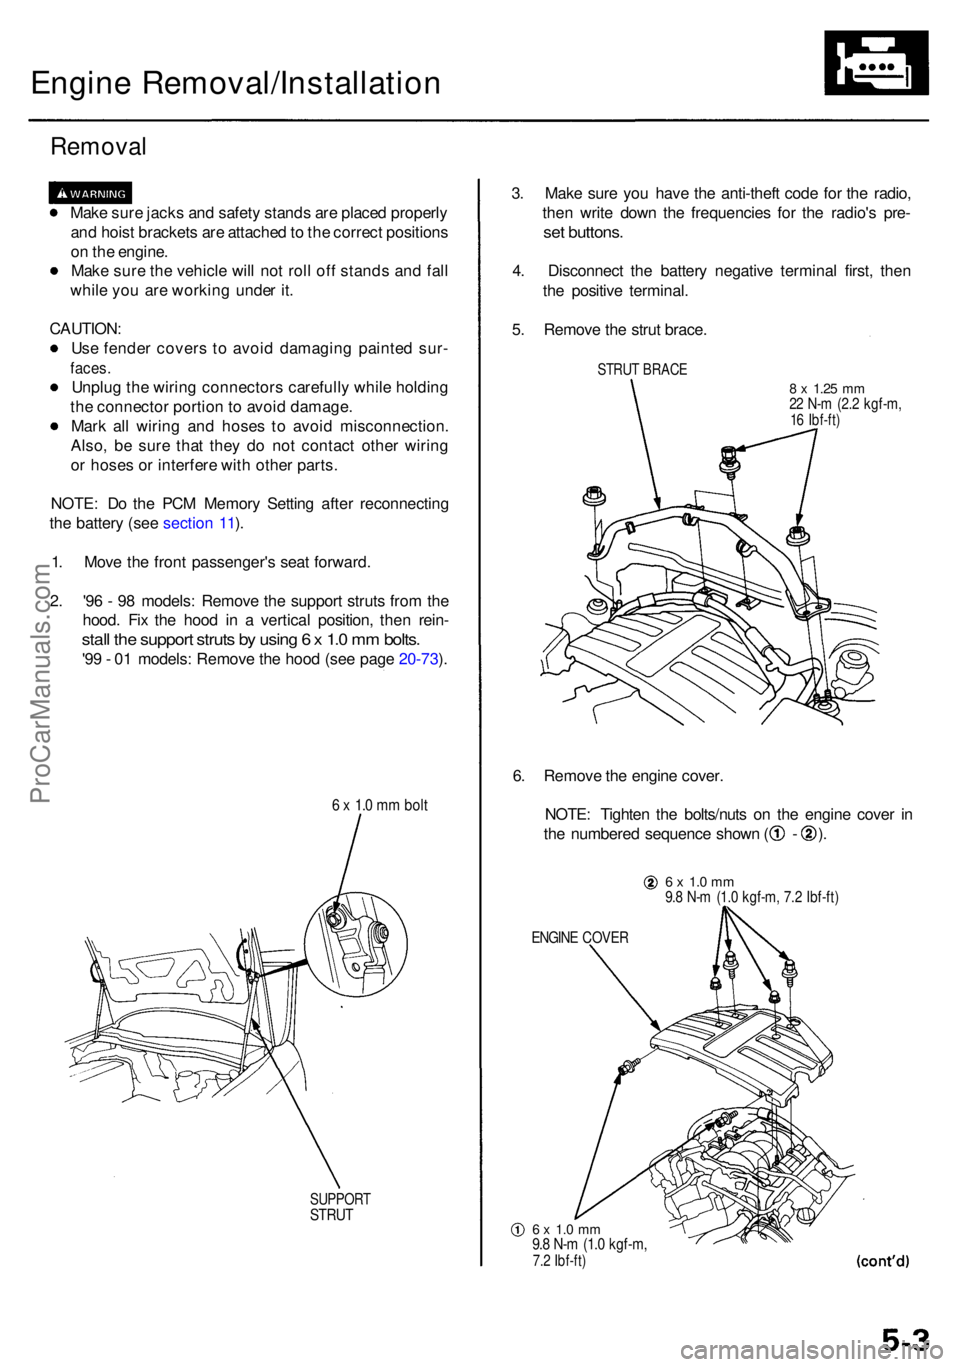
Engine Removal/Installatio n
Removal
Make sur e jack s an d safet y stand s ar e place d properl y
an d hois t bracket s ar e attache d to th e correc t position s
o n th e engine .
Mak e sur e th e vehicl e wil l no t rol l of f stand s an d fal l
whil e yo u ar e workin g unde r it .
CAUTION :
Us e fende r cover s t o avoi d damagin g painte d sur -
faces .
Unplu g th e wirin g connector s carefull y whil e holdin g
th e connecto r portio n to avoi d damage .
Mar k al l wirin g an d hose s t o avoi d misconnection .
Also , b e sur e tha t the y d o no t contac t othe r wirin g
o r hose s o r interfer e wit h othe r parts .
NOTE : D o th e PC M Memor y Settin g afte r reconnectin g
th e batter y (se e sectio n 11 ).
1 . Mov e th e fron t passenger' s sea t forward .
2 . '9 6 - 9 8 models : Remov e th e suppor t strut s fro m th e
hood . Fi x th e hoo d i n a vertica l position , the n rein -
stall th e suppor t strut s b y usin g 6 x 1. 0 m m bolts .
'99 - 0 1 models : Remov e th e hoo d (se e pag e 20-73 ).
6 x 1. 0 m m bol t
SUPPOR TSTRUT
3. Mak e sur e yo u hav e th e anti-thef t cod e fo r th e radio ,
the n writ e dow n th e frequencie s fo r th e radio' s pre -
set buttons .
4. Disconnec t th e batter y negativ e termina l first , the n
th e positiv e terminal .
5 . Remov e th e stru t brace .
STRUT BRAC E
8 x 1.2 5 mm22 N- m (2. 2 kgf-m ,16 Ibf-ft )
6. Remov e th e engin e cover .
NOTE : Tighte n th e bolts/nut s o n th e engin e cove r i n
th e numbere d sequenc e show n ( - ).
6 x 1. 0 m m9.8 N- m (1. 0 kgf-m , 7. 2 Ibf-ft )
ENGIN E COVE R
6 x 1. 0 m m9.8 N- m (1. 0 kgf-m ,7.2 Ibf-ft )
ProCarManuals.com
Page 401 of 1954
Cylinder Head s
Remova l
Make sur e jack s an d safet y stand s ar e
place d properl y an d hois t bracket s ar e attache d t o th e
correc t position s o n th e engine .
CAUTION :
Us e fende r cover s t o avoi d damagin g painte d sur -
faces .
Unplu g th e wirin g connector s carefull y whil e holdin g
th e connecto r portio n to avoi d damage .
T o avoi d damagin g th e cylinde r head , wai t unti l th e
engin e coolan t temperatur e drop s belo w 100° F (38°C )
befor e loosenin g th e retainin g bolts .
NOTE :
Unspecifie d item s ar e common .
Mar k al l wirin g an d hose s t o avoi d misconnection .
Also , b e sur e tha t the y d o no t contac t othe r wirin g o r
hose s o r interfer e wit h othe r parts .
Inspec t th e timin g bel t befor e removin g th e cylinde r
head.
Turn th e crankshaf t pulle y s o tha t th e No . 1 pisto n i s
a t to p dea d cente r (TDC) .
D o th e PC M Memor y Settin g afte r reconnectin g th e
batter y (se e sectio n 11 ).
1 . Remov e th e suppor t strut s fro m th e hood . Fi x th e
hoo d i n a vertica l position , the n reinstal l th e sup -
por t strut s b y usin g 6 x 1. 0 m m bolt s (se e pag e 5-3 ).
2 . Mak e sur e yo u hav e th e anti-thef t cod e fo r th e radio ,
the n writ e dow n th e frequencie s fo r th e radio' s pre -
set buttons .
3. Disconnec t th e batter y negativ e termina l first , the n
th e positiv e terminal .
4 . Drai n th e engin e coolan t (se e pag e 10-5 ).
5 . Remov e th e stru t brac e (se e pag e 5-3 ).
6 . Remov e th e engine cover (se e pag e 5-3 ).
7 . Remov e th e intak e ai r duc t an d ai r cleane r housin g
assembl y (se e pag e 5-4 ). 8
. Remov e th e throttl e cove r (se e pag e 5-4 ).
9 . Remov e th e throttl e cabl e an d cruis e contro l cabl e
b y loosenin g th e locknuts , the n sli p th e cabl e end s
ou t o f th e accelerato r linkag e (se e pag e 5-4 ).
NOTE :
Take car e no t t o ben d th e cabl e whe n removin g
it . Alway s replac e an y kinke d cabl e wit h a ne w
one .
Adjus t th e throttl e cabl e whe n installin g (se e
sectio n 11 ).
Adjus t th e cruis e contro l cabl e whe n installin g
(se e sectio n 23 ).
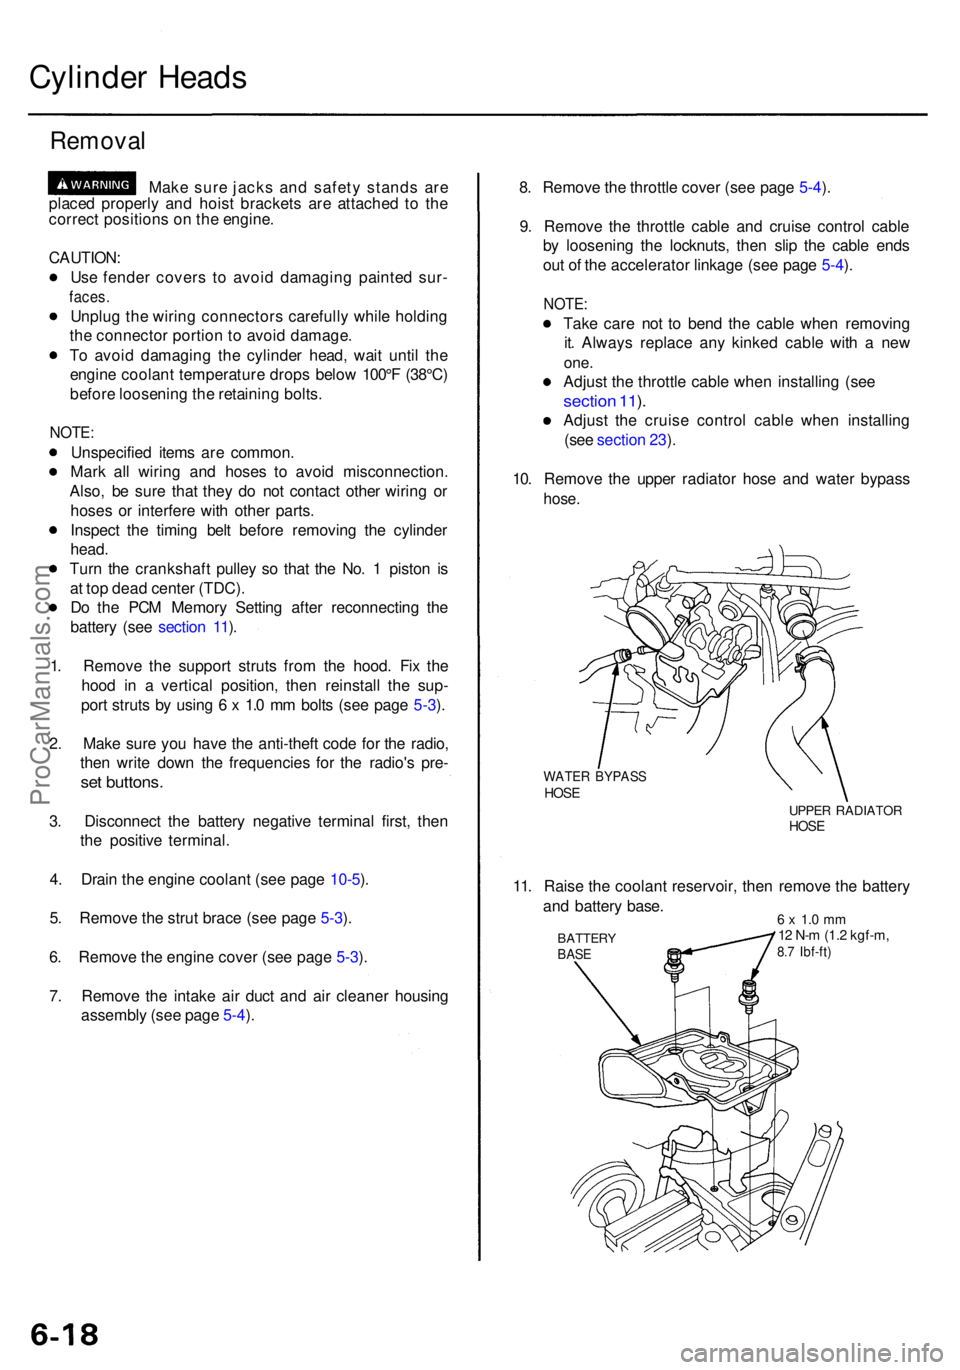
10 . Remov e th e uppe r radiato r hos e an d wate r bypas s
hose.
WATE R BYPAS SHOSEUPPE R RADIATO RHOSE
11. Rais e th e coolan t reservoir , the n remov e th e batter y
an d batter y base .
BATTER YBASE
6 x 1. 0 m m12 N- m (1. 2 kgf-m ,8.7 Ibf-ft )
ProCarManuals.com