ACURA TL 1995 Service Repair Manual
Manufacturer: ACURA, Model Year: 1995, Model line: TL, Model: ACURA TL 1995Pages: 1771, PDF Size: 62.49 MB
Page 981 of 1771
Lock-up Contro l Solenoi d Valv e A/ B
Tes t
NOTE : Lock-u p contro l solenoi d valve s A an d B mus t b e
removed/replace d a s a n assembly .
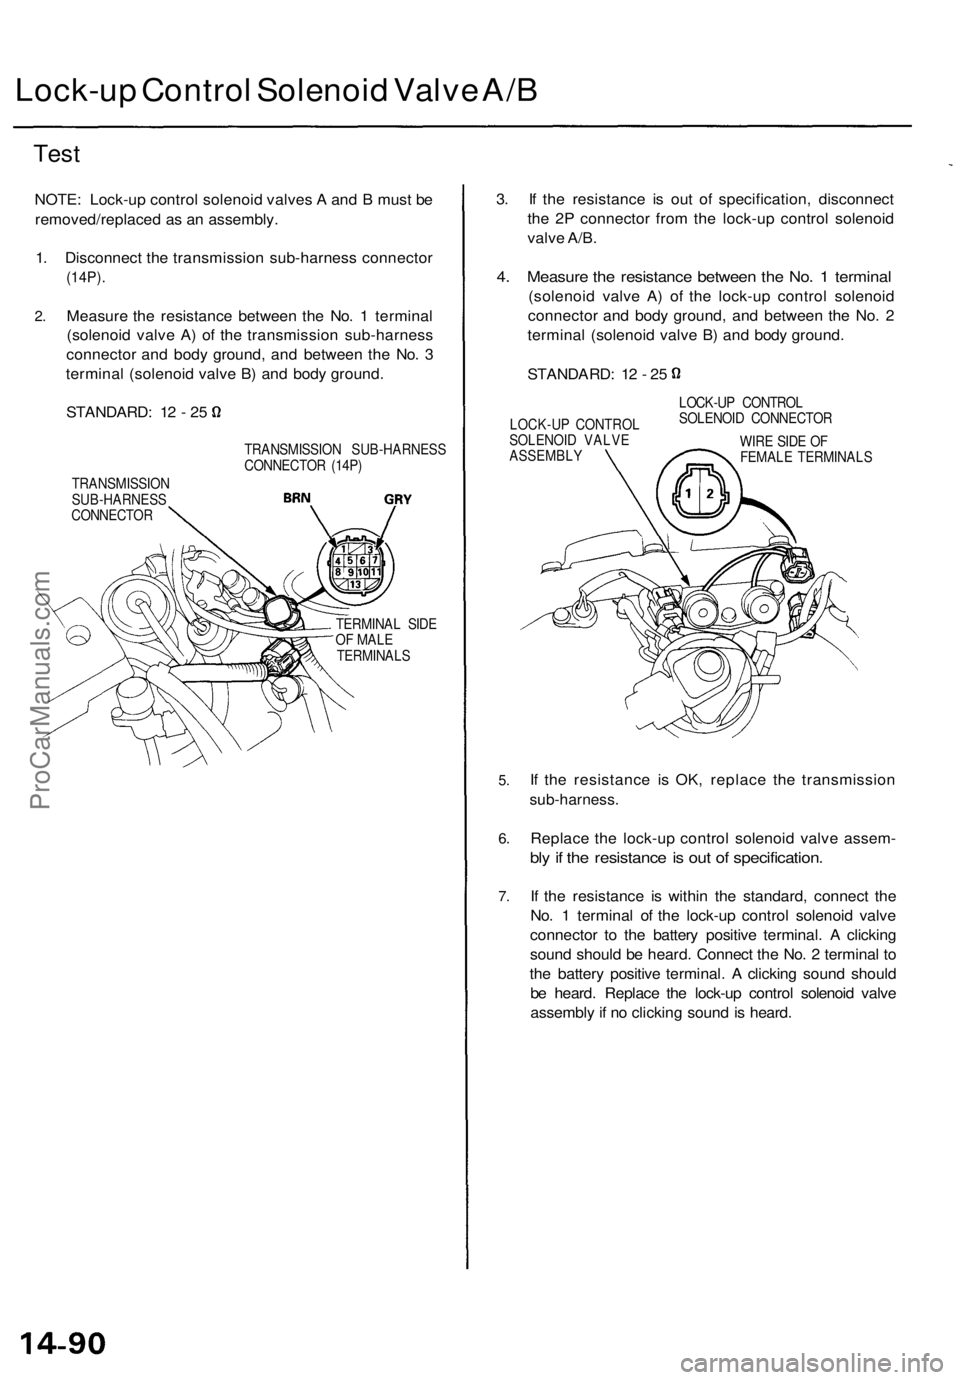
1 . Disconnec t th e transmissio n sub-harnes s connecto r
(14P).
2.Measur e th e resistanc e betwee n th e No . 1 termina l
(solenoi d valv e A ) o f th e transmissio n sub-harnes s
connecto r an d bod y ground , an d betwee n th e No . 3
termina l (solenoi d valv e B ) an d bod y ground .
STANDARD : 1 2 - 2 5
TRANSMISSIO N
SUB-HARNES S
CONNECTO R TRANSMISSIO
N SUB-HARNES S
CONNECTO R (14P )
TERMINA L SID E
O F MAL E
TERMINAL S
3. I f th e resistanc e i s ou t of specification , disconnec t
th e 2 P connecto r fro m th e lock-u p contro l solenoi d
valv e A/B .
4. Measur e th e resistanc e betwee n th e No . 1 termina l
(solenoi d valv e A ) of the lock-u p contro l solenoi d
connecto r an d bod y ground , an d betwee n th e No . 2
termina l (solenoi d valv e B ) an d bod y ground .
STANDARD : 1 2 - 2 5
LOCK-U P CONTRO L
SOLENOI D VALV E
ASSEMBL Y LOCK-U
P CONTRO L
SOLENOI D CONNECTO R
WIR E SID E O F
FEMAL E TERMINAL S
5.
6.
7 .
If th e resistanc e i s OK , replac e th e transmissio n
sub-harness.
Replace th e lock-u p contro l solenoi d valv e assem -
bly if th e resistanc e is ou t o f specification .
If th e resistanc e i s withi n th e standard , connec t th e
No . 1 termina l o f th e lock-u p contro l solenoi d valv e
connecto r t o th e batter y positiv e terminal . A clickin g
soun d shoul d b e heard . Connec t th e No . 2 termina l t o
th e batter y positiv e terminal . A clickin g soun d shoul d
b e heard . Replac e th e lock-u p contro l solenoi d valv e
assembl y if n o clickin g soun d is heard .
ProCarManuals.com
Page 982 of 1771
Replacement
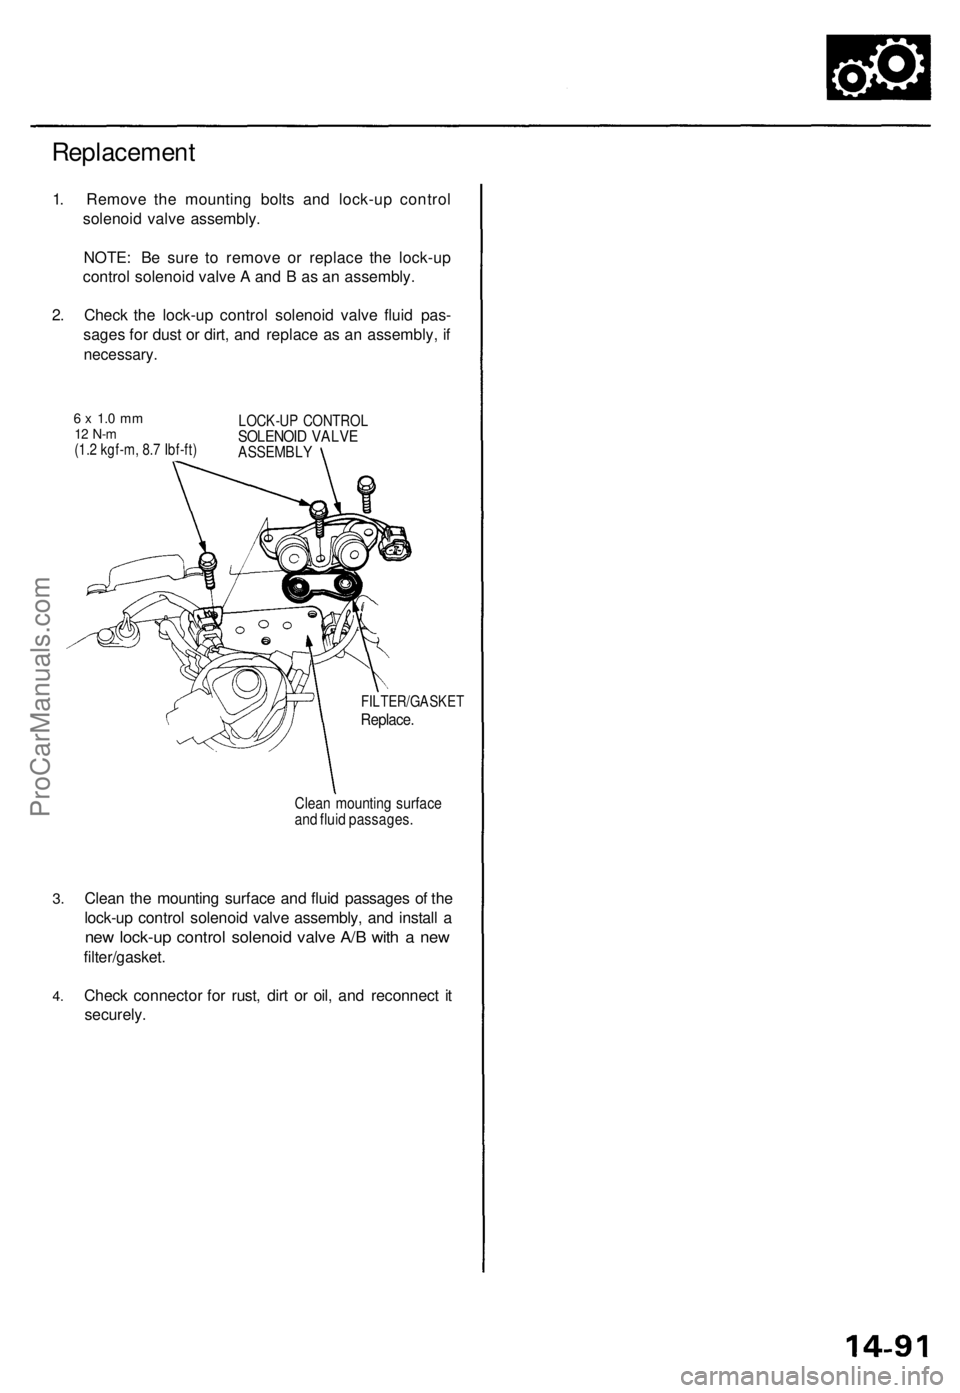
1. Remov e th e mountin g bolt s an d lock-u p contro l
solenoi d valv e assembly .
NOTE : B e sur e t o remov e o r replac e th e lock-u p
contro l solenoi d valv e A an d B as a n assembly .
2 . Chec k th e lock-u p contro l solenoi d valv e flui d pas -
sage s fo r dus t o r dirt , an d replac e a s a n assembly , i f
necessary .
6 x 1. 0 m m12 N- m(1.2 kgf-m , 8. 7 Ibf-ft )
LOCK-U P CONTRO LSOLENOID VALV EASSEMBL Y
3.
4 .
FILTER/GASKE T
Replace.
Clean mountin g surfac eand flui d passages .
Clean th e mountin g surfac e an d flui d passage s o f th e
lock-u p contro l solenoi d valv e assembly , an d instal l a
ne w lock-u p contro l solenoi d valv e A/ B wit h a ne w
filter/gasket .
Chec k connecto r fo r rust , dir t o r oil , an d reconnec t i t
securely .
ProCarManuals.com
Page 983 of 1771
Shift Contro l Solenoi d Valv e
Test
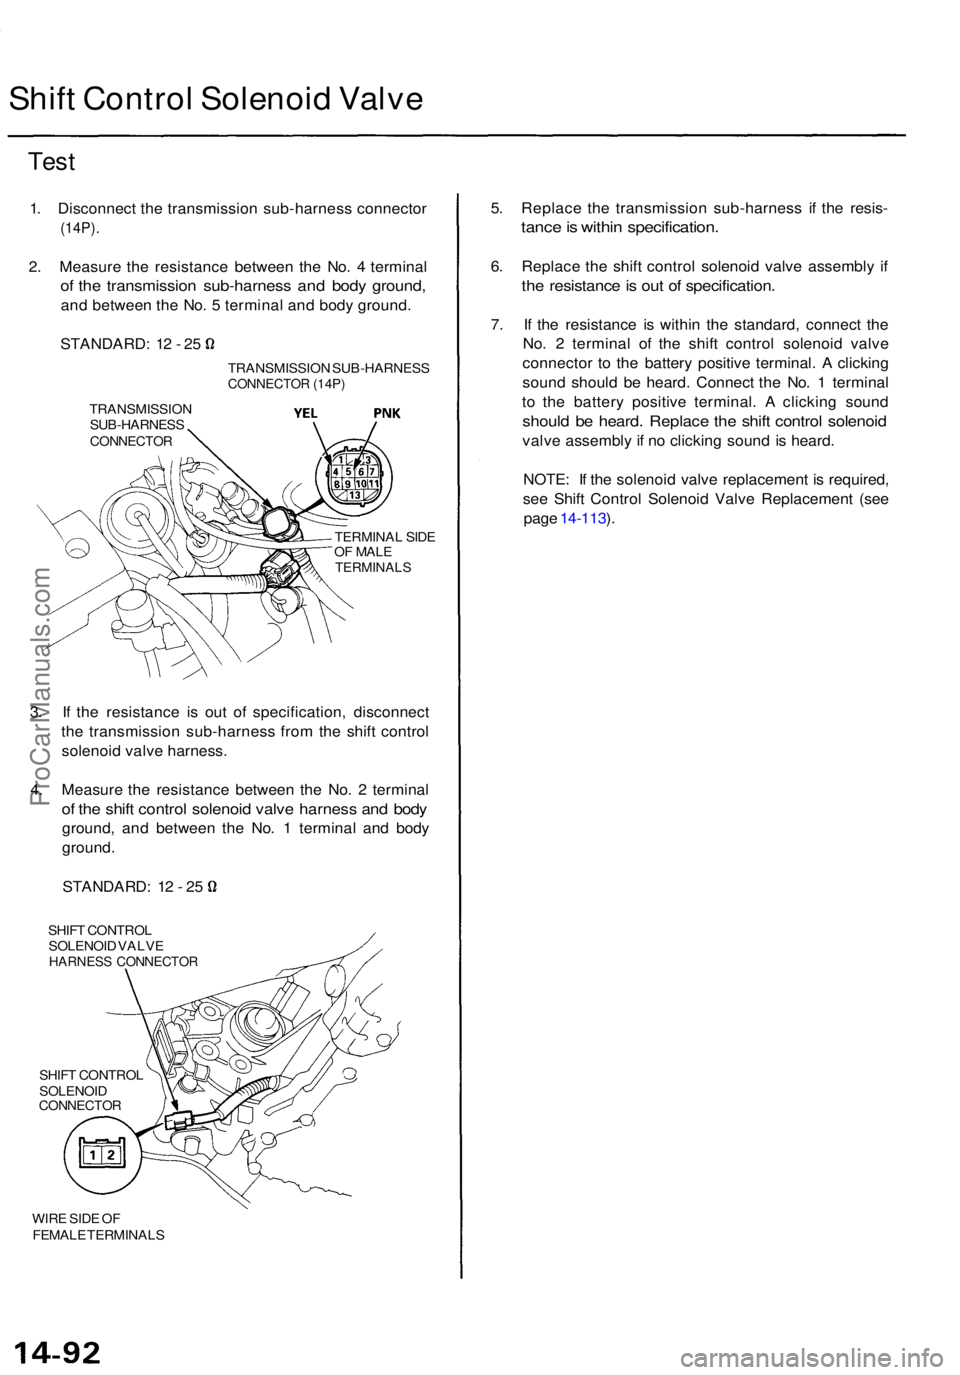
1. Disconnec t th e transmissio n sub-harnes s connecto r
(14P).
2. Measur e th e resistanc e betwee n th e No . 4 termina l
of th e transmissio n sub-harnes s an d bod y ground ,
and betwee n th e No . 5 termina l an d bod y ground .
STANDARD : 1 2 - 2 5
TRANSMISSIO N
SUB-HARNES S
CONNECTOR
TRANSMISSIO N SUB-HARNES SCONNECTOR (14P )
TERMINA L SID E
O F MAL E
TERMINAL S
3. I f th e resistanc e i s ou t o f specification , disconnec t
th e transmissio n sub-harnes s fro m th e shif t contro l
solenoi d valv e harness .
4 . Measur e th e resistanc e betwee n th e No . 2 termina l
of th e shif t contro l solenoi d valv e harnes s an d bod y
ground , an d betwee n th e No . 1 termina l an d bod y
ground .
STANDARD : 1 2 - 2 5
SHIF T CONTRO L
SOLENOI D VALV E
HARNES S CONNECTO R
SHIFT CONTRO L
SOLENOI D
CONNECTO R
WIRE SID E O F
FEMAL E TERMINAL S
5. Replac e th e transmissio n sub-harnes s i f th e resis -
tance is withi n specification .
6. Replac e th e shif t contro l solenoi d valv e assembl y i f
th e resistanc e is ou t o f specification .
7. I f th e resistanc e i s withi n th e standard , connec t th e
No . 2 termina l o f th e shif t contro l solenoi d valv e
connecto r t o th e batter y positiv e terminal . A clickin g
soun d shoul d b e heard . Connec t th e No . 1 termina l
t o th e batter y positiv e terminal . A clickin g soun d
should b e heard . Replac e th e shif t contro l solenoi d
valve assembl y if n o clickin g soun d is heard .
NOTE : I f th e solenoi d valv e replacemen t i s required ,
se e Shif t Contro l Solenoi d Valv e Replacemen t (se e
pag e 14-113 ).
ProCarManuals.com
Page 984 of 1771
Linear Solenoi d
Test
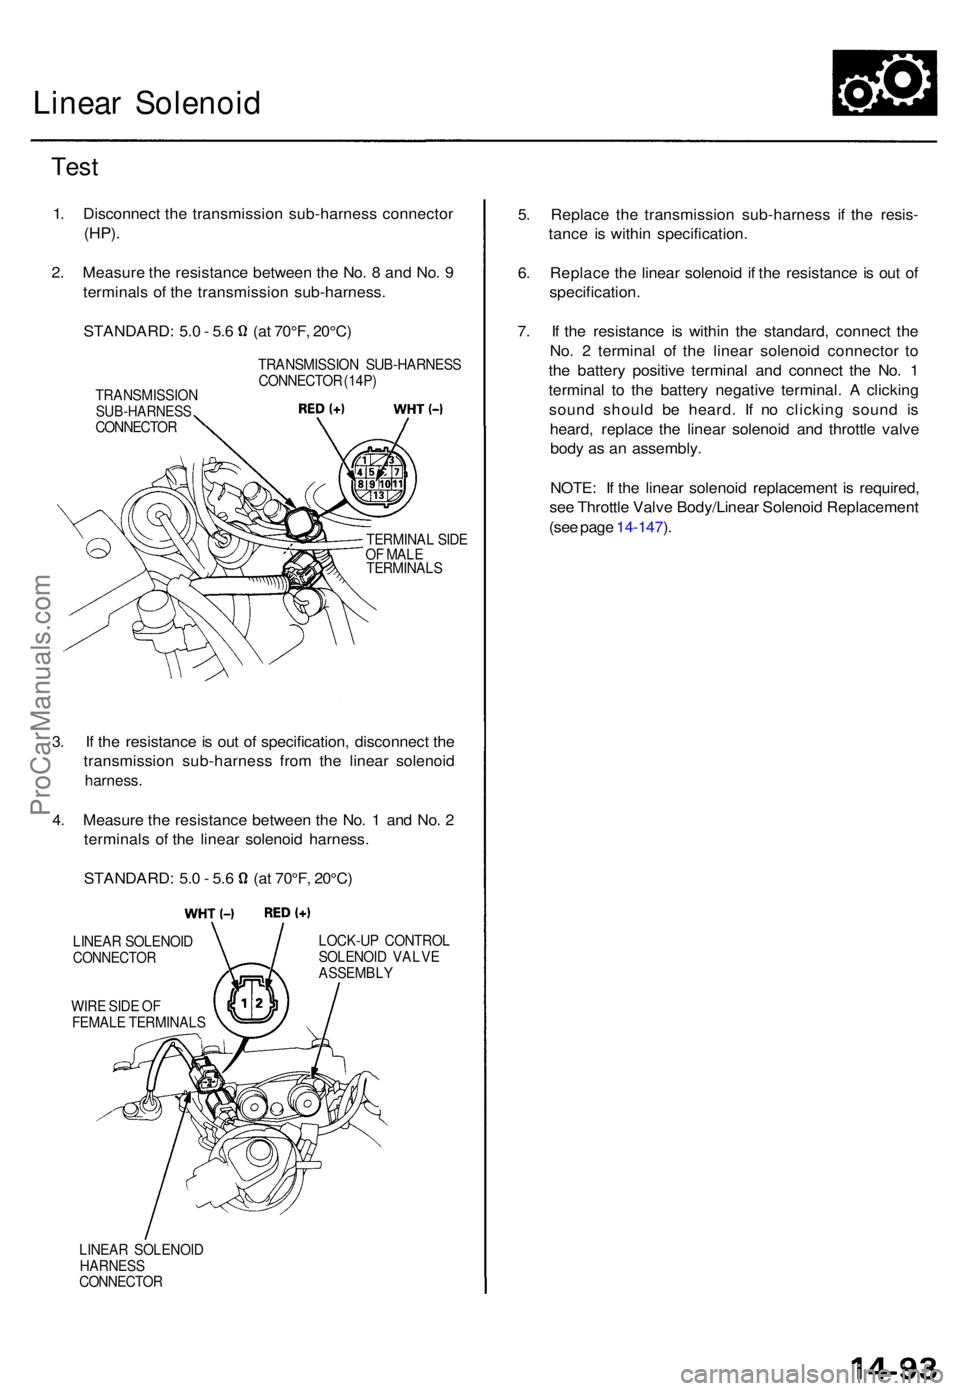
1. Disconnec t th e transmissio n sub-harnes s connecto r
(HP).
2. Measur e th e resistanc e betwee n th e No . 8 an d No . 9
terminal s o f th e transmissio n sub-harness .
STANDARD: 5. 0 - 5. 6 (a t 70°F , 20°C )
TRANSMISSIO NSUB-HARNESSCONNECTOR TRANSMISSIO
N SUB-HARNES S
CONNECTO R (14P )
TERMINA L SID E
O F MAL E
TERMINAL S
3. I f th e resistanc e is ou t o f specification , disconnec t th e
transmissio n sub-harnes s fro m th e linea r solenoi d
harness.
4. Measur e th e resistanc e betwee n th e No . 1 an d No . 2
terminal s of the linea r solenoi d harness .
STANDARD : 5. 0 - 5. 6 (a t 70°F , 20°C )
LINEA R SOLENOI DCONNECTO R
WIRE SID E O F
FEMAL E TERMINAL S LOCK-U
P CONTRO L
SOLENOI D VALV E
ASSEMBL Y
LINEA R SOLENOI D
HARNESSCONNECTO R
5. Replac e th e transmissio n sub-harnes s i f th e resis -
tanc e i s withi n specification .
6 . Replac e th e linea r solenoi d i f th e resistanc e is ou t o f
specification .
7 . I f th e resistanc e i s withi n th e standard , connec t th e
No . 2 termina l o f th e linea r solenoi d connecto r t o
th e batter y positiv e termina l an d connec t th e No . 1
termina l t o th e batter y negativ e terminal . A clickin g
soun d shoul d b e heard . I f n o clickin g soun d i s
heard , replac e th e linea r solenoi d an d throttl e valv e
bod y a s a n assembly .
NOTE : I f th e linea r solenoi d replacemen t i s required ,
se e Throttl e Valv e Body/Linea r Solenoi d Replacemen t
(se e pag e 14-147 ).
ProCarManuals.com
Page 985 of 1771
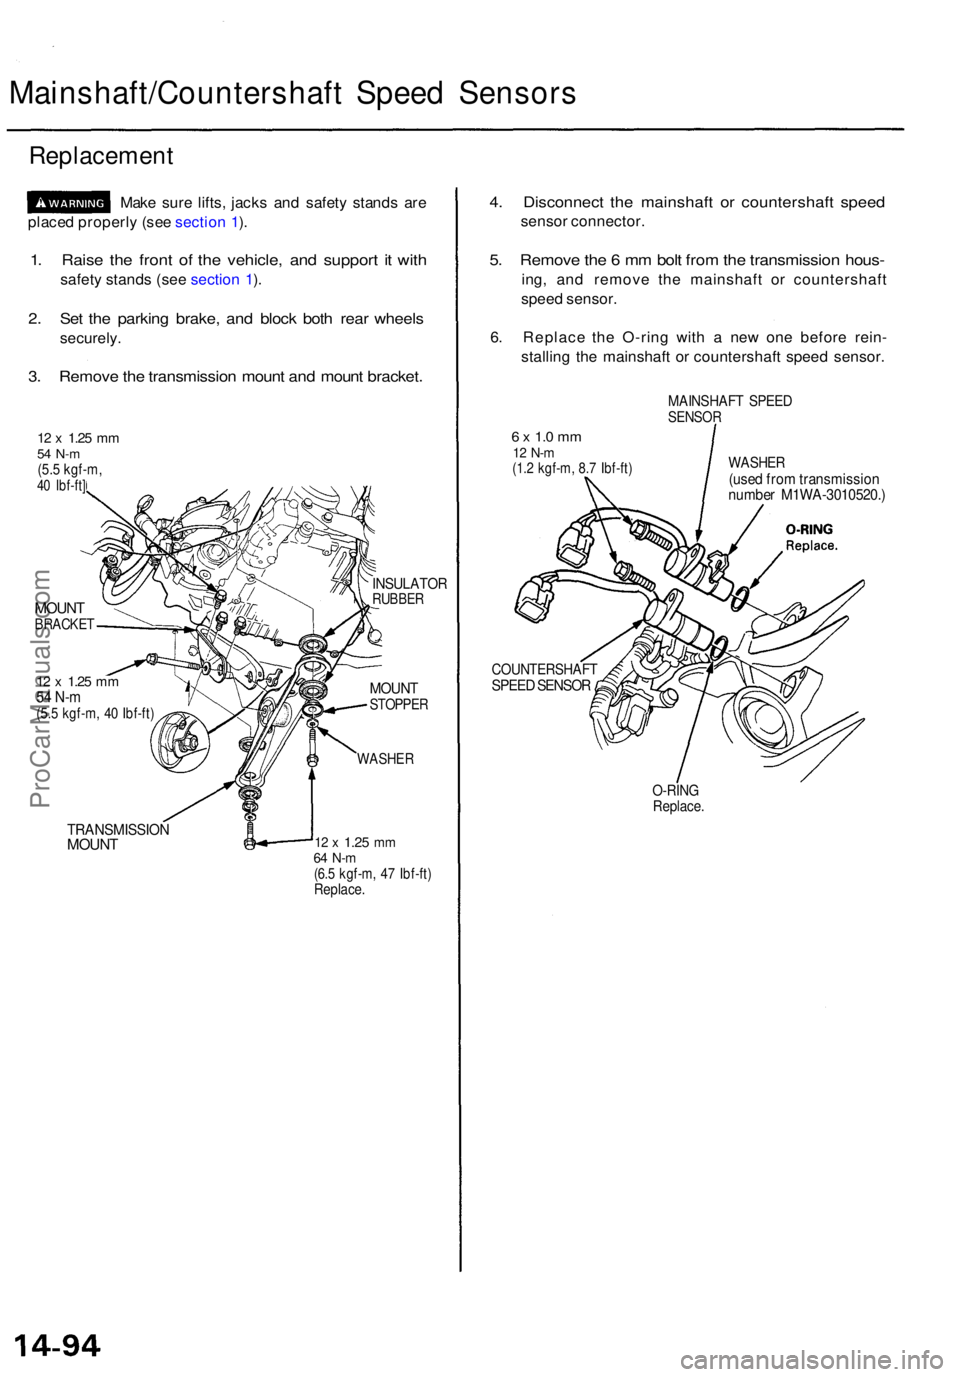
Mainshaft/Countershaft Spee d Sensor s
Replacemen t
Make sur e lifts , jack s an d safet y stand s ar e
place d properl y (se e sectio n 1 ).
1 . Rais e th e fron t o f th e vehicle , an d suppor t i t wit h
safet y stand s (se e sectio n 1 ).
2 . Se t th e parkin g brake , an d bloc k bot h rea r wheel s
securely .
3. Remov e th e transmissio n moun t an d moun t bracket .
12 x 1.2 5 mm54 N- m(5.5 kgf-m ,40 Ibf-ft ]
MOUN TBRACKE T
12 x 1.2 5 mm54 N- m(5.5 kgf-m , 4 0 Ibf-ft )
TRANSMISSIO NMOUNT
INSULATO RRUBBER
MOUNTSTOPPE R
WASHER
12 x 1.2 5 mm64 N- m(6.5 kgf-m , 4 7 Ibf-ft )Replace .
4. Disconnec t th e mainshaf t o r countershaf t spee d
senso r connector .
5. Remov e th e 6 m m bol t fro m th e transmissio n hous -
ing, an d remov e th e mainshaf t o r countershaf t
spee d sensor .
6 . Replac e th e O-rin g wit h a ne w on e befor e rein -
stallin g th e mainshaf t o r countershaf t spee d sensor .
MAINSHAF T SPEE DSENSO R
6 x 1. 0 m m12 N- m(1.2 kgf-m , 8. 7 Ibf-ft )WASHE R(used fro m transmissio n
numbe r M1WA-3010520. )
COUNTERSHAFTSPEED SENSO R
O-RINGReplace .
ProCarManuals.com
Page 986 of 1771
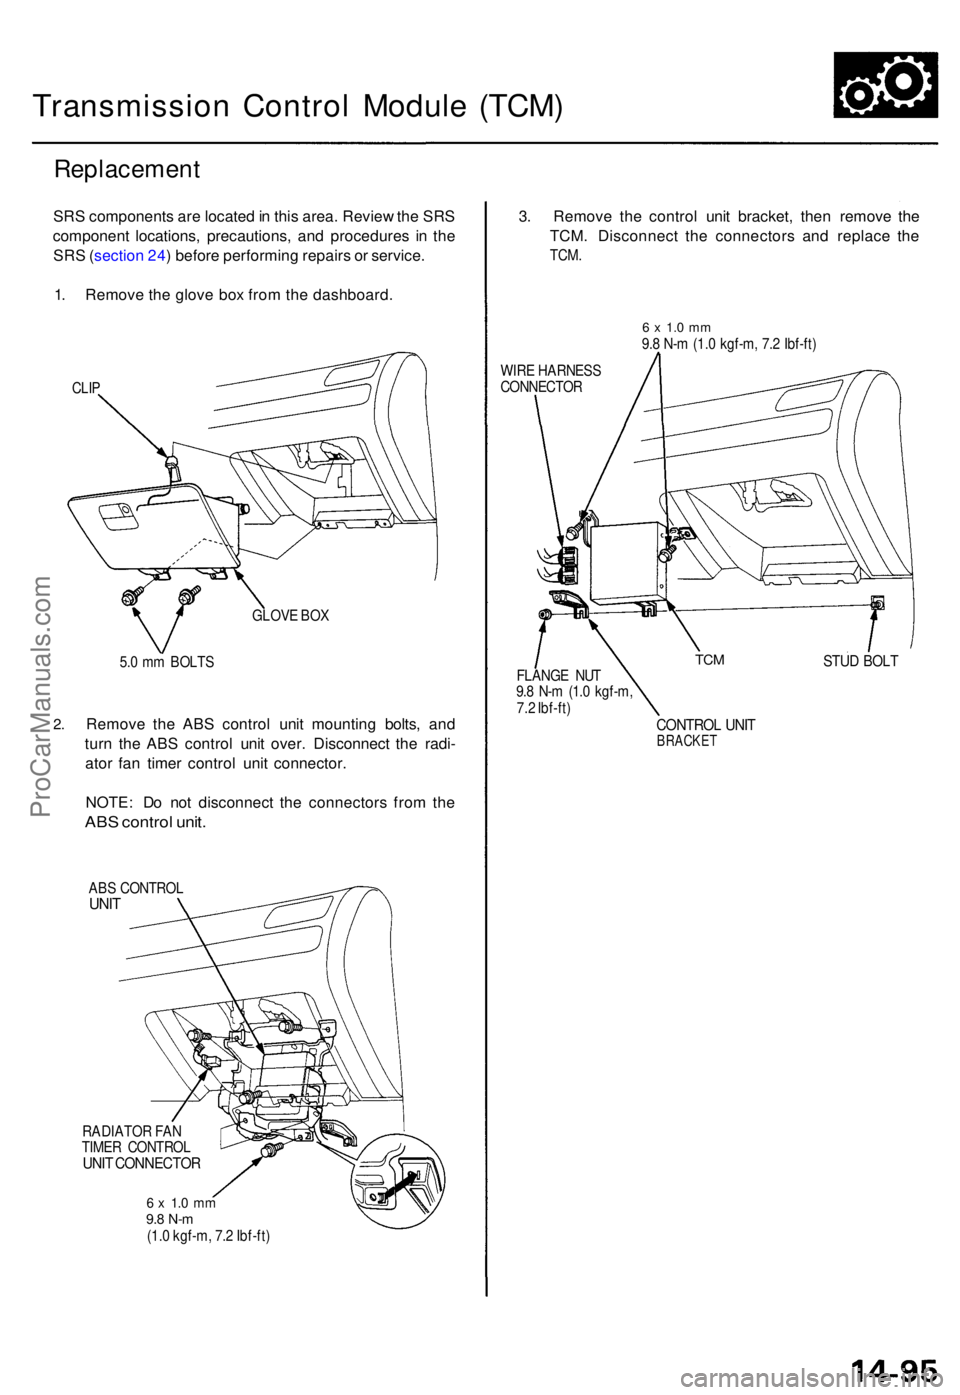
Transmission Contro l Modul e (TCM )
Replacemen t
SRS component s ar e locate d in thi s area . Revie w th e SR S
componen t locations , precautions , an d procedure s i n th e
SR S (sectio n 24 ) befor e performin g repair s o r service .
1 . Remov e th e glov e bo x fro m th e dashboard .
CLIP
GLOV E BO X
2.
5. 0 m m BOLT S
Remov e th e AB S contro l uni t mountin g bolts , an d
tur n th e AB S contro l uni t over . Disconnec t th e radi -
ato r fa n time r contro l uni t connector .
NOTE : D o no t disconnec t th e connector s fro m th e
AB S contro l unit .
ABS CONTRO LUNIT
RADIATO R FA N
TIME R CONTRO L
UNIT CONNECTO R
6 x 1. 0 m m9.8 N- m(1.0 kgf-m , 7. 2 Ibf-ft )
3. Remov e th e contro l uni t bracket , the n remov e th e
TCM . Disconnec t th e connector s an d replac e th e
TCM .
6 x 1. 0 m m9.8 N- m (1. 0 kgf-m , 7. 2 Ibf-ft )
WIR E HARNES S
CONNECTO R
STUD BOL TFLANG E NU T
9. 8 N- m (1. 0 kgf-m ,
7. 2 Ibf-ft )
CONTRO L UNI TBRACKE T
TCM
ProCarManuals.com
Page 987 of 1771
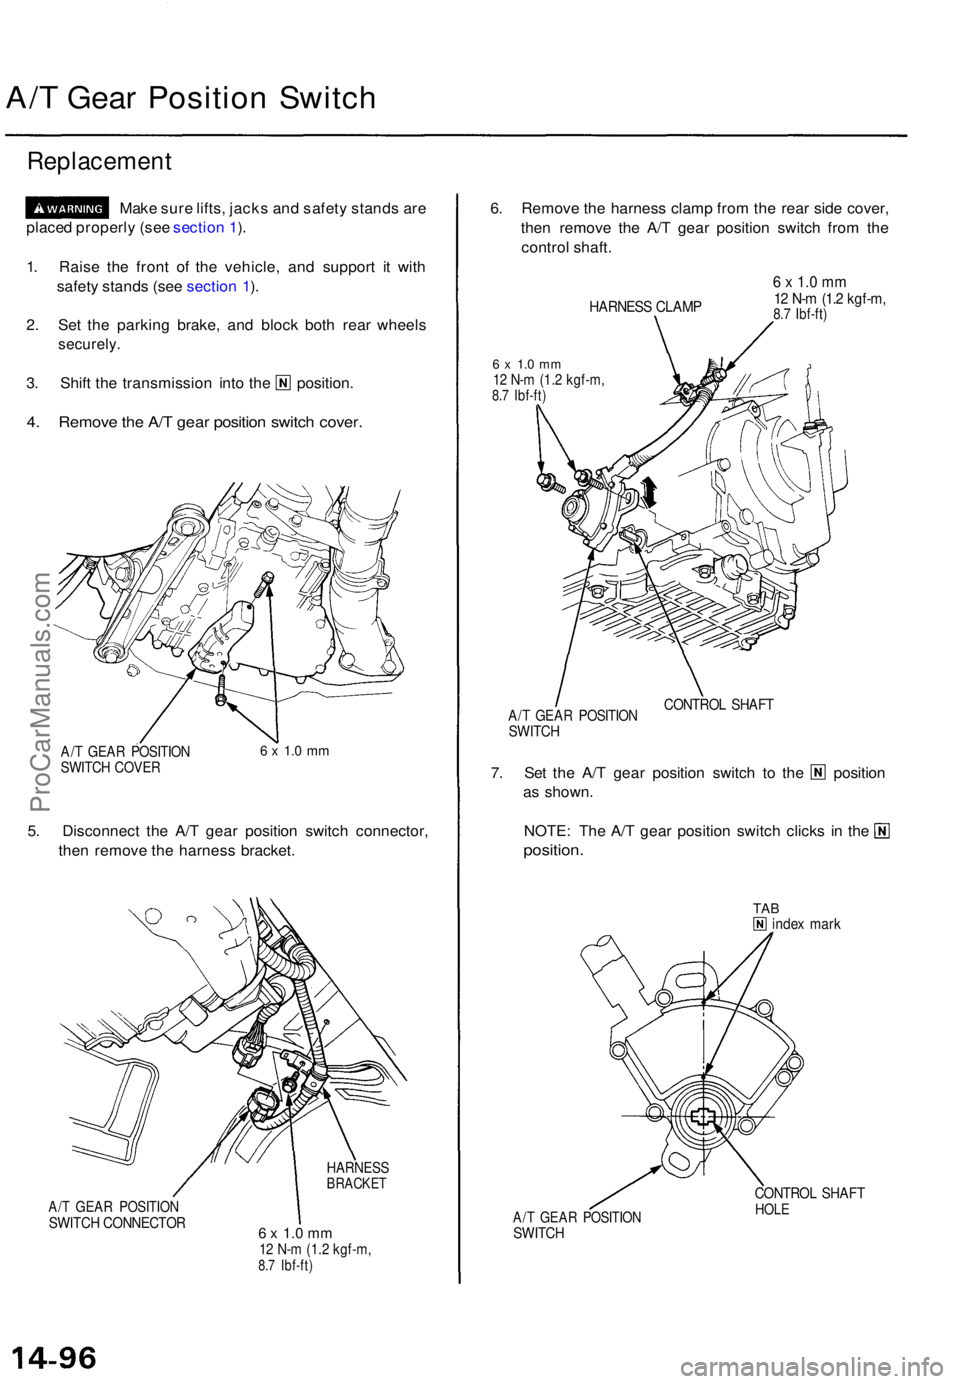
A/T Gea r Positio n Switc h
Replacemen t
Make sur e lifts , jack s an d safet y stand s ar e
place d properl y (se e sectio n 1 ).
1 . Rais e th e fron t o f th e vehicle , an d suppor t i t wit h
safet y stand s (se e sectio n 1 ).
2 . Se t th e parkin g brake , an d bloc k bot h rea r wheel s
securely .
3. Shif t th e transmissio n int o th e position .
4. Remov e th e A/ T gea r positio n switc h cover .
A/T GEA R POSITIO N
SWITC H COVE R6 x 1. 0 m m
5. Disconnec t th e A/ T gea r positio n switc h connector ,
the n remov e th e harnes s bracket .
A/T GEA R POSITIO NSWITCH CONNECTO R
HARNESSBRACKE T
6 x 1. 0 m m12 N- m (1.2 kgf-m ,8.7 Ibf-ft )
6. Remov e th e harnes s clam p fro m th e rea r sid e cover ,
the n remov e th e A/ T gea r positio n switc h fro m th e
contro l shaft .
HARNES S CLAM P
6 x 1.0 mm12 N- m (1. 2 kgf-m ,8.7 Ibf-ft )
6 x 1. 0 m m12 N- m (1.2 kgf-m ,8.7 Ibf-ft )
A/T GEA R POSITIO NSWITCH
CONTRO L SHAF T
7. Se t th e A/ T gea r positio n switc h t o th e positio n
a s shown .
NOTE : Th e A/ T gea r positio n switc h click s i n th e
position .
TABinde x mar k
A/T GEA R POSITIO NSWITCH
CONTRO L SHAF THOLE
ProCarManuals.com
Page 988 of 1771
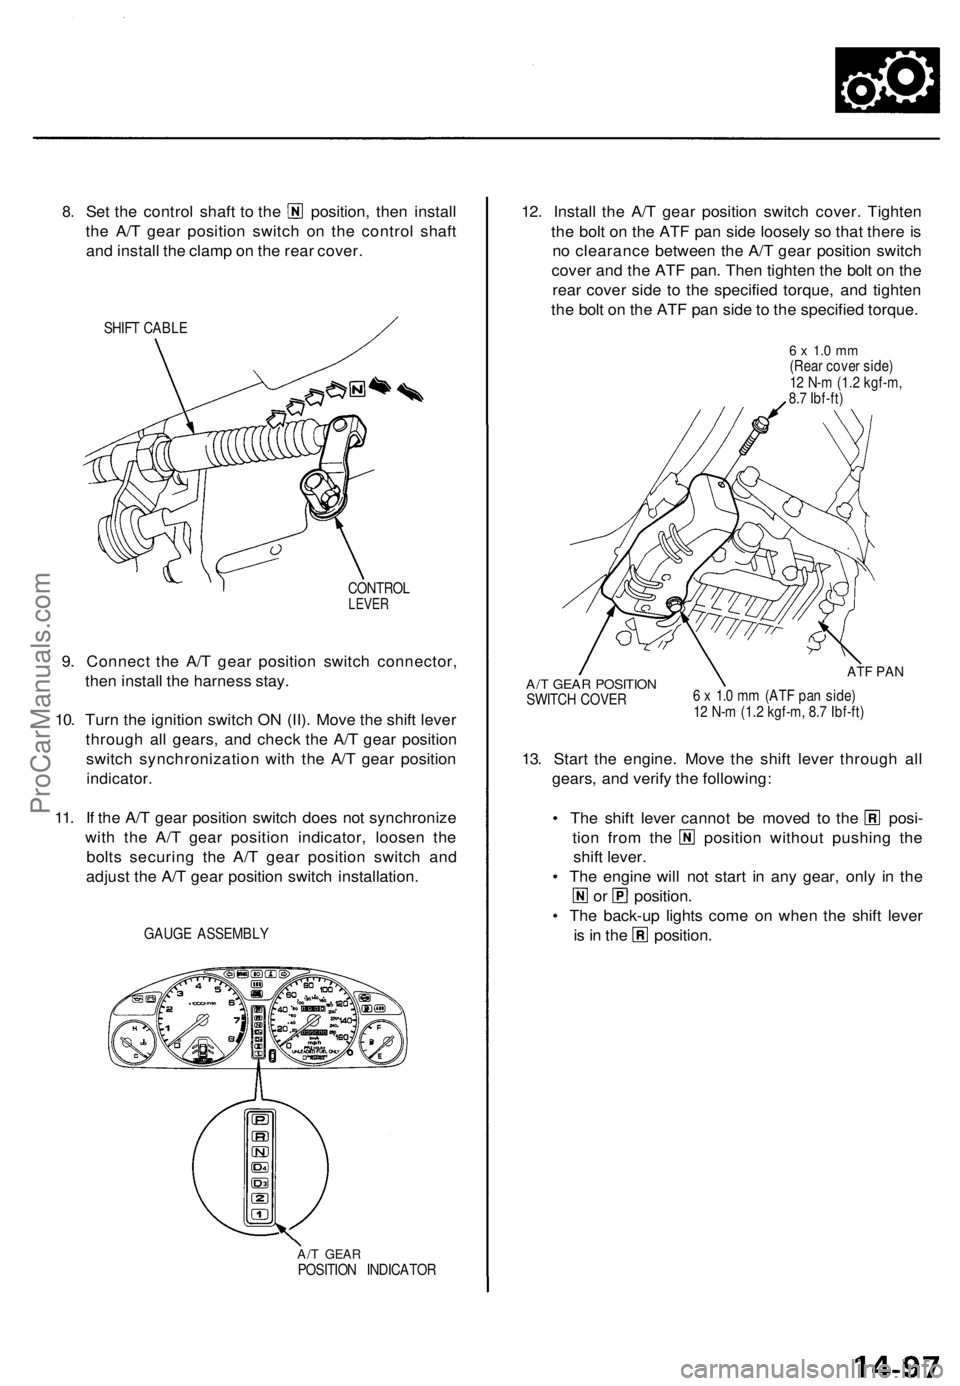
8.
Set the control shaft to the position, then install
the A/T gear position switch on the control shaft
and install the clamp on the rear cover.
SHIFT CABLE
CONTROL
LEVER
9. Connect the A/T gear position switch connector,
then install the harness stay.
10. Turn the ignition switch ON (II). Move the shift lever
through all gears, and check the A/T gear position
switch synchronization with the A/T gear position
indicator.
11. If the A/T gear position switch does not synchronize
with the A/T gear position indicator, loosen the
bolts securing the A/T gear position switch and
adjust the A/T gear position switch installation.
GAUGE ASSEMBLY
A/T GEAR
POSITION INDICATOR
12. Install the A/T gear position switch cover. Tighten
the bolt on the ATF pan side loosely so that there is
no clearance between the A/T gear position switch
cover and the ATF pan. Then tighten the bolt on the
rear cover side to the specified torque, and tighten
the bolt on the ATF pan side to the specified torque.
6 x 1.0 mm
(Rear cover side)
12 N-m (1.2 kgf-m,
8.7 Ibf-ft)
A/T GEAR POSITION
SWITCH COVER
ATF PAN
6 x 1.0 mm (ATF pan side)
12 N-m (1.2 kgf-m, 8.7 Ibf-ft)
13. Start the engine. Move the shift lever through all
gears, and verify the following:
• The shift lever cannot be moved to the posi-
tion from the position without pushing the
shift lever.
• The engine will not start in any gear, only in the
or position.
• The back-up lights come on when the shift lever
is in the position.ProCarManuals.com
Page 989 of 1771
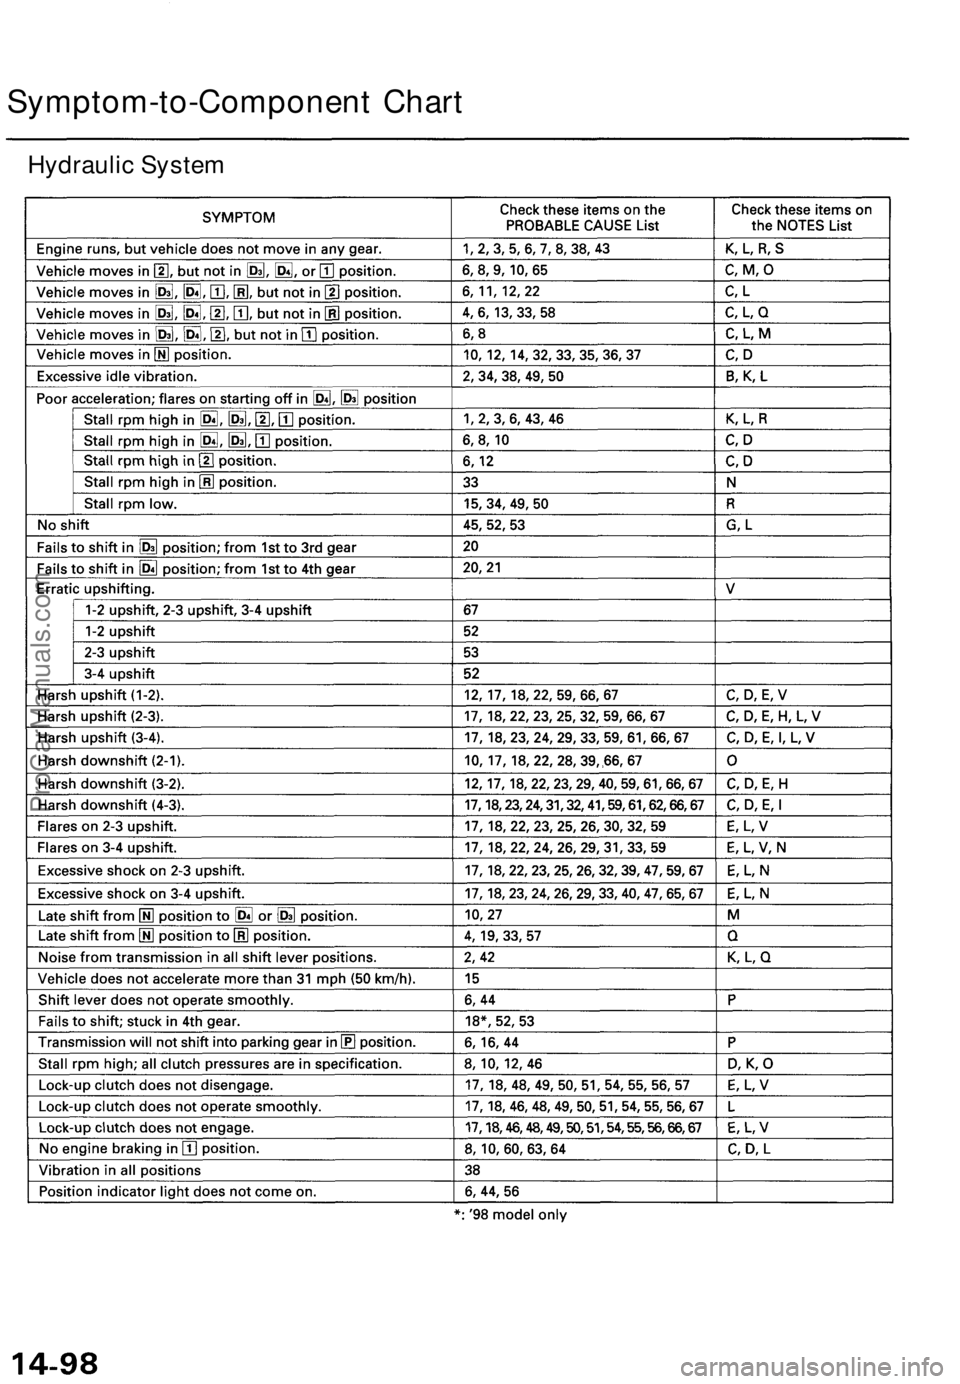
Symptom-to-Component Chart
Hydraulic SystemProCarManuals.com
Page 990 of 1771
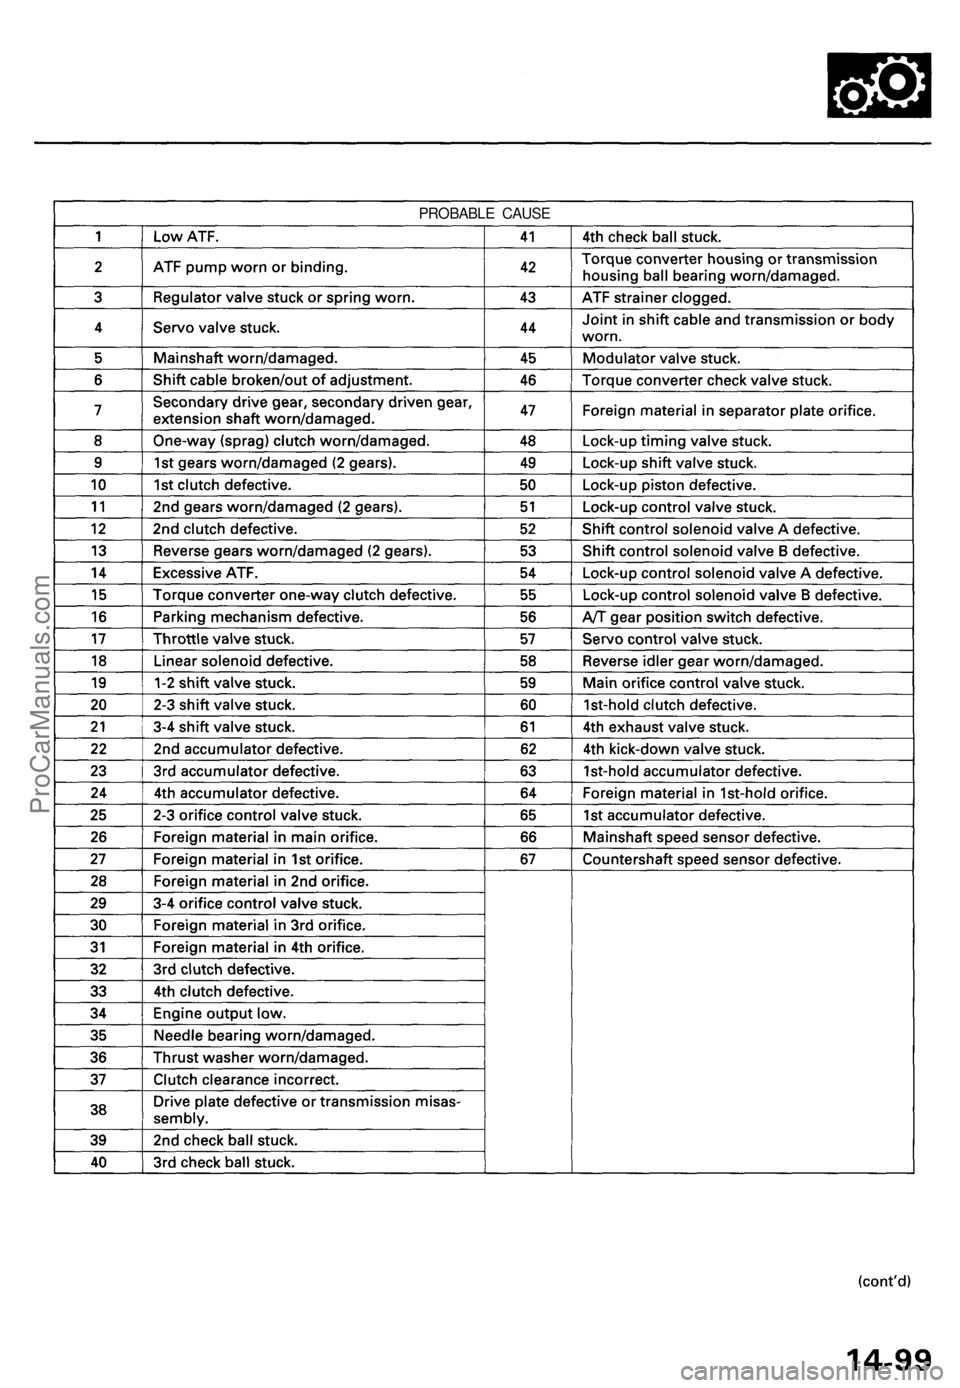
PROBABLE CAUSEProCarManuals.com