Page 91 Acura TL 2006 Repair Manual
[x] Cancel search | Manufacturer: ACURA, Model Year: 2006, Model line: TL, Model: Acura TL 2006Pages: 295, PDF Size: 3.89 MB
Page 160 of 295
As required by the FCC:This device complies with Part 15 of theFCC rules. Operation is subject to thef ollowing two conditions: (1) This devicemay not cause harmf ul interf erence, and(2) this device must accept anyinterf erence received, includinginterf erence that may cause undesiredoperation.
Changes or modif ications not expresslyapproved by the party responsible f orcompliance could void the user’sauthority to operate the equipment.
This device complies with IndustryCanada Standard RSS-210.Operation is subject to the f ollowing twoconditions: (1) this device may not causeinterf erence, and (2) this device mustaccept any interf erence that may causeundesired operation of the device.
Toerasethecodesstoredinallthree
buttons, press and hold the two
outside buttons until the red
indicator begins to f lash, then
release the buttons. If a standard transmitter was
programmed, the indicator will
stay on f or about 25 seconds.
Once the HomeLink indicator
begins to f lash slowly, continue to
hold the HomeLink button, and
f ollow steps 3 thru 6 under
‘‘Training HomeLink’’ (see page ).
If you have problems with training
the HomeLink Universal Transceiver,
or would like inf ormation on home
products that can be operated by
HomeLink, call (800) 355-3515. On
the Internet, go to
www.homelink.com.
HomeLink
is a registered
trademark of Johnson Controls, Inc.
Youshoulderaseallthreecodes
bef ore selling the vehicle.
If you want to retrain a programmed
button f or a new device, you do not
have to erase all button memory.
You can replace the existing memory
code using this procedure:
Press and hold the HomeLink
button to be trained until the
HomeLink indicator begins to
flash slowly.If a rolling code transmitter was
previously programmed, the
indicator will f lash rapidly f or 2
seconds, and then stay on f or
about 23 seconds.
1. 2.
157
Erasing Codes
Customer Assistance
Retraining a Button
HomeL ink Universal Transceiver
159
Page 161 of 295

When the HFL is in use, the sound
comes through the vehicle’s f ront
audio system speakers. If the audio
system is in use while making a call,
the HFL over-rides the audio system.
To change the volume level, use the
audio system volume knob. The HFL microphone is on the
ceiling, between the f ront seat
spotlights. On models with
navigation system, the microphone is
shared with the navigation system. Here are the main components of
the HFL system: The HFL can store up to 50 names
and phone numbers in its phonebook.
Withalinkedphone,youcanthen
automatically dial any name or
number in the phonebook.
Bluetooth
is a registered trademark
of bluetooth SIG, Inc.
Your vehicle is equipped with the
HandsFreeLink (HFL). HFL uses
Bluetooth technology as a wireless
link between it and your Bluetooth
compatible cell phone. When you are
in your vehicle and your phone is
linked to the HFL, you’ll enjoy saf e,
hands-f ree phone use.
Here are the main features of the
HFL. Instructions f or using the HFL
begin on page .
HFL recognizes simple voice
commands, such as phone numbers
and names. It uses these commands
to automatically dial, receive, and
store numbers. For more
inf ormation on voice control, see
UsingVoiceControlonpage . Bluetooth is the wireless technology
that links your phone to the HFL.
TheHFLusesaClass3Bluetooth,
which means the maximam range
between your phone and vehicke is
30 f eet ( 10 meters).
To use the HFL, your phone must
have Bluetooth capability along with
the Hands Free Prof ile. This type of
phone is available through many
phone makers and cellular carriers.
You can also f ind an approved phone
by visiting
In
Canada, visit
With a linked phone, the HFL allows
you to send and receive calls in your
vehicle without holding the phone.
163
163
www.acura.com/handsfree link (
www.acura.ca.).
BluetoothWireless Technology
Audio System Microphone Phonebook
Voice Control Incoming/Outgoing Calls
HandsFreeL ink
Features
160
TM
Page 164 of 295
TheHFLisoperatedbytheHFL
Talk and Back buttons on the left
side of the steering wheel. The next
f ew pages provide easy-to-use
instructions f or all basic f eatures of
the HFL.To skip a voice prompt, press the
Talk button while the HFL is
speaking. The HFL will then begin
listening f or your next command.
To go back one step in a command
process, say, ‘‘Go back,’’ or press
the Back button.
If nothing is said while the HFL is
listening f or a command, the HFL
will time out and stop its voice
recognition. The next time you
press the Talk button, the HFL
begins listening f rom the point at
which it timed out.
To end a command sequence at
any time, press and hold the Back
button, or press the Talk button,
wait f or the beep, and say, ‘‘Cancel.’’
ThenexttimeyoupresstheTalk
button, the HFL begins f rom its
main menu.
If the HFL does not recognize a
command, its response is, ‘‘Pardon.’’
If it doesn’t recognize the
command a second time, its
response is, ‘‘Please repeat.’’ If it
doesn’t recognize the command a
third time, it plays the Help
prompt.
To hear a list of available options
at any time, press the Talk button,
wait f or the beep, and say, ‘‘Hands
f ree link help.’’
Many commands can be spoken
together. For example, you can
say, ‘‘Dial 123-456-7891.’’
To enter a string of numbers in a
Call or Dial command, you can say
them all at once, or you can
separate them in blocks of 3, 4, 7,
10, and 11.
For best system operation, set the
climate control f an speed to low,
and direct the center vents away
f rom the microphone in the ceiling. To enter a command, press the
Talk button. Then, af ter the beep,
say your command in a clear,
natural tone.
Here are some guidelines f or using
voice control: All phones may not
operate identically, and some may
cause inconsistent operation of the
HFL. How to Use the HFL
Using Voice Control
HandsFreeL ink
163
NOTE:
TM
Page 179 of 295
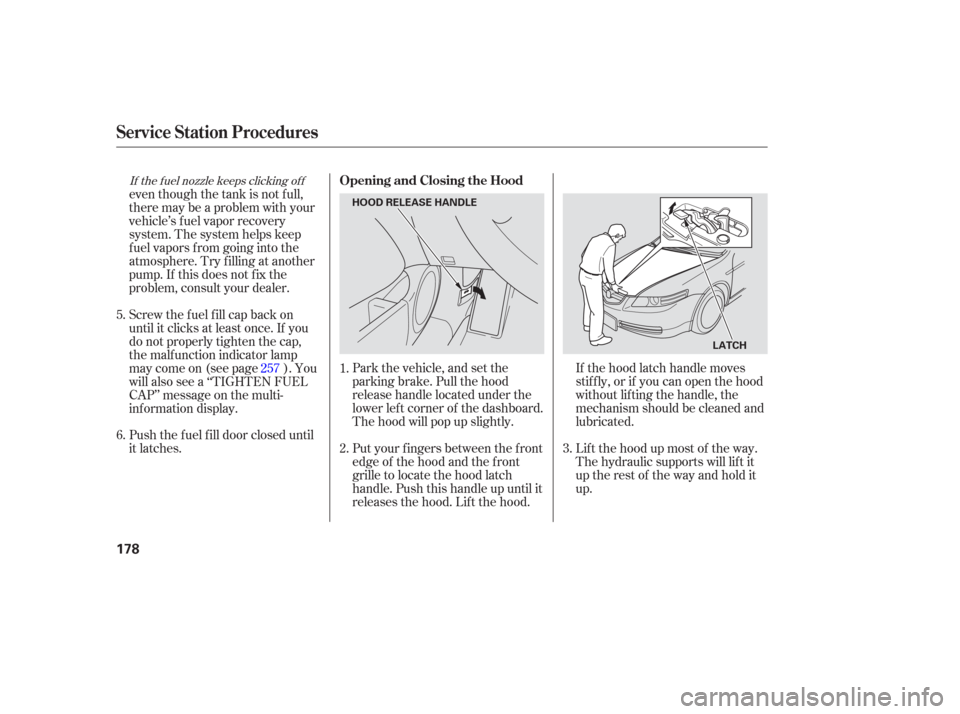
Park the vehicle, and set the
parking brake. Pull the hood
release handle located under the
lower lef t corner of the dashboard.
The hood will pop up slightly.
Put your f ingers between the f ront
edge of the hood and the f ront
grille to locate the hood latch
handle. Push this handle up until it
releases the hood. Lif t the hood.Lif t the hood up most of the way.
The hydraulic supports will lif t it
uptherestof thewayandholdit
up. If the hood latch handle moves
stif f ly, or if you can open the hood
without lifting the handle, the
mechanism should be cleaned and
lubricated.
even though the tank is not f ull,
there may be a problem with your
vehicle’s fuel vapor recovery
system. The system helps keep
f uel vapors f rom going into the
atmosphere. Try f illing at another
pump. If this does not f ix the
problem, consult your dealer.
Screw the fuel fill cap back on
until it clicks at least once. If you
do not properly tighten the cap,
the malf unction indicator lamp
maycomeon(seepage ).You
will also see a ‘‘TIGHTEN FUEL
CAP’’ message on the multi-
inf ormation display.
Push the f uel f ill door closed until
it latches.
1.
2.
3.
5.
6.
257
If the f uel nozzle keeps clicking of f
Service Station Procedures
Opening and Closing the Hood
178
HOOD RELEASE HANDLE
LATCH
Page 180 of 295

Remove the dipstick again, and
check the level. It should be
between the upper and lower
marks.
Wait a f ew minutes af ter turning the
engine of f bef ore you check the oil.
Remove the dipstick (orange loop).
Wipe of f the dipstick with a clean
cloth or paper towel.
Insert it all the way back in its tube.
To close the hood, lower it to about a
f oot (30 cm) above the f ender, then
press down f irmly with your hands.
Make sure the hood is securely
latched.
If it is near or below the lower mark,
seeon page .
4.
1.
2.
3 218
Service Station Procedures
Oil Check
A dding Engine Oil
Bef ore Driving
179
UPPER MARK
LOWER MARK
DIPSTICK
Page 181 of 295
Try to maintain a constant speed.
Everytimeyouslowdownand
speed up, your vehicle uses extra
f uel. Use cruise control when
appropriate.
Combine several short trips into
one.
The air conditioning puts an extra
load on the engine which makes it
usemorefuel.Usethefresh-air
ventilation when possible.
Always maintain your vehicle
according to the maintenance
messages given by the multi-
inf ormation display. See
on page
.
an underinf lated tire
causes more ‘‘rolling resistance,’’
which uses more f uel.
The build-up of snow or mud on
your vehicle’s underside adds
weight and rolling resistance.
Frequent cleaning helps your f uel
mileage and reduces the chance of
corrosion.
Drive moderately. Rapid
acceleration, abrupt cornering,
and hard braking use more f uel.
Always drive in the highest gear
possible.
Refer to
on page f or inf ormation
about checking other items on your
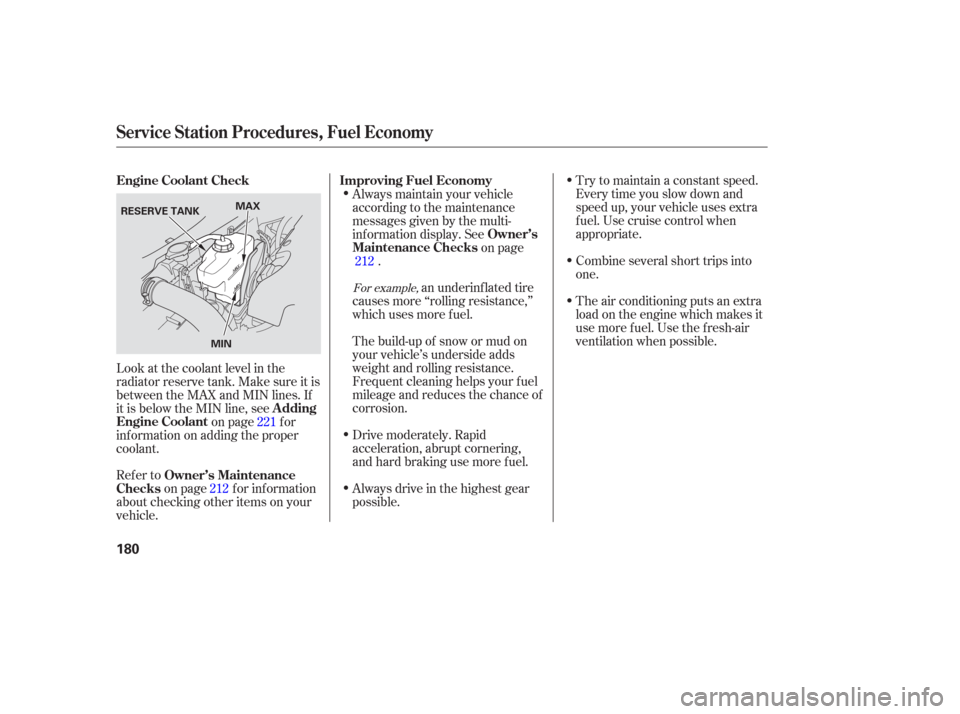
vehicle. Look at the coolant level in the
radiator reserve tank. Make sure it is
between the MAX and MIN lines. If
it is below the MIN line, see on page f or
inf ormation on adding the proper
coolant. 221
212 212
For example,
Service Station Procedures, Fuel Economy
Improving Fuel Economy
Owner’s
Maintenance Checks
Engine Coolant Check
Owner’s Maintenance
Checks A dding
Engine Coolant
180
RESERVE TANK
MINMAX
Page 182 of 295
Modif ying your vehicle, or installing
some non-Acura accessories, can
make it unsaf e. Bef ore you make any
modif ications or add any accessories,
be sure to read the f ollowing
inf ormation.
Your dealer has Acura accessories
that allow you to personalize your
vehicle. These accessories have
been designed and approved f or your
vehicle, and are covered by warranty.Bef ore installing any accessory:
Make sure the accessory does not
obscure any lights, or interf ere
with proper vehicle operation or
perf ormance.
Although non-Acura accessories may
f it on your vehicle, they may not
meet f actory specif ications, and
could adversely af f ect your vehicle’s
handling and stability. When properly installed, cellular
phones, alarms, two-way radios, and
low-powered audio systems should
not interf ere with your vehicle’s
computer controlled systems, such
as your airbags and anti-lock brakes. Bef ore installing any electronic
accessory, have the installer
contact your dealer for assistance.
If possible, have your dealer
inspect the f inal installation.
Do not install accessories on the
side pillars or across the rear
windows. In these areas,
accessories may interf ere with
proper operation of the side
curtain airbags. Be sure electronic accessories do
not overload electrical circuits
(see page ) or interf ere with
proper operation of your vehicle.
259
A ccessories
A ccessories and Modif ications
Bef ore Driving
181
Improper accessories or
modifications can affect your
vehicle’s handling, stability, and
performance, and cause a
crash in which you can be hurt
or killed.
Follow all instructions in this
owner’s manual regarding
accessories and modifications.
Page 184 of 295
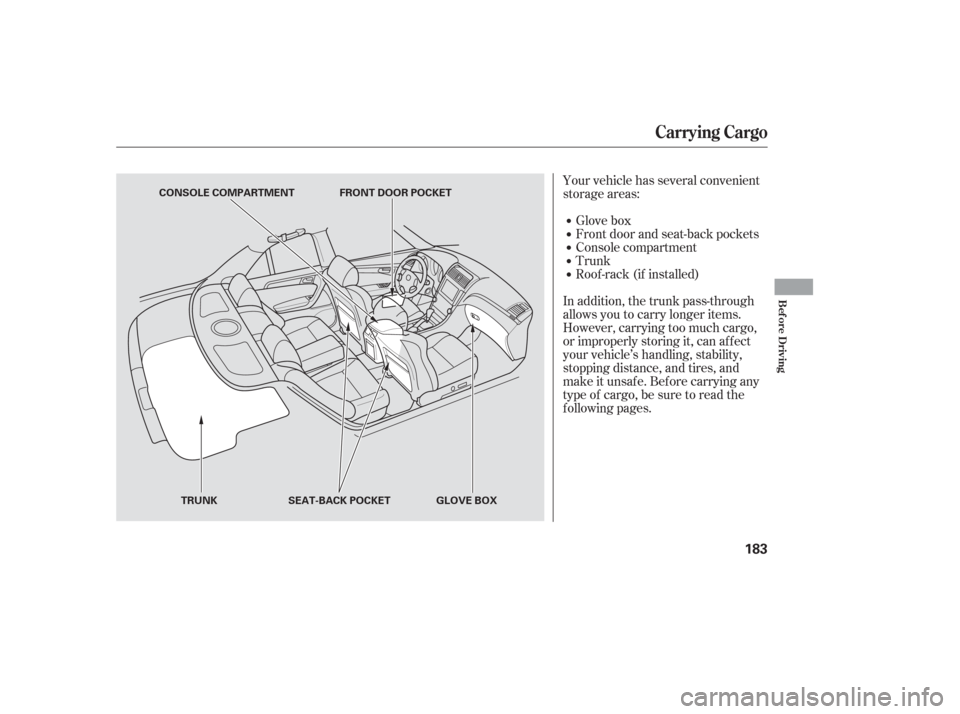
Your vehicle has several convenient
storage areas:Glove box
Front door and seat-back pockets
Console compartment
Trunk
Roof -rack (if installed)
In addition, the trunk pass-through
allows you to carry longer items.
However, carrying too much cargo,
or improperly storing it, can af f ect
your vehicle’s handling, stability,
stopping distance, and tires, and
make it unsaf e. Bef ore carrying any
type of cargo, be sure to read the
f ollowing pages.
Carrying Cargo
Bef ore Driving
183
CONSOLE COMPARTMENT FRONT DOOR POCKET
TRUNK SEAT-BACK POCKET GLOVE BOX
Page 186 of 295
Distribute cargo evenly on the
f loor of the trunk, placing the
heaviest items on the bottom and
as far forward as possible.
Store or secure all items that could
be thrown around and hurt
someone during a crash.
Keep the glove box closed while
driving. If it is open, a passenger
could injure their knees during a
crash or sudden stop. Be sure items placed on the f loor
behind the f ront seats cannot roll
under the seats and interf ere with
the pedals or seat operation. Do not put any items on top of the
trunk panel. They can block your
view and be thrown around the
vehicle during a crash.
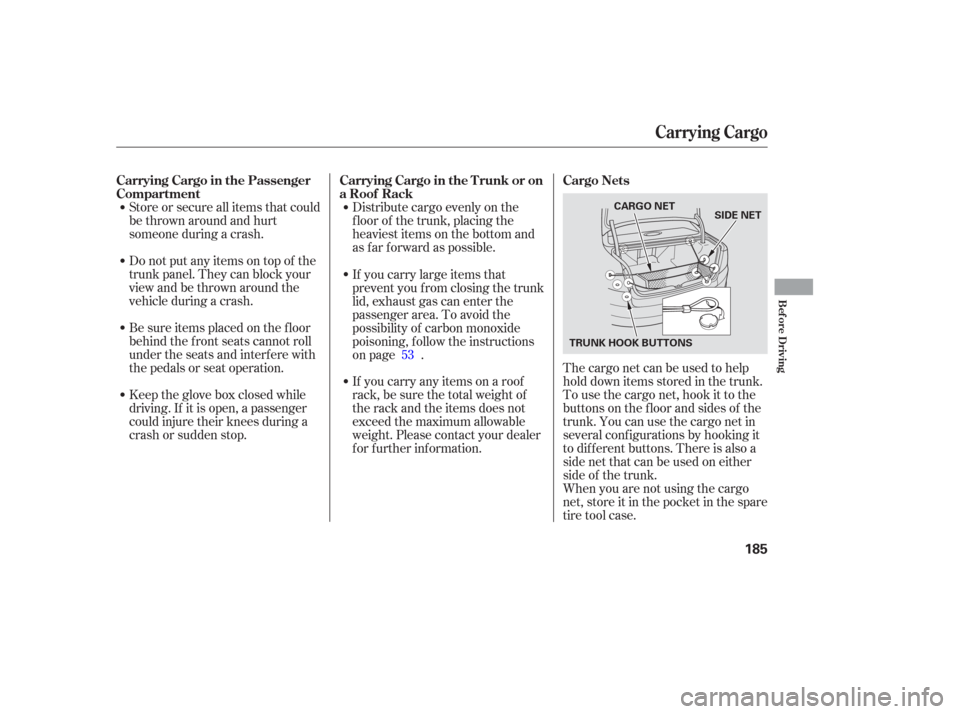
The cargo net can be used to help
hold down items stored in the trunk.
To use the cargo net, hook it to the
buttons on the f loor and sides of the
trunk. You can use the cargo net in
several conf igurations by hooking it
to dif f erent buttons. There is also a
side net that can be used on either
side of the trunk.
When you are not using the cargo
net, store it in the pocket in the spare
tire tool case.
If you carry large items that
prevent you f rom closing the trunk
lid, exhaust gas can enter the
passenger area. To avoid the
possibility of carbon monoxide
poisoning, f ollow the instructions
on page .
If you carry any items on a roof
rack,besurethetotalweightof
the rack and the items does not
exceed the maximum allowable
weight. Please contact your dealer
for further information.
53
Carrying Cargo
Carrying Cargo in the Trunk or on
a Roof Rack
Cargo Nets
Carrying Cargo in the Passenger
Compartment
Bef ore Driving
185
CARGO NET
SIDE NET
TRUNK HOOK BUTTONS
Page 189 of 295
Youshoulddothefollowingchecks
and adjustments every day bef ore
you drive your vehicle.Make sure all windows, mirrors,
and outside lights are clean and
unobstructed. Remove f rost, snow,
or ice.
Check that the hood and trunk are
f ully closed.
Visually check the tires. If a tire
looks low, use a gauge to check its
pressure. Check the seat adjustment (see
page ).
Check the adjustment of the
inside and outside mirrors (see
page ).
Check the steering wheel
adjustment (see page ).
Make sure the doors are securely
closed and locked.
Fasten your seat belt. Check that
your passengers have f astened
their seat belts (see page ).
Check that any items you may be
carrying are stored properly or
f astened down securely. When you start the engine, check
the gauges and indicators in the
instrument panel, and the
messages on the multi-inf ormation
display (see page , and
).
3. 2.
1.
4. 5.
6.
7.
8.
16 59 68
9. 10.
98
101 88 73
Preparing to Drive
Driving188