lock Acura TL 2013 Technology Reference Guide
[x] Cancel search | Manufacturer: ACURA, Model Year: 2013, Model line: TL, Model: Acura TL 2013Pages: 18, PDF Size: 2.39 MB
Page 3 of 18

\f3
K E Y L E S S A C C E S S S Y S T E M
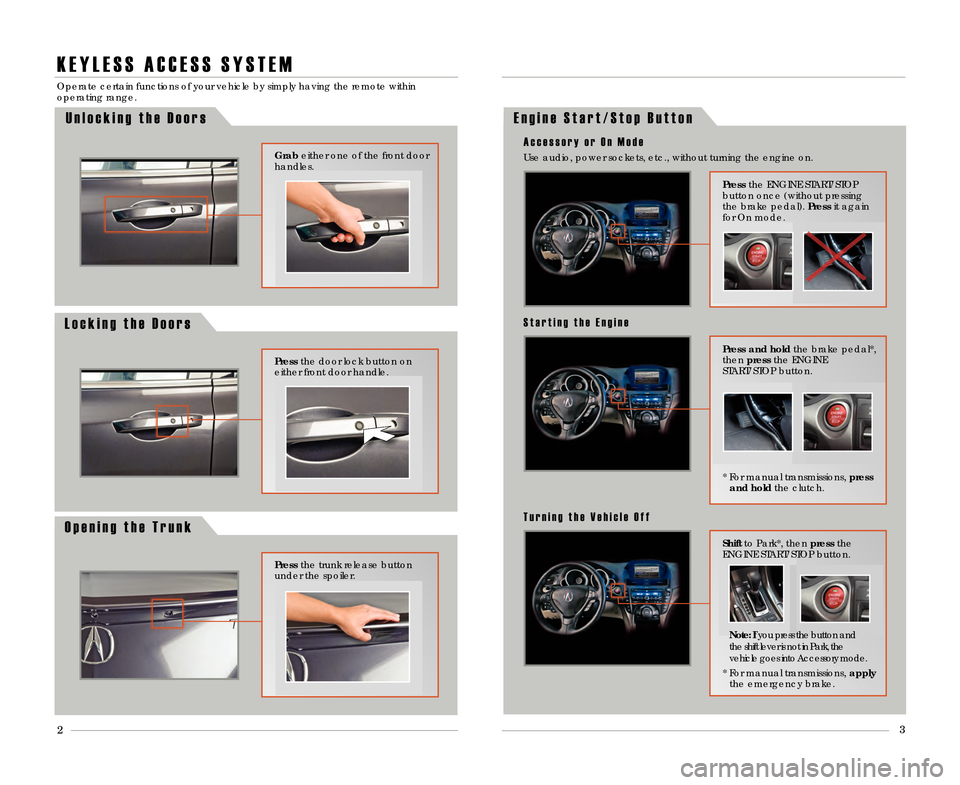
Operate certain functions of your vehicle by simply\3 having the remote within
operating range\b
Press the door lock button on
either front door handle\b
Grab either one of the front door
handles\b
O p e n i n g t h e T r u n k
Press the trunk release button
under the spoiler\b
E n g i n e S t a r t / S t o p B u t t o n
Press and hold the brake pedal*,
then press the ENGINE
START/STOP button\b
* For manual transmissions, press and hold the clutch\b
S t a r t i n g t h e E n g i n e
Shiftto Park*, then press the
ENGINE START/STOP button\b
T u r n i n g t h e V e h i c l e O f f
Press the ENGINE START/STOP
button once (without pressing
the brake pedal)\b Press it again
for On mode\b
Use audio, power sockets, etc\b, without turn\3ing the engine on\b
A c c e s s o r y o r O n M o d e
* For manual transmissions, apply
the emergency brake\b
L o c k i n g t h e D o o r sU n l o c k i n g t h e D o o r s
Note\b
If you press the button and
the shift lever is not in Park, the
vehicle goes into Accessory mode\b
13 TL ATG_Tech_ATG_\ANEW STYLE 8/14/201\A2 2\f00 PM Page 3
Page 4 of 18

I N S T R U M E N T P A N E L I N D I C A T O R S
O n / O f f I n d i c a t o r s
M a l f u n c t i o n I n d i c a t o r s
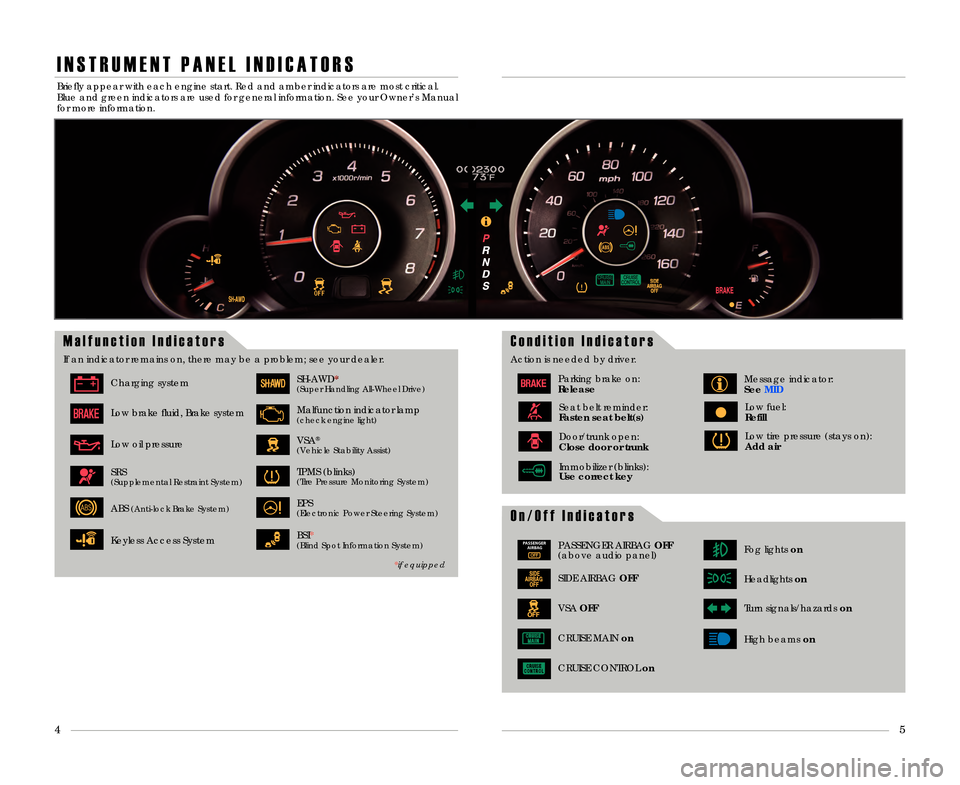
If an indicator remains on, there may be a \3problem; see your dealer\b
Charging system
Low brake fluid, Brake system
Low oil pressure
SH�AWD*(Super Handling All�Wheel Drive)
VSA®
(Vehicle Stability Assist)
Malfunction indicator lamp(check engine light)
TPMS (blinks)(Tire Pressure Monitoring System)SRS(Supplemental Restraint System)
ABS (Anti�lock Brake System)EPS(Electronic Power Steering System)
OFF
PASSENGER AIRBAGPASSENGER AIRBAG OFF
(above audio panel)
SIDE AIRBAG OFF
VSA OFF
Fog lights on
Headlights on
Turn signals/hazards on
CRUISE CONTROL on
CRUISE MAIN on
High beams on
Briefly appear with each engine start\b Red and \3amber indicators are most critical\b
Blue and green indicators are used for general \3information\b See your Owner’s Manual
for more information\b
*if equipped
5
4
C o n d i t i o n I n d i c a t o r s
Action is needed by driver\b
Parking brake on:
ReleaseMessage indicator:
See MI\f
Door/trunk open:
Close door or trunkLow tire pressure (stays on):
Add air
Seat belt reminder:
Fasten seat belt(s)Low fuel:
Refill
BSI*(Blind Spot Information System)Keyless Access System
Immobilizer (blinks):
Use correct key
13 TL ATG_Tech_ATG_\ANEW STYLE 8/14/201\A2 2\f00 PM Page 4
*
Page 6 of 18

8
T i r e P r e s s u r e M o n i t o r i n g S y s t e m
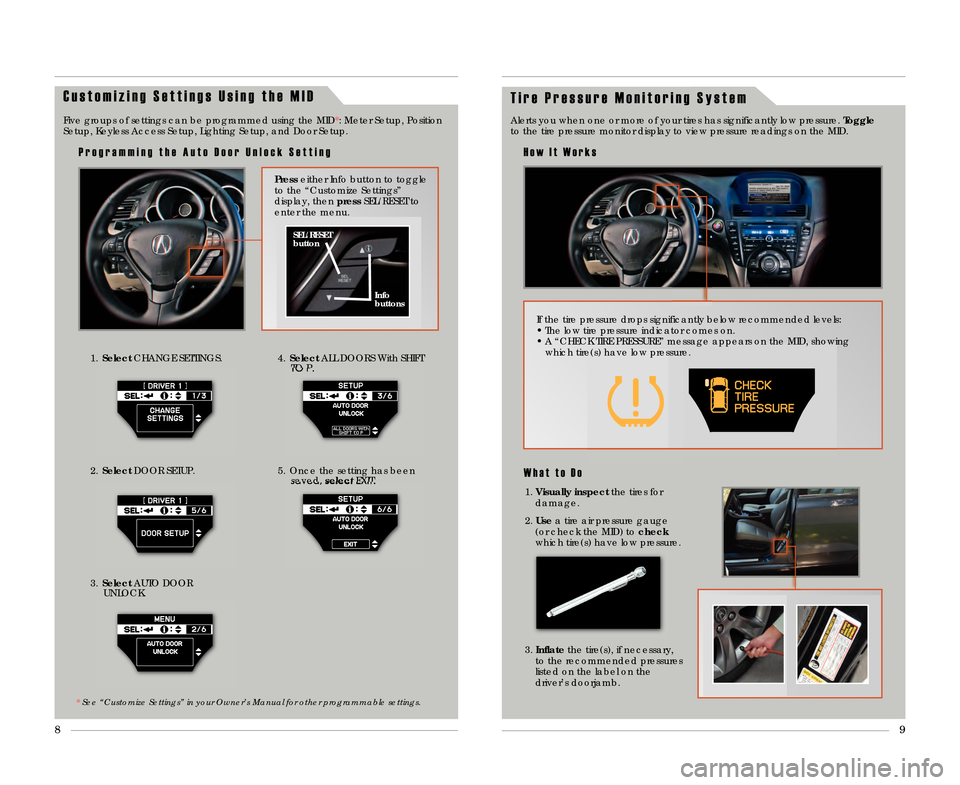
Alerts you when one or more of your tires \3has significantly low pressure\b Toggle
to the tire pressure monitor display to view pre\3ssure readings on the MID\b
H o w I t W o r k s
W h a t t o D o
1\b Visually inspect the tires for
damage\b
\f\b Use a tire air pressure gauge
(or check the MID) to check
which tire(s) have low pressure\b
3\b Inflate the tire(s), if necessary,
to the recommended pressures
listed on the label on the
driver’s doorjamb\b
9
If the tire pressure drops significantly below reco\3mmended levels:
• The low tire pressure indicator comes on\b
• A “CHECK TIRE PRESSURE” mess\3age appears on the MID, showing which tire(s) have low pressure\b
C u s t o m i z i n g S e t t i n g s U s i n g t h e M I D
1\b Select CHANGE SETTINGS\b
3\b Select AUTO DOOR
UNLOCK\b4\b Select ALL DOORS With SHIFT
TO P\b
5\b Once the setting has been saved, select EXIT\b
Five groups of settings can be programmed using \3the MID*: Meter Setup, Position
Setup, Keyless Access Setup, Lighting Setup,\3 and Door Setup\b
SEL/RESET
button
Info
buttons
Press either Info button to toggle
to the “Customize Settings”
display, then press SEL/RESET to
enter the menu\b
P r o g r a m m i n g t h e A u t o D o o r U n l o c k S e t t i n g
* See “Customize Settings” in your Owner’s \5Manual for other programmable settings.
\f\b Select DOOR SETUP\b
13 TL ATG_Tech_ATG_\ANEW STYLE 8/14/201\A2 2\f00 PM Page \b
Page 7 of 18

9
10
11
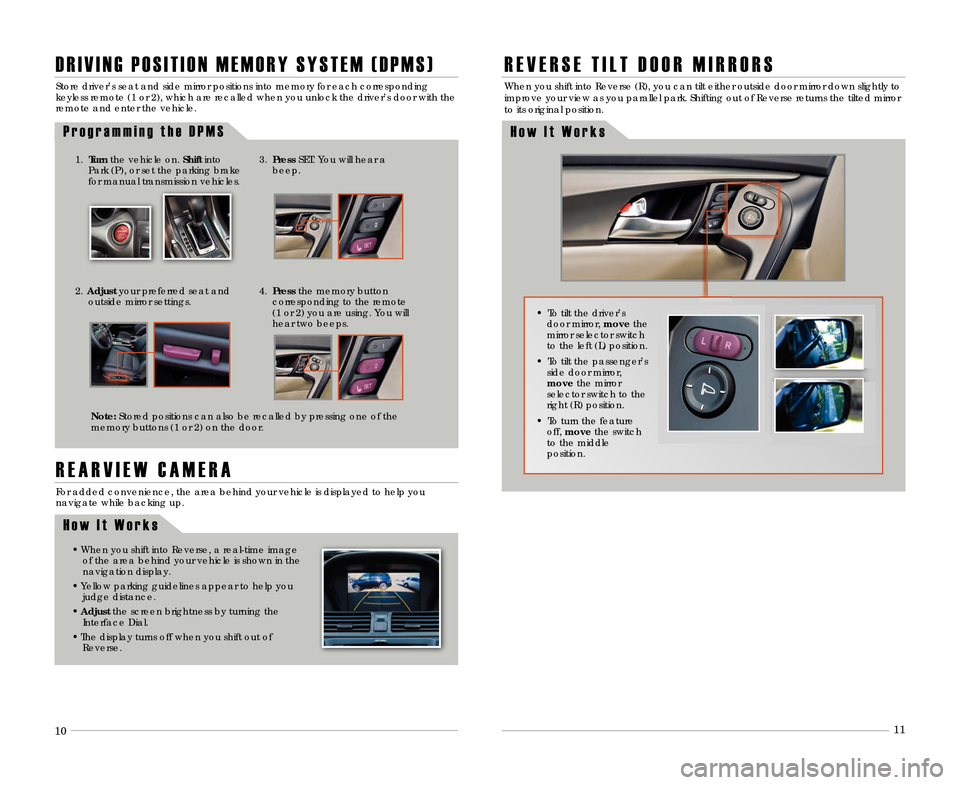
Store driver’s seat and side mirror positions into\3 memory for each corresponding
keyless remote (1 or \f), which are rec\3alled when you unlock the driver’s door with the\3
remote and enter the vehicle\b
P r o g r a m m i n g t h e D P M S
D R I V I N G P O S I T I O N M E M O R Y S Y S T E M ( D P M S )
3\b Press SET\b You will hear a
beep\b
\f\b Adjust your preferred seat and
outside mirror settings\b
4\b Press the memory button
corresponding to the remote
(1 or \f) you are using\b You will
hear two beeps\b
Note\b Stored positions can also be recalled by pressing \3one of the
memory buttons (1 or \f) on the door\b
1\b Turn the vehicle on\b Shift into
Park (P), or set the parking brake
for manual transmission vehicles.
R E A R V I E W C A M E R A
For added convenience, the area behind your v\3ehicle is displayed to help you navigate while backing up\b
• When you shift into Reverse, a real�time \3imageof the area behind your vehicle is shown in t\3he
navigation display\b
• Yellow parking guidelines appear to help you judge distance\b
• Adjust the screen brightness by turning the
Interface Dial\b
• The display turns off when you shift out o\3f Reverse\b
H o w I t W o r k s
R E V E R S E T I L T D O O R M I R R O R S
H o w I t W o r k s
When you shift into Reverse (R), you can \3tilt either outside door mirror down slightly to
improve your view as you parallel park\b Shifting \3out of Reverse returns the tilted mirror
to its original position\b
• To tilt the driver’s door mirror, move the
mirror selector switch
to the left (L) position\b
• To tilt the passenger’s side door mirror,
move the mirror
selector switch to the
right (R) position\b
• To turn the feature off, move the switch
to the middle
position\b
13 TL ATG_Tech_ATG_\ANEW STYLE 8/14/201\A2 2\f00 PM Page 7