Acura ZDX 2012 Owner's Manual
Manufacturer: ACURA, Model Year: 2012, Model line: ZDX, Model: Acura ZDX 2012Pages: 645, PDF Size: 16.36 MB
Page 561 of 645
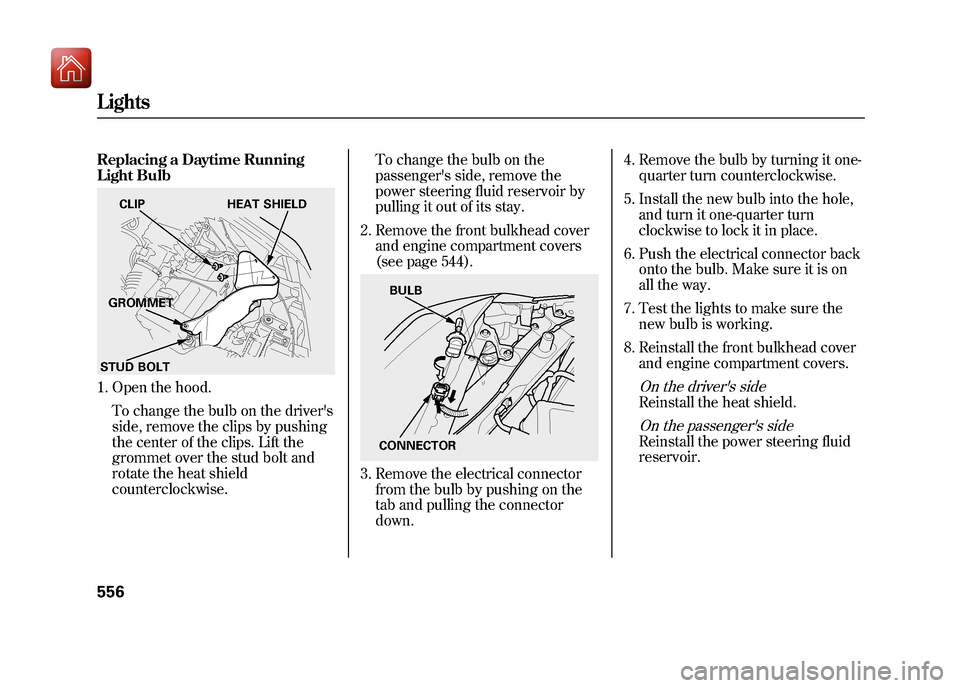
Replacing a Daytime Running
Light Bulb1. Open the hood.To change the bulb on the driver's
side, remove the clips by pushing
the center of the clips. Lift the
grommet over the stud bolt and
rotate the heat shield
counterclockwise. To change the bulb on the
passenger's side, remove the
power steering fluid reservoir by
pulling it out of its stay.
2. Remove the front bulkhead cover and engine compartment covers
(see page 544).
3. Remove the electrical connectorfrom the bulb by pushing on the
tab and pulling the connector
down. 4. Remove the bulb by turning it one-
quarter turn counterclockwise.
5. Install the new bulb into the hole, and turn it one-quarter turn
clockwise to lock it in place.
6. Push the electrical connector back onto the bulb. Make sure it is on
all the way.
7. Test the lights to make sure the new bulb is working.
8. Reinstall the front bulkhead cover and engine compartment covers.
On the driver's sideReinstall the heat shield.On the passenger's sideReinstall the power steering fluid
reservoir.
CLIP HEAT SHIELD
GROMMET
STUD BOLT
CONNECTOR BULB
Lights55609/10/28 17:15:37 10 ACURA ZDX KA KC New North America Own 50 31SZN600 enu
Page 562 of 645
Replacing Front Fog Light Bulbs
Your vehicle uses halogen light
bulbs. When replacing a bulb, handle
it by its plastic case, and protect the
glass from contact with your skin or
hard objects. If you touch the glass,
clean it with denatured alcohol and a
clean cloth.Halogen bulbs get very hot when lit.
Oil, perspiration, or a scratch on the
glass can cause the bulb to overheat
and shatter.
The fog lights were properly aimed
when your vehicle was new. If you
regularly carry heavy items in the
cargo area or pull a trailer,
readjustment may be required.
Adjustment should be done by your
dealer or other qualified technician.
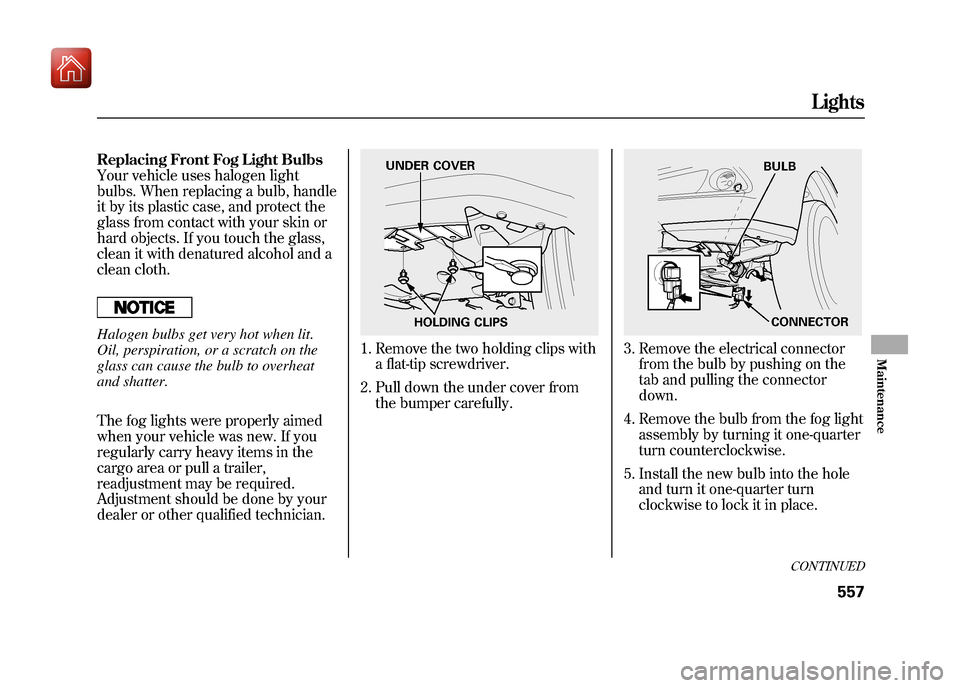
1. Remove the two holding clips witha flat-tip screwdriver.
2. Pull down the under cover from the bumper carefully.
3. Remove the electrical connectorfrom the bulb by pushing on the
tab and pulling the connector
down.
4. Remove the bulb from the fog light assembly by turning it one-quarter
turn counterclockwise.
5. Install the new bulb into the hole and turn it one-quarter turn
clockwise to lock it in place.
HOLDING CLIPS
UNDER COVER
BULB
CONNECTOR
CONTINUED
Lights
557
Maintenance
09/10/28 17:15:37 10 ACURA ZDX KA KC New North America Own 50 31SZN600 enu
Page 563 of 645
6. Push the electrical connector backonto the bulb. Make sure it is on
all the way.
7. Turn on the fog lights to test the new bulb.
8. Reinstall the holding clips, and push in the head of each clip. Replacing Rear Bulbs
(in Rear Pillar)
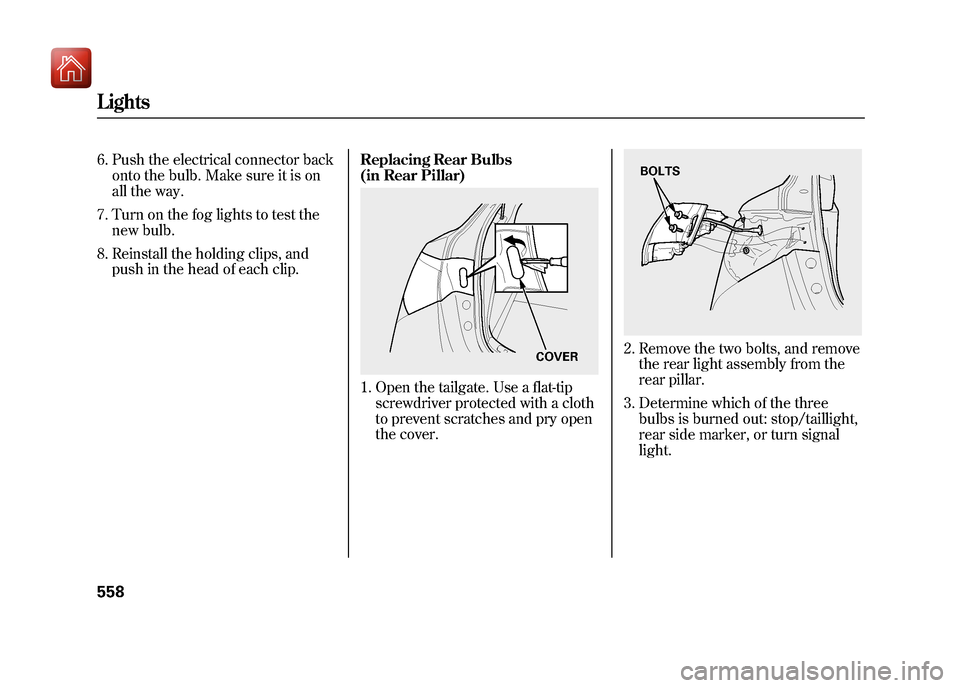
1. Open the tailgate. Use a flat-tip
screwdriver protected with a cloth
to prevent scratches and pry open
the cover.
2. Remove the two bolts, and removethe rear light assembly from the
rear pillar.
3. Determine which of the three bulbs is burned out: stop/taillight,
rear side marker, or turn signal
light.
COVER
BOLTS
Lights55809/10/28 17:15:37 10 ACURA ZDX KA KC New North America Own 50 31SZN600 enu
Page 564 of 645
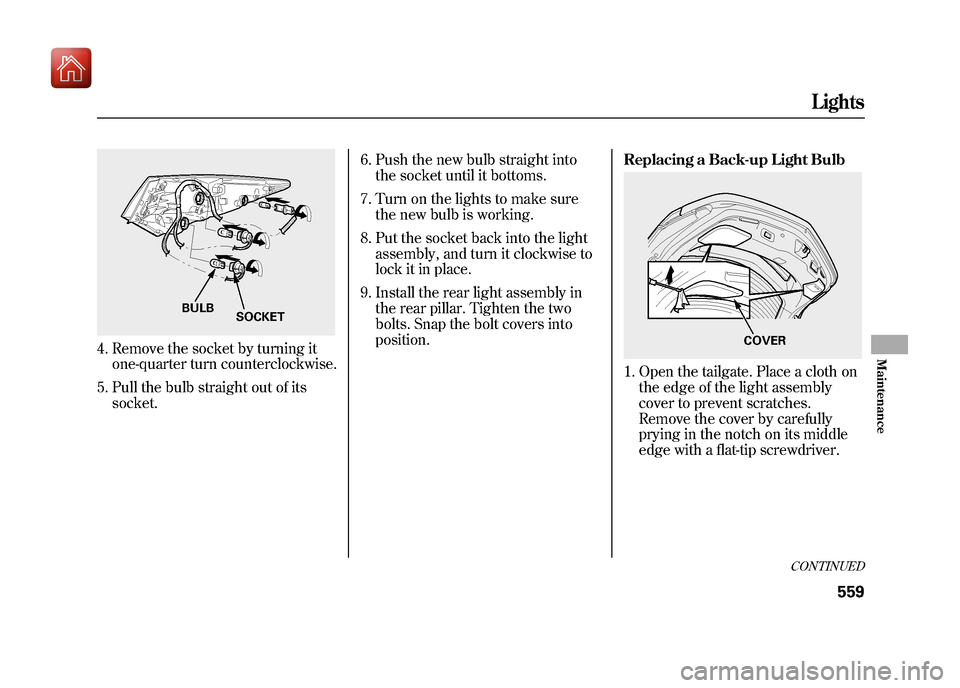
4. Remove the socket by turning itone-quarter turn counterclockwise.
5. Pull the bulb straight out of its socket. 6. Push the new bulb straight into
the socket until it bottoms.
7. Turn on the lights to make sure the new bulb is working.
8. Put the socket back into the light assembly, and turn it clockwise to
lock it in place.
9. Install the rear light assembly in the rear pillar. Tighten the two
bolts. Snap the bolt covers into
position. Replacing a Back-up Light Bulb
1. Open the tailgate. Place a cloth on
the edge of the light assembly
cover to prevent scratches.
Remove the cover by carefully
prying in the notch on its middle
edge with a flat-tip screwdriver.
BULB SOCKET
COVER
CONTINUED
Lights
559
Maintenance
09/10/28 17:15:37 10 ACURA ZDX KA KC New North America Own 50 31SZN600 enu
Page 565 of 645
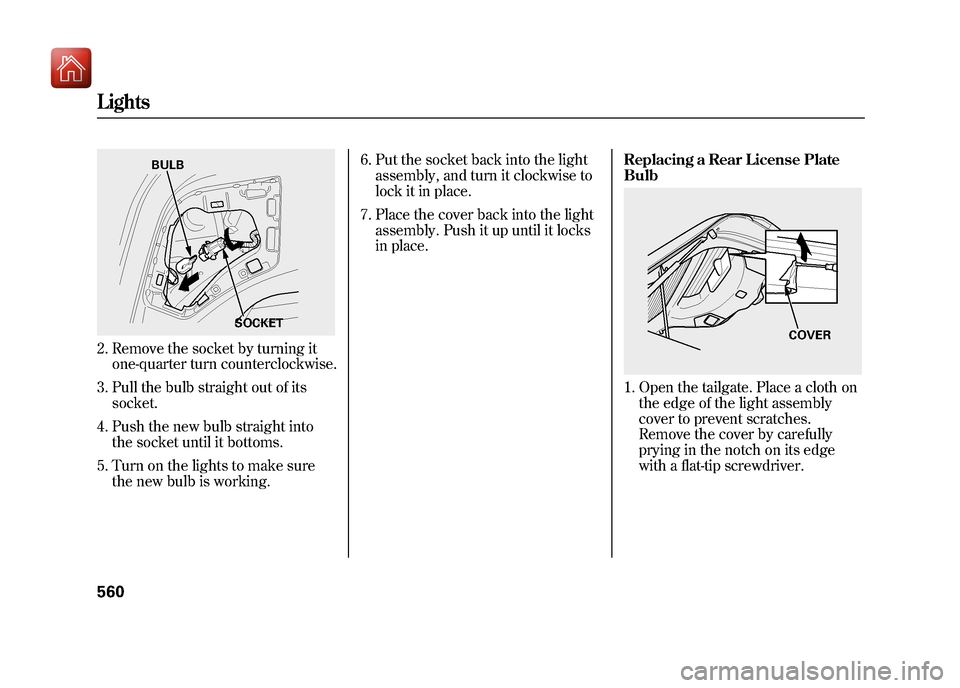
2. Remove the socket by turning itone-quarter turn counterclockwise.
3. Pull the bulb straight out of its socket.
4. Push the new bulb straight into the socket until it bottoms.
5. Turn on the lights to make sure the new bulb is working. 6. Put the socket back into the light
assembly, and turn it clockwise to
lock it in place.
7. Place the cover back into the light assembly. Push it up until it locks
in place. Replacing a Rear License Plate
Bulb
1. Open the tailgate. Place a cloth on
the edge of the light assembly
cover to prevent scratches.
Remove the cover by carefully
prying in the notch on its edge
with a flat-tip screwdriver.
BULB
SOCKET
COVER
Lights56009/10/28 17:15:37 10 ACURA ZDX KA KC New North America Own 50 31SZN600 enu
Page 566 of 645
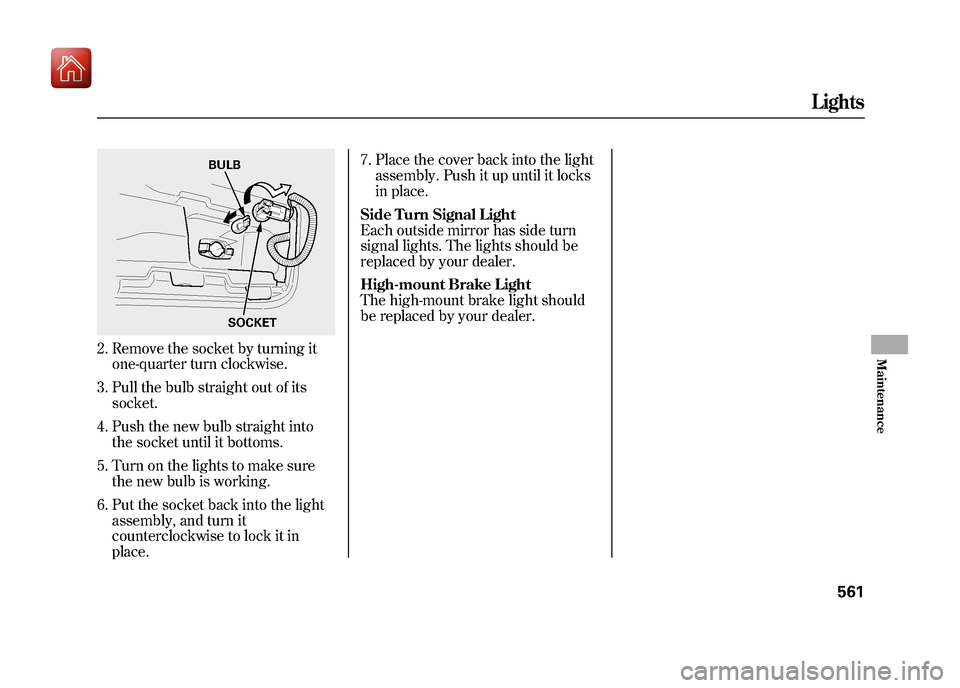
2. Remove the socket by turning itone-quarter turn clockwise.
3. Pull the bulb straight out of its socket.
4. Push the new bulb straight into the socket until it bottoms.
5. Turn on the lights to make sure the new bulb is working.
6. Put the socket back into the light assembly, and turn it
counterclockwise to lock it in
place. 7. Place the cover back into the light
assembly. Push it up until it locks
in place.
Side Turn Signal Light
Each outside mirror has side turn
signal lights. The lights should be
replaced by your dealer.
High-mount Brake Light
The high-mount brake light should
be replaced by your dealer.
BULB
SOCKET
Lights
561
Maintenance
09/10/28 17:15:37 10 ACURA ZDX KA KC New North America Own 50 31SZN600 enu
Page 567 of 645
Dust and Pollen Filter
This filter removes the dust and
pollen that is brought in from the
outside through the climate control
system.
Have your dealer replace the filter
when this service is indicated by a
maintenance message on the multi-
information display. It should be
replaced every 15,000 miles (24,000
km) if you drive primarily in urban
areas that have high concentrations
of soot in the air, or if the flow from
the climate control system becomes
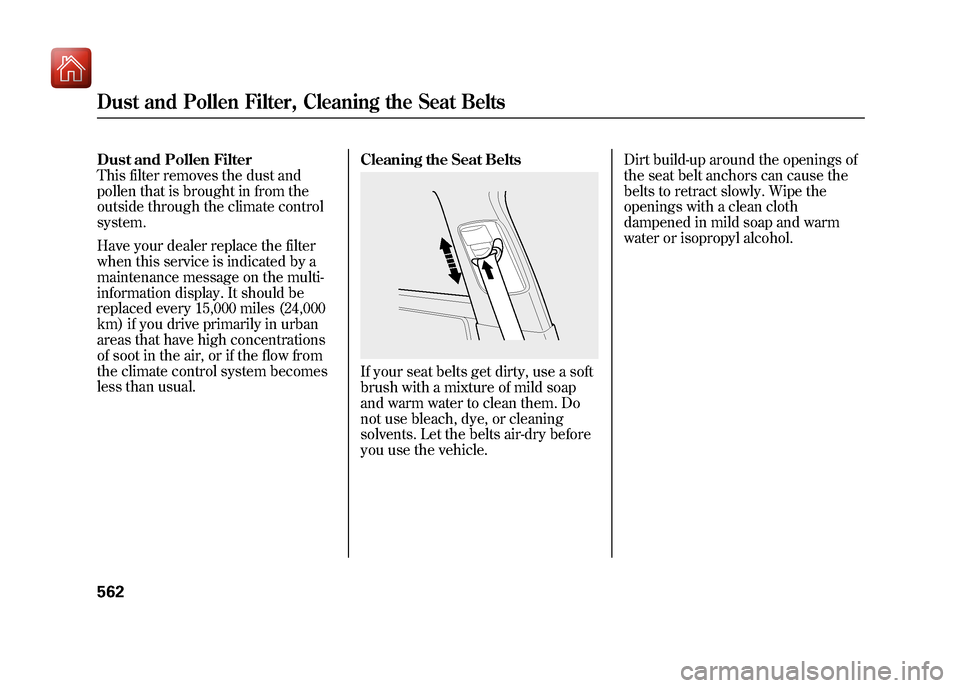
less than usual.Cleaning the Seat Belts
If your seat belts get dirty, use a soft
brush with a mixture of mild soap
and warm water to clean them. Do
not use bleach, dye, or cleaning
solvents. Let the belts air-dry before
you use the vehicle.Dirt build-up around the openings of
the seat belt anchors can cause the
belts to retract slowly. Wipe the
openings with a clean cloth
dampened in mild soap and warm
water or isopropyl alcohol.
Dust and Pollen Filter, Cleaning the Seat Belts56209/10/28 17:15:37 10 ACURA ZDX KA KC New North America Own 50 31SZN600 enu
Page 568 of 645
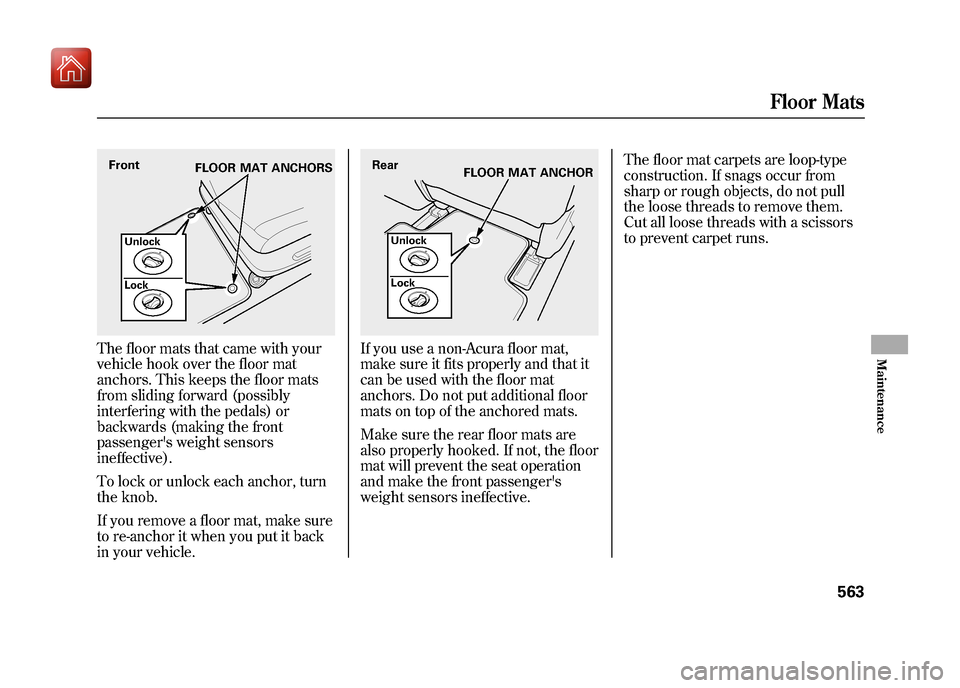
The floor mats that came with your
vehicle hook over the floor mat
anchors. This keeps the floor mats
from sliding forward (possibly
interfering with the pedals) or
backwards (making the front
passenger's weight sensors
ineffective).
To lock or unlock each anchor, turn
the knob.
If you remove a floor mat, make sure
to re-anchor it when you put it back
in your vehicle.
If you use a non-Acura floor mat,
make sure it fits properly and that it
can be used with the floor mat
anchors. Do not put additional floor
mats on top of the anchored mats.
Make sure the rear floor mats are
also properly hooked. If not, the floor
mat will prevent the seat operation
and make the front passenger's
weight sensors ineffective.The floor mat carpets are loop-type
construction. If snags occur from
sharp or rough objects, do not pull
the loose threads to remove them.
Cut all loose threads with a scissors
to prevent carpet runs.
Front
FLOOR MAT ANCHORS
Unlock
Lock
Lock Unlock
FLOOR MAT ANCHOR
Rear
Floor Mats
563
Maintenance
09/10/28 17:15:37 10 ACURA ZDX KA KC New North America Own 50 31SZN600 enu
Page 569 of 645
Check the condition of the wiper
blades at least every 6 months.
Replace them if you find signs of
cracking in the rubber, and areas
that are getting hard or if they leave
streaks and unwiped areas when
used.
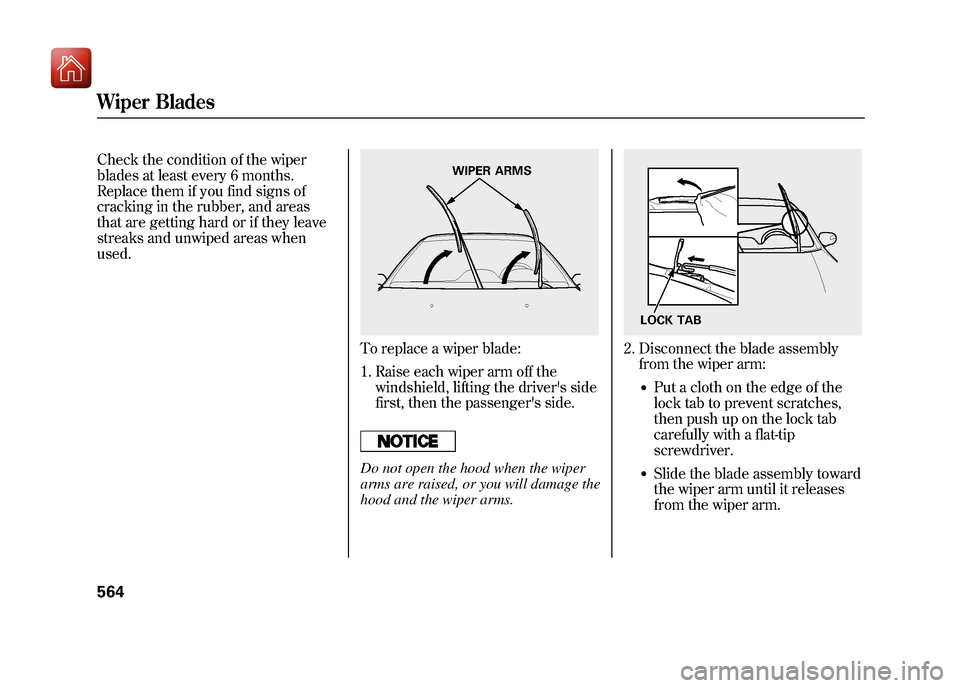
To replace a wiper blade:
1. Raise each wiper arm off thewindshield, lifting the driver's side
first, then the passenger's side.Do not open the hood when the wiper
arms are raised, or you will damage the
hood and the wiper arms.
2. Disconnect the blade assemblyfrom the wiper arm:
●Put a cloth on the edge of the
lock tab to prevent scratches,
then push up on the lock tab
carefully with a flat-tip
screwdriver.●Slide the blade assembly toward
the wiper arm until it releases
from the wiper arm.
WIPER ARMS
LOCK TAB
Wiper Blades56409/10/28 17:15:37 10 ACURA ZDX KA KC New North America Own 50 31SZN600 enu
Page 570 of 645
When replacing a wiper blade, make
sure not to drop the wiper blade or
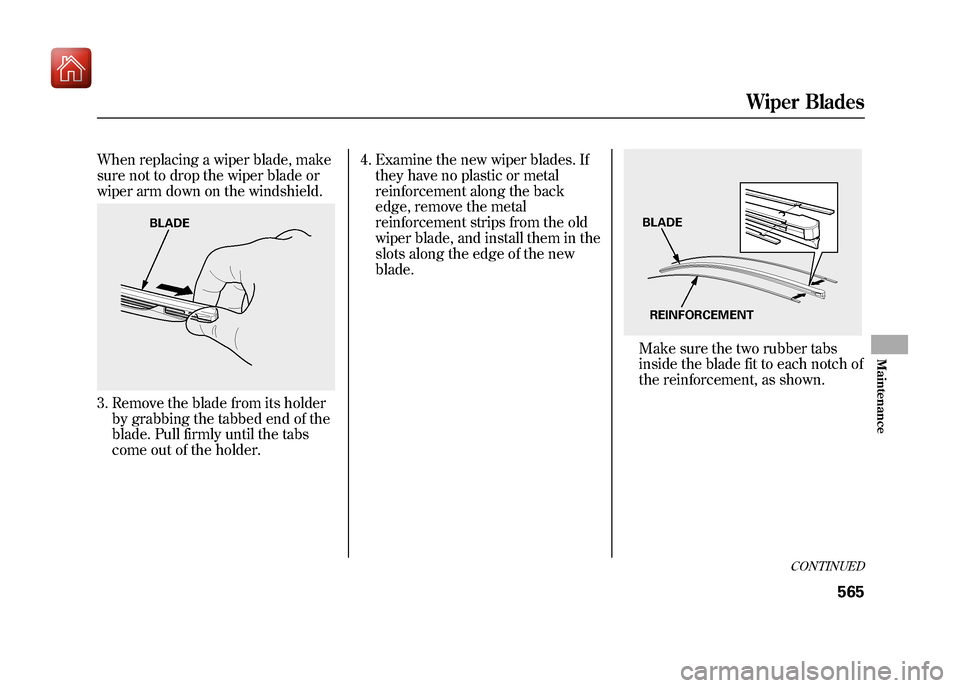
wiper arm down on the windshield.3. Remove the blade from its holderby grabbing the tabbed end of the
blade. Pull firmly until the tabs
come out of the holder. 4. Examine the new wiper blades. If
they have no plastic or metal
reinforcement along the back
edge, remove the metal
reinforcement strips from the old
wiper blade, and install them in the
slots along the edge of the new
blade.
Make sure the two rubber tabs
inside the blade fit to each notch of
the reinforcement, as shown.
BLADE
REINFORCEMENT
BLADE
CONTINUED
Wiper Blades
565
Maintenance
09/10/28 17:15:37 10 ACURA ZDX KA KC New North America Own 50 31SZN600 enu