engine Alfa Romeo 147 2006 Owner handbook (in English)
[x] Cancel search | Manufacturer: ALFA ROMEO, Model Year: 2006, Model line: 147, Model: Alfa Romeo 147 2006Pages: 291, PDF Size: 5.52 MB
Page 185 of 291

CORRECT USE OF THE CAR
183
Top speed
Fuel consumption considerably increases
with speed: it is helpful to note that passing
from 90 to 120 km/h consumption in-
creases by about +30%. Also maintain an
even as possible speed, avoiding superflu-
ous braking and accelerating again, which
cost in terms of both fuel and emissions. It
is therefore advisable to adopt a “smooth”
driving style trying to anticipate manoeuvres
to avoid imminent hazards and respect safe-
ty distances to avoid sudden slowing.
Acceleration
Accelerating heavily taking the engine to
a high speed, has a considerably adverse ef-
fect on consumption and emission levels;
it is wise to accelerate gradually and not ex-
ceed the maximum torque.CONDITIONS OF USE
Cold starting
Short journeys and frequent cold starts do
not allow the engine to reach optimum op-
erating temperature. This results in a sig-
nificant increase in consumption levels (from
+15 to +30% on the urban cycle) and emis-
sion of harmful substances.
Traffic situations and
road conditions
Rather high consumption levels are tied to
situations with heavy traffic, for example
in queues with frequent use of the lower
gears or in cities with many traffic lights.
Also winding mountain roads and rough
road surfaces adversely affect consumption.
Stopping in the traffic
During prolonged stops (e.g. level cross-
ings) it is advisable to switch the engine off.
ECONOMY AND
ENVIRONMENT
FRIENDLY DRIVING
Environment protection is one of the prin-
ciples that guided the development of your
Alfa 147 GTA.
It is not merely by chance that its antipol-
lution devices obtain results far beyond those
specified by current regulations.
However, the environment still needs the
utmost care from all of us.
By following a few simple rules it is pos-
sible to avoid damage to the environment
and very often at the same time to limit fu-
el consumption. On this subject we are giv-
ing some helpful suggestions to be added
to those marked with the
#in various points
of this booklet.
Kindly read them all carefully.
Page 186 of 291
CORRECT USE OF THE CAR
184
PROTECTING EMISSION
REDUCING DEVICES
Correct operation of the anti-pollution de-
vices not only guarantees respect for the en-
vironment but also influences vehicle per-
formance. Keeping these devices in good
condition is therefore the first rule for both
environment-friendly and economy driving.
The first precaution is to closely follow the
“Programmed Maintenance Schedule”. Use
only unleaded petrol (95 RON) (Specifica-
tion EN228).
If difficulty with starting is experienced do
not insist with extended attempts. Especially
avoid bump, tow or coast starts: these may
all damage the catalyst. Only use an auxil-
iary battery to start the car in an emergency.If when driving the engine is not running
smoothly, continue, minimising the need for
engine performance and contact Alfa Romeo
Authorised Services as soon as possible.
When the fuel reserve warning light turns
on, fill up as soon as possible. A low fuel lev-
el may cause an irregular supply to the en-
gine with inevitable increase of the exhaust
gas temperature; this would result in serious
damage to the catalyst.
Never run the engine, even as a test, with
one or more spark plugs disconnected. Do
not warm the engine at idle speed before
moving off, unless the outside temperature
is very low and, in this case too, for no more
than 30 seconds.
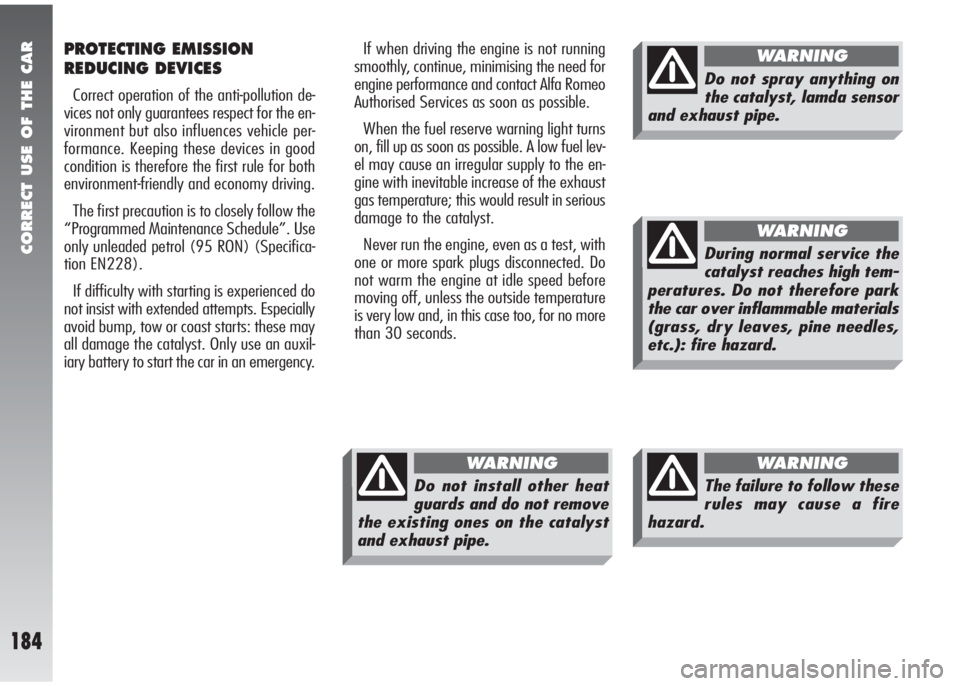
Do not spray anything on
the catalyst, lamda sensor
and exhaust pipe.
WARNING
The failure to follow these
rules may cause a fire
hazard.
WARNING
Do not install other heat
guards and do not remove
the existing ones on the catalyst
and exhaust pipe.
WARNING
During normal service the
catalyst reaches high tem-
peratures. Do not therefore park
the car over inflammable materials
(grass, dry leaves, pine needles,
etc.): fire hazard.
WARNING
Page 189 of 291
CORRECT USE OF THE CAR
187
USEFUL ACCESSORIES
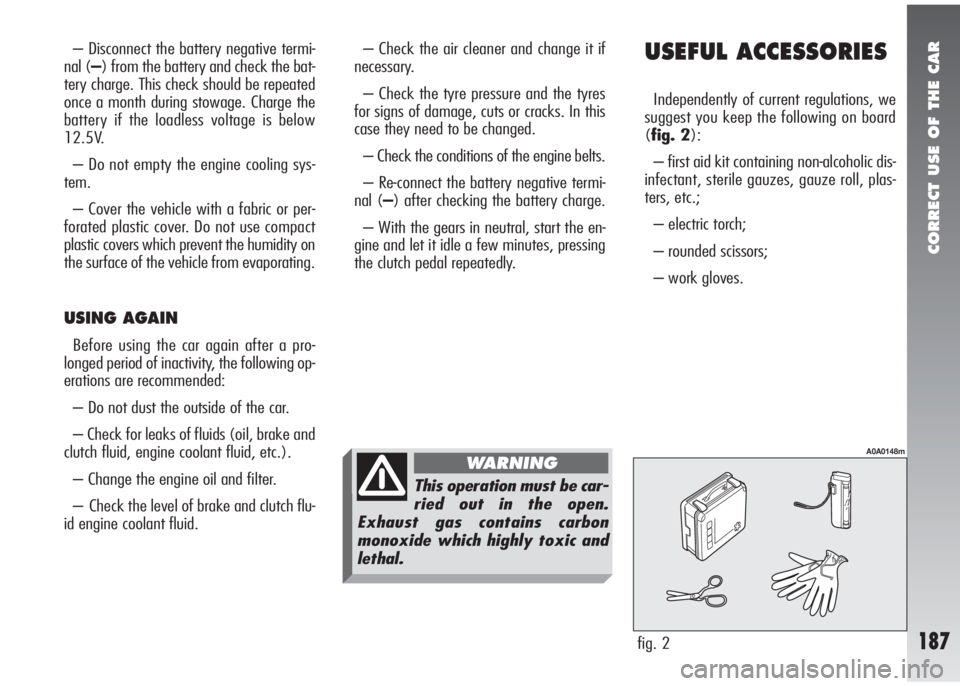
Independently of current regulations, we
suggest you keep the following on board
(fig. 2):
– first aid kit containing non-alcoholic dis-
infectant, sterile gauzes, gauze roll, plas-
ters, etc.;
– electric torch;
– rounded scissors;
– work gloves.
fig. 2
A0A0148m
– Disconnect the battery negative termi-
nal (–) from the battery and check the bat-
tery charge. This check should be repeated
once a month during stowage. Charge the
battery if the loadless voltage is below
12.5V.
– Do not empty the engine cooling sys-
tem.
– Cover the vehicle with a fabric or per-
forated plastic cover. Do not use compact
plastic covers which prevent the humidity on
the surface of the vehicle from evaporating.
USING AGAIN
Before using the car again after a pro-
longed period of inactivity, the following op-
erations are recommended:
– Do not dust the outside of the car.
– Check for leaks of fluids (oil, brake and
clutch fluid, engine coolant fluid, etc.).
– Change the engine oil and filter.
– Check the level of brake and clutch flu-
id engine coolant fluid.– Check the air cleaner and change it if
necessary.
– Check the tyre pressure and the tyres
for signs of damage, cuts or cracks. In this
case they need to be changed.
– Check the conditions of the engine belts.
– Re-connect the battery negative termi-
nal (–) after checking the battery charge.
– With the gears in neutral, start the en-
gine and let it idle a few minutes, pressing
the clutch pedal repeatedly.
This operation must be car-
ried out in the open.
Exhaust gas contains carbon
monoxide which highly toxic and
lethal.
WARNING
Page 190 of 291
IN AN EMERGENCY
188
3) Fully depress the accelerator pedal and
keep it pressed. The
Uwarning light will
come on for eight seconds and then go off,
now release the accelerator pedal.
4) The
Uwarning light begins to flash:
after it has flashed the same number of
times as the first digit on the CODE card,
press the accelerator pedal and keep it
pressed until the
Uwarning light turns on
(for four seconds) and then goes off, now
release the accelerator pedal.
5) The
Uwarning light starts to flash: af-
ter the number of flashes corresponding to
the second digit on the CODE card, press the
accelerator pedal and keep it pressed.
6) Repeat this procedure for the remain-
ing digits on the CODE card.
7) After entering the last figure, keep the
accelerator pedal pressed. The
Uwarn-
ing light turns on (for four seconds) and
then goes off; now release the accelera-
tor pedal.8) A quick flash of the
Uwarning light
(for about 4 seconds) confirms that the op-
eration has been carried out correctly.
9) Start the engine turning the ignition key
fromMARtoAV Vwithout returning the
key to the STOPposition.
Conversely, if the
Uwarning light stays
on, turn the key to STOPand repeat the
procedure starting from point 1).
IMPORTANTAfter emergency starting
it is advisable to contact an Alfa Romeo Au-
thorised Service, because the emergency
procedure must be repeated each time the
engine is started.
EMERGENCY
STARTING
If it is not possible to deactivate the engine
inhibitor with the Alfa Romeo CODE system,
the
YandUwarning lights stay on and
the engine will not start. Emergency start-
ing is needed to start the engine.
IMPORTANTYou are advised to care-
fully read the entire procedure before car-
rying it out.
If a mistake is made during the emergency
procedure, the ignition key should be turned
toSTOPand the operations must be re-
peated from the start (point 1).
1) Read the 5-figure electronic code on the
CODE card.
2) Turn the ignition key to MAR.
I I
N N
A A
N N
E E
M M
E E
R R
G G
E E
N N
C C
Y Y
Page 191 of 291
IN AN EMERGENCY
189
STARTING
WITH AN AUXILIARY BATTERY
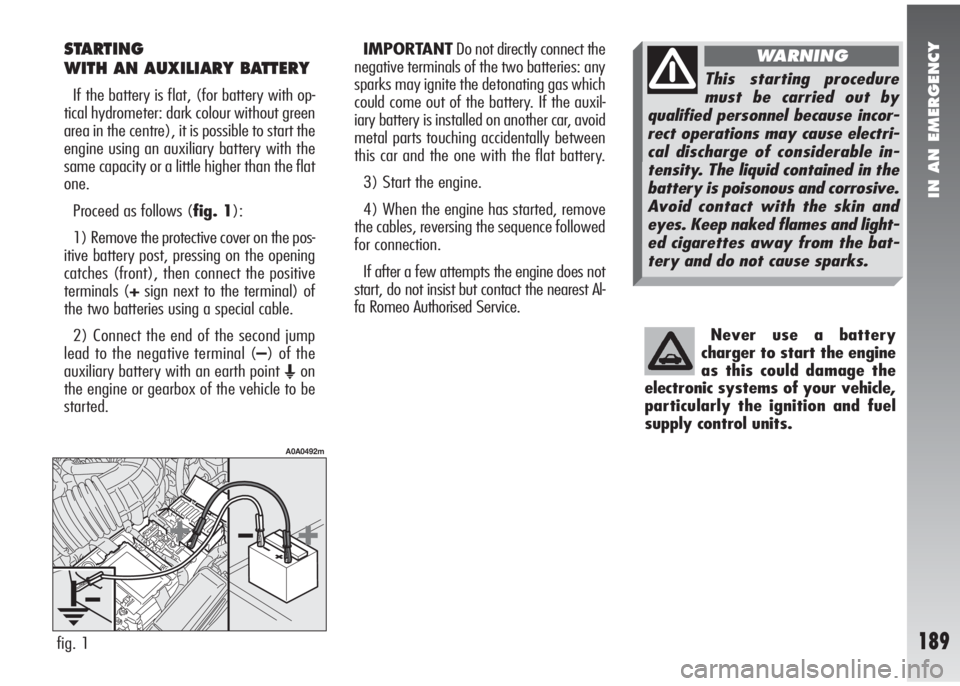
If the battery is flat, (for battery with op-
tical hydrometer: dark colour without green
area in the centre), it is possible to start the
engine using an auxiliary battery with the
same capacity or a little higher than the flat
one.
Proceed as follows (fig. 1):
1) Remove the protective cover on the pos-
itive battery post, pressing on the opening
catches (front), then connect the positive
terminals (+sign next to the terminal) of
the two batteries using a special cable.
2) Connect the end of the second jump
lead to the negative terminal (–) of the
auxiliary battery with an earth point
Eon
the engine or gearbox of the vehicle to be
started.IMPORTANTDo not directly connect the
negative terminals of the two batteries: any
sparks may ignite the detonating gas which
could come out of the battery. If the auxil-
iary battery is installed on another car, avoid
metal parts touching accidentally between
this car and the one with the flat battery.
3) Start the engine.
4) When the engine has started, remove
the cables, reversing the sequence followed
for connection.
If after a few attempts the engine does not
start, do not insist but contact the nearest Al-
fa Romeo Authorised Service.
fig. 1
A0A0492m
Never use a battery
charger to start the engine
as this could damage the
electronic systems of your vehicle,
particularly the ignition and fuel
supply control units.
This starting procedure
must be carried out by
qualified personnel because incor-
rect operations may cause electri-
cal discharge of considerable in-
tensity. The liquid contained in the
battery is poisonous and corrosive.
Avoid contact with the skin and
eyes. Keep naked flames and light-
ed cigarettes away from the bat-
tery and do not cause sparks.
WARNING
Page 192 of 291
IN AN EMERGENCY
190
IMPORTANTThe car is equipped with
“Kit for tyre quick repair Fix&Go“, see the
instructions contained in the following chap-
ter.
STARTING BY INERTIAIN THE EVENT OF A PUNCTURE
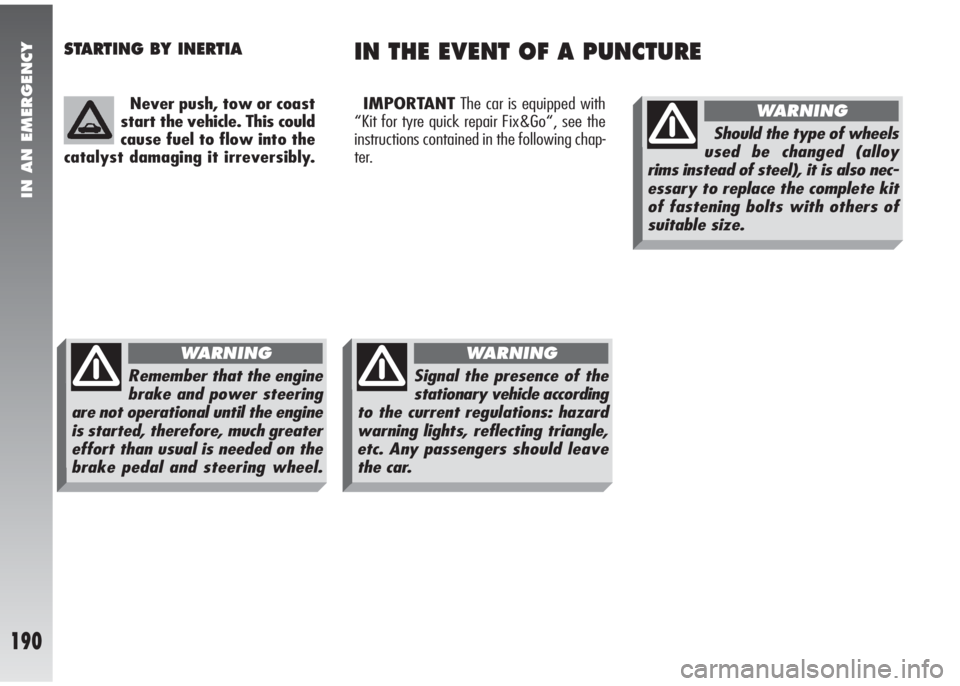
Never push, tow or coast
start the vehicle. This could
cause fuel to flow into the
catalyst damaging it irreversibly.
Remember that the engine
brake and power steering
are not operational until the engine
is started, therefore, much greater
effort than usual is needed on the
brake pedal and steering wheel.
WARNING
Signal the presence of the
stationary vehicle according
to the current regulations: hazard
warning lights, reflecting triangle,
etc. Any passengersshould leave
the car.
WARNING
Should the type of wheels
used be changed (alloy
rims instead of steel), it is also nec-
essary to replace the complete kit
of fastening bolts with others of
suitable size.
WARNING
Page 195 of 291
IN AN EMERGENCY
193
INFLATING PROCEDURE
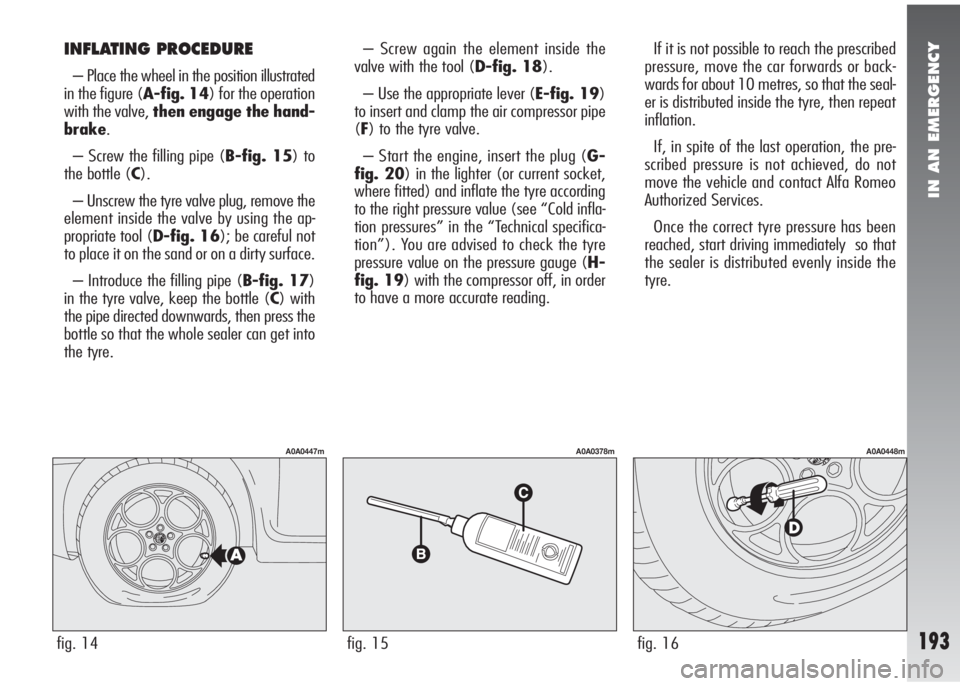
– Place the wheel in the position illustrated
in the figure (A-fig. 14) for the operation
with the valve, then engage the hand-
brake.
– Screw the filling pipe (B-fig. 15) to
the bottle (C).
– Unscrew the tyre valve plug, remove the
element inside the valve by using the ap-
propriate tool (D-fig. 16); be careful not
to place it on the sand or on a dirty surface.
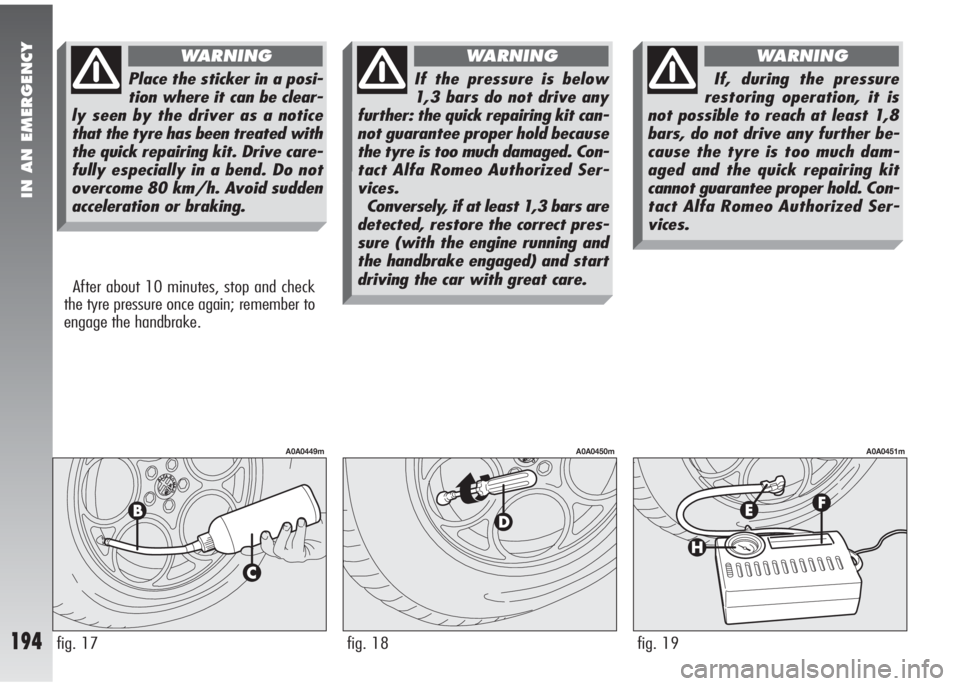
– Introduce the filling pipe (B-fig. 17)
in the tyre valve, keep the bottle (C) with
the pipe directed downwards, then press the
bottle so that the whole sealer can get into
the tyre.– Screw again the element inside the
valve with the tool (D-fig. 18).
– Use the appropriate lever (E-fig. 19)
to insert and clamp the air compressor pipe
(F) to the tyre valve.
– Start the engine, insert the plug (G-
fig. 20) in the lighter (or current socket,
where fitted) and inflate the tyre according
to the right pressure value (see “Cold infla-
tion pressures” in the “Technical specifica-
tion”). You are advised to check the tyre
pressure value on the pressure gauge (H-
fig. 19) with the compressor off, in order
to have a more accurate reading.If it is not possible to reach the prescribed
pressure, move the car forwards or back-
wards for about 10 metres, so that the seal-
er is distributed inside the tyre, then repeat
inflation.
If, in spite of the last operation, the pre-
scribed pressure is not achieved, do not
move the vehicle and contact Alfa Romeo
Authorized Services.
Once the correct tyre pressure has been
reached, start driving immediately so that
the sealer is distributed evenly inside the
tyre.
fig. 14
A0A0447m
fig. 15
A0A0378m
fig. 16
A0A0448m
Page 196 of 291
IN AN EMERGENCY
194fig. 17
A0A0449m
fig. 18
A0A0450m
fig. 19
A0A0451m
After about 10 minutes, stop and check
the tyre pressure once again; remember to
engage the handbrake.
Place the sticker in a posi-
tion where it can be clear-
ly seen by the driver as a notice
that the tyre has been treated with
the quick repairing kit. Drive care-
fully especially in a bend. Do not
overcome 80 km/h. Avoid sudden
acceleration or braking.
WARNING
If the pressure is below
1,3 bars do not drive any
further: the quick repairing kit can-
not guarantee proper hold because
the tyre is too much damaged. Con-
tact Alfa Romeo Authorized Ser-
vices.
Conversely, if at least 1,3 bars are
detected, restore the correct pres-
sure (with the engine running and
the handbrake engaged) and start
driving the car with great care.
WARNING
If, during the pressure
restoring operation, it is
not possible to reach at least 1,8
bars, do not drive any further be-
cause the tyre is too much dam-
aged and the quick repairing kit
cannot guarantee proper hold. Con-
tact Alfa Romeo Authorized Ser-
vices.
WARNING
Page 201 of 291

IN AN EMERGENCY
199
Front fog lights(fig. 23a)
IMPORTANT When needing to change
the left bulb, the side trim next to the light
itself needs to be removed to facilitate ac-
cess to the engine compartment.
To change the bulb, proceed as follows:
– Remove the protective cover turning it
counter-clockwise.
– Disconnect the electric connector (A).
– Release the bulb catch (B).
– Remove the bulb and replace it.
– Fit a new bulb, making the tab of the
metal part coincide with the one on the
lamp unit, then hook the bulb holder catch
(B).
– Reconnect the electric connector (A).
– Refit the protective cover correctly.Xenon dipped beam
headlights
(fig. 23b)
To change the bulb, proceed as follows:
– Remove the protective cover releasing
the locking screws.
– Disconnect the electric connector (A)
turning it slightly counter-clockwise.
– Remove ring nut (B) turning it slightly
counter-clockwise
– Remove the bulb and replace it.
– Fit a new bulb correctly observing the
grooves on the lamp lens, then refit the ring
nut (B).
– Reconnect the electric connector (A).
– Refit the protective cover correctly.
Front sidelights(fig. 24a)
To change the bulb, proceed as follows:
– Remove the protective cover releasing
the locking screws.
– Using the extension (A), integral with
the bulb holder (B), withdraw the bulb hold-
er itself which is snap-fitted.
– Remove the bulb (C), pushing it gen-
tly and turning it counter-clockwise.
– Change the bulb and refit the bulb hold-
er making sure that it clicks into place; al-
so check that the bulb is in the correct po-
sition looking at the lamp from outside.
– Refit the protective cover correctly.
fig. 23a
A0A0499m
fig. 23b
A0A0500m
fig. 24a
A0A0501m
Page 203 of 291
IN AN EMERGENCY
201
After replacement, refit
the covers correctly check-
ing that they are properly
secured.
IMPORTANTOn the inside surface of
the headlight there could appear a slight
coat of fogging; this does not show a de-
fect, since it is a natural occurrence due to
low temperature and to the degree of hu-
midity in the air; it will soon disappear as
soon as the lights are turned on. The pres-
ence of drops inside the headlight shows
water seepage, refer to the Alfa Romeo
Dealership.
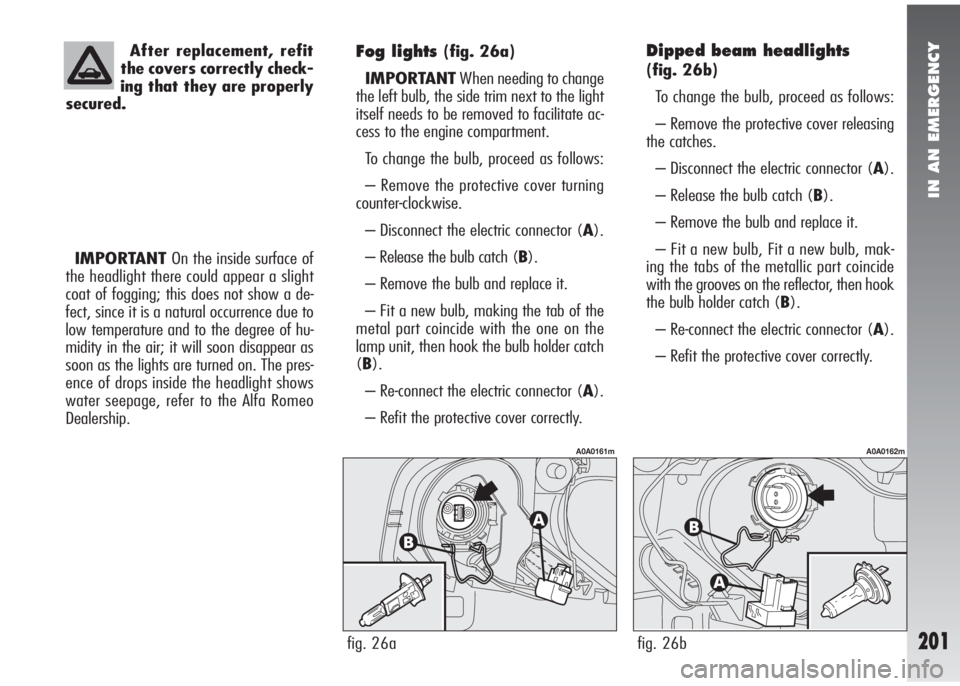
Fog lights(fig. 26a)
IMPORTANTWhen needing to change
the left bulb, the side trim next to the light
itself needs to be removed to facilitate ac-
cess to the engine compartment.
To change the bulb, proceed as follows:
– Remove the protective cover turning
counter-clockwise.
– Disconnect the electric connector (A).
– Release the bulb catch (B).
– Remove the bulb and replace it.
– Fit a new bulb, making the tab of the
metal part coincide with the one on the
lamp unit, then hook the bulb holder catch
(B).
– Re-connect the electric connector (A).
– Refit the protective cover correctly.Dipped beam headlights
(fig. 26b)
To change the bulb, proceed as follows:
– Remove the protective cover releasing
the catches.
– Disconnect the electric connector (A).
– Release the bulb catch (B).
– Remove the bulb and replace it.
– Fit a new bulb, Fit a new bulb, mak-
ing the tabs of the metallic part coincide
with the grooves on the reflector, then hook
the bulb holder catch (B).
– Re-connect the electric connector (A).
– Refit the protective cover correctly.
fig. 26a
A0A0161m
fig. 26b
A0A0162m