heater ASTON MARTIN V8 VANTAGE 2010 User Guide
[x] Cancel search | Manufacturer: ASTON MARTIN, Model Year: 2010, Model line: V8 VANTAGE, Model: ASTON MARTIN V8 VANTAGE 2010Pages: 947, PDF Size: 43.21 MB
Page 73 of 947

Seating (01.10)
Body System (01.00)
Issue 4, November 2008 Workshop Manual 1-7-7
4. Remove clip from adjust rod and pull through to clear motor (see Figure 3).
5. Remove motor from seat fr ame (bolt x1 and multiplug
x1). (see Figure 4)
Installation
1. Install motor to seat frame, push adjust rod through motor (key splined) and install clip.
2. Position motor and install bolt (x1) and multiplug (x1).
3. Install top mountings of lumbar adjust frame.
4. Connect heater multiplug and install squab foam.
5. Install squab cover (see Workshop Manual procedure 01.10.AC Cover Assembly - Front Seat Squab - Each -
Renew).
Lumbar Support Kit - Renew
Removal
1. Remove squab cover (see Workshop Manual procedure 01.10.AC Cover Assembly - Front Seat Squab - Each -
Renew).
2. Disconnect heater multiplug and remove squab foam (see Figure 1).
3. Remove seat back shell (rivets x4) (see Figure 2).
Figure 3
Figure 4
A0110289B
A0110302
Repair Operation Time (ROT)
A0110293
A0110285
Page 74 of 947

Seating (01.10)
Body System (01.00)1-7-8 Workshop Manual Issue 4, November 2008
4. Disconnect lumbar motor multiplug (see Figure 3).
5. Remove lumbar support fr om seat frame (screws x2)
(see Figure4).
Installation
1. Install lumbar support to seat frame (screws x2).
2. Connect lumbar motor multiplug.
3. Install seat back shell (rivets x4).
4. Connect heater multiplug and install squab foam.
5. Install squab cover (see Workshop Manual procedure 01.10.AC Cover Assembly - Front Seat Squab - Each -
Renew).
Side Airbag - Renew
Removal
1. Remove seat (see Workshop Manual procedure 01.10.AB Seat Assembly - Front - LH - Remove for
Access and Refit).
2. Remove lever cover (manoeuvre over lever).
3. Disconnect airbag multiplu g and release from bracket
(see Figure 1).
4. Remove fixing multiplug br acket, move aside (see Figure
2).
5. Remove (slide down) airbag module (bolt x1).
Installation
1. Install airbag module (bolt x1) (torque).
2. Install multiplug bracket fixing.
3. Connect airbag multiplug and secure to bracket.
4. Install lever cover (manoeuvre over lever).
5. Install seat (see Workshop Manual procedure 01.10.AB
Seat Assembly - Front - LH - Remove for Access and
Refit).
Figure 3
Figure 4
Repair Operation Time (ROT)
A0110284
A0110284A
Figure 1
Figure 2
A0110281
A0110281A
Page 75 of 947

Seating (01.10)
Body System (01.00)
Issue 4, November 2008 Workshop Manual 1-7-9
Front Seat Buckle Assembly - Renew
Removal
1. Power seat fully forward.
2. Remove bolts (x2) securing rear of seat to seat rails.
3. Power seat fully rearwards.
4. Remove bolts (x2) securing front of seat to seat rails.
5. Battery isolation switch ‘OFF’.
6. Remove bolt securing seat belt to seat frame.
7. Tip the seat forwards and disconnect multiplugs (x4).
8. With assistance, remove seat assembly.
9. Release multiplug (x1) seat belt buckle harness to 6 way
seat adjuster frame assembly.
10. Release cable ties (x4) securing seat belt buckle harness to 6 way seat adjuster frame assembly (see Figure 1). 11. Remove bolt (x1) seat belt buckle to frame (see Figure
2).
12. Remove seat belt buckle assembly.
Installation
1. Secure harness and multiplug to 6 way seat adjuster frame assembly.
2. Install seat belt buckle.
3. With assistance, install seat in the vehicle.
4. Position seat belt to seat frame, install and torque tighten bolt.
5. Tip seat forwards and connect multiplugs (x4).
6. Position seat onto seat rails.
7. Battery isolation switch ‘ON’.
8. Install front bolts (x2), Power seat forward and install rear bolts (x2). Torque tighten bolts (x 4).
Valance Heater and Lumbar Switch
Assembly - Renew
Removal
1. Power seat fully forward.
2. Remove bolts (x2) securing rear of seat to seat rails.
3. Power seat fully rearwards.
4. Remove bolts (x2) securing front of seat to seat rails.
5. Disconnect vehicle battery.
Repair Operation Time (ROT)
A0110289B
Figure 2
Repair Operation Time (ROT)
A0110287A
Page 76 of 947

Seating (01.10)
Body System (01.00)1-7-10 Workshop Manual Issue 4, November 2008
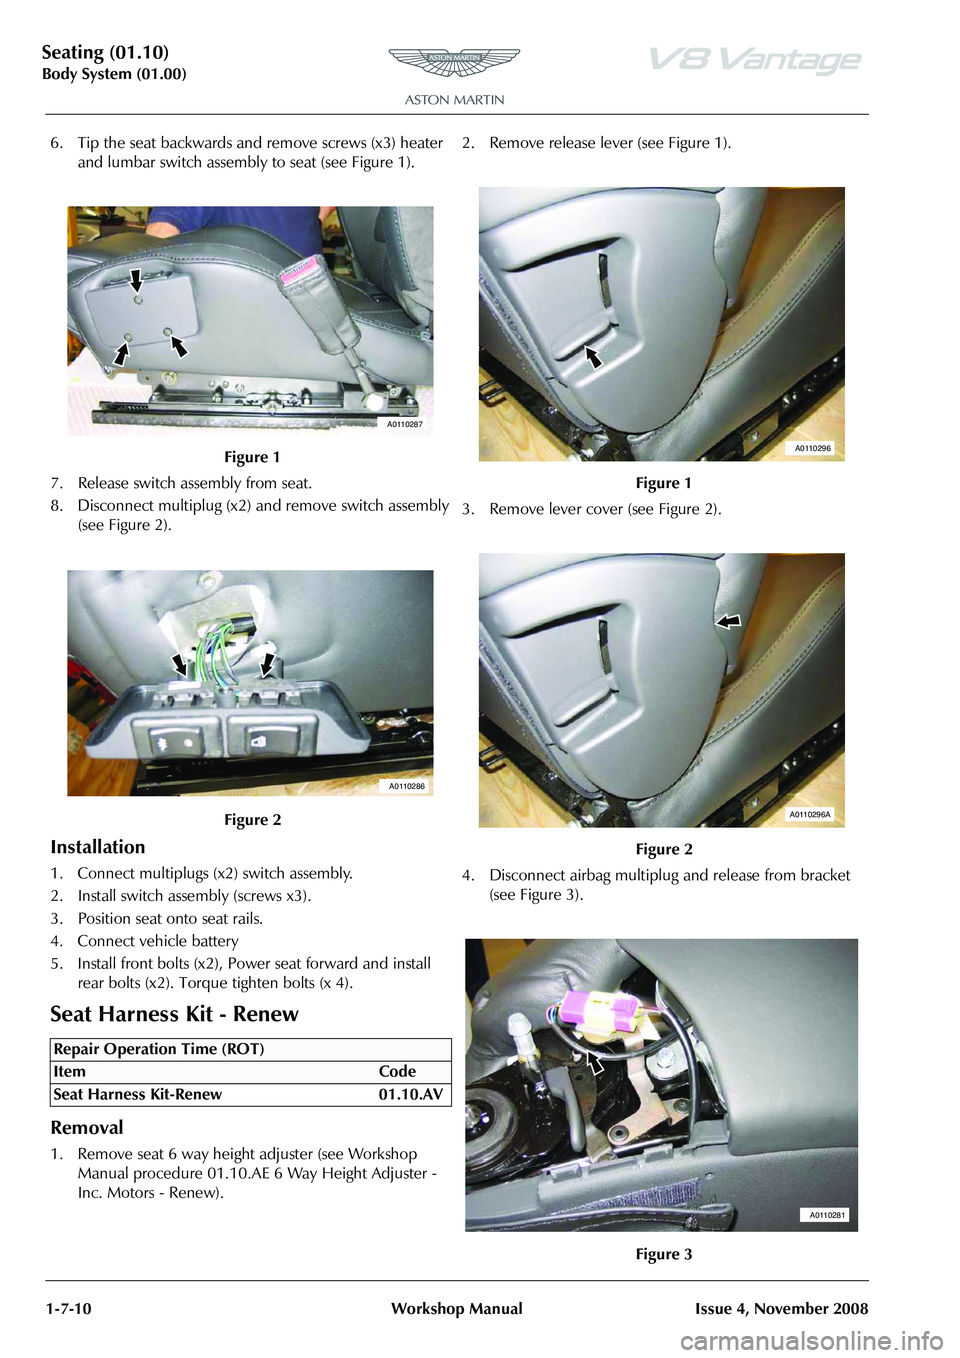
6. Tip the seat backwards and remove screws (x3) heater and lumbar switch assembly to seat (see Figure 1).
7. Release switch assembly from seat.
8. Disconnect multiplug (x2) and remove switch assembly (see Figure 2).
Installation
1. Connect multiplugs (x2) switch assembly.
2. Install switch assembly (screws x3).
3. Position seat onto seat rails.
4. Connect vehicle battery
5. Install front bolts (x2), Power seat forward and install rear bolts (x2). Torque tighten bolts (x 4).
Seat Harness Kit - Renew
Removal
1. Remove seat 6 way height adjuster (see Workshop Manual procedure 01.10.AE 6 Way Height Adjuster -
Inc. Motors - Renew). 2. Remove release lever (see Figure 1).
3. Remove lever cover (see Figure 2).
4. Disconnect airbag multiplu
g and release from bracket
(see Figure 3).
Figure 1
Figure 2
Repair Operation Time (ROT)
A0110287
A0110286
Figure 1
Figure 2
Figure 3
A0110296
A0110296A
A0110281
Page 77 of 947

Seating (01.10)
Body System (01.00)
Issue 4, November 2008 Workshop Manual 1-7-11
5. Remove fixing multiplug bracket, move aside.
6. Remove (slide down) airbag module (bolt x1).
7. Release cover from seat back shell (studs x2 velcrox2).
8. Release cover from seat back shell (strip x2 /clips x9).
9. Release cover from bottom of seat back shell.
10. Push cover through to front of seat, release strip and ease from foam (velcro strips).
11. Disconnect heater multip lug and remove squab foam
(see Figure 4).
12. Remove seat back shell (rivets x4) (see Figure 5). 13. Disconnect lumbar and sq
uab motor multiplugs (see
Figure 6).
14. Remove earth header (nut and bolt) and release harness from clips (x2) (see Figure 7).
Figure 4
Figure 5
A0110293
A0110285
Figure 6
Figure 7
A0110284
A0110295
Page 78 of 947

Seating (01.10)
Body System (01.00)1-7-12 Workshop Manual Issue 4, November 2008
15. Drill out pop rivets from release rod support, and feed harness past rod (see Figure 8).
16. Release harness from clips (x3) and seat cover loop, feed through seat frame (see Figure 9). 17. Disconnect cushion heater
multiplug (see Figure 10).
18. Release cushion cover from frame, feed harness through cover and foam (see Figure 11).
Installation
1. Feed harness through cushion cover and foam, secure cover to frame,
2. Connect cushion heater multiplug.
3. Feed harness through seat frame, secure to clips (x3) and seat cover loop.
4. Feed harness past rod and install pop rivets to release rod support.
5. Install earth header (nut and bolt) and secure harness to clips (x2).
6. Connect lumbar and squab motor multiplugs.
7. Install seat back shell (rivets x4).
8. Connect heater multiplug and install squab foam.
9. Ease cover over foam attach to velcro, secure strip and push through seat.
10. Secure cover to seat back shell.
Figure 8
Figure 9
A0110295A
A0110294
Figure 10
Figure 11
A0110294A
A0110294B
Page 91 of 947

Instrument Panel (IP) (01.12)
Body System (01.00)
Issue 5, January 2010 Workshop Manual 1-9-3
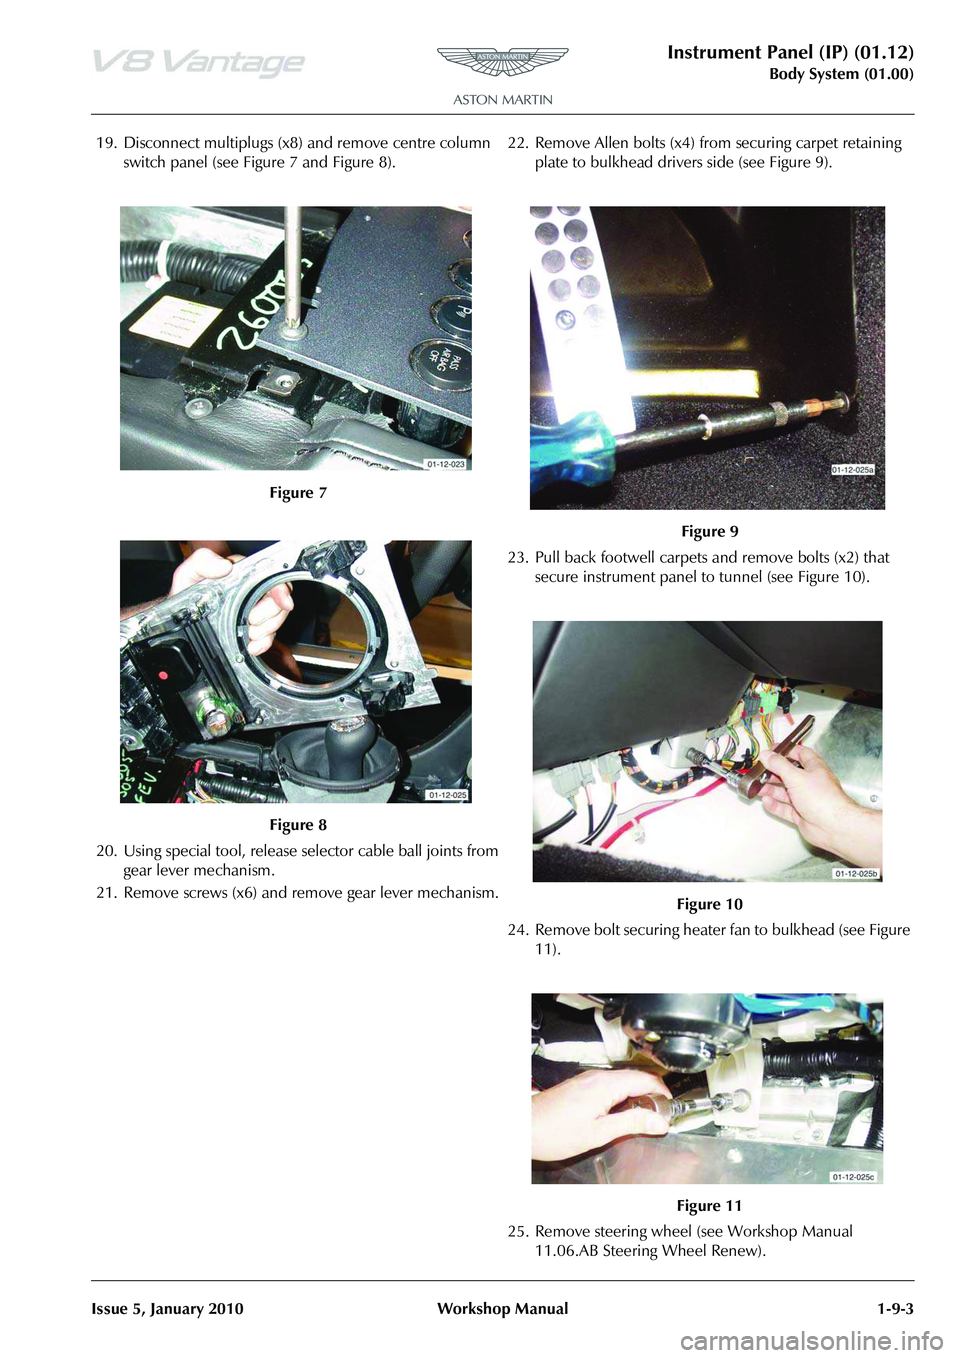
19. Disconnect multiplugs (x8) and remove centre column
switch panel (see Figure 7 and Figure 8).
20. Using special tool, release se lector cable ball joints from
gear lever mechanism.
21. Remove screws (x6) and remove gear lever mechanism. 22. Remove Allen bolts (x4) from securing carpet retaining
plate to bulkhead drivers side (see Figure 9).
23. Pull back footwell carpets and remove bolts (x2) that secure instrument panel to tunnel (see Figure 10).
24. Remove bolt securing heater fan to bulkhead (see Figure 11).
25. Remove steering wheel (see Workshop Manual 11.06.AB Steering Wheel Renew).
Figure 7
Figure 8
Figure 9
Figure 10
Figure 11
Page 93 of 947

Instrument Panel (IP) (01.12)
Body System (01.00)
Issue 5, January 2010 Workshop Manual 1-9-5
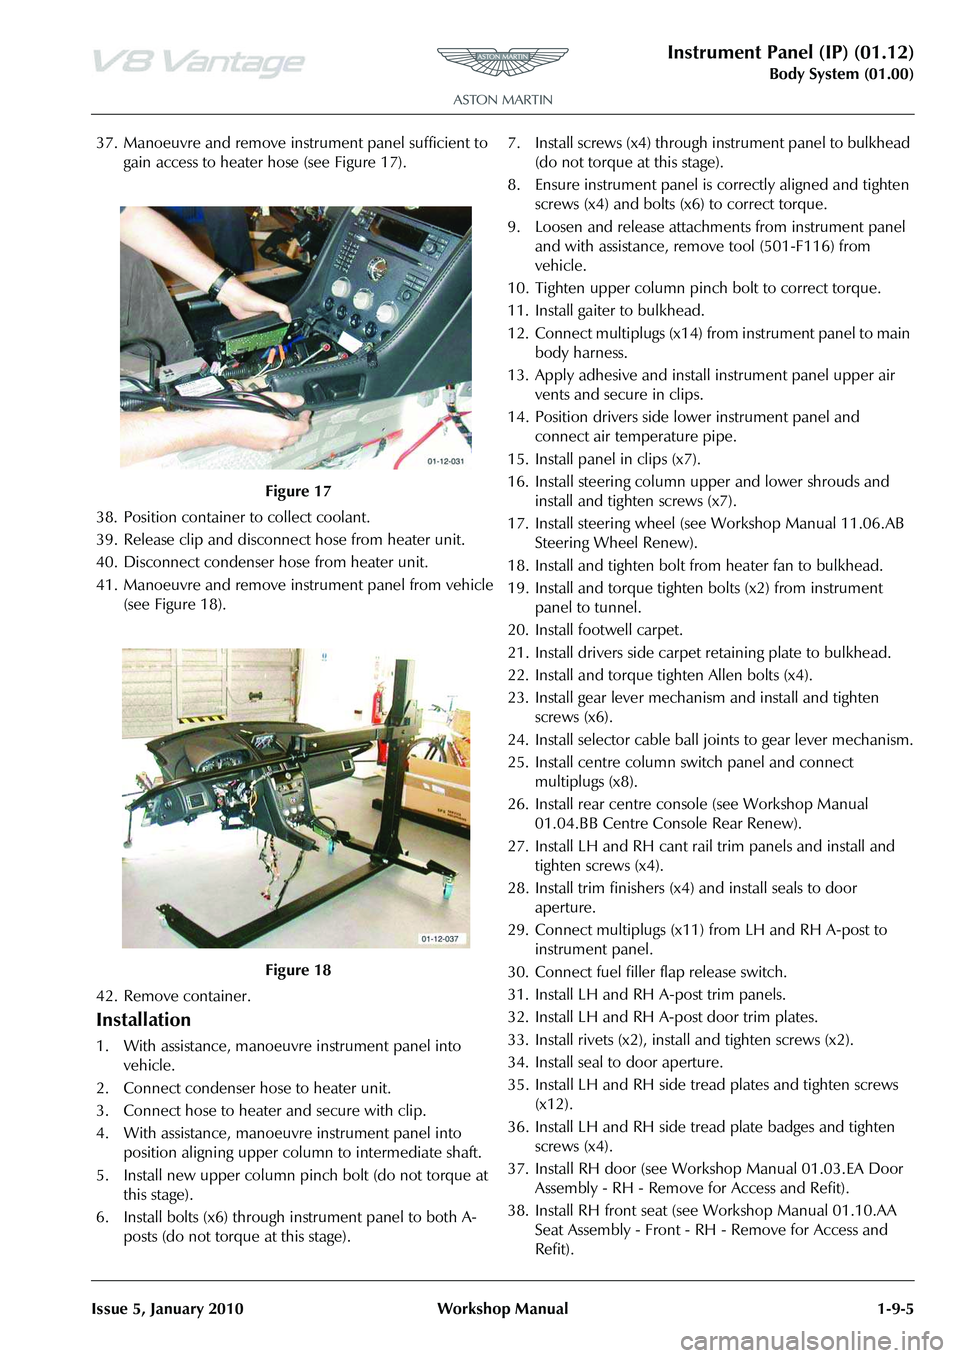
37. Manoeuvre and remove inst rument panel sufficient to
gain access to heater hose (see Figure 17).
38. Position container to collect coolant.
39. Release clip and disconne ct hose from heater unit.
40. Disconnect condenser hose from heater unit.
41. Manoeuvre and remove inst rument panel from vehicle
(see Figure 18).
42. Remove container.
Installation
1. With assistance, manoeuvre instrument panel into vehicle.
2. Connect condenser hose to heater unit.
3. Connect hose to heater and secure with clip.
4. With assistance, manoeuvre instrument panel into position aligning upper column to intermediate shaft.
5. Install new upper column pinch bolt (do not torque at this stage).
6. Install bolts (x6) through instrument panel to both A- posts (do not torque at this stage). 7. Install screws (x4) through
instrument panel to bulkhead
(do not torque at this stage).
8. Ensure instrument panel is correctly aligned and tighten screws (x4) and bolts (x6) to correct torque.
9. Loosen and release attachme nts from instrument panel
and with assistance, remove tool (501-F116) from
vehicle.
10. Tighten upper column pinch bolt to correct torque.
11. Install gaiter to bulkhead.
12. Connect multiplugs (x14) fr om instrument panel to main
body harness.
13. Apply adhesive and install instrument panel upper air
vents and secure in clips.
14. Position drivers side lower instrument panel and connect air temperature pipe.
15. Install panel in clips (x7).
16. Install steering column upper and lower shrouds and install and tighten screws (x7).
17. Install steering wheel (see Workshop Manual 11.06.AB Steering Wheel Renew).
18. Install and tighten bolt from heater fan to bulkhead.
19. Install and torque tighten bolts (x2) from instrument panel to tunnel.
20. Install footwell carpet.
21. Install drivers side carpet retaining plate to bulkhead.
22. Install and torque tighten Allen bolts (x4).
23. Install gear lever mechanism and install and tighten screws (x6).
24. Install selector cable ball joints to gear lever mechanism.
25. Install centre column switch panel and connect multiplugs (x8).
26. Install rear centre cons ole (see Workshop Manual
01.04.BB Centre Console Rear Renew).
27. Install LH and RH cant rail trim panels and install and tighten screws (x4).
28. Install trim finishers (x4) and install seals to door aperture.
29. Connect multiplugs (x11) from LH and RH A-post to
instrument panel.
30. Connect fuel filler flap release switch.
31. Install LH and RH A-post trim panels.
32. Install LH and RH A-post door trim plates.
33. Install rivets (x2), insta ll and tighten screws (x2).
34. Install seal to door aperture.
35. Install LH and RH side tread plates and tighten screws (x12).
36. Install LH and RH side tread plate badges and tighten screws (x4).
37. Install RH door (see Workshop Manual 01.03.EA Door Assembly - RH - Remove for Access and Refit).
38. Install RH front seat (see Workshop Manual 01.10.AA Seat Assembly - Front - RH - Remove for Access and
Refit).
Figure 17
Figure 18
Page 122 of 947

Handles and Lock Mechanisms (01.14)
Body System (01.00)1-10-2 Workshop Manual May 2007
Specifications
Maintenance
Ignition Cylinder Lock - Renew
Removal
1. Remove steering column shroud (see Workshop Manual procedure 11.04.DB Shroud Assembly - Upper and
Lower - Steering Column - Renew).
2. Insert ignition key into steering lock and turn to position 2 (see Figure 1).
3. Push release button down (through hole). 4. Retract barrel by pulling outwards (gently rotate from
side to side) with key (see Figure 2).
5. Remove key from barrel.
Installation
1. Install key to barrel.
2. Install barrel into steering lock housing until button locates properly.
3. Install steering column shroud (see Workshop Manual procedure 11.04.DB Shroud Assembly - Upper and
Lower - Steering Column - Renew).
RH/LH Front Door Latch Assembly -
Renew
Removal
1. Remove glass regulator (see Workshop Manual procedure 01.11.DA/01.11.1DB Regulator - Door Glass
- LH/RH - Renew).
2. Remove aperture seal from inside door.
3. Remove rear rubber cheater panel, fir tree trim pins (x3), and inner glass seal.
4. Disconnect latch mechanism multiplug.
5. Disconnect exterior door handle inner and outer cable.
6. Remove nuts (x3) securing exterior door handle, remove
handle.
7. Loosen upper nut and remo ve lower nut securing key
lock mechanism.
Torque Figures
DescriptionNm
Door handle 5
Latch 9
Repair Operation Time
ItemCode
Ignition Cylinder Lock-Renew 01.14.AD
Figure 1
A0114311
Figure 2
Repair Operation Time (ROT)
ItemCode
Front Door Latch Assembly RH01.14.CE
Front Door Latch Assembly LH01.14.CF
A0114312
Page 123 of 947

Handles and Lock Mechanisms (01.14)
Body System (01.00)
May 2007 Workshop Manual 1-10-3
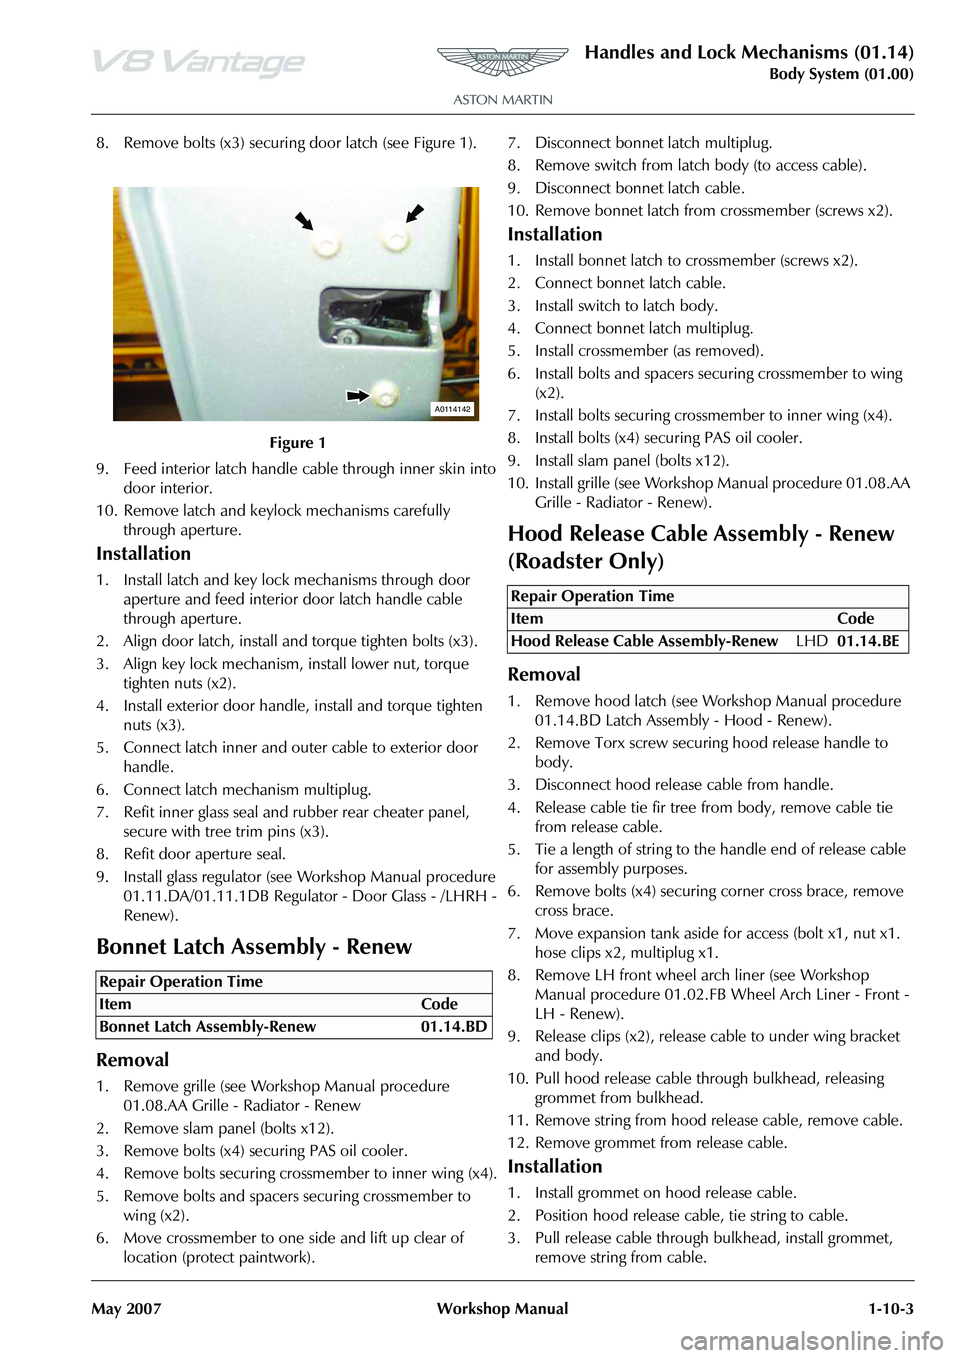
8. Remove bolts (x3) securing door latch (see Figure 1).
9. Feed interior latch handle cable through inner skin into door interior.
10. Remove latch and keylock mechanisms carefully through aperture.
Installation
1. Install latch and key lock mechanisms through door aperture and feed interior door latch handle cable
through aperture.
2. Align door latch, install and torque tighten bolts (x3).
3. Align key lock mechanism, install lower nut, torque tighten nuts (x2).
4. Install exterior door handle, install and torque tighten nuts (x3).
5. Connect latch inner and outer cable to exterior door handle.
6. Connect latch mechanism multiplug.
7. Refit inner glass seal and rubber rear cheater panel, secure with tree trim pins (x3).
8. Refit door aperture seal.
9. Install glass regulator (see Workshop Manual procedure 01.11.DA/01.11.1DB Regulato r - Door Glass - /LHRH -
Renew).
Bonnet Latch Assembly - Renew
Removal
1. Remove grille (see Workshop Manual procedure 01.08.AA Grille - Radiator - Renew
2. Remove slam panel (bolts x12).
3. Remove bolts (x4) securing PAS oil cooler.
4. Remove bolts securing crossmember to inner wing (x4).
5. Remove bolts and spacers securing crossmember to wing (x2).
6. Move crossmember to one side and lift up clear of location (protect paintwork). 7. Disconnect bonnet latch multiplug.
8. Remove switch from latch body (to access cable).
9. Disconnect bonnet latch cable.
10. Remove bonnet latch from
crossmember (screws x2).
Installation
1. Install bonnet latch to crossmember (screws x2).
2. Connect bonnet latch cable.
3. Install switch to latch body.
4. Connect bonnet latch multiplug.
5. Install crossmember (as removed).
6. Install bolts and spacers securing crossmember to wing
(x2).
7. Install bolts securing cros smember to inner wing (x4).
8. Install bolts (x4) securing PAS oil cooler.
9. Install slam panel (bolts x12).
10. Install grille (see Workshop Manual procedure 01.08.AA
Grille - Radiator - Renew).
Hood Release Cable Assembly - Renew
(Roadster Only)
Removal
1. Remove hood latch (see Wo rkshop Manual procedure
01.14.BD Latch Assembly - Hood - Renew).
2. Remove Torx screw securi ng hood release handle to
body.
3. Disconnect hood releas e cable from handle.
4. Release cable tie fir tree fr om body, remove cable tie
from release cable.
5. Tie a length of string to the handle end of release cable for assembly purposes.
6. Remove bolts (x4) securing corner cross brace, remove
cross brace.
7. Move expansion tank aside for access (bolt x1, nut x1. hose clips x2, multiplug x1.
8. Remove LH front wheel arch liner (see Workshop Manual procedure 01.02.FB Wheel Arch Liner - Front -
LH - Renew).
9. Release clips (x2), release cable to under wing bracket and body.
10. Pull hood release cable th rough bulkhead, releasing
grommet from bulkhead.
11. Remove string from hood release cable, remove cable.
12. Remove grommet from release cable.
Installation
1. Install grommet on hood release cable.
2. Position hood release cable, tie string to cable.
3. Pull release cable through bulkhead, install grommet, remove string from cable.
Figure 1
Repair Operation Time
ItemCode
Bonnet Latch Assembly-Renew 01.14.BD
A0114142
Repair Operation Time
ItemCode
Hood Release Cable Assembly-Renew LHD01.14.BE