AUDI A5 2021 Workshop Manual
Manufacturer: AUDI, Model Year: 2021, Model line: A5, Model: AUDI A5 2021Pages: 318, PDF Size: 85.96 MB
Page 51 of 318

8W7012721BB
Opening and closing
must be within range of the system, and the igni-
tion must be switched on.
There are multiple options to open or close the
system (such as the garage door).
> If you have only programmed one remote con-
trol transmitter, press the rs button on the
display. Or
> If you have programmed multiple remote con-
trol transmitters, press the 2 button on the
display and then press the respective system
button. Or
> Applies to: vehicles with programmable steer-
ing wheel button: If you have configured the
programmable steering wheel button, press
the *K button > page 30 and then press the re-
spective button for the system. Or
> Applies to: vehicles with location pairing: If you
have programmed Location pairing, press the
button for this in the display (notification cen-
ter > page 23). As you approach the system,
the button is displayed on the MMI.
If transmission was successful, the message:
Send to: XXX will appear.
Applies to: vehicles with garage door opener
You can program both fixed code and rolling code
systems in the MMI using the procedure that is
described.
Requirement: the ignition must be switched on.
Programming the system
Applies to: MMI
Requirement: the hand transmitter must be
present and the vehicle must be within range of
the system (such as the garage door) that you
would like to program.
> If you are programming the garage door opener
for the first time, press the - button on the
display. Follow the instructions in the MMI. Or
> If you would like to program other systems, se-
lect on the home screen: VEHICLE > Settings &
Service > Garage door opener. Select the de-
2) Only applies to rolling code systems
sired button: @). Follow the instructions in the
MMI.
> If you would like to reprogram systems that are
already programmed, select on the home
screen: VEHICLE > Settings & Service > Garage
door opener. Press the Z button and select 7
for the system to be reprogrammed. Select:
Program. Follow the instructions in the MMI.
With some systems, the garage door opener will
be immediately available after programming.
With other systems, the garage door opener
must also be synchronized.
Synchronizing!)
Requirement: the hand transmitter must already
be programmed and the vehicle must be within
range of the system (such as the garage door).
If the system synchronization is performed di-
rectly after the programming procedure, follow
the instructions on the MMI.
If you would like to sync at a later time:
> Applies to: MMI: Select on the home screen:
VEHICLE > Settings & Service > Garage door
opener.
> Press the button for the system that you would
like to synchronize.
> Follow the instructions in the MMI.
Renaming programmed systems
You can rename the programmed systems indi-
vidually (names may have a maximum of 10 char-
acters).
>» Applies to: MMI: Select on the home screen:
VEHICLE > Settings & Service > Garage door
opener.
> Press the Z button.
> Press the 7 button for the system that you
would like to rename.
> Select: Rename. If necessary, delete the preset
name, such as Garage door opener 1.
> Follow the instructions in the MMI.
49
Page 52 of 318
Opening and closing
Location pairing
Applies to: vehicles with location pairing
For easier operation, you can program your sys-
tem's location.
Requirements: the respective hand transmitter
must be programmed > page 49 and the vehicle
must be located in front of the system.
» Applies to: MMI: Select on the home screen:
VEHICLE > Settings & Service > Garage door
opener.
> Press the Z button.
> Press the 7 button for the system your vehicle
is facing.
> Select: Location pairing.
> Follow the instructions in the MMI.
Only a maximum of three systems can be dis-
played in the notification center > page 23. If
you would like to have all systems displayed,
press aa.
Deleting programmed systems
The programmed systems can be deleted individ-
ually or all at once.
» Applies to: MMI: Select on the home screen:
VEHICLE > Settings & Service > Garage door
opener.
> Press the Z button.
> To delete an individual system, press the L]
button for the desired system. If the checkmark
¥ is set, select: Delete.
> To delete all systems, select: All > Delete.
@ Tips
— Make sure the batteries in the hand trans-
mitter are charged before starting the pro-
gramming process.
— The programming process may take up to
30 seconds. It may be necessary for the
hand transmitter to be pressed again in the
meantime.
— The garage door opener may need to be
synchronized with the system after pro-
gramming. Follow the manufacturer's in-
structions for doing this.
sO
G) Tips
In some cases, the system may need to be
programmed in a different mode (“D mode”).
— Switch the ignition on.
— Applies to: MMI: Select on the home screen:
VEHICLE > Settings & Service > Garage
door opener.
— Press and hold the desired button @).
— Select Yes, in D mode and follow the in-
structions on the MMI.
Page 53 of 318

8W7012721BB
Power top
Power top
Automatic power top
eT e e eeu)
Applies to: vehicles with power top
The power top opens and closes automatically.
When open, the power top is stored completely
in the power top compartment. The power top
can be opened or closed at speeds up to 30 mph
(50 km/h). The power top will not open when the
temperature is below -5 °F (-15 °C).
Under normal conditions, the power top is wind-
and waterproof. In rare cases, small droplets of
water may form under extreme weather condi-
tions, such as torrential or prolonged rain. That is
normal and no cause for concern.
Follow the care instructions to keep the power
top free of leaks and to maintain its appearance
=> page 267, Care and cleaning. Also observe the
following:
— Open and stow the power top only when it is
clean and dry. Stowing the power top when it is
damp can create imprints in it, and mildew and
other damage can result if it is left stowed
while damp for long periods of time.
— To prevent scratching or damaging the power
top, do not use any sharp-edged objects to re-
move ice and snow. The rear window may be
cleared of ice with a standard ice scraper.
— Do not leave the power top open for several
weeks or the creases in it may become discol-
ored.
— Do not open the power top when the tempera-
ture is below 32 °F (0 °C). The fabric in the
power top loses elasticity in sub-zero tempera-
tures.
Opening and closing the power top
Applies to: vehicles with power top
e 8
a
2
= e a
Fig. 39 Center console: power top switch
Requirement: the luggage compartment lid must
be closed.
Opening and closing the power top
> Switch the ignition on.
> To open the power top, pull and hold the switch
@ during the entire process.
> To close the power top, pull and hold the switch
@ during the entire process.
Opening and closing the power top
(automatic operation)
It is not necessary to hold the switch.
Requirement: the speed must be between 4 mph
(6 km/h) and 30 mph (50 km/h). There must be
no passengers or objects on the rear bench seat.
> Switch the ignition on.
> To open the power top completely, pull the
switch @ briefly.
> To close the power top completely, pull the
switch @) briefly.
The status of the power top is shown in the in-
strument cluster display when operating the
power top switch.
You can close the power top when the wind de-
flector is installed > page 54.
A message will appear in the instrument cluster
if the power top cannot be opened or closed.
ZX WARNING
—When operating the power top, make sure
the function is not affected by wind or other
51
Page 54 of 318
Power top
factors and that it does not interfere with
other drivers.
— Visibility to the rear is limited when operat-
ing the power top. Avoid operating the top
while driving in reverse.
— Never drive with the power top unlocked.
The wind from driving could cause the pow-
er top to open. This can result in injuries and
damage to the vehicle.
— Make sure no one will be injured by the pow-
er top supports or other moving compo-
nents when opening and closing the top.
— The headroom in the rear is reduced when
opening and closing the power top. Make
sure the rear passengers keep enough dis-
tance from the power top to reduce the risk
of injury.
@) Note
To prevent damage to the power top:
— do not store any objects in the power top
storage compartment.
— make sure there is enough space above the
vehicle when opening or closing the power
top.
@) Tips
— To avoid draining the vehicle battery unnec-
essarily, do not open and close the power
top repeatedly when the engine is switched
off.
— The power top can also be operated manual-
ly temporarily if there is a malfunction
=> page 55, Power top emergency opera-
tion. Have the problem corrected as soon as
possible by an authorized Audi dealer or au-
thorized Audi Service Facility.
— If the vehicle is parked with the power top
open, the vehicle interior is not protected
from
damaging weather or unauthorized ac-
cess. Lock any items you leave behind in the
luggage compartment. Close the power top
before leaving the vehicle.
— The side windows automatically lower
slightly when opening or closing the power
top.
52
Power top convenience opening and closing
Applies to: vehicles with power top
“Ss
paw-0149
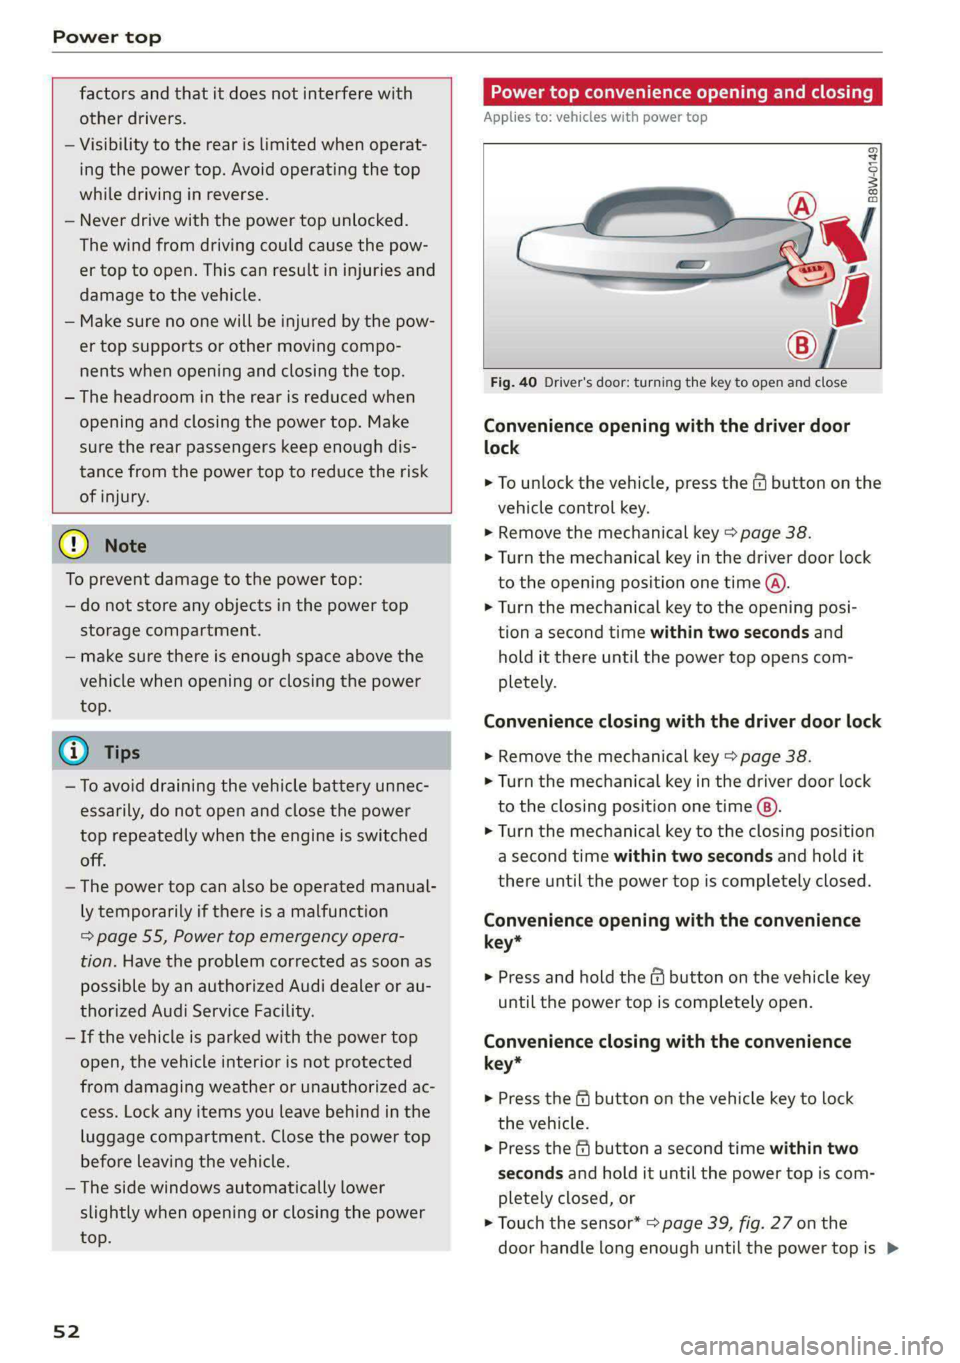
Fig. 40 Driver's door: turning the key to open and close
Convenience opening with the driver door
lock
> To unlock the vehicle, press the & button on the
vehicle control key.
> Remove the mechanical key > page 38.
> Turn the mechanical key in the driver door lock
to the opening position one time @).
> Turn the mechanical key to the opening posi-
tion a second time within two seconds and
hold it there until the power top opens com-
pletely.
Convenience closing with the driver door lock
> Remove the mechanical key > page 38.
> Turn the mechanical key in the driver door lock
to the closing position one time ®).
> Turn the mechanical key to the closing position
a second time within two seconds and hold it
there until the power top is completely closed.
Convenience opening with the convenience
key*
> Press and hold the & button on the vehicle key
until the power top is completely open.
Convenience closing with the convenience
key*
> Press the f& button on the vehicle key to lock
the vehicle.
> Press the f button a second time within two
seconds and hold it until the power top is com-
pletely closed, or
> Touch the sensor* > page 39, fig. 27 on the
door handle long enough until the power top is >
Page 55 of 318
8W7012721BB
Power top
completely closed. Do not place your hand in
the door handle when doing this.
The opening or closing process will stop immedi-
ately if you release the key or stop touching the
button or sensor*. Opening and closing with the
convenience key* is possible from up to 13 feet
(4 m) away.
ZX WARNING
Read and follow the important safety precau-
tions > A\ in Opening and closing the power
top on page 51.
Power top storage compartment
Applies to: vehicles with power top
B8W-0251
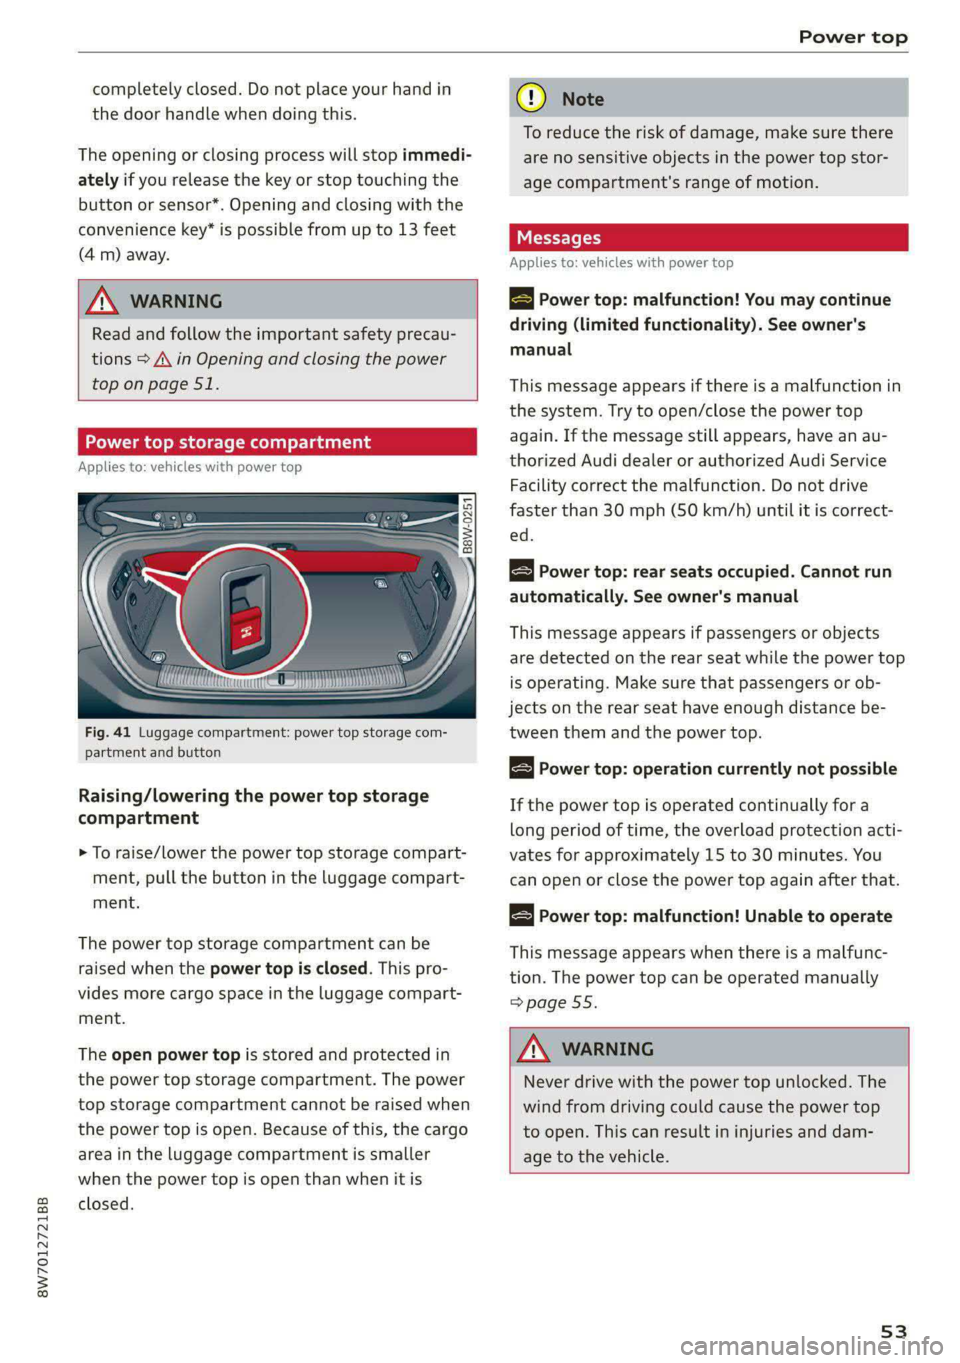
Fig. 41 Luggage compartment: power top storage com-
partment and button
Raising/lowering the power top storage
compartment
> To raise/lower the power top storage compart-
ment, pull the button in the luggage compart-
ment.
The power top storage compartment can be
raised when the power top is closed. This pro-
vides more cargo space in the luggage compart-
ment.
The open power top is stored and protected in
the power top storage compartment. The power
top storage compartment cannot be raised when
the power top is open. Because of this, the cargo
area in the luggage compartment is smaller
when the power top is open than when it is
closed.
® Note
To reduce the risk of damage, make sure there
are no sensitive objects in the power top stor-
age compartment's range of motion.
Messages
Applies to: vehicles with power top
B Power top: malfunction! You may continue
driving (limited functionality). See owner's
manual
This message appears if there is a malfunction in
the system. Try to open/close the power top
again. If the message still appears, have an au-
thorized Audi dealer or authorized Audi Service
Facility correct the malfunction. Do not drive
faster than 30 mph (50 km/h) until it is correct-
ed.
Power top: rear seats occupied. Cannot run
automatically. See owner's manual
This message appears if passengers or objects
are detected on the rear seat while the power top
is operating. Make sure that passengers or ob-
jects on the rear seat have enough distance be-
tween them and the power top.
Power top: operation currently not possible
If the power top is operated continually for a
long period of time, the overload protection acti-
vates for approximately 15 to 30 minutes. You
can open or close the power top again after that.
Power top: malfunction! Unable to operate
This message appears when there is a malfunc-
tion. The power top can be operated manually
=> page 55.
Z\ WARNING
Never drive with the power top unlocked. The
wind from driving could cause the power top
to open. This can result in injuries and dam-
age to the vehicle.
53
Page 56 of 318

Power top
Wind deflector
Applies to: vehicles with wind deflector
° © a
Kd > &
oO
Fig. 42 Rear of the vehicle: inserting the wind deflector (1)
B8V-0281
Fig. 43 Rear of the vehicle: inserting the wind deflector (2)
The wind deflector reduces air movement in the
passenger compartment in order to make driving
more comfortable.
The wind deflector is located in the luggage com-
partment inside the storage bag* or under the
cargo floor.
Inserting and positioning the wind deflector
> Open the rear window on the passenger's side.
> Remove the wind deflector from the luggage
compartment and fold it apart once. The wind
deflector is installed in the correct position
when the long side is toward the front and the
wind deflector frame is at the top.
> Insert both pins on the wind deflector (@) into
the mounts in the side trim panel on the driv-
er's side.
> Fold the handle @) upward and Lift the center of
the wind deflector slightly @).
> Now guide the wind deflector into the mounts
on the passenger's side @) and press lightly in
the middle of the wind deflector ©) until the
handle locks in place.
> Raise the wind deflector so that it is upright.
54
Removing the wind deflector
> Fold the handle (2) upward and lift the center of
the wind deflector slightly @).
> Remove the wind deflector from the mounts in
the side trim on the passenger's side.
> Pull the wind deflector out of the mounts on
the driver side and lift it out.
> Fold the wind deflector together and store it
securely in the luggage compartment.
A WARNING
— Do not use the wind deflector to secure car-
go.
— Be careful when installing so you do not
pinch your fingers.
— Pay attention to the traffic when installing
the wind deflector. Install the wind deflec-
tor from the side of the vehicle that is away
from traffic.
C) Note
Do not lean against the vehicle when instal-
ling the wind deflector. Hard objects and dec-
orations on clothing such as belt buckles can
scratch the paint.
@ Tips
— The wind deflector works best when all of
the windows are rolled up while driving.
— Only store the wind deflector in the storage
bag* or under the cargo floor when it is dry.
Page 57 of 318
8W7012721BB
Power top
Power top emergency
operation
Applies to: vehicles with power top
B8W-0258
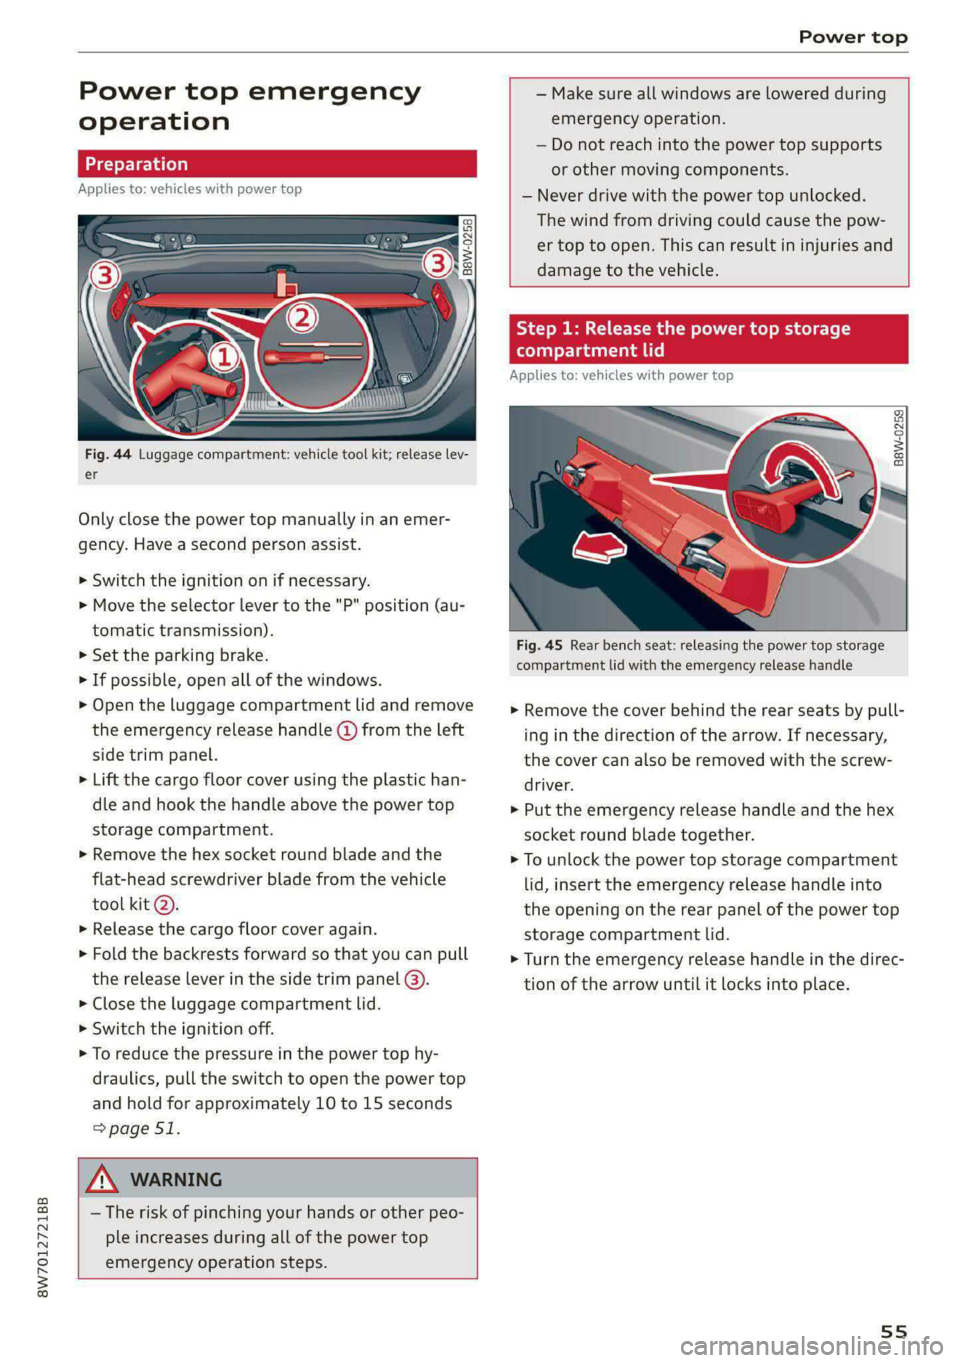
Fig. 44 Luggage compartment: vehicle tool kit; release lev-
er
Only close the power top manually in an emer-
gency. Have a second person assist.
> Switch the ignition on if necessary.
> Move the selector lever to the "P" position (au-
tomatic transmission).
> Set the parking brake.
> If possible, open all of the windows.
> Open the luggage compartment lid and remove
the emergency release handle (d) from the left
side trim panel.
> Lift the cargo floor cover using the plastic han-
dle and hook the handle above the power top
storage compartment.
> Remove the hex socket round blade and the
flat-head screwdriver blade from the vehicle
tool kit @).
>» Release the cargo floor cover again.
> Fold the backrests forward so that you can pull
the release lever in the side trim panel @).
> Close the luggage compartment lid.
> Switch the ignition off.
> To reduce the pressure in the power top hy-
draulics, pull the switch to open the power top
and hold for approximately 10 to 15 seconds
=> page 51.
Z\ WARNING
— The risk of pinching your hands or other peo-
ple increases during all of the power top
emergency operation steps.
— Make sure all windows are lowered during
emergency operation.
— Do not reach into the power top supports
or other moving components.
— Never drive with the power top unlocked.
The wind from driving could cause the pow-
er top to open. This can result in injuries and
damage to the vehicle.
Step 1: Release the power top storage
compartment lid
Applies to: vehicles with power top
B8W-0259
Fig. 45 Rear bench seat: releasing the power top storage
compartment lid with the emergency release handle
> Remove the cover behind the rear seats by pull-
ing in the direction of the arrow. If necessary,
the cover can also be removed with the screw-
driver.
> Put the emergency release handle and the hex
socket round blade together.
> To unlock the power top storage compartment
lid, insert the emergency release handle into
the opening on the rear panel of the power top
storage compartment lid.
> Turn the emergency release handle in the direc-
tion of the arrow until it locks into place.
55
Page 58 of 318

Power top
compartment lid
Applies to: vehicles with power top
B8W-0260
Fig. 46 Rear of the vehicle: lifting the power top storage
compartment lid out and securing
> Place the power top storage compartment lid in
the storage compartment ().
> Secure the raised power top storage compart-
ment lid by inserting the screwdriver into the
hinge @). Make sure to insert the screwdriver
through both holes in the hinge.
> Allow the power top storage compartment lid
to lower slowly until it remains stationary.
Step 3: Lock the power top
Applies to: vehicles with power top
B8F-0223
oS q
g|
a a
Fig. 48 Inside of the power top: locking the power top with
the emergency release handle
56
> Stand next to the vehicle when the door is
open.
> Hold the power top by its front edge and pull it
completely out of the power top storage com-
partment > A\ in Preparation on page 55.
> Press the power top onto the windshield frame
> fig. 47.
> Remove the cap from the inside of the power
top.
> Insert the emergency release handle into the
opening and turn it clockwise until it stops
> fig. 48.
> Check to make sure the power top is latched by
lifting at the front edge of the power top. If
locked correctly, the power top will not lift any
farther.
Step 4: Close the power to
Applies to: vehicles with power top
B8W-0262
Fig. 49 Rear of the vehicle: closing the power top storage
compartment lid and power top
B8W-0263
Fig. 50 Rear bench seat: locking the power top storage
compartment lid with the emergency release handle
> Lift the rear edge of the power top and remove
the inserted screwdriver from the hinge.
> Close the power top storage compartment
lid @ and let the rear edge of the power top
lower @>@.
Page 59 of 318
8W7012721BB
Power top
> Insert the emergency release handle into the
opening in the rear panel and turn it in the di-
rection of the arrow until it locks into place
> fig. 50.
> Mount the cover again > page 55, fig. 45.
> Put the removed vehicle tool kit back in place.
— Drive a maximum of 44 mph (70 km/h) and
have the malfunction corrected immediately
by an authorized Audi dealer or authorized
Audi Service Facility.
— Avoid touching the support rods and other
moving parts when opening or closing the
power top storage compartment lid. If you
do make contact, your hands could be
pinched.
— After the power top has been lowered, it
must not be pressed down entirely on the
molding or it could result in damage.
— Drive immediately to an authorized Audi
dealer or authorized Audi Service Facility to
have the malfunction repaired.
Make sure the locking mechanisms are locked
securely.
57
Page 60 of 318

Lights and Vision
Lights and Vision
Exterior lighting
Switching the lights on and off
Fig. 51 Instrument panel: light switch with button
@ Light switch &
Turn the light switch @ to the corresponding po-
sition when the ignition is switched on. The 2
symbol and the selected position will turn on (ex-
cept position 0).
O - The daytime running lights* will automatical-
ly turn on. In vehicles for some markets, you can
switch the automatic daytime running lights on
and off in the MMI.
AUTO - The headlights will automatically adapt to
the surrounding brightness.
300: — Parking lights
2D - Low beam headlights
When the low beam headlights or parking lights
are switched on, the corresponding BB or 200 in-
dicator light will turn on depending on vehicle
equipment.
@ All-weather lights Zo
Requirement: the light switch must be in the AU-
TO or ZO position.
The headlights automatically adjust so that there
will be less glare, for example when the road sur-
face is wet.
Automatic headlight range control
Your vehicle is equipped with automatic head-
light range control. It reduces glare for oncoming
58
traffic if the vehicle load changes. The headlight
range adjusts automatically.
Audi adaptive light
Applies to: vehicles with Audi adaptive light
Audi adaptive light provides better visibility when
driving in the dark. The lights are adapted to the
road conditions based on speed, such as when
driving on expressways, rural roads, at intersec-
tions, and around curves. The adaptive lights only
function when the light switch is in the AUTO po-
sition and the all-weather lights are switched off.
ZA WARNING
— Observe the safety precautions and note the
limits of the assist systems, sensors, and
cameras > page 126.
— Automatic headlights are only intended to
assist the driver. The driver is still responsi-
ble for controlling the headlights and may
need to switch them on and off manually
depending on light and visibility conditions.
For example, fog cannot be detected by the
light sensors. So always switch on the low
beams ZO under these weather conditions
and when driving in the dark.
(i) Tips
— If the vehicle battery has been discharging
for a while, the parking light may switch off
automatically. Avoid using the parking
lights for several hours.
— When using lighting equipment, the driver
is responsible for adhering to any local ap-
plicable regulations while driving and when
parking the vehicle.
— Only the front headlights turn on when the
daytime running lights are switched on*. In
vehicles in certain markets, the tail lights
will also turn on.
—Incool or damp weather, the inside of the
headlights, turn signals, and tail lights can
fog
over due to the temperature difference
between the inside and outside. They will
clear shortly after switching them on. This
does not affect the service life of the light-
ing.