language AUDI A7 2020 Owners Manual
[x] Cancel search | Manufacturer: AUDI, Model Year: 2020, Model line: A7, Model: AUDI A7 2020Pages: 310, PDF Size: 81.29 MB
Page 22 of 310
Touch displays
> If the General button is not displayed, swipe
toward the left or right with one finger until it
appears.
>» Press the General button.
> If the Date & time button is not displayed,
swipe upward or downward with one finger un-
tilit appears.
> Press the Date & time button.
@) Tips
If a menu or symbol is in parentheses in the
path, for example, (General) or (423), then it is
an optional menu item that does not need to
be used in every system.
You can adjust or turn off the MMI touch display
feedback.
> Applies to MMI: Select on the home screen:
SETTINGS > Display & brightness > MMI.
Possible settings:
— Brightness
— Touchscreen Feedback
Multi Media Interface
Airlie lia acoder)
Audi recommends performing certain Infotain-
ment system functions, such as entering a desti-
nation, only when the vehicle is stationary. Al-
ways be prepared to stop operating the Infotain-
ment system in the interest of your safety and
the safety of other road users.
ZA\ WARNING
Only use the Infotainment system when road,
traffic, weather, and visibility conditions per-
mit and always in a way that allows you to
maintain complete control over your vehicle.
@ Tips
Certain functions are not available while driv-
ing.
20
Wine mela mel mela
Switching the MMI on or off
> To switch the MMI off, press and hold the
On/Off knob > page 29, fig. 21 until the up-
per display and all Infotainment system func-
tions are switched off.
> To switch the MMI on, press the On/Off knob.
Restarting the MMI
>» Press and hold the On/Off knob for at least 10
seconds.
Switching displays on or off
> To switch the upper display off, press [Jon the
lower display.
> To switch the upper display on, touch the upper
display or press [Jon the lower display.
> To switch both displays on or off, press and hold
Co] on the lower display.
Introduction
You can display and operate Infotainment system
and vehicle functions using both of the Multi Me-
dia Interface (MMI) touch displays.
Configuration wizard
After starting for the first time, the configuration
wizard helps you to set up the vehicle, for exam-
ple to set the desired system language and con-
nect a telephone.
> Follow the instructions in the display.
> Applies to: MMI: To access the configuration
wizard at a later time, select on the home
screen: HELP > Configuration wizard.
Tool tips
Tool tips are displayed on the upper display after
starting for the first time. They introduce various
MMI functions to you.
> Follow the instructions in the display.
> Applies to: MMI: To access the tool tips at a lat-
er time, select on the home screen: SETTINGS
> Help > Show tool tips.
> Applies to: MMI: To receive additional tool tips,
select on the home screen: HELP > Tool tips >
Basic information or Expert information.
Page 26 of 310
Touch displays
acalileltia
ieee ye ell
aie
les, CA, 90012
Pei
les, Los Feliz, CA, 90027
Prot)
(eer com es
Pera
(eee a l¢y 2)
[RAZ-0711
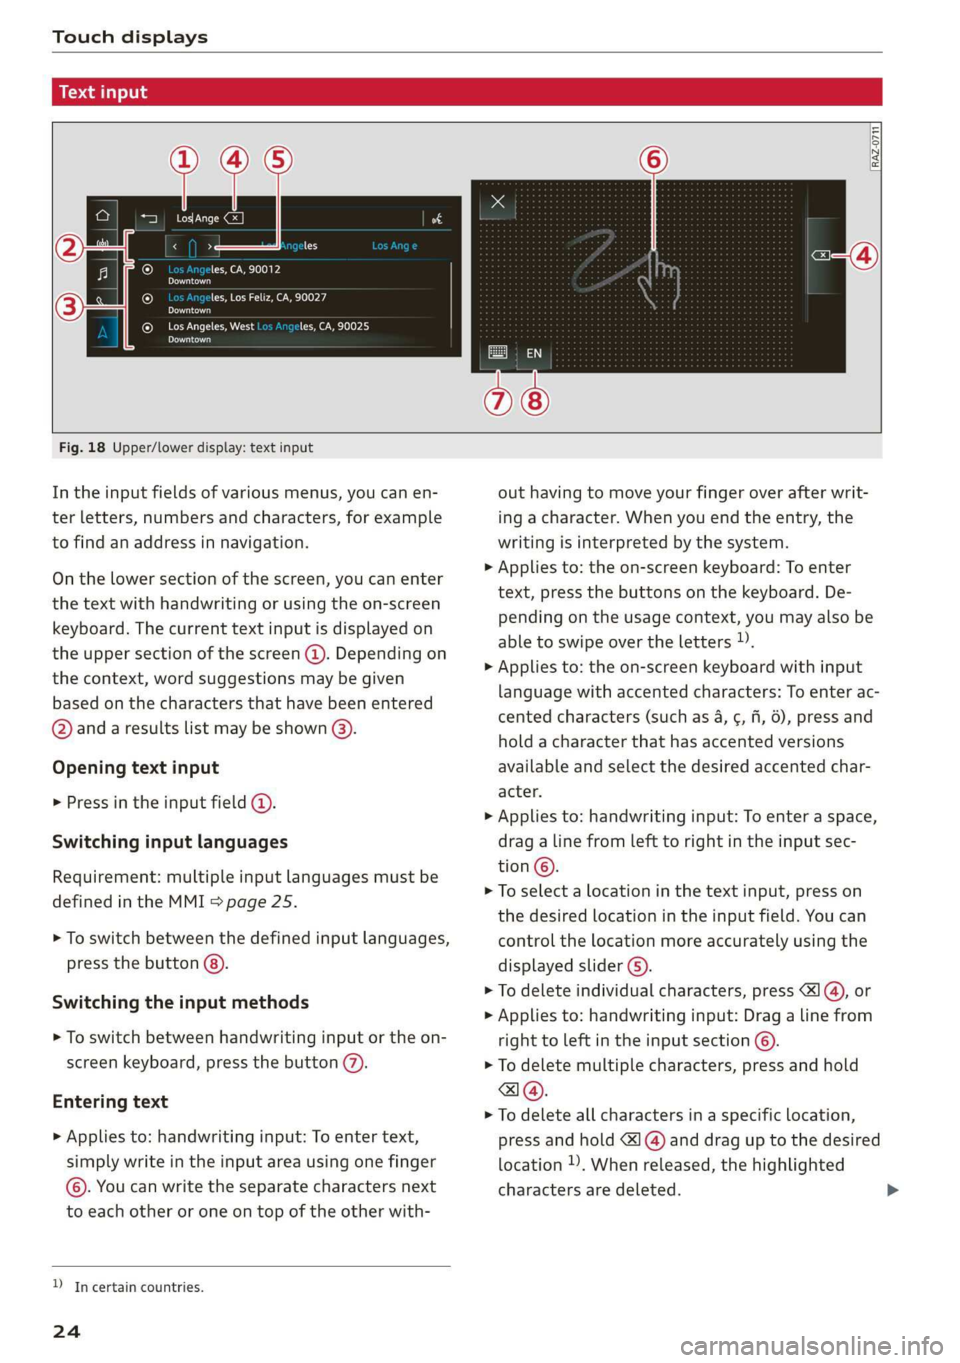
Fig. 18 Upper/lower display: text input
In the input fields of various menus, you can en-
ter letters, numbers and characters, for example
to find an address in navigation.
On the lower section of the screen, you can enter
the text with handwriting or using the on-screen
keyboard. The current text input is displayed on
the upper section of the screen @). Depending on
the context, word suggestions may be given
based on the characters that have been entered
@ and a results list may be shown @).
Opening text input
> Press in the input field @.
Switching input languages
Requirement: multiple input languages must be
defined in the MMI > page 25.
> To switch between the defined input languages,
press the button @).
Switching the input methods
> To switch between handwriting input or the on-
screen keyboard, press the button (7).
Entering text
> Applies to: handwriting input: To enter text,
simply write in the input area using one finger
©. You can write the separate characters next
to each other or one on top of the other with-
D_ In certain countries.
24
out having to move your finger over after writ-
ing a character. When you end the entry, the
writing is interpreted by the system.
> Applies to: the on-screen keyboard: To enter
text, press the buttons on the keyboard. De-
pending on the usage context, you may also be
able to swipe over the letters )).
> Applies to: the on-screen keyboard with input
language with accented characters: To enter ac-
cented characters (such as 4, ¢, fi, 6), press and
hold a character that has accented versions
available and select the desired accented char-
acter.
> Applies to: handwriting input: To enter a space,
drag a line from left to right in the input sec-
tion ©.
> To select a location in the text input, press on
the desired location in the input field. You can
control the location more accurately using the
displayed slider ©).
> To delete individual characters, press
> Applies to: handwriting input: Drag a line from
right to left in the input section ©.
> To delete multiple characters, press and hold
> To delete all characters in a specific location,
press and hold <1 @) and drag up to the desired
location )), When released, the highlighted
characters are deleted.
Page 27 of 310
4K8012721BC
Touch displays
Accepting suggested words or selecting
entries from the results list
> To accept a suggested word (2) or select an en-
try from the results list @), press on it.
> To display more content in the results list, drag
your finger upward or downward on the screen.
Setting the input language or keyboard
layout
> Applies to MMI: Select on the home screen:
SETTINGS > Language & keyboard > Keyboard.
> To define additional input languages, press the
© button.
> To change the keyboard layout for an input lan-
guage, press >. For example, you can select be-
tween QWERTZ and QWERTY.
25
Page 29 of 310
4K8012721BC
Voice recognition system
Voice recognition system
General information
Applies to: vehicles with voice recognition system
You can operate many functions in the vehicle
easily using voice commands.
Using the voice recognition system optimally
> Speak clearly and distinctly at a normal volume.
Speak louder when driving faster.
» Emphasize the words in the commands evenly
and do not leave long pauses.
> Close the doors, the windows, and the sunroof*
to reduce background noise. Make sure that
passengers are not speaking when you are giv-
ing a voice command.
> Do not direct the vents toward the hands-free
microphone, which is in the roof headliner near
the front interior lights.
> Only the driver should speak to the system, be-
cause the handsfree microphone is aimed to-
ward this seating position.
ZA WARNING
— Direct your full attention to driving. As the
driver, you have complete responsibility for
safety in traffic. Only use the functions in
such a way that you always maintain com-
plete control over your vehicle in all traffic
situations.
— Do not use the voice recognition system in
emergencies because your voice may change
in stressful situations. The system may take
longer to dial the number or may not be
able to dial it at all. Dial the emergency
number manually.
G) Tips
There are no voice guidance* prompts when a
dialog is active.
Operating
Applies to: vehicles with voice recognition system
(2 ELE
Pat) 5 ce
Where is a
Connect >
Diala
coy n
ey
Os 4
Cog
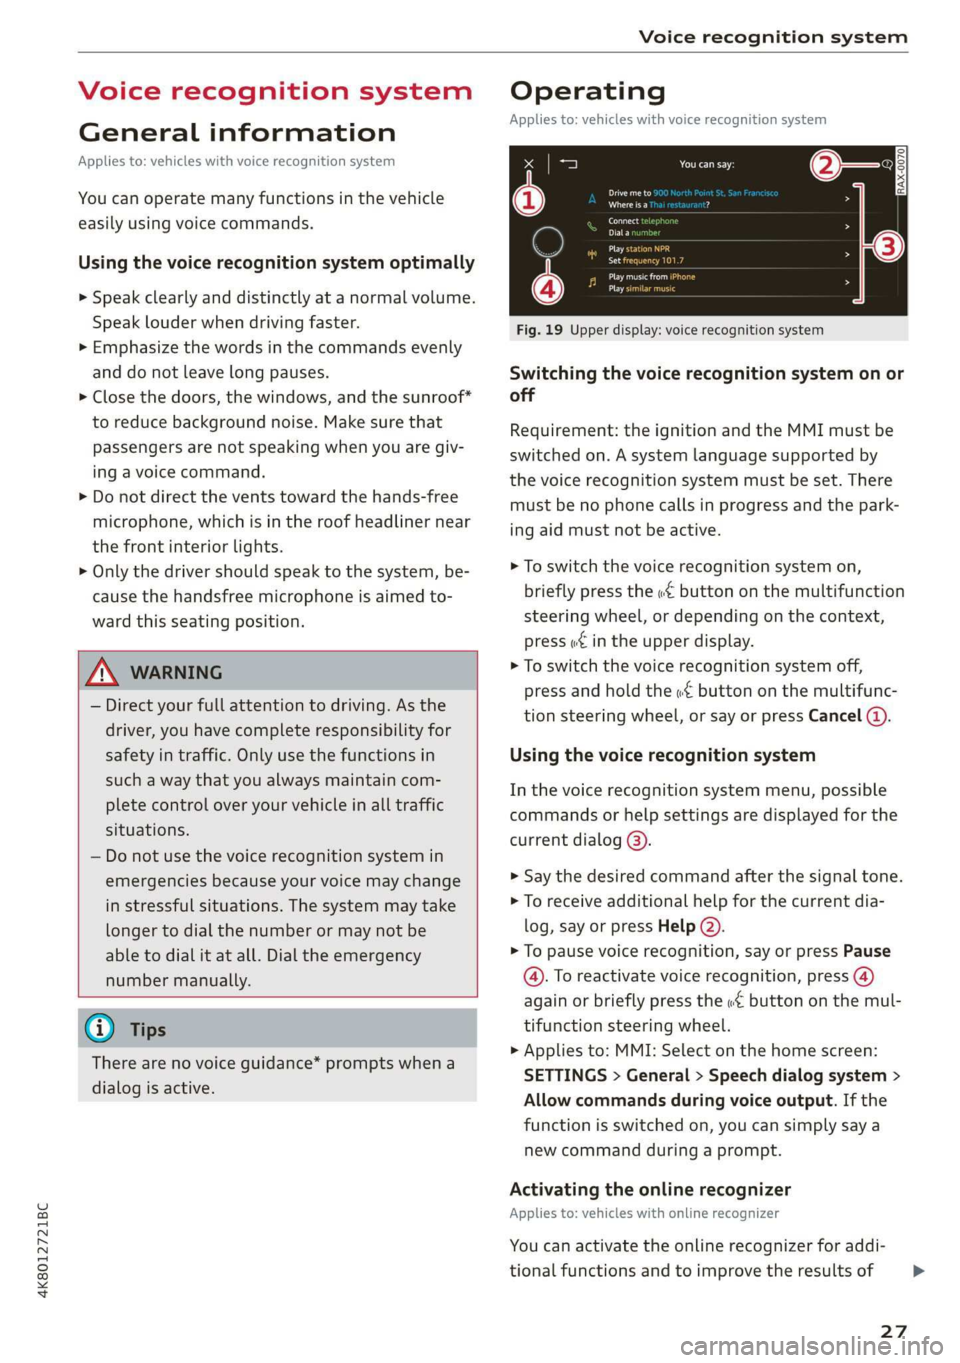
Fig. 19 Upper display: voice recognition system
Switching the voice recognition system on or
off
Requirement: the ignition and the MMI must be
switched on. A system language supported by
the voice recognition system must be set. There
must be no phone calls in progress and the park-
ing aid must not be active.
> To switch the voice recognition system on,
briefly press the «€ button on the multifunction
steering wheel, or depending on the context,
press w¢ in the upper display.
> To switch the voice recognition system off,
press and hold the « button on the multifunc-
tion steering wheel, or say or press Cancel (a).
Using the voice recognition system
In the voice recognition system menu, possible
commands or help settings are displayed for the
current dialog @).
> Say the desired command after the signal tone.
> To receive additional help for the current dia-
log, say or press Help (2).
> To pause voice recognition, say or press Pause
@. To reactivate voice recognition, press @)
again or briefly press the «€ button on the mul-
tifunction steering wheel.
> Applies to: MMI: Select on the home screen:
SETTINGS > General > Speech dialog system >
Allow commands during voice output. If the
function is switched on, you can simply say a
new command during a prompt.
Activating the online recognizer
Applies to: vehicles with online recognizer
You can activate the online recognizer for addi-
tional functions and to improve the results of
27
>
Page 30 of 310
Voice recognition system
voice recognition. A supported menu language
must be selected. When there is an active Inter-
net connection, the spoken command is evaluat-
ed in the vehicle and online.
> When you switch on the voice recognition sys-
tem for the first time, a menu for the online
recognizer opens. Or:
> Applies to: MMI: Select on the home screen:
SETTINGS > General > Speech dialog system >
Consent to speech dialog system online recog-
nizer.
> Read the licensing agreements and accept
them.
Activating Amazon Alexa!)
Applies to: vehicles with Amazon Alexa Integration
You can activate Amazon Alexa to access special
additional functions. A supported menu lan-
guage must be selected. A reduced number of
commands are available during this.
Requirement: you must be logged in to your
myAudi account in the vehicle. The online recog-
nizer must be activated.
> Applies to: MMI: Select on the home screen:
USER > Connect to Amazon Alexa.
> Follow the instructions in the display.
> After connecting successfully, turn on the voice
recognition system as normal > page 27,
Switching the voice recognition system on or
off, say the activation word “Alexa”, and then
say the desired command.
@) Note
Read the information about Audi connect, and
be sure to note the connectivity costs section
=@ in General information on page 174.
External voice operation
Applies to: vehicles with external speech dialog system
You can access and control the voice operation on
a connected mobile device through your vehicle.
2) AUDI AG provides access to services from third party pro-
viders. Permanent availability cannot be guaranteed, be-
cause that depends on the third party provider.
238
Switching external voice operation on or off
Requirement: the ignition and the MMI must be
switched on. A mobile device must be connected
to the MMI with the Handsfree profile
= page 161. The mobile device being connected
must have voice control that can be controlled
externally. There must be no phone calls in prog-
ress and the parking aid must not be active.
> To switch on the external voice operation, press
and hold the «€ button longer on the multifunc-
tion steering wheel.
> To switch off the external voice operation, press
and hold the «€ button longer on the multifunc-
tion steering wheel or press Cancel.
Using external voice operation
> Say the desired command after the signal tone.
> To reactivate voice recognition when it is
paused, press the «¢ button briefly on the mul-
tifunction steering wheel or press Resume.
(i) Tips
AUDI AG simply provides access to control
your mobile device with voice operation and
does not assume any responsibility for the
content and commands within the external
voice control.
Page 125 of 310
4K8012721BC
Driving information
— The traffic signs on the road always take pri-
ority over the display. The driver is always
responsible for adhering to the regulations
applicable in the country where the vehicle
is being operated.
— Units of measurement and language set-
tings are displayed based on how they were
set in the MMI system settings > page 219.
Applies to: vehicles with traffic light information
Switching traffic light information on and
off
The system can be switched on and off in the
MMI page 118.
Accessing traffic light information
> Select in the instrument cluster: vehicle func-
tions tab > Traffic signs.
G@) Tips
If another tab or another function is selected
in the instrument cluster, the traffic light in-
formation will appear in the status bar on the
instrument cluster.
Messages
Applies to: vehicles with traffic light information
Malfunction! See owner's manual
The system could not be configured, for example
due to a network malfunction. Switch the igni-
tion off and shut down the vehicle to restart the
system. Wait several minutes until the vehicle
has shut down completely and then switch the
ignition back on.
Function currently unavailable. See owner's
manual
There is a temporary system malfunction. Check
if one or more of the following situations applies
and correct the issue if necessary:
— Traffic light information is switched off
— Data transmission is deactivated
— The vehicle is not equipped with traffic sign rec-
ognition.
— There is no valid license
— Traffic light information is not available in that
area
Lap timer
Introduction
Applies to: vehicles with lap timer
You can measure and analyze lap times with the
lap timer in the display. You can operate the lap
timer using the multifunction steering wheel
=> page 13.
Opening the lap timer
> Select in the instrument cluster: Vehicle func-
tions tab > EI button > Lap times.
Z\ WARNING
Your focus should always be on driving your
vehicle safely. As the driver, you have com-
plete responsibility for safety in traffic. To re-
duce the risk of an accident, only use the lap
timer functions in such a way that you always
maintain complete control over your vehicle in
all traffic situations.
G) Tips
You can retrieve information from the trip
computer while the lap timer stopwatch is
running.
ya |
Applies to: vehicles with lap timer
Requirement: the lap timer must be open
=> page 123.
Timing laps
> To start timing manually, select Start lap 1 in
the menu.
> To start timing automatically as soon as you be-
gin to drive, select Start lap 1 by driving off or
Start by driving off in the menu.
> To start timing a new lap after driving a lap, se-
lect New lap in the menu. This starts timing
the next lap at the same time.
123
Page 168 of 310
Telephone
Managing favorites
Applies to: vehicles with telephone
You can store the desired number for a contact as
a shortcut in the favorites list.
Accessing favorites
> Applies to: MMI: Select on the home screen:
PHONE > Favorites.
Storing an existing phone number as a
favorite:
> Press Call list.
> Press and hold a contact in the list until the Op-
tions menu appears.
> Press Store as favorite. The favorite has been
stored. will appear briefly.
Deleting stored favorites
> Select: Favorites > Z > one or multiple favor-
ites or Select all > Delete > (Done).
@) Tips
If there are multiple mobile devices, you can
create separate favorites in the MMI for each
mobile device.
Opening contacts
Applies to: vehicles with telephone
(enced)
eu os ;
or
Business ©=
0049841123456
PMU esac}
Poeanect
ones Reel)
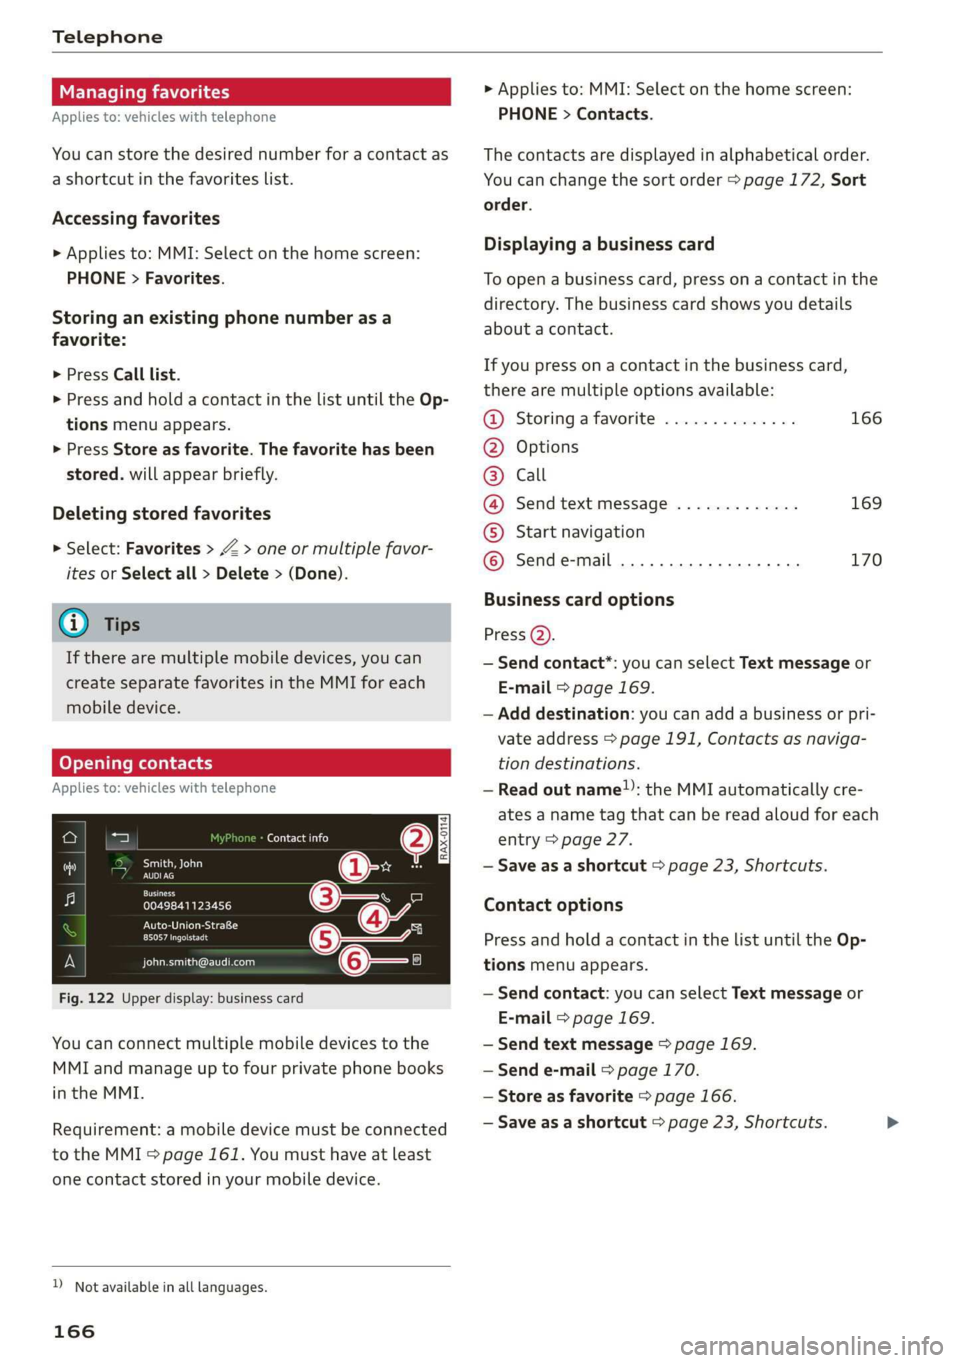
Fig. 122 Upper display: business card
You can connect multiple mobile devices to the
MMI and manage up to four private phone books
in the MMI.
Requirement: a mobile device must be connected
to the MMI > page 161. You must have at least
one contact stored in your mobile device.
) Not available in all languages.
166
> Applies to: MMI: Select on the home screen:
PHONE > Contacts.
The contacts are displayed in alphabetical order.
You can change the sort order > page 172, Sort
order.
Displaying a business card
To open a business card, press on a contact in the
directory. The business card shows you details
about a contact.
If you press on a contact in the business card,
there are multiple options available:
@ Storinga favorite .............. 166
@® Options
© call
@ Send text message ............. 169
© Start navigation
© Sende-mail ..............2000. 170
Business card options
Press Q).
— Send contact*: you can select Text message or
E-mail > page 169.
— Add destination: you can add a business or pri-
vate address > page 191, Contacts as naviga-
tion destinations.
— Read out name: the MMI automatically cre-
ates a name tag that can be read aloud for each
entry > page 27.
— Save as a shortcut > page 23, Shortcuts.
Contact options
Press and hold a contact in the list until the Op-
tions menu appears.
— Send contact: you can select Text message or
E-mail > page 169.
— Send text message > page 169.
— Send e-mail > page 170.
— Store as favorite > page 166.
— Save as a shortcut > page 23, Shortcuts.
Page 171 of 310
4K8012721BC
Telephone
Messages
Text messages
Applies to: vehicles with telephone
Depending on the mobile device being used and
the mobile network contract, you may be able to
receive and send text messages using the MMI.
Requirement: your mobile device must be con-
nected to the MMI via Bluetooth Message Access
Profile (Bluetooth MAP) > page 161.
> Applies to: MMI: Select on the home screen:
MESSAGES > (=) > Text message (SIM card)*/
text message (phone 1)/text message (phone
2)*,
Inboxes
— New text message: press on a template in the
list or dictate a text message. Press Add and
select one or more recipients from your con-
tacts. To remove a recipient, press Delete. Press
Send.
— Inbox: displays all received text messages.
— Sent: displays all sent text messages.
— Outbox": displays all text messages to be sent.
— Drafts*: text messages that have not been sent
yet by the mobile device are displayed on the
MMI.
— Deleted*: deleted text messages are displayed.
— User-defined*: folders defined by the user are
transferred from your mobile device.
Message options
The following options are available when you se-
lect a text message:
— Read out* the text message).
— Reply: a reply can be sent to the selected mes-
sage in the Inbox.
— To switch to the previous or the next message,
press < or >.
— More: options
D_ Not available in all languages.
2) Function is not supported on all mobile devices.
When you press More, the following options are
available:
— Call: Requirement: a number must be stored.
You
can call the contact.
— Forward: the selected text message can be for-
warded to other recipients. Text can also be
added before sending.
— Navigate: Requirement: the contact must have
a navigation address stored with it in the direc-
tory. You can start route guidance.
— Extract numbers: Requirement: the message
must contain a number. You can extract a num-
ber from a text message.
— Send again: Requirement: the text message
must be in the Outbox. The selected text mes-
sage can be resent.
Press
and hold an entry in the Inbox until the Op-
tions menu appears.
— Reply: a reply can be sent to the selected mes-
sage in the Inbox.
— Forward: the selected text message can be for-
warded to other recipients. Text can also be
added before sending.
Settings
Press ©},
— Automatically forward text message to mobile
device*2): when this function is switched on,
text messages will also be automatically stored
on your mobile device.
— New text message notification: when this
function is switched on, you will be notified
when new text messages are received. New text
messages are indicated with an envelope Min
the MMI status bar.
— Text message center*: the number for the text
message center of your cell phone service pro-
vider is displayed. If no number has been stor-
ed yet, you can enter the text message center
number.
— Delete text messages from SIM card”: if the
memory capacity on the SIM card is full, an en-
velope with a line through it is displayed in the
MMI status bar. You can continue to send text >
169
Page 172 of 310
Telephone
messages, but you cannot receive new text
messages. To delete all sent text messages
from the SIM card, select All sent messages. To
delete all read text messages from the SIM
card, select All read messages.
Delete text message
Select: a mailbox > Z > one or more text mes-
sages > Delete > Done.
@ Tips
— Please note that you may have to activate
the receiving and sending of text messages
depending on the SIM card being used (for
example, when using a multi-SIM).
— Messages that are deleted in the MMI are
also deleted in the mobile device automati-
cally.
— Only new received messages may be dis-
played depending on your mobile device.
Applies to: vehicles with telephone
Depending on the type of mobile device being
used, you may be able to receive and send e-
mails through the MMI.
Requirement: your mobile device must be con-
nected to the MMI via Bluetooth Message Access
Profile (Bluetooth MAP) > page 161.
> Applies to: MMI: Select on the home screen:
MESSAGES > (:=) > e-mail (phone 1)/e-mail
(phone 2)*.
Inboxes
— New e-mail: press on a template in the list.
Press Add and select one or more recipients
from your contacts. To remove one or all recipi-
ents, press Delete. Press Send.
— Inbox: displays all received e-mails. To update
the list, press OQ.
— Sent: displays all sent e-mails.
— Outbox: displays all e-mails to be sent.
— Drafts: e-mails that have not been sent yet are
displayed.
) Not available in all languages.
170
— Deleted*: deleted e-mails are displayed.
— User-defined*: folders defined by the user are
transferred from your mobile device.
Message options
The following options are available when you se-
lect an e-mail:
— Read out* the e-mail).
— Reply: a reply can be sent to the selected e-mail
in the Inbox.
— To switch to the previous or the next message,
press or >.
— More: options
When you press More, the following options may
be displayed depending on your mobile device
and the applicable mail folder:
— Call: Requirement: a number must be stored.
You can call the contact.
— Forward: the selected e-mail can be forwarded
to other recipients. Text can also be added be-
fore sending.
— Extract e-mail add.: you can extract the e-mail
address from an e-mail.
— Navigate: Requirement: the contact must have
a navigation address stored with it in the direc-
tory. You can start route guidance.
— Extract numbers: Requirement: the text in the
e-mail must contain a number. You can extract
a number from an e-mail.
— Show all recipients*: you can display the recipi-
ents of an e-mail.
— Show attachmts.”: you can display a list of at-
tachments to an e-mail.
— Send again: the selected e-mail in the Outbox
and Sent mailboxes can be sent again.
Press and hold an entry in the Inbox until the Op-
tions menu appears.
— Reply: a reply can be sent to the selected e-
mail.
— Reply all: a reply can be sent for the selected e-
mail and it will be sent to all of the entered re-
cipients.
— Forward: the selected e-mail can be forwarded
to different recipients.
Page 203 of 310
4K8012721BC
Radio
Setting presets using the MMI
> Applies to: MMI: To play a preset, select on the
home screen: RADIO > Source > Presets > a
preset.
> To store a favorite, press WY © = page 199,
fig. 135, or:
> Press Store as favorite in the options
=> page 203.
Requirement: the presets list must be displayed.
At least one preset must be stored.
> To delete a preset, select: Z > select one or
more stations or Select all > Delete > (Done).
Requirement: the presets list must be displayed.
At least two presets must be stored.
> To move a preset, press Z.
> Touch the $ symbol and move the entry to the
desired position.
> Press Done.
Smart favorites
Applies to: vehicles with SiriusXM
SiriusXM channels are stored in the presets as
smart favorites with the »% symbol. After switch-
ing the ignition and the MMI on, the smart favor-
ites store radio programs at a specific time.
> Press on a smart favorite. You have the follow-
ing options:
> Pause/Start: press I/D.
> Selecting the previous or next track: press I<
or >i.
> Going to the beginning of a recording or live
program: press and hold NX or Dh.
> Setting the playback point: you can adjust the
playback position using the knob.
> Going to a live program: press Lvé).
Applies to: vehicles with Audi connect Infotainment and on-
line radio
You can listen to various radio stations or pod-
casts on the Internet using online radio.
Requirement: the MMI must be connected to the
Internet > page 174, Audi connect.
> Applies to: MMI: Select on the home screen:
RADIO > Source > Online.
The following functions are available in the on-
line radio menu:
— Search: you only can search for online radio sta-
tions in this search. You can search for station
names and categories.
— Last stations: the station that was played last
will start playing.
— Top stations: select a station from the list of
popular online radio stations.
— Filtering the list: Select: 2 > (select a catego-
ry) > select a station name. The following cate-
gories are available:
— Countries
— Genres
— Languages
Other categories may be available depending on
the country and vehicle equipment.
Podcasts
— Applies to: MMI: Select on the home screen:
RADIO > Source > Online > Podcasts.
The following functions are available:
— Listening to a podcast: select: a podcast > a
podcast episode.
— Search: press 2.
The following functions are available in the pod-
cast playback view:
— Displaying the podcast episodes: press List.
— Starting or stopping the podcast: press > orl.
— Previous or next podcast: press K//Dl, or use one
finger to drag the center of the display to the
left or right.
— Changing the playback point: you can adjust
the playback position using the knob.
— Displaying the online radio menu: press a2.
— Switching to radio: press Source. The sources
in the Radio menu are displayed.
Podcast favorites
You can store podcasts in the Podcast favorites.
Storing a podcast favorite: requirement: the
podcast playback view must be displayed. Press
Y¥, or press Save podcast in the options
= page 203, Options.
201