radiator cap AUDI S5 2008 8T / 1.G Owners Manual
[x] Cancel search | Manufacturer: AUDI, Model Year: 2008, Model line: S5, Model: AUDI S5 2008 8T / 1.GPages: 294, PDF Size: 12.13 MB
Page 14 of 294
Downloaded from www.Manualslib.com manuals search engine Instruments and warning/indicator lamps 12Warning symbol in instrument cluster
If the symbol
lights up in the display, this means that either the
coolant temperature is too high or the coolant level is too low
⇒page 32.
If the needle is at the top end of the dial, this means the coolant
temperature is too high. Stop the vehicle, switch off the engine and
wait for it to cool down. If the warning lamp starts flashing again
after just a short distance, contact a qualified workshop.
WARNING
•
Before opening the bonnet and checking the coolant level,
please observe the warning information on ⇒page 221, “Working
on components in the engine compartment”.
•
Never open the bonnet if you can see or hear steam or coolant
escaping from the engine compartment; there is a risk of being
scalded. Wait until you can no longer see or hear escaping steam
or coolant.Caution
•
Additional lights and other accessories in front of the air inlet
reduce the cooling effect of the radiator. At high outside tempera-
tures and high engine loads, there is a risk of the engine over-
heating.
•
The front spoiler also ensures proper distribution of the cooling
air when the vehicle is moving. If the spoiler is damaged this can
reduce the cooling effect, which could cause the engine to overheat.
You should obtain professional assistance.
Rev counter
The rev counter indicates the number of engine revolu-
tions per minute.You should select a lower gear if the engine speed drops below
1500 rpm. The start of the red zone on the dial indicates the
maximum engine speed which may be used briefly when the engine
is warm and after it has been run in properly. However, it is advisable
to change up a gear or move the selector lever to “D” (or lift your
foot off the accelerator) before the needle reaches the red zone.
Caution
Never allow the rev counter needle ⇒page 11, fig. 2 to go into
the red zone on the dial for more than a very brief period: there is a
risk of damaging the engine. The start of the red zone on the dial is
different for some engine versions.
For the sake of the environment
Changing up a gear early will help you to save fuel and minimise
engine noise.
button
This button has a number of different functions.
A2
SET
Fig. 3 Instrument
cluster: SET button
document_0900452a81793dcc.book Seite 12 Mittwoch, 21. März 2007 5:42 17
Page 223 of 294
Downloaded from www.Manualslib.com manuals search engine Checking and topping up fluids221
Controls
Safety
Driving tips
General maintenance
Self-help
Technical data
Working on components in the engine compartment
Extra caution is necessary when working on components
in the engine compartment.Always be aware of the danger of injury and scalding as well as the
risk of accident or fire when working in the engine compartment
(e.g. when checking and refilling fluids). Always observe the warn-
ings listed below and follow all normal safety precautions. The
engine compartment of any motor vehicle is a potentially
hazardous area. ⇒.
WARNING
•
Switch off the engine.
•
Remove the ignition key.
•
Apply the parking brake.
•
Move the gear lever into neutral.
•
Wait for the engine to cool down.
•
Keep children away from engine compartment.
•
Never spill fluids on hot engine components. These fluids can
cause a fire (e.g. radiator anti-freeze).
•
Take care not to cause short circuits in the electrical system,
especially when working on the battery.
•
Do not touch the radiator fan when the engine is hot. The fan
may start running suddenly.
•
Do not unscrew the cap on the expansion tank when the engine
is hot. The cooling system is under pressure.
•
Protect face, hands and arms by covering the cap with a large,
thick rag to protect against escaping coolant and steam.
•
If any tests have to be performed with the engine running,
there is an extra safety risk from the rotating parts, such as the
drive belts, alternator and radiator fan, etc., and from the high-
voltage ignition system.
•
Observe the following additional warnings if work on the fuel
system or the electrical system is necessary:
−Always disconnect the battery.
−Do not smoke.
−Never work near naked flames.
−Always keep an approved fire extinguisher immediately
available.Caution
When topping up fluids make sure the correct fluid is put into the
correct filler opening. This can otherwise cause serious malfunc-
tions or engine damage.
For the sake of the environment
Inspect the ground underneath your vehicle regularly so that any
leaks are detected at an early stage. If you find oil spots or other
fluids, have your vehicle inspected by a qualified workshop.
Note
On right-hand drive vehicles* some of the containers/ reservoirs
mentioned below are located on the other side of the engine
compartment.Closing the bonnet– To close the bonnet, pull it down to overcome the spring
pressure.
– Then let it drop into the catches; do not press down ⇒.
WARNING (continued)
document_0900452a81793dcc.book Seite 221 Mittwoch, 21. März 2007 5:42 17
Page 224 of 294
Downloaded from www.Manualslib.com manuals search engine Checking and topping up fluids 222
WARNING
•
For safety reasons the bonnet must always be completely
closed when the vehicle is moving. After closing it always check
that it is properly secured. The bonnet must be flush with the adja-
cent body panels.
•
Should you notice that the bonnet is not safely secured when
the vehicle is moving, stop the vehicle immediately and close the
bonnet properly, otherwise it could cause an accident.
Engine compartment layoutEngine compartment layout
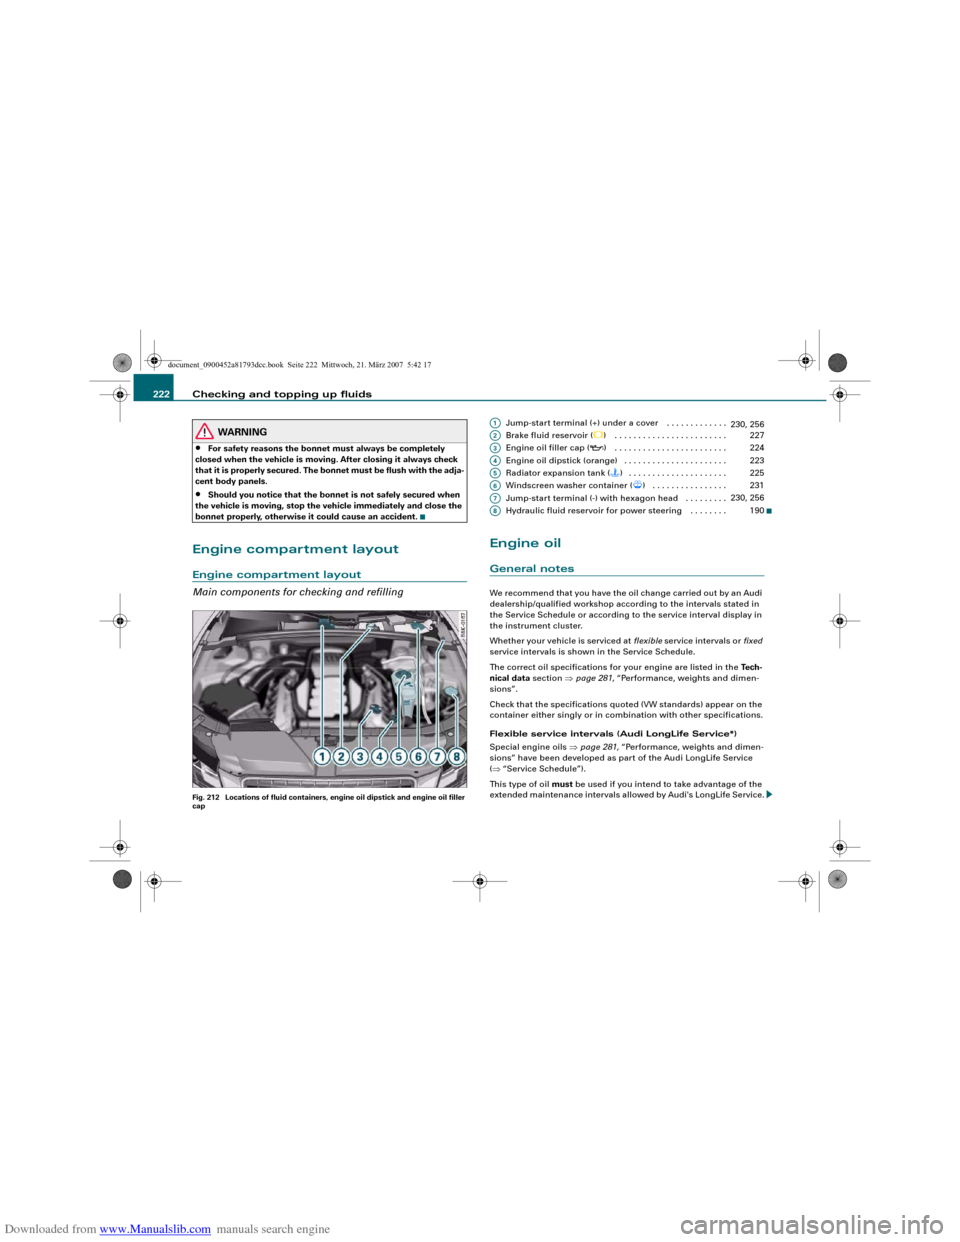
Main components for checking and refillingFig. 212 Locations of fluid containers, engine oil dipstick and engine oil filler
cap
Jump-start terminal (+) under a cover . . . . . . . . . . . . .
Brake fluid reservoir (
) . . . . . . . . . . . . . . . . . . . . . . . .
Engine oil filler cap (
) . . . . . . . . . . . . . . . . . . . . . . . .
Engine oil dipstick (orange) . . . . . . . . . . . . . . . . . . . . . .
Radiator expansion tank () . . . . . . . . . . . . . . . . . . . . .
Windscreen washer container (
) . . . . . . . . . . . . . . . .
Jump-start terminal (-) with hexagon head . . . . . . . . .
Hydraulic fluid reservoir for power steering . . . . . . . .
Engine oilGeneral notesWe recommend that you have the oil change carried out by an Audi
dealership/qualified workshop according to the intervals stated in
the Service Schedule or according to the service interval display in
the instrument cluster.
Whether your vehicle is serviced at flexible service intervals or fixed
service intervals is shown in the Service Schedule.
The correct oil specifications for your engine are listed in the Tech-
nical data section ⇒page 281, “Performance, weights and dimen-
sions”.
Check that the specifications quoted (VW standards) appear on the
container either singly or in combination with other specifications.
Flexible service intervals (Audi LongLife Service*)
Special engine oils ⇒page 281, “Performance, weights and dimen-
sions” have been developed as part of the Audi LongLife Service
(⇒“Service Schedule”).
This type of oil must be used if you intend to take advantage of the
extended maintenance intervals allowed by Audi's LongLife Service.A1
230, 256
A2
227
A3
224
A4
223
A5
225
A6
231
A7
230, 256
A8
190
document_0900452a81793dcc.book Seite 222 Mittwoch, 21. März 2007 5:42 17
Page 228 of 294
Downloaded from www.Manualslib.com manuals search engine Checking and topping up fluids 226
CautionRadiator sealants must not be added to the coolant. Such additives
could seriously impair the function of the cooling system.Topping up the coolant
Be careful when topping up coolant.– Switch off the engine.
– Wait for the engine to cool down.
– Cover the cap on the expansion tank ⇒page 225, fig. 215
with a cloth, and carefully unscrew the cap anti-clock-
wise ⇒.
– Add coolant.
– Screw the cap on again tightly.Make sure that the coolant meets the required specifications
⇒page 224, “Coolant”. Do not use a different type of additive if anti-
freeze additive G12+, G12 or G11 is not available. In this case use
only water and bring the coolant concentration back up to the
correct level as soon as possible by putting in the specified additive.
Always top up with fresh, unused coolant.
Do not fill above the “MAX” mark. Excess coolant is forced out of the
system through the valve in the filler cap when the engine gets hot.
If a lot of coolant has been lost, wait for the engine to cool down
before putting in cold coolant. Failure to do so could result in
serious engine damage.
WARNING
•
The cooling system is under pressure. Do not unscrew the cap
on the expansion tank when the engine is hot: you could be
scalded by escaping steam
•
The coolant and coolant additive can be a health hazard. Store
the coolant additive in the original container in a safe place out of
reach of children – risk of poisoning.For the sake of the environment
Drained off coolant should not be used again. Drain off the used
coolant into a suitable container and dispose of it in the proper
manner (observe environmental regulations).Radiator fan
The radiator fan can start running spontaneously.The radiator fan is driven by the engine via a poly V-belt. The speed
of the fan is varied by a viscous clutch according to the temperature.
There is also an auxiliary electric fan, which cuts in automatically
whenever the temperature of the coolant and the engine compart-
ment rises above a certain level.
The auxiliary fan can continue to run for as long as 10 minutes after
stopping the engine – even after the ignition is switched off. It may
also start running suddenly ⇒ after a while if•
residual heat raises the coolant temperature, or
•
the hot engine compartment is additionally heated up by the
sun.
WARNING
When working in the engine compartment be aware that the radi-
ator fan may start running suddenly – risk of injury.
document_0900452a81793dcc.book Seite 226 Mittwoch, 21. März 2007 5:42 17
Page 233 of 294
Downloaded from www.Manualslib.com manuals search engine Checking and topping up fluids231
Controls
Safety
Driving tips
General maintenance
Self-help
Technical data
Replacing the battery
A replacement battery must have the same specifications
as the original equipment battery.Your vehicle is equipped with an intelligent power management
system to control the distribution of electrical energy ⇒page 192.
The power management function ensures that the battery is
charged much more efficiently than on vehicles without a power
management system. For this additional power to be available after
replacing the battery, we recommend that the replacement battery
used is of the same make and type as the original-equipment
battery. The battery must be encoded in the control unit for power
management. This has to be done by a qualified workshop.
A replacement battery must have the same capacity, voltage (12 V)
and current rating. It must also have the same dimensions as the
original, factory-fitted battery and have sealed caps. The battery
must comply with the standards TL 825 06 (dated December 1997 or
later) and VW 7 50 73 (August 2001 or later).
Caution
•
Make sure that the vent hose is always attached to the opening
on the side of the battery. Gases or battery acid can otherwise
escape and possibly cause damage.
•
The battery holder and clamps must always be correctly secured.
•
Before starting any work on the battery, always observe the
warnings listed under ⇒page 229, “Important safety warnings for
handling a car battery”.For the sake of the environment
Batteries contain toxic substances including sulphuric acid and
lead. They must be disposed of appropriately and must not be put
together with ordinary household waste. Make sure the battery
removed from the vehicle cannot tip over. Otherwise, sulphuric acid
could escape.
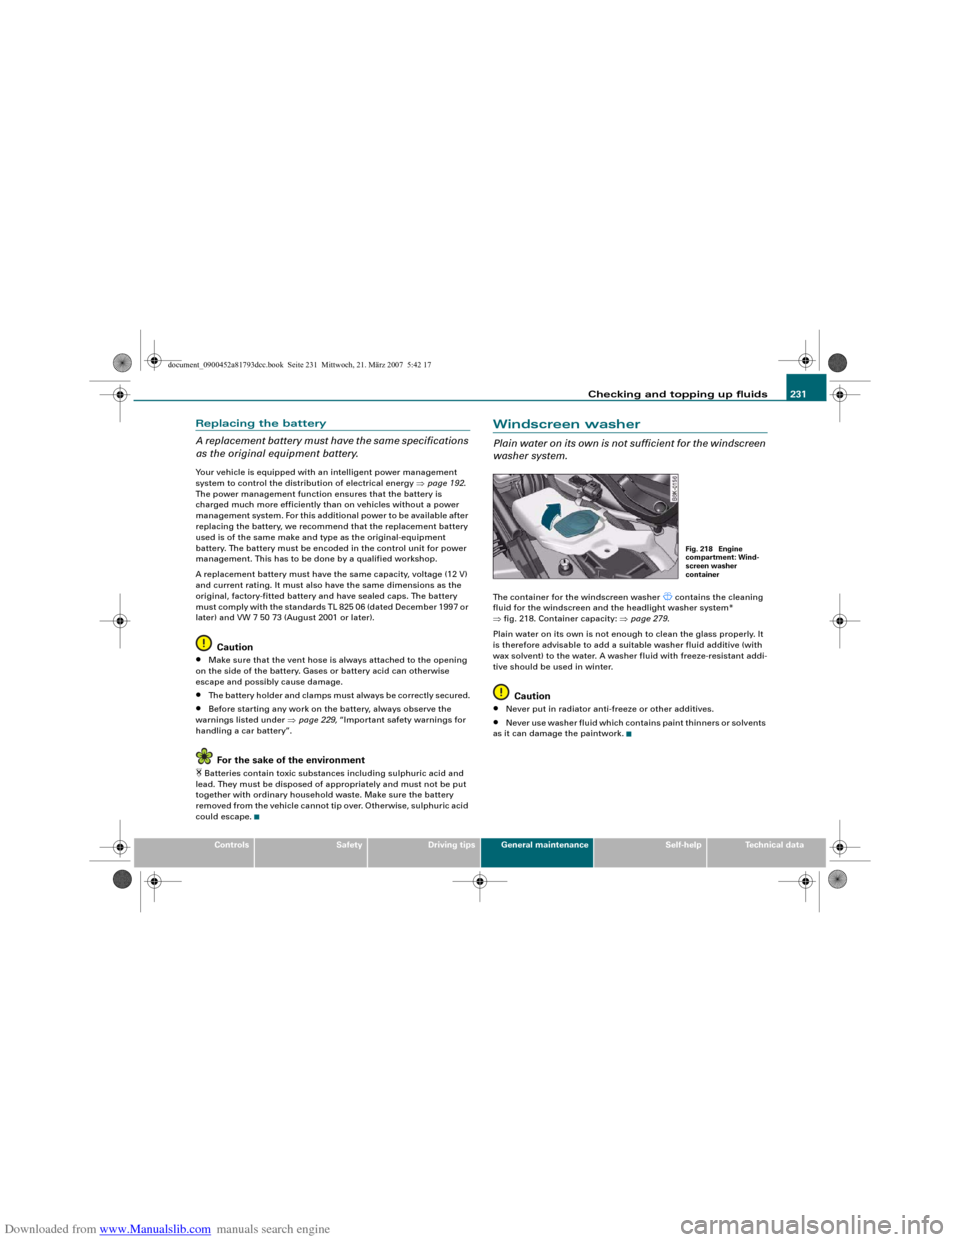
Windscreen washerPlain water on its own is not sufficient for the windscreen
washer system.The container for the windscreen washer
contains the cleaning
fluid for the windscreen and the headlight washer system*
⇒fig. 218. Container capacity: ⇒page 279.
Plain water on its own is not enough to clean the glass properly. It
is therefore advisable to add a suitable washer fluid additive (with
wax solvent) to the water. A washer fluid with freeze-resistant addi-
tive should be used in winter.
Caution
•
Never put in radiator anti-freeze or other additives.
•
Never use washer fluid which contains paint thinners or solvents
as it can damage the paintwork.
Fig. 218 Engine
compartment: Wind-
screen washer
container
document_0900452a81793dcc.book Seite 231 Mittwoch, 21. März 2007 5:42 17
Page 287 of 294
Downloaded from www.Manualslib.com manuals search engine Index285
Controls
Safety
Driving tips
General maintenance
Self-help
Technical data Blower
Deluxe automatic air conditioner . . . . 94
Deluxe automatic air conditioner plus . .
102
Bonnet
Closing . . . . . . . . . . . . . . . . . . . . . . . . . 221
Opening . . . . . . . . . . . . . . . . . . . . . . . . 220
Releasing . . . . . . . . . . . . . . . . . . . . . . . 220
Boot
SeeLoading luggage compartment . 158
SeeLuggage compartment . . . . . . . . . 75
Boot lid
Central locking system . . . . . . . . . . . . . 48
Manual release . . . . . . . . . . . . . . . . . . . . 49
Brake system
Brake assist system . . . . . . . . . . . . . . . 187
Brake fluid . . . . . . . . . . . . . . . . . . . . . . 227
Brake light defective . . . . . . . . . . . . . . . 36
Brake pads worn . . . . . . . . . . . . . . . . . . 36
Brake servo . . . . . . . . . . . . . . . . . . . . . . 189
Electro-mechanical parking brake . . . 119
General notes . . . . . . . . . . . . . . . . . . . . 189
Malfunction . . . . . . . . . . . . . . . . . . . . . . 31
Warning lamp . . . . . . . . . . . . . . . . . . . . 19
Bulb holder
Bayonet fastener . . . . . . . . . . . . . . . . . 266
Bulb monitor . . . . . . . . . . . . . . . . . . . . . . . . 36
Bulbs
Bayonet fastener . . . . . . . . . . . . . . . . . 266
Changing (general notes) . . . . . . . . . . 265
Bulbs, changing . . . . . . . . . . . . . . . . . . . . 265
Brake lights . . . . . . . . . . . . . . . . . . . . . 269
Bulb holder with bayonet fastener . . 266Front fog lights . . . . . . . . . . . . . . . . . . 268
Number plate light . . . . . . . . . . . . . . . 274
Rear fog light . . . . . . . . . . . . . . . . . . . . 272
Rear lights . . . . . . . . . . . . . . . . . . . . . . 269
Reversing light . . . . . . . . . . . . . . . . . . . 272
Turn signals (rear) . . . . . . . . . . . . . . . . 269
Business equipment . . . . . . . . . . . . . . . . . 240
CCapacities . . . . . . . . . . . . . . . . . . . . . . . . . . 279
Car keys . . . . . . . . . . . . . . . . . . . . . . . . . . . . 38
Care of vehicle . . . . . . . . . . . . . . . . . . . . . . 210
Catalytic converter . . . . . . . . . . . . . . . . . . 195
Central locking system . . . . . . . . . . . . . . . . 42
Boot lid . . . . . . . . . . . . . . . . . . . . . . . . . . 48
Deadlock mechanism . . . . . . . . . . . . . . 45
Fuel tank flap . . . . . . . . . . . . . . . . . . . . 217
Locking . . . . . . . . . . . . . . . . . . . . . . . . . . 45
Locking and unlocking the vehicle from
inside . . . . . . . . . . . . . . . . . . . . . . . . . . 46
Manual locking . . . . . . . . . . . . . . . . . . . . 47
Opening and closing windows . . . . . . . 50
Switches on driver's door . . . . . . . . . . . 46
Unlocking . . . . . . . . . . . . . . . . . . . . . . . . 45
Changing a wheel . . . . . . . . . . . . . . . . . . . 250
Changing bulbs
SeeBulbs . . . . . . . . . . . . . . . . . . . . . . . 265
Chassis number . . . . . . . . . . . . . . . . . . . . . 279
Child safety . . . . . . . . . . . . . . . . . . . . . . . . 175
Child safety seat . . . . . . . . . . . . . . . . . . . . 176
Child seat categories . . . . . . . . . . . . . . 176
Fitting . . . . . . . . . . . . . . . . . . . . . . . . . . 179ISOFIX system . . . . . . . . . . . . . . . . . . . . 181
On front passenger's seat . . . . . . . . . . 176
Safety notes . . . . . . . . . . . . . . . . . . . . . 175
Cigarette lighter . . . . . . . . . . . . . . . . . . . . . . 85
Cleaning . . . . . . . . . . . . . . . . . . . . . . . . . . . 210
Cleaning Alcantara . . . . . . . . . . . . . . . . . . 216
Cleaning seat covers
Alcantara . . . . . . . . . . . . . . . . . . . . . . . . 216
Natural leather . . . . . . . . . . . . . . . . . . . 215
Textile covers . . . . . . . . . . . . . . . . . . . . 213
Cleaning textile covers and trim parts . . 213
Clock, setting . . . . . . . . . . . . . . . . . . . . . . . . 13
Closing
Bonnet . . . . . . . . . . . . . . . . . . . . . . . . . . 221
Coat hooks . . . . . . . . . . . . . . . . . . . . . . . . . . 90
Colour code . . . . . . . . . . . . . . . . . . . . . . . . 279
Compact temporary spare wheel
SeeSpare wheel . . . . . . . . . . . . . . . . . . 246
Compartment for (sun)glasses . . . . . . . . . 89
Compass in mirror . . . . . . . . . . . . . . . . . . . . 68
Controls and displays
Overview . . . . . . . . . . . . . . . . . . . . . . . . . . 9
Convenience close function . . . . . . . . . . . . 50
Convenience open function . . . . . . . . . . . . 50
Cooling system
Anti-freeze additive . . . . . . . . . . . . . . . 224
Checking coolant level . . . . . . . . . . . . 225
Coolant . . . . . . . . . . . . . . . . . . . . . . . . . 224
Coolant temperature gauge . . . . . . . . . 11
Malfunction . . . . . . . . . . . . . . . . . . . . . . 32
Radiator fan . . . . . . . . . . . . . . . . . . . . . 226
Topping up coolant . . . . . . . . . . . . . . . 226
document_0900452a81793dcc.book Seite 285 Mittwoch, 21. März 2007 5:42 17