tow AUDI TT 2021 Owner´s Manual
[x] Cancel search | Manufacturer: AUDI, Model Year: 2021, Model line: TT, Model: AUDI TT 2021Pages: 280, PDF Size: 99.18 MB
Page 18 of 280
![AUDI TT 2021 Owner´s Manual Instrument cluster
Accessing the sport displays in the central
area
> Open the first Vehicle tab (trip computer) using
the [<>] button on the multifunction steering
wheel.
> Select on the mul AUDI TT 2021 Owner´s Manual Instrument cluster
Accessing the sport displays in the central
area
> Open the first Vehicle tab (trip computer) using
the [<>] button on the multifunction steering
wheel.
> Select on the mul](/img/6/40287/w960_40287-17.png)
Instrument cluster
Accessing the sport displays in the central
area
> Open the first Vehicle tab (trip computer) using
the [<>] button on the multifunction steering
wheel.
> Select on the multifunction steering wheel: left
control button > Sport displays.
> Turn the left thumbwheel on the multifunction
steering wheel until the desired sport display
appears in the instrument cluster.
Accessing the sport displays in the additional
display
> Select on the multifunction steering wheel:
right control button > Additional display.
> Select the desired additional display.
G meter*
The G meter displays the longitudinal and lateral
acceleration. The maximum values that are
reached are stored and displayed when the vehi-
cle is stationary.
> To reset the stored values, select on the multi-
function steering wheel: right control button >
Reset values.
Engine data*
The engine data displays the current power and
torque.
Tire pressure monitoring system*
The tire pressure monitoring system displays the
current tire pressures and temperature. Also see
=> page 233, Tire pressure monitoring system.
Messages
@)Electromechanical parking brake
If the Zi / © indicator light turns on, the park-
ing brake was set.
© Parking brake: warning! Vehicle parked too
steep
Zi / © Parking brake: warning! Vehicle
parked too steep
If the indicator light blinks and the message ap-
pears, there is not enough braking power to se-
16
cure the vehicle. The brakes have overheated. The
vehicle could roll away, even ona small incline.
ww Parking brake: malfunction! Please contact
Service
There is a malfunction in the parking brake. Drive
to an authorized Audi dealer or authorized Audi
Service Facility immediately to have the malfunc-
tion corrected. Do not park the vehicle on hills,
because it could roll.
La (3 / {@) Parking brake: warning! Vehicle
parked too steep
The braking force may not be enough to secure
the vehicle from rolling away. Park the vehicle in
a place with less of an incline.
A TA3 / (Q) Parking brake: applied
The parking brake is set. Press and hold the brake
pedal to release the parking brake.
@- Steering lock
BS Steering: malfunction! Please stop vehicle
There is a malfunction in the electronic steering
lock. You cannot turn the ignition on.
Do not tow your vehicle because it cannot be
steered. See an authorized Audi dealer or author-
ized Audi Service Facility for assistance.
|e—e| Steering lock: malfunction! Please contact
Service
There is a malfunction in the electronic steering
lock.
Drive immediately to an authorized Audi dealer
or authorized Audi Service Facility to have the
malfunction repaired.
Z\ WARNING
Do not tow your vehicle when there is a mal-
function in the electronic steering lock - this
increases the risk of an accident.
oem ate eee LT
S&S Engine start system: malfunction! Please
contact Service
Page 26 of 280
Opening and closing
Mechanically unlocki
doors
g and locking t
If the central locking fails, you must unlock or
lock the doors separately.
BFV-0257
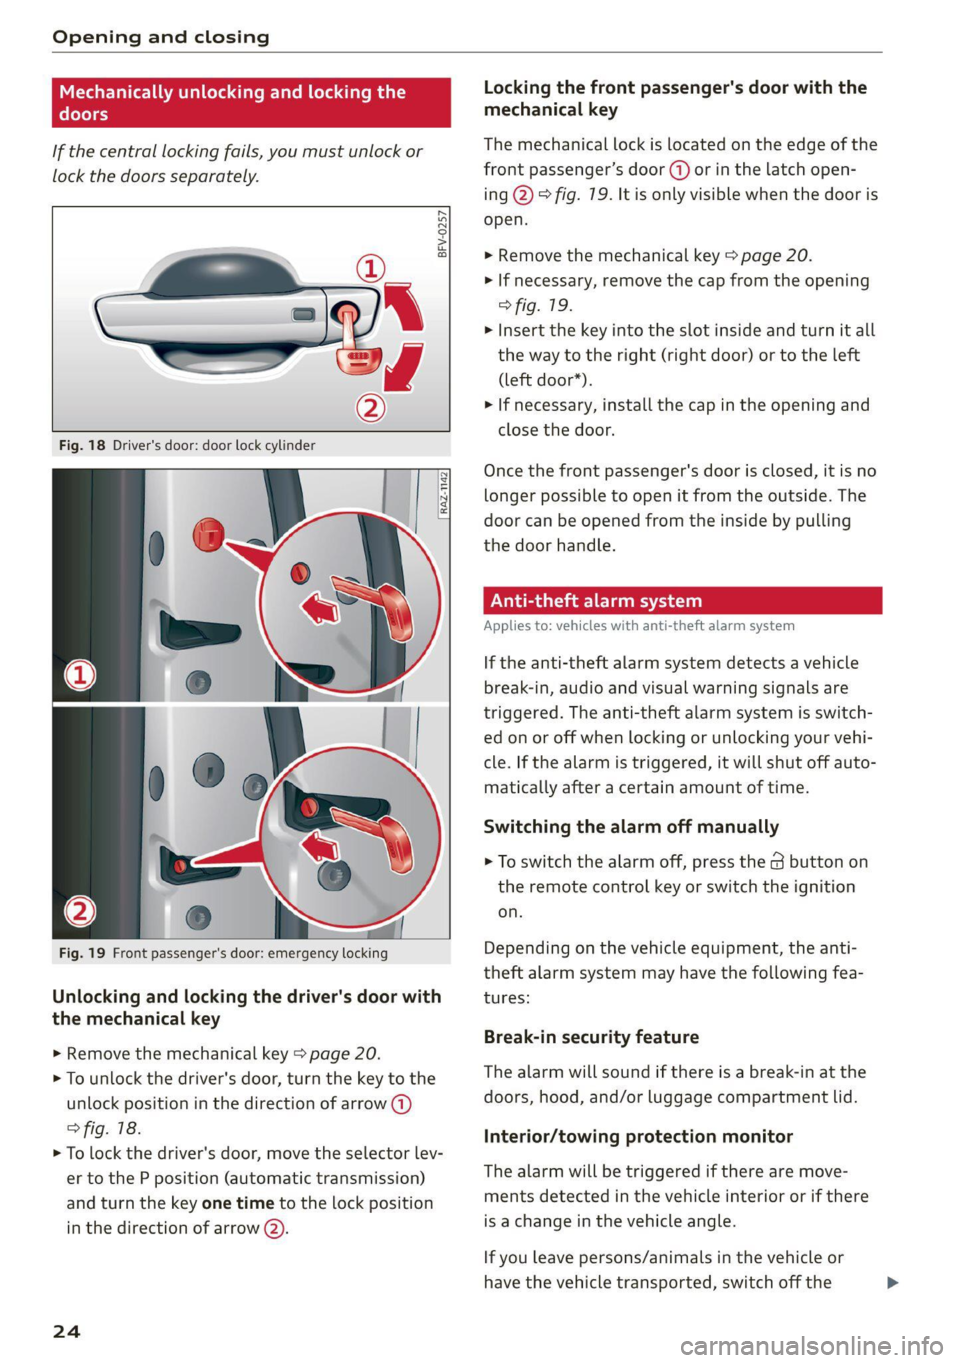
Fig. 18 Driver's door: door lock cylinder
[RAzZ-149|
Fig. 19 Front passenger's door: emergency locking
Unlocking and locking the driver's door with
the mechanical key
> Remove the mechanical key > page 20.
> To unlock the driver's door, turn the key to the
unlock position in the direction of arrow (a)
> fig. 18.
> To lock the driver's door, move the selector lev-
er to the P position (automatic transmission)
and turn the key one time to the lock position
in the direction of arrow @).
24
Locking the front passenger's door with the
mechanical key
The mechanical lock is located on the edge of the
front passenger’s door (J) or in the latch open-
ing @) ° fig. 19. It is only visible when the door is
open.
> Remove the mechanical key > page 20.
> If necessary, remove the cap from the opening
> fig. 19.
> Insert the key into the slot inside and turn it all
the way to the right (right door) or to the left
(left door*).
> If necessary, install the cap in the opening and
close the door.
Once the front passenger's door is closed, it is no
longer possible to open it from the outside. The
door can be opened from the inside by pulling
the door handle.
Pea
Applies to: vehicles with anti-theft alarm system
If the anti-theft alarm system detects a vehicle
break-in, audio and visual warning signals are
triggered. The anti-theft alarm system is switch-
ed on or off when locking or unlocking your vehi-
cle. If the alarm is triggered, it will shut off auto-
matically after a certain amount of time.
Switching the alarm off manually
> To switch the alarm off, press the button on
the remote control key or switch the ignition
on.
Depending on the vehicle equipment, the anti-
theft alarm system may have the following fea-
tures:
Break-in security feature
The alarm will sound if there is a break-in at the
doors, hood, and/or luggage compartment lid.
Interior/towing protection monitor
The alarm will be triggered if there are move-
ments detected in the vehicle interior or if there
is a change in the vehicle angle.
If you leave persons/animals in the vehicle or
have the vehicle transported, switch off the >
Page 27 of 280
8S1012721BE
Opening and closing
interior/towing protection monitoring alarm to
prevent the alarm from being triggered:
> Press the fj button on the remote control key a
second time within 2 seconds. Or
> Applies to: vehicles with convenience key:
Touch the sensor on the door handle a second
time within two seconds. Or
> Turn the mechanical key in the door lock to the
close position a second time within two sec-
onds.
> If you lock the vehicle, then the interior/towing
protection monitor will stay off until the next
time the vehicle is unlocked.
@) Tips
The interior/towing protection monitoring on-
ly functions correctly when the windows and
the power top* are closed.
Luggage compartment
lid
Opening and closing the luggage
compartment lid
BFV-0069
Applies to: Coupe
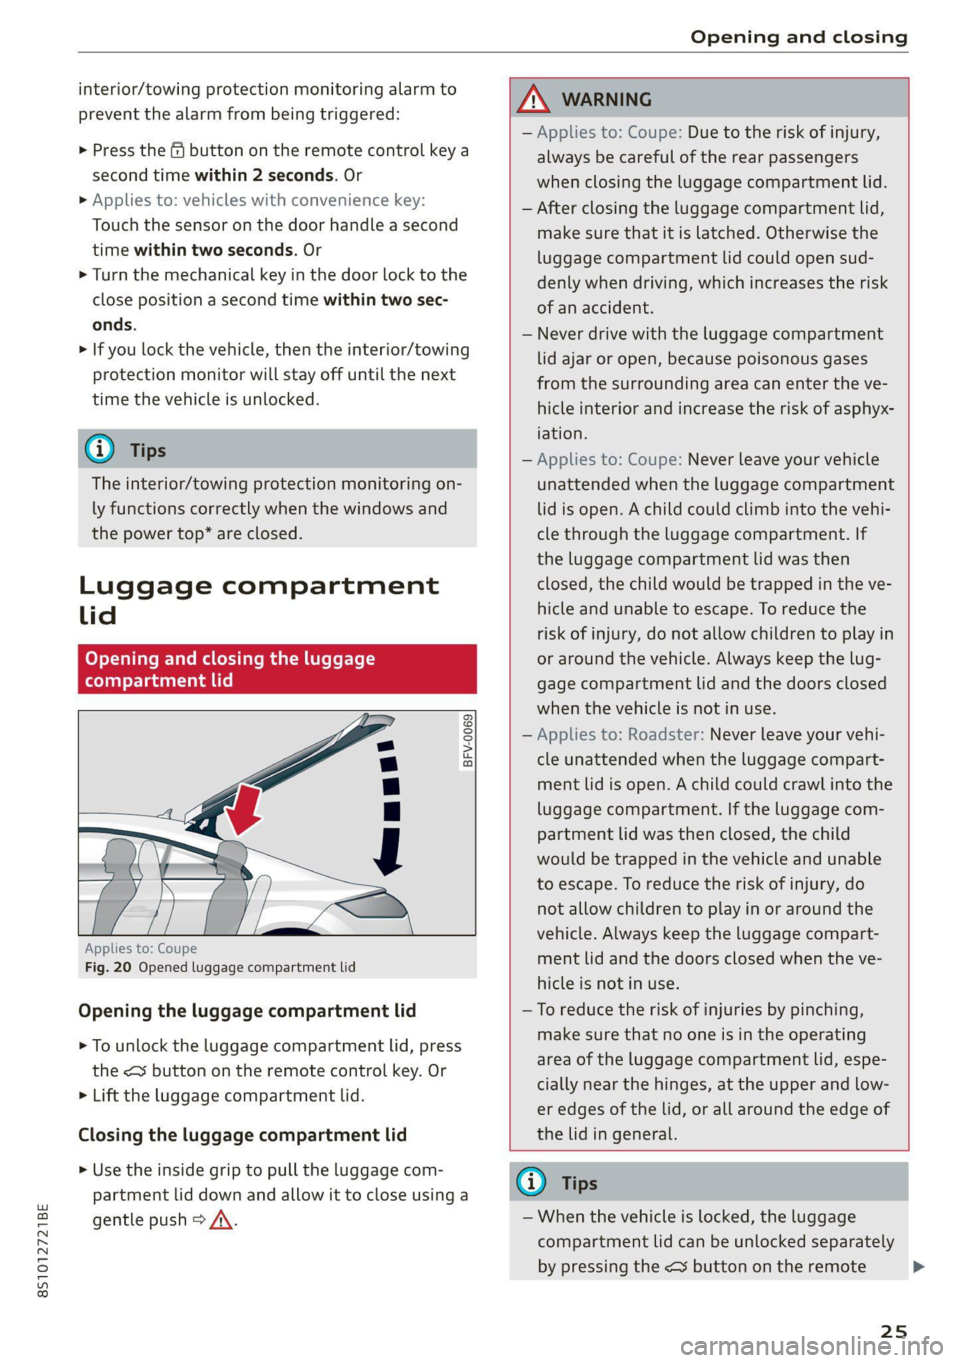
Fig. 20 Opened luggage compartment lid
Opening the luggage compartment lid
> To unlock the luggage compartment lid, press
the < button on the remote control key. Or
> Lift the luggage compartment lid.
Closing the luggage compartment lid
> Use the inside grip to pull the luggage com-
partment lid down and allow it to close using a
gentle push > /\.
ZA WARNING
— Applies to: Coupe: Due to the risk of injury,
always be careful of the rear passengers
when closing the luggage compartment lid.
— After closing the luggage compartment lid,
make sure that it is latched. Otherwise the
luggage compartment lid could open sud-
denly when driving, which increases the risk
of an accident.
— Never drive with the luggage compartment
lid ajar or open, because poisonous gases
from the surrounding area can enter the ve-
hicle interior and increase the risk of asphyx-
iation.
— Applies to: Coupe: Never leave your vehicle
unattended when the luggage compartment
lid is open. A child could climb into the vehi-
cle through the luggage compartment. If
the luggage compartment lid was then
closed, the child would be trapped in the ve-
hicle and unable to escape. To reduce the
risk of injury, do not allow children to play in
or around the vehicle. Always keep the lug-
gage compartment lid and the doors closed
when the vehicle is not in use.
— Applies to: Roadster: Never leave your vehi-
cle unattended when the luggage compart-
ment lid is open. A child could crawl into the
luggage compartment. If the luggage com-
partment lid was then closed, the child
would be trapped in the vehicle and unable
to escape. To reduce the risk of injury, do
not allow children to play in or around the
vehicle. Always keep the luggage compart-
ment lid and the doors closed when the ve-
hicle is not in use.
—To reduce the risk of injuries by pinching,
make sure that no one is in the operating
area of the luggage compartment lid, espe-
cially near the hinges, at the upper and low-
er edges of the lid, or all around the edge of
the lid in general.
@ Tips
— When the vehicle is locked, the luggage
compartment lid can be unlocked separately
by pressing the <3 button on the remote
25
>
Page 33 of 280
8S1012721BE
Power top
Power top
Automatic power top
(eT e @eleurlsela)
Applies to: vehicles with power top
The power top opens and closes automatically.
When open, the power top is stored completely
in the power top compartment. The power top
can be opened or closed at speeds up to 30 mph
(50 km/h). The power top will not open when the
temperature is below 5 °F (-15 °C).
Under normal conditions, the power top is wind-
and waterproof. In rare cases, small droplets of
water may form under extreme weather condi-
tions, such as torrential or prolonged rain. That is
normal and no cause for concern.
Follow
the care instructions to keep the power
top free of leaks and to maintain its appearance
=> page 236, Care and cleaning. Also observe the
following:
— Open and stow the power top only when it is
clean and dry. Stowing the power top when it is
damp can create imprints in it, and mildew and
other damage can result if it is left stowed
while damp for long periods of time.
— To prevent scratching or damaging the power
top, do not use any sharp-edged objects to re-
move ice and snow. The rear window may be
cleared of ice with a standard ice scraper.
— Do not leave the power top open for several
weeks or the creases in it may become discol-
ored.
— Do not open the power top when the tempera-
ture is below 32 °F (0 °C). The fabric in the
power top loses elasticity in sub-zero tempera-
tures.
Opening and closing the power top
Applies to: vehicles with power top
toad a
> im o
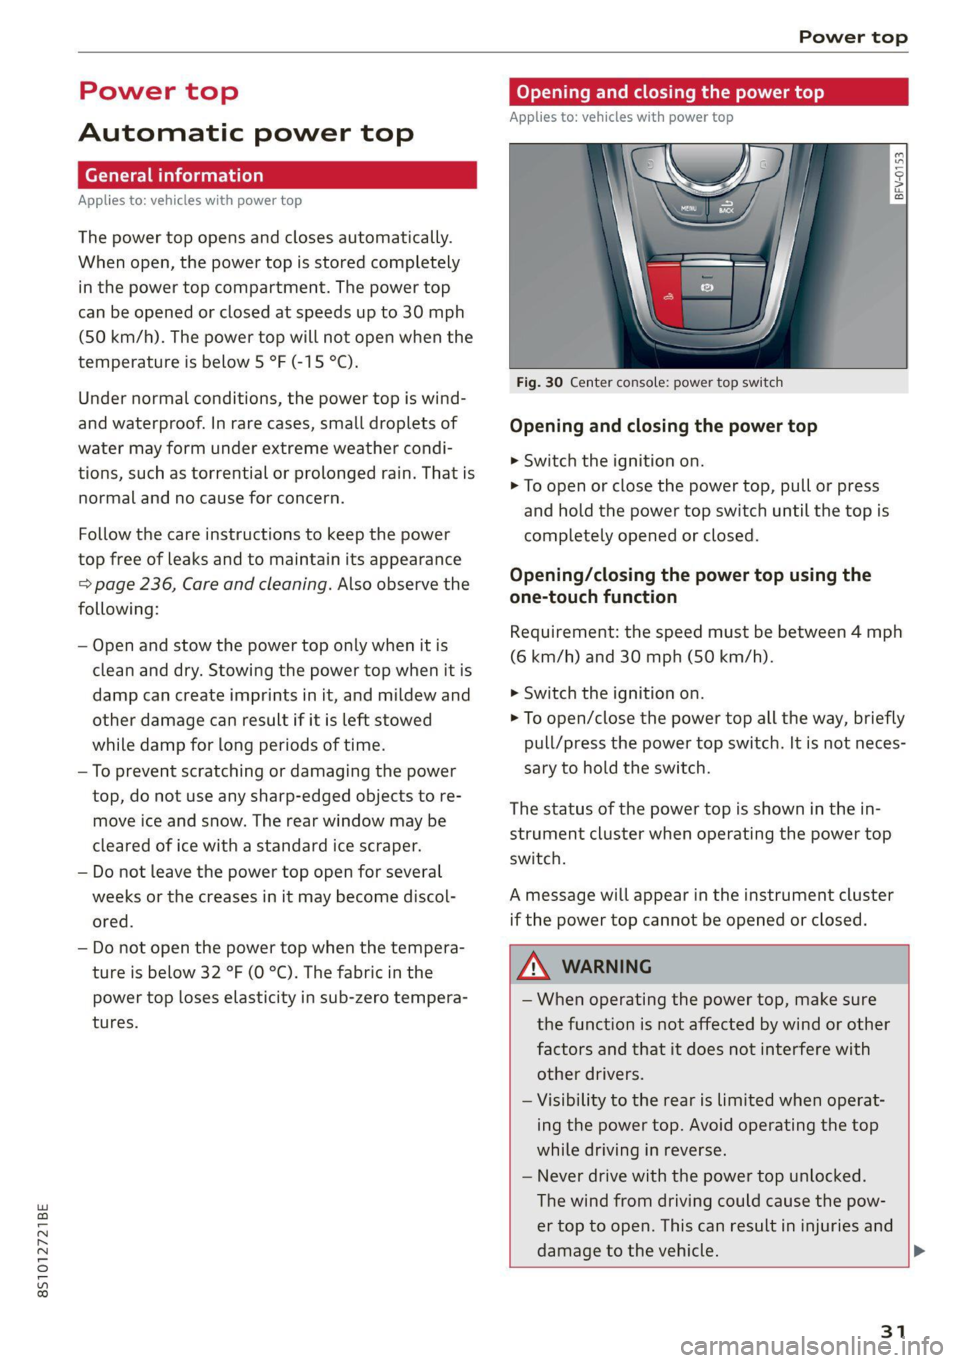
Fig. 30 Center console: power top switch
Opening and closing the power top
> Switch the ignition on.
> To open or close the power top, pull or press
and hold the power top switch until the top is
completely opened or closed.
Opening/closing the power top using the
one-touch function
Requirement: the speed must be between 4 mph
(6 km/h) and 30 mph (50 km/h).
>» Switch the ignition on.
> To open/close the power top all the way, briefly
pull/press the power top switch. It is not neces-
sary to hold the switch.
The status of the power top is shown in the in-
strument cluster when operating the power top
switch.
A message will appear in the instrument cluster
if the power top cannot be opened or closed.
A WARNING
— When operating the power top, make sure
the function is not affected by wind or other
factors and that it does not interfere with
other drivers.
— Visibility to the rear is limited when operat-
ing the power top. Avoid operating the top
while driving in reverse.
— Never drive with the power top unlocked.
The wind from driving could cause the pow-
er top to open. This can result in injuries and
damage to the vehicle. >
31
Page 38 of 280
Lights and Vision
Lights and Vision
Exterior lighting
Switching the lights on and off
B8V-0430
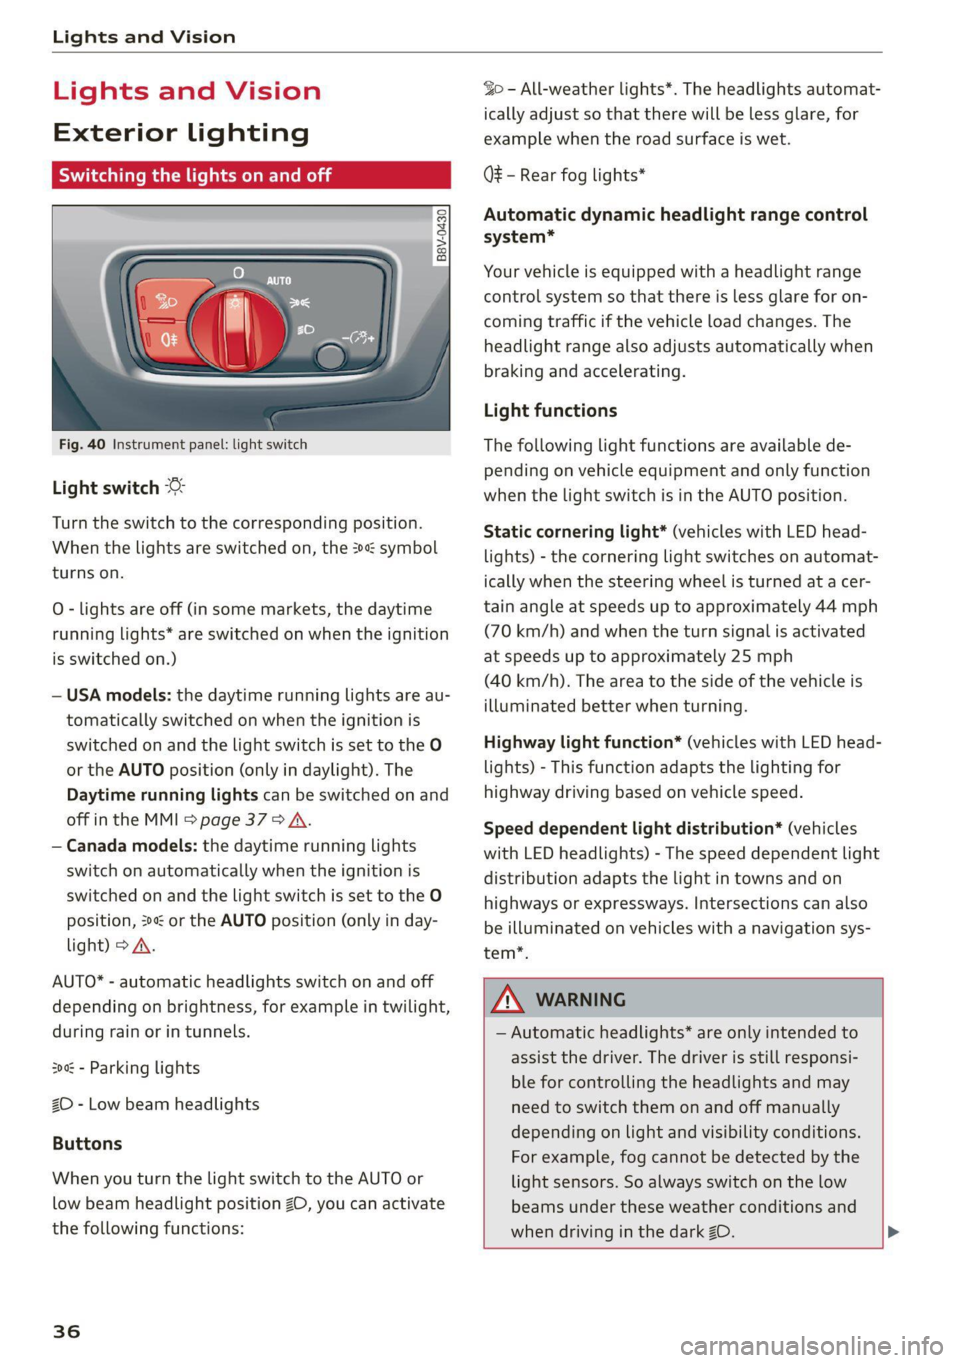
Fig. 40 Instrument panel: light switch
Light switch ©
Turn the switch to the corresponding position.
When the lights are switched on, the »« symbol
turns on.
O - lights are off (in some markets, the daytime
running lights* are switched on when the ignition
is switched on.)
— USA models: the daytime running lights are au-
tomatically switched on when the ignition is
switched on and the light switch is set to the O
or the AUTO position (only in daylight). The
Daytime running lights can be switched on and
off in the MMI > page 37 > A.
— Canada models: the daytime running lights
switch on automatically when the ignition is
switched on and the light switch is set to the O
position, 24 or the AUTO position (only in day-
light) > A.
AUTO* - automatic headlights switch on and off
depending on brightness, for example in twilight,
during rain or in tunnels.
30a - Parking lights
2D - Low beam headlights
Buttons
When you turn the light switch to the AUTO or
low beam headlight position 20, you can activate
the following functions:
36
So - All-weather lights*. The headlights automat-
ically adjust so that there will be less glare, for
example when the road surface is wet.
Q# - Rear fog lights*
Automatic dynamic headlight range control
system*
Your vehicle is equipped with a headlight range
control system so that there is less glare for on-
coming traffic if the vehicle load changes. The
headlight range also adjusts automatically when
braking and accelerating.
Light functions
The following light functions are available de-
pending on vehicle equipment and only function
when the light switch is in the AUTO position.
Static cornering light* (vehicles with LED head-
lights) - the cornering light switches on automat-
ically when the steering wheel is turned at a cer-
tain angle at speeds up to approximately 44 mph
(70 km/h) and when the turn signal is activated
at speeds up to approximately 25 mph
(40 km/h). The area to the side of the vehicle is
illuminated better when turning.
Highway light function* (vehicles with LED head-
lights) - This function adapts the lighting for
highway driving based on vehicle speed.
Speed dependent light distribution* (vehicles
with LED headlights) - The speed dependent light
distribution adapts the light in towns and on
highways or expressways. Intersections can also
be illuminated on vehicles with a navigation sys-
tem*.
ZA WARNING
— Automatic headlights* are only intended to
assist the driver. The driver is still responsi-
ble for controlling the headlights and may
need to switch them on and off manually
depending on light and visibility conditions.
For example, fog cannot be detected by the
light sensors. So always switch on the low
beams under these weather conditions and
when driving in the dark ZO. >
Page 40 of 280
Lights and Vision
Daytime running lights
USA models: the daytime running lights can be
switched on or off using the MMI. Select On or
Off.
Canada models: this function cannot be switched
off. They activate automatically each time the ig-
nition is switched on. This menu item is shown
with a “gray background”.
Entry/exit lighting
The Entry/exit lighting illuminates the area
around the vehicle when the vehicle is unlocked
or when the driver’s door is opened while the ig-
nition is off. The entry/exit lighting works when it
is dark and the light switch is in the AUTO posi-
tion. The front and rear daytime running lights*
switch on automatically each time the vehicle is
unlocked regardless of how bright it is outside
the vehicle.
Emergency flashers
a 2 3 g
g|
z a.
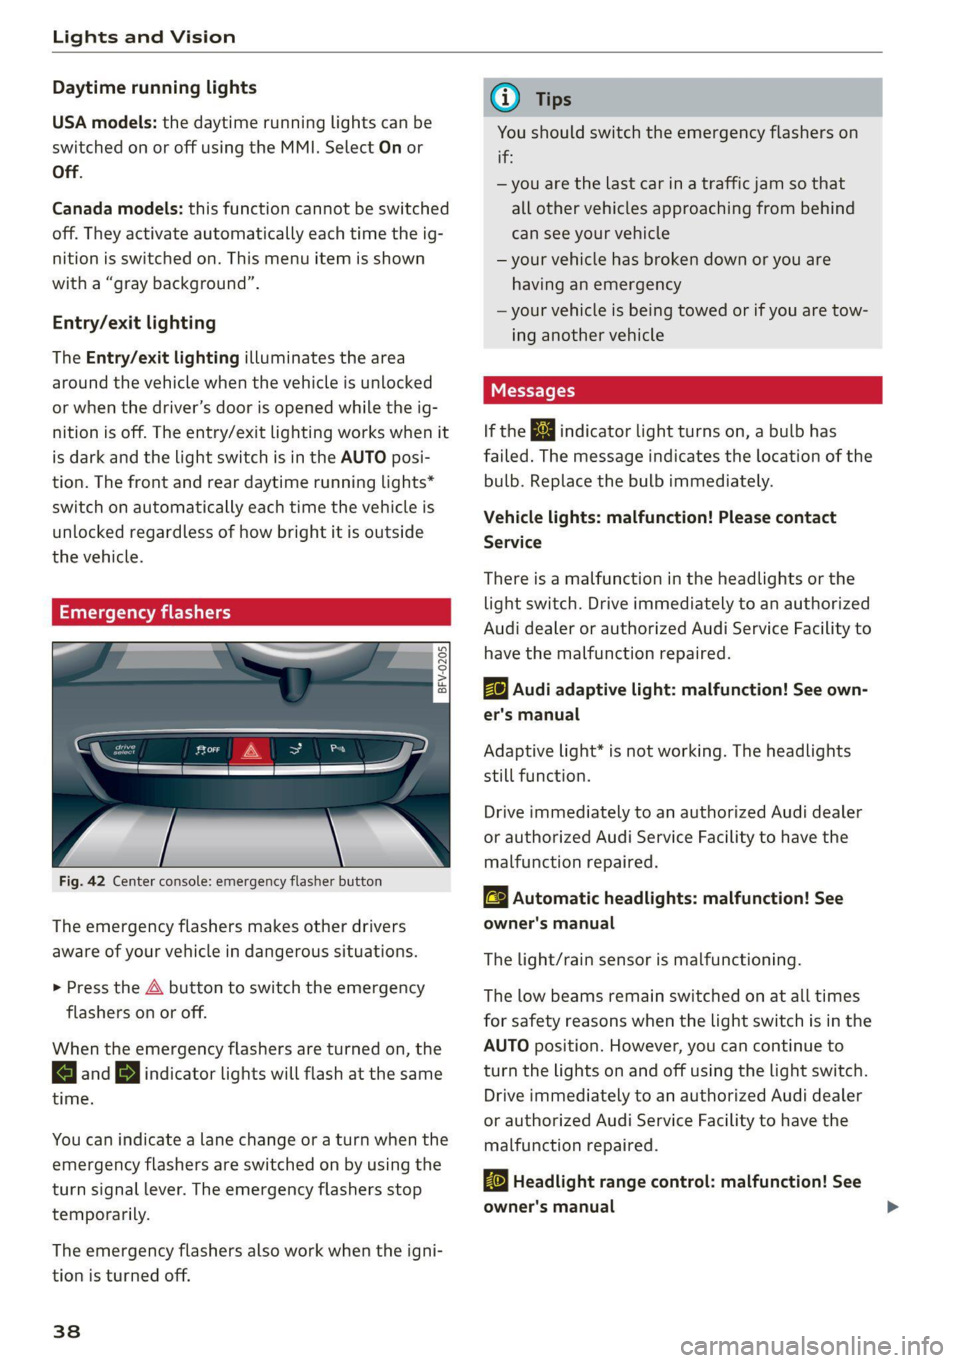
Fig. 42 Center console: emergency flasher button
The emergency flashers makes other drivers
aware of your vehicle in dangerous situations.
> Press the A button to switch the emergency
flashers on or off.
When the emergency flashers are turned on, the
a and B indicator lights will flash at the same
time.
You can indicate a lane change or a turn when the
emergency flashers are switched on by using the
turn signal lever. The emergency flashers stop
temporarily.
The emergency flashers also work when the igni-
tion is turned off.
38
G) Tips
You should switch the emergency flashers on
if:
— you are the last car in a traffic jam so that
all other vehicles approaching from behind
can see your vehicle
— your vehicle has broken down or you are
having an emergency
—your vehicle is being towed or if you are tow-
ing another vehicle
Messages
If the & indicator light turns on, a bulb has
failed. The message indicates the location of the
bulb. Replace the bulb immediately.
Vehicle lights: malfunction! Please contact
Service
There is a malfunction in the headlights or the
light switch. Drive immediately to an authorized
Audi dealer or authorized Audi Service Facility to
have the malfunction repaired.
Bg) Audi adaptive light: malfunction! See own-
er's manual
Adaptive light* is not working. The headlights
still function.
Drive immediately to an authorized Audi dealer
or authorized Audi Service Facility to have the
malfunction repaired.
a Automatic headlights: malfunction! See
owner's manual
The light/rain sensor is malfunctioning.
The low beams remain switched on at all times
for safety reasons when the light switch is in the
AUTO position. However, you can continue to
turn the lights on and off using the light switch.
Drive immediately to an authorized Audi dealer
or authorized Audi Service Facility to have the
malfunction repaired.
Ba Headlight range control: malfunction! See
owner's manual
Page 41 of 280
8S1012721BE
Lights and Vision
There is a malfunction in the headlight range
control system, which may cause glare for other
drivers.
Drive to an authorized Audi dealer or authorized
Audi Service Facility immediately to have the
malfunction corrected.
Ww
— Light bulbs are pressurized and can explode
when they are replaced, which increases the
risk of injury.
—To reduce the risk of fatal injury, the high-
voltage component on HID headlights (xe-
non lights) must be handled correctly.
Interior lighting
Interior lighting
BFV-0181
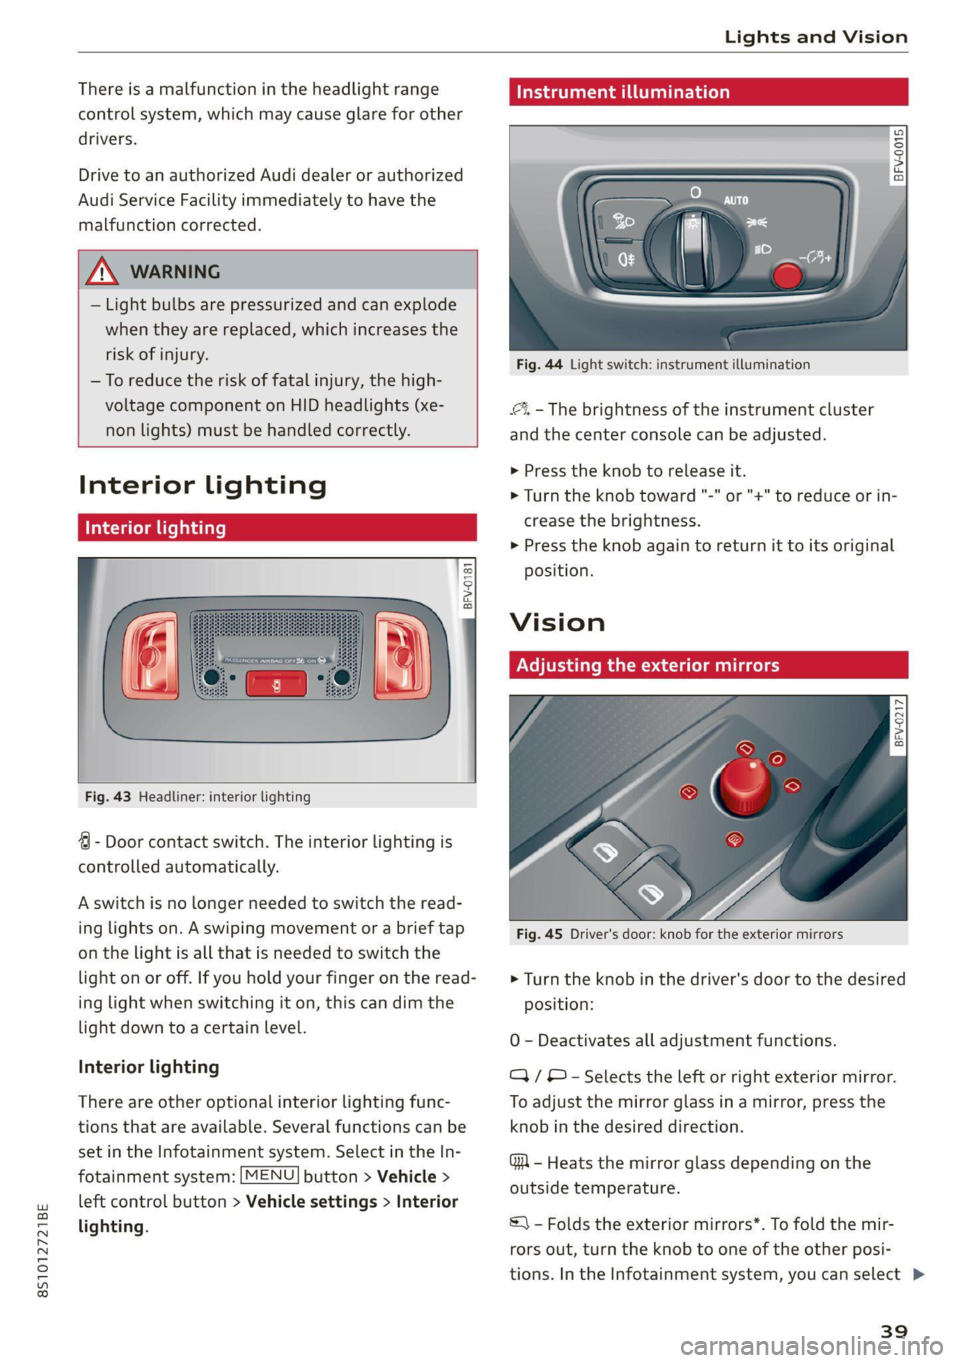
Fig. 43 Headliner: interior lighting
4 - Door contact switch. The interior lighting is
controlled automatically.
A switch is no longer needed to switch the read-
ing lights on. A swiping movement or a brief tap
on the light is all that is needed to switch the
light on or off. If you hold your finger on the read-
ing light when switching it on, this can dim the
light down to a certain level.
Interior lighting
There are other optional interior lighting func-
tions that are available. Several functions can be
set in the Infotainment system. Select in the In-
fotainment system: [MENU] button > Vehicle >
left control button > Vehicle settings > Interior
lighting.
Instrument i
a
Ss
g 3 a o
Fig. 44 Light switch: instrument illumination
4%, - The brightness of the instrument cluster
and the center console can be adjusted.
> Press the knob to release it.
> Turn the knob toward "-" or "+" to reduce or in-
crease the brightness.
> Press the knob again to return it to its original
Position.
Vision
Adjusting the exterior mirrors
| BFv-0217|
Fig. 45 Driver's door: knob for the exterior mirrors
> Turn the knob in the driver's door to the desired
position:
0 - Deactivates all adjustment functions.
/ © - Selects the left or right exterior mirror.
To adjust the mirror glass in a mirror, press the
knob in the desired direction.
GA - Heats the mirror glass depending on the
outside temperature.
S\ - Folds the exterior mirrors*. To fold the mir-
rors out, turn the knob to one of the other posi-
tions. In the Infotainment system, you can select >
39
Page 43 of 280
8S1012721BE
Lights and Vision
® Tips
— If the light reaching the rearview mirror is
obstructed, the automatic dimming mirror
will not function correctly,
— The automatic dimming mirrors do not dim
when the interior lighting is turned on or
the reverse gear is selected.
ry Ss cd
> c
o
Fig. 46 Roof headliner: sun visor
Applies to: vehicles with pivoting sun visors: The
sun visors can be pulled out of their brackets and
turned toward the doors (4).
The vanity mirrors on the sun visors have covers.
Slide the cover in the direction of the arrow (2).
Applies to: vehicles with mirror lighting: The mir-
ror lighting switches on when the cover opens.
Windshield wipers
Switching the windshield wipers on
BFV-0019
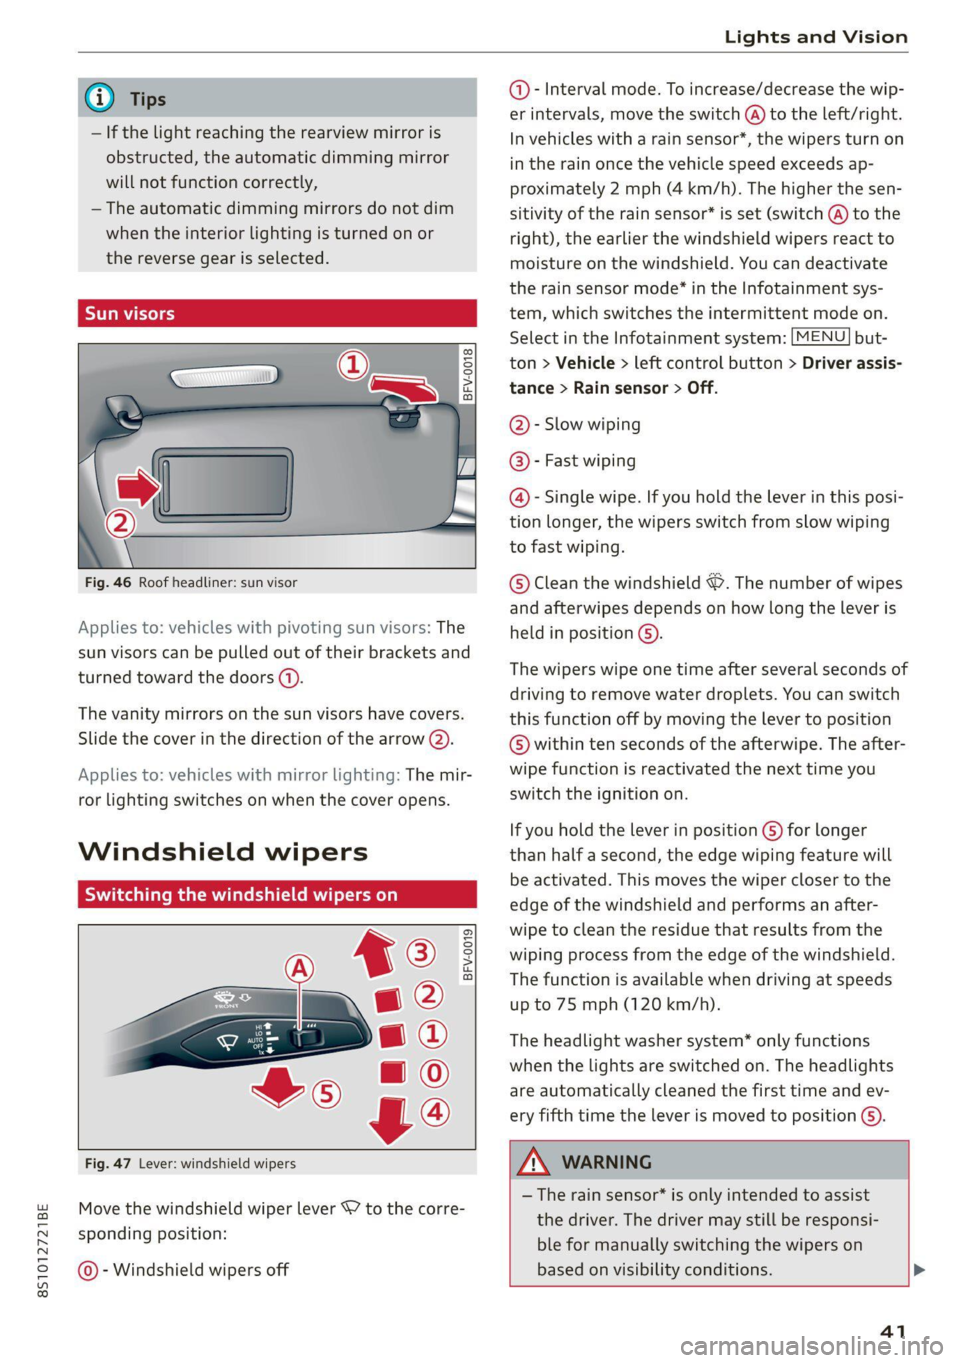
Fig. 47 Lever: windshield wipers
Move the windshield wiper lever SY to the corre-
sponding position:
@ - Windshield wipers off
@- Interval mode. To increase/decrease the wip-
er intervals, move the switch @ to the left/right.
In vehicles with a rain sensor*, the wipers turn on
in the rain once the vehicle speed exceeds ap-
proximately 2 mph (4 km/h). The higher the sen-
sitivity of the rain sensor* is set (switch @) to the
right), the earlier the windshield wipers react to
moisture on the windshield. You can deactivate
the rain sensor mode®* in the Infotainment sys-
tem, which switches the intermittent mode on.
Select in the Infotainment system: [MENU] but-
ton > Vehicle > left control button > Driver assis-
tance > Rain sensor > Off.
@- Slow wiping
@®- Fast wiping
@- Single wipe. If you hold the lever in this posi-
tion longer, the wipers switch from slow wiping
to fast wiping.
© Clean the windshield &. The number of wipes
and afterwipes depends on how long the lever is
held in position ©).
The wipers wipe one time after several seconds of
driving to remove water droplets. You can switch
this function off by moving the lever to position
© within ten seconds of the afterwipe. The after-
wipe function is reactivated the next time you
switch the ignition on.
If you hold the lever in position ) for longer
than half a second, the edge wiping feature will
be activated. This moves the wiper closer to the
edge of the windshield and performs an after-
wipe to clean the residue that results from the
wiping process from the edge of the windshield.
The function is available when driving at speeds
up to 75 mph (120 km/h).
The headlight washer system” only functions
when the lights are switched on. The headlights
are automatically cleaned the first time and ev-
ery fifth time the lever is moved to position ©).
ZX WARNING
— The rain sensor* is only intended to assist
the driver. The driver may still be responsi-
ble for manually switching the wipers on
based on visibility conditions.
41
Page 44 of 280
Lights and Vision
— The windshield must not be treated with
water-repelling windshield coating agents.
Under unfavorable conditions, such as wet-
ness, darkness, and when the sun is low,
these coatings can cause increased glare,
which increases the risk of an accident. They
can also cause wiper blade chatter.
— Properly functioning windshield wiper
blades are required for a clear view and safe
driving > page 42, Replacing windshield
wiper blades.
> Place the windshield wiper arms in the service
position > page 42.
> Fold the windshield wiper arms away from the
windshield.
ZX WARNING
Dirty windshield wiper blades can impair vi-
sion, which increases the risk of an accident.
Replacing windshield wiper blades
@) Note
— If there is frost, make sure the windshield
wiper blades are not frozen to the wind-
shield. Switching on the windshield wipers
when the blades are frozen to the wind-
shield can damage the wiper blades.
— The windshield wiper system must be
switched off (lever in position 0) before us-
ing a car wash. This prevents the wipers
from switching on unintentionally and caus-
ing damage to the windshield wiper system.
@ Tips
— The windshield wipers switch off when the
ignition is switched off. You can activate the
windshield wipers after the ignition is
switched on again by moving the windshield
wiper lever to any position.
— Worn or dirty windshield wiper blades result
in streaking. This can affect the rain sensor*
function. Check your windshield wiper
blades regularly.
— The washer fluid nozzles in the windshield
washer system are heated* at low tempera-
tures when the ignition is on.
— When stopping temporarily, such as ata
traffic light, the speed of the windshield
wipers automatically reduces by one level.
Cleaning windshield wiper blades
Clean the wiper blades when you see wiper
streaks. Clean the wiper blades with a soft towel
and glass cleaner.
42
B8R-0379
A
> 2
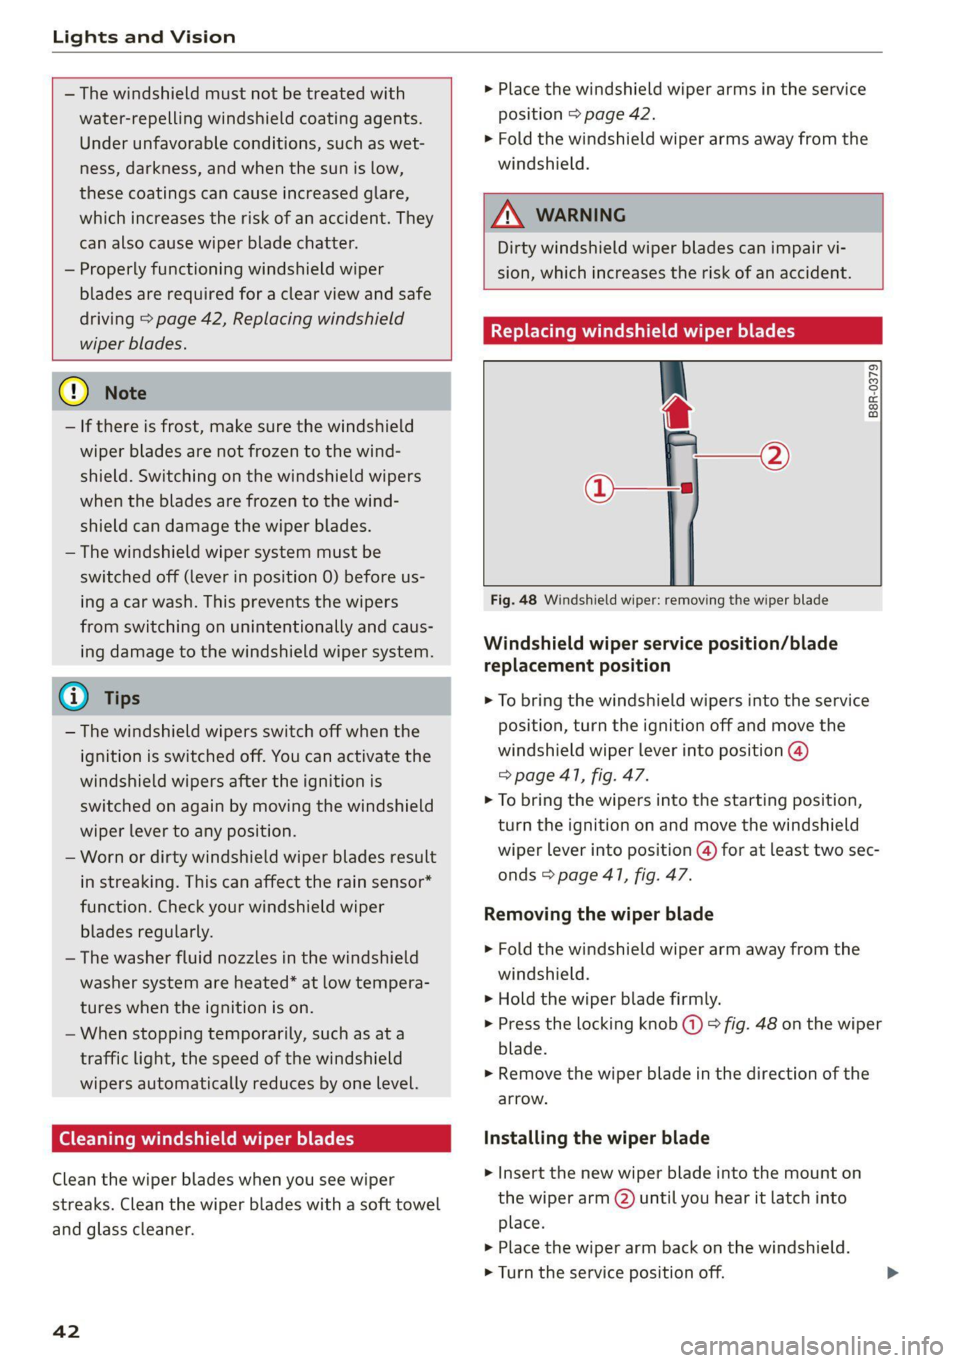
Fig. 48 Windshield wiper: removing the wiper blade
Windshield wiper service position/blade
replacement position
> To bring the windshield wipers into the service
position, turn the ignition off and move the
windshield wiper lever into position @)
=> page 41, fig. 47.
> To bring the wipers into the starting position,
turn the ignition on and move the windshield
wiper lever into position (@) for at least two sec-
onds & page 41, fig. 47.
Removing the wiper blade
> Fold the windshield wiper arm away from the
windshield.
> Hold the wiper blade firmly.
> Press the locking knob (+) > fig. 48 on the wiper
blade.
> Remove the wiper blade in the direction of the
arrow.
Installing the wiper blade
> Insert the new wiper blade into the mount on
the wiper arm () until you hear it latch into
place.
>» Place the wiper arm back on the windshield.
> Turn the service position off.
Page 59 of 280
8S1012721BE
Sitting correctly and safely
Always make sure the indicator light corresponds
to the occupancy of the front passenger's seat.
— An adult or individual of similar size in the
front passenger's seat: the front passenger's
airbag must be activated, therefore
PASSENGER AIR BAG ON @ must remain
turned on.
— An individual of smaller size (for example, an
adolescent or small adult) in the front pas-
senger's seat: the front passenger's airbag
must be activated, so
PASSENGER AIR BAG ON ® must stay on.
— Child in a child safety seat on the front pas-
senger's seat: the front passenger's airbag
must be deactivated, so
PASSENGER AIR BAG OFF #; must stay on.
— Front passenger's seat not occupied: the front
passenger's airbag must be deactivated, so
PASSENGER AIR BAG OFF $; must stay on.
Z\ WARNING
— An adult or a person with a small stature
(such as a young person or small adult) seat-
ed on the front passenger's seat will not be
protected by the passenger's airbag in the
event of a collision if the passenger's airbag
is deactivated. This increases the risk of in-
jury and death. Always make sure that
PASSENGER AIR BAG ON @ remains on
while driving. If
PASSENGER AIR BAG ON @ does not
turn on, make sure the front passenger is
sitting correctly in the seat > page 45 and
that there is nothing covering the front pas-
senger's seat (such as blankets or pillows). If
PASSENGER AIR BAG ON @ still does
not turn on, the front passenger's seat must
not be used. Drive to an authorized Audi
dealer or authorized Audi Service Facility
and have the airbag system inspected.
—Achild ina child safety seat on the front
passenger's seat - especially in a rear-facing
child safety seat - can receive a severe im-
pact if the front passenger's airbag deploys,
which increases the risk of serious or fatal
injury. Applies to Coupe: Always secure child
safety seats on the rear seats. If special cir-
cumstances require the use of a child safety
seat on the front passenger's seat, always
make sure that
PASSENGER AIR BAG OFF &%; stays on
while driving. If
PASSENGER AIR BAG OFF #%; does not
turn on, remove the child safety seat and in-
stall it again according to the child safety
seat manufacturer instructions. If
PASSENGER AIR BAG OFF &%; still does
not turn on, the front passenger's seat must
not be used. Drive to an authorized Audi
dealer or authorized Audi Service Facility
and have the airbag system inspected.
— Fluids, electronic devices, or mechanical
damage on the front passenger's seat may
cause the front passenger seat occupant de-
tection to malfunction. The system may
then incorrectly detect if the front passeng-
er's seat is occupied. As a result, it could de-
ploy the front passenger’s airbag incorrectly
or fail to deploy it, which increases the risk
of serious or fatal injury. Make sure that no
wet objects (such as a wet hand towel) and
no fluids come into contact with the front
passenger's seat cushion. If the front pas-
senger's seat becomes wet, dry it immedi-
ately. Make sure no electronic devices (such
as a laptop or a retrofitted seat heater) are
on the front passenger's seat. Do not trans-
port any objects on or under the front pas-
senger's seat.
— Seat covers or protective covers may prevent
the advanced airbag system from correctly
detecting child safety seats or passengers in
the front passenger's seat. You must not use
seat covers or protective covers on the front
passenger's seat that are not specifically ap-
proved for use on Audi seats with an ad-
vanced airbag system.
Child safety seats
General information
When installing and using child safety seats, fol-
low the information in this Owner's Manual, the
applicable state and federal regulations, and the
manufacturer instructions for the child safety
seat.
57