car battery BMW X5 2011 E70 Owner's Manual
[x] Cancel search | Manufacturer: BMW, Model Year: 2011, Model line: X5, Model: BMW X5 2011 E70Pages: 312, PDF Size: 8.91 MB
Page 28 of 312
Opening and closing
26
Opening and closing
Keys/remote control
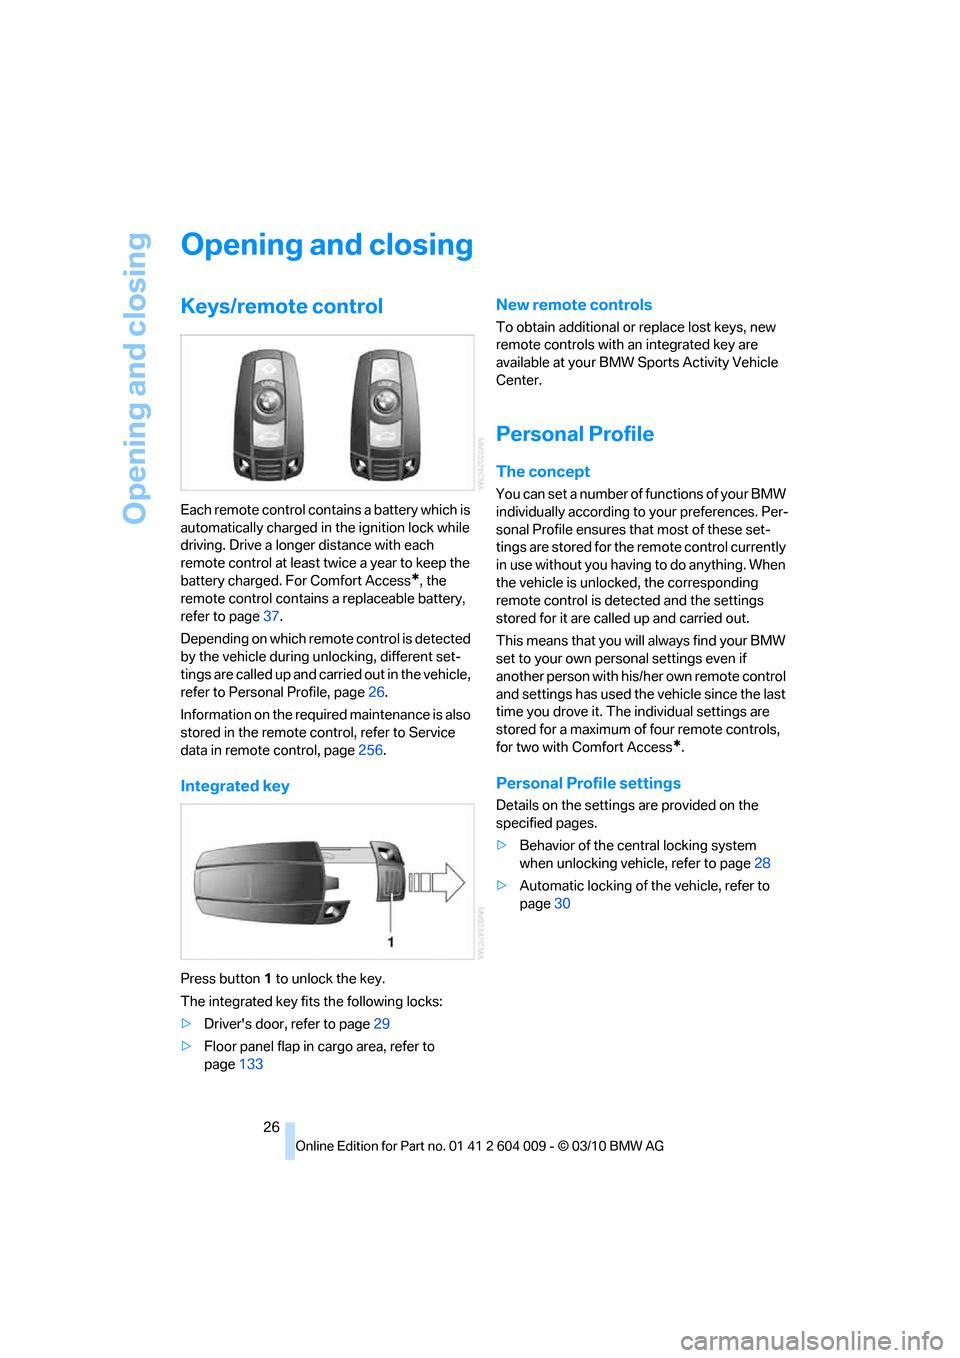
Each remote control contains a battery which is
automatically charged in the ignition lock while
driving. Drive a longer distance with each
remote control at least twice a year to keep the
battery charged. For Comfort Access
*, the
remote control contains a replaceable battery,
refer to page37.
Depending on which remote control is detected
by the vehicle during unlocking, different set-
tings are called up and carried out in the vehicle,
refer to Personal Profile, page26.
Information on the required maintenance is also
stored in the remote control, refer to Service
data in remote control, page256.
Integrated key
Press button1 to unlock the key.
The integrated key fits the following locks:
>Driver's door, refer to page29
>Floor panel flap in cargo area, refer to
page133
New remote controls
To obtain additional or replace lost keys, new
remote controls with an integrated key are
available at your BMW Sports Activity Vehicle
Center.
Personal Profile
The concept
You can set a number of functions of your BMW
individually according to your preferences. Per-
sonal Profile ensures that most of these set-
tings are stored for the remote control currently
in use without you having to do anything. When
the vehicle is unlocked, the corresponding
remote control is detected and the settings
stored for it are called up and carried out.
This means that you will always find your BMW
set to your own personal settings even if
another person with his/her own remote control
and settings has used the vehicle since the last
time you drove it. The individual settings are
stored for a maximum of four remote controls,
for two with Comfort Access
*.
Personal Profile settings
Details on the settings are provided on the
specified pages.
>Behavior of the central locking system
when unlocking vehicle, refer to page28
>Automatic locking of the vehicle, refer to
page30
Page 38 of 312
Opening and closing
36
Comparison with ordinary remote
control
You can control the functions mentioned previ-
ously with Comfort Access or by pressing the
buttons on the remote control. Therefore,
please familiarize yourself with the information
on opening and closing beginning on page26
beforehand.
The special features when using Comfort
Access are described in the following.
Should a short delay occur when opening
or closing the windows or the glass sun-
roof
*/panoramic glass sunroof*, the system
checks whether a remote control is located in
the vehicle. Please repeat opening or closing if
necessary.<
Releasing
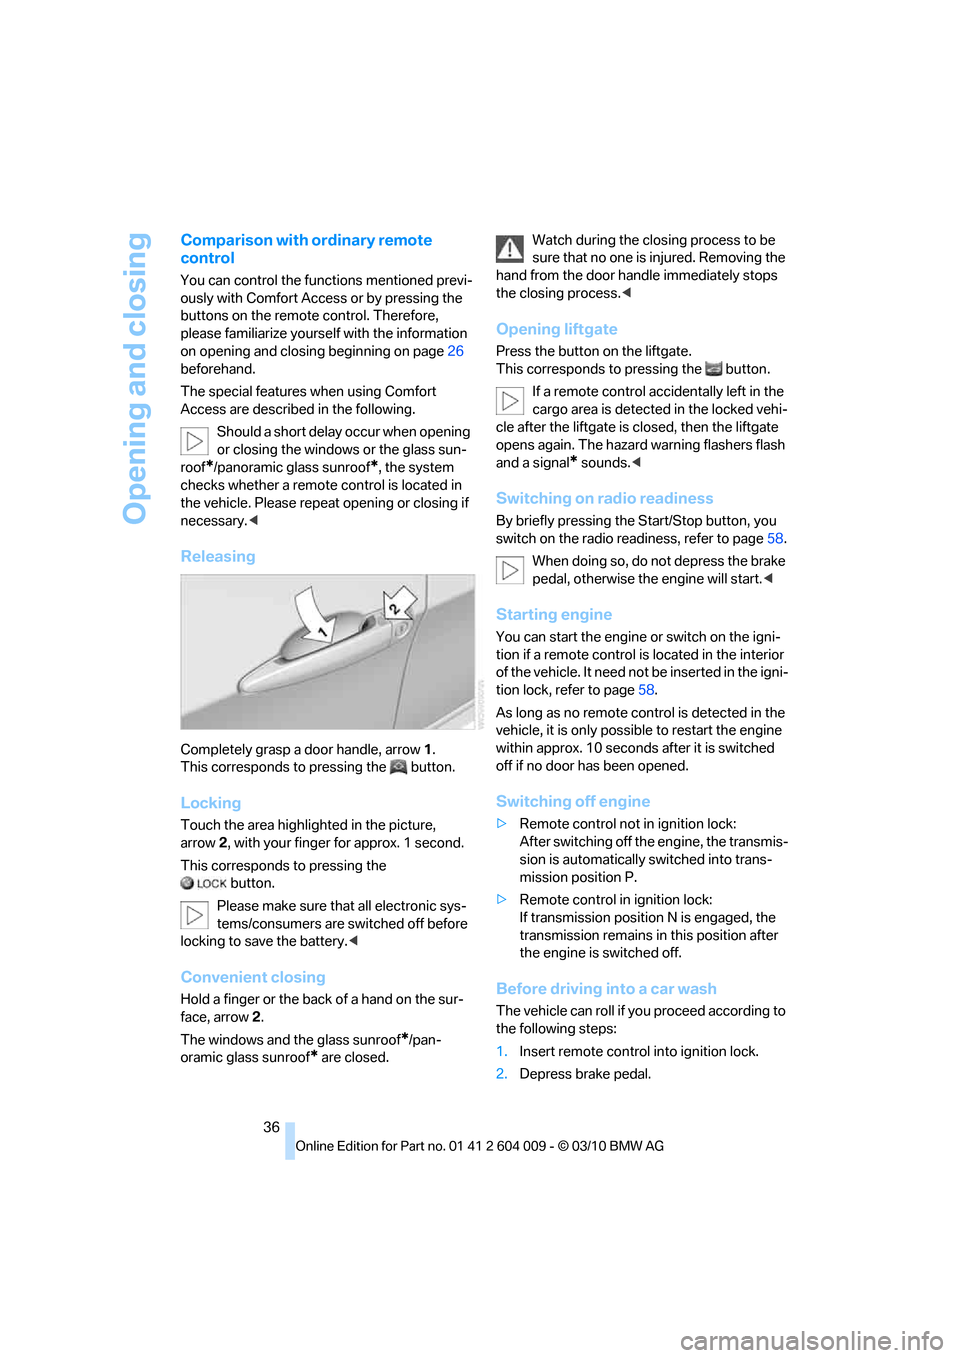
Completely grasp a door handle, arrow1.
This corresponds to pressing the button.
Locking
Touch the area highlighted in the picture,
arrow2, with your finger for approx. 1 second.
This corresponds to pressing the
button.
Please make sure that all electronic sys-
tems/consumers are switched off before
locking to save the battery.<
Convenient closing
Hold a finger or the back of a hand on the sur-
face, arrow2.
The windows and the glass sunroof
*/pan-
oramic glass sunroof
* are closed.Watch during the closing process to be
sure that no one is injured. Removing the
hand from the door handle immediately stops
the closing process.<
Opening liftgate
Press the button on the liftgate.
This corresponds to pressing the button.
If a remote control accidentally left in the
cargo area is detected in the locked vehi-
cle after the liftgate is closed, then the liftgate
opens again. The hazard warning flashers flash
and a signal
* sounds.<
Switching on radio readiness
By briefly pressing the Start/Stop button, you
switch on the radio readiness, refer to page58.
When doing so, do not depress the brake
pedal, otherwise the engine will start.<
Starting engine
You can start the engine or switch on the igni-
tion if a remote control is located in the interior
of the vehicle. It need not be inserted in the igni-
tion lock, refer to page58.
As long as no remote control is detected in the
vehicle, it is only possible to restart the engine
within approx. 10 seconds after it is switched
off if no door has been opened.
Switching off engine
>Remote control not in ignition lock:
After switching off the engine, the transmis-
sion is automatically switched into trans-
mission position P.
>Remote control in ignition lock:
If transmission position N is engaged, the
transmission remains in this position after
the engine is switched off.
Before driving into a car wash
The vehicle can roll if you proceed according to
the following steps:
1.Insert remote control into ignition lock.
2.Depress brake pedal.
Page 39 of 312
Controls
37Reference
At a glance
Driving tips
Communications
Navigation
Entertainment
Mobility
3.Engage transmission position N.
4.Release the parking brake.
5.Switch off the engine.
6.Leave the remote control in the ignition
lock.
Malfunction
The Comfort Access function may malfunction
due to local radio waves. Then open or close the
vehicle with the buttons on the remote control
or with a key. To start the engine following this,
insert the remote control in the ignition lock.
The warning lamp in the instrument
panel lights up when an attempt is
made to start the engine: starting the
engine is not possible. The remote control is
not in the vehicle or has a malfunction. Take
along the remote control into the vehicle or
have it checked. Insert another remote control
into the ignition lock if necessary.
The warning lamp in the instrument
panel lights up when the engine is
running: the remote control is no
longer in the vehicle. After switching off the
engine, the engine can only be started again
within approx. 10 seconds if no door has been
opened.
The indicator lamp in the instrument
panel lights up and a message
appears on the Control Display:
replace the battery of the remote control.
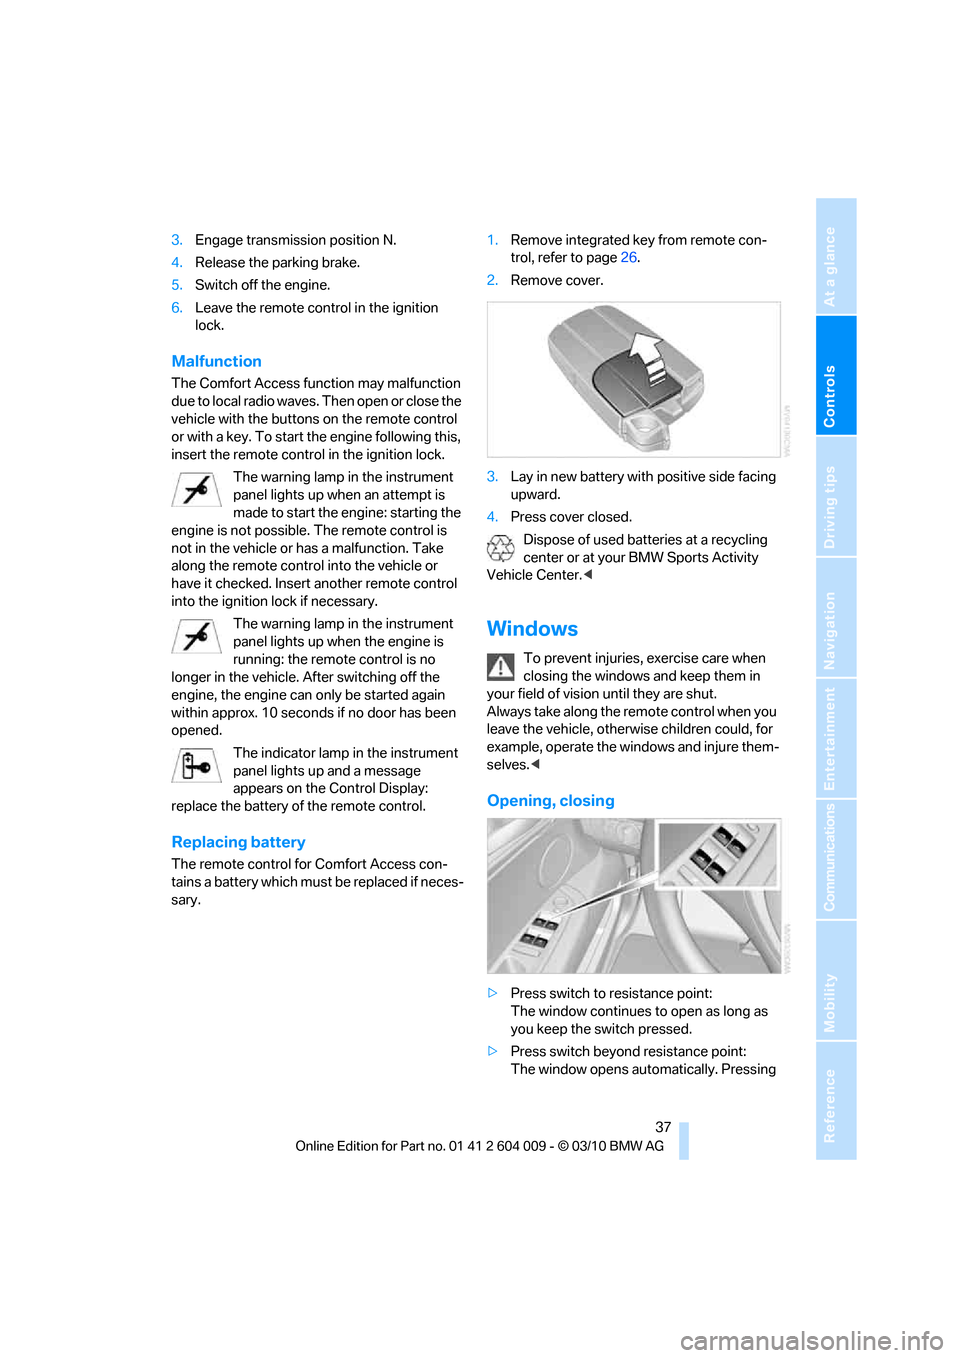
Replacing battery
The remote control for Comfort Access con-
tains a battery which must be replaced if neces-
sary.1.Remove integrated key from remote con-
trol, refer to page26.
2.Remove cover.
3.Lay in new battery with positive side facing
upward.
4.Press cover closed.
Dispose of used batteries at a recycling
center or at your BMW Sports Activity
Vehicle Center.<
Windows
To prevent injuries, exercise care when
closing the windows and keep them in
your field of vision until they are shut.
Always take along the remote control when you
leave the vehicle, otherwise children could, for
example, operate the windows and injure them-
selves.<
Opening, closing
>Press switch to resistance point:
The window continues to open as long as
you keep the switch pressed.
>Press switch beyond resistance point:
The window opens automatically. Pressing
Page 53 of 312
Controls
51Reference
At a glance
Driving tips
Communications
Navigation
Entertainment
Mobility
Active seat*
The seat cushion is actively varied by alter-
nately raising and lowering the right and left half
of the seat cushion. This reduces muscular ten-
sion and fatigue to help prevent lower back
pain.
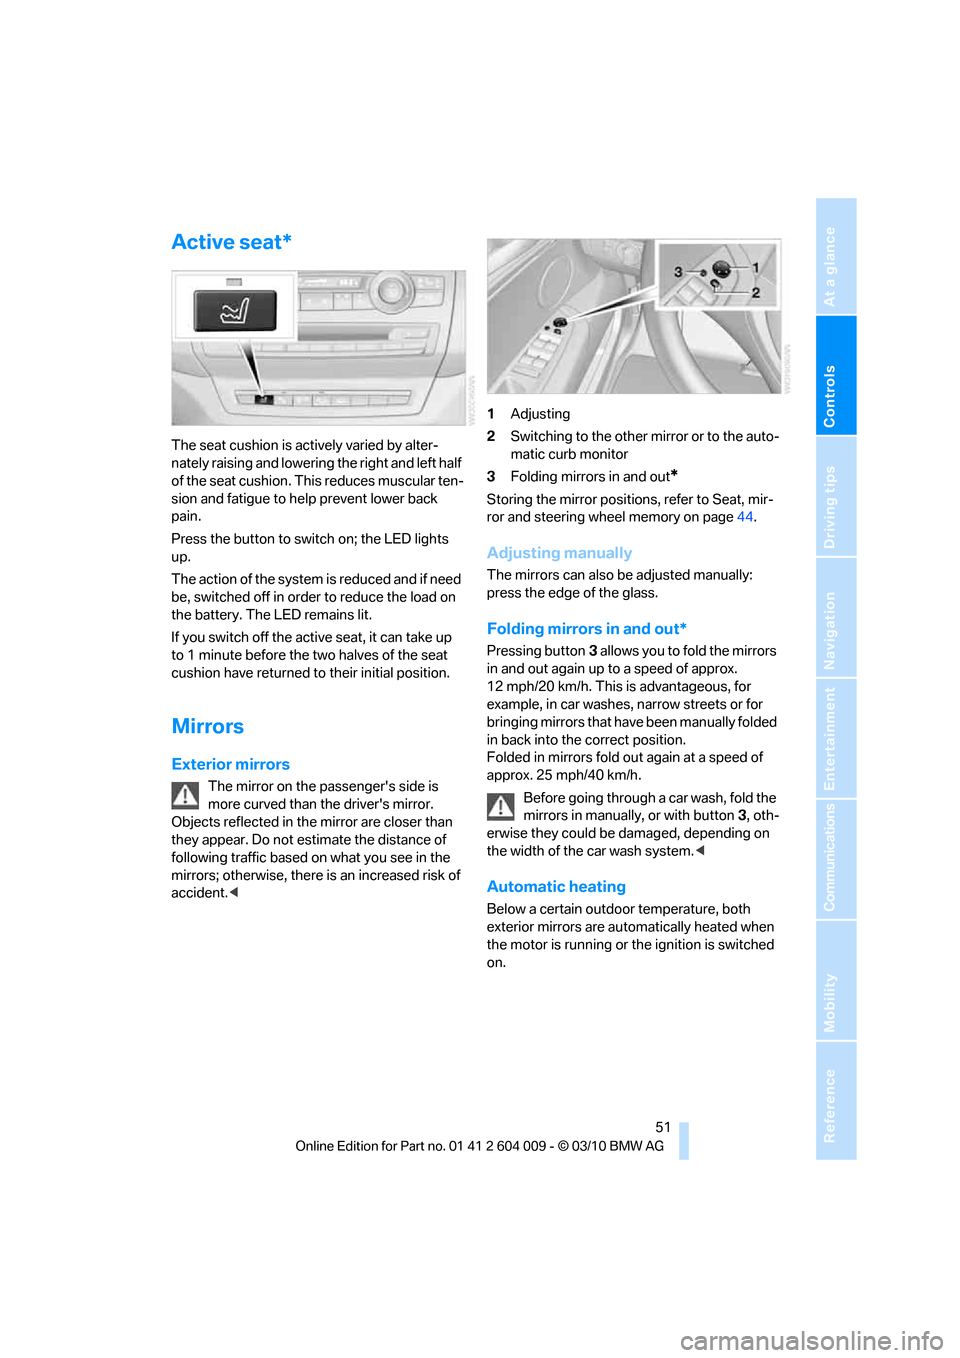
Press the button to switch on; the LED lights
up.
The action of the system is reduced and if need
be, switched off in order to reduce the load on
the battery. The LED remains lit.
If you switch off the active seat, it can take up
to 1 minute before the two halves of the seat
cushion have returned to their initial position.
Mirrors
Exterior mirrors
The mirror on the passenger's side is
more curved than the driver's mirror.
Objects reflected in the mirror are closer than
they appear. Do not estimate the distance of
following traffic based on what you see in the
mirrors; otherwise, there is an increased risk of
accident.<1Adjusting
2Switching to the other mirror or to the auto-
matic curb monitor
3Folding mirrors in and out
*
Storing the mirror positions, refer to Seat, mir-
ror and steering wheel memory on page44.
Adjusting manually
The mirrors can also be adjusted manually:
press the edge of the glass.
Folding mirrors in and out*
Pressing button3 allows you to fold the mirrors
in and out again up to a speed of approx.
12 mph/20 km/h. This is advantageous, for
example, in car washes, narrow streets or for
bringing mirrors that have been manually folded
in back into the correct position.
Folded in mirrors fold out again at a speed of
approx. 25 mph/40 km/h.
Before going through a car wash, fold the
mirrors in manually, or with button3, oth-
erwise they could be damaged, depending on
the width of the car wash system.<
Automatic heating
Below a certain outdoor temperature, both
exterior mirrors are automatically heated when
the motor is running or the ignition is switched
on.
Page 117 of 312
Controls
115Reference
At a glance
Driving tips
Communications
Navigation
Entertainment
Mobility
Instrument lighting
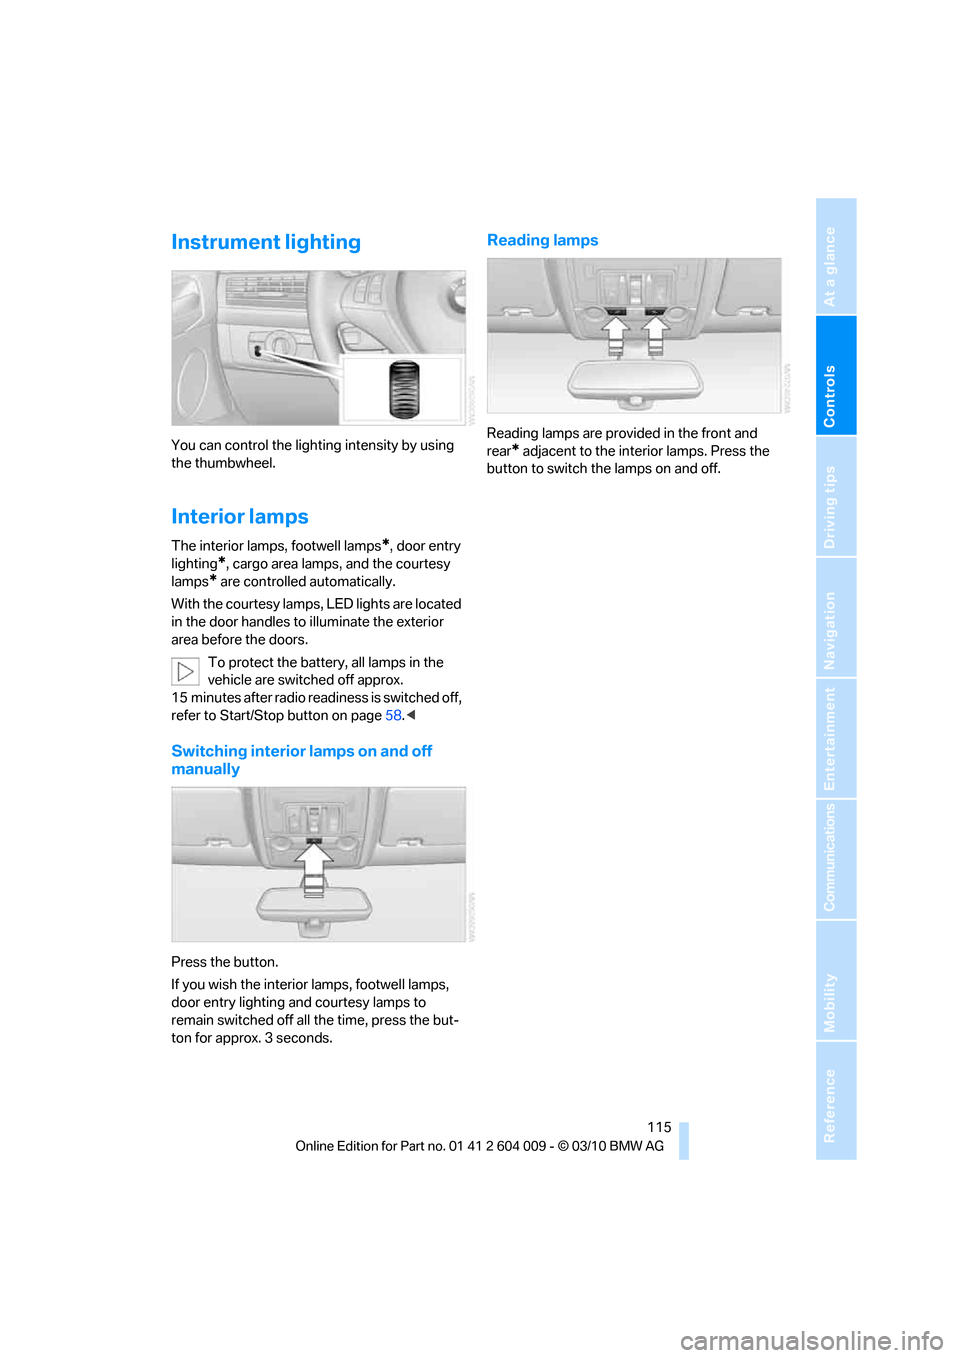
You can control the lighting intensity by using
the thumbwheel.
Interior lamps
The interior lamps, footwell lamps*, door entry
lighting
*, cargo area lamps, and the courtesy
lamps
* are controlled automatically.
With the courtesy lamps, LED lights are located
in the door handles to illuminate the exterior
area before the doors.
To protect the battery, all lamps in the
vehicle are switched off approx.
15 minutes after radio readiness is switched off,
refer to Start/Stop button on page58.<
Switching interior lamps on and off
manually
Press the button.
If you wish the interior lamps, footwell lamps,
door entry lighting and courtesy lamps to
remain switched off all the time, press the but-
ton for approx. 3 seconds.
Reading lamps
Reading lamps are provided in the front and
rear
* adjacent to the interior lamps. Press the
button to switch the lamps on and off.
Page 124 of 312
Climate
122
Air volume, manual
You can vary the air volume by
pressing on the corresponding
side. You can reactivate the auto-
matic mode for the air volume with the AUTO
button.
Switching off rear automatic climate
control
You can select the lowest blower
speed by pressing and holding the
left side. Pressing again switches
off the automatic climate control.
The automatic climate control can also be
switched off with iDrive. To switch on the
automatic climate control again, the system
must first be reactivated, refer to Activating/
deactivating.<
Y o u s w i t c h o n t h e s y s t e m a g a i n b y p r e s s i n g a n y
button of the rear automatic climate control.
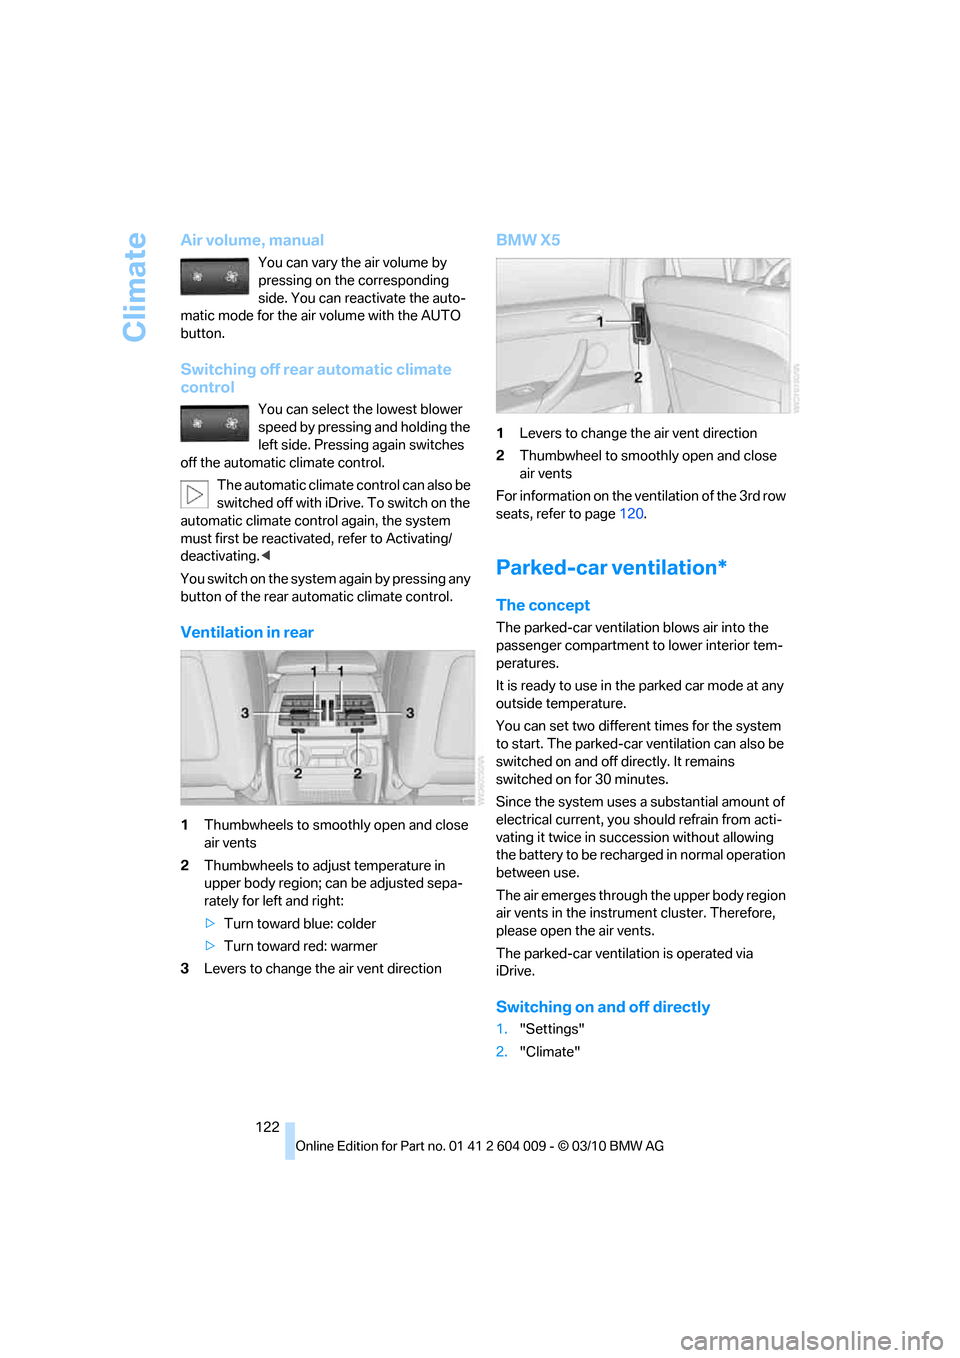
Ventilation in rear
1Thumbwheels to smoothly open and close
air vents
2Thumbwheels to adjust temperature in
upper body region; can be adjusted sepa-
rately for left and right:
>Turn toward blue: colder
>Turn toward red: warmer
3Levers to change the air vent direction
BMW X5
1Levers to change the air vent direction
2Thumbwheel to smoothly open and close
air vents
For information on the ventilation of the 3rd row
seats, refer to page120.
Parked-car ventilation*
The concept
The parked-car ventilation blows air into the
passenger compartment to lower interior tem-
peratures.
It is ready to use in the parked car mode at any
outside temperature.
You can set two different times for the system
to start. The parked-car ventilation can also be
switched on and off directly. It remains
switched on for 30 minutes.
Since the system uses a substantial amount of
electrical current, you should refrain from acti-
vating it twice in succession without allowing
the battery to be recharged in normal operation
between use.
The air emerges through the upper body region
air vents in the instrument cluster. Therefore,
please open the air vents.
The parked-car ventilation is operated via
iDrive.
Switching on and off directly
1."Settings"
2."Climate"
Page 214 of 312
Telephone
212
Telephone
The concept
Your BMW is equipped with a full preparation
package mobile phone. After pairing a suitable
mobile phone with the vehicle once, you can
operate the mobile phone using iDrive, the but-
tons on the steering wheel, or voice com-
mands
*.
Once a mobile phone has been paired with your
vehicle, it is automatically recognized as soon
as it is inside the vehicle while the engine is run-
ning or the ignition is switched on. The pairing
data of up to four mobile phones can be stored
simultaneously. If several mobile phones are
detected simultaneously, the respective last
mobile phone paired can be operated via the
vehicle.
Using a phone in your vehicle
Using snap-in adapter*
The so-called snap-in adapter, a mobile phone
cradle, enables the battery to be charged and
the mobile phone to be connected to the exter-
nal antenna of your vehicle. This ensures
improved network reception and a consistent
voice reproduction quality. Ask your BMW
Sports Activity Vehicle Center which mobile
phones snap-in adapters are offered for.
For your safety
A car phone makes life more convenient in
many ways, and can even save lives in an emer-
gency. While you should consult your mobile
phone's separate operating instructions for a
detailed description of safety precautions and
information, we request that you direct your
particular attention to the following:
Only make entries when the traffic situa-
tion allows you to do so. Do not hold the
mobile phone in your hand while you are driving;
use the hands-free system instead. If you do
not observe this precaution, your being dis-tracted can endanger vehicle occupants and
other road users.<
Suitable mobile phones
Please ask your BMW Sports Activity Vehicle
Center which mobile phones with Bluetooth
interface are supported by the mobile phone
preparation package and which mobile phones
are compatible with the snap-in adapter. By vir-
tue of their particular software versions, these
mobile phones support the functions described
in this Owner's Manual. Malfunctions can occur
with other mobile phones.
Operating options
You can operate the mobile phone using:
>Buttons on the steering wheel, refer to
page10
>iDrive, refer to page16
>Voice commands
*, refer to page219
>Programmable memory buttons, refer to
page20
Avoid operating a mobile phone detected by
the vehicle with the keypad of the mobile
phone, otherwise malfunctions can occur.
Commissioning
Pairing mobile phone in vehicle
The following prerequisites must be met:
>Compatible mobile phone: the mobile
phone is supported by the full mobile phone
preparation package. Information on this
subject is also provided on the Internet at:
www.bmw.com/bluetooth
>The mobile phone is ready to operate.
>Bluetooth has been activated in the vehicle,
refer to page214, and on the mobile phone.
*
Page 272 of 312
Replacing components
270 3.Position the new wheel or compact wheel.
Secure the wheel by screwing at least two
lug bolts into opposite bolt holes.
When you mount wheels other than Genu-
ine BMW light-alloy wheels, different lug
bolts may also be required.
4.Screw in the remaining lug bolts. Tighten all
the bolts securely in a diagonal pattern.
5.Lower the vehicle and remove the jack from
beneath the vehicle.
After mounting
1.Tighten the lug bolts in a diagonal pattern.
To ensure safety, always have the
lug bolts checked with a calibrated
torque wrench as soon as possible to
ensure that they are tightened to the speci-
fied torque. Otherwise, incorrectly tight-
ened lug bolts are a hidden safety risk. The
tightening torque is 101 lb ft/140 Nm.<
2.Stow the defective wheel in the cargo area.
The defective wheel cannot be stored
under the floor panel flap due to its
size.<
3.Check and correct the tire inflation pressure
at the earliest opportunity.
Protect valve stems with valve screw
caps against dirt and contamination.
Dirt in valve stems is a frequent source of
gradual air loss.<
4.Initialize the Flat Tire Monitor, refer to
page100, or reset the Tire Pressure Moni-
tor, refer to page102.
5.Replace the damaged tire as soon as possi-
ble and have the new wheel/tire balanced.
Driving with compact wheel
Drive reservedly and do not exceed a
speed of 50 mph/80 km/h. Otherwise,
changes in the driving characteristics could
result, for example reduced track stability on
braking, extended braking distance, and altered
self-steering characteristics in the limit range.
In conjunction with winter tires, these charac-
teristics are more pronounced.
their original size as quickly as possible. Failure
to do so is a safety risk.<
Vehicle battery
Battery care
The battery is 100 % maintenance-free, i.e., the
electrolyte will last for the life of the battery
when the vehicle is operated in a temperate cli-
mate. Your BMW Sports Activity Vehicle Center
will be glad to advise in all matters concerning
the battery.
Replacing battery
Only use vehicle batteries that have been
approved for your vehicle by the manu-
facturer; otherwise, the vehicle could be dam-
aged and systems or functions may not be fully
available.<
After a battery replacement, have the battery
registered on the vehicle by your BMW Sports
Activity Vehicle Center to ensure that all com-
fort functions are fully available.
Charging battery
Only charge the battery in the vehicle via the
terminals in the engine compartment with the
engine switched off. Connections, refer to
Jump starting on page274.
Disposal
Have old batteries disposed of following
replacement at your BMW Sports Activity
Vehicle Center or bring them to a recycling cen-
ter. Maintain the battery in an upright position
for transport and storage. Always restrain the
battery to prevent it from tipping over during
transport.<
Power failure
Following a temporary power failure, e.g. due to
a discharged battery, the use of some equip-
ment will be restricted, requiring its reinitializa-
Page 276 of 312
Giving and receiving assistance
274 expiration dates of the contents regularly and
replace the contents concerned in good time if
necessary.
The first-aid kit is stored in the cargo area,
depending on the vehicle's equipment,
>On the right in a storage tray or
>Behind the left side panel
Roadside Assistance*
Roadside Assistance can be reached around
the clock in many countries. You can obtain
assistance there in the event of a vehicle break-
down.
The phone numbers of Roadside Assistance
can be found in the Contact brochure.
With BMW Assist or BMW TeleService, you can
contact BMW Roadside Assistance directly via
iDrive to request assistance in the event of a
breakdown, refer to page227.
Jump starting
When your battery is discharged, you can use
two jumper cables to start your BMW with
power from the battery in a second vehicle. You
can also use the same method to help start
another vehicle. Use only jumper cables with
fully-insulated clamp handles.
To avoid the risk of potentially fatal injury,
always avoid all contact with electrical
components while the engine is running. Care-
fully adhere to the following sequence, both to
prevent damage to one or both vehicles, and to
guard against possible personal injuries.<
Preparation
1.Check whether the battery of the other
vehicle has a voltage of 12 Volts and
approximately the same capacitance in Ah.
This information can be found on the bat-
tery.
2.Switch off the engine of the assisting vehi-
cle.3.Switch off any electrical systems and com-
ponents in both vehicles.
There must not be any contact between
the bodies of the two vehicles, otherwise
there is a danger of shorting.<
Connecting jumper cables
To avoid personal injury from sparks, fol-
low this sequence when connecting
jumper cables.<
On your BMW the so-called starting-aid termi-
nal in the engine compartment acts as the bat-
tery positive terminal, also refer to the engine
compartment overview on page252. The cover
cap is marked with +.
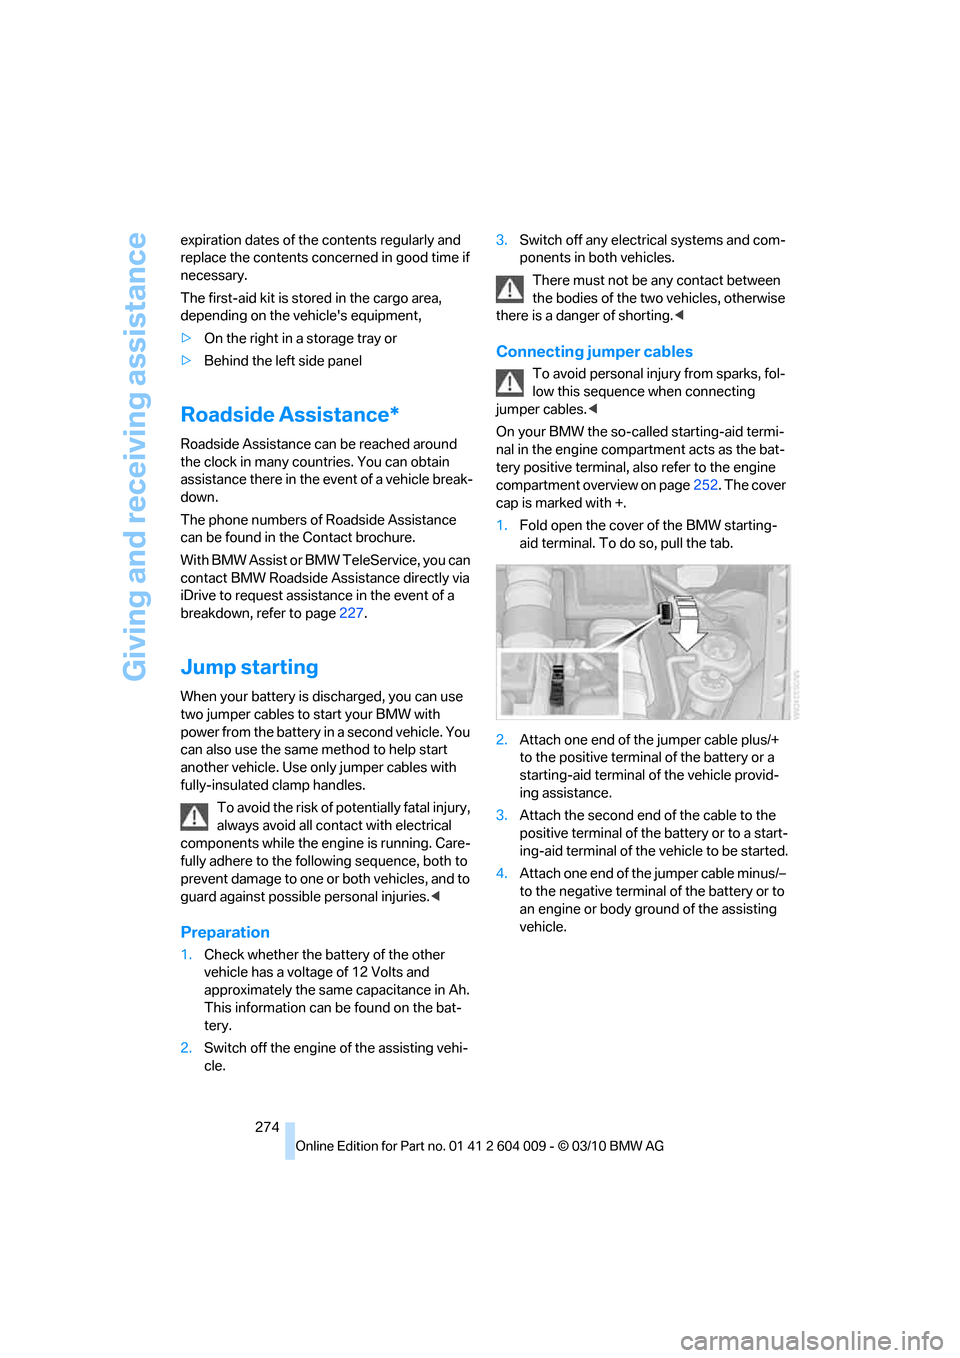
1.Fold open the cover of the BMW starting-
aid terminal. To do so, pull the tab.
2.Attach one end of the jumper cable plus/+
to the positive terminal of the battery or a
starting-aid terminal of the vehicle provid-
ing assistance.
3.Attach the second end of the cable to the
positive terminal of the battery or to a start-
ing-aid terminal of the vehicle to be started.
4.Attach one end of the jumper cable minus/–
to the negative terminal of the battery or to
an engine or body ground of the assisting
vehicle.
Page 296 of 312
Everything from A - Z
294 Breaking-in rear axle
differential138
Break-in period138
Brightness
– of Control Display86
– on Head-up Display109
Button for starting engine58
Buttons on steering wheel11
C
Calibrating driver's seat49
California Proposition 65
Warning6
Call
– accepting215
– ending216
– rejecting216
Calling, refer to Phone
numbers, dialing216
Calling, refer to the telephone
owner's manual
Camera
– refer to Rear view camera93
– refer to Top View90
Camera, Side View93
Can holder, refer to
Cupholders128
Capacities284
Capacity of cargo area283
Car battery, refer to Vehicle
battery270Care258
– car-care products258
– carpets260
– car washes258
– CD/DVD-player261
– chrome components259
– displays260
– exterior258
– fine wooden
components260
– hand washing259
– headlamps259
– high-pressure cleaning
jets259
– interior260
– leather260
– light-alloy wheels259
– paint259
– plastic components260
– rubber gaskets259
– running boards260
– safety belts260
– sensors and cameras260
– upholstery materials and
cloth-covered paneling260
– windows259
Cargo
– refer to Loading140
– securing142
– securing with ski bag135
Cargo area
– capacity283
– emergency actuation, refer
to Manually opening or
closing34
– emergency operation, refer
to Opening manually31
– expanding132
– opening
33
– opening/closing, refer to
Liftgate30,33
– opening/closing, refer to
Tailgate32
– opening from inside31
– opening from outside31
– opening with remote
control28
Cargo area, refer to Cargo
area131Cargo area cover, refer to
Luggage compartment
roller cover131
Caring for the vehicle
finish259
Car key, refer to Keys/remote
control26
Car phone
– installation location, refer to
Center armrest, front128
– refer to separate operating
instructions
Car phone, refer to
Telephone212
Car radio, refer to Radio171
Car wash258
– before driving in59
– with Comfort Access36
Car washes258
Catalytic converter, refer to
Hot exhaust system139
CBC Cornering Brake
Control95
CBS Condition Based
Service256
CD, audio playback180
CD, refer to Playing audio
tracks, DVD system in
rear202
CD/DVD changer
– magazine, loading183
CD-/DVD player in rear197
CD changer179,183
– controls168
– fast forward/reverse181
– random play sequence180
– selecting a track180
– switching on/off168
– tone control168
– volume168
CD player179
– controls168
– fast forward/reverse181
– random play sequence180
– selecting a track180
– switching on/off168
– tone control168
– volume168