wheel BMW X5 XDRIVE 30I 2010 E70 User Guide
[x] Cancel search | Manufacturer: BMW, Model Year: 2010, Model line: X5 XDRIVE 30I, Model: BMW X5 XDRIVE 30I 2010 E70Pages: 300, PDF Size: 12.41 MB
Page 47 of 300
Controls
45Reference
At a glance
Driving tips
Communications
Navigation
Entertainment
Mobility
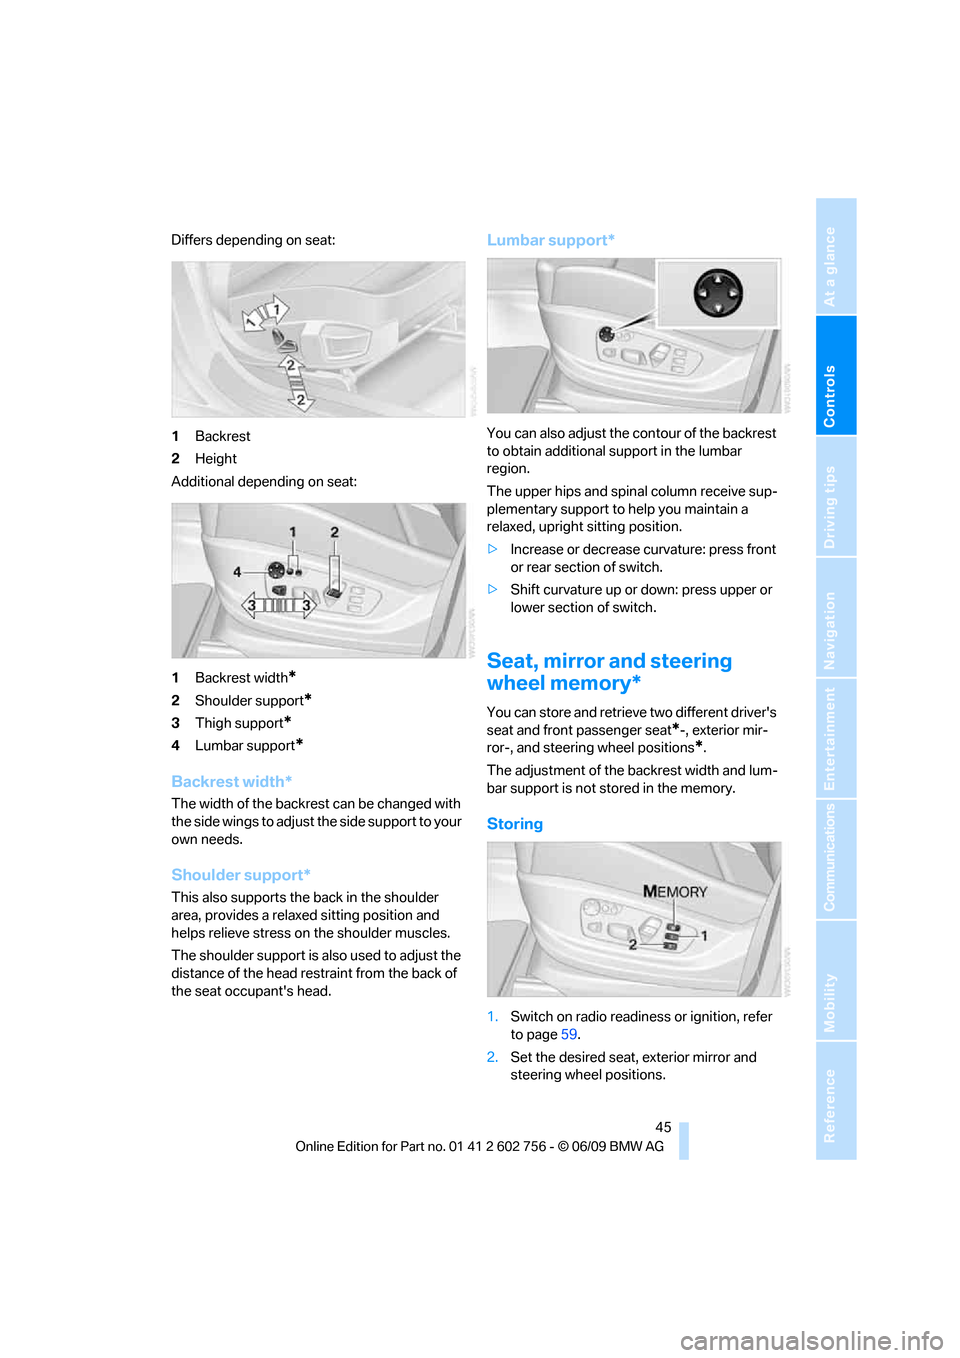
Differs depending on seat:
1Backrest
2Height
Additional depending on seat:
1Backrest width
*
2Shoulder support*
3Thigh support*
4Lumbar support*
Backrest width*
The width of the backrest can be changed with
the side wings to adjust the side support to your
own needs.
Shoulder support*
This also supports the back in the shoulder
area, provides a relaxed sitting position and
helps relieve stress on the shoulder muscles.
The shoulder support is also used to adjust the
distance of the head restraint from the back of
the seat occupant's head.
Lumbar support*
You can also adjust the contour of the backrest
to obtain additional support in the lumbar
region.
The upper hips and spinal column receive sup-
plementary support to help you maintain a
relaxed, upright sitting position.
>Increase or decrease curvature: press front
or rear section of switch.
>Shift curvature up or down: press upper or
lower section of switch.
Seat, mirror and steering
wheel memory*
You can store and retrieve two different driver's
seat and front passenger seat
*-, exterior mir-
ror-, and steering wheel positions
*.
The adjustment of the backrest width and lum-
bar support is not stored in the memory.
Storing
1.Switch on radio readiness or ignition, refer
to page59.
2.Set the desired seat, exterior mirror and
steering wheel positions.
ba8_e70ag.book Seite 45 Freitag, 5. Juni 2009 11:42 11
Page 48 of 300
Adjusting
46 3.Press the button:
The LED in the button lights up.
4.Press the desired memory button1 or2:
the LED goes out.
The positions of the driver's seat, the exte-
rior mirrors, and steering wheel are stored
for the remote control currently in use.
Activating
Do not activate the memory function
while the vehicle is moving. There is a risk
of accident from unexpected movement of the
seat or steering wheel.<
Comfort mode
1.After unlocking, open the driver's door or
switch on radio readiness, refer to page59.
2.Briefly press the desired memory button1
or 2.
The adjusting procedure is canceled if you
briefly press a seat-adjusting switch or one of
the memory buttons.
Safety feature
1.Close the driver's door and switch the igni-
tion on or off, refer to page59.
2.Press the desired memory button1 or2
and maintain pressure until the adjustment
process has been completed.
If the button was pressed inadvertently:
press the button again; the LED goes out.
Activating with the remote control
The driver's seat position last set is stored for
the remote control currently in use.
You can select whether or not the seat is reset
to that position automatically.
When using this feature, always make
sure that the footwell behind the driver's
seat is empty and unobstructed. Failure to do
so could cause injury to persons or damage to
objects behind the seat as a result of a rearward
movement of the seat.
the memory buttons.
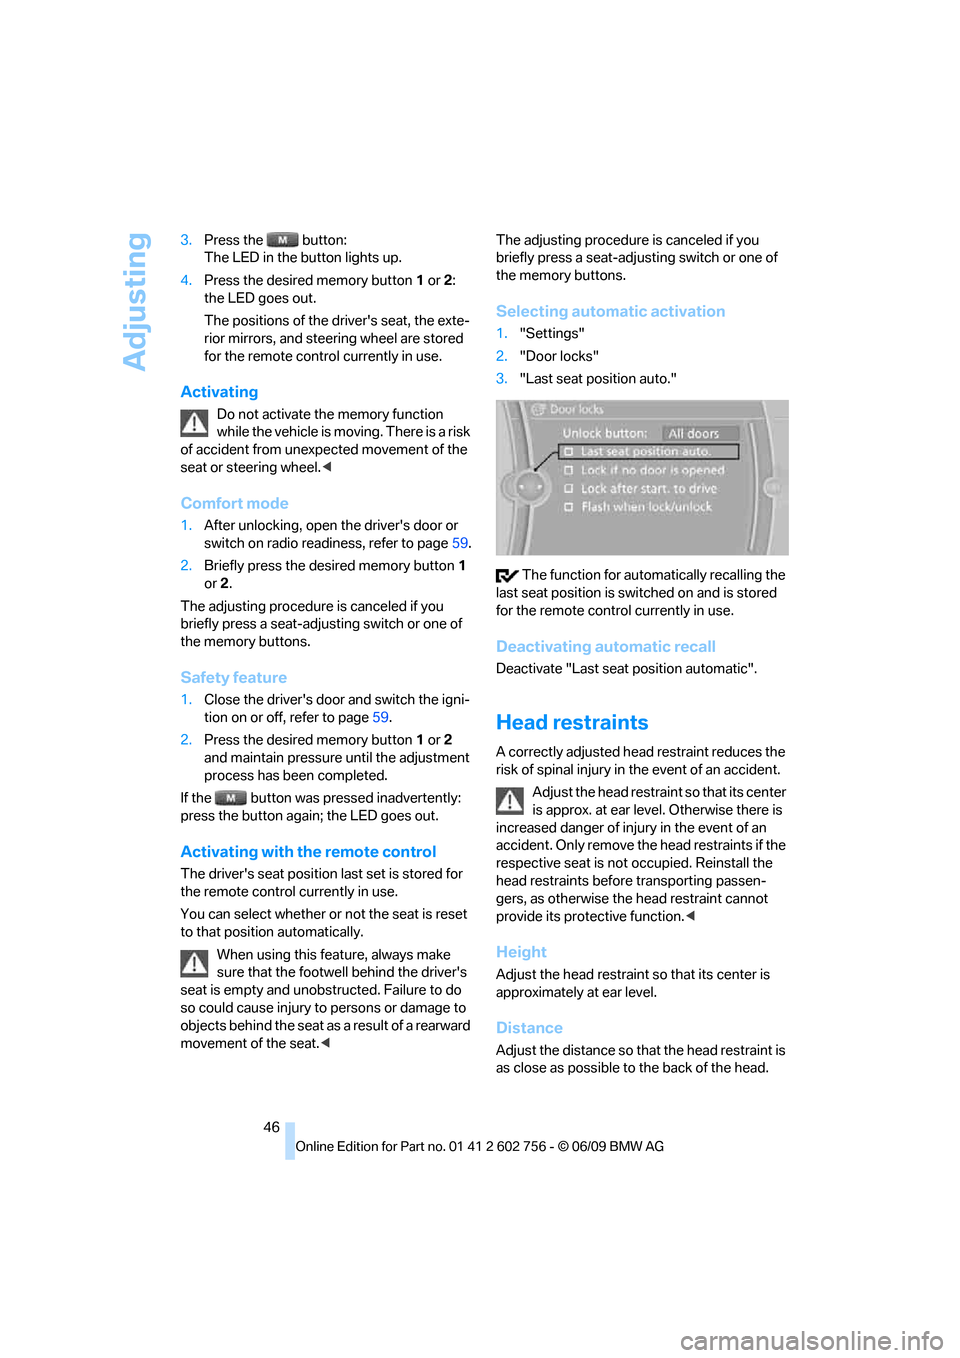
Selecting automatic activation
1."Settings"
2."Door locks"
3."Last seat position auto."
The function for automatically recalling the
last seat position is switched on and is stored
for the remote control currently in use.
Deactivating automatic recall
Deactivate "Last seat position automatic".
Head restraints
A correctly adjusted head restraint reduces the
risk of spinal injury in the event of an accident.
Adjust the head restraint so that its center
is approx. at ear level. Otherwise there is
increased danger of injury in the event of an
accident. Only remove the head restraints if the
respective seat is not occupied. Reinstall the
head restraints before transporting passen-
gers, as otherwise the head restraint cannot
provide its protective function.<
Height
Adjust the head restraint so that its center is
approximately at ear level.
Distance
Adjust the distance so that the head restraint is
as close as possible to the back of the head.
ba8_e70ag.book Seite 46 Freitag, 5. Juni 2009 11:42 11
Page 54 of 300
Adjusting
52
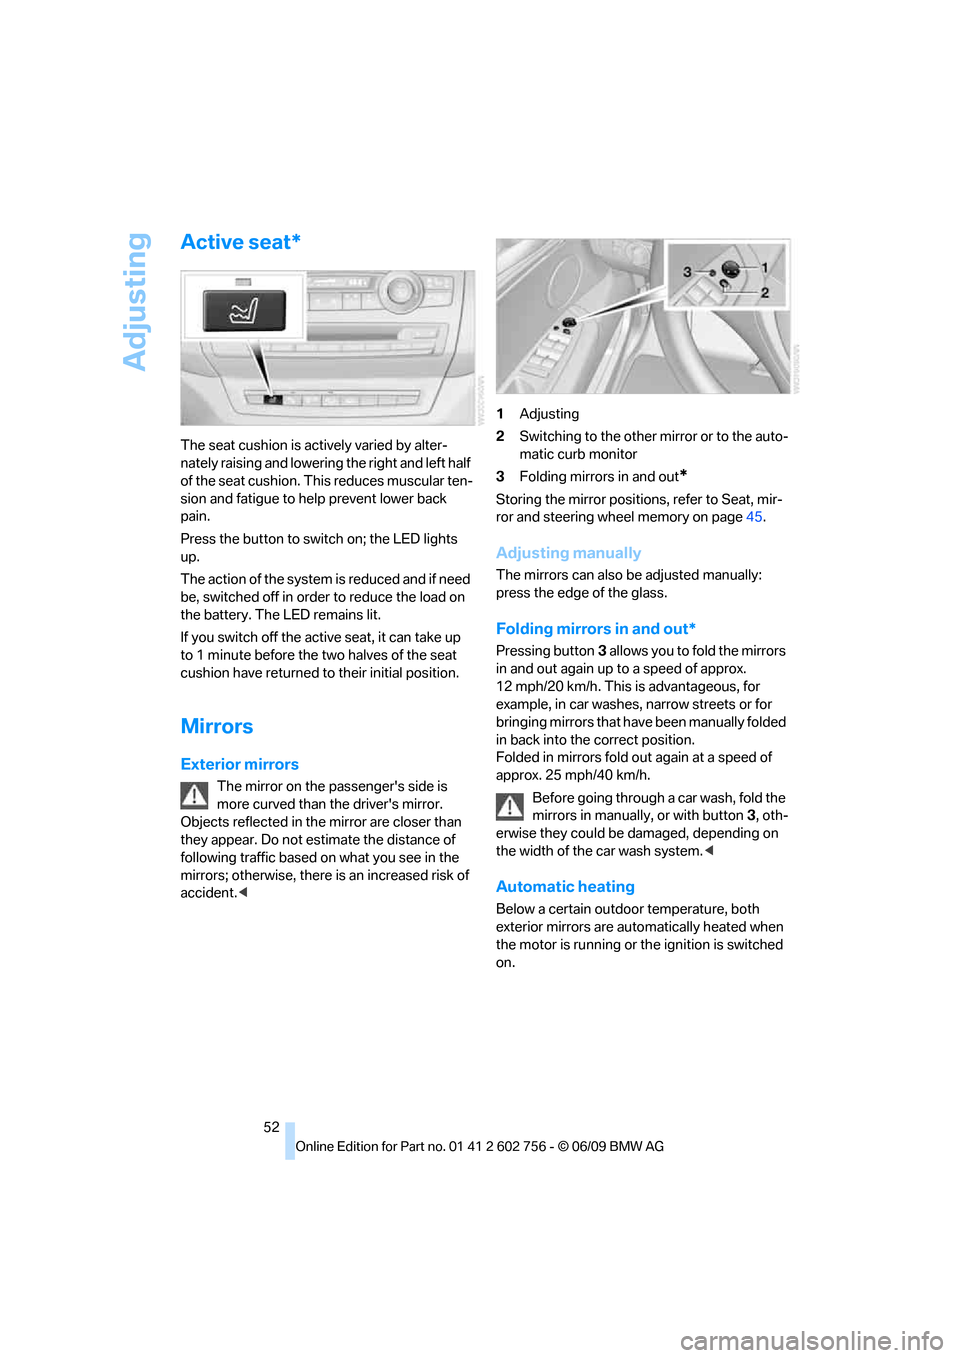
Active seat*
The seat cushion is actively varied by alter-
nately raising and lowering the right and left half
of the seat cushion. This reduces muscular ten-
sion and fatigue to help prevent lower back
pain.
Press the button to switch on; the LED lights
up.
The action of the system is reduced and if need
be, switched off in order to reduce the load on
the battery. The LED remains lit.
If you switch off the active seat, it can take up
to 1 minute before the two halves of the seat
cushion have returned to their initial position.
Mirrors
Exterior mirrors
The mirror on the passenger's side is
more curved than the driver's mirror.
Objects reflected in the mirror are closer than
they appear. Do not estimate the distance of
following traffic based on what you see in the
mirrors; otherwise, there is an increased risk of
accident.<1Adjusting
2Switching to the other mirror or to the auto-
matic curb monitor
3Folding mirrors in and out
*
Storing the mirror positions, refer to Seat, mir-
ror and steering wheel memory on page45.
Adjusting manually
The mirrors can also be adjusted manually:
press the edge of the glass.
Folding mirrors in and out*
Pressing button3 allows you to fold the mirrors
in and out again up to a speed of approx.
12 mph/20 km/h. This is advantageous, for
example, in car washes, narrow streets or for
bringing mirrors that have been manually folded
in back into the correct position.
Folded in mirrors fold out again at a speed of
approx. 25 mph/40 km/h.
Before going through a car wash, fold the
mirrors in manually, or with button3, oth-
erwise they could be damaged, depending on
the width of the car wash system.<
Automatic heating
Below a certain outdoor temperature, both
exterior mirrors are automatically heated when
the motor is running or the ignition is switched
on.
ba8_e70ag.book Seite 52 Freitag, 5. Juni 2009 11:42 11
Page 55 of 300
Controls
53Reference
At a glance
Driving tips
Communications
Navigation
Entertainment
Mobility
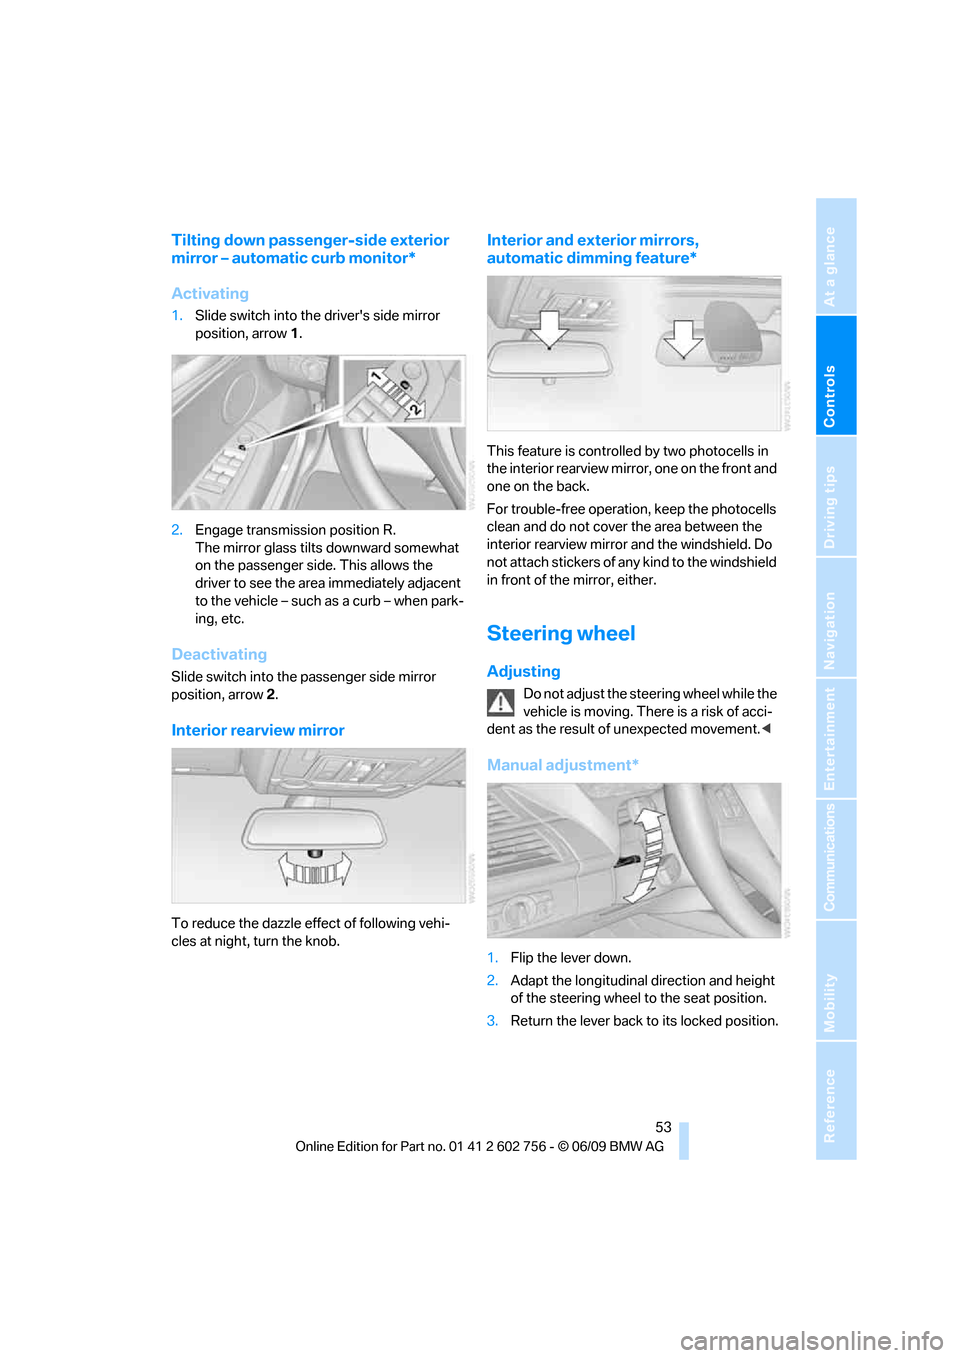
Tilting down passenger-side exterior
mirror – automatic curb monitor*
Activating
1.Slide switch into the driver's side mirror
position, arrow 1.
2.Engage transmission position R.
The mirror glass tilts downward somewhat
on the passenger side. This allows the
driver to see the area immediately adjacent
to the vehicle – such as a curb – when park-
ing, etc.
Deactivating
Slide switch into the passenger side mirror
position, arrow 2.
Interior rearview mirror
To reduce the dazzle effect of following vehi-
cles at night, turn the knob.
Interior and exterior mirrors,
automatic dimming feature*
This feature is controlled by two photocells in
the interior rearview mirror, one on the front and
one on the back.
For trouble-free operation, keep the photocells
clean and do not cover the area between the
interior rearview mirror and the windshield. Do
not attach stickers of any kind to the windshield
in front of the mirror, either.
Steering wheel
Adjusting
Do not adjust the steering wheel while the
vehicle is moving. There is a risk of acci-
dent as the result of unexpected movement.<
Manual adjustment*
1.Flip the lever down.
2.Adapt the longitudinal direction and height
of the steering wheel to the seat position.
3.Return the lever back to its locked position.
ba8_e70ag.book Seite 53 Freitag, 5. Juni 2009 11:42 11
Page 56 of 300
Adjusting
54
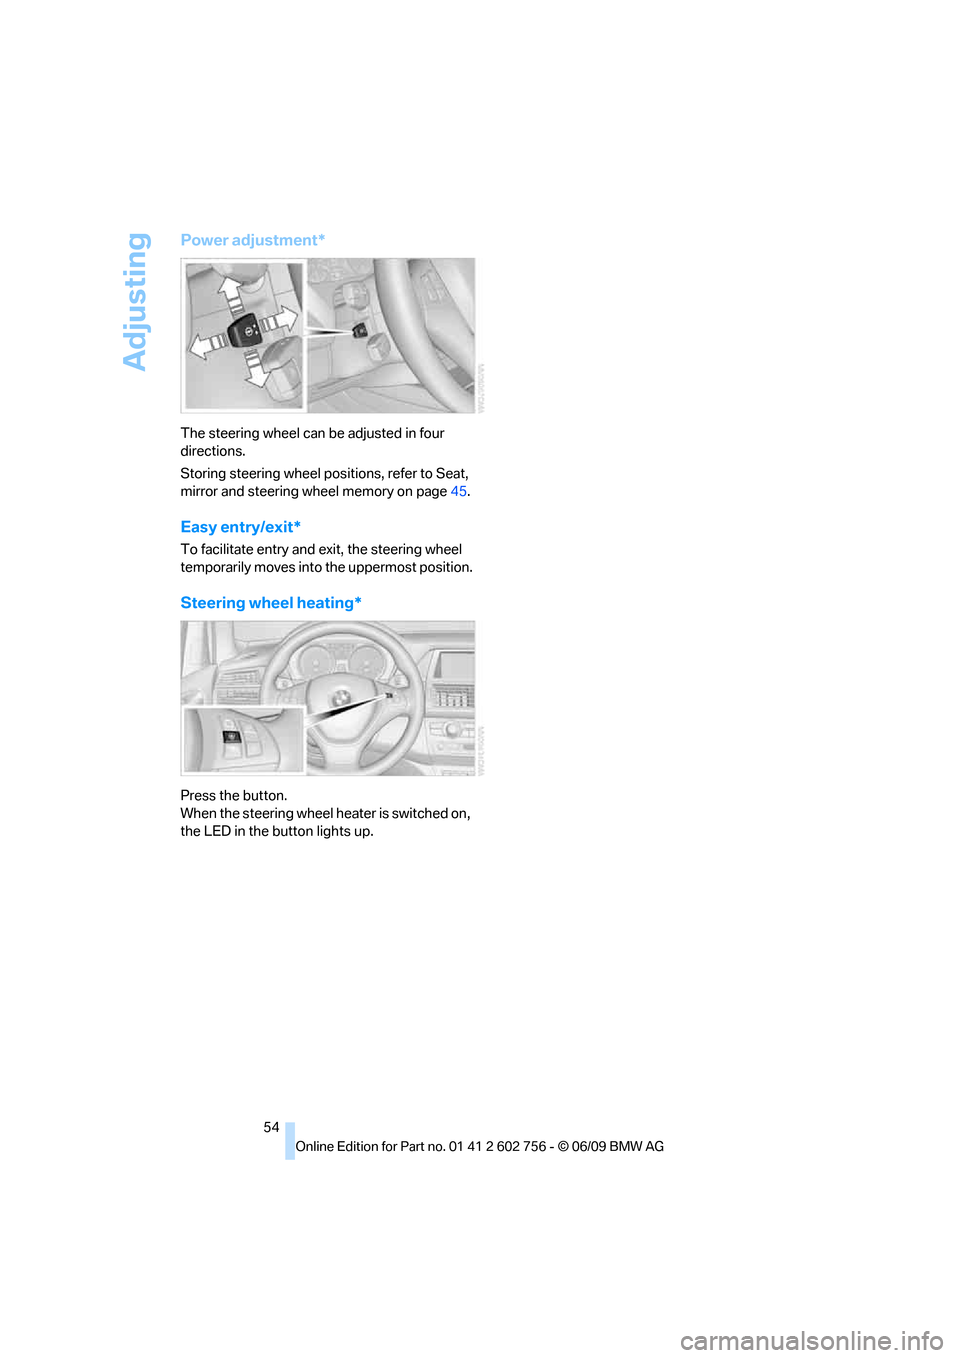
Power adjustment*
The steering wheel can be adjusted in four
directions.
Storing steering wheel positions, refer to Seat,
mirror and steering wheel memory on page45.
Easy entry/exit*
To facilitate entry and exit, the steering wheel
temporarily moves into the uppermost position.
Steering wheel heating*
Press the button.
When the steering wheel heater is switched on,
the LED in the button lights up.
ba8_e70ag.book Seite 54 Freitag, 5. Juni 2009 11:42 11
Page 63 of 300
Controls
61Reference
At a glance
Driving tips
Communications
Navigation
Entertainment
Mobility
Transmission position P will be engaged:
>automatically after approx. 30 minutes
>if you remove the remote control from the
ignition lock
Parking brake
The concept
Your BMW is equipped with an electromechan-
ical parking brake.
The parking brake is primarily intended to pre-
vent the vehicle from rolling while parked.
You can use the parking brake in two ways:
>manually, by pulling and pushing the button
>automatically, by activating Automatic
Hold, refer to page61
With the engine stopped, the parking brake acts
on the rear wheels via an electromechanical
system. When the engine is running, the park-
ing brake acts on the disk brakes of the front
and rear wheels via the brake hydraulics.
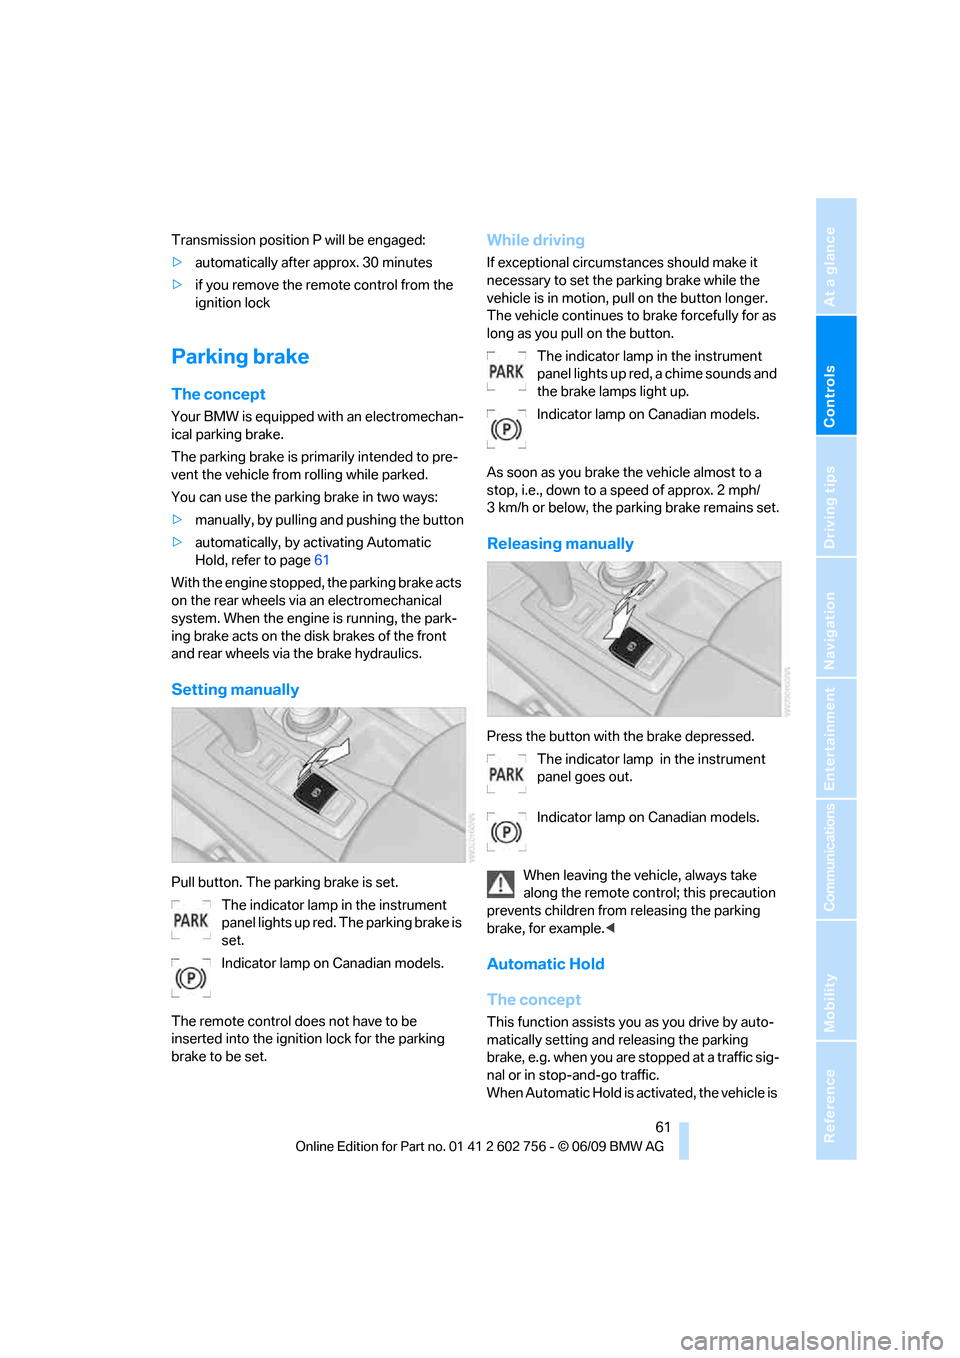
Setting manually
Pull button. The parking brake is set.
The indicator lamp in the instrument
panel lights up red. The parking brake is
set.
Indicator lamp on Canadian models.
The remote control does not have to be
inserted into the ignition lock for the parking
brake to be set.
While driving
If exceptional circumstances should make it
necessary to set the parking brake while the
vehicle is in motion, pull on the button longer.
The vehicle continues to brake forcefully for as
long as you pull on the button.
The indicator lamp in the instrument
panel lights up red, a chime sounds and
the brake lamps light up.
Indicator lamp on Canadian models.
As soon as you brake the vehicle almost to a
stop, i.e., down to a speed of approx. 2 mph/
3 km/h or below, the parking brake remains set.
Releasing manually
Press the button with the brake depressed.
The indicator lamp in the instrument
panel goes out.
Indicator lamp on Canadian models.
When leaving the vehicle, always take
along the remote control; this precaution
prevents children from releasing the parking
brake, for example.<
Automatic Hold
The concept
This function assists you as you drive by auto-
matically setting and releasing the parking
brake, e.g. when you are stopped at a traffic sig-
nal or in stop-and-go traffic.
When Automatic Hold is activated, the vehicle is
ba8_e70ag.book Seite 61 Freitag, 5. Juni 2009 11:42 11
Page 65 of 300
Controls
63Reference
At a glance
Driving tips
Communications
Navigation
Entertainment
Mobility
>the vehicle is braked to a stop during driving
In the instrument panel, the indicator
lamp changes from green to red and
the indication AUTO H goes out.
Indicator lamp on Canadian models.
Before you start to drive, either release the
parking brake manually, refer to page61, or
reactivate Automatic Hold, refer to page62.
Before leaving the vehicle with the engine
running, shift the selector lever into posi-
tion P of the automatic transmission and make
sure that the parking brake is set. Otherwise,
the vehicle may begin to roll.<
Malfunction
If the parking brake fails or malfunctions, secure
the vehicle against rolling, e.g. with a wheel
chock, if you leave the vehicle.
Releasing parking brake manually
In the event of an electrical power loss or elec-
trical malfunction, you can release the parking
brake manually.
Before manually releasing the parking
brake and each time you park the vehicle
without setting the parking brake, make sure
that the automatic transmission is in position P,
refer to page65. Be sure to pay attention to the
information in the instrument panel.
In addition, secure the vehicle against rolling,
e.g. with a wheel chock. Otherwise there is a
danger that the vehicle could roll if parked on a
steep slope.<
If it becomes necessary to also release the
transmission lock of the automatic transmission
manually, follow this sequence:
1.If necessary, start by releasing the parking
brake manually.
2.Then release the automatic transmission's
transmission lock manually, refer to
page66.
Jump starting and towing, refer to information
starting on page262.
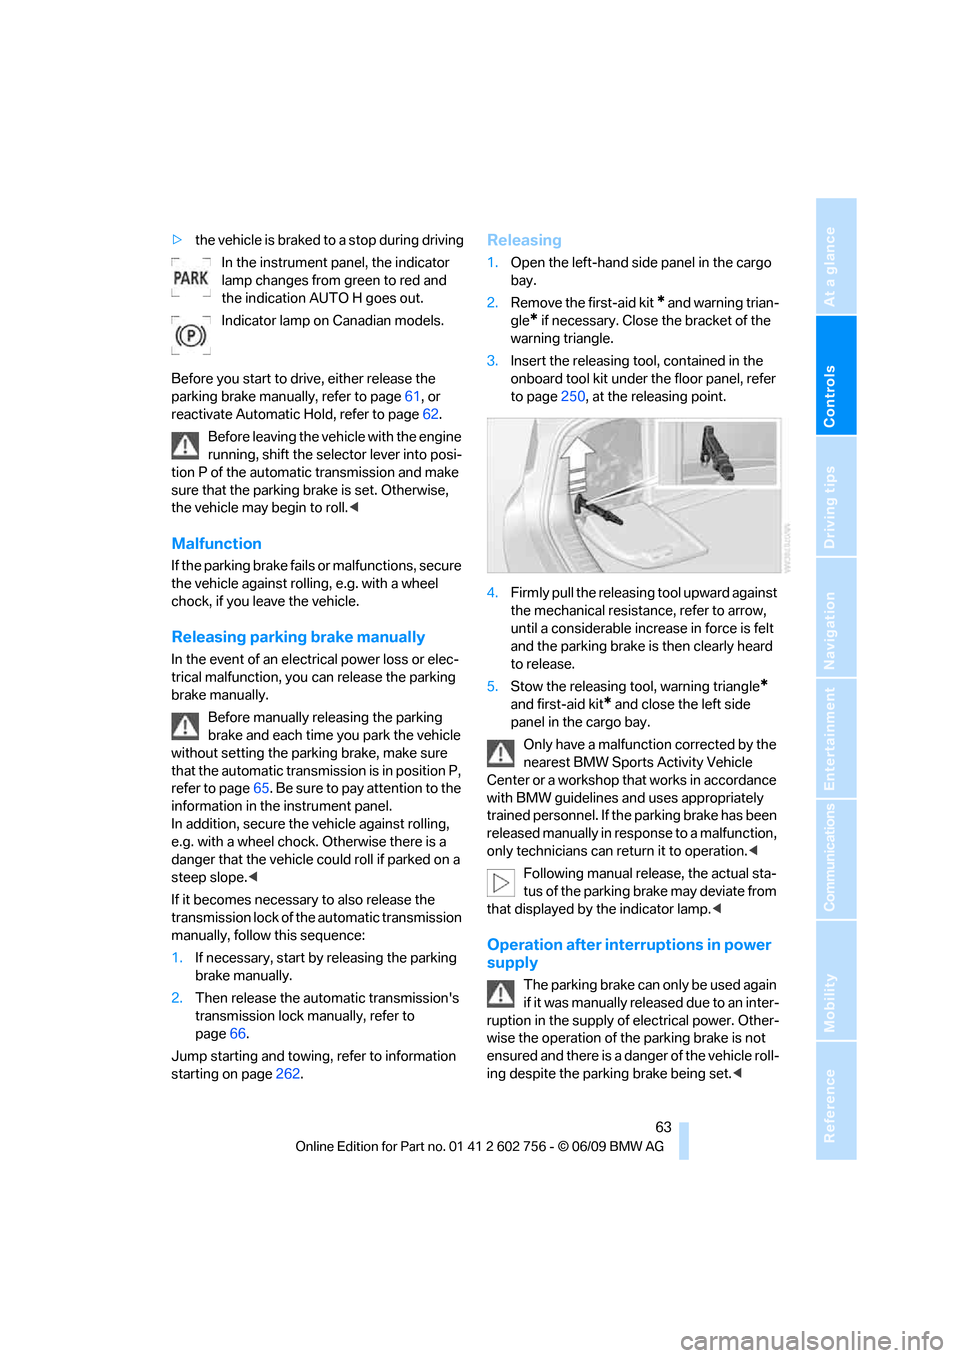
Releasing
1.Open the left-hand side panel in the cargo
bay.
2.Remove the first-aid kit
* and warning trian-
gle
* if necessary. Close the bracket of the
warning triangle.
3.Insert the releasing tool, contained in the
onboard tool kit under the floor panel, refer
to page250, at the releasing point.
4.Firmly pull the releasing tool upward against
the mechanical resistance, refer to arrow,
until a considerable increase in force is felt
and the parking brake is then clearly heard
to release.
5.Stow the releasing tool, warning triangle
*
and first-aid kit* and close the left side
panel in the cargo bay.
Only have a malfunction corrected by the
nearest BMW Sports Activity Vehicle
Center or a workshop that works in accordance
with BMW guidelines and uses appropriately
trained personnel. If the parking brake has been
released manually in response to a malfunction,
only technicians can return it to operation.<
Following manual release, the actual sta-
tus of the parking brake may deviate from
that displayed by the indicator lamp.<
Operation after interruptions in power
supply
The parking brake can only be used again
if it was manually released due to an inter-
ruption in the supply of electrical power. Other-
wise the operation of the parking brake is not
ensured and there is a danger of the vehicle roll-
ing despite the parking brake being set.<
ba8_e70ag.book Seite 63 Freitag, 5. Juni 2009 11:42 11
Page 67 of 300
Controls
65Reference
At a glance
Driving tips
Communications
Navigation
Entertainment
Mobility
R Reverse
Select only with the vehicle stationary.
An interlock prevents inadvertent gearshifts
into transmission position R. To release the
lock, push the unlock button1.
P Park
Select only with the vehicle stationary. The rear
wheels are locked.
P is engaged automatically as soon as
you switch off the engine unless N is
engaged and on vehicles with comfort access
the remote control is inserted in the ignition
lock, refer to page59.<
N Neutral
Can, for example, be engaged in automatic car
washes. The vehicle can roll.
N remains engaged even after the engine
is switched off whenever you leave the
remote control in the ignition lock. This function
is used, for example, in a car wash, refer to
page60. After approx. 30 minutes P is auto-
matically engaged.<
D Drive, automatic position
Position for normal vehicle operation. All for-
ward gears are available.
Under normal operating conditions, the fuel
consumption is lowest when driving in posi-
tion D.
Kick-down
The kick-down mode provides maximum accel-
eration.
Press the accelerator pedal beyond the
increased resistance at full throttle.
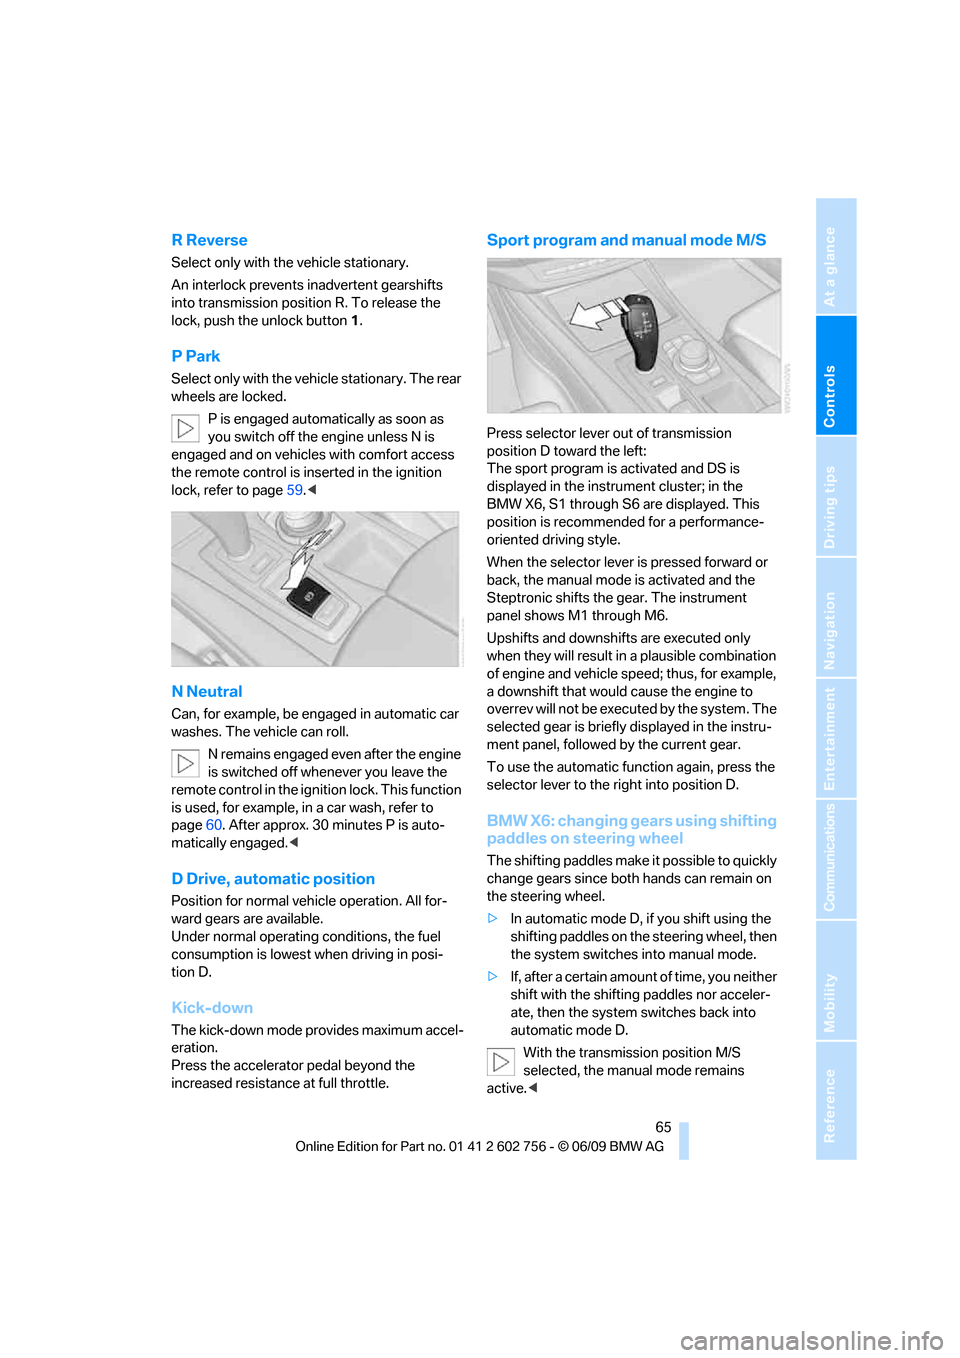
Sport program and manual mode M/S
Press selector lever out of transmission
position D toward the left:
The sport program is activated and DS is
displayed in the instrument cluster; in the
BMW X6, S1 through S6 are displayed. This
position is recommended for a performance-
oriented driving style.
When the selector lever is pressed forward or
back, the manual mode is activated and the
Steptronic shifts the gear. The instrument
panel shows M1 through M6.
Upshifts and downshifts are executed only
when they will result in a plausible combination
of engine and vehicle speed; thus, for example,
a downshift that would cause the engine to
overrev will not be executed by the system. The
selected gear is briefly displayed in the instru-
ment panel, followed by the current gear.
To use the automatic function again, press the
selector lever to the right into position D.
BMW X6: changing gears using shifting
paddles on steering wheel
The shifting paddles make it possible to quickly
change gears since both hands can remain on
the steering wheel.
>In automatic mode D, if you shift using the
shifting paddles on the steering wheel, then
the system switches into manual mode.
>If, after a certain amount of time, you neither
shift with the shifting paddles nor acceler-
ate, then the system switches back into
automatic mode D.
With the transmission position M/S
selected, the manual mode remains
active.<
ba8_e70ag.book Seite 65 Freitag, 5. Juni 2009 11:42 11
Page 68 of 300
Driving
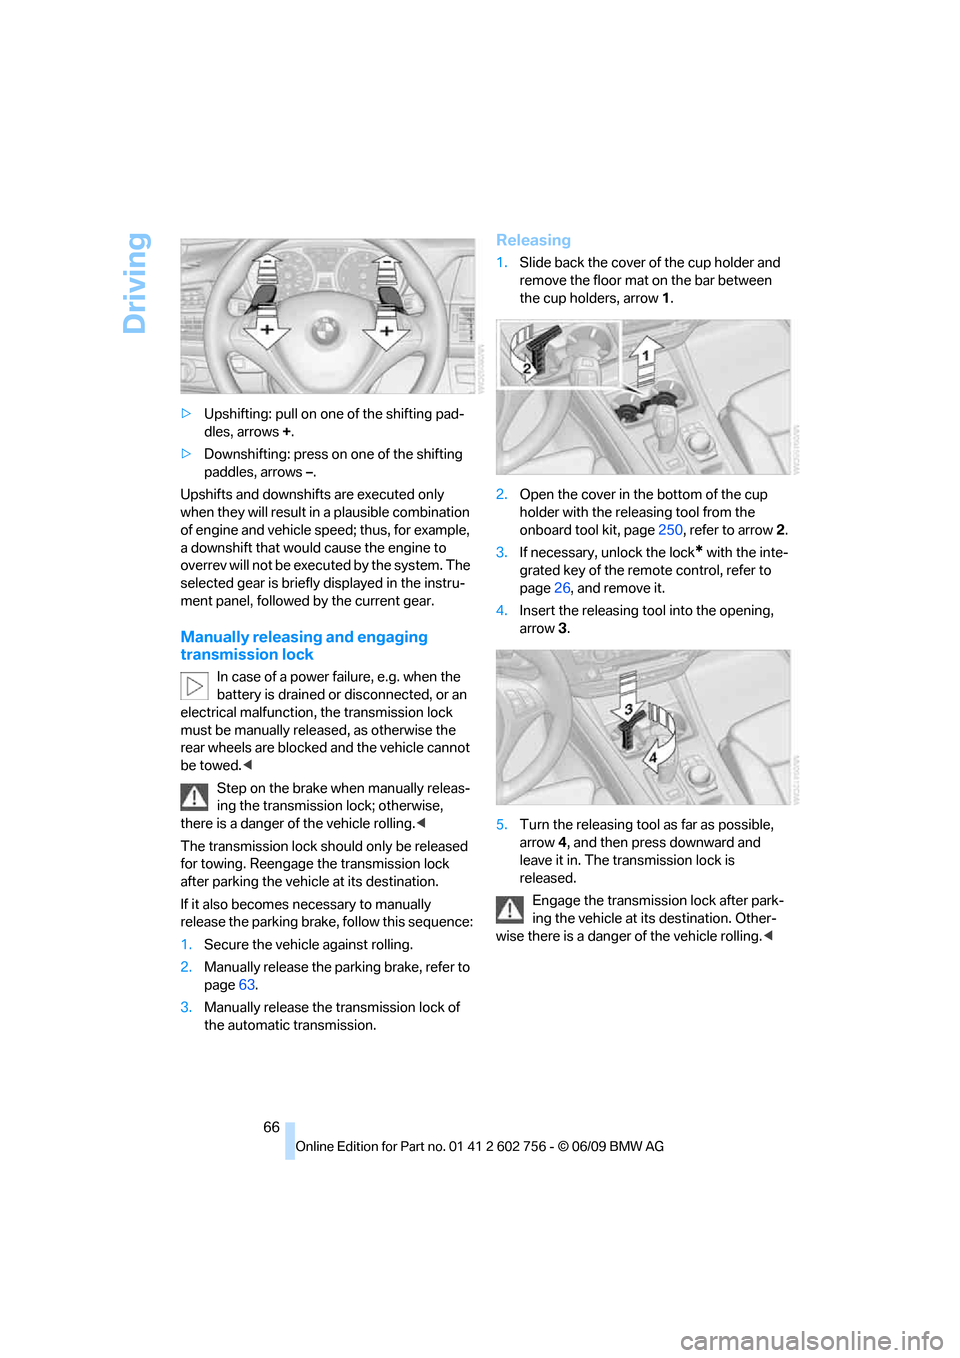
66 >Upshifting: pull on one of the shifting pad-
dles, arrows +.
>Downshifting: press on one of the shifting
paddles, arrows –.
Upshifts and downshifts are executed only
when they will result in a plausible combination
of engine and vehicle speed; thus, for example,
a downshift that would cause the engine to
overrev will not be executed by the system. The
selected gear is briefly displayed in the instru-
ment panel, followed by the current gear.
Manually releasing and engaging
transmission lock
In case of a power failure, e.g. when the
battery is drained or disconnected, or an
electrical malfunction, the transmission lock
must be manually released, as otherwise the
rear wheels are blocked and the vehicle cannot
be towed.<
Step on the brake when manually releas-
ing the transmission lock; otherwise,
there is a danger of the vehicle rolling.<
The transmission lock should only be released
for towing. Reengage the transmission lock
after parking the vehicle at its destination.
If it also becomes necessary to manually
release the parking brake, follow this sequence:
1.Secure the vehicle against rolling.
2.Manually release the parking brake, refer to
page63.
3.Manually release the transmission lock of
the automatic transmission.
Releasing
1.Slide back the cover of the cup holder and
remove the floor mat on the bar between
the cup holders, arrow1.
2.Open the cover in the bottom of the cup
holder with the releasing tool from the
onboard tool kit, page250, refer to arrow2.
3.If necessary, unlock the lock
* with the inte-
grated key of the remote control, refer to
page26, and remove it.
4.Insert the releasing tool into the opening,
arrow3.
5.Turn the releasing tool as far as possible,
arrow4, and then press downward and
leave it in. The transmission lock is
released.
Engage the transmission lock after park-
ing the vehicle at its destination. Other-
wise there is a danger of the vehicle rolling.<
ba8_e70ag.book Seite 66 Freitag, 5. Juni 2009 11:42 11
Page 70 of 300
Driving
68
Switching on wipers
Pull the lever upward, arrow1.
The lever automatically returns to its initial posi-
tion when released.
Normal wiper speed
Press once.
The system reverts to operation in the intermit-
tent mode with the vehicle stationary.
Fast wiper speed
Press twice or press beyond the resistance
point.
The system reverts to normal speed with the
vehicle stationary.
Intermittent operation or rain sensor*
With the rain sensor, the wiper operation is con-
trolled automatically as a function of the rain
intensity. The rain sensor is located on the
windshield, directly in front of the interior rear-
view mirror.
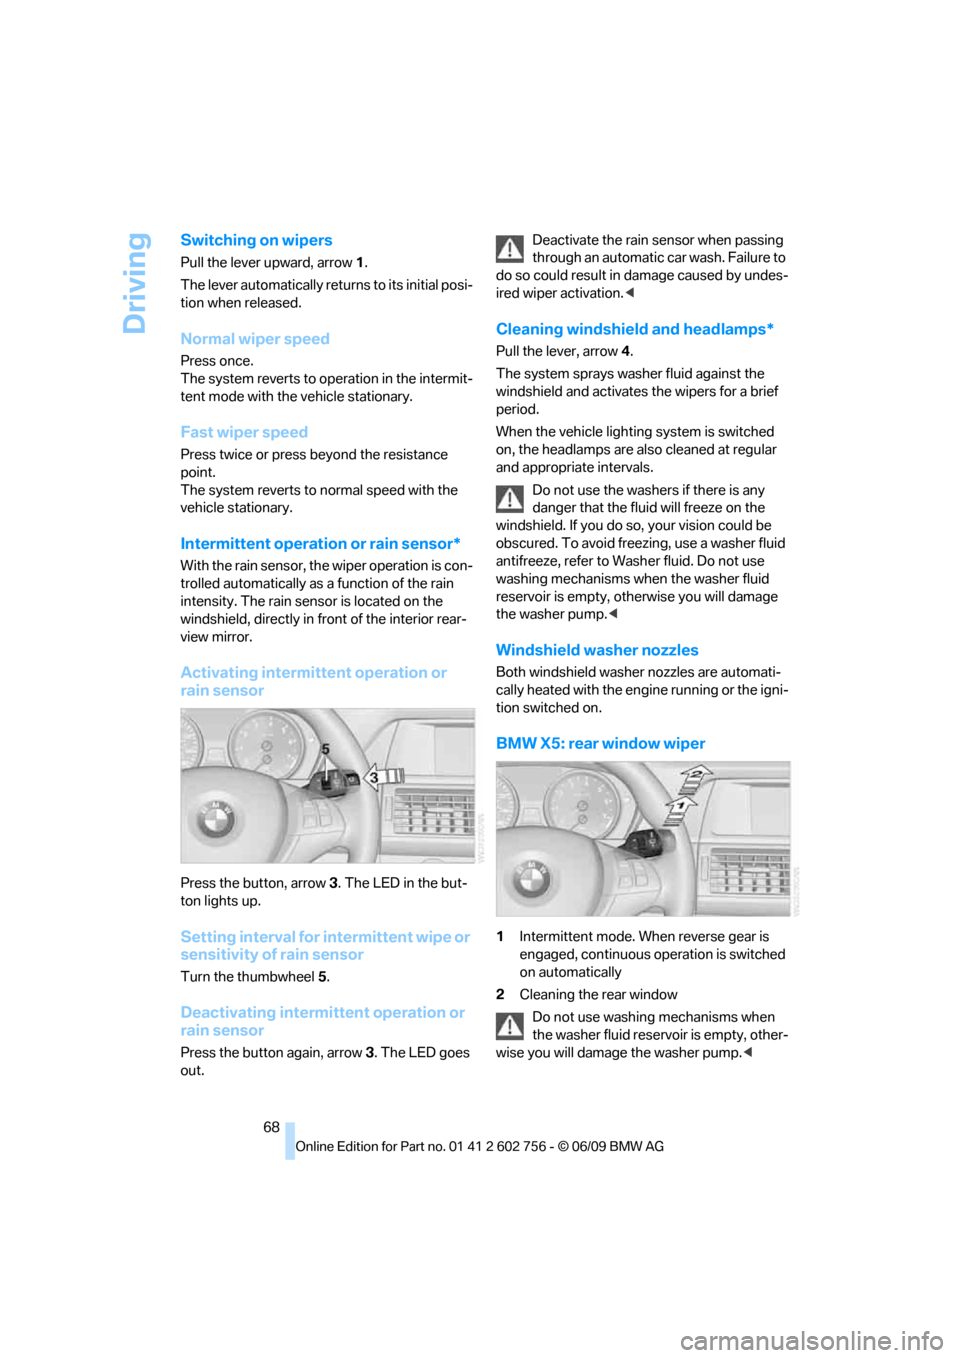
Activating intermittent operation or
rain sensor
Press the button, arrow3. The LED in the but-
ton lights up.
Setting interval for intermittent wipe or
sensitivity of rain sensor
Turn the thumbwheel5.
Deactivating intermittent operation or
rain sensor
Press the button again, arrow3. The LED goes
out.Deactivate the rain sensor when passing
through an automatic car wash. Failure to
do so could result in damage caused by undes-
ired wiper activation.<
Cleaning windshield and headlamps*
Pull the lever, arrow4.
The system sprays washer fluid against the
windshield and activates the wipers for a brief
period.
When the vehicle lighting system is switched
on, the headlamps are also cleaned at regular
and appropriate intervals.
Do not use the washers if there is any
danger that the fluid will freeze on the
windshield. If you do so, your vision could be
obscured. To avoid freezing, use a washer fluid
antifreeze, refer to Washer fluid. Do not use
washing mechanisms when the washer fluid
reservoir is empty, otherwise you will damage
the washer pump.<
Windshield washer nozzles
Both windshield washer nozzles are automati-
cally heated with the engine running or the igni-
tion switched on.
BMW X5: rear window wiper
1Intermittent mode. When reverse gear is
engaged, continuous operation is switched
on automatically
2Cleaning the rear window
Do not use washing mechanisms when
the washer fluid reservoir is empty, other-
wise you will damage the washer pump.<
ba8_e70ag.book Seite 68 Freitag, 5. Juni 2009 11:42 11