BMW X6 2014 F16 Owner's Manual
Manufacturer: BMW, Model Year: 2014, Model line: X6, Model: BMW X6 2014 F16Pages: 259, PDF Size: 5.92 MB
Page 181 of 259
Ensuring the stability of the child seat
When installing child restraint systems,
make sure that the child seat is securely fas‐
tened to the backrest of the seat. Angle and
headrest of the backrest might need to be ad‐
justed or possibly be removed. Make sure that
all backrests are securely locked. Otherwise
the stability of the child seat can be affected,
and there is an increased risk of injury because
of unexpected movement of the rear seat
backrest.◀
Ensure that the lock is securely engaged
When you fold back the backrest make
sure that it locks in place. When this happens
the red warning field on the seat disappears.
Otherwise transported cargo could shoot into
the car's interior during braking or evasive ma‐
neuvers and endanger occupants.◀
Using the middle safety belt
If the middle safety belt in the rear is
used, the larger side of the backrest must be
locked. Otherwise, the safety belt will not have
a restraining effect.◀
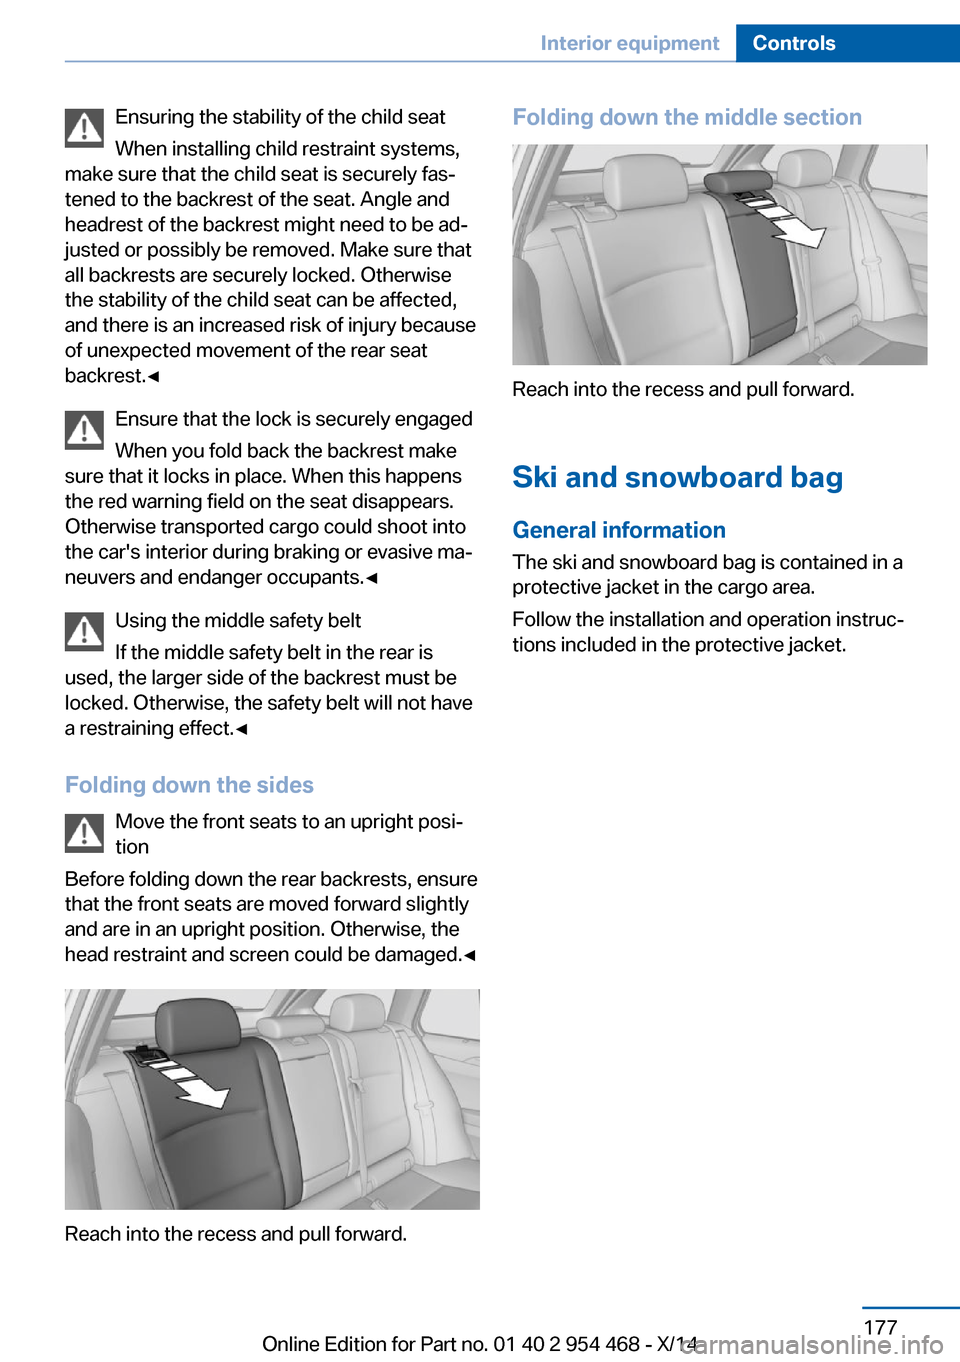
Folding down the sides Move the front seats to an upright posi‐
tion
Before folding down the rear backrests, ensure
that the front seats are moved forward slightly
and are in an upright position. Otherwise, the
head restraint and screen could be damaged.◀
Reach into the recess and pull forward.
Folding down the middle section
Reach into the recess and pull forward.
Ski and snowboard bag General information
The ski and snowboard bag is contained in a
protective jacket in the cargo area.
Follow the installation and operation instruc‐
tions included in the protective jacket.
Seite 177Interior equipmentControls177
Online Edition for Part no. 01 40 2 954 468 - X/14
Page 182 of 259
Storage compartmentsVehicle features and optionsThis chapter describes all standard, country-
specific and optional features offered with the
series. It also describes features that are not
necessarily available in your car, e. g., due to
the selected options or country versions. This
also applies to safety-related functions and
systems.
Hints No loose objects in the car's interior
Do not stow any objects in the car's inte‐
rior without securing them; otherwise, they
may present a danger to occupants e.g., during
braking and evasive maneuvers.◀
Do not place anti-slip mats on the dash‐
board
Do not place anti-slip mats on the dashboard.
The mat materials could damage the dash‐
board.◀
Storage compartments The following storage compartments are avail‐
able in the vehicle interior:▷Glove compartment on the front passenger
side, refer to page 178.▷Glove compartment on the driver's side,
refer to page 179.▷Compartments in the doors, refer to
page 179.▷Storage compartment on the center arm‐
rest, refer to page 179.▷Center armrest, refer to page 179.▷Glasses compartment, refer to page 180.Glove compartment
Front passenger side
Note Close the glove compartment again im‐
mediately
Close the glove compartment immediately af‐
ter use while driving; otherwise, injury may oc‐
cur during accidents.◀
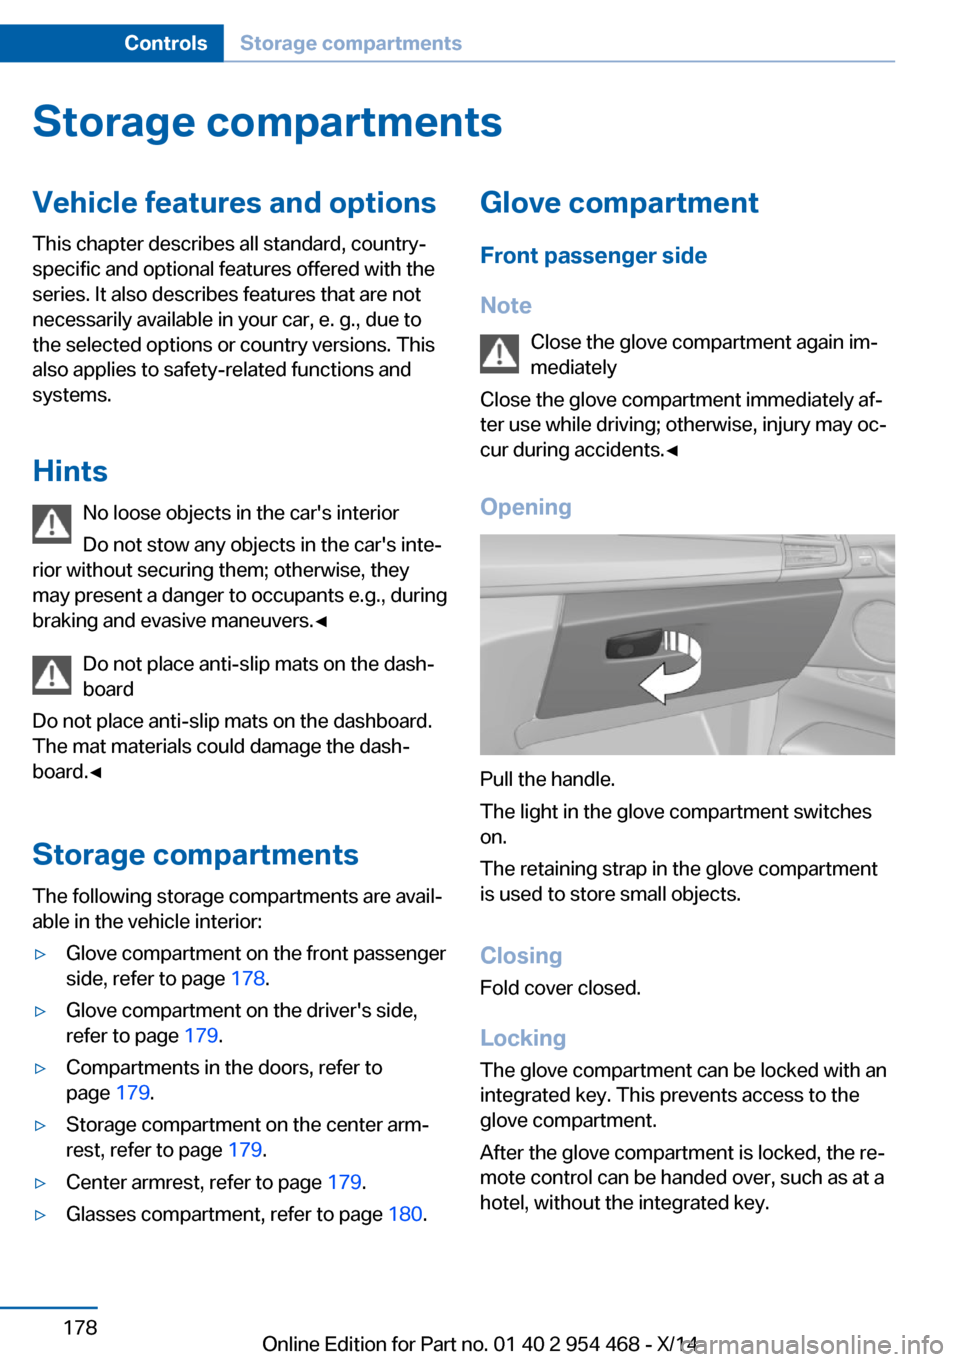
Opening
Pull the handle.
The light in the glove compartment switches
on.
The retaining strap in the glove compartment
is used to store small objects.
ClosingFold cover closed.
Locking
The glove compartment can be locked with an
integrated key. This prevents access to the
glove compartment.
After the glove compartment is locked, the re‐
mote control can be handed over, such as at a
hotel, without the integrated key.
Seite 178ControlsStorage compartments178
Online Edition for Part no. 01 40 2 954 468 - X/14
Page 183 of 259
Driver's side
Note Close the glove compartment again im‐
mediately
Close the glove compartment immediately af‐
ter use while driving; otherwise, injury may oc‐
cur during accidents.◀
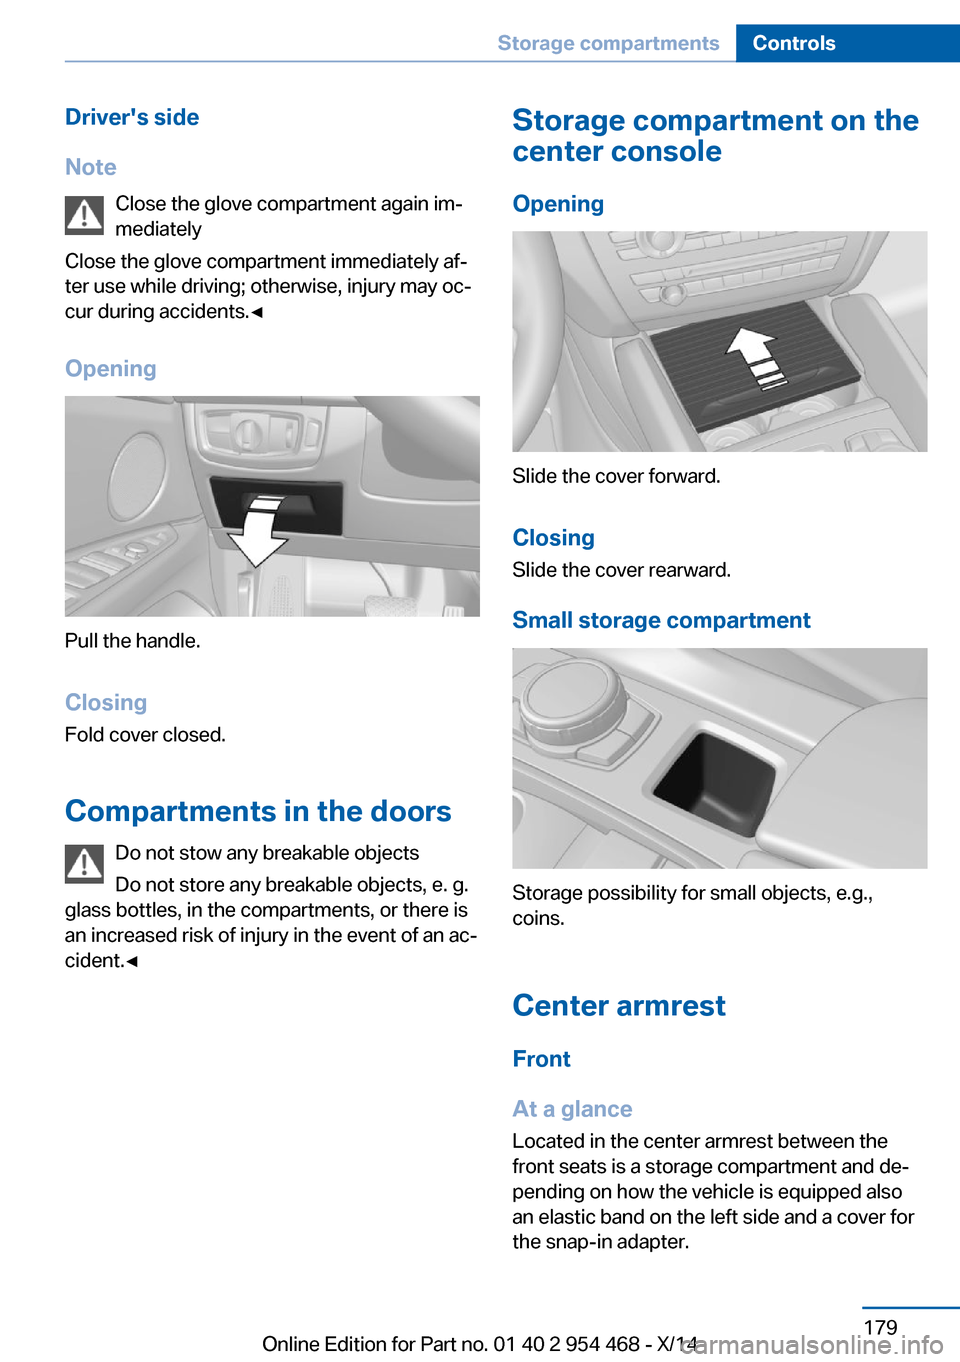
Opening
Pull the handle.
ClosingFold cover closed.
Compartments in the doors Do not stow any breakable objects
Do not store any breakable objects, e. g.
glass bottles, in the compartments, or there is
an increased risk of injury in the event of an ac‐
cident.◀
Storage compartment on the
center console
Opening
Slide the cover forward.
Closing Slide the cover rearward.
Small storage compartment
Storage possibility for small objects, e.g.,
coins.
Center armrest Front
At a glance
Located in the center armrest between the
front seats is a storage compartment and de‐ pending on how the vehicle is equipped also
an elastic band on the left side and a cover for
the snap-in adapter.
Seite 179Storage compartmentsControls179
Online Edition for Part no. 01 40 2 954 468 - X/14
Page 184 of 259
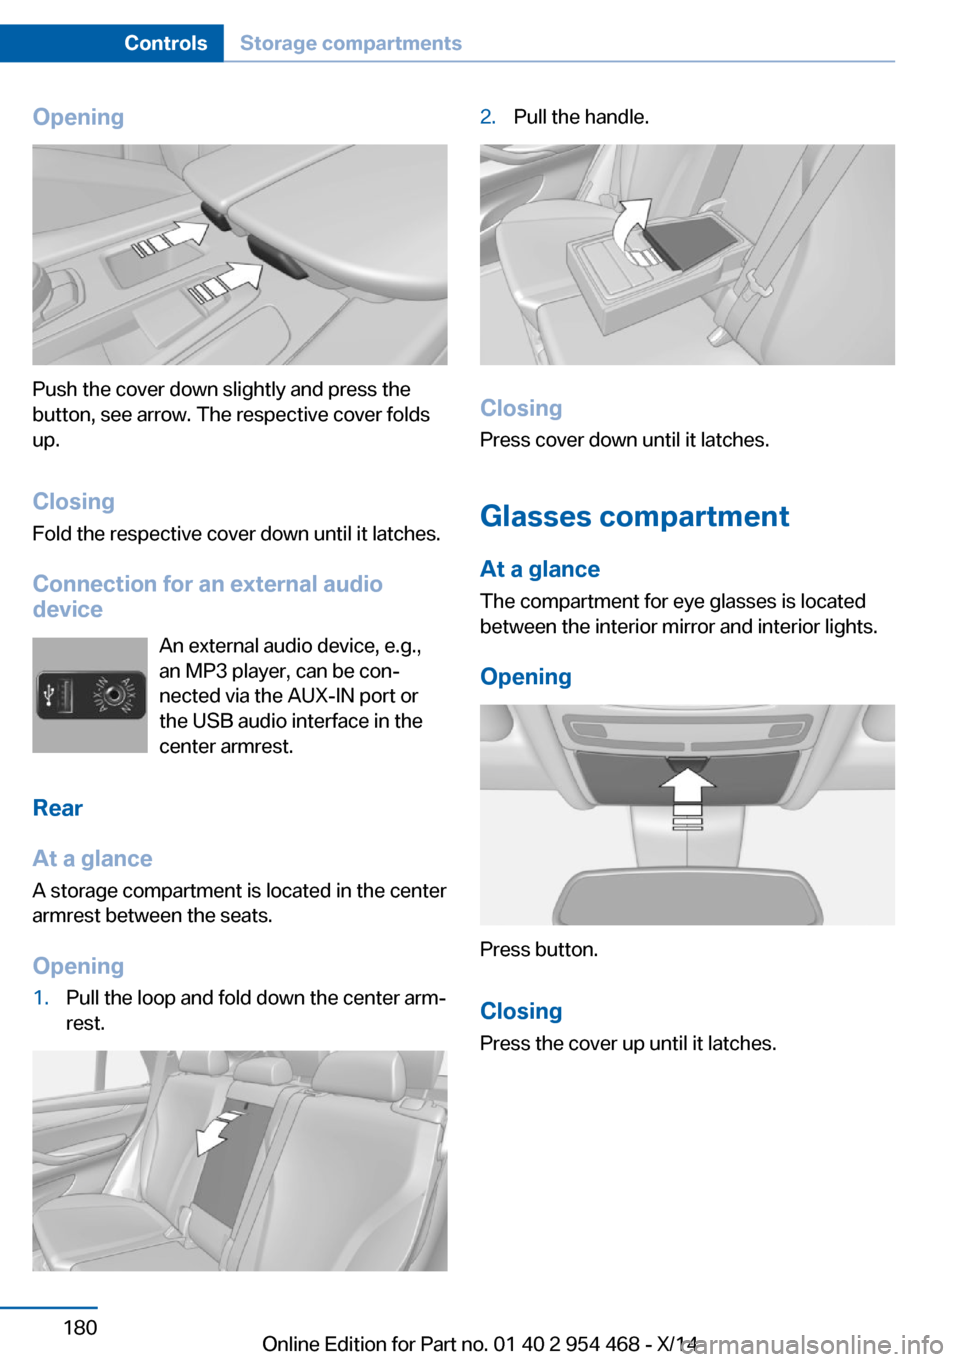
Opening
Push the cover down slightly and press the
button, see arrow. The respective cover folds
up.
ClosingFold the respective cover down until it latches.
Connection for an external audio
device
An external audio device, e.g.,
an MP3 player, can be con‐
nected via the AUX-IN port or
the USB audio interface in the
center armrest.
Rear
At a glance A storage compartment is located in the center
armrest between the seats.
Opening
1.Pull the loop and fold down the center arm‐
rest.2.Pull the handle.
Closing
Press cover down until it latches.
Glasses compartment At a glance
The compartment for eye glasses is located
between the interior mirror and interior lights.
Opening
Press button.
Closing Press the cover up until it latches.
Seite 180ControlsStorage compartments180
Online Edition for Part no. 01 40 2 954 468 - X/14
Page 185 of 259
Cupholders
Hints Shatter-proof containers and no hot
drinks
Use light and shatter-proof containers and do
not transport hot drinks. Otherwise, there is the increased danger of injury in an accident.◀
Unsuitable containers
Do not forcefully push unsuitable con‐
tainers into the cupholders. This may result in
damage.◀
Front
At a glance
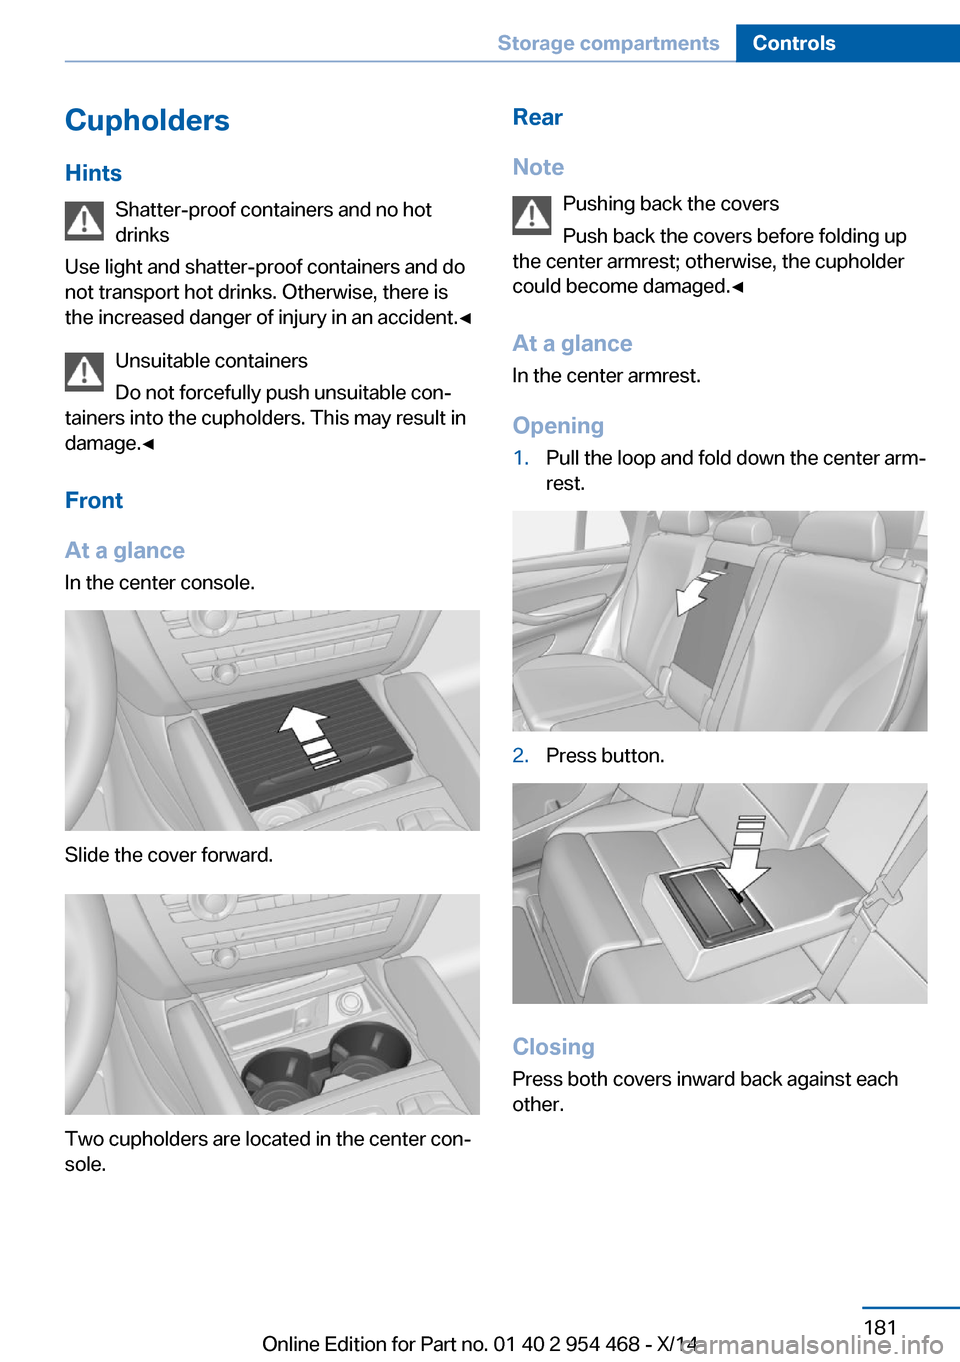
In the center console.
Slide the cover forward.
Two cupholders are located in the center con‐
sole.
Rear
Note Pushing back the covers
Push back the covers before folding up
the center armrest; otherwise, the cupholder
could become damaged.◀
At a glance
In the center armrest.
Opening1.Pull the loop and fold down the center arm‐
rest.2.Press button.
Closing
Press both covers inward back against each
other.
Seite 181Storage compartmentsControls181
Online Edition for Part no. 01 40 2 954 468 - X/14
Page 186 of 259

Clothes hooksDo not obstruct view
When suspending clothing from the
hooks, ensure that it will not obstruct the driv‐
er's view.◀
No heavy objects
Do not hang heavy objects from the
hooks; otherwise, they may present a danger
to passengers during braking and evasive ma‐
neuvers.◀
Two folding clothes hooks are provided in the
rear of the vehicle. To unfold them, press on
the top edge of the clothes hooks.
Storage compartments in thecargo area
Storage space under cargo floor panel
Fold up the cargo floor panel. The storage
space under the cargo floor panel is subdi‐
vided.
Hooks/multi-function hook
Multi-function hooks are available on the left
and right cargo area walls.
Retaining strapA retaining strap is available on the left side
trim for fastening small objects.
Net
Smaller objects can be stored in the net on the
left side of the cargo area.
Storage compartment on the right
side
A waterproof storage compartment is available
on the right side of the cargo area.
Left side storage compartment
Pull the handle.
Lashing eyes in the cargo area with
rail
To secure the cargo, refer to page 191, there
are lashing eyes in the cargo area.
Cargo net, FlexNet To secure the cargo, refer to page 191, the
flexible cargo net can also be used.
Seite 182ControlsStorage compartments182
Online Edition for Part no. 01 40 2 954 468 - X/14
Page 187 of 259
Seite 183Storage compartmentsControls183
Online Edition for Part no. 01 40 2 954 468 - X/14
Page 188 of 259
Online Edition for Part no. 01 40 2 954 468 - X/14
Page 189 of 259
Driving tips
This chapter provides you with information useful in dealing with specific driving and operating modes.Online Edition for Part no. 01 40 2 954 468 - X/14
Page 190 of 259
Things to remember when drivingVehicle features and options
This chapter describes all standard, country-
specific and optional features offered with the
series. It also describes features that are not
necessarily available in your car, e. g., due to
the selected options or country versions. This
also applies to safety-related functions and
systems.
Breaking-in period
General information Moving parts need time to adjust to one an‐
other (break-in time).
The following instructions will help accomplish
a long vehicle life and good efficiency.
During break-in, do not use the Launch Con‐
trol, refer to page 80.
Engine, transmission, and axle drive Always obey the official speed limit.
Up to 1,200 miles/2,000 km
Do not exceed the maximum engine and road
speed:▷For gasoline engine 4,500 rpm and
100 mph/160 km/h.
Avoid full load or kickdown under all circum‐
stances.
From 1,200 miles/2,000 km The engine and vehicle speed can gradually be
increased.
Tires
Tire traction is not optimal due to manufactur‐
ing circumstances when tires are brand-new;
they achieve their full traction potential after a
break-in time.
Drive conservatively for the first
200 miles/300 km.
Brake system
Brakes require an initial break-in period of ap‐
prox. 300 miles/500 km to achieve optimal per‐
formance between brake discs and brake
pads. Drive moderately during this break-in pe‐
riod.
Following part replacement
The same break-in procedures should be ob‐
served if any of the components above-men‐
tioned have to be renewed in the course of the
vehicle's operating life.
General driving notes
Closing the tailgate Drive with the tailgate closed
Only drive with the tailgate closed; other‐
wise, in the event of an accident or braking and
evasive maneuvers, passengers and other traf‐
fic may be injured, and the vehicle may be
damaged. In addition, exhaust fumes may en‐
ter the vehicle interior.◀
If driving with the tailgate open cannot be
avoided:▷Close all windows and the glass sunroof.▷Greatly increase the air flow from the vents.▷Drive moderately.
Hot exhaust system
Hot exhaust system
High temperatures are generated in the
exhaust system.
Seite 186Driving tipsThings to remember when driving186
Online Edition for Part no. 01 40 2 954 468 - X/14