center console BUICK ENCLAVE 2016 Get To Know Guide
[x] Cancel search | Manufacturer: BUICK, Model Year: 2016, Model line: ENCLAVE, Model: BUICK ENCLAVE 2016Pages: 16, PDF Size: 0.77 MB
Page 9 of 16

9
Infotainment System
Storing Favorite Stations
Radio stations from all bands (AM, FM or XMF) can be stored, in any order, on up to six
pages of favorites.
1. Tune in the desired radio station.
2. Press and hold one of the six preset screen buttons until a beep is heard.
3. Repeat the steps for each desired station.
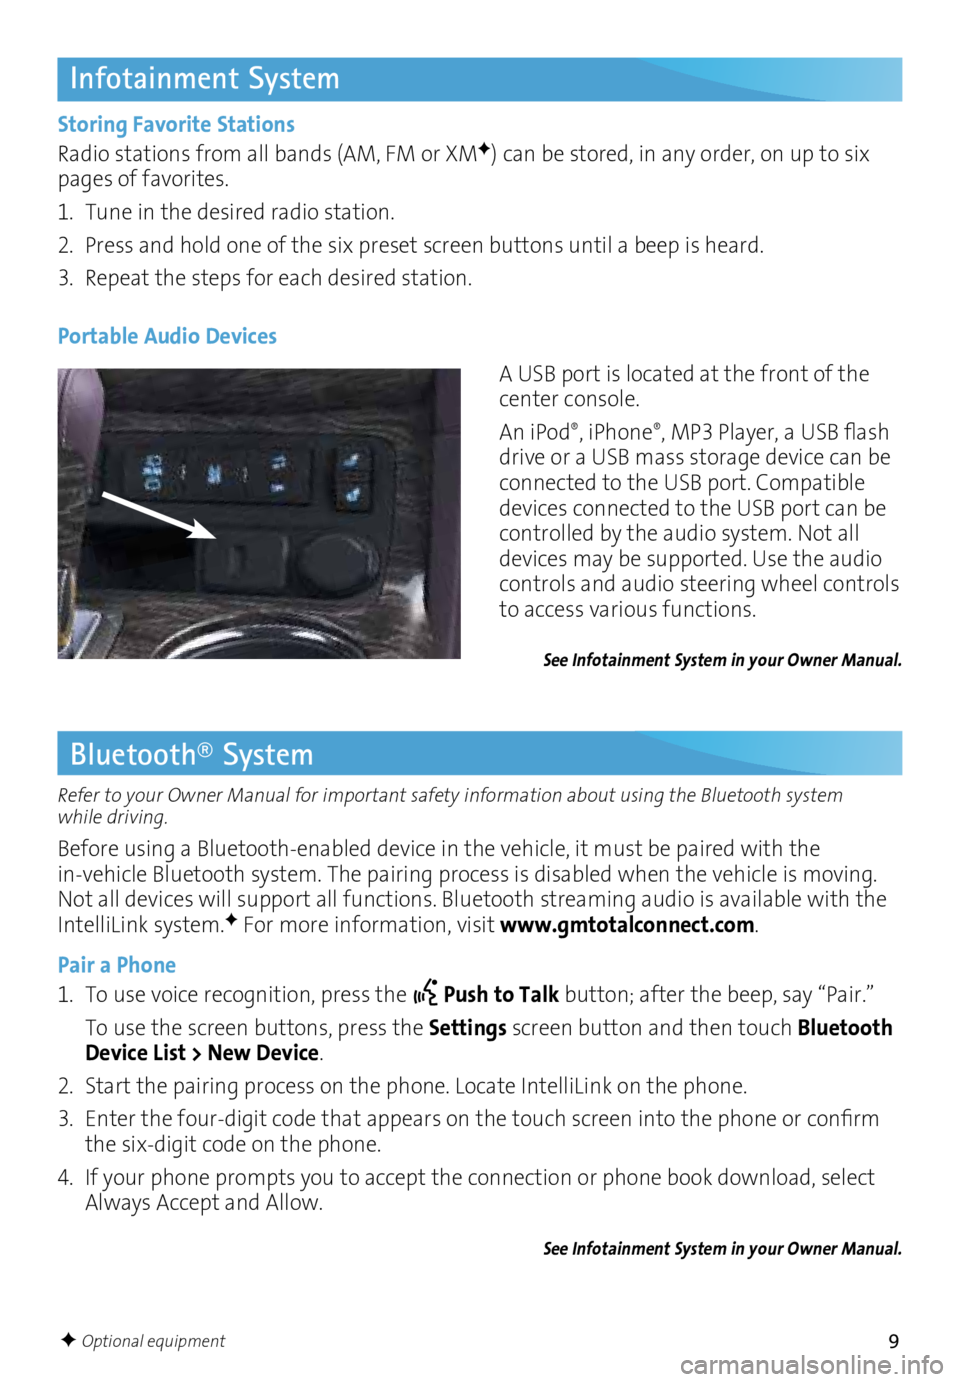
A USB port is located at the front of the
center console.
An iPod
®, iPhone®, MP3 Player, a USB flash
drive or a USB mass storage device can be
connected to the USB port. Compatible
devices connected to the USB port can be
controlled by the audio system. Not all
devices may be supported. Use the audio
controls and audio steering wheel controls
to access various functions.
Portable Audio Devices
See Infotainment System in your Owner Manual.
Bluetooth® System
Refer to your Owner Manual for important safety information about using the Bluetooth system
while driving.
Before using a Bluetooth-enabled device in the vehicle, it must be paired with the
in-vehicle Bluetooth system. The pairing process is disabled when the vehicle is moving.
Not all devices will support all functions. Bluetooth streaming audio is available with the
IntelliLink system.
F For more information, visit www.gmtotalconnect.com.
Pair a Phone
1. To use voice recognition, press the
Push to Talk button; after the beep, say “Pair.”
To use the screen buttons, press the Settings screen button and then touch Bluetooth
Device List > New Device.
2. Start the pairing process on the phone. Locate IntelliLink on the phone.
3. Enter the four-digit code that appears on the touch screen into the phone or confirm
the six-digit code on the phone.
4. If your phone prompts you to accept the connection or phone book download, select
Always Accept and Allow.
See Infotainment System in your Owner Manual.
F Optional equipment
Page 14 of 16

14
Rear Wiper/Washer
Rear Wiper
Press the top of the switch to turn the rear
wiper on or off.
Washer Fluid
Press the bottom of the switch to spray
washer fluid on the rear window.
See Instruments and Controls in your Owner Manual.
Power Liftgate Switch
Press the Power Liftgate OFF switch
to turn off the power liftgate. The lift-gate can only be operated manually
when the switch is in the Off position.
Press the top of the Power Liftgate
switch to turn on the power liftgate.
Note: If the power liftgate does not open or
close, make sure the power liftgate switch is not
in the Off position. The Driver Information Center
will display POWER LIFTGATE OFF if the power
liftgate is disabled.
Open/Close the Power Liftgate
Press and hold the Power Liftgate
button on the Remote Keyless Entry
transmitter until the liftgate starts
moving.
Press the top of the Power Liftgate
switch on the center console.
Press the touchpad (A) in the liftgate
handle to open.
Press the touchpad (B) next to the
liftgate latch to close.
See Keys, Doors and Windows in your Owner Manual.
Power LiftgateF
F Optional equipment
A
B
Page 15 of 16

15
Wind Noise
Towing
Battery Location
Tire Pressure Monitor
If a rear window is open, there may be a buffeting wind noise inside the vehicle.
Opening a front window slightly when a rear window is open will prevent this noise
from occurring.
See Keys, Doors and Windows in your Owner Manual.
The Enclave base towing capacity is 2,000 lbs. Vehicles equipped with the Trailer Towing
Package have a towing capacity of 4,500 lbs.
Use the Tow/Haul mode
F when pulling a heavy trailer to reduce the frequency of
transmission shifts and improve the control of vehicle speed.
To turn the Tow/Haul mode on or off, press the Tow/Haul button on the center console.
See Driving and Operating in your Owner Manual.
The battery is located beneath the floor behind the front passenger seat. Jump-start posi-tive and negative posts are located under the hood on the passenger’s side of the vehicle.
See Vehicle Care in your Owner Manual.
The Low Tire Pressure warning light on the instrument cluster illuminates when one
or more of the vehicle’s tires is significantly underinflated. Fill the tires to the proper tire
pressures. The proper tire pressures for the vehicle are listed on the Tire and Loading
Information label, located below the driver’s door latch. Current tire pressures can be
viewed in the Driver Information Center.
Tire pressure is affected by cold weather and distance driven. If the low tire pressure
warning light illuminates when the vehicle is first started in cooler temperatures and
then turns off as the vehicle is driven, check for the proper tire pressures.
Refer to your Owner Manual for additional information about normal monthly tire maintenance.
See Vehicle Care in your Owner Manual.
F Optional equipment