lock CADILLAC CT5 2020 Service Manual
[x] Cancel search | Manufacturer: CADILLAC, Model Year: 2020, Model line: CT5, Model: CADILLAC CT5 2020Pages: 359, PDF Size: 6.04 MB
Page 91 of 359
Cadillac CT5 Owner Manual (GMNA-Localizing-U.S./Canada-13060105) -
2020 - CRC - 2/14/20
90 STORAGE
Storage
Storage Compartments
Storage Compartments . . . . . . . . . . . . 90
Glove Box . . . . . . . . . . . . . . . . . . . . . . . . . . 90
Cupholders . . . . . . . . . . . . . . . . . . . . . . . . . 90
Center Console Storage . . . . . . . . . . . . 91
Umbrella Storage . . . . . . . . . . . . . . . . . . 91
Additional Storage Features
Cargo Tie-Downs . . . . . . . . . . . . . . . . . . . 92
Storage Compartments
{Warning
Do not store heavy or sharp objects
in storage compartments. In a
crash, these objects may cause the
cover to open and could result in
injury.
Glove Box
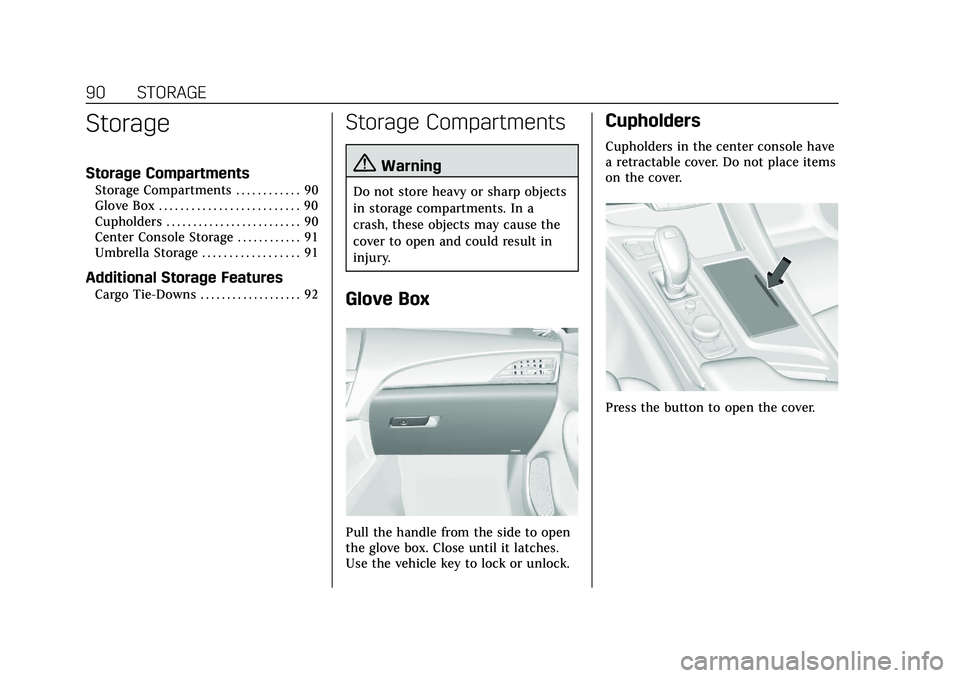
Pull the handle from the side to open
the glove box. Close until it latches.
Use the vehicle key to lock or unlock.
Cupholders
Cupholders in the center console have
a retractable cover. Do not place items
on the cover.
Press the button to open the cover.
Page 94 of 359
Cadillac CT5 Owner Manual (GMNA-Localizing-U.S./Canada-13060105) -
2020 - CRC - 2/14/20
INSTRUMENTS AND CONTROLS 93
Instruments and
Controls
Controls
Steering Wheel Adjustment . . . . . . . 94
Steering Wheel Controls . . . . . . . . . . 94
Heated Steering Wheel . . . . . . . . . . . . 94
Horn . . . . . . . . . . . . . . . . . . . . . . . . . . . . . . . . 95
Windshield Wiper/Washer . . . . . . . . 95
Compass . . . . . . . . . . . . . . . . . . . . . . . . . . . . 97
Clock . . . . . . . . . . . . . . . . . . . . . . . . . . . . . . . 97
Power Outlets . . . . . . . . . . . . . . . . . . . . . . 97
Wireless Charging . . . . . . . . . . . . . . . . . 98
Warning Lights, Gauges, and
Indicators
Warning Lights, Gauges, andIndicators . . . . . . . . . . . . . . . . . . . . . . . 100
Instrument Cluster . . . . . . . . . . . . . . . 101
Speedometer . . . . . . . . . . . . . . . . . . . . . . 104
Odometer . . . . . . . . . . . . . . . . . . . . . . . . . 104
Trip Odometer . . . . . . . . . . . . . . . . . . . . 104
Tachometer . . . . . . . . . . . . . . . . . . . . . . . 104
Fuel Gauge . . . . . . . . . . . . . . . . . . . . . . . . 104
Engine Coolant Temperature Gauge . . . . . . . . . . . . . . . . . . . . . . . . . . . . 105
Seat Belt Reminders . . . . . . . . . . . . . . 105
Airbag Readiness Light . . . . . . . . . . 106 Passenger Airbag Status
Indicator . . . . . . . . . . . . . . . . . . . . . . . . . 107
Charging System Light . . . . . . . . . . . 107
Malfunction Indicator Lamp (Check Engine Light) . . . . . . . . . . . 108
Brake System Warning Light . . . . 110
Electric Parking Brake Light . . . . . 110
Service Electric Parking Brake Light . . . . . . . . . . . . . . . . . . . . . . . . . . . . . 110
Antilock Brake System (ABS) Warning Light . . . . . . . . . . . . . . . . . . 111
Performance Shifting Light . . . . . . 111
Automatic Vehicle Hold (AVH) Light . . . . . . . . . . . . . . . . . . . . . . . . . . . . . 111
Lane Keep Assist (LKA) Light . . . 111
Vehicle Ahead Indicator . . . . . . . . . 112
Pedestrian Ahead Indicator . . . . . . 112
Traction Off Light . . . . . . . . . . . . . . . . 112
StabiliTrak OFF Light . . . . . . . . . . . . 113
Traction Control System (TCS)/ StabiliTrak Light . . . . . . . . . . . . . . . . 113
Engine Coolant Temperature Warning Light . . . . . . . . . . . . . . . . . . 113
Driver Mode Control Light . . . . . . . 114
Tire Pressure Light . . . . . . . . . . . . . . . 114
Engine Oil Pressure Light . . . . . . . . 115
Low Fuel Warning Light . . . . . . . . . 115
Security Light . . . . . . . . . . . . . . . . . . . . . 115
High-Beam On Light . . . . . . . . . . . . . 116
Lamps On Reminder . . . . . . . . . . . . . 116 Cruise Control Light . . . . . . . . . . . . . . 116
Door Ajar Light . . . . . . . . . . . . . . . . . . . 117
Information Displays
Driver Information
Center (DIC) . . . . . . . . . . . . . . . . . . . . . 117
Head-Up Display (HUD) . . . . . . . . . 119
Vehicle Messages
Vehicle Messages . . . . . . . . . . . . . . . . . 123
Engine Power Messages . . . . . . . . . . 123
Vehicle Speed Messages . . . . . . . . . 124
Vehicle Personalization
Vehicle Personalization . . . . . . . . . . 124
Universal Remote System
Universal Remote System . . . . . . . . 130
Universal Remote System Programming . . . . . . . . . . . . . . . . . . . 130
Universal Remote System Operation . . . . . . . . . . . . . . . . . . . . . . . . 132
Page 95 of 359
Cadillac CT5 Owner Manual (GMNA-Localizing-U.S./Canada-13060105) -
2020 - CRC - 2/14/20
94 INSTRUMENTS AND CONTROLS
Controls
Steering Wheel Adjustment
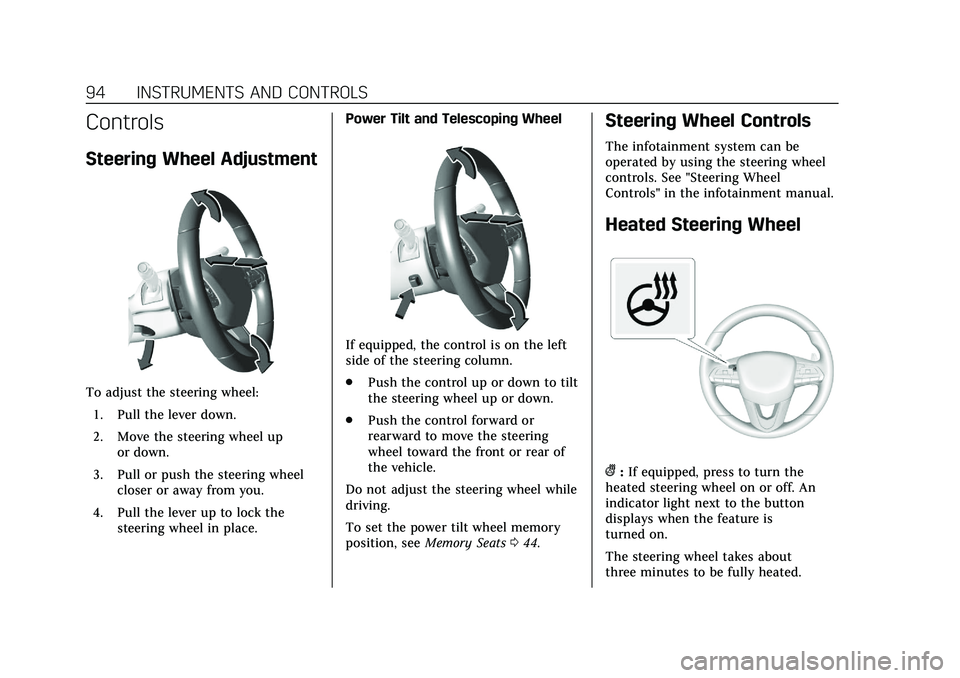
To adjust the steering wheel:1. Pull the lever down.
2. Move the steering wheel up or down.
3. Pull or push the steering wheel closer or away from you.
4. Pull the lever up to lock the steering wheel in place. Power Tilt and Telescoping Wheel
If equipped, the control is on the left
side of the steering column.
.
Push the control up or down to tilt
the steering wheel up or down.
. Push the control forward or
rearward to move the steering
wheel toward the front or rear of
the vehicle.
Do not adjust the steering wheel while
driving.
To set the power tilt wheel memory
position, see Memory Seats 044.
Steering Wheel Controls
The infotainment system can be
operated by using the steering wheel
controls. See "Steering Wheel
Controls" in the infotainment manual.
Heated Steering Wheel
(:If equipped, press to turn the
heated steering wheel on or off. An
indicator light next to the button
displays when the feature is
turned on.
The steering wheel takes about
three minutes to be fully heated.
Page 96 of 359
Cadillac CT5 Owner Manual (GMNA-Localizing-U.S./Canada-13060105) -
2020 - CRC - 2/14/20
INSTRUMENTS AND CONTROLS 95
If equipped with a remote start heated
steering wheel, the heated steering
wheel and indicator will turn on
automatically.
If equipped with auto heated seats,
the heated steering wheel will turn on
along with the heated seats when it is
cold outside. The heated steering
wheel indicator light may not come
on. SeeHeated and Ventilated Front
Seats 046.
Horn
Pressaon the steering wheel pad to
sound the horn.
Windshield Wiper/Washer
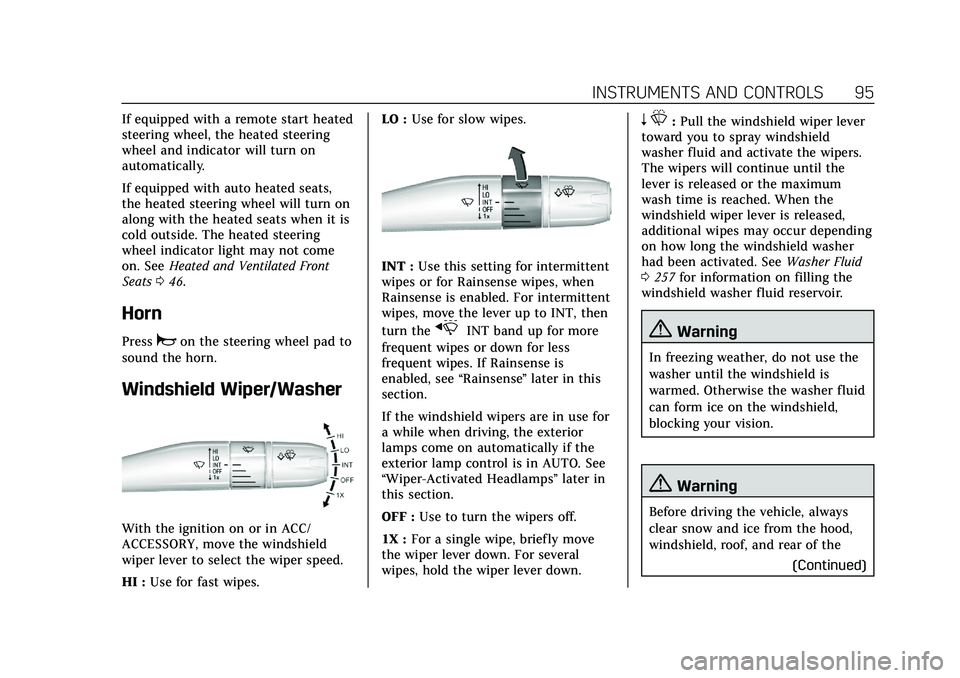
With the ignition on or in ACC/
ACCESSORY, move the windshield
wiper lever to select the wiper speed.
HI : Use for fast wipes. LO :
Use for slow wipes.
INT : Use this setting for intermittent
wipes or for Rainsense wipes, when
Rainsense is enabled. For intermittent
wipes, move the lever up to INT, then
turn the
xINT band up for more
frequent wipes or down for less
frequent wipes. If Rainsense is
enabled, see “Rainsense”later in this
section.
If the windshield wipers are in use for
a while when driving, the exterior
lamps come on automatically if the
exterior lamp control is in AUTO. See
“Wiper-Activated Headlamps” later in
this section.
OFF : Use to turn the wipers off.
1X : For a single wipe, briefly move
the wiper lever down. For several
wipes, hold the wiper lever down.
n L: Pull the windshield wiper lever
toward you to spray windshield
washer fluid and activate the wipers.
The wipers will continue until the
lever is released or the maximum
wash time is reached. When the
windshield wiper lever is released,
additional wipes may occur depending
on how long the windshield washer
had been activated. See Washer Fluid
0 257 for information on filling the
windshield washer fluid reservoir.
{Warning
In freezing weather, do not use the
washer until the windshield is
warmed. Otherwise the washer fluid
can form ice on the windshield,
blocking your vision.
{Warning
Before driving the vehicle, always
clear snow and ice from the hood,
windshield, roof, and rear of the
(Continued)
Page 98 of 359
Cadillac CT5 Owner Manual (GMNA-Localizing-U.S./Canada-13060105) -
2020 - CRC - 2/14/20
INSTRUMENTS AND CONTROLS 97
wiper speed. For this feature to work,
the exterior lamp control must be
in AUTO.
The wiper-activated headlamps
immediately turn off when the
ignition is turned to off, or the
windshield wiper control is turned off.
Compass
The vehicle may have a compass
display on the Driver Information
Center (DIC). The compass receives its
heading and other information from
the Global Positioning System (GPS)
antenna, StabiliTrak/Electronic
Stability Control (ESC), and vehicle
speed information.
The compass system is designed to
operate for a certain number of miles
or degrees of turn before needing a
signal from the GPS satellites. When
the compass display shows CAL, drive
the vehicle for a short distance in an
open area where it can receive a GPS
signal. The compass system will
automatically determine when a GPS
signal is restored and provide a
heading again.
Clock
The time and date for the clock can be
set using the infotainment system. See
“Time/Date”in “System ”under
“Settings ”in the infotainment manual.
Power Outlets
The accessory power outlets can be
used to plug in electrical equipment,
such as a cell phone or MP3 player.
The vehicle has two accessory power
outlets:
.
Inside the center console
storage area.
. On the rear of the center floor
console.
Lift the cover to access the accessory
power outlet.
Certain electrical accessories may not
be compatible with the accessory
power outlet and could overload a
vehicle circuit breaker or adapter fuse.
If overloaded, the circuit breaker will
reset after all devices are disconnected
or if Retained Accessory Power (RAP)
is turned off and then back on. See
Retained Accessory Power (RAP) 0169. Wait one minute to allow the circuit
breaker to reset before reconnecting
devices or turning RAP back on. If the
problem continues, the issue could be
within your device. Try another
known good device to make sure the
circuit breaker is operating properly.
If this does not resolve your problem,
see your dealer.
It is possible to replace the factory
power outlet with a cigar lighter
receptacle, if desired. This requires the
factory installed circuit breaker to be
replaced with a standard minifuse by
the dealer. A minifuse will not reset
and will have to be replace if blown.
Caution
Failure to replace the circuit
breaker with the minifuse could
overheat the cigar lighter and
damage the vehicle.
When adding electrical equipment, be
sure to follow the proper installation
instructions included with the
equipment. See Add-On Electrical
Equipment 0236.
Page 112 of 359
Cadillac CT5 Owner Manual (GMNA-Localizing-U.S./Canada-13060105) -
2020 - CRC - 2/14/20
INSTRUMENTS AND CONTROLS 111
If this light stays on, the vehicle
should be taken to a dealer as soon as
possible. SeeElectric Parking Brake
0 180. A message may also display in
the Driver Information Center (DIC).
Antilock Brake System
(ABS) Warning Light
This warning light should come on
briefly when the vehicle is turned on.
If the light does not come on, have it
fixed so it will be ready to warn if
there is a problem.
If the light comes on while driving,
safely stop as soon as it is possible
and turn off the vehicle. Then turn on
the vehicle again to reset the system.
If the ABS warning light stays on,
or comes on again while driving, the
vehicle needs service. A chime may
also sound when the light stays on. If the ABS warning light is the only
light on, the vehicle has regular
brakes, but ABS is not functioning.
If both the ABS warning light and the
brake system warning light are on,
ABS is not functioning and there is a
problem with the regular brakes. See
your dealer for service.
See
Brake System Warning Light 0110.
Performance Shifting Light
If equipped, this light may display
when Sport Mode is activated and
certain driving conditions are met.
Sport Mode detects when the vehicle
is being driven in a competitive
manner, and adjusts the shifting of
the gears accordingly. The color of this
light may change based on how
competitively the vehicle is being
driven. See Driver Mode Control 0185.
Automatic Vehicle Hold
(AVH) Light
This light comes on when AVH is
actively holding the vehicle. See
Automatic Vehicle Hold (AVH) 0182.
Lane Keep Assist (LKA)
Light
After the vehicle is started, this light
turns off and stays off if LKA has not
been turned on or is unavailable.
Page 128 of 359
Cadillac CT5 Owner Manual (GMNA-Localizing-U.S./Canada-13060105) -
2020 - CRC - 2/14/20
INSTRUMENTS AND CONTROLS 127
.Remote Mirror Folding
. Rain Sense Wipers
. Hands Free Liftgate/Trunk Control
Chime Volume
This setting determines the chime
volume level.
Touch the controls on the
infotainment display to adjust the
volume.
Reverse Tilt Mirror
When on, both the driver and
passenger, driver, or passenger outside
mirrors will tilt downward when the
vehicle is shifted to R (Reverse) to
improve visibility of the ground near
the rear wheels. They may return to
their previous driving position when
the vehicle is shifted out of
R (Reverse) or the engine is turned off.
See Reverse Tilt Mirrors 031.
Touch Off, On - Driver and Passenger,
On - Driver, or On - Passenger. Remote Mirror Folding
This setting adjusts the outside
mirrors when locking and unlocking
the vehicle. Press
Qon the remote key
or lock button on the door handle to
fold the mirrors in. Press
Kon the
remote key or unlock button on the
door handle to unfold the mirrors. See
Folding Mirrors 030.
Touch Off or On.
Rain Sense Wipers
This setting automatically turns on
the wipers when moisture is detected
and the wiper switch is in
intermittent mode.
Touch Disabled or Enabled.
Hands Free Liftgate/Trunk Control
The trunk may be operated with a
kicking motion under the rear bumper
at the location of the projected logo.
See Trunk 020.
Touch Off, or On-Open Only.
Lighting
Touch and the following may display:
. Vehicle Locator Lights .
Exit Lighting
Vehicle Locator Lights
This setting flashes the vehicle’s
headlamps when
Kis pressed on the
remote key.
Touch Off or On.
Exit Lighting
This setting specifies how long the
headlamps stay on after the vehicle is
turned off and exited.
Touch Off, 30 Seconds, 60 Seconds,
or 120 Seconds.
Power Door Locks
Touch and the following may display:
. Auto Door Unlock
. Delayed Door Lock
Auto Door Unlock
This setting allows selection of which
doors will automatically unlock when
the vehicle is shifted into P (Park).
Touch Off, All Doors, or Driver Door.
Page 129 of 359
Cadillac CT5 Owner Manual (GMNA-Localizing-U.S./Canada-13060105) -
2020 - CRC - 2/14/20
128 INSTRUMENTS AND CONTROLS
Delayed Door Lock
This setting delays the locking of the
vehicle’s doors.
Touch Off or On.
Remote Lock, Unlock, Start
Touch and the following may display:
.Remote Unlock Light Feedback
. Remote Lock Feedback
. Remote Door Unlock
. Remote Start Auto Cool Seats
. Remote Start Auto Heat Seats
. Remote Window Operation
. Passive Door Unlock
. Passive Door Lock
. Remote Left in Vehicle Alert
. Remote Removed from Vehicle
Alert
Remote Unlock Light Feedback
This setting flashes the exterior lamps
when the vehicle is unlocked with the
remote key.
Touch Off or Flash Lights. Remote Lock Feedback
This setting specifies how the vehicle
responds when the vehicle is locked
with the remote key.
Touch Off, Lights and Horn, Lights
Only, or Horn Only.
Remote Door Unlock
This setting specifies whether all
doors, or just the driver door, unlock
when pressing
Kon the remote key.
Touch All Doors or Driver Door.
Remote Start Auto Cool Seats
This setting automatically turns on
the ventilated seats when using the
remote start function on warm days.
See Heated and Ventilated Front Seats
0 46 and
Remote Vehicle Start 015.
Touch Off or On.
Remote Start Auto Heat Seats
This setting automatically turns on
the heated seats when using the
remote start function on cold days. See
Heated and Ventilated Front Seats
0 46 and
Remote Vehicle Start 015.
If equipped with auto heated steering
wheel, this feature will turn on when
the remote start auto heated seats
turn on.
Touch Off or On.
Remote Window Operation
If equipped, this feature enables
remote operation of the windows with
the remote key. See Remote Keyless
Entry (RKE) System Operation 08.
Touch Off or On.
Passive Door Unlock
This setting specifies which doors
unlock when using the button on the
driver door handle to unlock the
vehicle.
Touch Off, All Doors or Driver
Door Only.
Passive Door Lock
This setting specifies if the vehicle will
automatically lock, or lock and
provide an alert after all the doors are
closed, and you walk away from the
Page 130 of 359
Cadillac CT5 Owner Manual (GMNA-Localizing-U.S./Canada-13060105) -
2020 - CRC - 2/14/20
INSTRUMENTS AND CONTROLS 129
vehicle with the remote key. See
Remote Keyless Entry (RKE) System
Operation08.
Touch Off, On with Horn Chirp, or On.
Remote Left in Vehicle Alert
This feature sounds an alert when the
remote key is left in the vehicle. This
menu also enables Remote No Longer
in Vehicle Alert.
Touch Off or On.
Remote Removed from Vehicle
Alert
This feature beeps the horn 3 times
when exiting a running vehicle with
the remote key.
Touch Off or On.
Seating Position
Touch and the following may display:
. Seat Entry Memory
. Seat Exit Memory Seat Entry Memory
This feature automatically recalls the
previously stored 1 or 2 button
positions when the ignition is changed
from off to on or ACC/ACCESSORY.
See
Memory Seats 044.
Touch On or Off.
Seat Exit Memory
This feature automatically recalls the
previously stored exit button positions
when the ignition is changed from on
or ACC/ACCESSORY to off if the driver
door is open or opened. See Memory
Seats 044.
Touch Off or On.
Teen Driver
See “Teen Driver” under“Settings ”in
the infotainment manual.
Valet Mode
This will lock the infotainment system
and steering wheel controls. It may
also limit access to vehicle storage
locations, if equipped.
To enable valet mode:
1. Enter a four-digit code on the keypad.
2. Touch Enter to go to the confirmation screen.
3. Re-enter the four-digit code.
Touch Lock or Unlock to lock or
unlock the system. Touch Back to go
back to the previous menu.
Page 136 of 359
Cadillac CT5 Owner Manual (GMNA-Localizing-U.S./Canada-13060105) -
2020 - CRC - 2/14/20
LIGHTING 135
.The other vehicle's lamps are
missing, damaged, obstructed from
view, or otherwise undetected.
. The other vehicle's lamps are
covered with dirt, snow, and/or
road spray.
. The other vehicle's lamps cannot
be detected due to dense exhaust,
smoke, fog, snow, road spray, mist,
or other airborne obstructions.
. The vehicle's windshield is dirty,
cracked, or obstructed by
something that blocks the view of
the light sensor.
. The vehicle is loaded such that the
front end points upward, causing
the light sensor to aim high and
not detect headlamps and
taillamps.
. The vehicle is being driven on
winding or hilly roads.
The automatic high-beam headlamps
may need to be disabled if any of the
above conditions exist.Exterior Lamps Off
Reminder
A warning chime sounds if the driver
door is opened while the ignition is off
and the exterior lamps are on.
Headlamp High/Low-Beam
Changer
3: Push the turn signal lever away
from you and release, to turn the high
beams on. To return to low beams,
push the lever again or pull it toward
you and release.
This indicator light turns on in the
instrument cluster when the
high-beam headlamps are on.
Flash-to-Pass
To flash the high beams, pull the turn
signal lever toward you, and release.
Daytime Running
Lamps (DRL)
DRL can make it easier for others to
see the front of your vehicle during
the day. Fully functional DRL are
required on all vehicles first sold in
Canada.
If equipped, the DRL will come on
when all of the following conditions
are met:
. The ignition is on.
. The exterior lamp control is
in AUTO.
. The light sensor determines it is
daytime.
When the DRL are on, the taillamps,
sidemarker lamps, and other lamps
will not be on.
The DRL turn off when the headlamps
are turned to
Oor the ignition is off.
For vehicles first sold in Canada, the
DRL can only be turned off when the
vehicle is parked.