buttons CADILLAC CTS 2013 2.G Infotainment Manual
[x] Cancel search | Manufacturer: CADILLAC, Model Year: 2013, Model line: CTS, Model: CADILLAC CTS 2013 2.GPages: 70, PDF Size: 0.65 MB
Page 49 of 70
Black plate (49,1)Cadillac CTS/CTS-V Navigation System - 2013 - crc - 8/21/12
Infotainment System 49
3. Using the desired method ofentering a destination, enter the
waypoint. See “Destination”
previously for more information.
The system calculates and
highlights the route. The route is
now ready to be started.
4. To add more waypoints, press the DEST control button, then
select the Add screen button,
where the next waypoint should
fall on the route. The system
calculates and highlights the
route. The route is now ready to
be started.
To delete a waypoint:
1. Press the DEST control button.
2. Press Delete next to the waypoint to be deleted.
3. The system displays a pop-up confirmation message. Press
Yes to delete the waypoint;
press No to cancel this
operation. The system calculates
and highlights the route. The
route is now ready to be started. Suspend Guidance
Press this screen button, from the
Route screen, to put the current
route on hold.
Resume Guidance
Press this screen button, from the
Route screen, to resume guidance
on the current route.
Cancel Guidance
Press this screen button, from the
Route screen, to cancel the current
route. A confirmation window
displays. Select Yes to cancel; No to
cancel this operation.
Preset Destinations
—Adding
or Changing
This feature allows addition or
changes to one of six preset
destinations. When a destination
has been added as a preset
destination, it is available to select
from the Select Destination screen. See
“Preset Destination” previously
for information on how to select a
preset destination as a final
destination.
Storing the Current Destination
To store the current final destination
as a preset destination:
1. Press the Add screen button
from the map screen. The
Address Book screen appears.
2. Press the Name screen button. An alpha-keyboard displays.
Enter the name.
3. Press and hold one of the six screen buttons at the bottom of
the screen until the text within
the button changes.
The name appears in that preset
destination screen button and is
now available to select from the
Select Destination screen.
Page 50 of 70
Black plate (50,1)Cadillac CTS/CTS-V Navigation System - 2013 - crc - 8/21/12
50 Infotainment System
Adding or Changing Destinations
1. Press the DEST control button.
2. Press the Address Book screenbutton.
3. Select the address book entry to add or change.
4. Press and hold one of the six screen buttons at the bottom of
the screen until the text within
the button changes.
The name appears in that preset
destination screen button and is
now available to select from the
Select Destination screen.
Address Book —Storing
Destinations
To store the current final destination
to the address book, press the Add
screen button from the map screen
while touch-tapping to the final
destination. The system
automatically saves the final
destination information in the
address book.
Address Book —Editing and
Deleting Entries
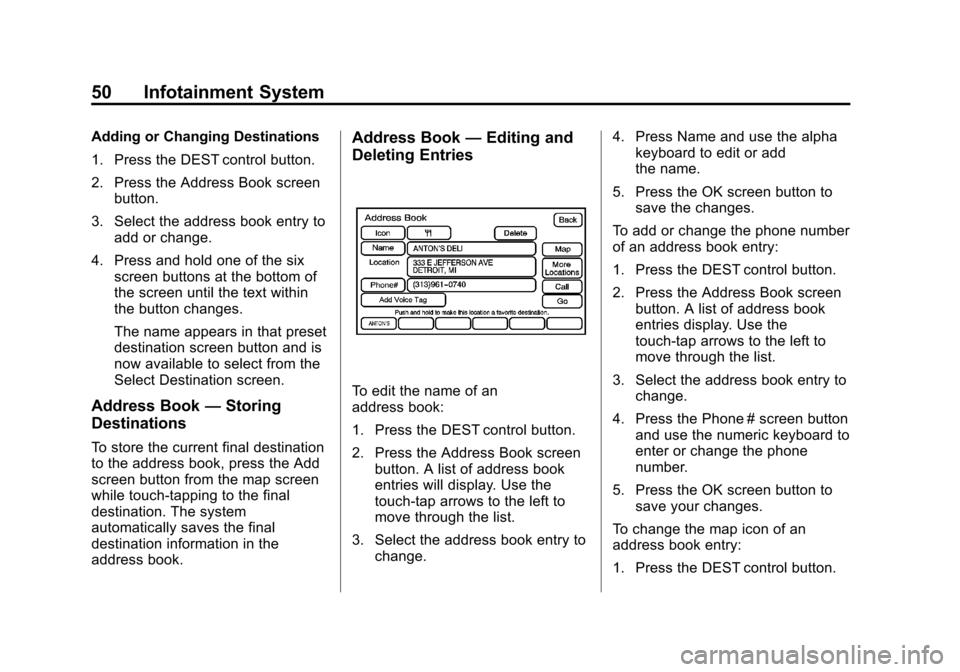
To edit the name of an
address book:
1. Press the DEST control button.
2. Press the Address Book screen
button. A list of address book
entries will display. Use the
touch-tap arrows to the left to
move through the list.
3. Select the address book entry to change. 4. Press Name and use the alpha
keyboard to edit or add
the name.
5. Press the OK screen button to save the changes.
To add or change the phone number
of an address book entry:
1. Press the DEST control button.
2. Press the Address Book screen button. A list of address book
entries display. Use the
touch-tap arrows to the left to
move through the list.
3. Select the address book entry to change.
4. Press the Phone # screen button and use the numeric keyboard to
enter or change the phone
number.
5. Press the OK screen button to save your changes.
To change the map icon of an
address book entry:
1. Press the DEST control button.
Page 52 of 70
Black plate (52,1)Cadillac CTS/CTS-V Navigation System - 2013 - crc - 8/21/12
52 Infotainment System
Sound
Press the CONFIG control button to
enter the Menu options, then press
the CONFIG control button
repeatedly until Sound is selected or
press the Sound screen button to
make speaker and DSP (Digital
Signal Processing) adjustments.
SeeAM-FM Radio on page 10.
Radio
Press the CONFIG control button to
enter the menu options, then press
the CONFIG control button
repeatedly until Radio is selected or
press the Radio screen button to
make changes for radio information
displayed, preset pages, and
Automatic Volume Control. See
AM-FM Radio on page 10.
Nav (Navigation)
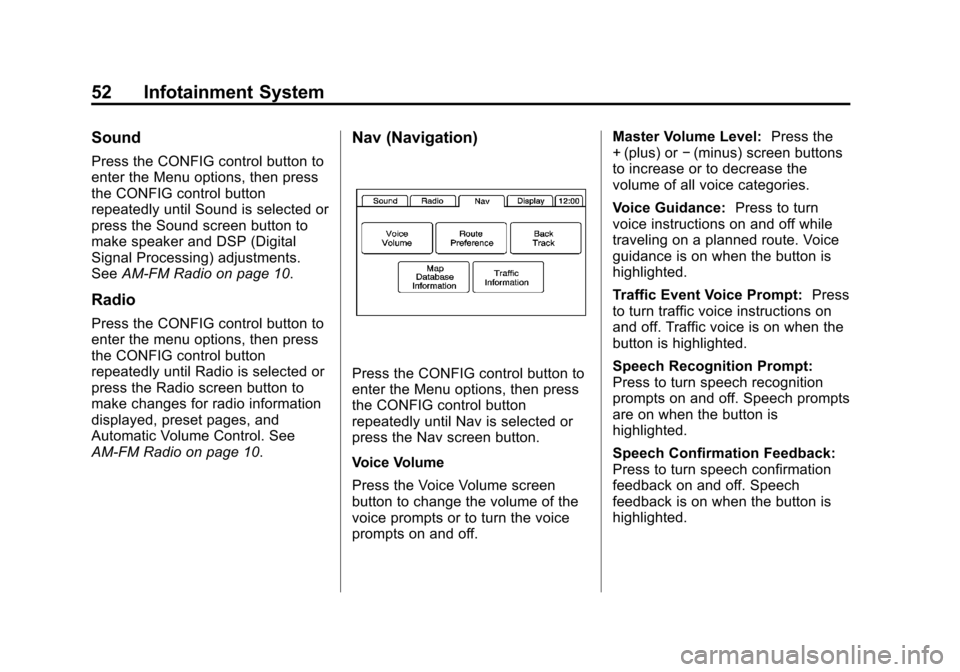
Press the CONFIG control button to
enter the Menu options, then press
the CONFIG control button
repeatedly until Nav is selected or
press the Nav screen button.
Voice Volume
Press the Voice Volume screen
button to change the volume of the
voice prompts or to turn the voice
prompts on and off. Master Volume Level:
Press the
+ (plus) or −(minus) screen buttons
to increase or to decrease the
volume of all voice categories.
Voice Guidance: Press to turn
voice instructions on and off while
traveling on a planned route. Voice
guidance is on when the button is
highlighted.
Traffic Event Voice Prompt: Press
to turn traffic voice instructions on
and off. Traffic voice is on when the
button is highlighted.
Speech Recognition Prompt:
Press to turn speech recognition
prompts on and off. Speech prompts
are on when the button is
highlighted.
Speech Confirmation Feedback:
Press to turn speech confirmation
feedback on and off. Speech
feedback is on when the button is
highlighted.
Page 55 of 70
Black plate (55,1)Cadillac CTS/CTS-V Navigation System - 2013 - crc - 8/21/12
Infotainment System 55
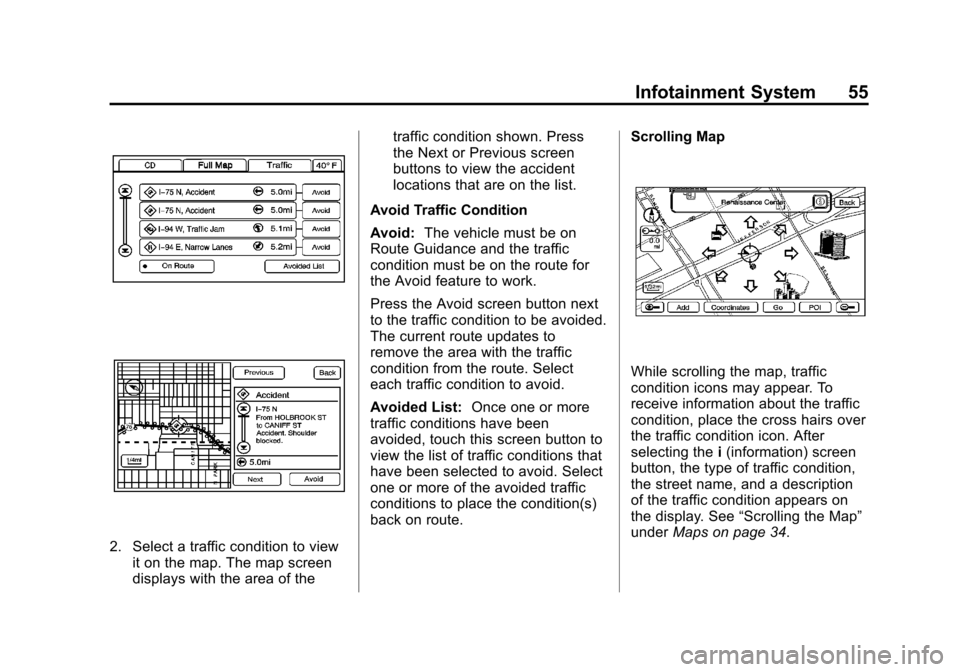
2. Select a traffic condition to viewit on the map. The map screen
displays with the area of the traffic condition shown. Press
the Next or Previous screen
buttons to view the accident
locations that are on the list.
Avoid Traffic Condition
Avoid: The vehicle must be on
Route Guidance and the traffic
condition must be on the route for
the Avoid feature to work.
Press the Avoid screen button next
to the traffic condition to be avoided.
The current route updates to
remove the area with the traffic
condition from the route. Select
each traffic condition to avoid.
Avoided List: Once one or more
traffic conditions have been
avoided, touch this screen button to
view the list of traffic conditions that
have been selected to avoid. Select
one or more of the avoided traffic
conditions to place the condition(s)
back on route. Scrolling Map
While scrolling the map, traffic
condition icons may appear. To
receive information about the traffic
condition, place the cross hairs over
the traffic condition icon. After
selecting the
i(information) screen
button, the type of traffic condition,
the street name, and a description
of the traffic condition appears on
the display. See “Scrolling the Map”
under Maps on page 34.
Page 58 of 70
Black plate (58,1)Cadillac CTS/CTS-V Navigation System - 2013 - crc - 8/21/12
58 Infotainment System
Brightness/Contrast/Mode
Press this screen button to change
the brightness, contrast, and mode
of the display.
](Brightness):Press the + (plus)
or −(minus) screen buttons to
increase or decrease the brightness
of the screen.
_(Contrast): Press the + (plus) or
− (minus) screen buttons to increase
or decrease the contrast of the
screen.
Auto (Automatic): Press to
automatically adjust the screen
background depending on exterior
lighting conditions.
Day: Press to make the map
background brighter.
Night: Press to make the map
background darker.
The dimming change button on the
navigation faceplate is used to
toggle between these dimming
modes.
Setting the Clock
The navigation system time and the
analog clock are separate features.
Changing the time through the
navigation system will not change
the time on the analog clock and
vice versa. See “Analog Clock”in
the owner manual.
To set the time:
1. Press the CONFIG control button to enter the menu
options, then press the CONFIG
control button repeatedly until
the time is selected or press the
clock screen button located in
the upper right corner of the
screen.
2. Press the Hours and Minutes –
(minus) and + (plus) signs to
decrease and to increase
the time.
12/24 HR Format: Select the 12
HR screen button for standard time;
select the 24 HR screen button for
military time. DD/MM or MM/DD Format:
Press
the + (plus) or −(minus) display
buttons to increase or decrease the
MM, DD, and YYYY date display.
Auto GPS Update: Press either
the On or Off display buttons. If On,
the GPS update feature
automatically updates the date
and time.
Daylight Savings: Press either the
On or Off display buttons. Press On
to jump ahead for daylight savings
time. Press Off to fall back out of
daylight savings time.
Time Zone: Auto GPS Update
must be off before the time zone
can be changed. Select the change
display button to select the desired
time zone.
Global Positioning
System (GPS)
The navigation system determines
the position of the vehicle by using
satellite signals, various vehicle
signals, and map data.
Page 68 of 70

Black plate (2,1)Cadillac CTS/CTS-V Navigation System - 2013 - crc - 8/21/12
i-2 INDEX
H
Handling the DVD Map Disc . . . . . 34
Hard Drive Device (HDD) . . . . . . . . 24
I
Installing the DVD Map Disc . . . . . 34
Introduction . . . . . . . . . . . . . . . . . . . . . . . 3
L
Language . . . . . . . . . . . . . . . . . . . . . . . . . 6
M
Map Adjustments . . . . . . . . . . . . . . . . 35
Map Coverage . . . . . . . . . . . . . . . . . . . 34
Map Scales . . . . . . . . . . . . . . . . . . . . . . 35
Maps . . . . . . . . . . . . . . . . . . . . . . . . . . . . 34
MenuConfigure . . . . . . . . . . . . . . . . . . . . . . . 51
Microsoft
®License Agreement . . . 64
MP3 . . . . . . . . . . . . . . . . . . . . . . . . . . . . . 21
Music Navigator Screen . . . . . . . . . 27
N
Nav (Navigation) . . . . . . . . . . . . . . . . . 52
Navigation Destination . . . . . . . . . . . . . . . . . . . . . 40
Symbols . . . . . . . . . . . . . . . . . . . . . . . . 36
Using the System . . . . . . . . . . . . . . . 32
Navigation Control Buttons . . . . . . 32
O
OnStar®Destination
Download (If Equipped) . . . . . . . . 45
Ordering Map DVDs . . . . . . . . . . . . . . . . . . . . . . 61
Overview . . . . . . . . . . . . . . . . . . . . . . . . 62
Overview, Infotainment System . . . 4
P
Playing a CD . . . . . . . . . . . . . . . . . . . . 15
Playing a DVD . . . . . . . . . . . . . . . . . . . 17
Playing the Radio . . . . . . . . . . . . . . . . 10
Point of Interest (POI) . . . . . . . . . . . 43 Power Mode . . . . . . . . . . . . . . . . . . . . . 29
Preset Destinations
—Adding
or Changing . . . . . . . . . . . . . . . . . . . . 49
Previous Destinations —
Deleting . . . . . . . . . . . . . . . . . . . . . . . . 51
Problems with Route Guidance . . . . . . . . . . . . . . . . . . . . . . 60
R
Radio . . . . . . . . . . . . . . . . . . . . . . . . . . . . 52
Radio Data System (RDS) . . . . . . . 14
Radio Menu . . . . . . . . . . . . . . . . . . . . . 13
Radios
AM-FM Radio . . . . . . . . . . . . . . . . . . . 10
CD/DVD Player . . . . . . . . . . . . . . . . . 15
Satellite . . . . . . . . . . . . . . . . . . . . . . . . . 15
Recording from a CD . . . . . . . . . . . . 24
Recording from a USB Device . . . 25
Page 69 of 70

Black plate (3,1)Cadillac CTS/CTS-V Navigation System - 2013 - crc - 8/21/12
INDEX i-3
S
Satellite Radio . . . . . . . . . . . . . . . . . . . 15
Saving HDD Favorites . . . . . . . . . . . 29
Scrolling the Map . . . . . . . . . . . . . . . . 35
Setting the Clock . . . . . . . . . . . . . . . . 58
Sound . . . . . . . . . . . . . . . . . . . . . . . . . . . 52
Sound Menu . . . . . . . . . . . . . . . . . . . . . 12
Speech Recognition . . . . . . . . . . . . . 62
Storing Radio StationPresets . . . . . . . . . . . . . . . . . . . . . . . 6, 11
Symbols, Navigation . . . . . . . . . . . . . 36
System Needs Service, If . . . . . . . . 60
T
Timeshift . . . . . . . . . . . . . . . . . . . . . . . . . 14
Touch-Screen Buttons . . . . . . . . . . . 33
U
USB Background Recording . . . . . 30
USB Host Support . . . . . . . . . . . . . . . 30
USB Media Recording . . . . . . . . . . . 30
USB Playback . . . . . . . . . . . . . . . . . . . 30
USB Supported Devices . . . . . . . . . 30
Using an MP3 CD and DVD . . . . . 21
Using OnStar
®Destination
Download (If Equipped) . . . . . . . . 45
Using Speech Recognition . . . . . . 62
Using the Radio Controls to Connect and Control
Your iPod
®. . . . . . . . . . . . . . . . . . . . . 30
Using the Stored Preset Destinations . . . . . . . . . . . . . . . . . . . . . 9
V
VehiclePositioning . . . . . . . . . . . . . . . . . . . . . 59
Voice Guidance . . . . . . . . . . . . . . . . . . . 9
Voice Recognition . . . . . . . . . . . . . . . 62
X
XM NavTraffic™ (USA and
Canada) . . . . . . . . . . . . . . . . . . . . . . . . 53
XM™ Category Restore (If
Equipped) . . . . . . . . . . . . . . . . . . . . . . 15
XM™ Satellite Radio Service
(If Equipped) . . . . . . . . . . . . . . . . . . . 15