V4 mode CADILLAC ESCALADE 2018 Owner's Manual
[x] Cancel search | Manufacturer: CADILLAC, Model Year: 2018, Model line: ESCALADE, Model: CADILLAC ESCALADE 2018Pages: 399, PDF Size: 6.23 MB
Page 3 of 399
Cadillac Escalade Owner Manual (GMNA-Localizing-U.S./Canada/Mexico-
11349344) - 2018 - crc - 11/7/17
2 INTRODUCTION
Introduction
The names, logos, emblems, slogans,
vehicle model names, and vehicle
body designs appearing in this manual
including, but not limited to, GM, the
GM logo, CADILLAC, the CADILLAC
Emblem, and ESCALADE are
trademarks and/or service marks of
General Motors LLC, its subsidiaries,
affiliates, or licensors.
For vehicles first sold in Canada,
substitute the name“General Motors
of Canada Company ”for Cadillac
Motor Division wherever it appears in
this manual. This manual describes features that
may or may not be on the vehicle
because of optional equipment that
was not purchased on the vehicle,
model variants, country specifications,
features/applications that may not be
available in your region, or changes
subsequent to the printing of this
owner’s manual.
Refer to the purchase documentation
relating to your specific vehicle to
confirm the features.
Keep this manual in the vehicle for
quick reference.
Canadian Vehicle Owners
A French language manual can be
obtained from your dealer, at
www.helminc.com, or from:
Propriétaires Canadiens
On peut obtenir un exemplaire de ce
guide en français auprès du
concessionnaire ou à l'adresse
suivante:
Helm, Incorporated
Attention: Customer Service
47911 Halyard Drive
Plymouth, MI 48170
USA
Using this Manual
To quickly locate information about
the vehicle, use the Index in the back
of the manual. It is an alphabetical
list of what is in the manual and the
page number where it can be found.
Litho in U.S.A.
Part No. 84016525 B Second Printing©2017 General Motors LLC. All Rights Reserved.
Page 8 of 399

Cadillac Escalade Owner Manual (GMNA-Localizing-U.S./Canada/Mexico-
11349344) - 2018 - crc - 11/7/17
IN BRIEF 7
1.Air Vents 0179.
2. Head-Up Display (HUD) 0147 (If
Equipped).
3. Turn Signal Lever. See Turn and
Lane-Change Signals 0168.
Windshield Wiper/Washer 0121.
Rear Window Wiper/Washer
0 123.
4. Hazard Warning Flashers 0168.
5. Instrument Cluster 0130.
6. Shift Lever. See Automatic
Transmission 0206.
Tow/Haul Mode Selector Button.
See Tow/Haul Mode 0210.
Range Selection Mode Buttons (If
Equipped). See Manual Mode
0 209.
7. Magnetic Ride Control Button. See Magnetic Ride Control 0221.
Pedal Adjust Switch (If
Equipped). See Adjustable Throttle
and Brake Pedal 0198.
Traction Control/Electronic
Stability Control 0218. 8. Light Sensor. See
Automatic
Headlamp System 0167.
9. Infotainment 0172.
10. Glove Box Button. See Glove Box
0 116.
Lane Keep Assist (LKA) 0246 (If
Equipped).
Parking Assist Button. See
Assistance Systems for Parking or
Backing 0233.
11. Dual Automatic Climate Control
System 0173.
Instrument Panel Storage 0116.
12. CD Player. See the infotainment manual.
13. ENGINE START/STOP Button. SeeIgnition Positions 0199.
14. Steering Wheel Controls 0121.
Driver Information Center (DIC)
Controls. See Driver Information
Center (DIC) 0145.
15. Horn 0121.
16. Steering Wheel Adjustment 0121.
17. Hood Release. See Hood0266. 18.
Cruise Control 0222 (If
Equipped).
Adaptive Cruise Control 0225 (If
Equipped).
Forward Collision Alert (FCA)
System 0240 (If Equipped).
Heated Steering Wheel 0121 (If
Equipped).
Phone Button. See the
infotainment manual.
19. Automatic Transfer Case Knob (If Equipped). See Four-Wheel Drive
0 211.
20. Data Link Connector (DLC) (Out of View). See Malfunction
Indicator Lamp (Check Engine
Light) 0137.
21. Electric Parking Brake 0216 (If
Equipped).
22. Exterior Lamp Controls 0164.
23. Instrument Panel Illumination
Control 0169.
Page 11 of 399
Cadillac Escalade Owner Manual (GMNA-Localizing-U.S./Canada/Mexico-
11349344) - 2018 - crc - 11/7/17
10 IN BRIEF
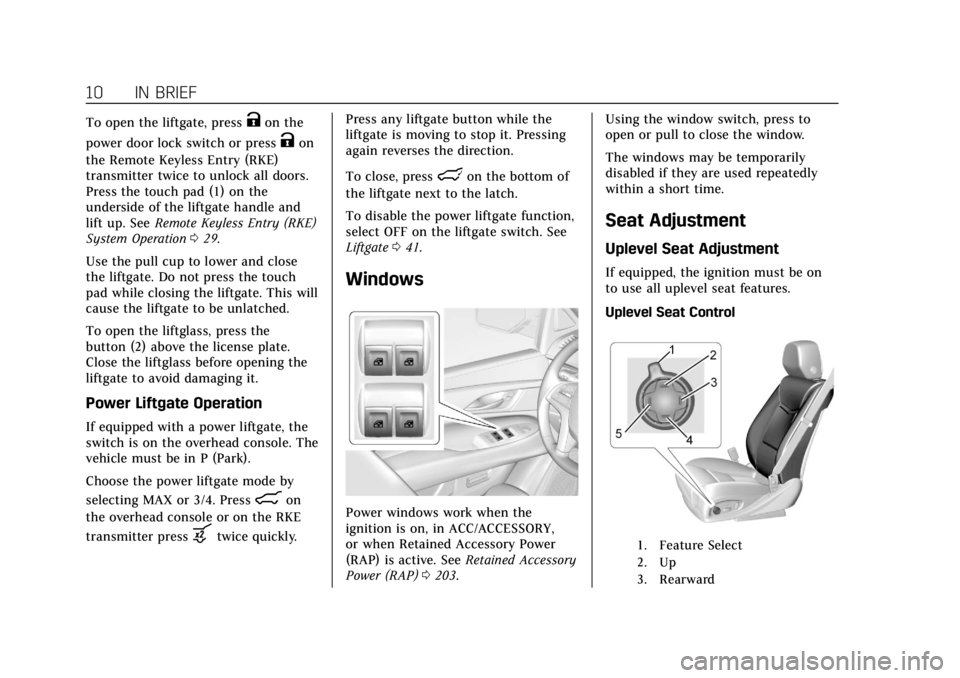
To open the liftgate, pressKon the
power door lock switch or press
Kon
the Remote Keyless Entry (RKE)
transmitter twice to unlock all doors.
Press the touch pad (1) on the
underside of the liftgate handle and
lift up. See Remote Keyless Entry (RKE)
System Operation 029.
Use the pull cup to lower and close
the liftgate. Do not press the touch
pad while closing the liftgate. This will
cause the liftgate to be unlatched.
To open the liftglass, press the
button (2) above the license plate.
Close the liftglass before opening the
liftgate to avoid damaging it.
Power Liftgate Operation
If equipped with a power liftgate, the
switch is on the overhead console. The
vehicle must be in P (Park).
Choose the power liftgate mode by
selecting MAX or 3/4. Press
8on
the overhead console or on the RKE
transmitter press
btwice quickly. Press any liftgate button while the
liftgate is moving to stop it. Pressing
again reverses the direction.
To close, press
lon the bottom of
the liftgate next to the latch.
To disable the power liftgate function,
select OFF on the liftgate switch. See
Liftgate 041.
Windows
Power windows work when the
ignition is on, in ACC/ACCESSORY,
or when Retained Accessory Power
(RAP) is active. See Retained Accessory
Power (RAP) 0203. Using the window switch, press to
open or pull to close the window.
The windows may be temporarily
disabled if they are used repeatedly
within a short time.
Seat Adjustment
Uplevel Seat Adjustment
If equipped, the ignition must be on
to use all uplevel seat features.
Uplevel Seat Control
1. Feature Select
2. Up
3. Rearward
Page 20 of 399
Cadillac Escalade Owner Manual (GMNA-Localizing-U.S./Canada/Mexico-
11349344) - 2018 - crc - 11/7/17
IN BRIEF 19
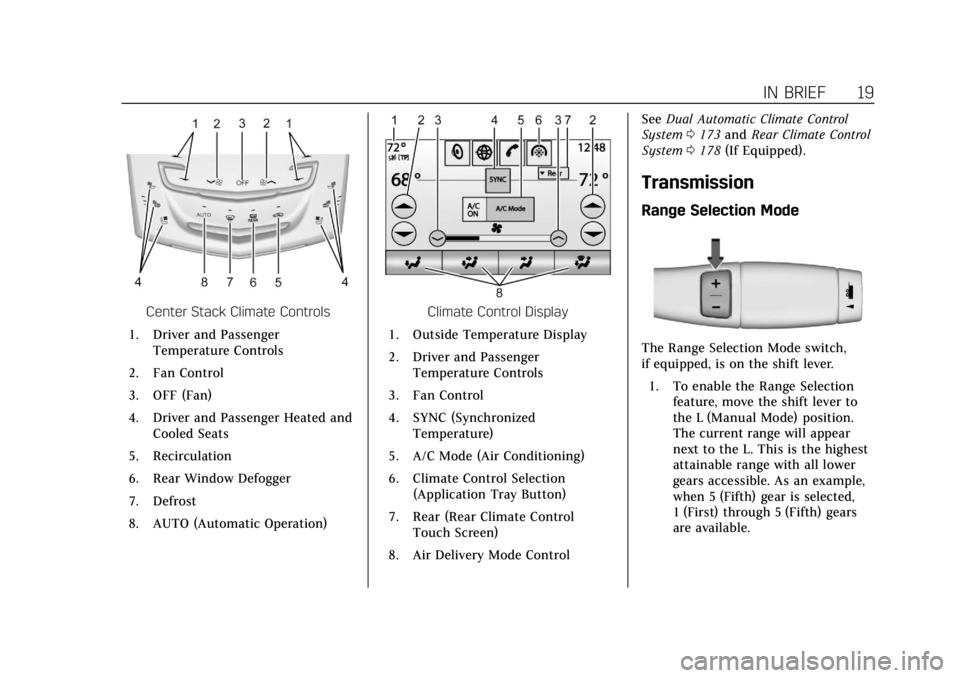
Center Stack Climate Controls
1. Driver and Passenger Temperature Controls
2. Fan Control
3. OFF (Fan)
4. Driver and Passenger Heated and Cooled Seats
5. Recirculation
6. Rear Window Defogger
7. Defrost
8. AUTO (Automatic Operation)Climate Control Display
1. Outside Temperature Display
2. Driver and Passenger Temperature Controls
3. Fan Control
4. SYNC (Synchronized Temperature)
5. A/C Mode (Air Conditioning)
6. Climate Control Selection (Application Tray Button)
7. Rear (Rear Climate Control Touch Screen)
8. Air Delivery Mode Control See
Dual Automatic Climate Control
System 0173 and Rear Climate Control
System 0178 (If Equipped).
Transmission
Range Selection Mode
The Range Selection Mode switch,
if equipped, is on the shift lever.
1. To enable the Range Selection feature, move the shift lever to
the L (Manual Mode) position.
The current range will appear
next to the L. This is the highest
attainable range with all lower
gears accessible. As an example,
when 5 (Fifth) gear is selected,
1 (First) through 5 (Fifth) gears
are available.
Page 21 of 399
Cadillac Escalade Owner Manual (GMNA-Localizing-U.S./Canada/Mexico-
11349344) - 2018 - crc - 11/7/17
20 IN BRIEF
2. Press the plus/minus buttons onthe shift lever to select the
desired range of gears for current
driving conditions. See Manual
Mode 0209.
While using Range Selection Mode,
cruise control and the Tow/Haul Mode
can be used.
Grade Braking is not available when
Range Selection Mode is active. See
Tow/Haul Mode 0210.
Four-Wheel Drive
If equipped with four-wheel drive, the
engine's driving power can be sent to
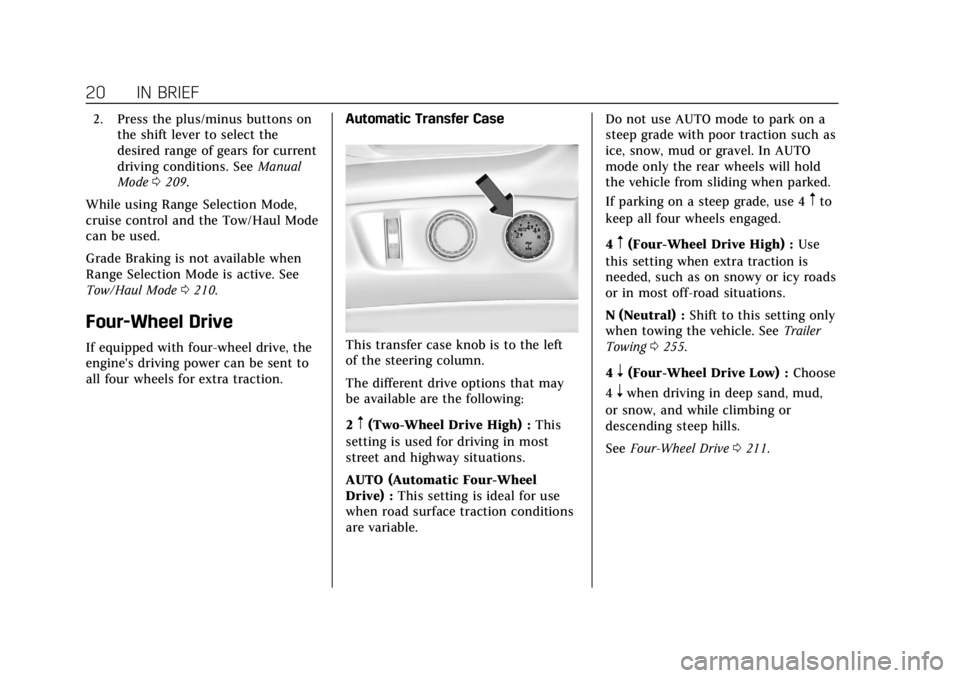
all four wheels for extra traction. Automatic Transfer CaseThis transfer case knob is to the left
of the steering column.
The different drive options that may
be available are the following:
2
m(Two-Wheel Drive High) :
This
setting is used for driving in most
street and highway situations.
AUTO (Automatic Four-Wheel
Drive) : This setting is ideal for use
when road surface traction conditions
are variable. Do not use AUTO mode to park on a
steep grade with poor traction such as
ice, snow, mud or gravel. In AUTO
mode only the rear wheels will hold
the vehicle from sliding when parked.
If parking on a steep grade, use 4
mto
keep all four wheels engaged.
4
m(Four-Wheel Drive High) : Use
this setting when extra traction is
needed, such as on snowy or icy roads
or in most off-road situations.
N (Neutral) : Shift to this setting only
when towing the vehicle. See Trailer
Towing 0255.
4
n(Four-Wheel Drive Low) : Choose
4
nwhen driving in deep sand, mud,
or snow, and while climbing or
descending steep hills.
See Four-Wheel Drive 0211.
Page 26 of 399
Cadillac Escalade Owner Manual (GMNA-Localizing-U.S./Canada/Mexico-
11349344) - 2018 - crc - 11/7/17
IN BRIEF 25
express-close the sunroof, fully press
and release
K(1). Press the switch
again to stop the movement.
Open/Close (Manual Mode) : To
open the sunroof, press and hold
I
(1). Release the switch to stop the
movement. Press and hold
K(1) to
close the sunroof. Release the switch
to stop the movement.
Tilt Switch
Vent : From the closed position,
press
J(2) to vent the sunroof. Press
K(2) to close the sunroof vent.
When the sunroof is opened, an air
deflector will automatically raise. The
air deflector will retract when the
sunroof is closed.
The sunroof also has a sunshade
which can be pulled forward to block
sun rays. The sunshade must be
opened and closed manually.
If an object is in the path of the
sunroof while it is closing, the
automatic reversal feature will detect
the object and stop the sunroof.
See Sunroof 056.
Performance and
Maintenance
Traction Control/Electronic
Stability Control
The vehicle has a Traction Control
System (TCS) that limits wheel spin
and the StabiliTrak system that assists
with directional control of the vehicle
in difficult driving conditions. Both
systems come on automatically when
the vehicle is started and begins
to move.
.
To turn off TCS, press and release
gon the center stack. The
traction off light
idisplays in the
instrument cluster. The
appropriate Driver Information
Center (DIC) message displays.
. To turn off both TCS and
StabiliTrak, press and hold
guntil
iandgilluminate in the
instrument cluster and the
appropriate DIC message displays.
. Press and release
gagain to turn
on both systems. StabiliTrak will automatically turn on
if the vehicle exceeds 56 km/h
(35 mph). Traction control will
remain off.
See
Traction Control/Electronic Stability
Control 0218.
Tire Pressure Monitor
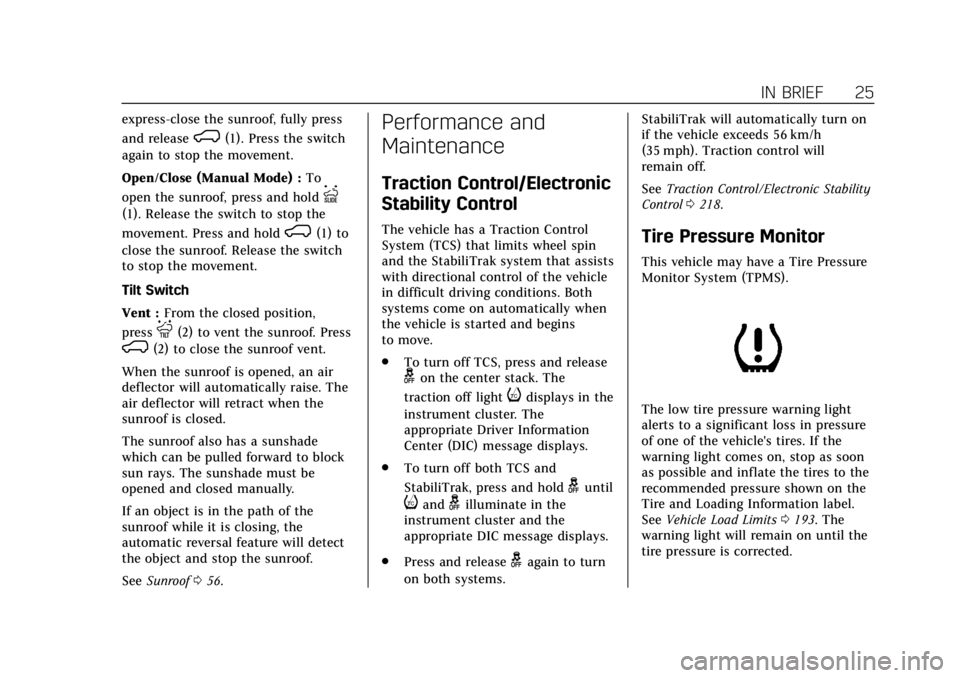
This vehicle may have a Tire Pressure
Monitor System (TPMS).
The low tire pressure warning light
alerts to a significant loss in pressure
of one of the vehicle's tires. If the
warning light comes on, stop as soon
as possible and inflate the tires to the
recommended pressure shown on the
Tire and Loading Information label.
See Vehicle Load Limits 0193. The
warning light will remain on until the
tire pressure is corrected.
Page 34 of 399

Cadillac Escalade Owner Manual (GMNA-Localizing-U.S./Canada/Mexico-
11349344) - 2018 - crc - 11/7/17
KEYS, DOORS, AND WINDOWS 33
Programming Transmitters to
the Vehicle
Only RKE transmitters programmed to
the vehicle will work. If a transmitter
is lost or stolen, a replacement can be
purchased and programmed through
your dealer. The vehicle can be
reprogrammed so that lost or stolen
transmitters no longer work. Each
vehicle can have up to eight
transmitters matched to it.
Programming with Recognized
Transmitters
A new transmitter can be programmed
to the vehicle when there are two
recognized transmitters.
To program, the vehicle must be off
and all transmitters, both currently
recognized and new, must be
with you.1. Remove the key from the recognized transmitter.
2. Place the two recognized transmitters in the cupholder or
on the passenger seat. 3. Remove the key lock cylinder cap
on the driver door handle. See
Door Locks 037. Insert the
vehicle key into the key lock
cylinder on the driver door
handle; then turn the key
counterclockwise, to the unlock
position five times within
10 seconds.
The Driver Information Center
(DIC) displays READY FOR
REMOTE #2, 3, 4, ETC.
4. Open the center console storage area and the storage tray. 5. Place the new transmitter in the
transmitter pocket/insert, in
front of the center console
storage area.
6. Press ENGINE START/STOP. When the transmitter is learned,
the DIC display will show that it
is ready to program the next
transmitter.
7. Remove the transmitter from the transmitter pocket/insert and
press
KorQon the transmitter.
To program additional
transmitters, repeat Steps 4–7.
When all additional transmitters
are programmed, press and hold
ENGINE START/STOP for
approximately 12 seconds to exit
programming mode.
8. Put the key back into the transmitter.
Programming without Recognized
Transmitters
If two currently recognized
transmitters are not available, follow
this procedure to program up to eight
transmitters. This feature is not
Page 35 of 399
Cadillac Escalade Owner Manual (GMNA-Localizing-U.S./Canada/Mexico-
11349344) - 2018 - crc - 11/7/17
34 KEYS, DOORS, AND WINDOWS
available in Canada. This procedure
will take approximately 30 minutes to
complete. The vehicle must be off and
all transmitters to be programmed
must be with you.1. Remove the vehicle key from the transmitter.
2. Remove the key lock cylinder cap on the driver door handle. See
Door Locks 037. Insert the
vehicle key into the key lock
cylinder on the driver door
handle; then turn the key
counterclockwise, to the unlock
position, five times within
10 seconds.
The Driver Information Center
(DIC) displays REMOTE LEARN
PENDING, PLEASE WAIT.
3. Wait for 10 minutes until the DIC displays PRESS ENGINE
START BUTTON TO LEARN,
then press ENGINE
START/STOP.
The DIC display will again show
REMOTE LEARN PENDING,
PLEASE WAIT. 4. Repeat Step 3 two additional
times. After the third time all
previously known transmitters
will no longer work with the
vehicle. Remaining transmitters
can be relearned during the next
steps.
The DIC display should now
show READY FOR REMOTE # 1.
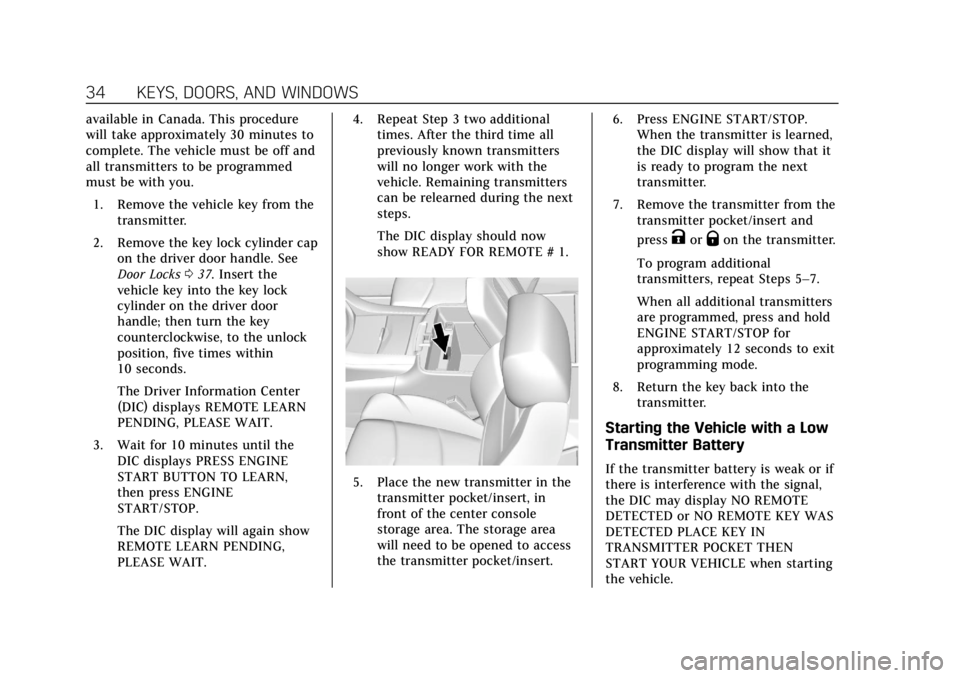
5. Place the new transmitter in the
transmitter pocket/insert, in
front of the center console
storage area. The storage area
will need to be opened to access
the transmitter pocket/insert. 6. Press ENGINE START/STOP.
When the transmitter is learned,
the DIC display will show that it
is ready to program the next
transmitter.
7. Remove the transmitter from the transmitter pocket/insert and
press
KorQon the transmitter.
To program additional
transmitters, repeat Steps 5–7.
When all additional transmitters
are programmed, press and hold
ENGINE START/STOP for
approximately 12 seconds to exit
programming mode.
8. Return the key back into the transmitter.
Starting the Vehicle with a Low
Transmitter Battery
If the transmitter battery is weak or if
there is interference with the signal,
the DIC may display NO REMOTE
DETECTED or NO REMOTE KEY WAS
DETECTED PLACE KEY IN
TRANSMITTER POCKET THEN
START YOUR VEHICLE when starting
the vehicle.
Page 43 of 399

Cadillac Escalade Owner Manual (GMNA-Localizing-U.S./Canada/Mexico-
11349344) - 2018 - crc - 11/7/17
42 KEYS, DOORS, AND WINDOWS
The switch is on the overhead console.
The vehicle must be in P (Park).
The modes are:
MAX :Opens to maximum height.
3/4 : Opens to a reduced height that
can be set from 3/4 to fully open. Use
to prevent the liftgate from opening
into overhead objects such as a garage
door or roof-mounted cargo. The
liftgate can be opened all the way
manually.
OFF : Opens manually only.
To open or close the liftgate, select
MAX or 3/4 mode and then: .
Press
btwice quickly on the RKE
transmitter until the liftgate
moves.
. Press
8on the overhead
console. The driver door must be
unlocked.
. Press the touch pad on the
underside of the liftgate handle
after unlocking all doors. A locked
vehicle can be opened if the RKE
transmitter is within 1 m (3 ft) of
the touch pad.
.
Presslon the bottom edge of
the liftgate next to the latch to
close. Press any liftgate button, the touch
pad, or
bon the RKE transmitter
while the liftgate is moving to stop it.
Pressing any liftgate button or
pressing
btwice quickly on the RKE
transmitter restarts the operation in
the reverse direction. Pressing the
touch pad on the liftgate handle will
restart the motion, but only in the
opening direction.
Caution
Manually forcing the liftgate to
open or close during a power cycle
can damage the vehicle. Allow the
power cycle to complete.
The power liftgate may be temporarily
disabled in extremely low
temperatures, or after repeated power
cycling over a short period of time.
If this occurs, the liftgate can still be
operated manually. Select OFF on the
liftgate switch.
If the vehicle is shifted out of P (Park)
while the power function is in
progress, the liftgate will continue to
Page 44 of 399
Cadillac Escalade Owner Manual (GMNA-Localizing-U.S./Canada/Mexico-
11349344) - 2018 - crc - 11/7/17
KEYS, DOORS, AND WINDOWS 43
completion. If the vehicle is
accelerated before the liftgate has
completed moving, the liftgate may
stop or reverse direction. Check for
Driver Information Center (DIC)
messages and make sure the liftgate is
closed and latched before driving.
Falling Liftgate Detection
If the power liftgate automatically
closes after a power opening cycle, it
indicates that the system is reacting
to excess weight on the liftgate or a
possible support strut failure. Remove
any excess weight. If the liftgate
continues to automatically close after
opening, see your dealer for service
before using the power liftgate.
Interfering with the power liftgate
motion or manually closing the
liftgate too quickly after power
opening may resemble a support strut
failure. This could also activate the
falling liftgate detection feature. Allow
the liftgate to complete its operation
and wait a few seconds before
manually closing the liftgate.Obstacle Detection Features
If the liftgate encounters an obstacle
during a power open or close cycle,
the liftgate will automatically reverse
direction and move a short distance
away from the obstacle. After
removing the obstruction, the power
liftgate operation can be used again.
If the liftgate encounters multiple
obstacles on the same power cycle,
the power function will deactivate.
After removing the obstructions,
manually close the liftgate. This will
allow normal power operation
functions to resume.
If the vehicle is locked while the
liftgate is closing, and an obstacle
prevents the liftgate from completely
closing, the horn will sound as an
alert that the liftgate did not close.
Pinch sensors are on the side edges of
the liftgate. If an object is caught
between the liftgate and the vehicle
and presses against a sensor, the
liftgate will reverse direction and stop
at a partially open position. The
liftgate will remain open until it is
activated again or closed manually.
Setting the 3/4 Mode
To change the position the liftgate
stops at when opening:1. Select MAX or 3/4 mode and open the liftgate.
2. Stop the liftgate movement at the desired height by pressing
any liftgate button. Manually
adjust the liftgate position if
needed.
3. Press and hold
lon the
bottom edge of the liftgate next
to the latch on the outside of the
liftgate until the turn signals
flash and a beep sounds. This
indicates the setting has been
recorded.
The liftgate cannot be set below a
minimum programmable height.
If there is no light flash or sound,
then the height adjustment may be
too low.
Manual Operation
Select OFF to manually operate the
liftgate.