jump start CADILLAC ESCALADE EXT 2005 2.G Owners Manual
[x] Cancel search | Manufacturer: CADILLAC, Model Year: 2005, Model line: ESCALADE EXT, Model: CADILLAC ESCALADE EXT 2005 2.GPages: 460, PDF Size: 2.95 MB
Page 225 of 460
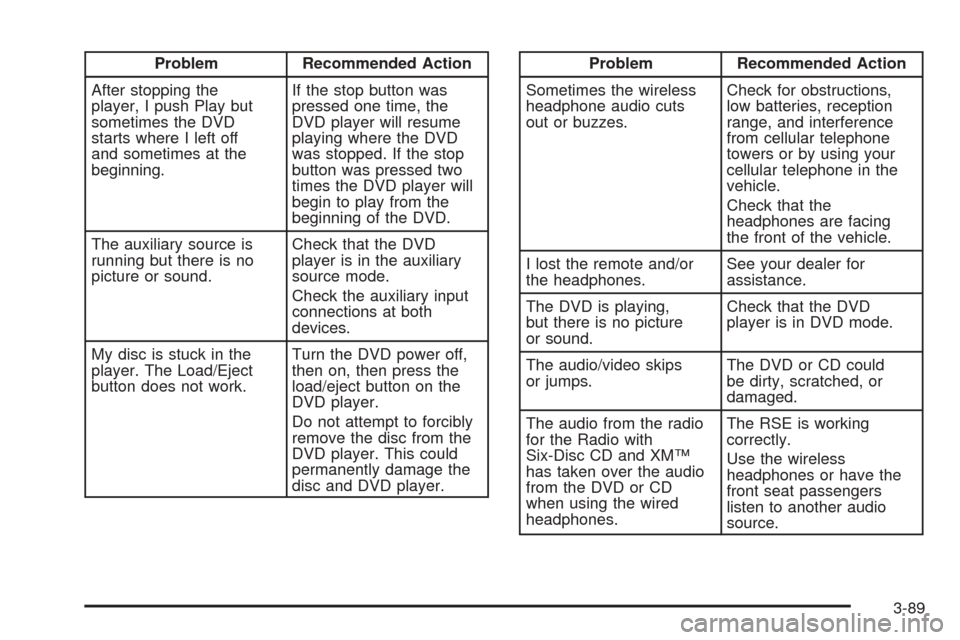
Problem Recommended Action
After stopping the
player, I push Play but
sometimes the DVD
starts where I left off
and sometimes at the
beginning.If the stop button was
pressed one time, the
DVD player will resume
playing where the DVD
was stopped. If the stop
button was pressed two
times the DVD player will
begin to play from the
beginning of the DVD.
The auxiliary source is
running but there is no
picture or sound.Check that the DVD
player is in the auxiliary
source mode.
Check the auxiliary input
connections at both
devices.
My disc is stuck in the
player. The Load/Eject
button does not work.Turn the DVD power off,
then on, then press the
load/eject button on the
DVD player.
Do not attempt to forcibly
remove the disc from the
DVD player. This could
permanently damage the
disc and DVD player.Problem Recommended Action
Sometimes the wireless
headphone audio cuts
out or buzzes.Check for obstructions,
low batteries, reception
range, and interference
from cellular telephone
towers or by using your
cellular telephone in the
vehicle.
Check that the
headphones are facing
the front of the vehicle.
I lost the remote and/or
the headphones.See your dealer for
assistance.
The DVD is playing,
but there is no picture
or sound.Check that the DVD
player is in DVD mode.
The audio/video skips
or jumps.The DVD or CD could
be dirty, scratched, or
damaged.
The audio from the radio
for the Radio with
Six-Disc CD and XM™
has taken over the audio
from the DVD or CD
when using the wired
headphones.The RSE is working
correctly.
Use the wireless
headphones or have the
front seat passengers
listen to another audio
source.
3-89
Page 299 of 460
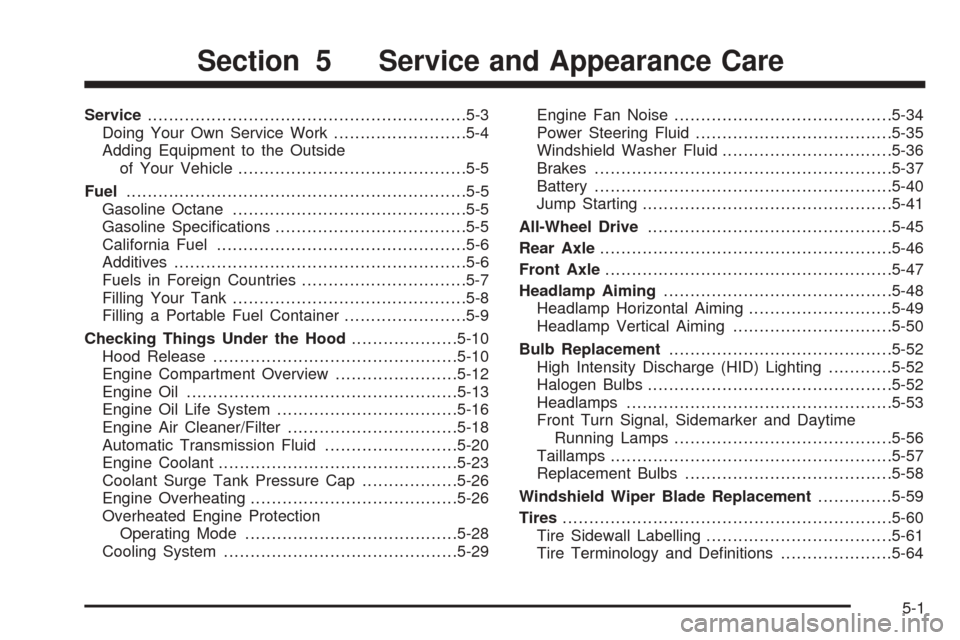
Service............................................................5-3
Doing Your Own Service Work.........................5-4
Adding Equipment to the Outside
of Your Vehicle...........................................5-5
Fuel................................................................5-5
Gasoline Octane............................................5-5
Gasoline Speci�cations....................................5-5
California Fuel...............................................5-6
Additives.......................................................5-6
Fuels in Foreign Countries...............................5-7
Filling Your Tank............................................5-8
Filling a Portable Fuel Container.......................5-9
Checking Things Under the Hood....................5-10
Hood Release..............................................5-10
Engine Compartment Overview.......................5-12
Engine Oil...................................................5-13
Engine Oil Life System..................................5-16
Engine Air Cleaner/Filter................................5-18
Automatic Transmission Fluid.........................5-20
Engine Coolant.............................................5-23
Coolant Surge Tank Pressure Cap..................5-26
Engine Overheating.......................................5-26
Overheated Engine Protection
Operating Mode........................................5-28
Cooling System............................................5-29Engine Fan Noise.........................................5-34
Power Steering Fluid.....................................5-35
Windshield Washer Fluid................................5-36
Brakes........................................................5-37
Battery........................................................5-40
Jump Starting...............................................5-41
All-Wheel Drive..............................................5-45
Rear Axle.......................................................5-46
Front Axle......................................................5-47
Headlamp Aiming...........................................5-48
Headlamp Horizontal Aiming...........................5-49
Headlamp Vertical Aiming..............................5-50
Bulb Replacement..........................................5-52
High Intensity Discharge (HID) Lighting............5-52
Halogen Bulbs..............................................5-52
Headlamps..................................................5-53
Front Turn Signal, Sidemarker and Daytime
Running Lamps.........................................5-56
Taillamps.....................................................5-57
Replacement Bulbs.......................................5-58
Windshield Wiper Blade Replacement..............5-59
Tires..............................................................5-60
Tire Sidewall Labelling...................................5-61
Tire Terminology and De�nitions.....................5-64
Section 5 Service and Appearance Care
5-1
Page 311 of 460
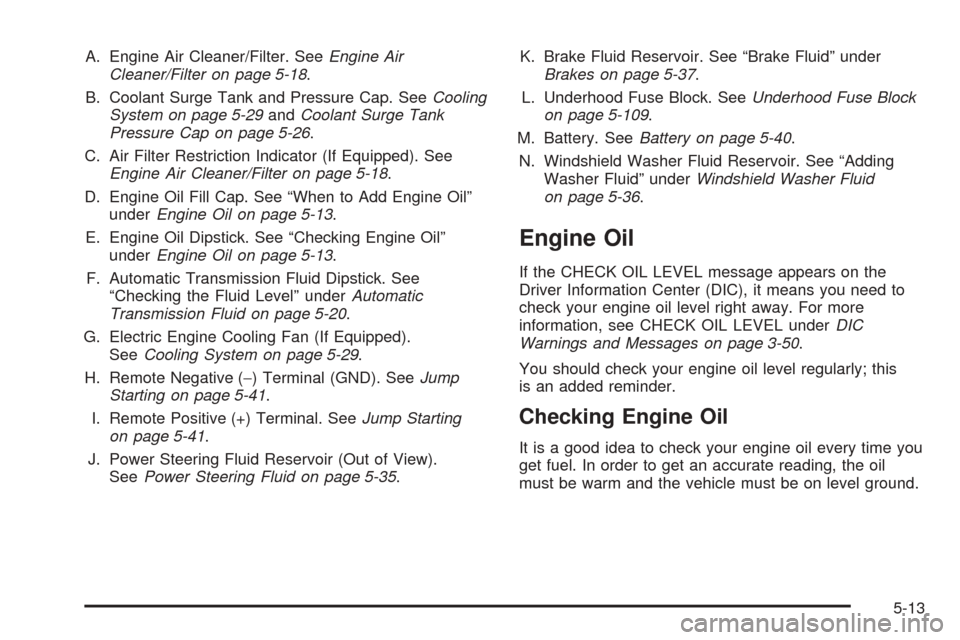
A. Engine Air Cleaner/Filter. SeeEngine Air
Cleaner/Filter on page 5-18.
B. Coolant Surge Tank and Pressure Cap. SeeCooling
System on page 5-29andCoolant Surge Tank
Pressure Cap on page 5-26.
C. Air Filter Restriction Indicator (If Equipped). See
Engine Air Cleaner/Filter on page 5-18.
D. Engine Oil Fill Cap. See “When to Add Engine Oil”
underEngine Oil on page 5-13.
E. Engine Oil Dipstick. See “Checking Engine Oil”
underEngine Oil on page 5-13.
F. Automatic Transmission Fluid Dipstick. See
“Checking the Fluid Level” underAutomatic
Transmission Fluid on page 5-20.
G. Electric Engine Cooling Fan (If Equipped).
SeeCooling System on page 5-29.
H. Remote Negative (−) Terminal (GND). SeeJump
Starting on page 5-41.
I. Remote Positive (+) Terminal. SeeJump Starting
on page 5-41.
J. Power Steering Fluid Reservoir (Out of View).
SeePower Steering Fluid on page 5-35.K. Brake Fluid Reservoir. See “Brake Fluid” under
Brakes on page 5-37.
L. Underhood Fuse Block. SeeUnderhood Fuse Block
on page 5-109.
M. Battery. SeeBattery on page 5-40.
N. Windshield Washer Fluid Reservoir. See “Adding
Washer Fluid” underWindshield Washer Fluid
on page 5-36.
Engine Oil
If the CHECK OIL LEVEL message appears on the
Driver Information Center (DIC), it means you need to
check your engine oil level right away. For more
information, see CHECK OIL LEVEL underDIC
Warnings and Messages on page 3-50.
You should check your engine oil level regularly; this
is an added reminder.
Checking Engine Oil
It is a good idea to check your engine oil every time you
get fuel. In order to get an accurate reading, the oil
must be warm and the vehicle must be on level ground.
5-13
Page 338 of 460
If you do not, your brakes may no longer work properly.
For example, if someone puts in brake linings that
are wrong for your vehicle, the balance between your
front and rear brakes can change — for the worse. The
braking performance you have come to expect can
change in many other ways if someone puts in
the wrong replacement brake parts.
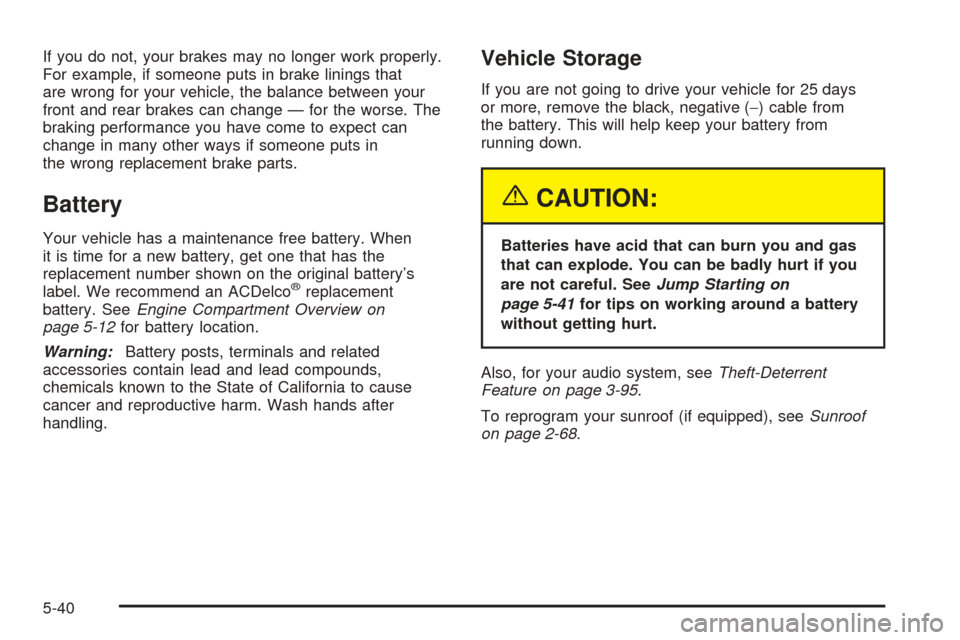
Battery
Your vehicle has a maintenance free battery. When
it is time for a new battery, get one that has the
replacement number shown on the original battery’s
label. We recommend an ACDelco
®replacement
battery. SeeEngine Compartment Overview on
page 5-12for battery location.
Warning:Battery posts, terminals and related
accessories contain lead and lead compounds,
chemicals known to the State of California to cause
cancer and reproductive harm. Wash hands after
handling.
Vehicle Storage
If you are not going to drive your vehicle for 25 days
or more, remove the black, negative (−) cable from
the battery. This will help keep your battery from
running down.
{CAUTION:
Batteries have acid that can burn you and gas
that can explode. You can be badly hurt if you
are not careful. SeeJump Starting on
page 5-41for tips on working around a battery
without getting hurt.
Also, for your audio system, seeTheft-Deterrent
Feature on page 3-95.
To reprogram your sunroof (if equipped), seeSunroof
on page 2-68.
5-40
Page 339 of 460
Jump Starting
If your battery has run down, you may want to use
another vehicle and some jumper cables to start your
vehicle. Be sure to use the following steps to do it safely.
{CAUTION:
Batteries can hurt you. They can be dangerous
because:
They contain acid that can burn you.
They contain gas that can explode or
ignite.
They contain enough electricity to
burn you.
If you do not follow these steps exactly, some
or all of these things can hurt you.
Notice:Ignoring these steps could result in costly
damage to your vehicle that would not be covered
by your warranty.Trying to start your vehicle by pushing or pulling it
will not work, and it could damage your vehicle.
1. Check the other vehicle. It must have a 12-volt
battery with a negative ground system.
Notice:If the other vehicle’s system is not a 12-volt
system with a negative ground, both vehicles can
be damaged. Only use vehicles with 12-volt systems
with negative grounds to jump start your vehicle.
2. Get the vehicles close enough so the jumper cables
can reach, but be sure the vehicles are not touching
each other. If they are, it could cause a ground
connection you do not want. You would not be able
to start your vehicle, and the bad grounding
could damage the electrical systems.
To avoid the possibility of the vehicles rolling, set
the parking brake �rmly on both vehicles involved in
the jump start procedure. Put an automatic
transmission in PARK (P) or a manual transmission
in NEUTRAL before setting the parking brake.
5-41
Page 340 of 460
Notice:If you leave your radio or other accessories
on during the jump starting procedure, they could
be damaged. The repairs would not be covered
by your warranty. Always turn off your radio and
other accessories when jump starting your vehicle.
3. Turn off the ignition on both vehicles. Unplug
unnecessary accessories plugged into the cigarette
lighter or accessory power outlets. Turn off the
radio and all lamps that are not needed. This will
avoid sparks and help save both batteries. And
it could save your radio!
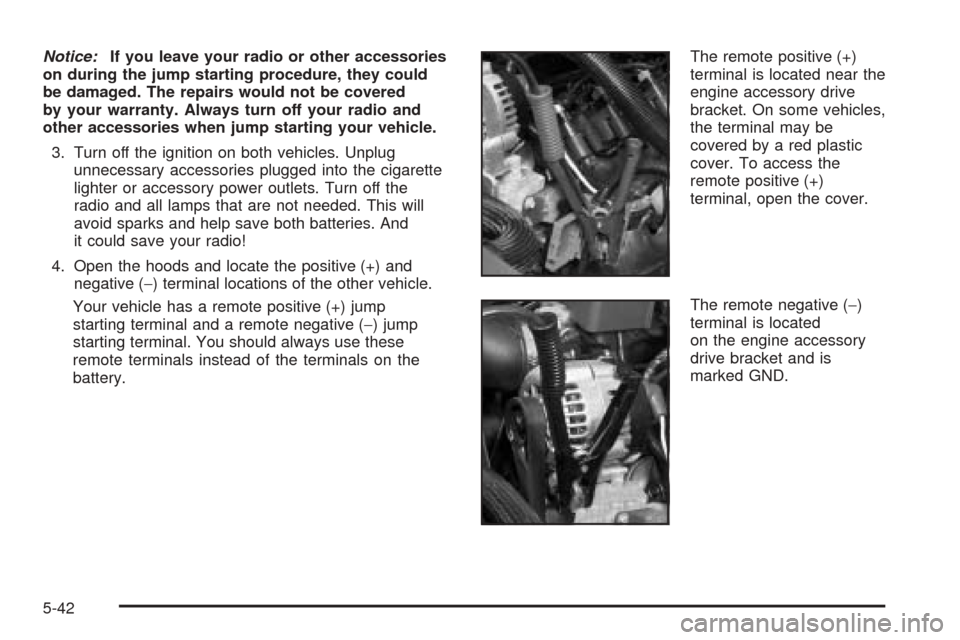
4. Open the hoods and locate the positive (+) and
negative (−) terminal locations of the other vehicle.
Your vehicle has a remote positive (+) jump
starting terminal and a remote negative (−) jump
starting terminal. You should always use these
remote terminals instead of the terminals on the
battery.The remote positive (+)
terminal is located near the
engine accessory drive
bracket. On some vehicles,
the terminal may be
covered by a red plastic
cover. To access the
remote positive (+)
terminal, open the cover.
The remote negative (−)
terminal is located
on the engine accessory
drive bracket and is
marked GND.
5-42
Page 342 of 460
8. Now connect the black negative (−) cable to the
negative (−) terminal of the good battery. Use a
remote negative (−) terminal if the vehicle has one.
Do not let the other end touch anything until the
next step. The other end of the negative (−) cable
does not go to the dead battery. It goes to a
heavy, unpainted metal engine part or to a remote
negative (−) terminal on the vehicle with the
dead battery.
9. Connect the other end of the negative (−) cable at
least 18 inches (45 cm) away from the dead battery,
but not near engine parts that move. The electrical
connection is just as good there, and the chance
of sparks getting back to the battery is much less.
Use a remote negative (−) terminal if the vehicle has
one. Your vehicle’s remote negative (−) terminal
is marked GND.
10. Now start the vehicle with the good battery and run
the engine for awhile.
11. Try to start the vehicle that had the dead battery.
If it will not start after a few tries, it probably
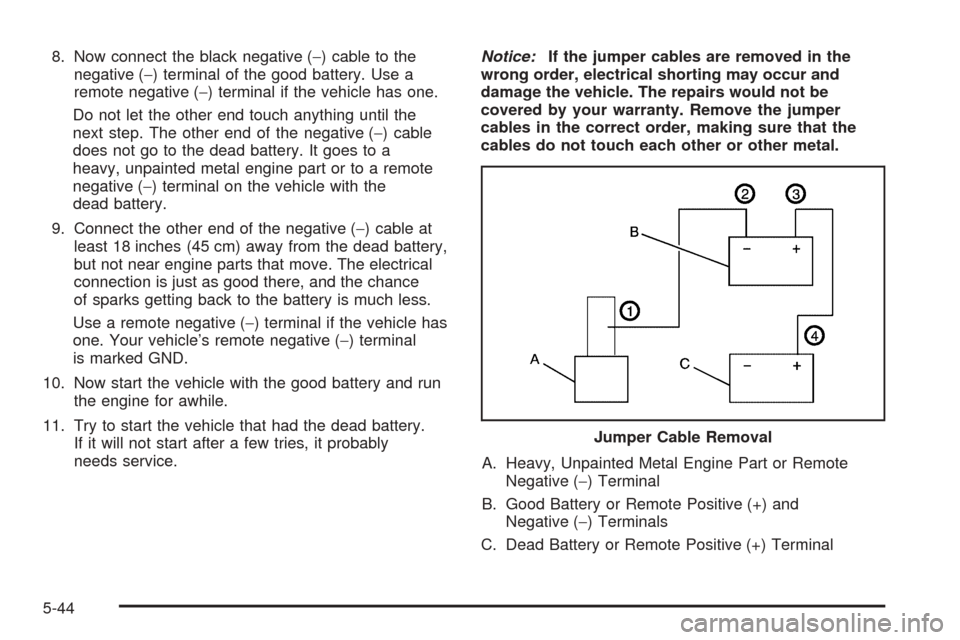
needs service.Notice:If the jumper cables are removed in the
wrong order, electrical shorting may occur and
damage the vehicle. The repairs would not be
covered by your warranty. Remove the jumper
cables in the correct order, making sure that the
cables do not touch each other or other metal.
A. Heavy, Unpainted Metal Engine Part or Remote
Negative (−) Terminal
B. Good Battery or Remote Positive (+) and
Negative (−) Terminals
C. Dead Battery or Remote Positive (+) TerminalJumper Cable Removal
5-44
Page 439 of 460
Cadillac Owner Privileges™
Roadside Service provides several Cadillac
Owner Privileges™ at “no charge,” throughout your
Cadillac Warranty Period — 48 months/50,000 miles
(80 000 km).
Emergency Road Service is performed on site for the
following situations:
Towing Service
Battery Jump Starting
Lock Out Assistance
Fuel Delivery
Flat Tire Change (Covers change only)
Trip Interruption — If your trip is interrupted due
to a warranty failure, incidental expenses may
be reimbursed during the 48 months/50,000 miles
(80 000 km) warranty period. Items covered
are hotel, meals, and rental car.
Roadside Service Availability
Wherever you drive in the United States or Canada,
an advisor is available to assist you over the phone.
A dealer technician, if available, can travel to your
location within a 30 mile (50 km) radius of a participating
Cadillac dealership. If beyond this radius, we will
arrange to have your car towed to the nearest Cadillac
dealership.
Reaching Roadside Service
Dial the toll-free Roadside Service number:
1-800-882-1112. A Roadside Service Advisor will
assist you and request the following information:
A description of the problem
Name, home address, home telephone number
Location of your Cadillac and number you are
calling from
The model year, Vehicle Identi�cation
Number (VIN), mileage, and date of delivery
7-7
Page 453 of 460
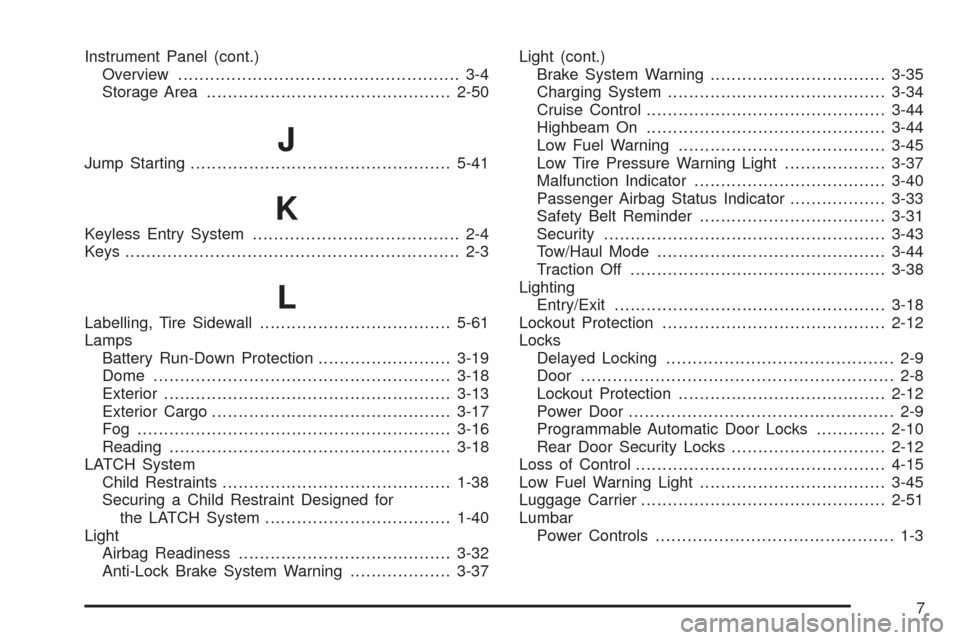
Instrument Panel (cont.)
Overview..................................................... 3-4
Storage Area..............................................2-50
JJump Starting.................................................5-41
K
Keyless Entry System....................................... 2-4
Keys............................................................... 2-3
L
Labelling, Tire Sidewall....................................5-61
Lamps
Battery Run-Down Protection.........................3-19
Dome........................................................3-18
Exterior......................................................3-13
Exterior Cargo.............................................3-17
Fog ...........................................................3-16
Reading.....................................................3-18
LATCH System
Child Restraints...........................................1-38
Securing a Child Restraint Designed for
the LATCH System...................................1-40
Light
Airbag Readiness........................................3-32
Anti-Lock Brake System Warning...................3-37Light (cont.)
Brake System Warning.................................3-35
Charging System.........................................3-34
Cruise Control.............................................3-44
Highbeam On.............................................3-44
Low Fuel Warning.......................................3-45
Low Tire Pressure Warning Light...................3-37
Malfunction Indicator....................................3-40
Passenger Airbag Status Indicator..................3-33
Safety Belt Reminder...................................3-31
Security.....................................................3-43
Tow/Haul Mode...........................................3-44
Traction Off................................................3-38
Lighting
Entry/Exit...................................................3-18
Lockout Protection..........................................2-12
Locks
Delayed Locking........................................... 2-9
Door........................................................... 2-8
Lockout Protection.......................................2-12
Power Door.................................................. 2-9
Programmable Automatic Door Locks.............2-10
Rear Door Security Locks.............................2-12
Loss of Control...............................................4-15
Low Fuel Warning Light...................................3-45
Luggage Carrier..............................................2-51
Lumbar
Power Controls............................................. 1-3
7