AUX CADILLAC ESCALADE EXT 2010 3.G User Guide
[x] Cancel search | Manufacturer: CADILLAC, Model Year: 2010, Model line: ESCALADE EXT, Model: CADILLAC ESCALADE EXT 2010 3.GPages: 580, PDF Size: 6.23 MB
Page 266 of 580
For example, rear seat passengers can control and
listen to a CD through the headphones, while the driver
listens to the radio through the speakers. The rear seat
passengers have control of the volume for each set of
headphones.
The radio functionality is controlled by both the RSA
and the front radio. Only one band can be tuned to at
one time. Changing the band on the RSA or the front
radio will change the band on the other system, if they
are both sourced to the radio.
The RSA functions can be used even when the main
radio is off.
Audio can be heard through wired headphones (not
included) plugged into the jacks on the RSA. If your
vehicle has this feature, audio can also be heard on
Channel 2 of the wireless headphones.
The front audio system allows the rear speakers to
continue playing even when the RSA audio is active
through the headphones.
To listen to an iPod or portable audio device through the
RSA, attach the iPod or portable audio device to the
auxiliary input (if available), located below the RSA
system. Turn the iPod on, then choose the front
auxiliary input with the RSA SRCE button.
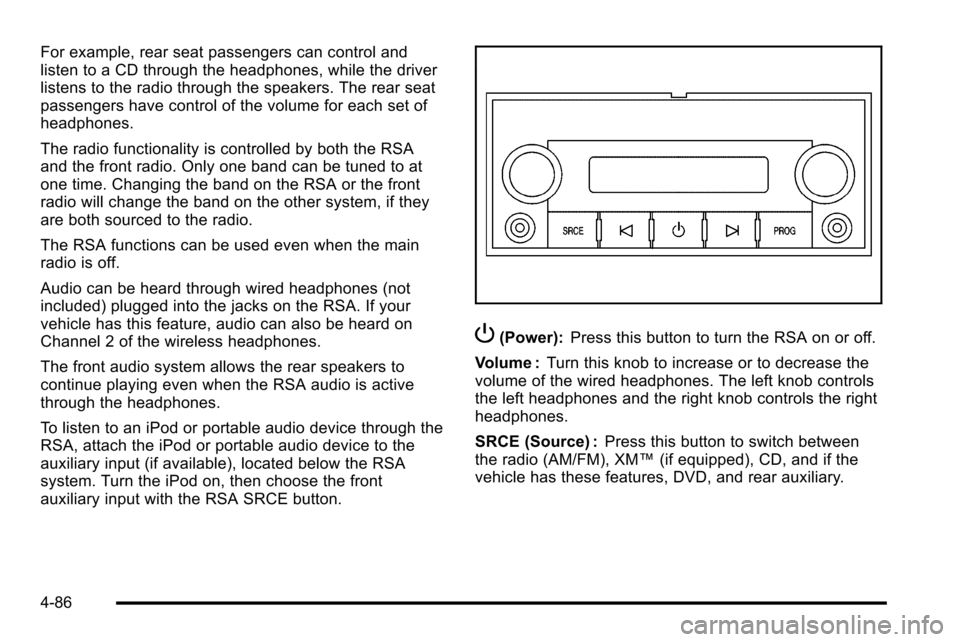
P(Power):Press this button to turn the RSA on or off.
Volume : Turn this knob to increase or to decrease the
volume of the wired headphones. The left knob controls
the left headphones and the right knob controls the right
headphones.
SRCE (Source) : Press this button to switch between
the radio (AM/FM), XM™ (if equipped), CD, and if the
vehicle has these features, DVD, and rear auxiliary.
4-86
Page 268 of 580
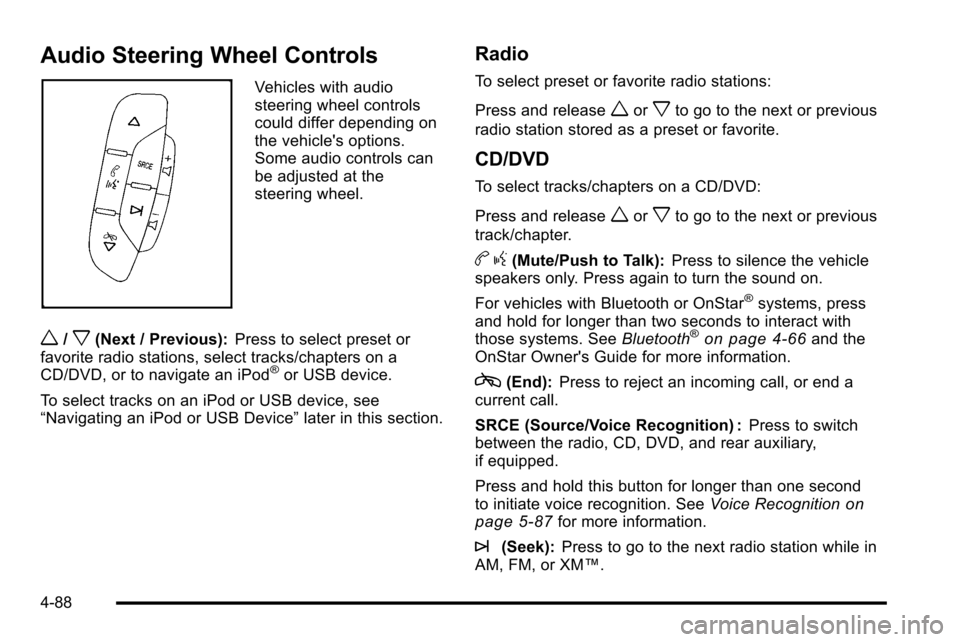
Audio Steering Wheel Controls
Vehicles with audio
steering wheel controls
could differ depending on
the vehicle's options.
Some audio controls can
be adjusted at the
steering wheel.
w/x(Next / Previous):Press to select preset or
favorite radio stations, select tracks/chapters on a
CD/DVD, or to navigate an iPod
®or USB device.
To select tracks on an iPod or USB device, see
“Navigating an iPod or USB Device” later in this section.
Radio
To select preset or favorite radio stations:
Press and release
worxto go to the next or previous
radio station stored as a preset or favorite.
CD/DVD
To select tracks/chapters on a CD/DVD:
Press and release
worxto go to the next or previous
track/chapter.
b g(Mute/Push to Talk): Press to silence the vehicle
speakers only. Press again to turn the sound on.
For vehicles with Bluetooth or OnStar
®systems, press
and hold for longer than two seconds to interact with
those systems. See Bluetooth
®on page 4‑66and the
OnStar Owner's Guide for more information.
c(End): Press to reject an incoming call, or end a
current call.
SRCE (Source/Voice Recognition) : Press to switch
between the radio, CD, DVD, and rear auxiliary,
if equipped.
Press and hold this button for longer than one second
to initiate voice recognition. See Voice Recognition
on
page 5‑87for more information.
¨(Seek): Press to go to the next radio station while in
AM, FM, or XM™.
4-88
Page 271 of 580
Section 5 Navigation System
Overview. . . . . . . . . . . . . . . . . . . . . . . . . . . . . . . . . . . . . . . . . . . 5-2
Navigation System Overview . . . . . . . . . . . . . . . . . . . . 5-2
Getting Started . . . . . . . . . . . . . . . . . . . . . . . . . . . . . . . . . . 5-4
Cleaning the Display . . . . . . . . . . . . . . . . . . . . . . . . . . . 5-11
Features and Controls . . . . . . . . . . . . . . . . . . . . . . . . . . . 5-12
Using the Navigation System . . . . . . . . . . . . . . . . . . 5-12
Maps . . . . . . . . . . . . . . . . . . . . . . . . . . . . . . . . . . . . . . . . . . 5-14
Symbols . . . . . . . . . . . . . . . . . . . . . . . . . . . . . . . . . . . . . . . 5-17
Destination . . . . . . . . . . . . . . . . . . . . . . . . . . . . . . . . . . . . 5-24
Configure Menu . . . . . . . . . . . . . . . . . . . . . . . . . . . . . . . 5-42
Global Positioning System (GPS) . . . . . . . . . . . . . . 5-56 Vehicle Positioning . . . . . . . . . . . . . . . . . . . . . . . . . . . . 5-57
Problems with Route Guidance . . . . . . . . . . . . . . . . 5-58
If the System Needs Service . . . . . . . . . . . . . . . . . . . 5-58
Ordering Map DVDs . . . . . . . . . . . . . . . . . . . . . . . . . . . 5-58
Database Coverage Explanations . . . . . . . . . . . . . 5-59
Navigation Audio System . . . . . . . . . . . . . . . . . . . . . . . .5-59
CD Player . . . . . . . . . . . . . . . . . . . . . . . . . . . . . . . . . . . . . 5-68
DVD Player . . . . . . . . . . . . . . . . . . . . . . . . . . . . . . . . . . . . 5-75
Care of Your CDs and DVDs . . . . . . . . . . . . . . . . . . . 5-85
Auxiliary Devices . . . . . . . . . . . . . . . . . . . . . . . . . . . . . . 5-86
Voice Recognition . . . . . . . . . . . . . . . . . . . . . . . . . . . . . . . . 5-87
5-1
Page 282 of 580
Features and Controls
Using the Navigation System
This section presents basic information needed to
operate the navigation system.
Use the hard keys located on the navigation system
along with the available touch-sensitive screen buttons
on the navigation screen to operate the system.
SeeNavigation System Overview
on page 5‑2for
more information.
Once the vehicle is moving, various functions are
disabled to reduce driver distractions.
Hard Keys
The following hard keys are located on the navigation
system:
O/n(Power/Volume): Press to turn the system
on and off. Turn to increase or decrease the volume to
the audio system.
Press and hold for more than two seconds to turn off
the navigation system, the Rear Seat Entertainment
(RSE), and Rear Seat Audio (RSA). If the vehicle has
not been tuned off, the RSE and the RSA can be turned
back on by pressing this knob and continues play of the
last active source.
w(Tune): Turn to go to the next or previous radio
station or disc track or chapter. See Navigation Audio
System
on page 5‑59, CD Playeron page 5‑68,
or DVD Playeron page 5‑75for more information.
Z(DVD Map Disc Eject): Press to eject the DVD
map disc. This button is located next to the upper disc
slot. See Maps
on page 5‑14for more information.
M(Load):Press to load CDs or audio/video DVDs.
See CD Playeron page 5‑68orDVD Playeron
page 5‑75for more information.
Z(CD/DVD Eject): Press to eject CDs or audio/video
DVDs. This button is located under the load button.
See CD Player
on page 5‑68orDVD Playeron
page 5‑75for more information.
M(Disc Up/Down): Press the up or down arrows to
go to the next or previous disc.
AUDIO : Press to access the full Audio screen to
change AM, FM, XM™ Satellite Radio Service
(if equipped), CD/DVD, and auxiliary input. See “Audio”
under Navigation Audio System
on page 5‑59for more
information.
5-12
Page 330 of 580
Playing the Radio
O
/n(Power/Volume):Press to turn the audio
system on and off. Turn to increase or to decrease the
volume.
Press and hold for more than two seconds to turn off
the navigation system, the Rear Seat Entertainment
(RSE) video screen, and Rear Seat Audio (RSA). If the
vehicle has not been turned off, press this knob to turn
RSE and RSA back on and to continue playback of the
last active source.
w(Tuning Knob): Turn to go to the next or previous
frequency or disc track or chapter. See CD Playeron
page 5‑68or DVD Playeron page 5‑75for more
information.
AUDIO : Press to display the audio screen. Press to
switch between AM, FM, or XM, if equipped, DISC,
or AUX (Auxiliary), or touch the screen button. See CD
Player
on page 5‑68, DVD Playeron page 5‑75, and
Auxiliary Deviceson page 5‑86for more information.
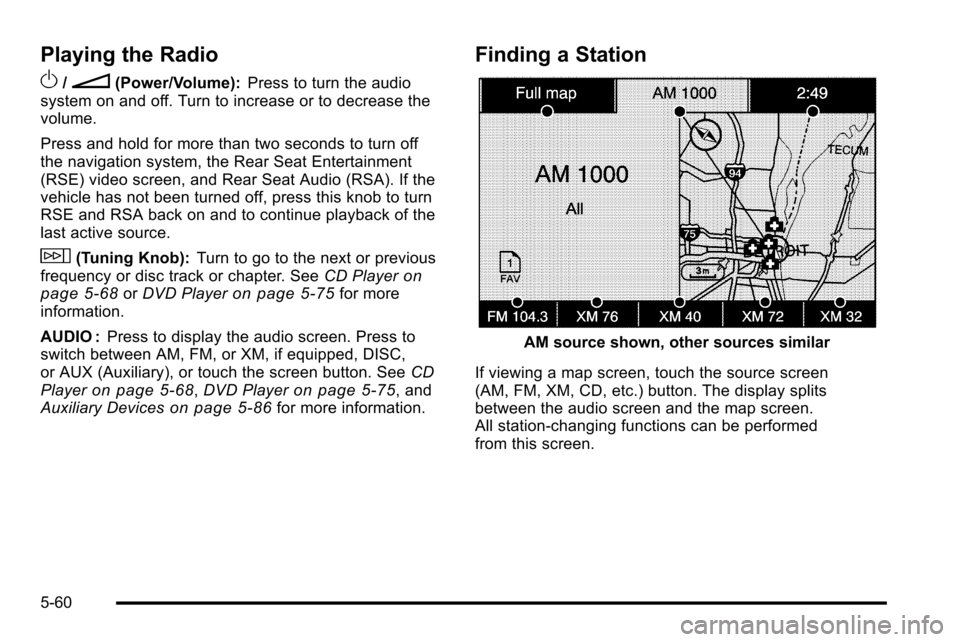
Finding a Station
AM source shown, other sources similar
If viewing a map screen, touch the source screen
(AM, FM, XM, CD, etc.) button. The display splits
between the audio screen and the map screen.
All station-changing functions can be performed
from this screen.
5-60
Page 333 of 580
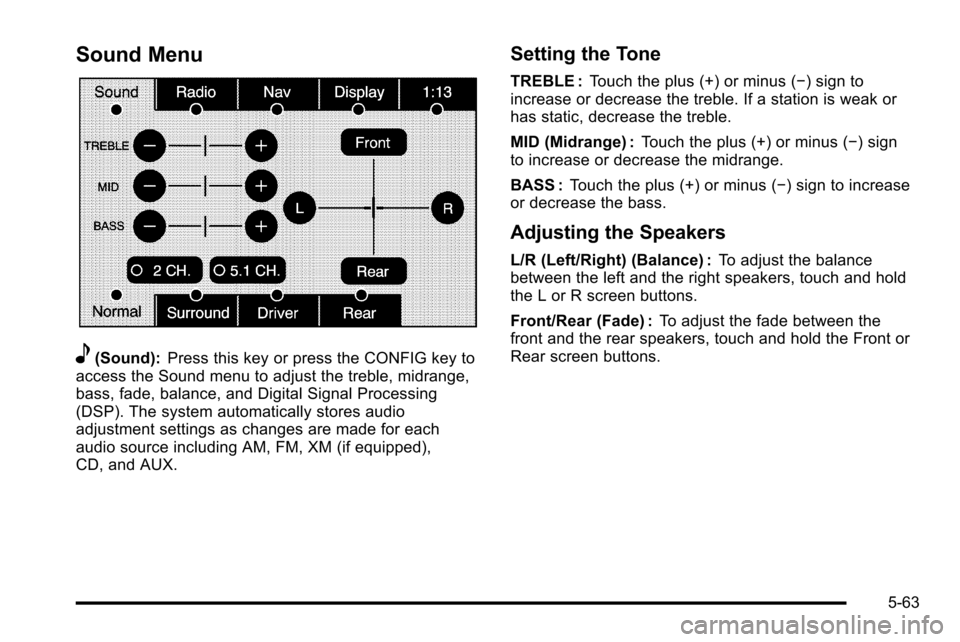
Sound Menu
e(Sound):Press this key or press the CONFIG key to
access the Sound menu to adjust the treble, midrange,
bass, fade, balance, and Digital Signal Processing
(DSP). The system automatically stores audio
adjustment settings as changes are made for each
audio source including AM, FM, XM (if equipped),
CD, and AUX.
Setting the Tone
TREBLE : Touch the plus (+) or minus (−) sign to
increase or decrease the treble. If a station is weak or
has static, decrease the treble.
MID (Midrange) : Touch the plus (+) or minus (−) sign
to increase or decrease the midrange.
BASS : Touch the plus (+) or minus (−) sign to increase
or decrease the bass.
Adjusting the Speakers
L/R (Left/Right) (Balance) : To adjust the balance
between the left and the right speakers, touch and hold
the L or R screen buttons.
Front/Rear (Fade) : To adjust the fade between the
front and the rear speakers, touch and hold the Front or
Rear screen buttons.
5-63
Page 352 of 580
USB Supported File and Folder Structure
The guidelines that must be met while using USB
supported files and folders are:
.Up to 700 folders.
.Up to 8 folders in depth.
.Up to 65,535 files.
.Folder and file names up to 64 bytes.
.Files with an .mp3 or .wma file extension.
.AAC files stored on an iPod.
.FAT16
.FAT32
Using the Navigation Audio System to
Control a USB Storage Device or iPod®
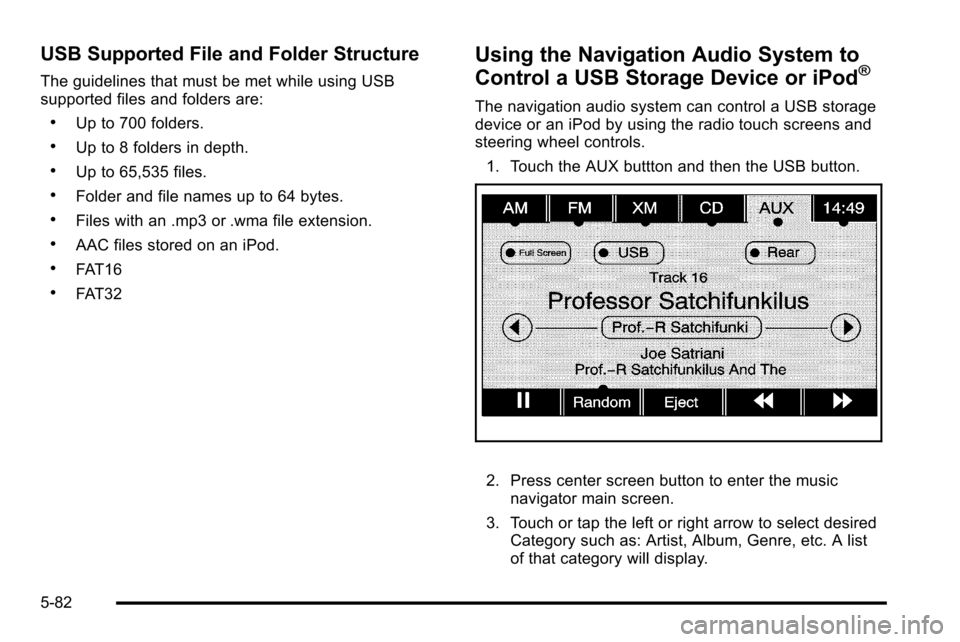
The navigation audio system can control a USB storage
device or an iPod by using the radio touch screens and
steering wheel controls.1. Touch the AUX buttton and then the USB button.
2. Press center screen button to enter the music navigator main screen.
3. Touch or tap the left or right arrow to select desired Category such as: Artist, Album, Genre, etc. A list
of that category will display.
5-82
Page 356 of 580

Auxiliary Devices
The vehicle may have a rear entertainment system
(RSE) with a second and third row screen. The RSE
has audio adapters to allow you to connect auxiliary
devices. The audio can be heard through the speakers
or through the wireless or wired headphones. See
“Audio/Video Jacks”under,Rear Seat Entertainment
(RSE) System
on page 4‑77for more information.
Drivers are encouraged to set up any auxiliary device
while the vehicle is in P (Park). See Defensive Driving
on page 6‑2for more information on driver distraction.
To switch the RSE system to use an auxiliary device:
1. Connect the auxiliary device to the RSE system, for the second or third row.
2. Press the AUDIO key then press the AUDIO key repeatedly until AUX (auxiliary) is selected or touch
the AUX screen button. An auxiliary device must
be connected for the AUX screen button to appear
as an option to select.
3. For the second row display select the Rear AUX screen button next to Rear Display 1 and for the
third row display select the Rear AUX screen
button next to Rear Display 2. Each screen works
independently of the other. The second row screen
can watch a DVD while the third row screen can
use the auxiliary device.
The rear seat passengers can also use the remote
control to change the functions of the RSE. See Rear
Seat Entertainment (RSE) System
on page 4‑77for
more information.
5-86
Page 360 of 580
CD Commands
The following are CD, MP3, and DVD commands that
can be accessed by clearly stating the commands
exactly as they are written.
CD, DVD, Disc :Use this command to select a CD,
DVD, or disc that is currently loaded.
CD, DVD, Disc, [select] track (one, two, three, etc.) :
Instructs the system to select a specific track number.
CD, DVD, Disc select next folder : Use this command
to select the next folder on the MP3 or audio DVD.
CD, DVD, Disc select previous folder : Use this
command to select the previous folder on the MP3 or
audio DVD.
CD help, DVD help, Disc help : Instructs the system to
assist with CD and DVD commands.
Auxiliary Commands
The following auxiliary commands can be accessed by
clearly stating the commands exactly as they are
written. The commands are available when the auxiliary
source is available.
Aux, Auxiliary : Use this command to select the
auxiliary device, when a device is connected.
Voice Help
Voice help : Provides a description of help commands
that can be used.
5-90
Page 524 of 580

FusesUsage
24Fuel Injectors, Ignition Coils
(Left Side)
25 Trailer Park Lamps
26 Driver Side Park Lamps
27 Passenger Side Park Lamps
28 Fog Lamps
29 Horn
30 Passenger Side High-Beam
Headlamp
31 Daytime Running Lamps (DRL)
32 Driver Side High-Beam Headlamp
33 Daytime Running Lights 2
34 Sunroof
35 Key Ignition System, Theft Deterrent
System
36 Windshield Wiper
37 SEO B2 Upfitter Usage (Battery)
38 Electric Adjustable Pedals
39 Climate Controls (Battery)
40 Airbag System (Ignition)
Fuses Usage
41 Amplifier
42 Audio System
43Miscellaneous (Ignition), Cruise
Control
44 Liftgate Release
45 Airbag System (Battery)
46 Instrument Panel Cluster
47 Not Used
48 Auxiliary Climate Control (Ignition)
49 Center High-Mounted Stoplamp
50 Rear Defogger
51 Heated Mirrors
52 SEO B1 Upfitter Usage (Battery)
53 Cigarette Lighter, Auxiliary Power
Outlet
54 Automatic Level Control Compressor
Relay
55 Climate Controls (Ignition)
56 Engine Control Module, Secondary
Fuel Pump (Ignition)
7-110