air filter CADILLAC SRX 2015 2.G Owners Manual
[x] Cancel search | Manufacturer: CADILLAC, Model Year: 2015, Model line: SRX, Model: CADILLAC SRX 2015 2.GPages: 417, PDF Size: 4.59 MB
Page 184 of 417
Black plate (1,1)Cadillac SRX Owner Manual (GMNA-Localizing-U.S./Canada/Mexico-
7707476) - 2015 - crc - 4/10/14
Climate Controls 8-1
Climate Controls
Climate Control Systems
Dual Automatic Climate ControlSystem . . . . . . . . . . . . . . . . . . . . . . 8-1
Rear Climate Control System . . . . . . . . . . . . . . . . . . . . . . 8-6
Air Vents
Air Vents . . . . . . . . . . . . . . . . . . . . . . 8-7
Maintenance
Passenger Compartment AirFilter . . . . . . . . . . . . . . . . . . . . . . . . . 8-8
Climate Control Systems
Dual Automatic Climate Control System
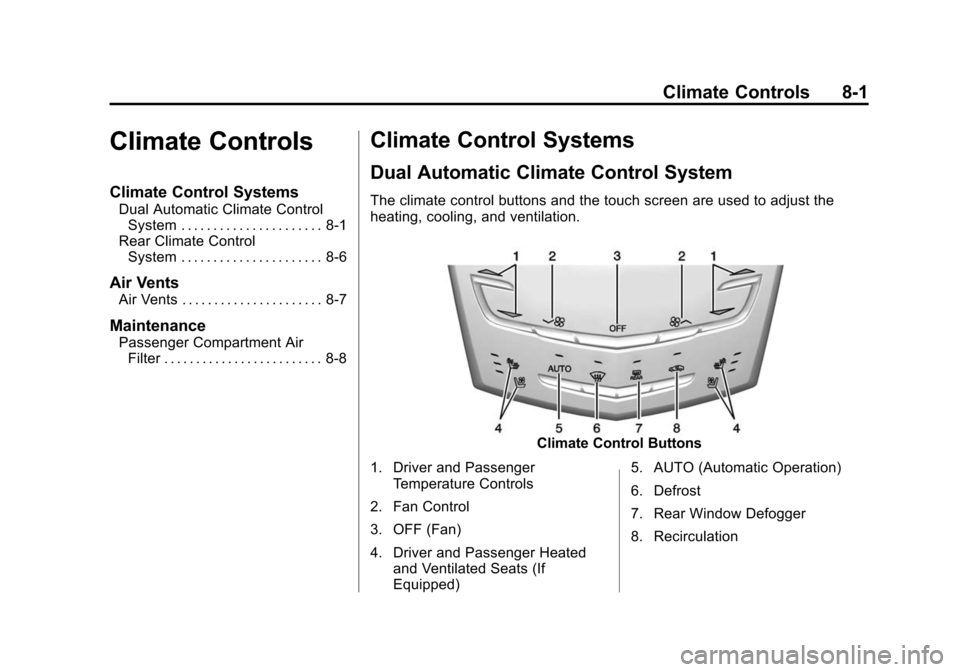
The climate control buttons and the touch screen are used to adjust the
heating, cooling, and ventilation.
Climate Control Buttons
1. Driver and Passenger Temperature Controls
2. Fan Control
3. OFF (Fan)
4. Driver and Passenger Heated and Ventilated Seats (If
Equipped) 5. AUTO (Automatic Operation)
6. Defrost
7. Rear Window Defogger
8. Recirculation
Page 191 of 417
Black plate (8,1)Cadillac SRX Owner Manual (GMNA-Localizing-U.S./Canada/Mexico-
7707476) - 2015 - crc - 4/10/14
8-8 Climate Controls
Maintenance
Passenger Compartment
Air Filter
The filter reduces the dust, pollen,
and other airborne irritants from
outside air that is pulled into the
vehicle.
The filter should be replaced as part
of routine scheduled maintenance,
seeMaintenance Schedule on
page 11-3. To find out what type of
filter to use, see Maintenance
Replacement Parts on page 11-14.
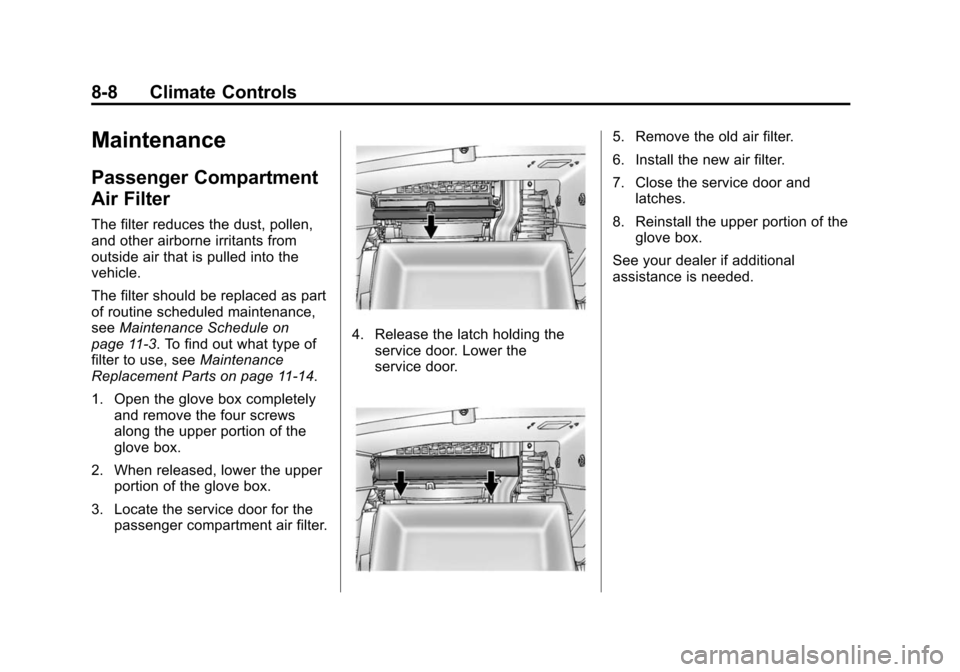
1. Open the glove box completely and remove the four screws
along the upper portion of the
glove box.
2. When released, lower the upper portion of the glove box.
3. Locate the service door for the passenger compartment air filter.
4. Release the latch holding theservice door. Lower the
service door.
5. Remove the old air filter.
6. Install the new air filter.
7. Close the service door andlatches.
8. Reinstall the upper portion of the glove box.
See your dealer if additional
assistance is needed.
Page 260 of 417
Black plate (1,1)Cadillac SRX Owner Manual (GMNA-Localizing-U.S./Canada/Mexico-
7707476) - 2015 - crc - 4/8/14
Vehicle Care 10-1
Vehicle Care
General Information
General Information . . . . . . . . . . 10-2
California Proposition65 Warning . . . . . . . . . . . . . . . . . 10-2
California Perchlorate Materials Requirements . . . . 10-3
Accessories and Modifications . . . . . . . . . . . . . . . 10-3
Vehicle Checks
Doing Your OwnService Work . . . . . . . . . . . . . . . 10-3
Hood . . . . . . . . . . . . . . . . . . . . . . . . 10-4
Engine Compartment Overview . . . . . . . . . . . . . . . . . . . 10-5
Engine Cover . . . . . . . . . . . . . . . . 10-6
Engine Oil . . . . . . . . . . . . . . . . . . . 10-7
Engine Oil Life System . . . . . . 10-9
Automatic Transmission Fluid . . . . . . . . . . . . . . . . . . . . . . 10-10
Engine Air Cleaner/Filter . . . . 10-10
Cooling System . . . . . . . . . . . . 10-12
Engine Coolant . . . . . . . . . . . . . 10-13
Engine Overheating . . . . . . . . 10-16
Power Steering Fluid . . . . . . . 10-18
Washer Fluid . . . . . . . . . . . . . . . 10-18 Brakes . . . . . . . . . . . . . . . . . . . . . 10-19
Brake Fluid . . . . . . . . . . . . . . . . . 10-20
Battery . . . . . . . . . . . . . . . . . . . . . 10-21
All-Wheel Drive . . . . . . . . . . . . . 10-22
Starter Switch Check . . . . . . . 10-22
Automatic Transmission Shift
Lock Control Function
Check . . . . . . . . . . . . . . . . . . . . . 10-23
Park Brake and P (Park) Mechanism Check . . . . . . . . 10-23
Wiper Blade Replacement . . . . . . . . . . . . . . 10-23Headlamp Aiming
Headlamp Aiming . . . . . . . . . . 10-25
Bulb Replacement
Bulb Replacement . . . . . . . . . . 10-25
Halogen Bulbs . . . . . . . . . . . . . . 10-25
High Intensity Discharge(HID) Lighting . . . . . . . . . . . . . 10-26
Headlamps . . . . . . . . . . . . . . . . . 10-26
Turn Signal Lamps . . . . . . . . . 10-29
Back-Up Lamps . . . . . . . . . . . . 10-30
License Plate Lamp . . . . . . . . 10-31
Replacement Bulbs . . . . . . . . . 10-32
Electrical System
Electrical System Overload . . . . . . . . . . . . . . . . . . 10-32
Fuses and Circuit Breakers . . . . . . . . . . . . . . . . . . 10-33
Engine Compartment Fuse
Block . . . . . . . . . . . . . . . . . . . . . 10-33
Instrument Panel Fuse Block . . . . . . . . . . . . . . . . . . . . . 10-36
Rear Compartment Fuse Block . . . . . . . . . . . . . . . . . . . . . 10-38
Wheels and Tires
Tires . . . . . . . . . . . . . . . . . . . . . . . . 10-41
All-Season Tires . . . . . . . . . . . . 10-42
Winter Tires . . . . . . . . . . . . . . . . 10-42
Summer Tires . . . . . . . . . . . . . . 10-42
Tire Sidewall Labeling . . . . . . 10-43
Tire Designations . . . . . . . . . . . 10-45
Tire Terminology andDefinitions . . . . . . . . . . . . . . . . 10-45
Tire Pressure . . . . . . . . . . . . . . . 10-48
Tire Pressure for High-Speed Operation . . . . . . . . . . . . . . . . . 10-49
Tire Pressure Monitor System . . . . . . . . . . . . . . . . . . . 10-50
Tire Pressure Monitor Operation . . . . . . . . . . . . . . . . . 10-51
Tire Inspection . . . . . . . . . . . . . . 10-54
Page 265 of 417
Black plate (6,1)Cadillac SRX Owner Manual (GMNA-Localizing-U.S./Canada/Mexico-
7707476) - 2015 - crc - 4/8/14
10-6 Vehicle Care
1.Engine Air Cleaner/Filter on
page 10-10.
2. Power Steering Reservoir and Cap (Under Engine Cover). See
Power Steering Fluid on
page 10-18.
3. Engine Oil Fill Cap. See Engine
Oil on page 10-7.
4. Engine Oil Dipstick (Out of View). See Engine Oil on
page 10-7.
5. Engine Cover on page 10-6.
6. Transmission Fluid Cap and Dipstick (Out of View). See
Automatic Transmission Fluid on
page 10-10.
7. Brake Fluid Reservoir. See Brakes on page 10-19.
8. Engine Coolant Surge Tank and Pressure Cap. See Engine
Coolant on page 10-13.
9. Battery (Out of View). See Battery on page 10-21. 10. Remote Positive (+) Terminal.
SeeJump Starting on
page 10-79.
11. Remote Negative (−) Terminal (Out of View). See Jump
Starting on page 10-79.
12. Engine Compartment Fuse
Block on page 10-33.
13. Windshield Washer Fluid Reservoir. See Washer Fluid
on page 10-18.
Engine Cover
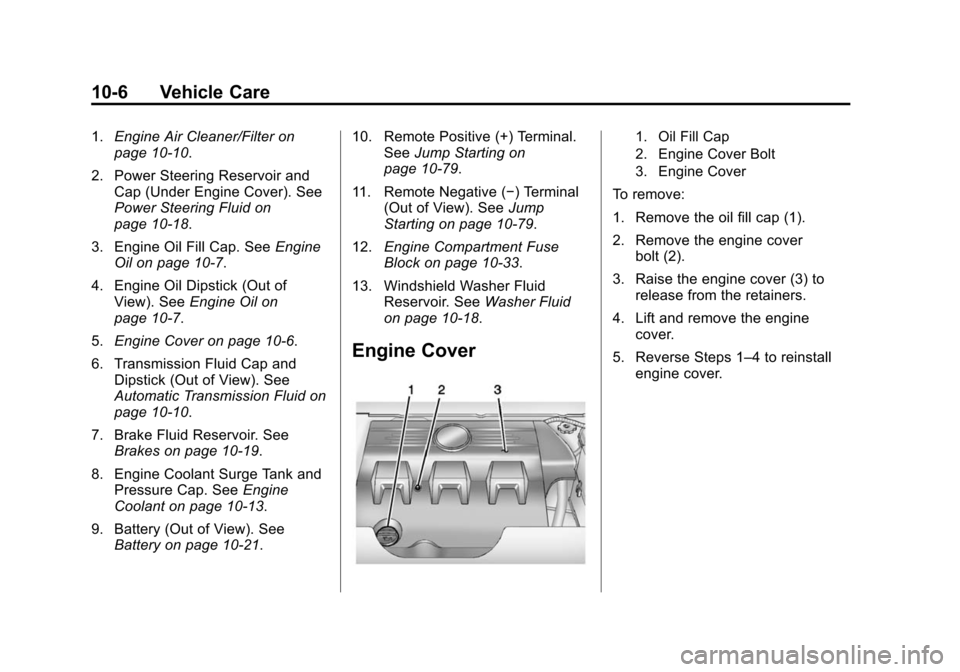
1. Oil Fill Cap
2. Engine Cover Bolt
3. Engine Cover
To remove:
1. Remove the oil fill cap (1).
2. Remove the engine cover bolt (2).
3. Raise the engine cover (3) to release from the retainers.
4. Lift and remove the engine cover.
5. Reverse Steps 1–4 to reinstall engine cover.
Page 269 of 417
Black plate (10,1)Cadillac SRX Owner Manual (GMNA-Localizing-U.S./Canada/Mexico-
7707476) - 2015 - crc - 4/8/14
10-10 Vehicle Care
How to Reset the Engine Oil
Life System
Reset the system whenever the
engine oil is changed so that the
system can calculate the next
engine oil change. To reset the
system:
1. Using the DIC controls on theright side of the steering wheel,
display REMAINING OIL LIFE
on the DIC. See Driver
Information Center (DIC) on
page 5-25. When remaining oil
life is low, the CHANGE
ENGINE OIL SOON message
will appear on the display. See
Engine Oil Messages on
page 5-31.
2. Press SEL on the DIC controls and hold SEL down for a few
seconds to clear the CHANGE
ENGINE OIL SOON message
and reset the oil life at 100%.
Be careful not to reset the oil life
display accidentally at any time
other than after the oil is changed. It cannot be reset
accurately until the next oil
change.
The oil life system can also be reset
as follows:
1. Turn the ignition on with the engine off.
2. Fully press and release the accelerator pedal three times
within five seconds.
If the CHANGE ENGINE OIL
SOON message is not on, the
system is reset.
The system is reset when the
CHANGE ENGINE OIL SOON
message is off.
If the CHANGE ENGINE OIL SOON
message comes back on when the
vehicle is started, the engine oil life
system has not been reset. Repeat
the procedure.
Automatic Transmission
Fluid
A transmission fluid leak is the only
reason for fluid loss. If a leak
occurs, take the vehicle to your
dealer and have it repaired as soon
as possible.
Change the fluid and filter at the
intervals listed in Maintenance
Schedule on page 11-3, and be sure
to use the fluid listed in
Recommended Fluids and
Lubricants on page 11-13.
Engine Air Cleaner/Filter
See Engine Compartment Overview
on page 10-5 for the location of the
engine air cleaner/filter.
When to Inspect the Engine Air
Cleaner/Filter
Inspect the air cleaner/filter at the
scheduled maintenance intervals
and replace it at the first oil change
after each 80 000 km (50,000 mi)
interval.
Page 270 of 417
Black plate (11,1)Cadillac SRX Owner Manual (GMNA-Localizing-U.S./Canada/Mexico-
7707476) - 2015 - crc - 4/8/14
Vehicle Care 10-11
SeeMaintenance Schedule on
page 11-3. If driving in dusty/dirty
conditions, inspect the filter at each
engine oil change.
How to Inspect the Engine Air
Cleaner/Filter
To inspect the air cleaner/filter,
remove the filter from the vehicle
and lightly shake the filter to release
loose dust and dirt. If the filter
remains covered with dirt, a new
filter is required. Never use
compressed air to clean the filter.
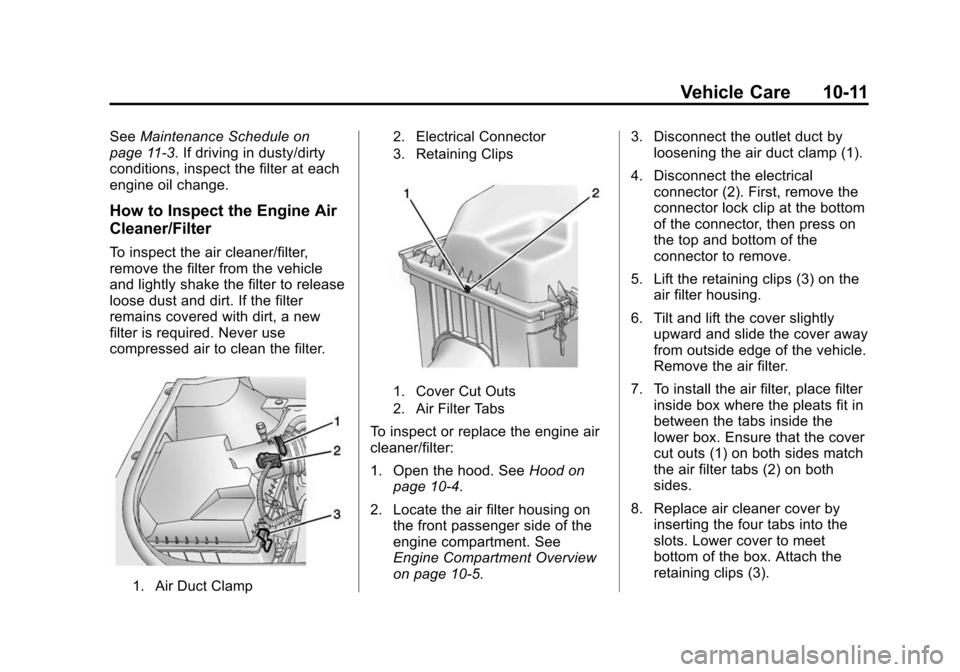
1. Air Duct Clamp 2. Electrical Connector
3. Retaining Clips
1. Cover Cut Outs
2. Air Filter Tabs
To inspect or replace the engine air
cleaner/filter:
1. Open the hood. See
Hood on
page 10-4.
2. Locate the air filter housing on the front passenger side of the
engine compartment. See
Engine Compartment Overview
on page 10-5. 3. Disconnect the outlet duct by
loosening the air duct clamp (1).
4. Disconnect the electrical connector (2). First, remove the
connector lock clip at the bottom
of the connector, then press on
the top and bottom of the
connector to remove.
5. Lift the retaining clips (3) on the air filter housing.
6. Tilt and lift the cover slightly upward and slide the cover away
from outside edge of the vehicle.
Remove the air filter.
7. To install the air filter, place filter inside box where the pleats fit in
between the tabs inside the
lower box. Ensure that the cover
cut outs (1) on both sides match
the air filter tabs (2) on both
sides.
8. Replace air cleaner cover by inserting the four tabs into the
slots. Lower cover to meet
bottom of the box. Attach the
retaining clips (3).
Page 271 of 417
Black plate (12,1)Cadillac SRX Owner Manual (GMNA-Localizing-U.S./Canada/Mexico-
7707476) - 2015 - crc - 4/8/14
10-12 Vehicle Care
9. Reconnect outlet duct to thecover and tighten the air duct
clamp (1).
10. Reconnect the electrical connector (2). Install connector
lock clip to the bottom of
connector.
{Warning
Operating the engine with the air
cleaner/filter off can cause you or
others to be burned. The air
cleaner not only cleans the air; it
helps to stop flames if the engine
backfires. Use caution when
working on the engine and do not
drive with the air cleaner/filter off.
{Caution
If the air cleaner/filter is off, dirt
can easily get into the engine,
which could damage it. Always
have the air cleaner/filter in place
when you are driving.
Cooling System
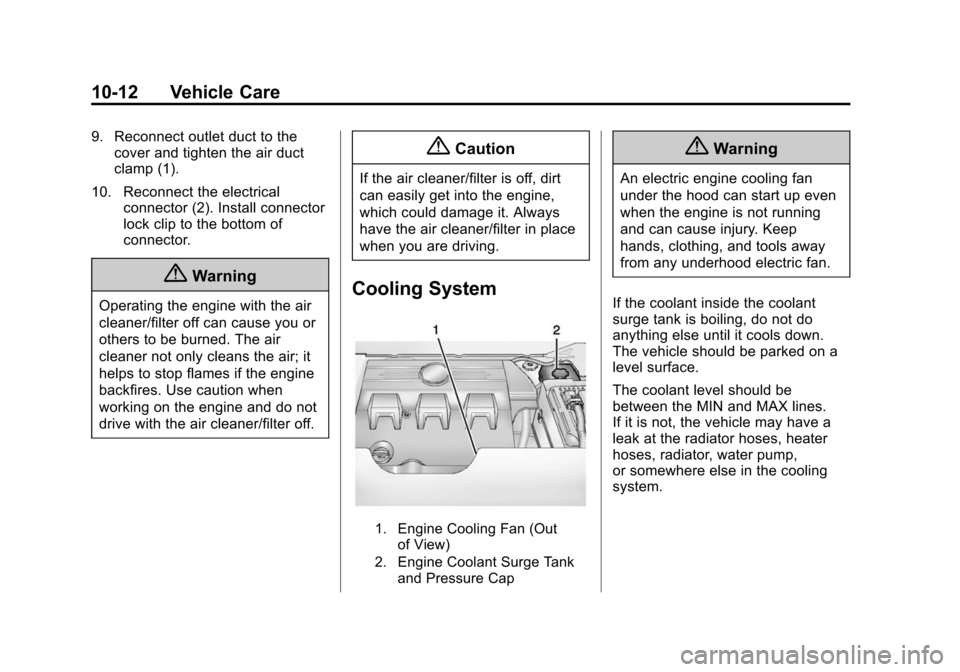
1. Engine Cooling Fan (Out
of View)
2. Engine Coolant Surge Tank and Pressure Cap
{Warning
An electric engine cooling fan
under the hood can start up even
when the engine is not running
and can cause injury. Keep
hands, clothing, and tools away
from any underhood electric fan.
If the coolant inside the coolant
surge tank is boiling, do not do
anything else until it cools down.
The vehicle should be parked on a
level surface.
The coolant level should be
between the MIN and MAX lines.
If it is not, the vehicle may have a
leak at the radiator hoses, heater
hoses, radiator, water pump,
or somewhere else in the cooling
system.
Page 286 of 417

Black plate (27,1)Cadillac SRX Owner Manual (GMNA-Localizing-U.S./Canada/Mexico-
7707476) - 2015 - crc - 4/8/14
Vehicle Care 10-27
{Warning
Liquids from environment or
spillage and/or tools placed on
top of or used in the underhood
electrical center while the cover is
removed can pose a risk of
electrical shock/burn to anyone in
the vicinity. These conditions can
also cause damage to electrical
components on the vehicle. Keep
liquids and tools away from the
underhood electrical center when
the cover is removed.
2. Unlatch the three clips and lift upthe underhood electrical center
cover to remove.
Passenger Side
The removal of the air filter/cleaner
assembly and base is required for
the replacement of one of these
bulbs:
1. Open the hood. See Hood on
page 10-4.
2. Remove the air cleaner/filter cover. See Engine Air Cleaner/
Filter on page 10-10. 3. Lift the air cleaner/filter base to
disengage from the three pins.
Low-Beam Headlamps/Daytime
Running Lamps (DRL),
High-Beam Headlamps (Base)
1. From the back side of theheadlamp assembly, remove the
top cap to replace the low-beam
headlamp/DRL bulb.
Page 287 of 417

Black plate (28,1)Cadillac SRX Owner Manual (GMNA-Localizing-U.S./Canada/Mexico-
7707476) - 2015 - crc - 4/8/14
10-28 Vehicle Care
2. From the back side of theheadlamp assembly, remove the
bottom cap to replace the
high-beam headlamp bulb.
3. Disconnect the electrical connector.
4. Remove the bulb socket from the headlamp assembly.
5. Replace the bulb in the bulb socket.
6. Install the bulb socket in the headlamp assembly.
7. Connect the electrical connector. 8. Install the cap with the down
arrow pointing down in the back
of the headlamp assembly.
9. For the driver side, reinstall the underhood electrical center
cover by latching three clips.
10. For the passenger side, reinstall the air filter/cleaner
assembly base by pushing to
seat. Verify the base is seated
securely, then install the engine
air filter/cleaner assembly.High/Low-Beam Headlamps
(Uplevel)
The high/low-beam headlamps on
the uplevel are High Intensity
Discharge (HID) and should be
replaced at the dealer.
Daytime Running Lamp (DRL)
(Uplevel)
1. From the back side of theheadlamp assembly, remove the
bottom cap to replace the
DRL bulb.
2. Disconnect electrical connector.
3. Remove the DRL bulb socket from the headlamp assembly.
4. Replace the bulb in the bulb socket.
5. Install the bulb socket in the headlamp assembly.
Page 288 of 417
Black plate (29,1)Cadillac SRX Owner Manual (GMNA-Localizing-U.S./Canada/Mexico-
7707476) - 2015 - crc - 4/8/14
Vehicle Care 10-29
6. Connect the electrical connector.
7. Install the cap with the downarrow pointing down in the back
of the headlamp assembly.
8. For the driver side, reinstall the underhood electrical center
cover by latching three clips.
9. For the passenger side, reinstall the air filter/cleaner assembly
base by pushing to seat. Verify
the base is seated securely, then
install the engine air filter/
cleaner assembly.
Front Turn Signal Lamp (Base
and Uplevel)
To replace the front turn
signal lamp:
1. Remove the turn signal lamp
bulb socket from the headlamp
assembly.
2. Remove the turn signal lamp bulb from the socket.
3. Replace the bulb in the bulb socket. 4. Install the bulb socket in the
headlamp assembly.
5. For the driver side, reinstall the underhood electrical center
cover by latching the three clips.
6. For the passenger side, reinstall the air filter/cleaner assembly
base by pushing to seat. Verify
the base is seated securely, then
install the engine air filter/
cleaner assembly.
Turn Signal Lamps
To replace one of these bulbs:
1. Open the liftgate. See Liftgate
on page 2-14.
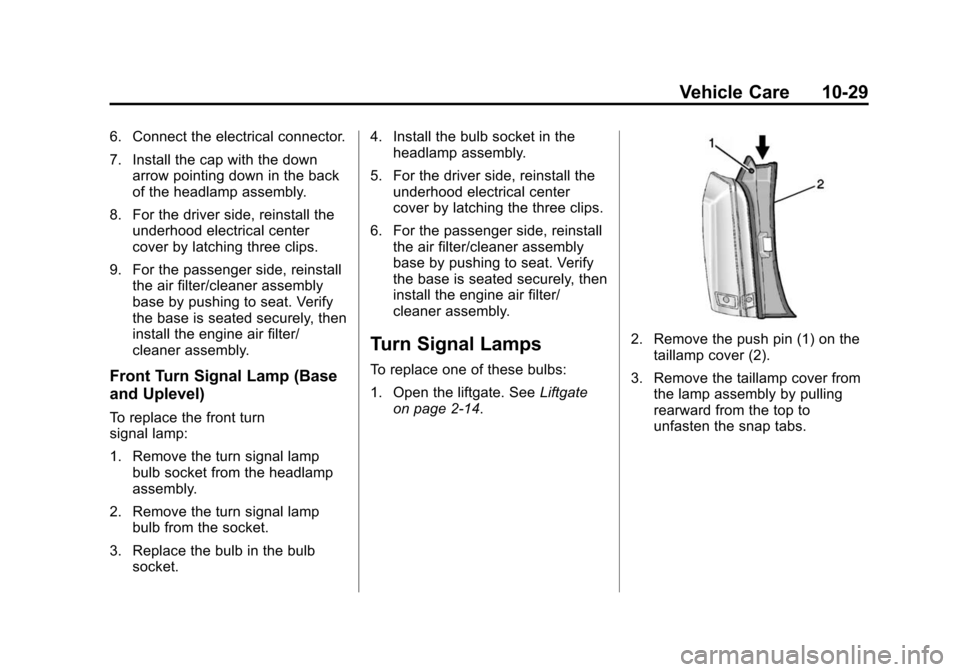
2. Remove the push pin (1) on the taillamp cover (2).
3. Remove the taillamp cover from the lamp assembly by pulling
rearward from the top to
unfasten the snap tabs.