buttons CADILLAC STS 2005 1.G User Guide
[x] Cancel search | Manufacturer: CADILLAC, Model Year: 2005, Model line: STS, Model: CADILLAC STS 2005 1.GPages: 446, PDF Size: 2.58 MB
Page 139 of 446
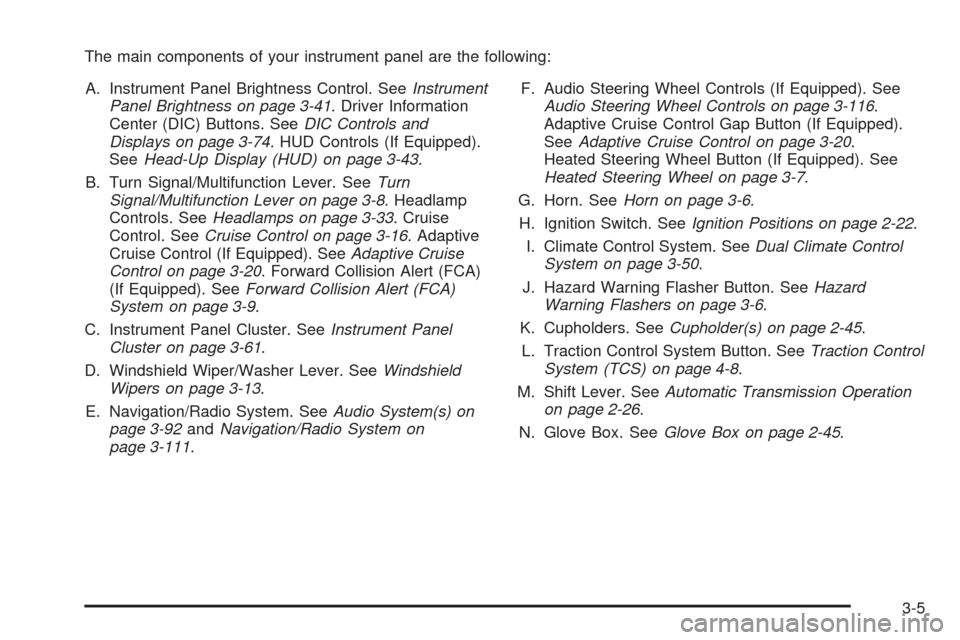
The main components of your instrument panel are the following:
A. Instrument Panel Brightness Control. SeeInstrument
Panel Brightness on page 3-41. Driver Information
Center (DIC) Buttons. SeeDIC Controls and
Displays on page 3-74. HUD Controls (If Equipped).
SeeHead-Up Display (HUD) on page 3-43.
B. Turn Signal/Multifunction Lever. SeeTurn
Signal/Multifunction Lever on page 3-8. Headlamp
Controls. SeeHeadlamps on page 3-33. Cruise
Control. SeeCruise Control on page 3-16. Adaptive
Cruise Control (If Equipped). SeeAdaptive Cruise
Control on page 3-20. Forward Collision Alert (FCA)
(If Equipped). SeeForward Collision Alert (FCA)
System on page 3-9.
C. Instrument Panel Cluster. SeeInstrument Panel
Cluster on page 3-61.
D. Windshield Wiper/Washer Lever. SeeWindshield
Wipers on page 3-13.
E. Navigation/Radio System. SeeAudio System(s) on
page 3-92andNavigation/Radio System on
page 3-111.F. Audio Steering Wheel Controls (If Equipped). See
Audio Steering Wheel Controls on page 3-116.
Adaptive Cruise Control Gap Button (If Equipped).
SeeAdaptive Cruise Control on page 3-20.
Heated Steering Wheel Button (If Equipped). See
Heated Steering Wheel on page 3-7.
G. Horn. SeeHorn on page 3-6.
H. Ignition Switch. SeeIgnition Positions on page 2-22.
I. Climate Control System. SeeDual Climate Control
System on page 3-50.
J. Hazard Warning Flasher Button. SeeHazard
Warning Flashers on page 3-6.
K. Cupholders. SeeCupholder(s) on page 2-45.
L. Traction Control System Button. SeeTraction Control
System (TCS) on page 4-8.
M. Shift Lever. SeeAutomatic Transmission Operation
on page 2-26.
N. Glove Box. SeeGlove Box on page 2-45.
3-5
Page 145 of 446
{CAUTION:
On winding roads, FCA may not detect a
vehicle ahead. You could crash into a
vehicle ahead of you. Do not rely on FCA
on winding roads.
When visibility is low, such as in fog, rain,
or snow, FCA performance is limited.
There may not be enough warning
distance to the vehicle in front of you. Do
not rely on FCA in low visibility conditions.
{CAUTION:
When FCA is enabled, the Adaptive Cruise
Control switch is on. If you press the Adaptive
Cruise Control button, you might go into
cruise when you do not want to. You could be
startled and even lose control. Be careful not
to press adaptive cruise buttons unless you
want to use cruise control.
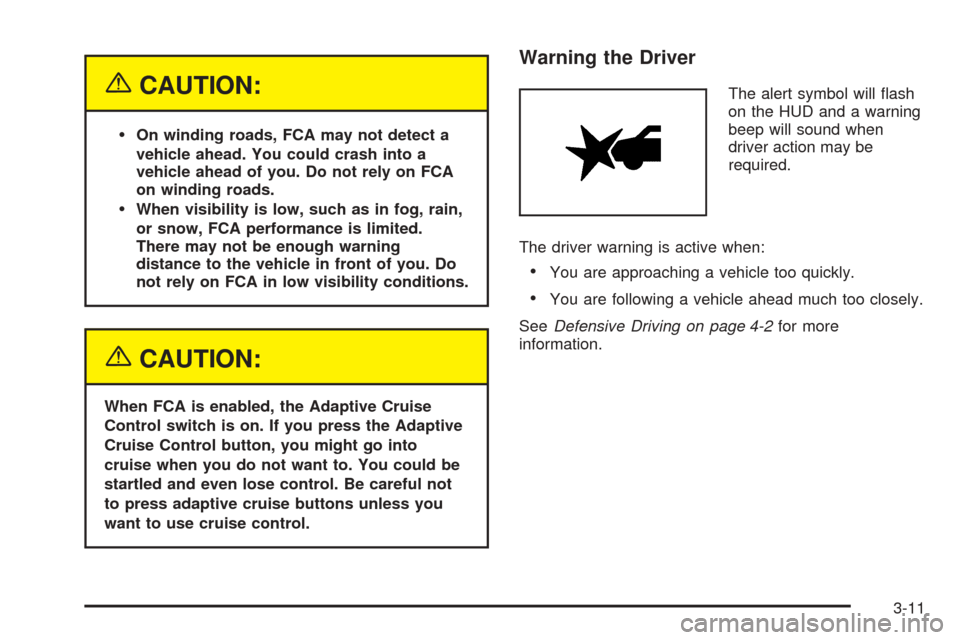
Warning the Driver
The alert symbol will �ash
on the HUD and a warning
beep will sound when
driver action may be
required.
The driver warning is active when:
You are approaching a vehicle too quickly.
You are following a vehicle ahead much too closely.
SeeDefensive Driving on page 4-2for more
information.
3-11
Page 191 of 446
Rear Climate Control System
Your vehicle has a rear climate control system. The
base model includes air outlets in the rear of the center
console for cooling and under-seat air outlets for
heating. The temperature, quantity, and air delivery
location is controlled automatically by the front climate
control system.
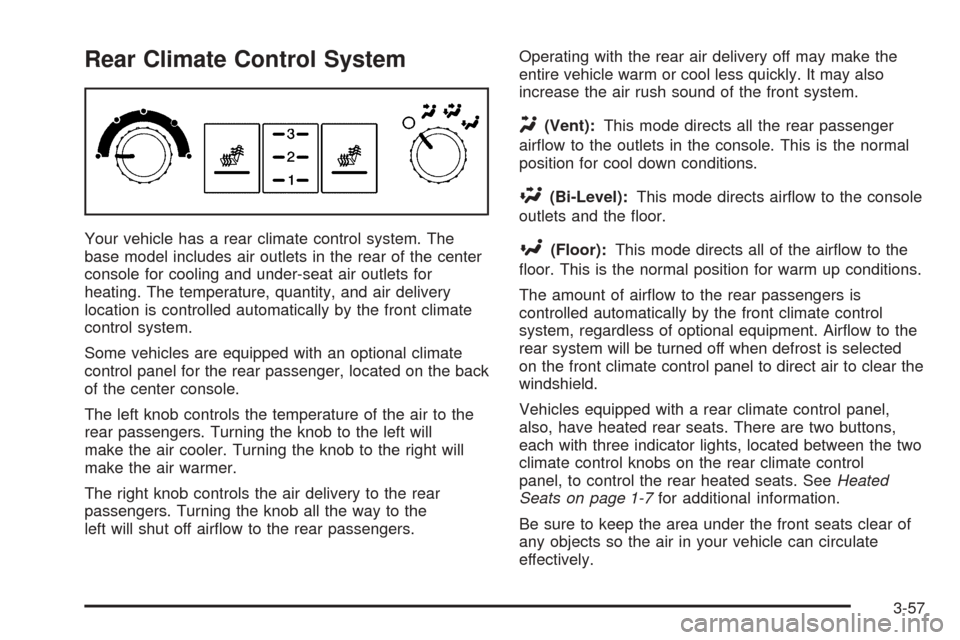
Some vehicles are equipped with an optional climate
control panel for the rear passenger, located on the back
of the center console.
The left knob controls the temperature of the air to the
rear passengers. Turning the knob to the left will
make the air cooler. Turning the knob to the right will
make the air warmer.
The right knob controls the air delivery to the rear
passengers. Turning the knob all the way to the
left will shut off air�ow to the rear passengers.Operating with the rear air delivery off may make the
entire vehicle warm or cool less quickly. It may also
increase the air rush sound of the front system.
Y(Vent):This mode directs all the rear passenger
air�ow to the outlets in the console. This is the normal
position for cool down conditions.
\(Bi-Level):This mode directs air�ow to the console
outlets and the �oor.
[(Floor):This mode directs all of the air�ow to the
�oor. This is the normal position for warm up conditions.
The amount of air�ow to the rear passengers is
controlled automatically by the front climate control
system, regardless of optional equipment. Air�ow to the
rear system will be turned off when defrost is selected
on the front climate control panel to direct air to clear the
windshield.
Vehicles equipped with a rear climate control panel,
also, have heated rear seats. There are two buttons,
each with three indicator lights, located between the two
climate control knobs on the rear climate control
panel, to control the rear heated seats. SeeHeated
Seats on page 1-7for additional information.
Be sure to keep the area under the front seats clear of
any objects so the air in your vehicle can circulate
effectively.
3-57
Page 207 of 446
Driver Information Center (DIC)
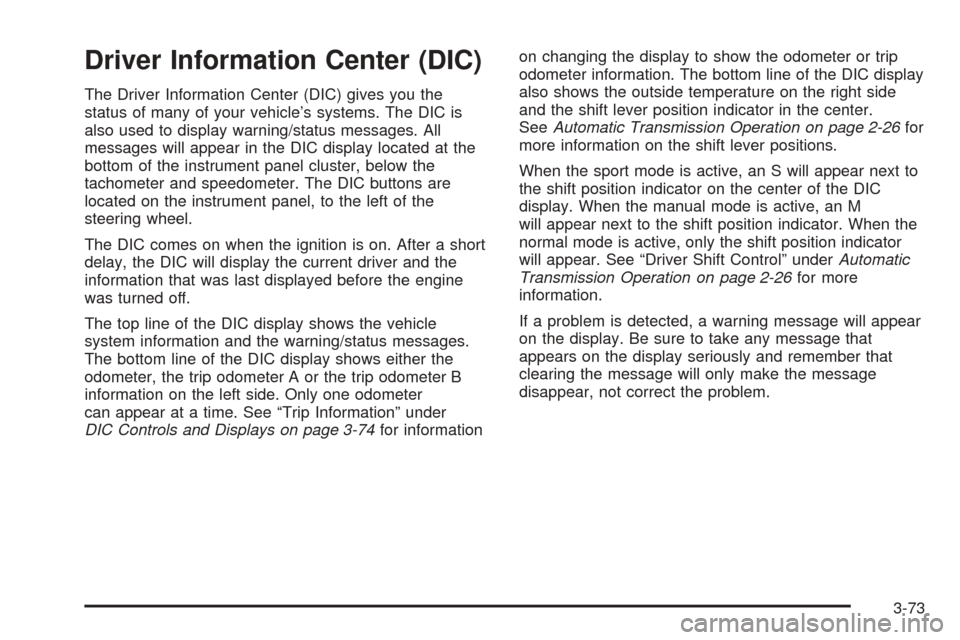
The Driver Information Center (DIC) gives you the
status of many of your vehicle’s systems. The DIC is
also used to display warning/status messages. All
messages will appear in the DIC display located at the
bottom of the instrument panel cluster, below the
tachometer and speedometer. The DIC buttons are
located on the instrument panel, to the left of the
steering wheel.
The DIC comes on when the ignition is on. After a short
delay, the DIC will display the current driver and the
information that was last displayed before the engine
was turned off.
The top line of the DIC display shows the vehicle
system information and the warning/status messages.
The bottom line of the DIC display shows either the
odometer, the trip odometer A or the trip odometer B
information on the left side. Only one odometer
can appear at a time. See “Trip Information” under
DIC Controls and Displays on page 3-74for informationon changing the display to show the odometer or trip
odometer information. The bottom line of the DIC display
also shows the outside temperature on the right side
and the shift lever position indicator in the center.
SeeAutomatic Transmission Operation on page 2-26for
more information on the shift lever positions.
When the sport mode is active, an S will appear next to
the shift position indicator on the center of the DIC
display. When the manual mode is active, an M
will appear next to the shift position indicator. When the
normal mode is active, only the shift position indicator
will appear. See “Driver Shift Control” underAutomatic
Transmission Operation on page 2-26for more
information.
If a problem is detected, a warning message will appear
on the display. Be sure to take any message that
appears on the display seriously and remember that
clearing the message will only make the message
disappear, not correct the problem.
3-73
Page 208 of 446
DIC Controls and Displays
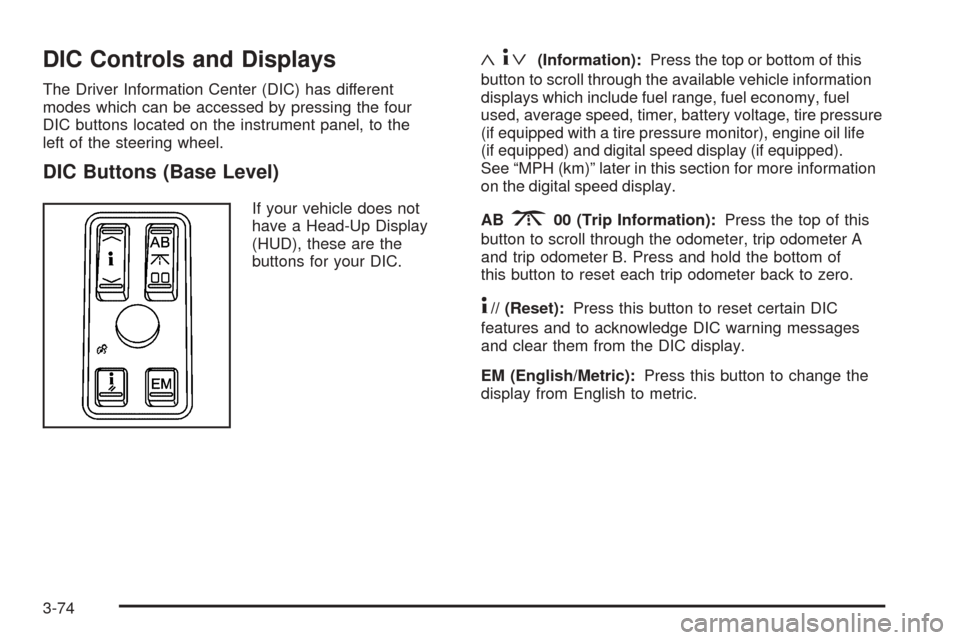
The Driver Information Center (DIC) has different
modes which can be accessed by pressing the four
DIC buttons located on the instrument panel, to the
left of the steering wheel.
DIC Buttons (Base Level)
If your vehicle does not
have a Head-Up Display
(HUD), these are the
buttons for your DIC.
«4ª(Information):Press the top or bottom of this
button to scroll through the available vehicle information
displays which include fuel range, fuel economy, fuel
used, average speed, timer, battery voltage, tire pressure
(if equipped with a tire pressure monitor), engine oil life
(if equipped) and digital speed display (if equipped).
See “MPH (km)” later in this section for more information
on the digital speed display.
AB
300 (Trip Information):Press the top of this
button to scroll through the odometer, trip odometer A
and trip odometer B. Press and hold the bottom of
this button to reset each trip odometer back to zero.
4// (Reset):Press this button to reset certain DIC
features and to acknowledge DIC warning messages
and clear them from the DIC display.
EM (English/Metric):Press this button to change the
display from English to metric.
3-74
Page 209 of 446
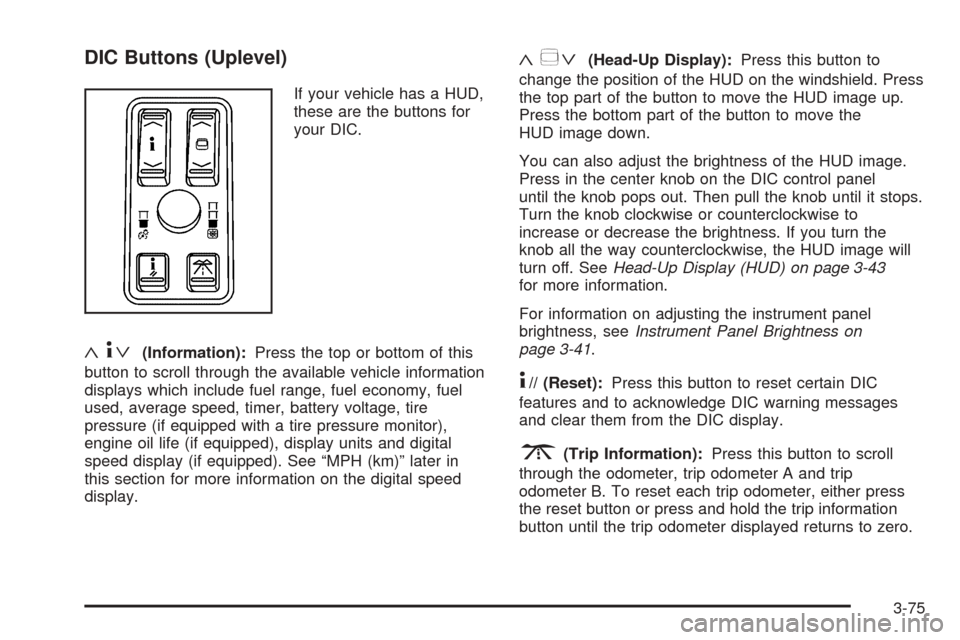
DIC Buttons (Uplevel)
If your vehicle has a HUD,
these are the buttons for
your DIC.
«4ª(Information):Press the top or bottom of this
button to scroll through the available vehicle information
displays which include fuel range, fuel economy, fuel
used, average speed, timer, battery voltage, tire
pressure (if equipped with a tire pressure monitor),
engine oil life (if equipped), display units and digital
speed display (if equipped). See “MPH (km)” later in
this section for more information on the digital speed
display.
«~ª(Head-Up Display):Press this button to
change the position of the HUD on the windshield. Press
the top part of the button to move the HUD image up.
Press the bottom part of the button to move the
HUD image down.
You can also adjust the brightness of the HUD image.
Press in the center knob on the DIC control panel
until the knob pops out. Then pull the knob until it stops.
Turn the knob clockwise or counterclockwise to
increase or decrease the brightness. If you turn the
knob all the way counterclockwise, the HUD image will
turn off. SeeHead-Up Display (HUD) on page 3-43
for more information.
For information on adjusting the instrument panel
brightness, seeInstrument Panel Brightness on
page 3-41.
4// (Reset):Press this button to reset certain DIC
features and to acknowledge DIC warning messages
and clear them from the DIC display.
3(Trip Information):Press this button to scroll
through the odometer, trip odometer A and trip
odometer B. To reset each trip odometer, either press
the reset button or press and hold the trip information
button until the trip odometer displayed returns to zero.
3-75
Page 230 of 446
ALOCAL/DISTANT Selection:With this feature
you can set the radio to search for local stations or
stations that are further away for a larger selection. To
set this feature to LOCAL or DISTANT, perform the
following steps:
1. Press the tune/select knob to enter the main menu.
2. Turn the tune/select knob until SEEK LOCAL or
SEEK DISTANT appears on the display.
3. Press the tune/select knob to select either LOCAL
or DISTANT.
4. Press the BACK (F6) button to exit the display. To
return to the original display, repeatedly press the
BACK (F6) button or wait for the display to time out.
To search for stations, press the single arrow buttons.
If the system is set to LOCAL, SEEK will appear on the
display and seek to stations with strong signals only.
If the system is set to DISTANT, D-SEEK will appear on
the display and seek to stations with weak and strong
signals.Setting Preset Stations
Up to 30 stations (six FM1, six FM2, and six AM,
six XM1 and six XM2 (if equipped)), can be programmed
on the six numbered pushbuttons, by performing the
following steps:
1. Turn the radio on.
2. Press BAND to select FM1, FM2, or AM, or XM1
or XM2.
3. Tune in the desired station.
4. Press and hold one of the six numbered
pushbuttons for two seconds until you hear a beep.
The set preset station number will appear on the
display above the pushbutton that it is set to.
Whenever that numbered pushbutton is pressed for
less than two seconds, the station that was set
will return.
5. Repeat the steps for each pushbutton.
To set the preset stations with an equalization
setting, DSP setting, or a PTY setting, see each
of these features later in this section. When a preset
station is selected, once one of these additional
settings is selected, the preset station will remember
each setting and it will remain active, until the
setting is selected off for that preset station.
3-96
Page 231 of 446
AUTOSTORE PRESETS:To set the preset stations
automatically, perform the following steps:
1. Turn the radio on.
2. Press BAND to select FM1, FM2, or AM.
3. Press the tune/select knob to enter the main menu.
4. Turn the tune/select knob until AUTOSTORE
PRESETS appears on the display.
5. Press the tune/select knob to select. AUTOSTORE
will appear on the display. The radio will
automatically search the band and select and store
the six radio stations with the strongest signal.
The stations will be stored by signal strength, not
sequential order. The set preset station number will
appear on the display above the pushbutton that
it is set to. Whenever that numbered pushbutton is
pressed for less than two seconds, the station
that was set will return.
6. Press the BACK (F6) button to exit the display. To
return to the original display, repeatedly press the
BACK (F6) button or wait for the display to time out.
When battery power is removed and later applied, you
will not have to reset your radio presets.PRESETS HOME/AWAY:This feature gives you the
ability to store two different kinds of station presets.
HOME can be used for stations available where you live
and AWAY can be for stations available outside of
your local broadcasting area. To set preset stations for
home and away perform the following steps:
1. Press the tune/select knob to enter the main menu.
2. Turn the tune/select knob until PRESETS
HOME/AWAY appears on the display.
3. Press the tune/select knob to select. HOME or
AWAY will appear on the display.
4. Press the BACK (F6) button to exit the display. To
return to the original display, repeatedly press the
BACK (F6) button or wait for the display to time out.
Follow the manual or automatic steps previously listed
for setting the preset pushbuttons for both home
and away.
3-97
Page 234 of 446
To turn TA on or off, perform the following steps:
1. Press the tune/select knob to enter the main menu.
2. Turn the tune/select knob until TRAFFIC
ANNOUNCE appears on the display.
3. Press the tune/select knob to select ON or
OFF. An X will appear in the box when TA is
selected on.
4. Press the BACK (F6) button to exit the display. To
return to the original display, repeatedly press the
BACK (F6) button or wait for the display to time out.
Activating Program Type (PTY)
Stations (RDS and XM™)
PTY allows you to search for stations with speci�c
types of music. The selectable PTYs are POP, EASY,
TALK, CNTRY (Country), CLASS (Classical), and JAZZ.
To activate program types, perform the following
steps:
1. Press the tune/select knob to enter the main menu.
2. Turn the tune/select knob until PROGRAM TYPE
MODE appears on the display.
3. Press the tune/select knob to select ON or
OFF. An X will appear in the box when PTY
is selected on.
4. Press the BACK (F6) button to exit the display. To
return to the original display, repeatedly press the
BACK (F6) button or wait for the display to time out.Once program type is activated the PTYs will appear on
the display above the pushbuttons, in place of the
preset stations (if programmed). Press the pushbutton
for the PTY that you would like to listen to. Not all
stations support PTYs. The radio may not go to all of
the stations with that music type when pressing the
pushbutton.
AF (Alternate Frequency):Alternate frequency allows
the radio to switch to a stronger station with the
same program type.
To turn AF on or off, perform the following steps:
1. Press the tune/select knob to enter the main menu.
2. Turn the tune/select knob until ALTERNATE
FREQ. appears on the display.
3. Press the tune/select knob to select AF OFF,
AF ON, or AF REG. An X will appear in the box
when AF is selected on.
4. Press the BACK (F6) button to exit the display. To
return to the original display, repeatedly press the
BACK (F6) button or wait for the display to time out.
Radio Message
THEFTLOCK:This message is displayed when the
THEFTLOCK®system has been activated. Take
the vehicle to the dealer for service.
3-100
Page 237 of 446

Using the Single CD Player
Insert a CD partway into the slot, label side up. The
player will pull it in. If the ignition and the radio are on,
the CD will begin playing. A CD may be loaded with
the radio off, but it will not start playing until the radio
is on.
If the ignition or radio is turned off with a CD in the
player, it will stay in the player. When the ignition
or radio is turned on, the CD will start to play where it
stopped, if it was the last selected audio source.
When the CD is inserted, CD will appear on the display.
As each new track starts to play, the track number
will appear on the display.
The CD player can play the smaller 3 inch (8 cm) single
CDs with an adapter ring. Full-size CDs and the
smaller CDs are loaded in the same manner.
If playing a CD-R the sound quality may be reduced
due to CD-R quality, the method of recording, the quality
of the music that has been recorded, and the way the
CD-R has been handled. There may be an increase
in skipping, difficulty in �nding tracks, and/or difficulty in
loading and ejecting. If these problems occur, try a
known good CD.
Do not add paper labels to CDs, they could get caught
in the CD player.If an error appears on the display, see “CD Messages”
later in this section.
When a CD is inserted, the CD functions will appear on
the display above the pushbuttons, in place of the
preset stations (if programmed).
F1
{(Reverse):Press this pushbutton to go to the
previous track. Press and hold this pushbutton to
reverse quickly within a track. Release the pushbutton
to play the passage. The elapsed time of the track
will appear on the display.
F2
|(Forward):Press this pushbutton to go to the
next track. Press and hold this pushbutton to advance
quickly within a track. Release the pushbutton to
play the passage. The elapsed time of the track will
appear on the display.
F3 RDM (Random):Press this pushbutton to listen to
the tracks in random, rather than sequential, order.
RANDOM will appear on the display. Press RDM again
to turn off random play. RANDOM will disappear
from the display.
F4 RPT (Repeat):Press this pushbutton to hear a
track over again. REPEAT will appear on the display.
Press RPT again to turn off repeat play. REPEAT
will disappear from the display.
3-103