CHERY TIGGO 2009 Service Repair Manual
Manufacturer: CHERY, Model Year: 2009, Model line: TIGGO, Model: CHERY TIGGO 2009Pages: 1903, PDF Size: 33.38 MB
Page 1411 of 1903
Downloaded from www.Manualslib.com manuals search engine Power Brake Booster - RHD
Description
The power brake booster is mounted in the engine compartment on the right side of the dash panel. The master
cylinder is bolted to the front of the booster.
Operation
A vacuum line connects the check value to engine source vacuum. The booster input rod extends through the dash
panel and connects to the brake pedal.
Removal & Installation
CAUTION:
The vacuum in the power brake booster must be pumped down before removing the master cyl-
inder to avoid damaging the master cylinder and to prevent the booster from sucking in any con-
tamination. This can be done by pumping the brake pedal while the engine is not running until a
firm brake pedal is achieved.
1. Remove the master cylinder (See Master Cylinder Removal & Installation in Section 12 Brakes).
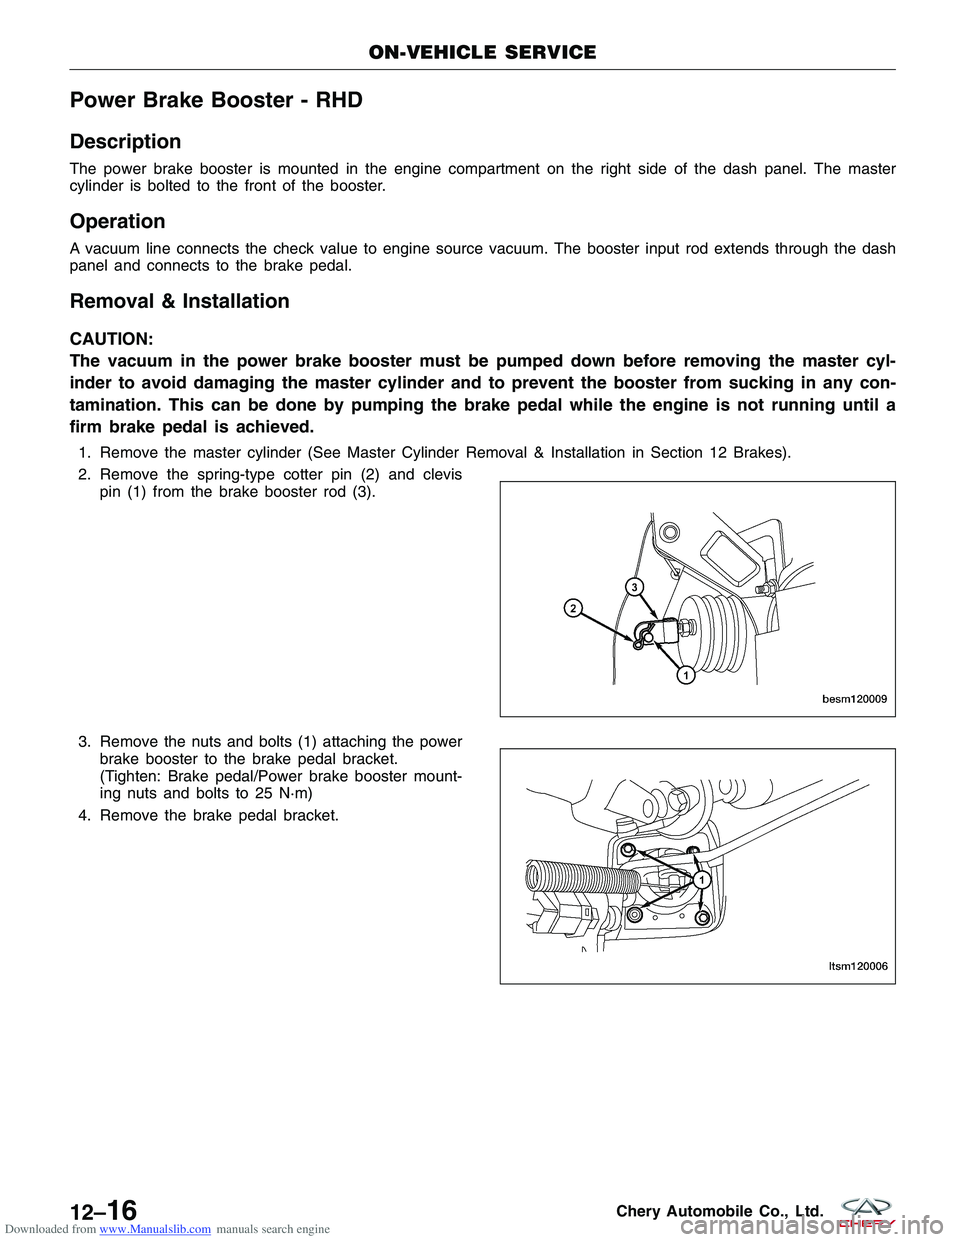
2. Remove the spring-type cotter pin (2) and clevispin (1) from the brake booster rod (3).
3. Remove the nuts and bolts (1) attaching the power brake booster to the brake pedal bracket.
(Tighten: Brake pedal/Power brake booster mount-
ing nuts and bolts to 25 N·m)
4. Remove the brake pedal bracket.
ON-VEHICLE SERVICE
BESM120009
LTSM120006
12–16Chery Automobile Co., Ltd.
Page 1412 of 1903
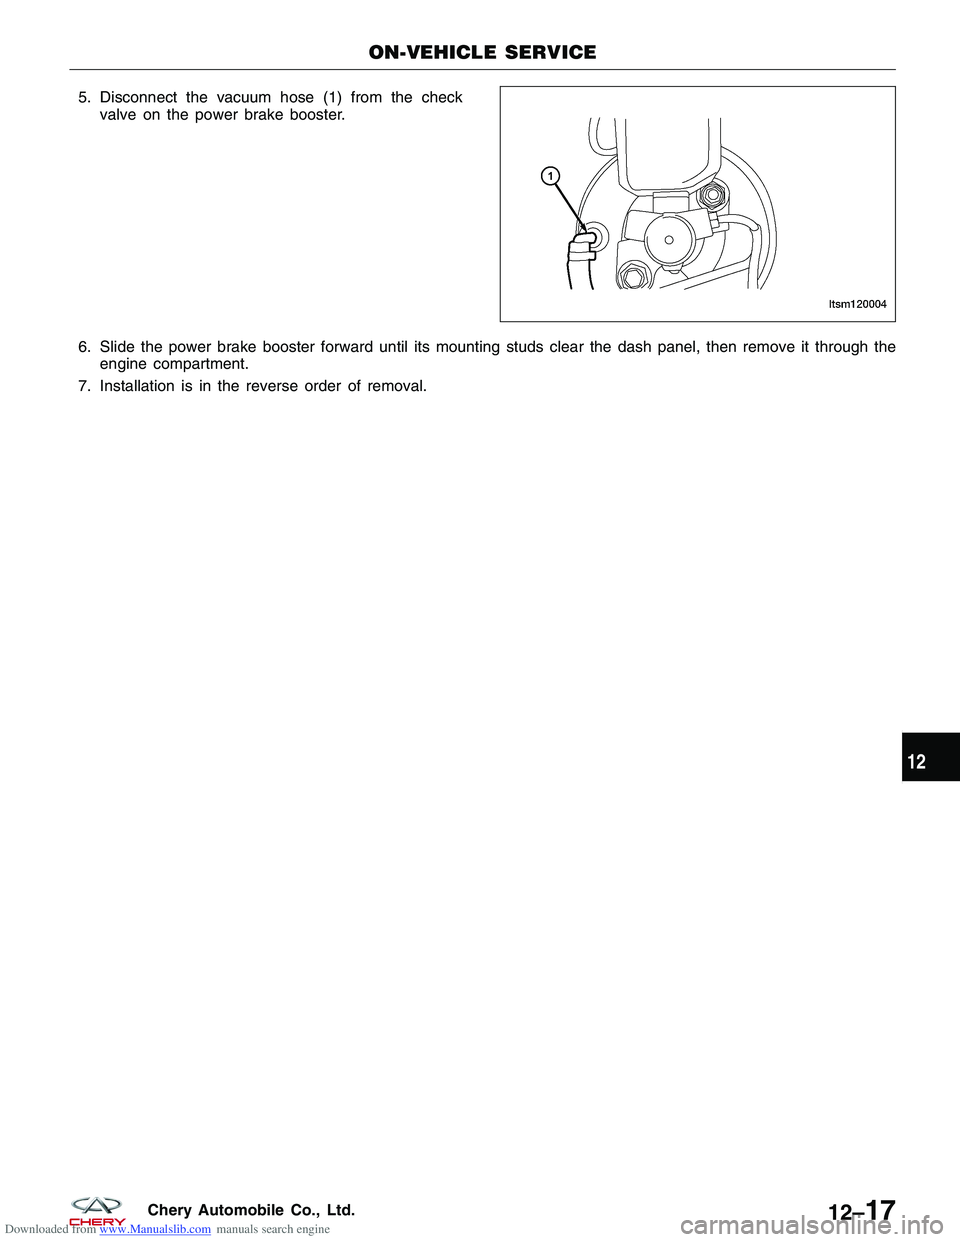
Downloaded from www.Manualslib.com manuals search engine 5. Disconnect the vacuum hose (1) from the checkvalve on the power brake booster.
6. Slide the power brake booster forward until its mounting studs clear the dash panel, then remove it through the engine compartment.
7. Installation is in the reverse order of removal.
ON-VEHICLE SERVICE
LTSM120004
12
12–17Chery Automobile Co., Ltd.
Page 1413 of 1903
Downloaded from www.Manualslib.com manuals search engine Front Brake Caliper
Description
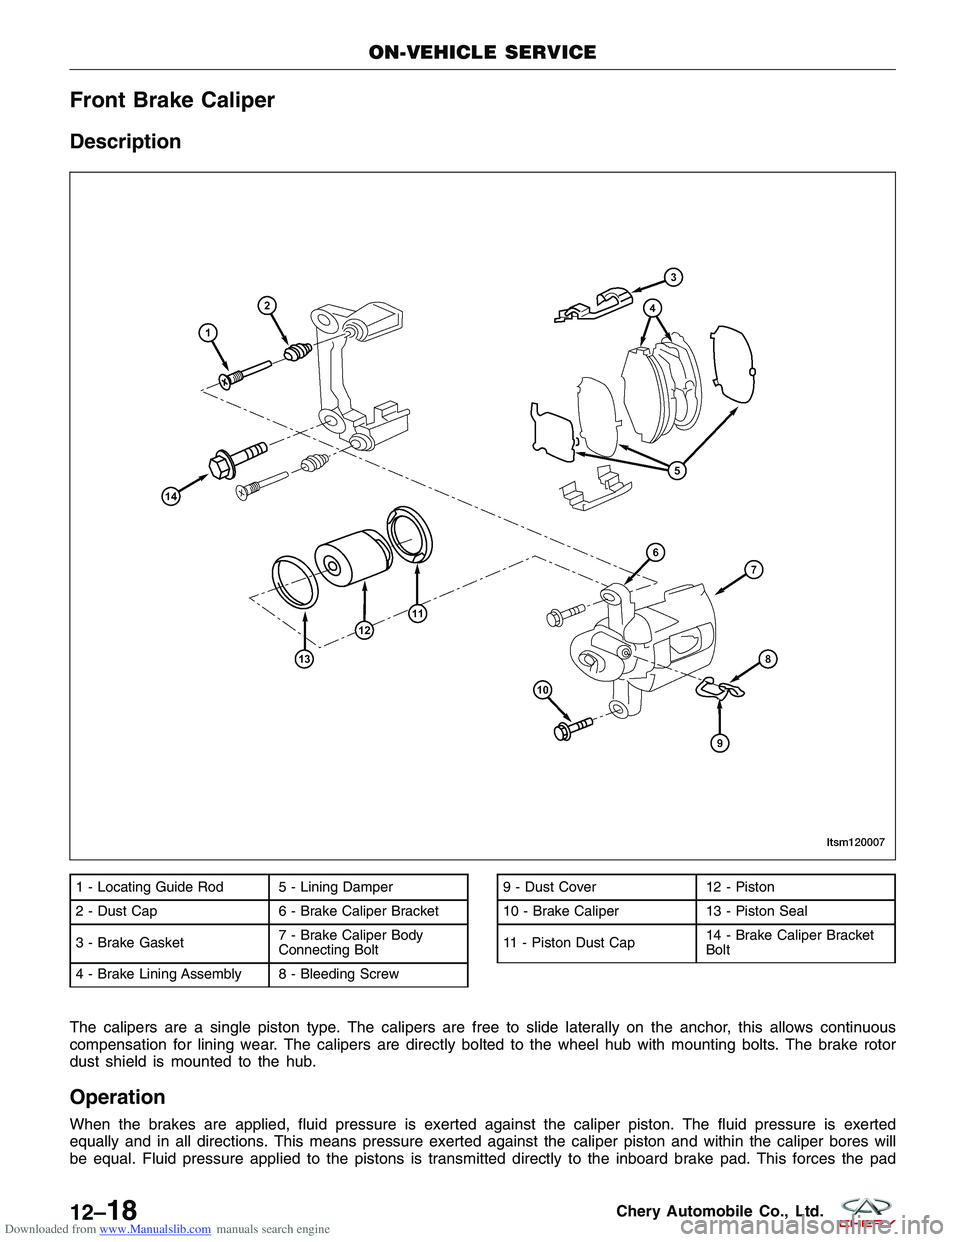
The calipers are a single piston type. The calipers are free to slide laterally on the anchor, this allows continuous
compensation for lining wear. The calipers are directly bolted to the wheel hub with mounting bolts. The brake rotor
dust shield is mounted to the hub.
Operation
When the brakes are applied, fluid pressure is exerted against the caliper piston. The fluid pressure is exerted
equally and in all directions. This means pressure exerted against the caliper piston and within the caliper bores will
be equal. Fluid pressure applied to the pistons is transmitted directly to the inboard brake pad. This forces the pad
1 - Locating Guide Rod 5 - Lining Damper
2 - Dust Cap 6 - Brake Caliper Bracket
3 - Brake Gasket7 - Brake Caliper Body
Connecting Bolt
4 - Brake Lining Assembly 8 - Bleeding Screw9 - Dust Cover 12 - Piston
10 - Brake Caliper 13 - Piston Seal
11 - Piston Dust Cap 14 - Brake Caliper Bracket
Bolt
ON-VEHICLE SERVICE
LTSM120007
12–18Chery Automobile Co., Ltd.
Page 1414 of 1903
Downloaded from www.Manualslib.com manuals search engine lining against the inner surface of the disc brake rotor. At the same time, fluid pressure within the piston bore forces
the caliper to slide inward on the slide pins. This action brings the outboard brake pad lining into contact with the
outer surface of the disc brake rotor.
Removal & Installation
1. Using a brake pedal holding tool, depress the brake pedal past its first 25 mm of travel and hold it in this posi-tion. This will isolate the master cylinder from the brake hydraulic system and will not allow the brake fluid to
drain out of the master cylinder reservoir when the lines are opened.
2. Raise and support the vehicle.
3. Remove the wheel mounting nuts and the tire and wheel assembly. (Tighten: Wheel mounting nuts to 110 N·m)
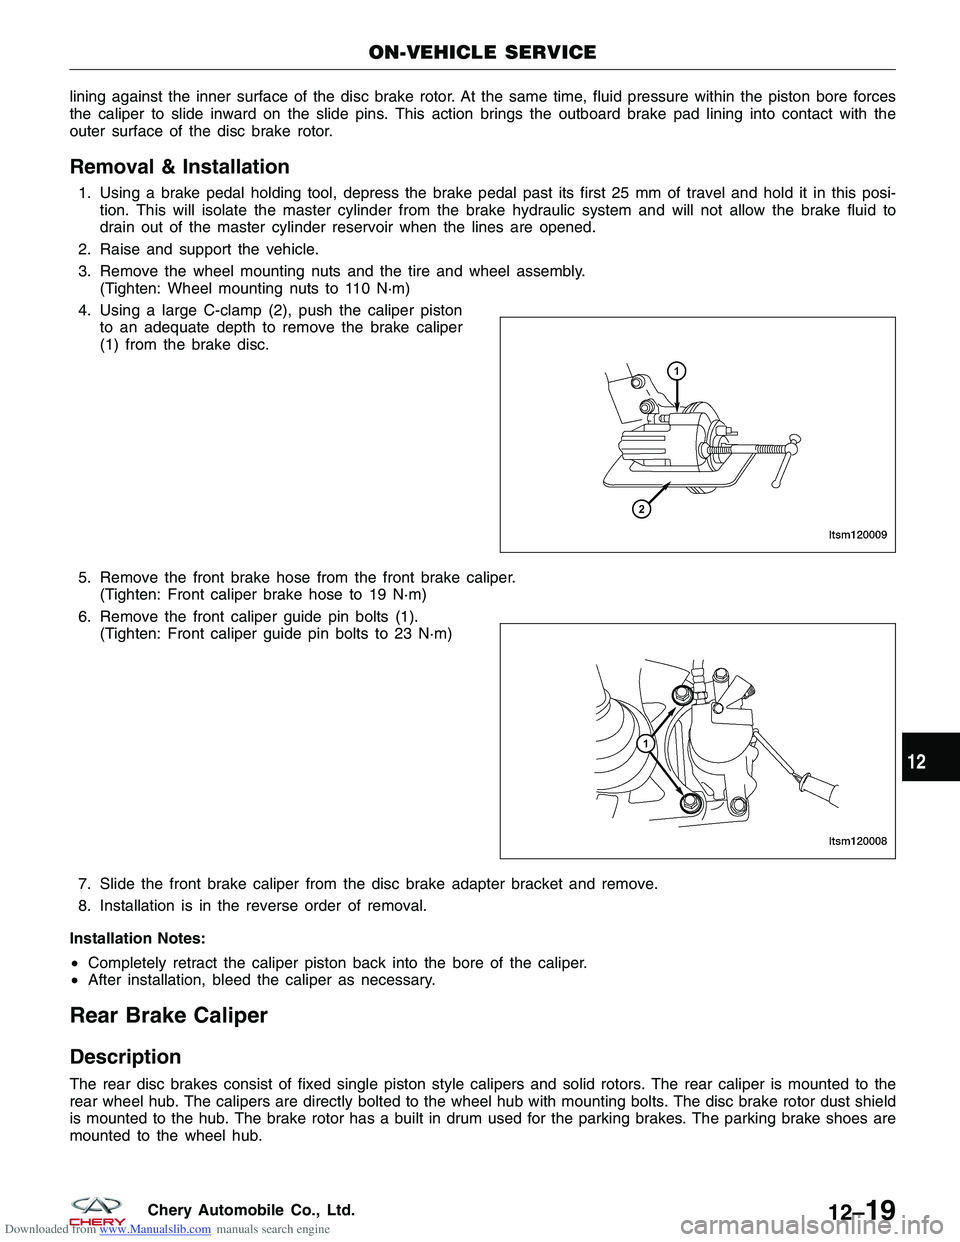
4. Using a large C-clamp (2), push the caliper piston to an adequate depth to remove the brake caliper
(1) from the brake disc.
5. Remove the front brake hose from the front brake caliper. (Tighten: Front caliper brake hose to 19 N·m)
6. Remove the front caliper guide pin bolts (1). (Tighten: Front caliper guide pin bolts to 23 N·m)
7. Slide the front brake caliper from the disc brake adapter bracket and remove.
8. Installation is in the reverse order of removal.
Installation Notes:
• Completely retract the caliper piston back into the bore of the caliper.
• After installation, bleed the caliper as necessary.
Rear Brake Caliper
Description
The rear disc brakes consist of fixed single piston style calipers and solid rotors. The rear caliper is mounted to the
rear wheel hub. The calipers are directly bolted to the wheel hub with mounting bolts. The disc brake rotor dust shield
is mounted to the hub. The brake rotor has a built in drum used for the parking brakes. The parking brake shoes are
mounted to the wheel hub.
ON-VEHICLE SERVICE
LTSM120009
LTSM120008
12
12–19Chery Automobile Co., Ltd.
Page 1415 of 1903
Downloaded from www.Manualslib.com manuals search engine Operation
When the brakes are applied, fluid pressure is exerted against the caliper piston. The fluid pressure is exerted
equally and in all directions. This means pressure exerted against the caliper piston and within the caliper bores will
be equal. Fluid pressure applied to the pistons is transmitted directly to the inboard brake pad. This forces the pad
lining against the inner surface of the brake rotor. At the same time, fluid pressure within the piston bore forces the
caliper to slide inward on the slide pins. This action brings the outboard brake pad lining into contact with the outer
surface of the disc brake rotor.
Removal & Installation
1. Using a brake pedal holding tool, depress the brake pedal past its first 25 mm of travel and hold it in this posi-tion. This will isolate the master cylinder from the brake hydraulic system and will not allow the brake fluid to
drain out of the master cylinder reservoir when the lines are opened.
2. Raise and support the vehicle.
3. Remove the wheel mounting nuts and the tire and wheel assembly. (Tighten: Wheel mounting nuts to 110 N·m)
4. Remove the banjo bolt connecting the brake hose to the rear brake caliper. (Tighten: Rear caliper banjo bolt to 20 N·m)
5. Remove the rear caliper guide pin bolts. (Tighten: Rear caliper guide pin bolts to 23 N·m)
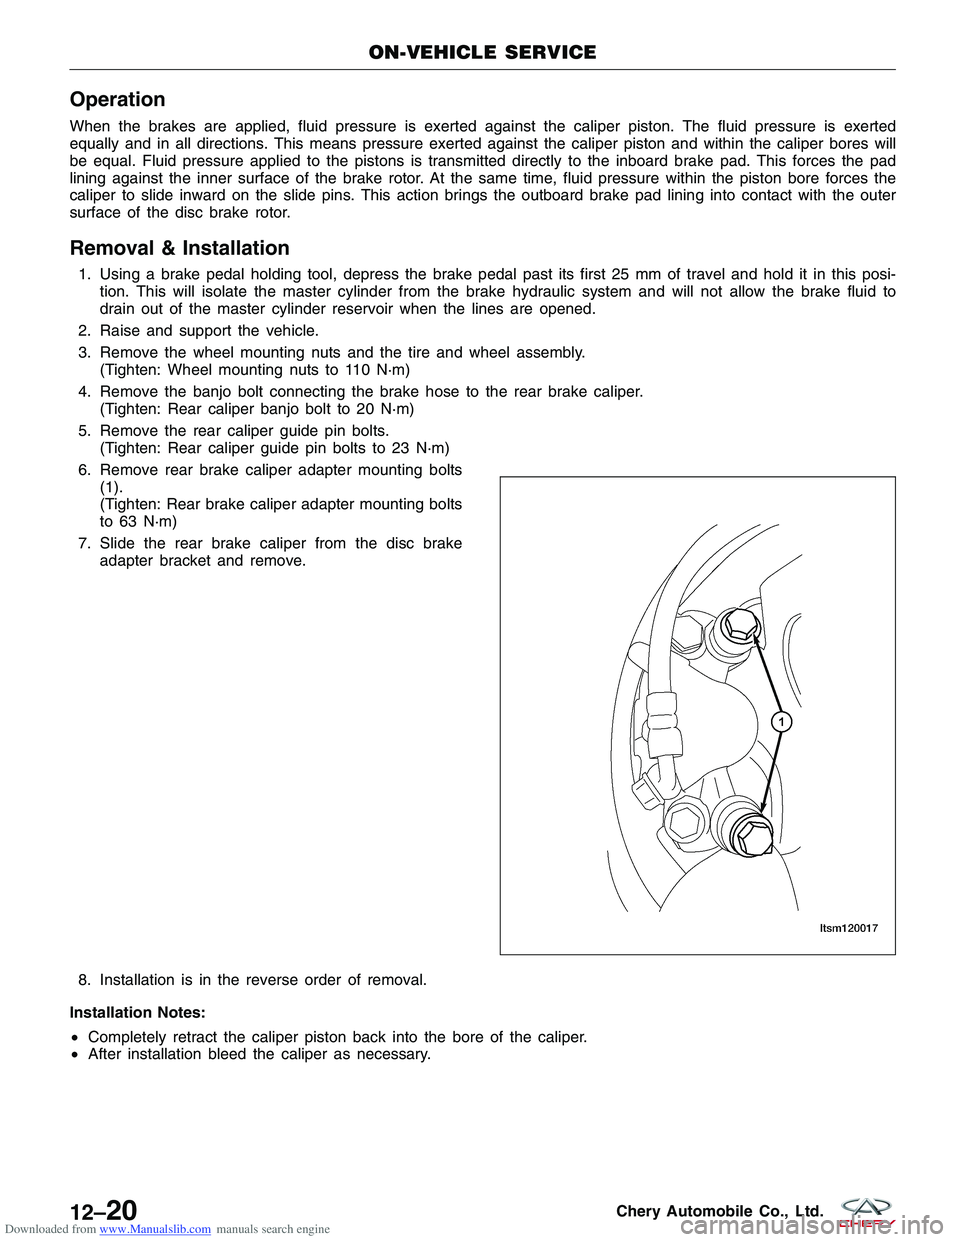
6. Remove rear brake caliper adapter mounting bolts (1).
(Tighten: Rear brake caliper adapter mounting bolts
to 63 N·m)
7. Slide the rear brake caliper from the disc brake adapter bracket and remove.
8. Installation is in the reverse order of removal.
Installation Notes:
• Completely retract the caliper piston back into the bore of the caliper.
• After installation bleed the caliper as necessary.
ON-VEHICLE SERVICE
LTSM120017
12–20Chery Automobile Co., Ltd.
Page 1416 of 1903
Downloaded from www.Manualslib.com manuals search engine Front Brake Rotor
Removal & Installation
1. Raise and support the vehicle.
2. Remove the wheel mounting nuts and the tire and wheel assembly.(Tighten: Wheel mounting nuts to 110 N·m)
3. Remove the front caliper (See Front Caliper Removal & Installation in Section 12 Brakes).
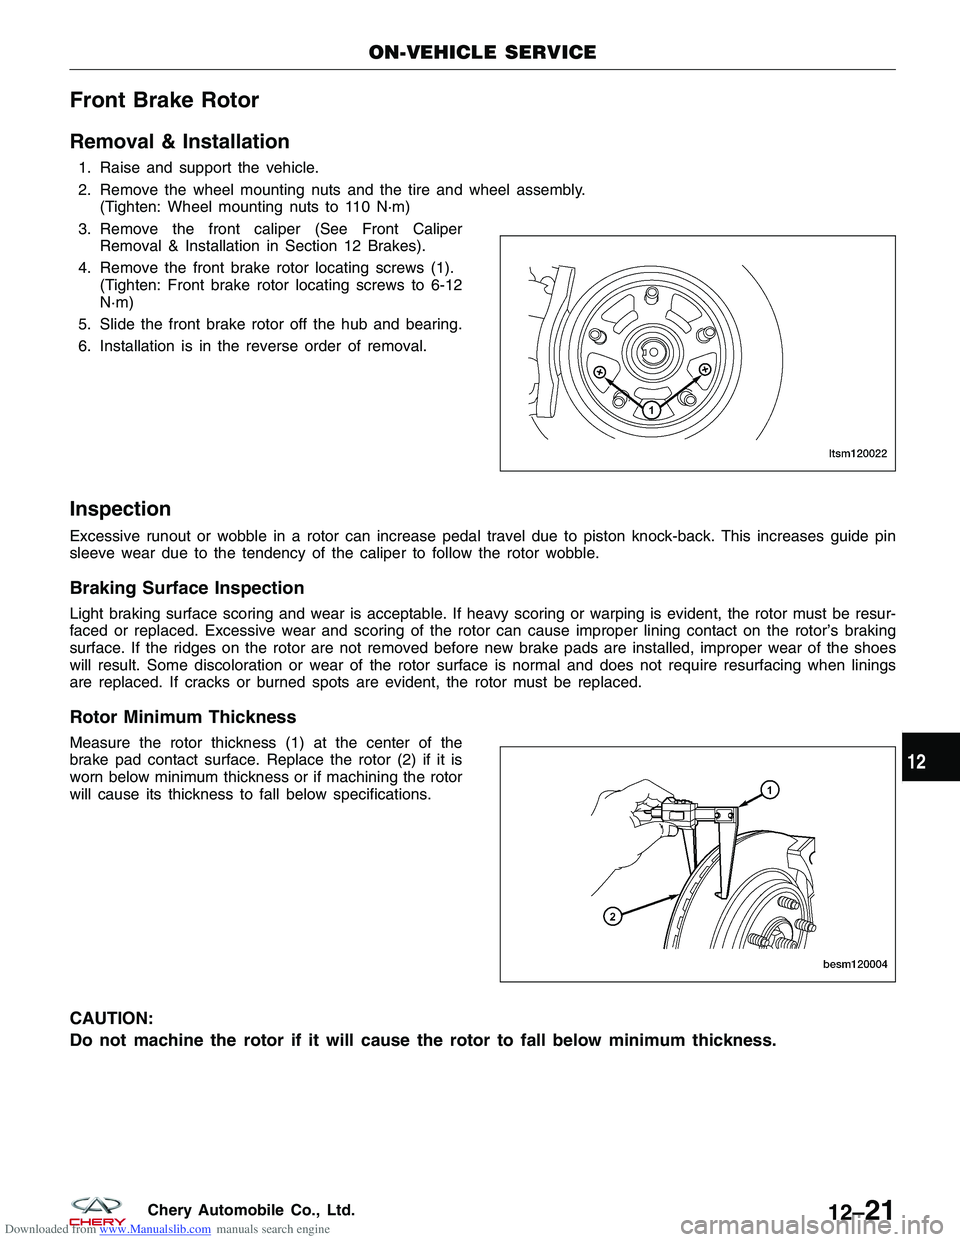
4. Remove the front brake rotor locating screws (1). (Tighten: Front brake rotor locating screws to 6-12
N·m)
5. Slide the front brake rotor off the hub and bearing.
6. Installation is in the reverse order of removal.
Inspection
Excessive runout or wobble in a rotor can increase pedal travel due to piston knock-back. This increases guide pin
sleeve wear due to the tendency of the caliper to follow the rotor wobble.
Braking Surface Inspection
Light braking surface scoring and wear is acceptable. If heavy scoring or warping is evident, the rotor must be resur-
faced or replaced. Excessive wear and scoring of the rotor can cause improper lining contact on the rotor’s braking
surface. If the ridges on the rotor are not removed before new brake pads are installed, improper wear of the shoes
will result. Some discoloration or wear of the rotor surface is normal and does not require resurfacing when linings
are replaced. If cracks or burned spots are evident, the rotor must be replaced.
Rotor Minimum Thickness
Measure the rotor thickness (1) at the center of the
brake pad contact surface. Replace the rotor (2) if it is
worn below minimum thickness or if machining the rotor
will cause its thickness to fall below specifications.
CAUTION:
Do not machine the rotor if it will cause the rotor to fall below minimum thickness.
ON-VEHICLE SERVICE
LTSM120022
BESM120004
12
12–21Chery Automobile Co., Ltd.
Page 1417 of 1903
Downloaded from www.Manualslib.com manuals search engine Rotor Runout
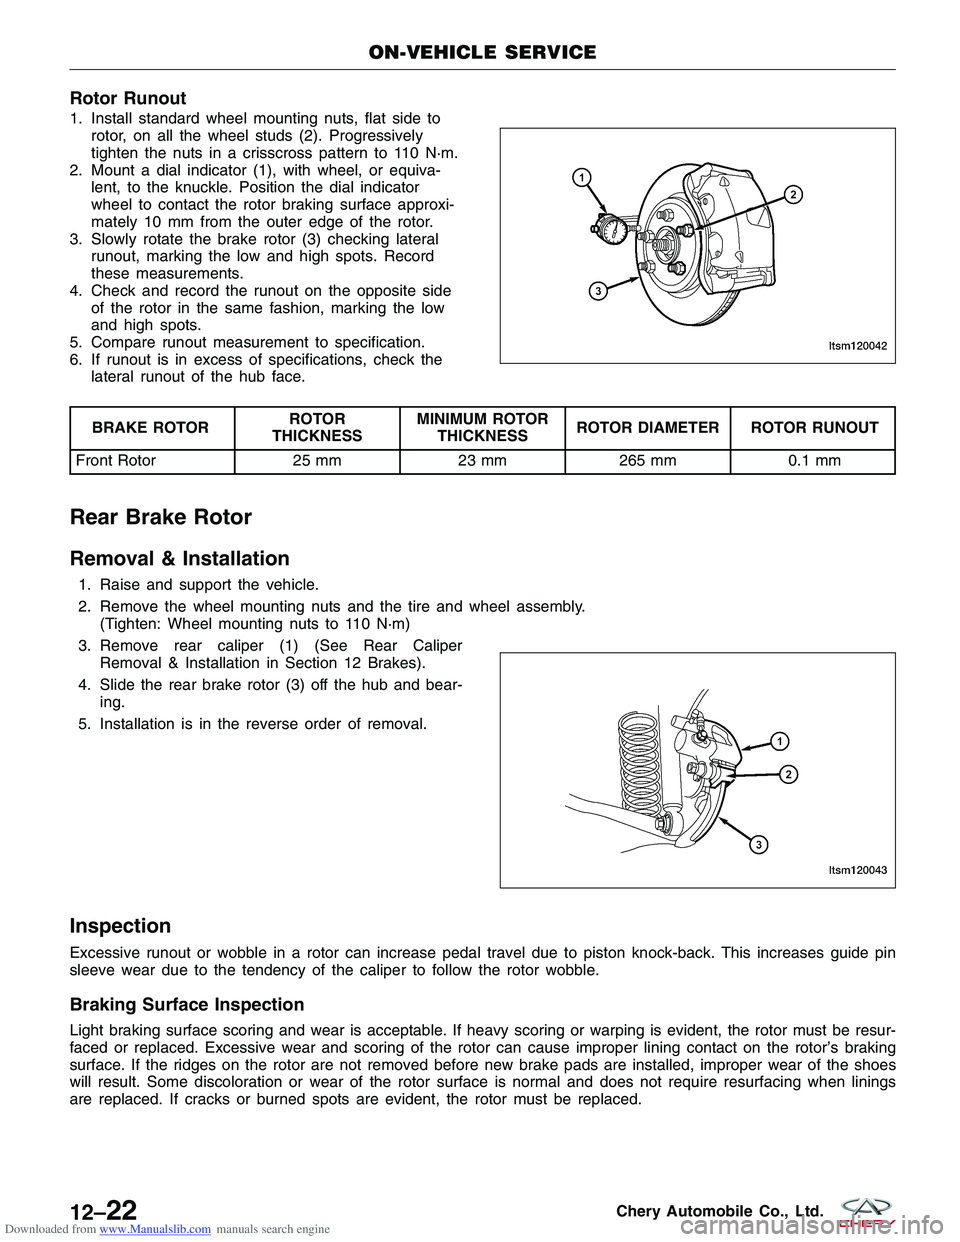
1. Install standard wheel mounting nuts, flat side torotor, on all the wheel studs (2). Progressively
tighten the nuts in a crisscross pattern to 110 N·m.
2. Mount a dial indicator (1), with wheel, or equiva- lent, to the knuckle. Position the dial indicator
wheel to contact the rotor braking surface approxi-
mately 10 mm from the outer edge of the rotor.
3. Slowly rotate the brake rotor (3) checking lateral runout, marking the low and high spots. Record
these measurements.
4. Check and record the runout on the opposite side of the rotor in the same fashion, marking the low
and high spots.
5. Compare runout measurement to specification.
6. If runout is in excess of specifications, check the lateral runout of the hub face.
BRAKE ROTOR ROTOR
THICKNESS MINIMUM ROTOR
THICKNESS ROTOR DIAMETER ROTOR RUNOUT
Front Rotor 25 mm23 mm265 mm 0.1 mm
Rear Brake Rotor
Removal & Installation
1. Raise and support the vehicle.
2. Remove the wheel mounting nuts and the tire and wheel assembly.
(Tighten: Wheel mounting nuts to 110 N·m)
3. Remove rear caliper (1) (See Rear Caliper Removal & Installation in Section 12 Brakes).
4. Slide the rear brake rotor (3) off the hub and bear- ing.
5. Installation is in the reverse order of removal.
Inspection
Excessive runout or wobble in a rotor can increase pedal travel due to piston knock-back. This increases guide pin
sleeve wear due to the tendency of the caliper to follow the rotor wobble.
Braking Surface Inspection
Light braking surface scoring and wear is acceptable. If heavy scoring or warping is evident, the rotor must be resur-
faced or replaced. Excessive wear and scoring of the rotor can cause improper lining contact on the rotor’s braking
surface. If the ridges on the rotor are not removed before new brake pads are installed, improper wear of the shoes
will result. Some discoloration or wear of the rotor surface is normal and does not require resurfacing when linings
are replaced. If cracks or burned spots are evident, the rotor must be replaced.
ON-VEHICLE SERVICE
LTSM120042
LTSM120043
12–22Chery Automobile Co., Ltd.
Page 1418 of 1903
Downloaded from www.Manualslib.com manuals search engine Rotor Minimum Thickness
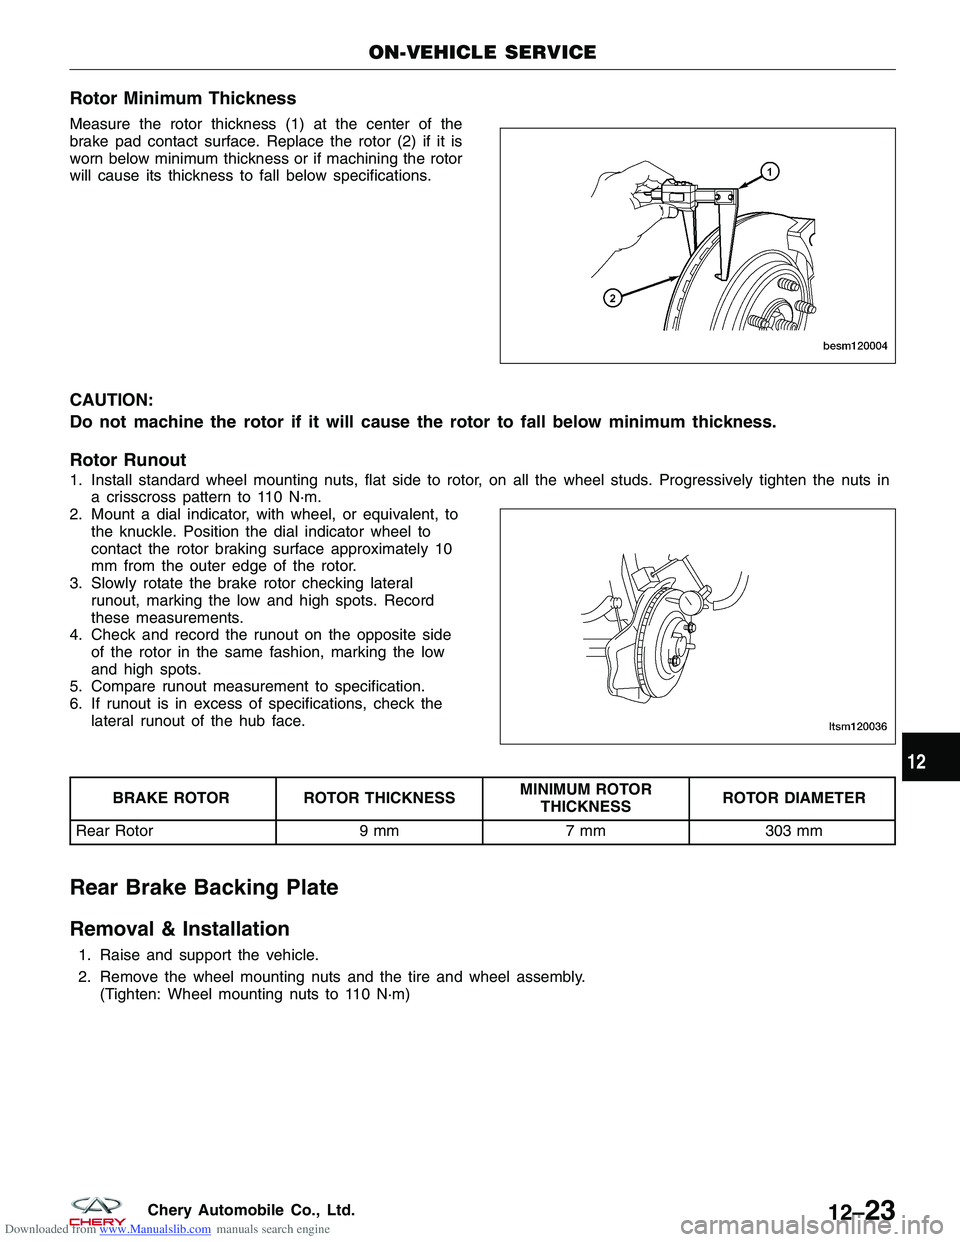
Measure the rotor thickness (1) at the center of the
brake pad contact surface. Replace the rotor (2) if it is
worn below minimum thickness or if machining the rotor
will cause its thickness to fall below specifications.
CAUTION:
Do not machine the rotor if it will cause the rotor to fall below minimum thickness.
Rotor Runout
1. Install standard wheel mounting nuts, flat side to rotor, on all the wheel studs. Progressively tighten the nuts ina crisscross pattern to 110 N·m.
2. Mount a dial indicator, with wheel, or equivalent, to the knuckle. Position the dial indicator wheel to
contact the rotor braking surface approximately 10
mm from the outer edge of the rotor.
3. Slowly rotate the brake rotor checking lateral runout, marking the low and high spots. Record
these measurements.
4. Check and record the runout on the opposite side of the rotor in the same fashion, marking the low
and high spots.
5. Compare runout measurement to specification.
6. If runout is in excess of specifications, check the lateral runout of the hub face.
BRAKE ROTOR ROTOR THICKNESS MINIMUM ROTOR
THICKNESS ROTOR DIAMETER
Rear Rotor 9 mm7 mm303 mm
Rear Brake Backing Plate
Removal & Installation
1. Raise and support the vehicle.
2. Remove the wheel mounting nuts and the tire and wheel assembly.
(Tighten: Wheel mounting nuts to 110 N·m)
ON-VEHICLE SERVICE
BESM120004
LTSM120036
12
12–23Chery Automobile Co., Ltd.
Page 1419 of 1903
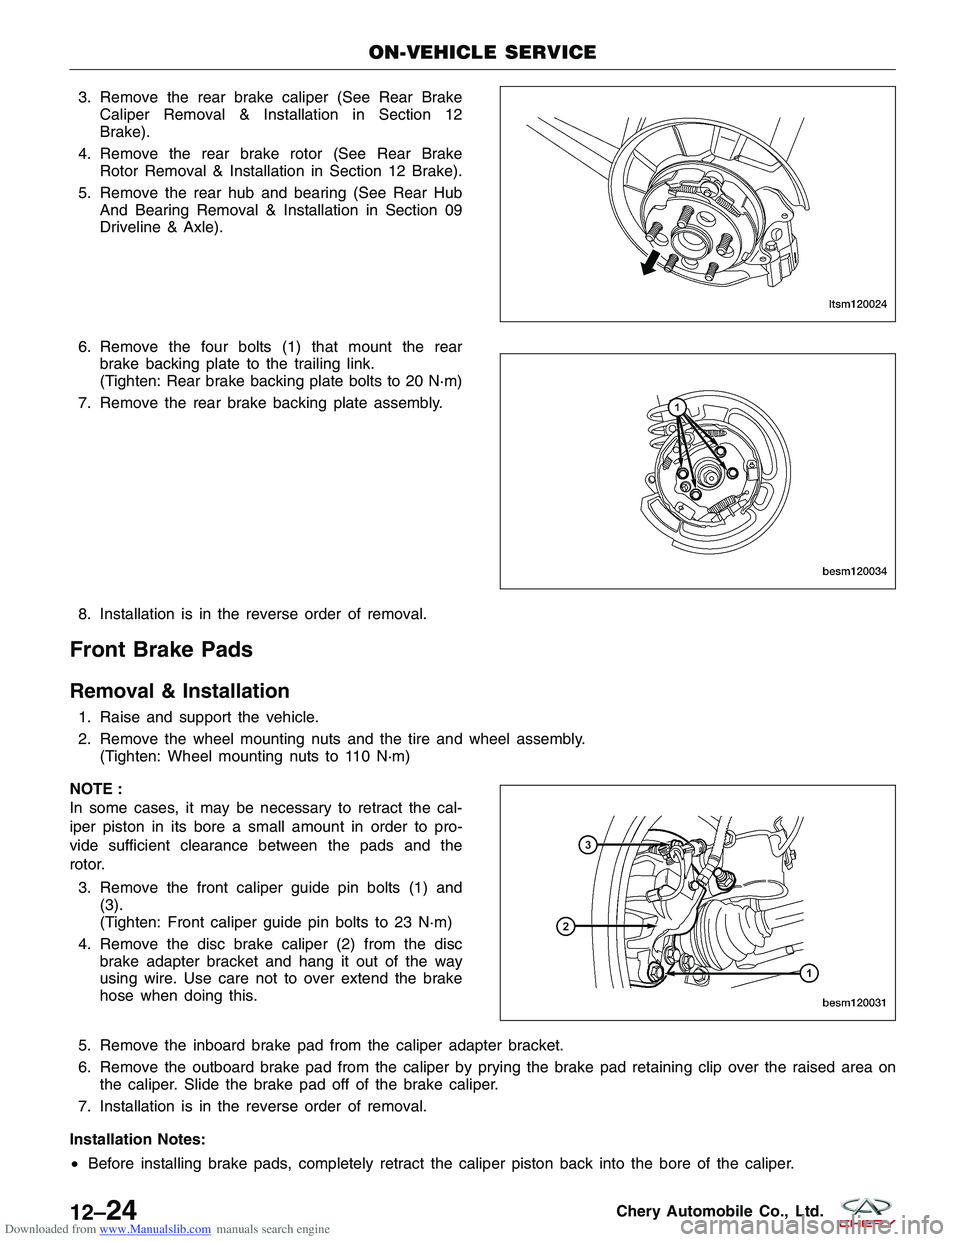
Downloaded from www.Manualslib.com manuals search engine 3. Remove the rear brake caliper (See Rear BrakeCaliper Removal & Installation in Section 12
Brake).
4. Remove the rear brake rotor (See Rear Brake Rotor Removal & Installation in Section 12 Brake).
5. Remove the rear hub and bearing (See Rear Hub And Bearing Removal & Installation in Section 09
Driveline & Axle).
6. Remove the four bolts (1) that mount the rear brake backing plate to the trailing link.
(Tighten: Rear brake backing plate bolts to 20 N·m)
7. Remove the rear brake backing plate assembly.
8. Installation is in the reverse order of removal.
Front Brake Pads
Removal & Installation
1. Raise and support the vehicle.
2. Remove the wheel mounting nuts and the tire and wheel assembly. (Tighten: Wheel mounting nuts to 110 N·m)
NOTE :
In some cases, it may be necessary to retract the cal-
iper piston in its bore a small amount in order to pro-
vide sufficient clearance between the pads and the
rotor. 3. Remove the front caliper guide pin bolts (1) and (3).
(Tighten: Front caliper guide pin bolts to 23 N·m)
4. Remove the disc brake caliper (2) from the disc brake adapter bracket and hang it out of the way
using wire. Use care not to over extend the brake
hose when doing this.
5. Remove the inboard brake pad from the caliper adapter bracket.
6. Remove the outboard brake pad from the caliper by prying the brake pad retaining clip over the raised area on the caliper. Slide the brake pad off of the brake caliper.
7. Installation is in the reverse order of removal.
Installation Notes:
• Before installing brake pads, completely retract the caliper piston back into the bore of the caliper.
ON-VEHICLE SERVICE
LTSM120024
BESM120034
BESM120031
12–24Chery Automobile Co., Ltd.
Page 1420 of 1903
Downloaded from www.Manualslib.com manuals search engine •After installation and before moving the vehicle, pump the brake pedal several times to set the pads to the
brake rotor.
• Check and adjust the brake fluid level in the reservoir as necessary.
• Road test the vehicle and make several stops to wear off any foreign material on the brakes and to seat the
brake pads.
• After installation and before moving the vehicle, pump the brake pedal several times to set the pads to the
brake rotor.
Inspection
Visually inspect brake pads for uneven lining wear. Also inspect for excessive lining deterioration. Check the clear-
ance between the tips of the wear indicators (if equipped) on the pads and the brake rotors. If a visual inspection
does not adequately determine the condition of the lining, a physical check will be necessary. To check the amount
of lining wear, remove the disc brake pads from the vehicle. Measure the brake pad minimum thickness. Brake pads
must be replaced when usable material on a brake pad lining measured at its thinnest point measures one millimeter
or less. Replace both disc brake pads (inboard and outboard) at each caliper. It is also necessary to replace the pads
on the opposite side of the vehicle as well as the pads failing inspection to maintain proper braking characteristics.
If the brake pad assemblies do not require replacement, be sure to reinstall the brake pads in the original position
from which they were removed.
Rear Brake Pads
Removal & Installation
1. Raise and support the vehicle.
2. Remove the wheel mounting nuts and the tire and wheel assembly.
(Tighten: Wheel mounting nuts to 110 N·m)
NOTE :
In some cases, it may be necessary to retract the caliper piston in its bore a small amount in order to provide suf-
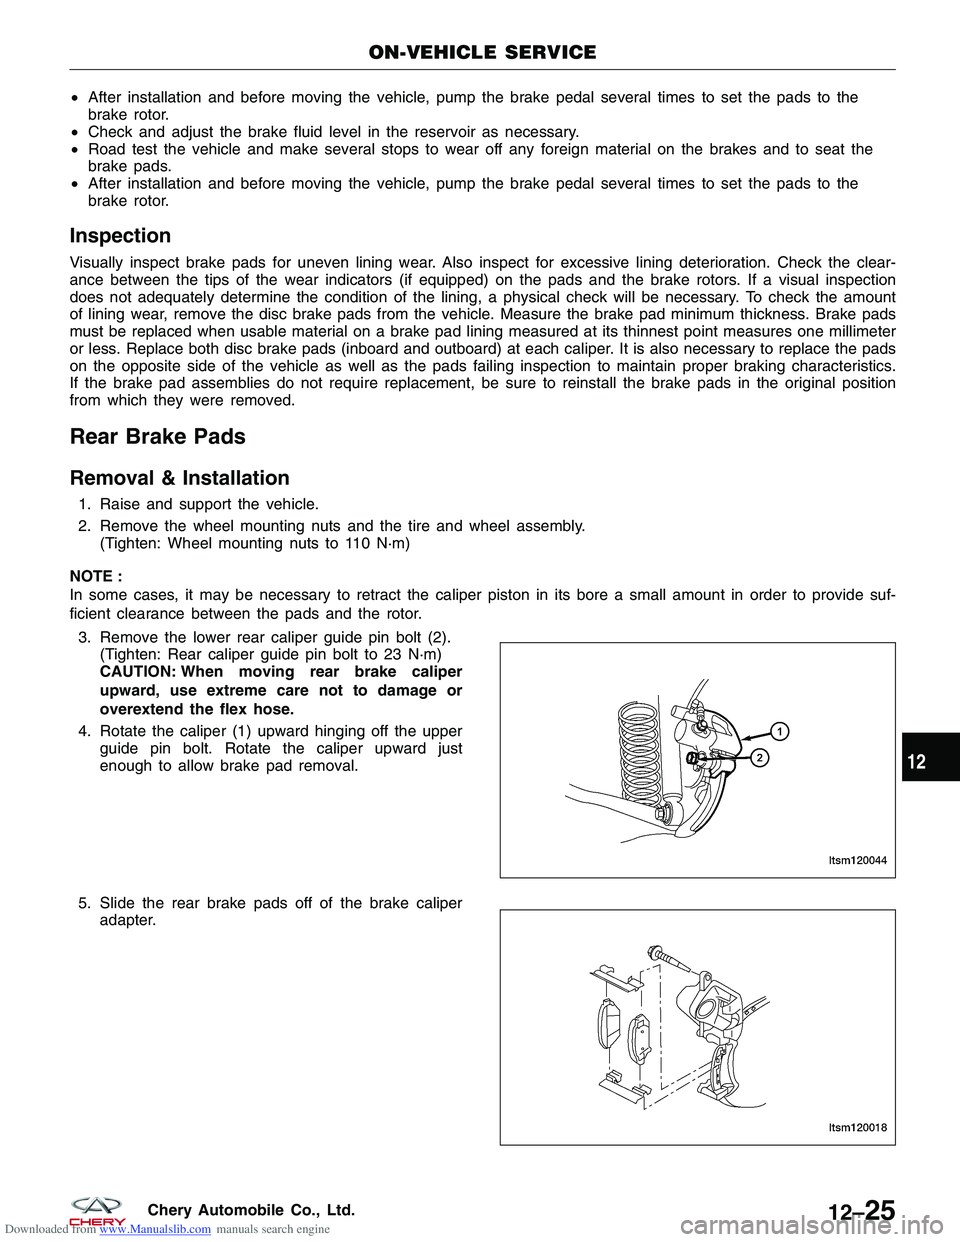
ficient clearance between the pads and the rotor. 3. Remove the lower rear caliper guide pin bolt (2). (Tighten: Rear caliper guide pin bolt to 23 N·m)
CAUTION: When moving rear brake caliper
upward, use extreme care not to damage or
overextend the flex hose.
4. Rotate the caliper (1) upward hinging off the upper guide pin bolt. Rotate the caliper upward just
enough to allow brake pad removal.
5. Slide the rear brake pads off of the brake caliper adapter.
ON-VEHICLE SERVICE
LTSM120044
LTSM120018
12
12–25Chery Automobile Co., Ltd.