flat tire CHEVROLET BLAZER 2003 2.G Owners Manual
[x] Cancel search | Manufacturer: CHEVROLET, Model Year: 2003, Model line: BLAZER, Model: CHEVROLET BLAZER 2003 2.GPages: 420, PDF Size: 2.94 MB
Page 266 of 420

If a Tire Goes Flat........................................5-62
Changing a Flat Tire.....................................5-63
Compact Spare Tire......................................5-75
Spare Tire...................................................5-76
Appearance Care............................................5-76
Cleaning the Inside of Your Vehicle.................5-77
Care of Safety Belts......................................5-78
Weatherstrips...............................................5-79
Cleaning the Outside of Your Vehicle..............5-79
Sheet Metal Damage.....................................5-81
Finish Damage.............................................5-81
Underbody Maintenance................................5-81
Chemical Paint Spotting.................................5-82
Vehicle Care/Appearance Materials..................5-82Vehicle Identi®cation......................................5-83
Vehicle Identi®cation Number (VIN).................5-83
Service Parts Identi®cation Label.....................5-84
Electrical System............................................5-84
Add-On Electrical Equipment..........................5-84
Headlamps..................................................5-84
Windshield Wiper Fuses................................5-85
Power Windows and Other Power Options.......5-85
Fuses and Circuit Breakers............................5-85
Capacities and Speci®cations..........................5-91
Normal Maintenance Replacement Parts..........5-92
Section 5 Service and Appearance Care
5-2
Page 320 of 420

When to Check
Check your tires once a month or more.
Also, check the tire pressure of the spare tire.
If you have a compact spare tire, it should be at
60 psi (420 kPa).
How to Check
Use a good quality pocket-type gage to check tire
pressure. You can't tell if your tires are properly in¯ated
simply by looking at them. Radial tires may look
properly in¯ated even when they're underin¯ated.
Be sure to put the valve caps back on the valve stems.
They help prevent leaks by keeping out dirt and
moisture.
Tire Inspection and Rotation
Tires should be rotated every 6,000 to 8,000 miles
(10 000 to 13 000 km).
Any time you notice unusual wear, rotate your tires as
soon as possible and check wheel alignment. Also
check for damaged tires or wheels. See
When It Is Time
for New Tires on page 5-57andWheel Replacement
on page 5-60for more information.Make sure the spare tire is stored securely. Push, pull,
and then try to rotate or turn the tire. If it moves,
use the wheel wrench to tighten the cable. See
Changing a Flat Tire on page 5-63.
The purpose of regular rotation is to achieve more
uniform wear for all tires on the vehicle. The ®rst rotation
is the most important. See ªPart A: Scheduled
Maintenance Services,º in Section 6, for scheduled
rotation intervals.
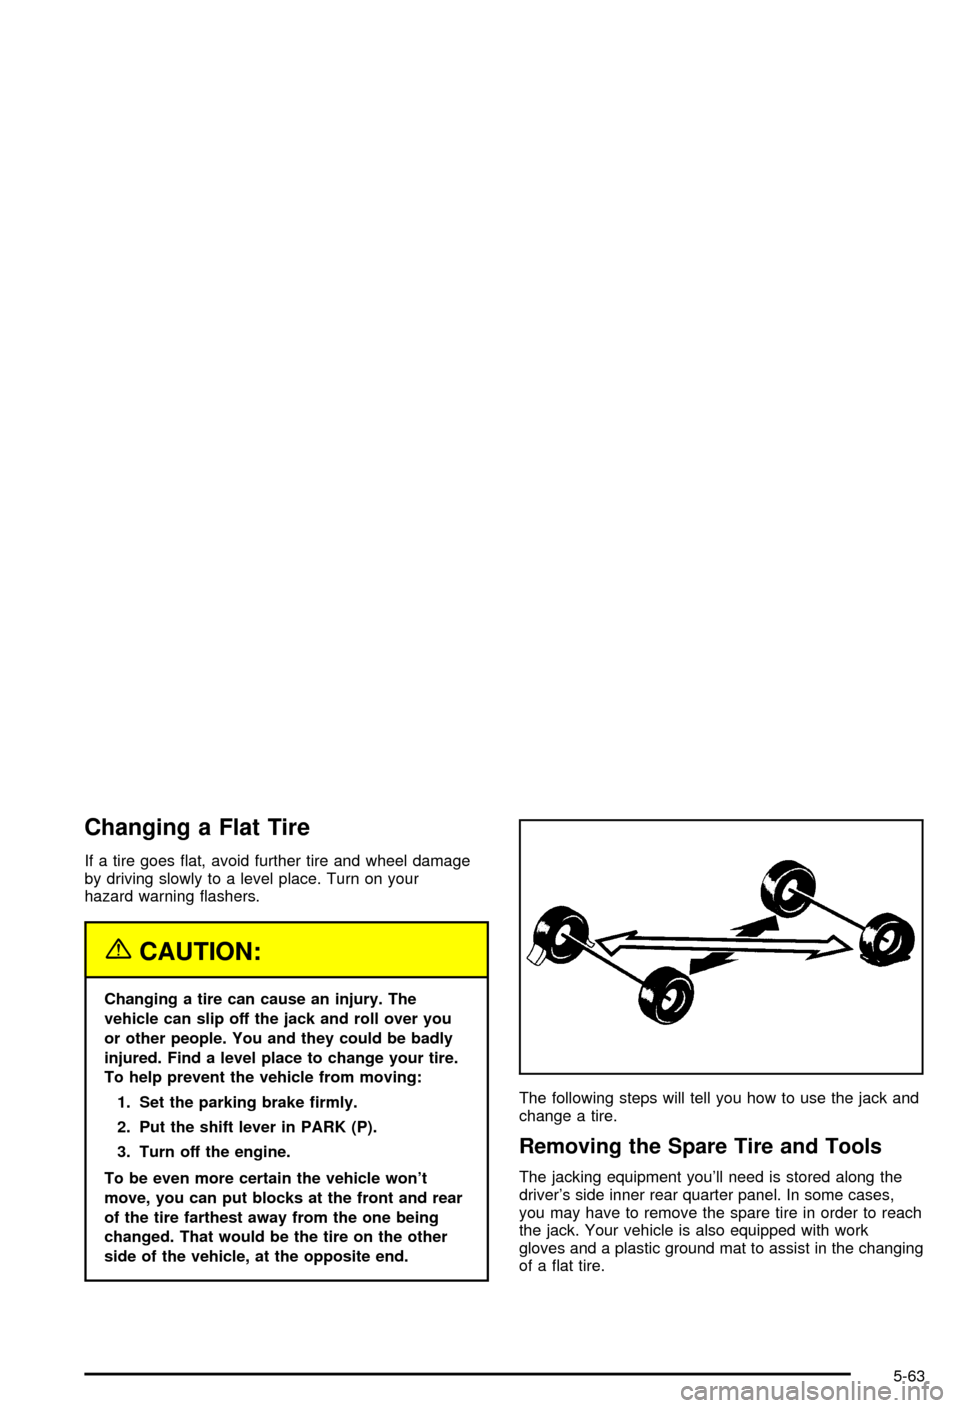
When rotating your tires, always use one of the correct
rotation patterns shown here.
If your vehicle has a compact spare tire or a spare tire
that does not match your vehicle's regular road tires
and wheels in size and type, do not include the spare in
the tire rotation.
5-56
Page 321 of 420
After the tires have been rotated, adjust the front and
rear in¯ation pressures as shown on the
Certi®cation/Tire label. Make certain that all wheel nuts
are properly tightened. See ªWheel Nut Torqueº
under
Capacities and Speci®cations on page 5-91.
{CAUTION:
Rust or dirt on a wheel, or on the parts to
which it is fastened, can make wheel nuts
become loose after a time. The wheel could
come off and cause an accident. When you
change a wheel, remove any rust or dirt from
places where the wheel attaches to the vehicle.
In an emergency, you can use a cloth or a
paper towel to do this; but be sure to use a
scraper or wire brush later, if you need to, to
get all the rust or dirt off. See ªChanging a Flat
Tireº in the Index.
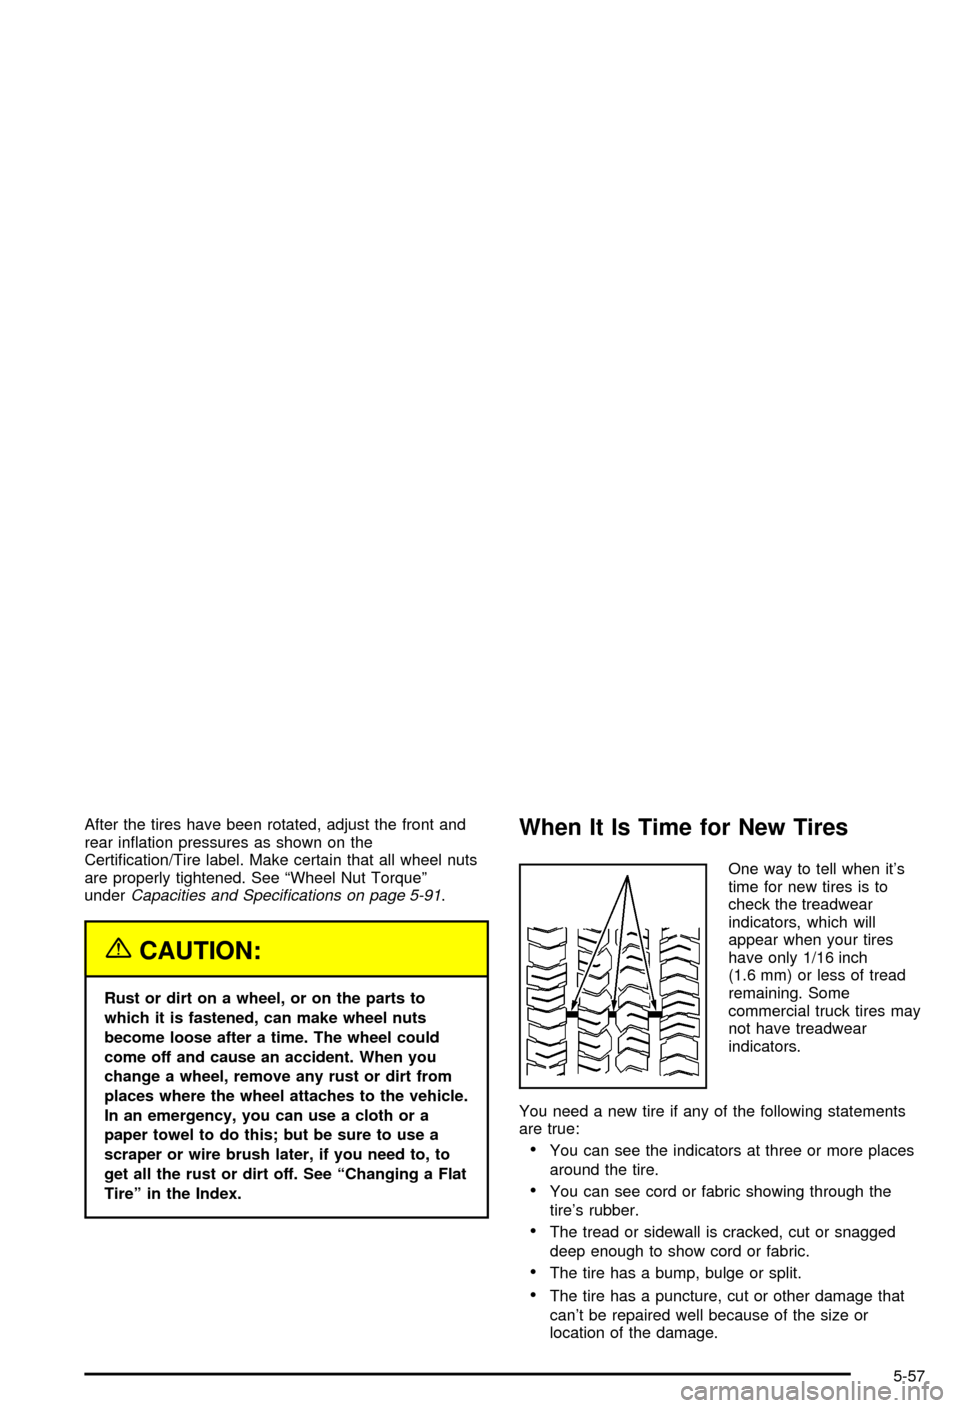
When It Is Time for New Tires
One way to tell when it's
time for new tires is to
check the treadwear
indicators, which will
appear when your tires
have only 1/16 inch
(1.6 mm) or less of tread
remaining. Some
commercial truck tires may
not have treadwear
indicators.
You need a new tire if any of the following statements
are true:
·You can see the indicators at three or more places
around the tire.
·You can see cord or fabric showing through the
tire's rubber.
·The tread or sidewall is cracked, cut or snagged
deep enough to show cord or fabric.
·The tire has a bump, bulge or split.
·The tire has a puncture, cut or other damage that
can't be repaired well because of the size or
location of the damage.
5-57
Page 325 of 420
Each new wheel should have the same load-carrying
capacity, diameter, width, offset and be mounted
the same way as the one it replaces.
If you need to replace any of your wheels, wheel bolts
or wheel nuts, replace them only with new GM
original equipment parts. This way, you will be sure to
have the right wheel, wheel bolts and wheel nuts
for your vehicle.
{CAUTION:
Using the wrong replacement wheels, wheel
bolts or wheel nuts on your vehicle can be
dangerous. It could affect the braking and
handling of your vehicle, make your tires lose
air and make you lose control. You could have
a collision in which you or others could be
injured. Always use the correct wheel, wheel
bolts and wheel nuts for replacement.
Notice:The wrong wheel can also cause problems
with bearing life, brake cooling, speedometer or
odometer calibration, headlamp aim, bumper height,
vehicle ground clearance and tire or tire chain
clearance to the body and chassis.
See
Changing a Flat Tire on page 5-63for more
information.
Used Replacement Wheels
{CAUTION:
Putting a used wheel on your vehicle is
dangerous. You can't know how it's been used
or how far it's been driven. It could fail
suddenly and cause a crash. If you have to
replace a wheel, use a new GM original
equipment wheel.
5-61
Page 326 of 420
Tire Chains
{CAUTION:
Don't use tire chains. There's not enough
clearance. Tire chains used on a vehicle
without the proper amount of clearance can
cause damage to the brakes, suspension or
other vehicle parts. The area damaged by the
tire chains could cause you to lose control of
your vehicle and you or others may be injured
in a crash. Use another type of traction device
only if its manufacturer recommends it for use
on your vehicle and tire size combination and
road conditions. Follow that manufacturer's
instructions. To help avoid damage to your
vehicle, drive slowly, readjust or remove the
device if it's contacting your vehicle, and don't
spin your wheels. If you do ®nd traction
devices that will ®t, install them on the
rear tires.
If a Tire Goes Flat
It's unusual for a tire to ªblowoutº while you're driving,
especially if you maintain your tires properly. If air goes
out of a tire, it's much more likely to leak out slowly.
But if you should ever have a ªblowout,º here are a few
tips about what to expect and what to do:
If a front tire fails, the ¯at tire will create a drag that
pulls the vehicle toward that side. Take your foot off the
accelerator pedal and grip the steering wheel ®rmly.
Steer to maintain lane position, and then gently brake to
a stop well out of the traffic lane.
A rear blowout, particularly on a curve, acts much like a
skid and may require the same correction you'd use
in a skid. In any rear blowout, remove your foot from the
accelerator pedal. Get the vehicle under control by
steering the way you want the vehicle to go. It may be
very bumpy and noisy, but you can still steer. Gently
brake to a stop, well off the road if possible.
If a tire goes ¯at, the next part shows how to use your
jacking equipment to change a ¯at tire safely.
5-62
Page 327 of 420
Changing a Flat Tire
If a tire goes ¯at, avoid further tire and wheel damage
by driving slowly to a level place. Turn on your
hazard warning ¯ashers.
{CAUTION:
Changing a tire can cause an injury. The
vehicle can slip off the jack and roll over you
or other people. You and they could be badly
injured. Find a level place to change your tire.
To help prevent the vehicle from moving:
1. Set the parking brake ®rmly.
2. Put the shift lever in PARK (P).
3. Turn off the engine.
To be even more certain the vehicle won't
move, you can put blocks at the front and rear
of the tire farthest away from the one being
changed. That would be the tire on the other
side of the vehicle, at the opposite end.The following steps will tell you how to use the jack and
change a tire.
Removing the Spare Tire and Tools
The jacking equipment you'll need is stored along the
driver's side inner rear quarter panel. In some cases,
you may have to remove the spare tire in order to reach
the jack. Your vehicle is also equipped with work
gloves and a plastic ground mat to assist in the changing
of a ¯at tire.
5-63
Page 331 of 420
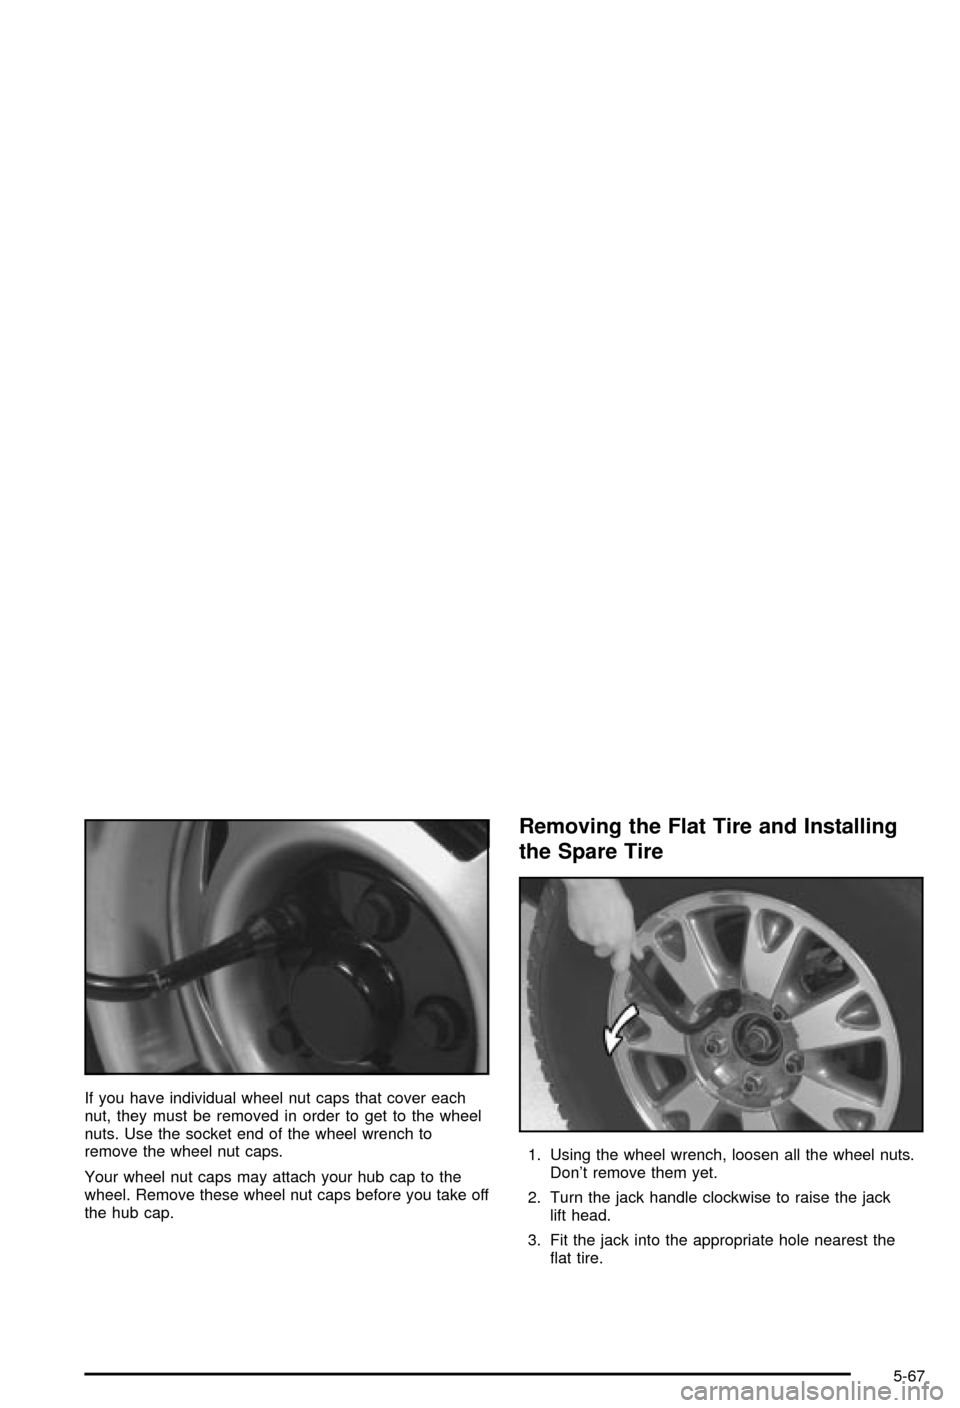
If you have individual wheel nut caps that cover each
nut, they must be removed in order to get to the wheel
nuts. Use the socket end of the wheel wrench to
remove the wheel nut caps.
Your wheel nut caps may attach your hub cap to the
wheel. Remove these wheel nut caps before you take off
the hub cap.
Removing the Flat Tire and Installing
the Spare Tire
1. Using the wheel wrench, loosen all the wheel nuts.
Don't remove them yet.
2. Turn the jack handle clockwise to raise the jack
lift head.
3. Fit the jack into the appropriate hole nearest the
¯at tire.
5-67
Page 336 of 420
Storing a Flat or Spare Tire and Tools
{CAUTION:
Storing a jack, a tire, or other equipment in the
passenger compartment of the vehicle could
cause injury. In a sudden stop or collision,
loose equipment could strike someone. Store
all these in the proper place.
Notice:An aluminum wheel with a ¯at tire should
always be stored under the vehicle with the
hoist. However, storing it that way for an extended
period could damage the wheel. To avoid this,
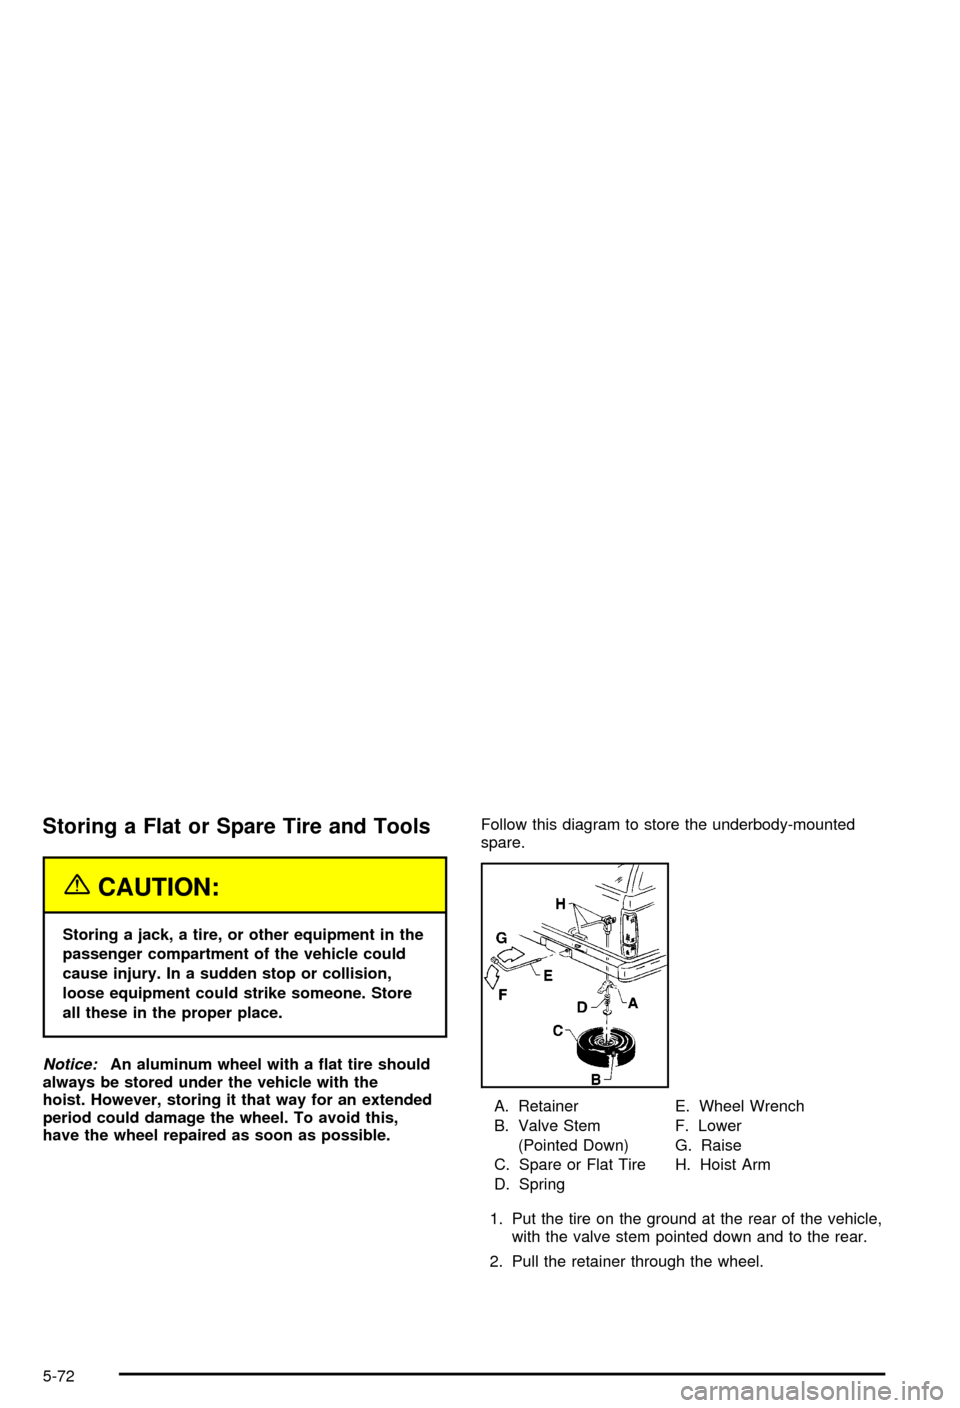
have the wheel repaired as soon as possible.Follow this diagram to store the underbody-mounted
spare.
A. Retainer
B. Valve Stem
(Pointed Down)
C. Spare or Flat Tire
D. SpringE. Wheel Wrench
F. Lower
G. Raise
H. Hoist Arm
1. Put the tire on the ground at the rear of the vehicle,
with the valve stem pointed down and to the rear.
2. Pull the retainer through the wheel.
5-72
Page 337 of 420

3. Put the chisel end of the wheel wrench, on an
angle, through the hole in the rear bumper and
into the hoist shaft.
4. Raise the tire fully against the underside of the
vehicle by turning the wrench clockwise until you
hear two clicks or feel it skip twice. The spare
tire hoist cannot be overtightened.
5. Make sure the tire is stored securely. Push, pull,
and then try to turn the tire. If the tire moves, use
the wheel wrench to tighten the cable.Follow this diagram for the inside-mounted spare.
A. Spare or Flat Tire
B. Retainer
C. NutD. Wheel Carrier
E. Hook
5-73
Page 338 of 420
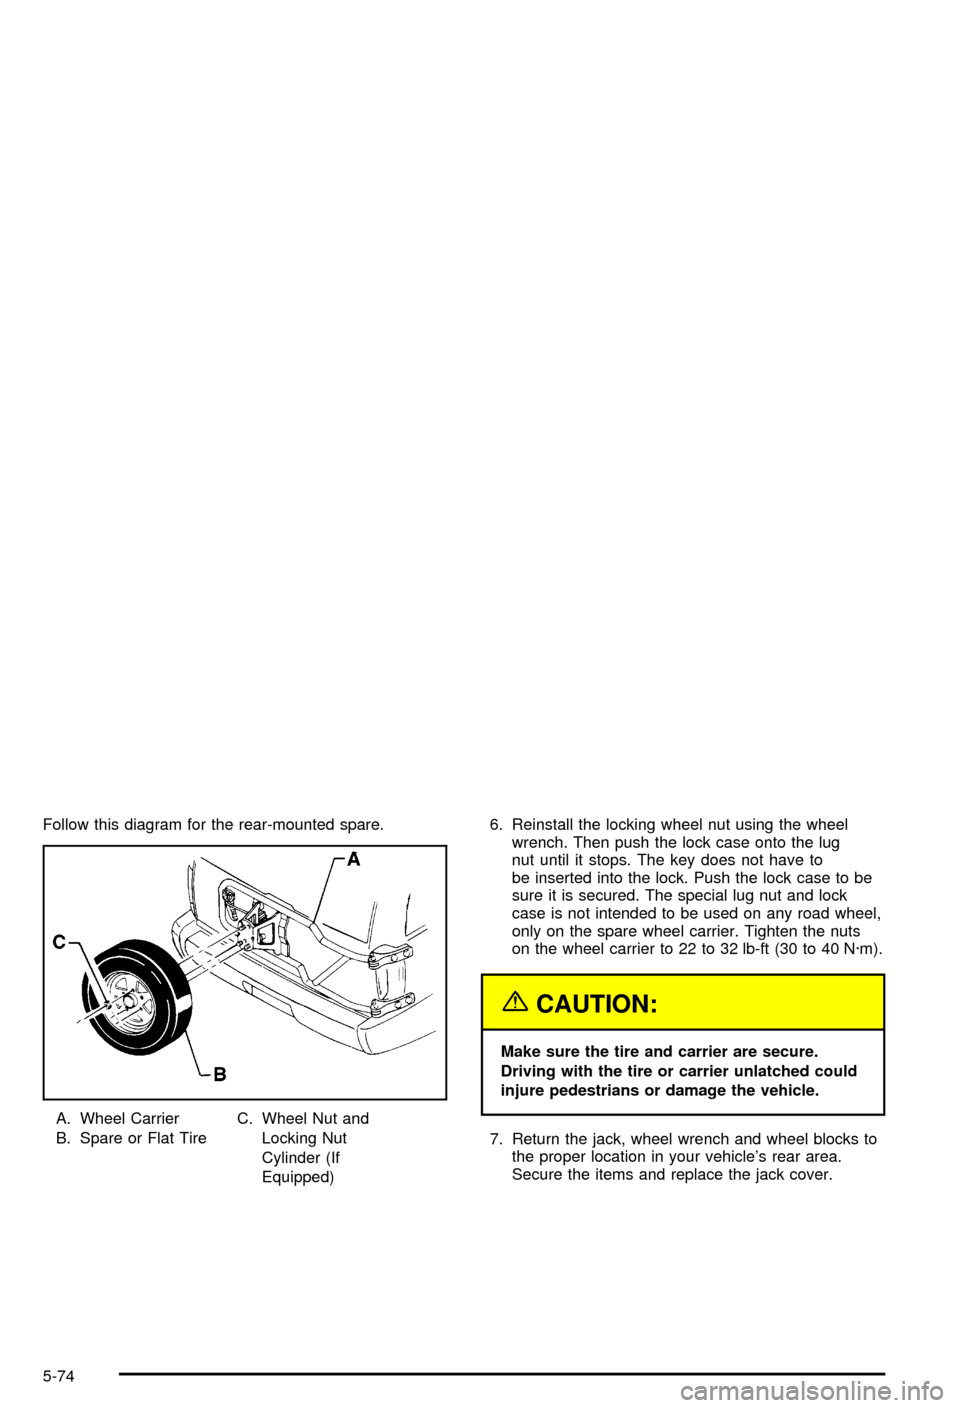
Follow this diagram for the rear-mounted spare.
A. Wheel Carrier
B. Spare or Flat TireC. Wheel Nut and
Locking Nut
Cylinder (If
Equipped)6. Reinstall the locking wheel nut using the wheel
wrench. Then push the lock case onto the lug
nut until it stops. The key does not have to
be inserted into the lock. Push the lock case to be
sure it is secured. The special lug nut and lock
case is not intended to be used on any road wheel,
only on the spare wheel carrier. Tighten the nuts
on the wheel carrier to 22 to 32 lb-ft (30 to 40 N´m).
{CAUTION:
Make sure the tire and carrier are secure.
Driving with the tire or carrier unlatched could
injure pedestrians or damage the vehicle.
7. Return the jack, wheel wrench and wheel blocks to
the proper location in your vehicle's rear area.
Secure the items and replace the jack cover.
5-74