diagram CHEVROLET CAMARO 1967 1.G Chassis Owner's Manual
[x] Cancel search | Manufacturer: CHEVROLET, Model Year: 1967, Model line: CAMARO, Model: CHEVROLET CAMARO 1967 1.GPages: 659, PDF Size: 114.24 MB
Page 334 of 659
ENGINE-ELECTRICAL 6Y-9
63 AMP 1
MODELS ONLY'
BATTERY FUSIBLE
LINK
HORN
FUSIBLE LINK'
TRANSISTOR
FUSIBLE LINK'
Fig.
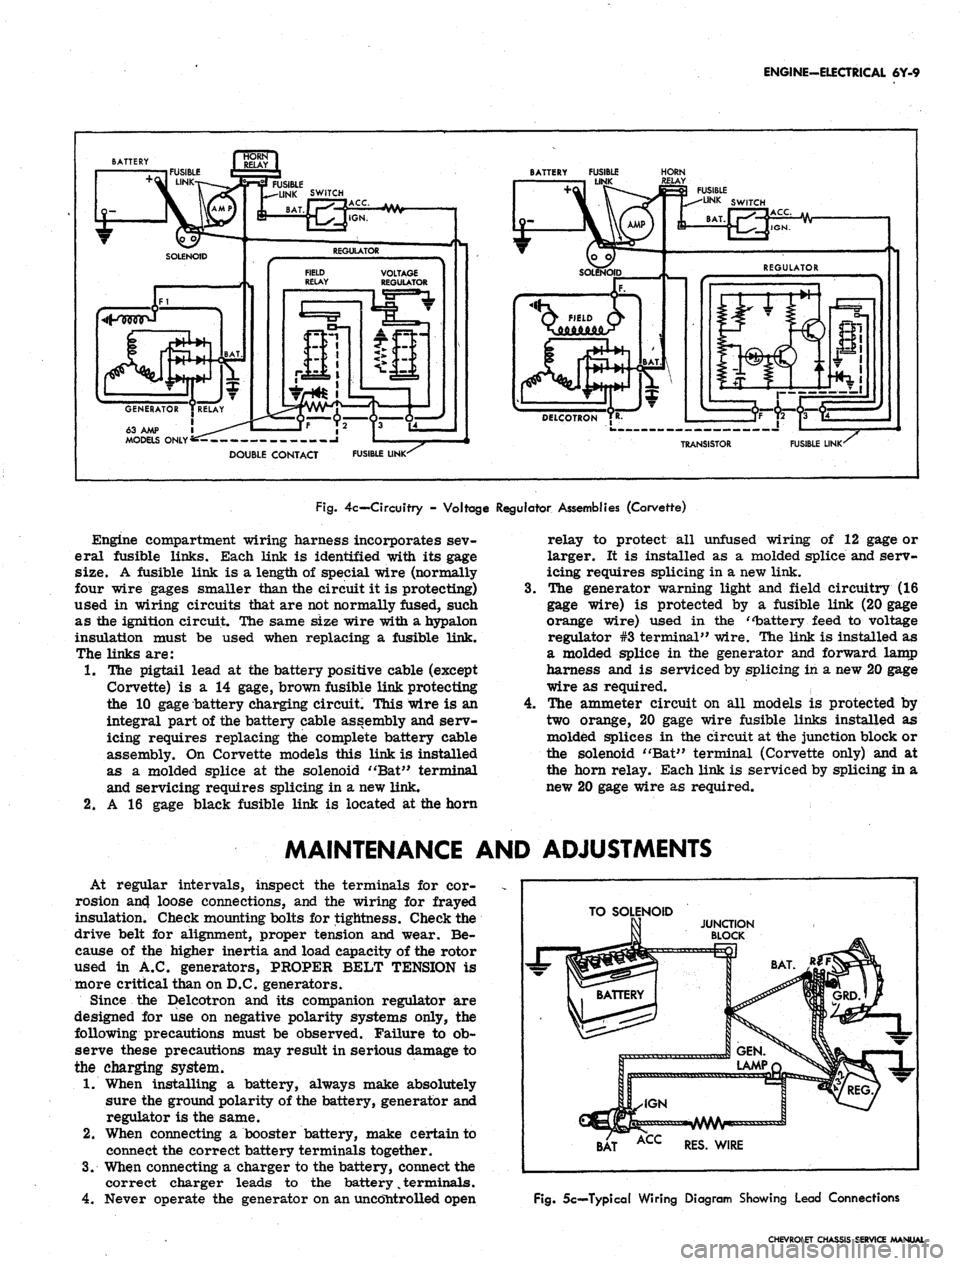
4c— Circuitry - Voltage Regulator Assemblies (Corvette)
Engine compartment wiring harness incorporates sev-
eral fusible links. Each link is identified with its gage
size. A fusible link is a length of special wire (normally
four wire gages smaller than the circuit it is protecting)
used in wiring circuits that are not normally fused, such
as the ignition circuit. The same size wire with a hypalon
insulation must be used when replacing a fusible link.
The links are:
1.
The pigtail lead at the battery positive cable (except
Corvette) is a 14 gage, brown fusible link protecting
the 10 gage battery charging circuit. This wire is an
integral part of the battery cable assembly and serv-
icing requires replacing the complete battery cable
assembly. On Corvette models this link is installed
as a molded splice at the solenoid "Bat" terminal
and servicing requires splicing in a new link.
2.
A 16 gage black fusible link is located at the horn
4.
relay to protect all unfused wiring of 12 gage or
larger. It is installed as a molded splice and serv-
icing requires splicing in a new link.
The generator warning light and field circuitry (16
gage wire) is protected by a fusible link (20 gage
orange wire) used in the "battery feed to voltage
regulator #3 terminal" wire. The link is installed as
a molded splice in the generator and forward lamp
harness and is serviced by splicing in a new 20 gage
wire as required.
The ammeter circuit on all models is protected by
two orange, 20 gage wire fusible links installed as
molded splices in the circuit at the junction block or
the solenoid "Bat" terminal (Corvette only) and at
the horn relay. Each link is serviced by splicing in a
new 20 gage wire as required.
MAINTENANCE AND ADJUSTMENTS
At regular intervals, inspect the terminals for cor-
rosion an4 loose connections, and the wiring for frayed
insulation. Check mounting bolts for tightness. Check the
drive belt for alignment, proper tension and wear. Be-
cause of the higher inertia and load capacity of the rotor
used in A.C. generators, PROPER BELT TENSION is
more critical than on D.C. generators.
Since the Delcotron and its companion regulator are
designed for use on negative polarity systems only, the
following precautions must be observed. Failure to ob-
serve these precautions may result in serious damage to
the charging system.
1.
When installing a battery, always make absolutely
sure the ground polarity of the battery, generator and
regulator is the same.
2.
When connecting a booster battery, make certain to
connect the correct battery terminals together.
3.
When connecting a charger to the battery, connect the
correct charger leads to the battery
%
terminals.
4.
Never operate the generator on an uncontrolled open
TO SOLENOID
BAT ACC RES. WIRE
Fig.
5c—Typical Wiring Diagram Showing Lead Connections
CHEVROLET CHASSIS SERVICE MANUAL
Page 358 of 659
ENGINE-ELECTRICAL 6Y-33
O
V-8 ENGINE
STARTING MOTOR
Fig.
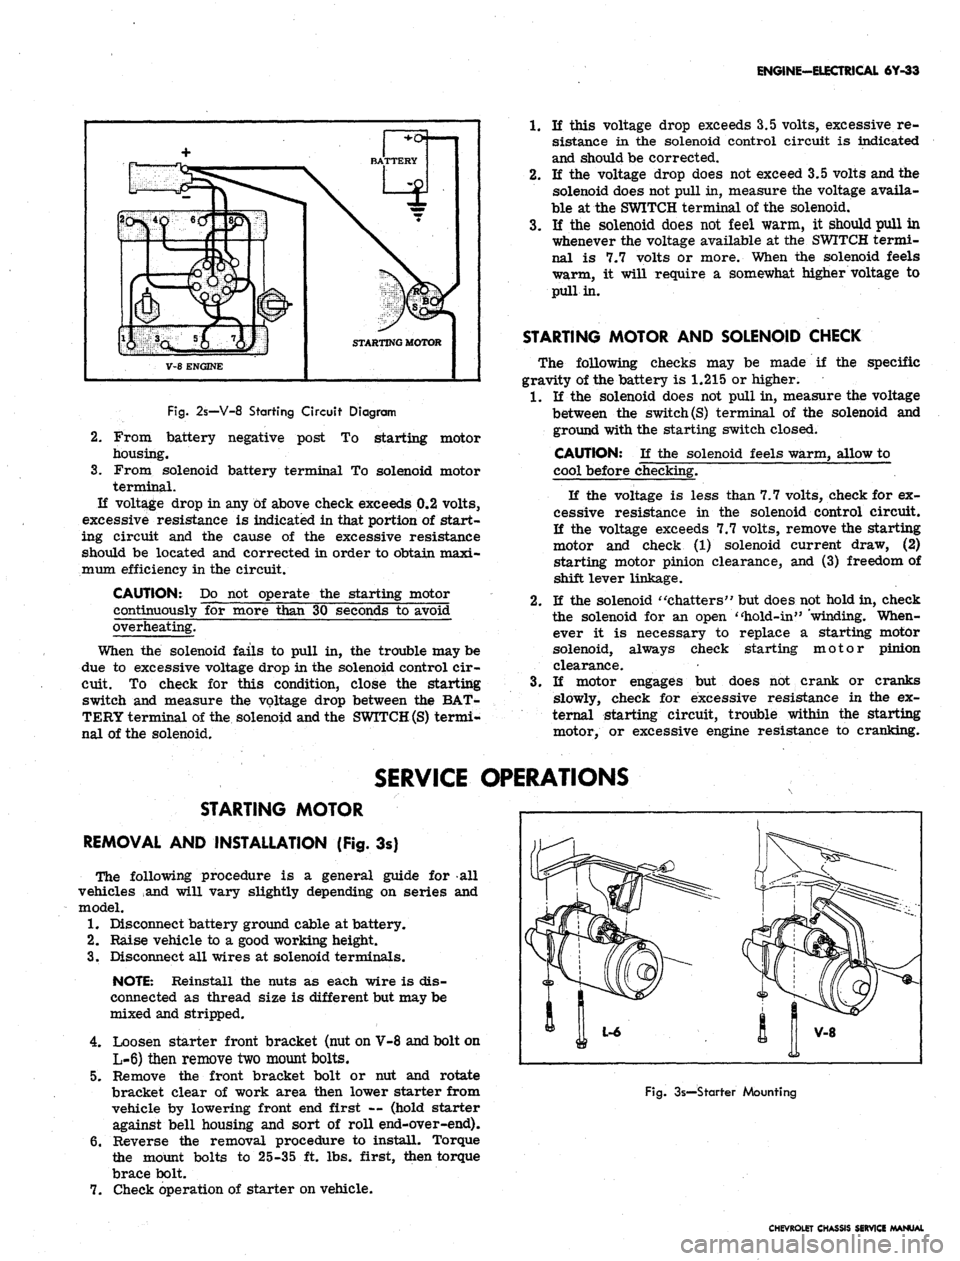
2s—V-8 Starting Circuit Diagram
2.
3.
From battery negative post
To
starting motor
housing.
From solenoid battery terminal
To
solenoid motor
terminal.
If voltage drop
in
any
of
above check exceeds 0.2 volts,
excessive resistance
is
indicated in that portion
of
start-
ing circuit
and the
cause
of the
excessive resistance
should
be
located
and
corrected
in
order to obtain maxi-
mum efficiency in the circuit.
CAUTION:
Do not
operate
the
starting motor
continuously
for
more than
30
seconds
to
avoid
overheating.
When
the
solenoid fails
to
pull
in, the
trouble may be
due
to
excessive voltage drop in the solenoid control cir-
cuit.
To
check
for
this condition, close
the
starting
switch
and
measure
the
voltage drop between
the
BAT-
TERY terminal of the solenoid and the
SWITCH (S)
termi-
nal
of
the solenoid.
1.
If
this voltage drop exceeds 3.5 volts, excessive
re-
sistance
in the
solenoid control circuit
is
indicated
and should be corrected.
2.
If the
voltage drop does not exceed 3.5 volts and the
solenoid does not pull in, measure the voltage availa-
ble
at
the SWITCH terminal
of
the solenoid.
3.
If the
solenoid does
not
feel warm,
it
should pull
in
whenever the voltage available
at
the SWITCH termi-
nal
is 7.7
volts
or
more. When
the
solenoid feels
warm,
it
will require
a
somewhat higher voltage
to
pull in.
STARTING MOTOR AND SOLENOID CHECK
The following checks
may be
made
if the
specific
gravity of the battery
is
1.215
or
higher.
1.
If the
solenoid does
not
pull in, measure the voltage
between
the
switch
(S)
terminal
of the
solenoid
and
ground with the starting switch closed.
CAUTION:
If the
solenoid feels warm, allow
to
cool before checking.
If
the
voltage
is
less than 7.7 volts, check for ex-
cessive resistance
in the
solenoid control circuit.
If
the
voltage exceeds 7.7 volts, remove the starting
motor
and
check
(1)
solenoid current draw,
(2)
starting motor pinion clearance,
and (3)
freedom of
shift lever linkage.
2.
If
the solenoid "chatters" but does not hold in, check
the solenoid
for an
open "hold-in" 'winding. When-
ever
it is
necessary
to
replace
a
starting motor
solenoid, always check starting motor pinion
clearance.
3.
If
motor engages
but
does
not
crank
or
cranks
slowly, check
for
excessive resistance
in the ex-
ternal starting circuit, trouble within
the
starting
motor,
or
excessive engine resistance
to
cranking.
SERVICE OPERATIONS
STARTING MOTOR
REMOVAL AND INSTALLATION (Fig.
3s)
The following procedure
is a
general guide
for all
vehicles
and
will vary slightly depending
on
series
and
model.
1.
Disconnect battery ground cable at battery.
2.
Raise vehicle
to a
good working height.
3.
Disconnect all wires
at
solenoid terminals.
NOTE: Reinstall
the
nuts
as
each wire
is
dis-
connected
as
thread size
is
different but may be
mixed and stripped.
4.
Loosen starter front bracket (nut on V-8 and bolt on
L-6) then remove two mount bolts.
5.
Remove
the
front bracket bolt
or nut and
rotate
bracket clear
of
work area then lower starter from
vehicle
by
lowering front end first
—
(hold starter
against bell housing
and
sort
of
roll end-over-end).
6. Reverse
the
removal procedure
to
install. Torque
the mount bolts
to
25-35
ft.
lbs. first, then torque
brace bolt.
7.
Check operation
of
starter on vehicle.
Fig.
3s—Starter Mounting
CHEVROLET CHASSIS SERVICE MANUAL
Page 372 of 659
CLUTCH AND TRANSMISSIONS 7-13
PULL-IN
WINDING
li
HOLD-IN
WINDING
Fig.
4B -
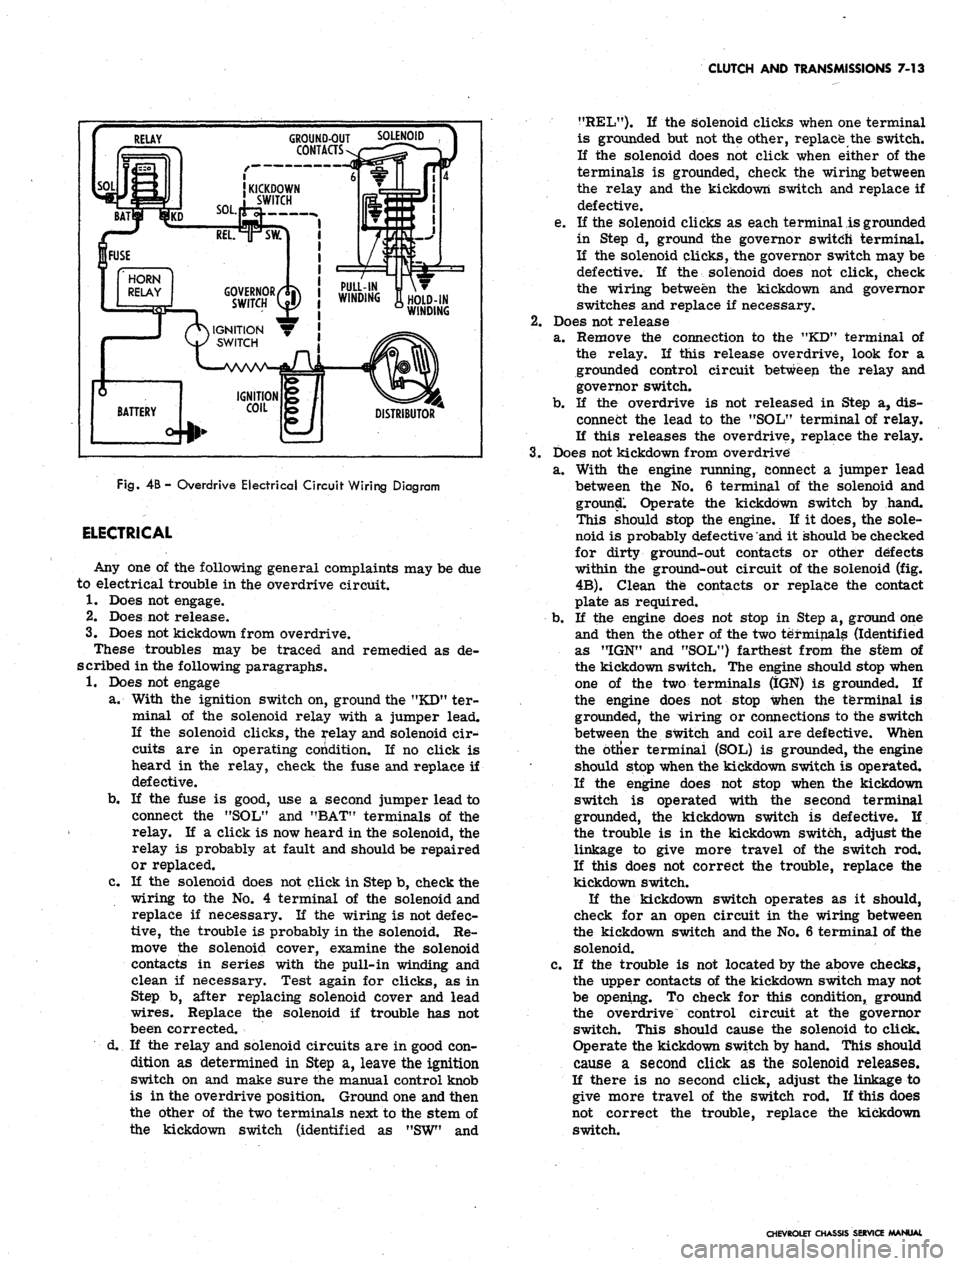
Overdrive Electrical Circuit Wiring Diagram
ELECTRICAL
Any one of the following general complaints may be due
to electrical trouble in the overdrive circuit.
1.
Does not engage.
2.
Does not release.
3.
Does not kickdown from overdrive.
These troubles may be traced and remedied as de-
scribed in the following paragraphs.
1.
Does not engage
a. With the ignition switch on, ground the "KD" ter-
minal of the solenoid relay with a jumper lead.
If the solenoid clicks, the relay and solenoid cir-
cuits are in operating condition. If no click is
heard in the relay, check the fuse and replace if
defective.
b.
If the fuse is good, use a second jumper lead to
connect the "SOL" and "BAT" terminals of the
relay. If a click is now heard in the solenoid, the
relay is probably at fault and should be repaired
or replaced.
c. If the solenoid does not click in Step b, check the
wiring to the No. 4 terminal of the solenoid and
replace if necessary. If the wiring is not defec-
tive,
the trouble is probably in the solenoid. Re-
move the solenoid cover, examine the solenoid
contacts in series with the pull-in winding and
clean if necessary. Test again for clicks, as in
Step b, after replacing solenoid cover and lead
wires.
Replace the solenoid if trouble has not
been corrected.
d. If the relay and solenoid circuits are in good con-
dition as determined in Step a, leave the ignition
switch on and make sure the manual control knob
is in the overdrive position. Ground one and then
the other of the two terminals next to the stem of
the kickdown switch (identified as "SW" and
?fREL"). K the solenoid clicks when one terminal
is grounded but not the other, replace the switch.
If the solenoid does not click when either of the
terminals is grounded, check the wiring between
the relay and the kickdown switch and replace if
defective.
e. If the solenoid clicks as each terminal is grounded
in Step d, ground the governor switch terminal.
If the solenoid clicks, the governor switch may be
defective. If the solenoid does not click, check
the wiring between the kickdown and governor
switches and replace if necessary.
2.
Does not release
a. Remove the connection to the "KD" terminal of
the relay. If this release overdrive, look for a
grounded control circuit between the relay and
governor switch.
b.
If the overdrive is not released in Step a, dis-
connect the lead to the "SOL" terminal of relay.
If this releases the overdrive, replace the relay.
3.
Does not kickdown from overdrive
a. With the engine running, connect a jumper lead
between the No. 6 terminal of the solenoid and
ground. Operate the kickdown switch by hand.
This should stop the engine. If it does, the sole-
noid is probably defective and it should be checked
for dirty ground-out contacts or other defects
within the ground-out circuit of the solenoid (fig.
4B).
Clean the contacts or replace the contact
plate as required.
b.
If the engine does not stop in Step a, ground one
and then the other of the two terminals (Identified
as "IGN" and "SOL") farthest from the sfem of
the kickdown switch. The engine should stop when
one of the two terminals (IGN) is grounded. If
the engine does not stop when the terminal is
grounded, the wiring or connections to the switch
between the switch and coil are defective. When
the btlier terminal (SOL) is grounded, the engine
should stop when the kickdown switch is operated.
If the engine does not stop when the kickdown
switch is operated with the second terminal
grounded, the kickdown switch is defective. If
the trouble is in the kickdown switch, adjust the
linkage to give more travel of the switch rod.
If this does not correct the trouble, replace the
kickdown switch.
If the kickdown switch operates as it should,
check for an open circuit in the wiring between
the kickdown switch and the No. 6 terminal of the
solenoid.
c. If the trouble is not located by the above checks,
the upper contacts of the kickdown switch may not
be opening. To check for this condition, ground
the overdrive control circuit at the governor
switch. This should cause the solenoid to click.
Operate the kickdown switch by hand. This should
cause a second click as the solenoid releases.
If there is no second click, adjust the linkage to
give more travel of the switch rod. If this does
not correct the trouble, replace the kickdown
switch.
CHEVROLET CHASSIS SERVICE MANUAL
Page 396 of 659
CLUTCH AND TRANSMISSIONS 7-37
LI.
- LI Range can be selected at any vehicle speed,
and the transmission will shift to second gear
and remain in second until vehicle speed is re-
duced to approximately 40 MPH, .depending on
axle ratio. LI Range position prevents the trans-
mission from shifting out of first gear.
It is very important that any communication concerning
the Turbo Hydra-Matic always contain the transmission
serial number and that all transmission parts returned
to Chevrolet Motor Division always be tagged with the
transmission serial number.
MAINTENANCE AND ADJUSTMENTS
TRANSMISSION FLUID
Transmission fluid level should be checked with trans-
mission warm and selector lever in "P" Park position,
every time engine oil level is checked or as specified in
Section 0 when engine oil is changed.
CAUTION: Since the Turbo Hydra-Matic trans-
mission is very sensitive to oil level, special
precautions should be taken when checking the
oil level, to insure against an overfifE
Transmission fluid should be changed as specified in
Section 0.
FLUID LEVEL INDICATOR
The fluid level indicator is located in the filler pipe at
the right rear corner of the engine. To bring the fluid
level from the add mark to the full mark add 1 pint.
Fluid level should be to the full mark with transmission
at normal operating temperature. With cold fluid the
level should be at the add mark or slightly below.
SHIFT CONTROL LINKAGE ADJUSTMENT
Adjust linkage as shown below and in Figure 2.
1.
The shift tube and lever assembly must be free in the
mast jacket See Section 9 for alignment of steering
column assembly if necessary.
2.
To check for proper shift linkage adjustment, lift the
transmission selector lever towards the steering
wheel. Allow the selector lever to be positioned in
drive (D) by the transmission detent.
NOTE: Do not use the indicator pointer as a
reference to position the selector lever. When
performing linkage adjustment, pointer is ad-
justed last.
3.
Release the selector lever. The lever should be in-
hibited from engaging low range unless the lever is
lifted.
4.
Lift the selector lever towards the steering wheel,
and allow the lever to be positioned in neutral (N) by
the transmission detent.
5.
Release the selector lever. The lever should now be
inhibited from engaging reverse range unless the
lever is lifted.
6. A properly adjusted linkage will prevent the selector
lever from moving beyond both the neutral detent,
and the drive detent unless the lever is lifted to pass
over the mechanical stop in the steering column.
See schematic diagram.
7.
In the event that an adjustment is required, place the
selector lever in drive (D) position as determined by
the transmission detent. See Steps 2 and 3.
8. Loosen the adjustment swivel at the cross-shaft, and
rotate the transmission lever so that it contacts the
drive stop in the steering column.
9. Tighten the swivel and recheck the adjustment. See
Steps 2 and 6. -
l(h Readjust indicator needle if necessary to agree with
the transmission detent" positions. See Section 9.
11.
Readjust neutral safety switch if necessary to pro-
vide the correct relationship to the transmission de-
tent positions. See Section 12.
12.
When properly adjusted the following conditions must
be met by manual operation of the steering column
shift lever:
a. From reverse to drive position travel, the trans-
mission detent feel must be noted and related to
indicated position on dial.
b.
When in drive and reverse positions, pull lever
rearward (towards steering wheel) and then re-
lease. It must drop back into position with no
restrictions.
NEUTRAL SAFETY SWITCH ADJUSTMENT
The neutral safety switch must be adjusted so that the
car will start in the park or neutral position, but will not
start in the other positions. For replacement refer to
Section 12 of this Manual.
DRAINING AND REFILLING TRANSMISSION
Drain oil immediately after operation before it has had
an opportunity to cool.
To drain oil proceed as follows:
1.
Remove bottom pan attaching screws, pan, and gas-
ket.
2.
Remove oil strainer. Remove "O" ring seal from
pick-up pipe and discard.
3.
Discard strainer if dirty.
4.
Install new "O" ring seal on pick-up pipe and install
strainer and pipe assembly.
5.
Thoroughly clean bottom pan.
6.. Affix new gasket to bottom pan with petroleum jelly.
7.
Install bottom pan with attaching screws and torque
to specifications;
8. If only the pan has been removed, pour approximately
7-1/2 pints of fluid into the transmission. If the
valve body has also been removed use 9-1/2 pints.
After a complete overhaul approximately 19 pints
are required. Be sure container, spout, or funnel is
clean.
9. Start engine and let idle (carburetor off fast idle
step).
Place selector lever in P position and apply
hand brake.
10.
With transmission warm (approximately 150°F), add
fluid to bring level to full mark on indicator.
CAUTION: Do not overfill. Foaming will re-
sult.
CHEVROLET CHASSIS SERVICE MANUAL
Page 513 of 659
SECTION 12
ELECTRICAL-BODY AND CHASSIS
CONTENTS
OF
THIS
SECTION
Page
Page
System 12-1
Instruments and Gauges 12-21
Directional Signal 12r40
Windshield Wipers and Washers 12-44
Wiring Diagrams 12-56
Special Tools 12-60
LIGHTING SYSTEM
INDEX
Page
General Description
!2-i
Maintenance and Adjustments
•.................. 12-2
Headlamp Adjustment......................
12-3
Headlamp Panel Travel Adjustment.
12-5
Service Operations.
. . .. 12-5
Front Lighting
12-5
Headlamp
. 12_5
Parking Lamp
12-5
Fender Lamp
. 12_^
Headlamp Panel
12-8
Headlamp Panel Motor
^2-9
Rear Lighting
l2-10
Tail, Stop and Directional Lamps
12-10
Page
Backing Lamps
12-14
License Plate Lamp
12-14
Automatic Transmission Quadrant Lamp
12-14
Seat Separator Console Lamps
. 12-15
Lighting Switch
. . 12-15
Wiper Switch.
12-15
Stoplight Switch
12-15
Dimmer Switch
12-15
Backing Lamp Switches
12-15
Neutral Safety Switches
12-17
Parking Brake Alarm Switch
................. 12-19
Instrument Panel Compartment Lamp/Switch
12-19
Cirgarette Lighter
12-19
GENERAL DESCRIPTION
.
The lighting system includes: the main lighting switch,
stop light, dimmer, and backing lamp switches, head-
lamps, parking lamps, stop, tail and directional lamps,
instrument illumination and indicator lamps, and the
necessary wiring to complete the various circuits. A
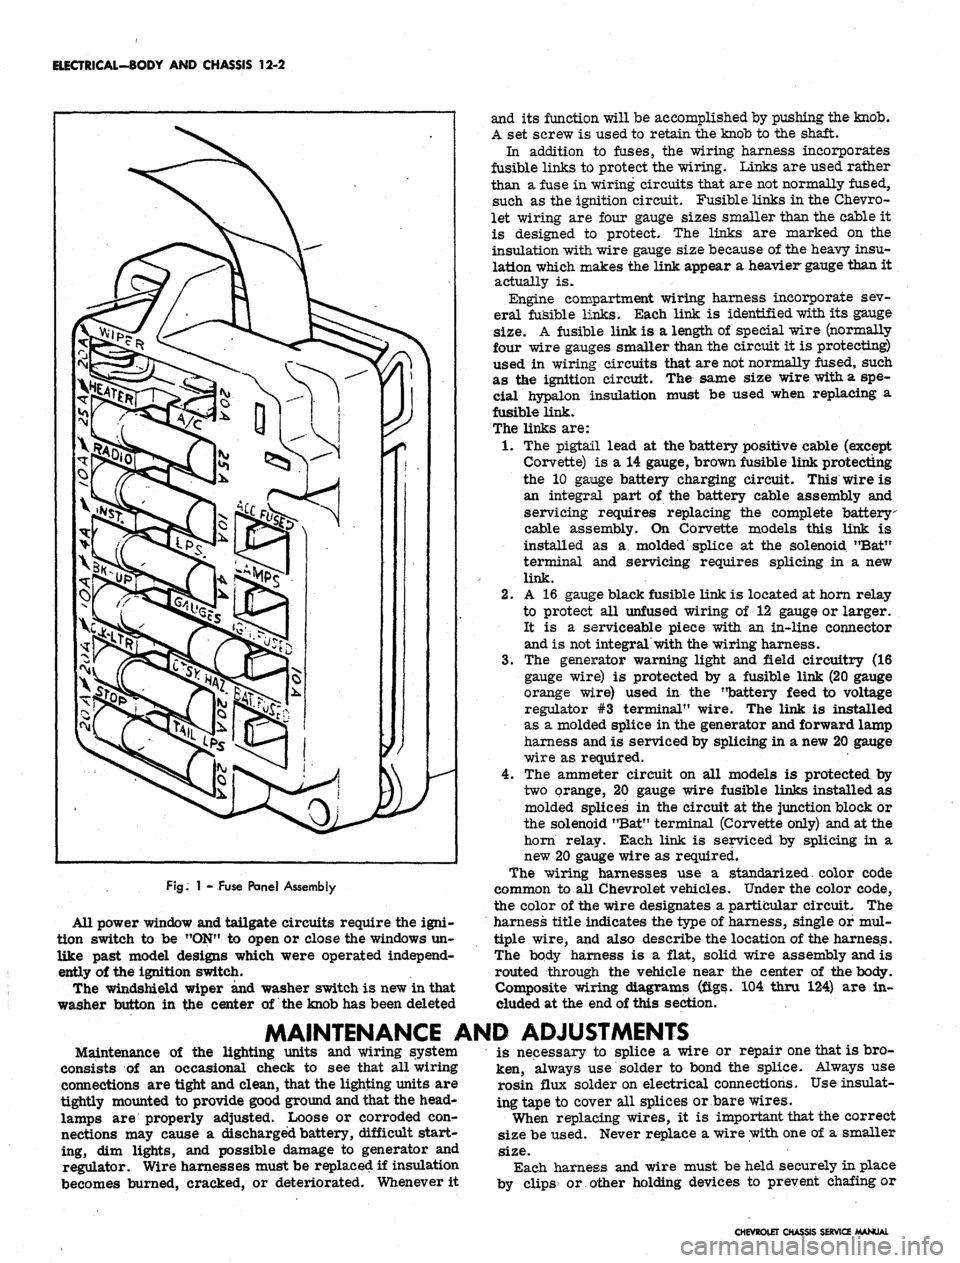
fuse panel provides convenient power take offs and fuse
clips for the appropriate circuits (fig. 1).
Chevrolet and Chevelle headlamp installation is all
new in that the headlamps are located in the radiator
support with adjusting screws and springs. Eliminating
the need for having separate headlamp housings. Chev-
rolet and Chevelle headlamp retainers and springs are
interchangeable.
Chevy n headlamp housings are new because of revised
front end styling and Corvette front end lighting is basi-
cally carryover.
Front fender lamps have been added as an option for
Chevrolet models and as standard equipment on Caprice
series.
Camaro models use single headlamps and the Rally
Sport model headlamps are covered by a retractable
section of the grille when lamps are not used. The sec-
tion of the grille covering the headlamps folds back when
lights are required; the headlamps are stationary. The
covering is retracted by a small electric motor mounted
to the headlamp housing. The headlamps are automat-
ically uncovered when the headlight switch is pulled "ON"
for illumination. If at any time the electrical circuit
becomes inoperative, the lamps can be uncovered manu-
ally. The ignition switch must be
"ON"
in order to close
the headlamp doors.
Parking lamp for Chevelle and Chevrolet models are
new due to revised front end sheet metal and bumper
styling. Parking lamps are located in the bumper on
Chevrolet, Chevelle and Chevy n models
Camaro parking lamps are located in the radiator
grille except for the Rally Sport models on which the
parking lamps are in the valance panel. For styling
reasons, the lens is white and an amber glass bulb is
used. All Camaro parking lamps require a separate
ground wire to assure a good ground contact because of
the plastic grille and painted contact surfaces.
The Chevrolet tail, stop, and directional lamps are in
one housing with a three section lens design on Impala
and Caprice sedans. The center lens for Impala series
is the back-up lamp. The center lens on the Caprice is
a tail lamp with the back-up lamps being located in the
rear bumper. Chevrolet station wagons have three indi-
vidual housings with three lenses, the center lamp being
the back-up. Biscayne and Bel-Air sedans have a single
housing and lens for tail, stop, and directional lamp with
a similarly constructed back-up lamp inboard and adja-
cent to it.
Chevelle tail, stop, and directional lamps are a single
lens design that follows through with the rear fender
styling. The back-up lamp is located in r.ear bumper.
Camaro models except Rally Sport have tail lamps
with integral back-up lamps mounted inboard of the rear
fenders between the trunk opening and bumper. The
Rally Sport model has dual tail lamps in the rear housing
and valance mounted back-up lamps.
Corvette, Chevy n, and Corvair tail and directional
signal lights are carryover. The Corvette has new back-
up lamps center mounted above the license plate opening.
CHEVROLET CHASSIS SERVICE
Page 514 of 659
ELECTRICAL-BODY AND CHASSIS 12-2
FJg.
1 - Fuse Panel Assembly
All power window and tailgate circuits require the igni-
tion switch to be "ON" to open or close the windows un-
like past model designs which were operated independ-
ently of the ignition switch.
The windshield wiper and washer switch is new in that
washer button in the center of the knob has been deleted
and its function will be accomplished by pushing the knob.
A set screw is used to retain the knob to the shaft.
In addition to fuses, the wiring harness incorporates
fusible links to protect the wiring. Links are used rather
than a fuse in wiring circuits that are not normally fused,
such as the ignition circuit. Fusible links in the Chevro-
let wiring are four gauge sizes smaller than the cable it
is designed to protect. The links are marked on the
insulation with wire gauge size because of the heavy insu-
lation which makes the link appear a heavier gauge than it
actually is.
Engine compartment wiring harness incorporate sev-
eral fusible links. Each link is identified with its gauge
size.
A fusible link is a length of special wire (normally
four wire gauges smaller than the circuit it is protecting)
used in wiring circuits that are not normally fused, such
as the ignition circuit. The same size wire with a spe-
cial hypalon insulation must be used when replacing a
fusible link.
The links are:
1.
The pigtail lead at the battery positive cable (except
Corvette) is a 14 gauge, brown fusible link protecting
the 10 gange battery charging circuit. This wire is
an integral part of the battery cable assembly and
servicing requires replacing the complete battery
cable assembly. On Corvette models this link is
installed as a molded splice at the solenoid "Bat"
terminal and servicing requires splicing in a new
link.
2.
A 16 gauge black fusible link is located at horn relay
to protect all unfused wiring of 12 gauge or larger.
It is a serviceable piece with an in-line connector
and is not integral with the wiring harness.
3.
The generator warning light and field circuitry (16
gauge wire) is protected by a fusible link (20 gauge
orange wire) used in the "battery feed to voltage
regulator #3 terminal" wire. The link is installed
as a molded splice in the generator and forward lamp
harness and is serviced by splicing in a new 20 gauge
wire as required.
4.
The ammeter circuit on all models is protected by
two orange, 20 gauge wire fusible links installed as
molded splices in the circuit at the junction block or
the solenoid "Bat" terminal (Corvette only) and at the
horn relay. Each link is serviced by splicing in a
new 20 gauge wire as required.
The wiring harnesses use a standarized. color code
common to all Chevrolet vehicles. Under the color code,
the color of the wire designates a particular circuit. The
harness title indicates the type of harness, single of mul-
tiple wire, and also describe the location of the harness.
The body harness is a flat, solid wire assembly and is
routed through the vehicle near the center of the body.
Composite wiring diagrams (figs. 104 thru 124) are in-
cluded at the end of this section.
MAINTENANCE AND ADJUSTMENTS
Maintenance of the lighting units and wiring system
consists of an occasional check to see that all wiring
connections are tight and clean, that the lighting units are
tightly mounted to provide good ground and that the head-
lamps are properly adjusted. Loose or corroded con-
nections may cause a discharged battery, difficult start-
ing, dim lights, and possible damage to generator and
regulator. Wire harnesses must be replaced if insulation
becomes burned, cracked, or deteriorated. Whenever it
is necessary to splice a wire or repair one that is bro-
ken, always use solder to bond the splice. Always use
rosin flux solder on electrical connections. Use insulat-
ing tape to cover all splices or bare wires.
When replacing wires, it is important that the correct
size be used. Never replace a wire with one of a smaller
size.
Each harness and wire must be held securely in place
by clips or other holding devices to prevent chafing or
CHEVROLET CHASSIS SERVICE MANUAL
Page 515 of 659
ELECTRICAL-BODY AND CHASSIS 12-3
Fig.
2 - T-3 Safety Aimer
wearing away the insulation due to vibration.
By referring to the wiring diagrams, circuits may be
tested for continuous circuit or shorts with a conventional
test lamp or low reading volt meter.
HEADLAMP ADJUSTMENT-
T-3 HEADLAMPS
CAUTION: Check and tighten radiator support
grille retaining bolts prior to attempting head-
lamp aiming. Distorted grille or supports in
this area will hinder proper aiming of head-
lamps. On Corvette models make sure head-
lamp panel is adjusted properly - refer to
"Headlamp Panel Travel Adjustment".
When aiming headlamps, vehicle should be filled to ca-
pacity with gas, oil, and water but no load. Tires should
be uniformly inflated to recommended pressure.
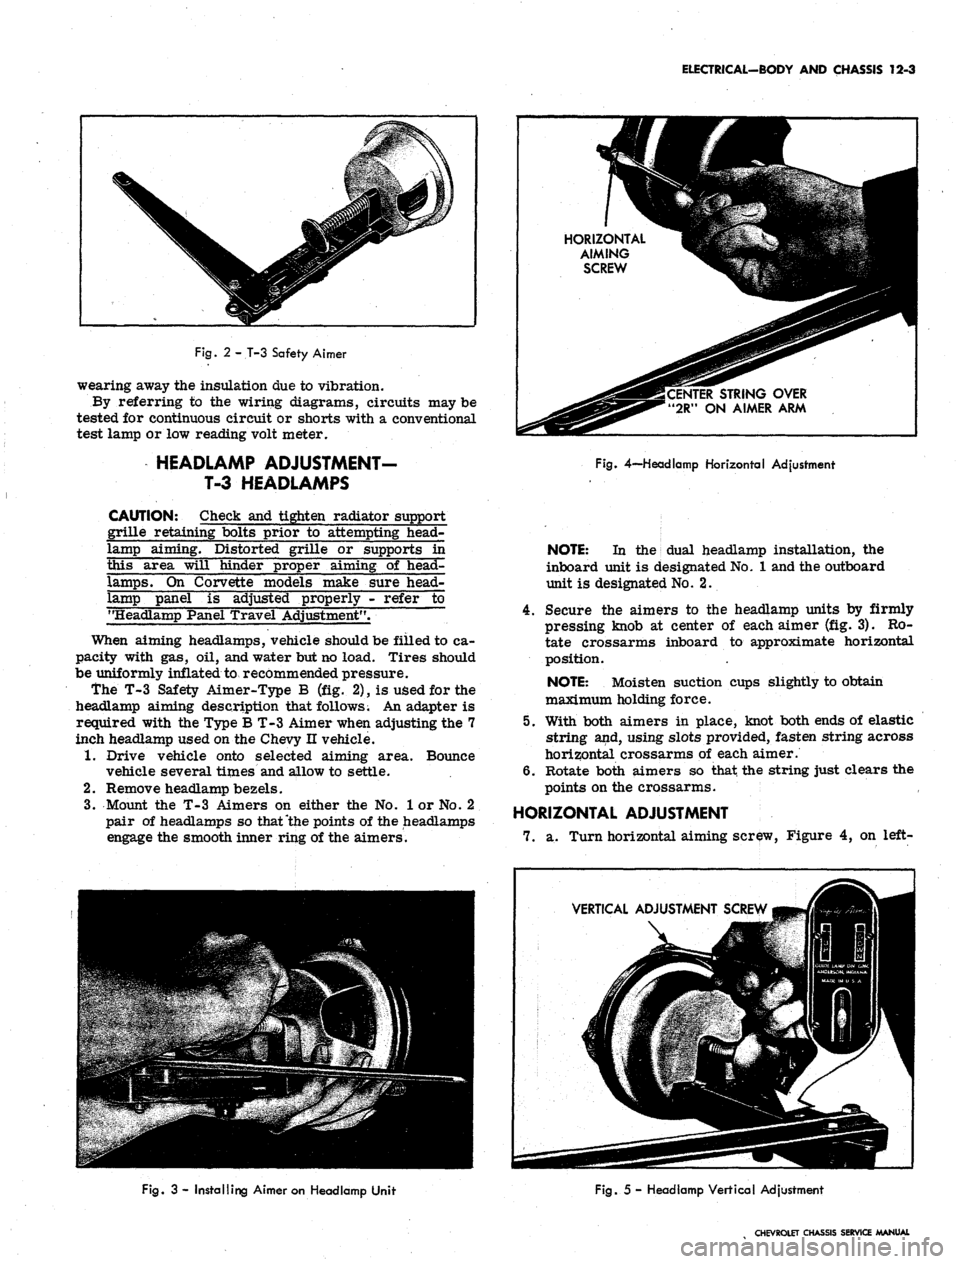
the T-3 Safety Aimer-Type B (fig. 2), is used for the
headlamp aiming description that follows. An adapter is
required with the Type B T-3 Aimer when adjusting the 7
inch headlamp used on the Chevy n vehicle.
1.
Drive vehicle onto selected aiming area. Bounce
vehicle several times and allow to settle.
2.
Remove headlamp bezels.
3.
Mount the T-3 Aimers on either the No. 1 or No. 2
pair of headlamps so that "the points of the headlamps
engage the smooth inner ring of the aimers.
HORIZONTAL
AIMING
SCREW
STRING OVER
"2R" ON AIMER ARM
Fig.
4—-Headlamp Horizontal Adjustment
NOTE:
In the dual headlamp installation, the
inboard unit is designated No. 1 and the outboard
unit is designated No. 2.
4.
Secure the aimers to the headlamp units by firmly
pressing knob at center of each aimer (fig. 3). Ro-
tate crossarms inboard to approximate horizontal
position.
NOTE:
Moisten suction cups slightly to obtain
maximum holding force.
5. With both aimers in place, knot both ends of elastic
string and, using slots provided, fasten string across
horizontal crossarms of each aimer.
6. Rotate both aimers so that the string just clears the
points on the crossarms.
HORIZONTAL ADJUSTMENT
7. a. Turn horizontal aiming screw, Figure 4, on left-
VERTICAL ADJUSTMENT SCREW
Fig.
3 - Installing Aimer on Headlamp Unit
Fig.
5 - Headlamp Vertical Adjustment
CHEVROLET CHASSIS SERVICE MANUAL
Page 617 of 659

ACCESSORIES
15-8
BROWN
BRAKE
SWITCH
+12V *
BLACK
CONNECTOR
AT FUSE BLOCK
CRUISE POSITION
BUTTON RELEASED
ENGAGE POSITION
BUTTON PARTIALLY DEPRESSED^ N. ENOAOi SWITCH
TRIM POSITION N. N. I
BUHON FULLY DEPRESSED. \ ^
BROWN
BLUE
ENGAGE SWITCH
CONFIGURATION
BLACK
BLUE
REGULATOR
- SOLENOID COIL
(5 a RESISTANCE)
9 BLACK
BLUE
REGULATOR
Fig.
10 - Wiring Diagram
Replacement
1.
Insert the switch into the turn signal knob, push the
retaining ring firmly against the switch, and push the
operating button onto the switch plunger. " .
SERVO
Service
—
H the Servo unit is found to be defective, re-
placement is required. Note the condition of the hoses
and replace any which are cracked or deteriorated.
CHEVROLET CHASSIS SERVICE MANUAL
Page 620 of 659
ACCESSORIES 15-11
12 VOLTS D.C.
ELECTRIC BRAKE
RELEASE
IGNITION
SWITCH
ENGINE
VACUUM
TRANSDUCER
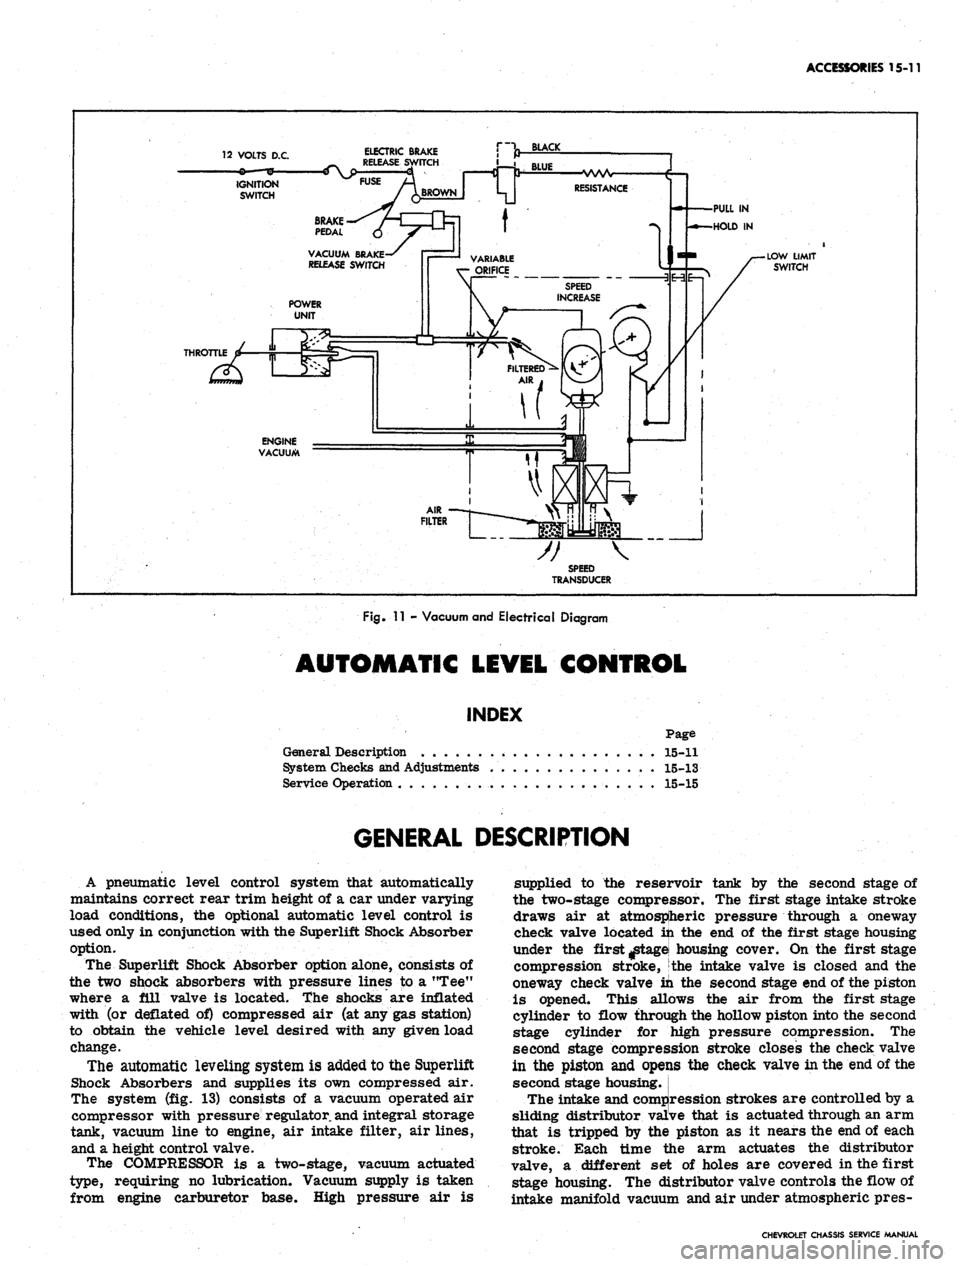
Fig.
11 - Vacuum and Electrical Diagram
AUTOMATIC LEVEL CONTROL
INDEX
Page
General Description . . 15-11
System Checks and Adjustments 15-13
Service Operation . 15-15
GENERAL DESCRIPTION
A pneumatic level control system that automatically
maintains correct rear trim height of a car under varying
load conditions, the optional automatic level control is
used only in conjunction with the Superlift Shock Absorber
option.
The Superlift Shock Absorber option alone, consists of
the two shock absorbers with pressure lines to a "Tee"
where a ill valve is located, the shocks are inflated
with (or deflated of) compressed air (at any gas station)
to obtain the vehicle level desired with any given load
change.
The automatic leveling system is added to the Superlift
Shock Absorbers and supplies its own compressed air.
The system (fig. 13) consists of a vacuum operated air
compressor with pressure regulator,
and
integral storage
tank, vacuum line to engine, air intake filter, air lines,
and a height control valve.
The COMPRESSOR is a two-stage, vacuum actuated
type, requiring no lubrication. Vacuum supply is taken
from engine carburetor base. High pressure air is
supplied to the reservoir tank by the second stage of
the two-stage compressor. The first stage intake stroke
draws air at atmospheric pressure through a oneway
check valve located in the end of the first stage housing
under the first ^tagei housing cover. On the first stage
compression stroke, the intake valve is closed and the
oneway check valve in the second stage end of the piston
is opened. This allows the air from the first stage
cylinder to flow through the hollow piston into the second
stage cylinder for jhigh pressure compression. The
second stage compression stroke closes the check valve
in the piston and opeijis the check valve in the end of the
second stage housing.
The intake and compression strokes are controlled by a
sliding distributor valive that is actuated through an arm
that is tripped by the piston as it nears the end of each
stroke. Each time the arm actuates the distributor
valve, a different set of holes are covered in the first
stage housing. The distributor valve controls the flow of
intake manifold vacuum and air under atmospheric pres-
CHEVROLET CHASSIS SERVICE MANUAL