automatic transmission CHEVROLET CAMARO 1967 1.G Chassis Owner's Guide
[x] Cancel search | Manufacturer: CHEVROLET, Model Year: 1967, Model line: CAMARO, Model: CHEVROLET CAMARO 1967 1.GPages: 659, PDF Size: 114.24 MB
Page 526 of 659

ELECTRICAL-BODY AND CHASSIS 12-14
BACKING LAMPS
lamp Housing Replacement (Fig. 19)
Bumper Installation
1.
Remove two screws retaining housing assembly in
the bumper and remove housing.
'2.
Disconnect lamp wire assembly connector from wir-
ing harness.
3.
Remove lens retaining screws, lens and bulb from
housing assembly and transfer to new housing unit.
4.
Connect lamp wiring assembly to harness assembly,
housing and check operation of lamp.
•5.
Position lamp assembly in place and install retaining
screws.
Corvette (Fig. 18)
1.
Remove license plate and bracket assembly.
2.
Remove tailpipe extensions and rear body valance
panel.
3.
Remove backing lamp attaching nuts.
4.
Disengage backing lamp assembly from body opening
and disconnect wiring harness at rear of lamp.
5. Transfer bulb, gasket and lens to replacement
housing.
6. Connect chassis wiring connector to housing and po-
sition lamp assembly to body opening.
7. Attach ground wire to housing and install retaining
nuts to housing.
8. Install body valance panel.
9. Position license plate assembly to body and install
retaining screws.
LICENSE PLATE LAMP SERVICE
Lamp Housing
1.
Remove the lamp assembly retaining screws and re-
move lamp assembly from mounting location (rear
bumper center face bar most models). On Corvette
models remove rear valance panel.
2.
Disconnect lamp wiring from chassis harness con-
nector (inside trunk on some models).
3.
Force grommet and Wiring down through body open-
ing (where applicable) and remove assembly from
vehicle.
4.
To install replacement unit, insert grommet and wir-
ing through body opening where applicable and con-
nect wiring to chassis harness.
5. Position assembly and install retaining screws. On
Corvette models make sure ground wire is properly
installed.
6. Check operation of lamp assembly.
iuib Replacement
1.
Remove lens retaining screws and lens.
NOTE:
On Camaro models loosen housing re-
taining screws.
2.
Remove and replace bulb.
3.
Position lens and install retaining screws.
AUTOMATIC TRANSMISSION
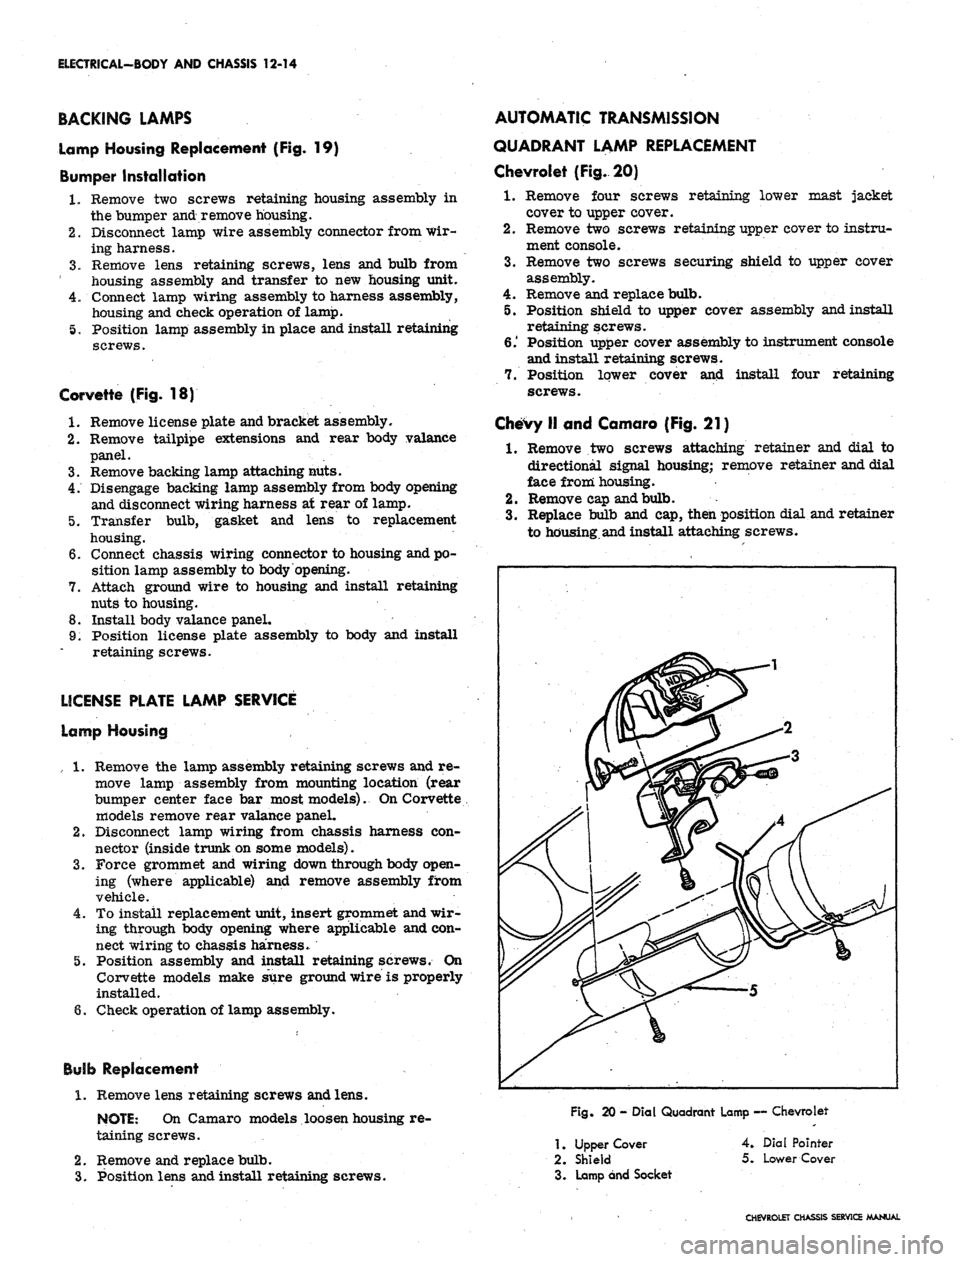
QUADRANT LAMP REPLACEMENT
Chevrolet (Fig. 20)
1.
Remove four screws retaining lower mast jacket
cover to upper cover.
2.
Remove two screws retaining upper cover to instru-
ment console.
3.
Remove two screws securing shield to upper cover
assembly.
4.
Remove and replace bulb.
5. Position shield to upper cover assembly and install
retaining screws.
6.' Position upper cover assembly to instrument console
and install retaining screws.
7. Position lower cover and install four retaining
screws.
Chevy II and Camaro (Fig. 21)
1.
Remove two screws attaching retainer and dial to
directional signal housing; remove retainer and dial
face from housing.
2.
Remove cap and bulb.
3.
Replace bulb and cap, then position dial and retainer
to housing.and install attaching screws.
Fig.
20 - Dial Quadrant Lamp — Chevrolet
1.
Upper Cover
2.
Shield
3. Lamp and Socket
4.
Dial Pointer
5.
Lower Cover
CHEVROLET CHASSIS SERVICE MANUAL
Page 553 of 659

ELECTRICAL-BODY AND CHASSIS 12-41
HAZARD WARNING
SWITCHES
Fig.
55- Directional Signal Switches
erating six to eight lamps simultaneously depending ve-
hicle series and model.
DIRECTIONAL SIGNAL SWITCH REPLACEMENT
All steering columns except tilt and telescoping.
Chevrolet, Chevelle, Chevy II and Camaro (Fig. 56)
1.
Disconnect battery ground cable.
2.
Disconnect signal switch wiring from chassis har-
ness at multiple connector under instrument panel.
3.
Remove steering wheel assembly as outlined in Sec-
tion 9, Steering.
4.
Remove shift lever roll pin and shift lever from
column (if applicable).
5. Push in hazard warning switch knob and unscrew
knob.
Remove switch lever arm.
6. On Chevy U and Camaro models equipped with auto-
matic transmission remove column mounted dial in-
dicator housing and lamp assembly (if applicable).
7. Remove mast jacket lower trim cover retaining
screws and remove trim cover(s).
8. On Chevrolet and Chevelle models equipped with
automatic transmission loosen set screw and remove
quadrant dial pointer (if applicable).
9. Remove retaining
"C"
ring from upper steering shaft
using snap ring remover Tool J-22569 (Refer to
Steering, Section 9). Slide thrust and wave washers
from steering shaft.
10.
Loosen three signal switch mounting screws until
assembly can be rotated counterclockwise.
NOTE:
Do not remove three screws from as-
sembly until unit is on the bench.
11.
Rotate switch assembly counterclockwise and pull
unit from top of mast jacket. Allow unit to hang
from end of column.
Fig.
56 - Standard Steering Column
CHEVROLET CHASSIS SERVICE
Page 555 of 659

ELECTRICAL-BODY AND CHASSIS 12-43
23.
Install
MCtT
ring over steering shaft using snap ring
installer J-22659 (refer to Section 9).
NOTE: Be sure retaining ring is completely
seated into groove.
24.
Install dial pointer on Chevrolet and Chevelle models
equipped with automatic transmission (if applicable).
25.
Install dial indicator and lamp assembly on Camaro
and Chevy n models equipped with automatic
transmission.
26.
Install mast jacket lower trim covers (if applicable).
27.
Install hazard warning knob and turn signal lever.
28.
Install shift lever.
29.
Install steering wheel.
30.
Install multiple connector to switch wiring using old
harness for wire color guide and connect to body
harness connector.
31.
Connect battery ground cable and check operation of
assembly.
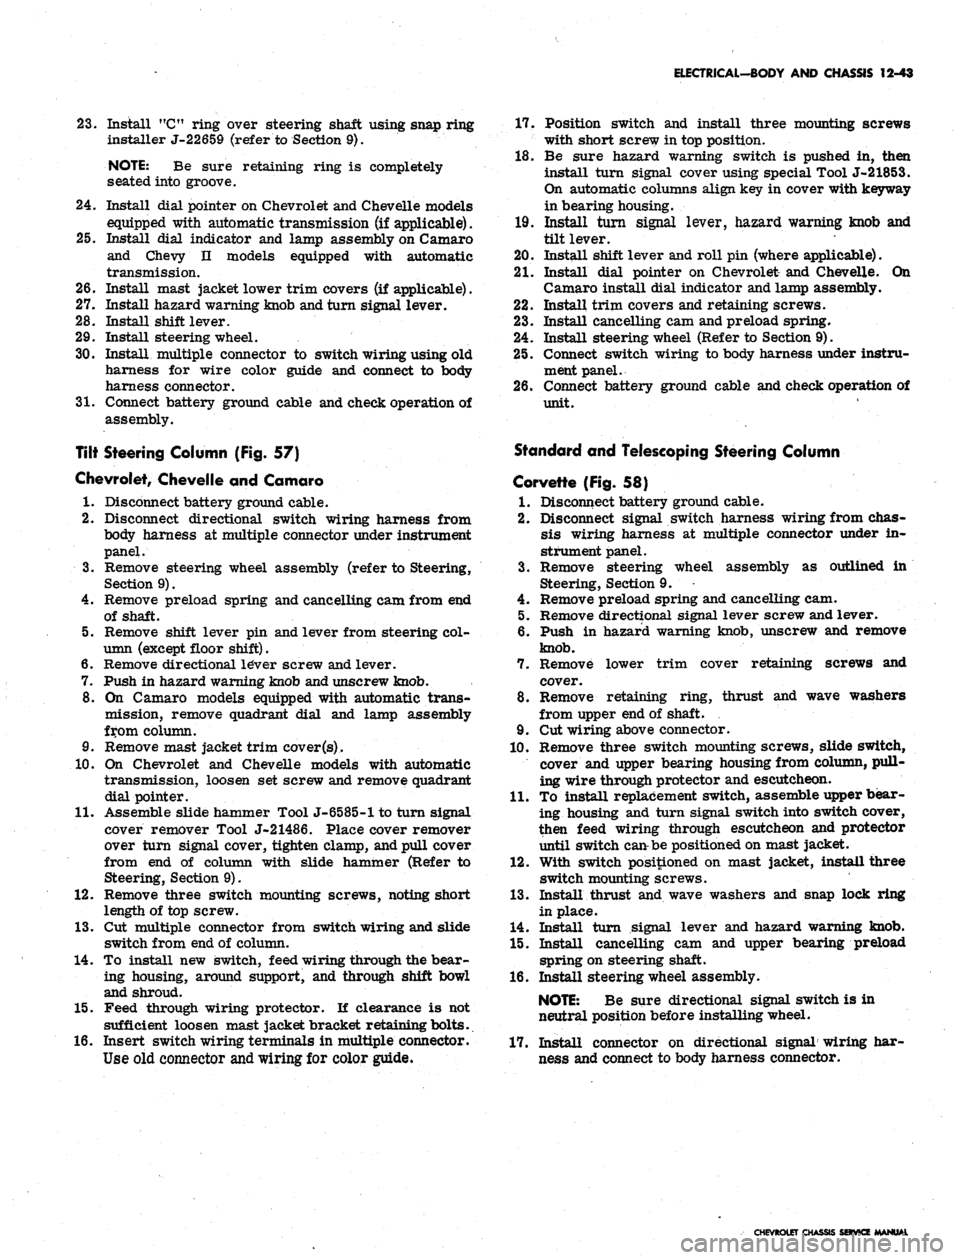
Tilt Steering Column (Fig. 57)
Chevrolet, Chevelle and Camaro
1.
Disconnect battery ground cable.
2.
Disconnect directional switch wiring harness from
body harness at multiple connector under instrument
panel.
3.
Remove steering wheel assembly (refer to Steering,
Section 9).
4.
Remove preload spring and cancelling cam from end
of shaft.
5.
Remove shift lever pin and lever from steering col-
umn (except floor shift).
6. Remove directional le*ver screw and lever.
7.
Push in hazard warning knob and unscrew knob.
8. On Camaro models equipped with automatic trans-
mission, remove quadrant dial and lamp assembly
from column.
9. Remove mast jacket trim cover
(s).
10.
On Chevrolet and Chevelle models with automatic
transmission, loosen set screw and remove quadrant
dial pointer.
11.
Assemble slide hammer Tool J-6585-1 to turn signal
cover remover Tool J-21486. Place cover remover
over turn signal cover, tighten clamp, and pull cover
from end of column with slide hammer (Refer to
Steering, Section 9).
12.
Remove three switch mounting screws, noting short
length of top screw.
13.
Cut multiple connector from switch wiring and slide
switch from end of column.
14.
To install new switch, feed wiring through the bear-
ing housing, around support, and through shift bowl
and shroud.
15.
Feed through wiring protector. If clearance is not
sufficient loosen mast jacket bracket retaining bolts.
16.
Insert switch wiring terminals in multiple connector.
Use old connector
and
wiring for color guide.
17.
Position switch and install three mounting screws
with short screw in top position.
18.
Be sure hazard warning switch is pushed in, then
install turn signal cover using special Tool J-21853.
On automatic columns align key in cover with keyway
in bearing housing.
19.
Install turn signal lever, hazard warning knob and
tilt lever.
20.
Install shift lever and roll pin (where applicable).
21.
Install dial pointer on Chevrolet and Chevelle. On
Camaro install dial indicator and lamp assembly.
22.
Install trim covers and retaining screws.
23.
Install cancelling cam and preload spring.
24.
Install steering wheel (Refer to Section 9).
25.
Connect switch wiring to body harness under instru-
ment panel.
26.
Connect battery ground cable and check operation of
unit.
Standard and Telescoping Steering Column
Corvette (Fig. 58)
1.
Disconnect battery ground cable.
2.
Disconnect signal switch harness wiring from chas-
sis wiring harness at multiple connector under in-
strument panel.
3.
Remove steering wheel assembly as outlined in
Steering, Section 9.
4.
Remove preload spring and cancelling cam.
5.
Remove directional signal lever screw and lever.
6. Push in hazard warning knob, unscrew and remove
knob.
7.
Remove lower trim cover retaining screws and
cover.
8. Remove retaining ring, thrust and wave washers
from upper end of shaft.
9. Cut wiring above connector.
10.
Remove three switch mounting screws, slide switch,
cover and upper bearing housing from column, pull-
ing wire through protector and escutcheon.
11.
To install replacement switch, assemble upper bear-
ing housing and turn signal switch into switch cover,
then feed wiring through escutcheon and protector
until switch can be positioned on mast jacket.
12.
With switch positioned on mast jacket, install three
switch mounting screws.
13.
Install thrust and wave washers and snap lock ring
in place.
14.
Install turn signal lever and hazard warning knob.
15.
Install cancelling cam and upper bearing preload
spring on steering shaft.
16.
Install steering wheel assembly.
NOTE:
Be sure directional signal switch is in
neutral position before installing wheel.
17.
Install connector on directional signal wiring har-
ness and connect to body harness connector.
CHEVROLET CHASSIS SERVICE
Page 615 of 659

ACCESSORIES
15-6
port thereby supplying vacuum to the Servo unit.
During system operation
the
following events occur:
1.
Car
speed below
20
mph—no function
of the
unit
because
the
rubber drum
has
not rotated
far
enough
to close
the
solenoid points.
No
energizing current
can flow through the solenoid coil.
2.
Car
speed above
20
mph—The tang
on the
rubber
drum
has
closed
the
solenoid points
and
current
is
flowing through
the 40 ohm
resistance wire
to the
solenoid coil. This current
is
not sufficient to "pull
in", the solenoid.
3.
Driver partially presses Engagement Switch—full
voltage flows through
the
solenoid
to
pull
it
into
operation. Solenoid
cam
tension
on the "U"
clip
is
released and the clip grips the rubber drum. Simul-
taneously the vacuum switch operates; applying man-
ifold vacuum
to the
Servo unit which tightens
the
throttle chain. When
the
driver releases pressure
from
the
accelerator pedal
the
unit will position the
throttle
to
maintain the speed
at
the time
of
solenoid
operation.
Driver releases
the
Engagement Switch—current
flows
to the
solenoid through
the 40
ohm wire and
since the solenoid is "pulled in", the reduced current
flow
is
sufficient to hold
it
in position.
The
car
begins
to
ascend
a
hill—car speed drops
slightly (very slightly) and the magnetic force on the
driven disk
of the
speed sensor
is
decreased.
The
disk rotates slightly
(as
would
a
speedometer shaft
because
of
hairspring tension) turning
the
rubber
drum. Since
the "U"
clip
is
gripping
the
drum,
it
moves
the
slide which COVERS
the air
bleed ports
more. With less air bleeding into the Servo, greater
vacuum exists
in it
and the diaphragm moves toward
the vacuum port opening
the
throttle wider.
The
tapered needle moves into the orifice further and the
diaphragm balances
in a
new position with the wider
throttle opening.
Car
speed
has
been maintained
automatically.
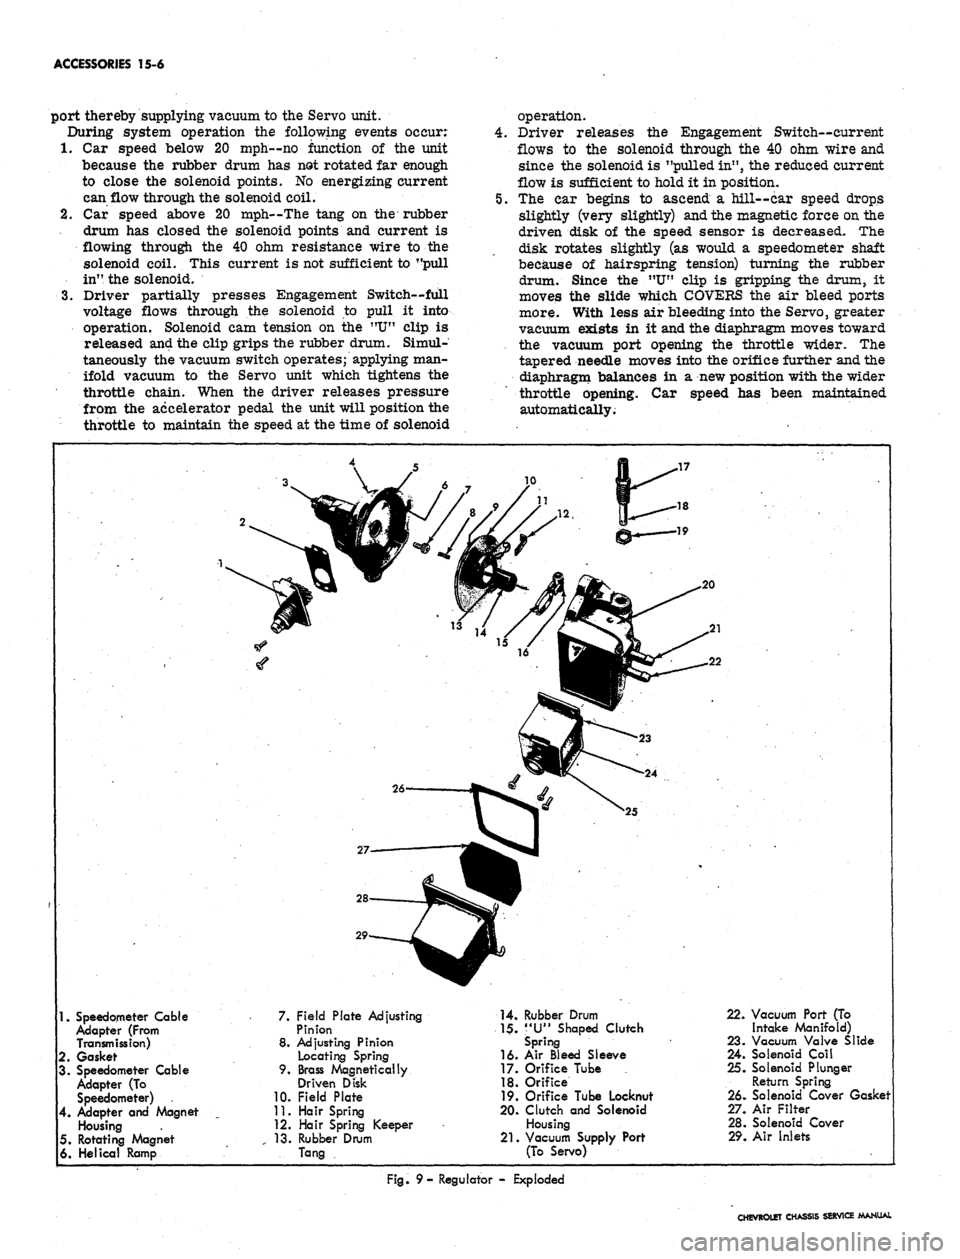
1.
Speedometer Cable
Adapter (From
Transmission)
2.
Gasket
3. Speedometer Cable
Adapter
(To
Speedometer)
4.
Adapter
and
Magnet
Housing
5. Rotating Magnet
6. Helical Ramp
7. Field Plate Adjusting
Pinion
8. Adjusting Pinion
Locating Spring
9. Brass Magnetically
Driven Disk
10.
Field Plate
11.
Hair Spring
12.
Hair Spring Keeper
13.
Rubber Drum
Tang
14.
Rubber Drum
1$.
"U"
Shaped Clutch
Spring
16.
Air
Bleed Sleeve
17.
Orifice Tube
18.
Orifice
19.
Orifice Tube Locknut
20.
Clutch
and
Solenoid
Housing
21.
Vacuum Supply Port
(To Servo)
22.
Vacuum Port (To
Intake Manifold)
23.
Vacuum Valve Slide
24.
Solenoid Coil
25.
Solenoid Plunger
Return Spring
26.
Solenoid Cover Gasket
27.
Air Filter
28.
Solenoid Cover
29.
Air Inlets
Fig.
9-
Regulator
-
Exploded
CHEVROLET CHASSIS SERVICE MANUAL
Page 639 of 659

SPECIFICATIONS
12
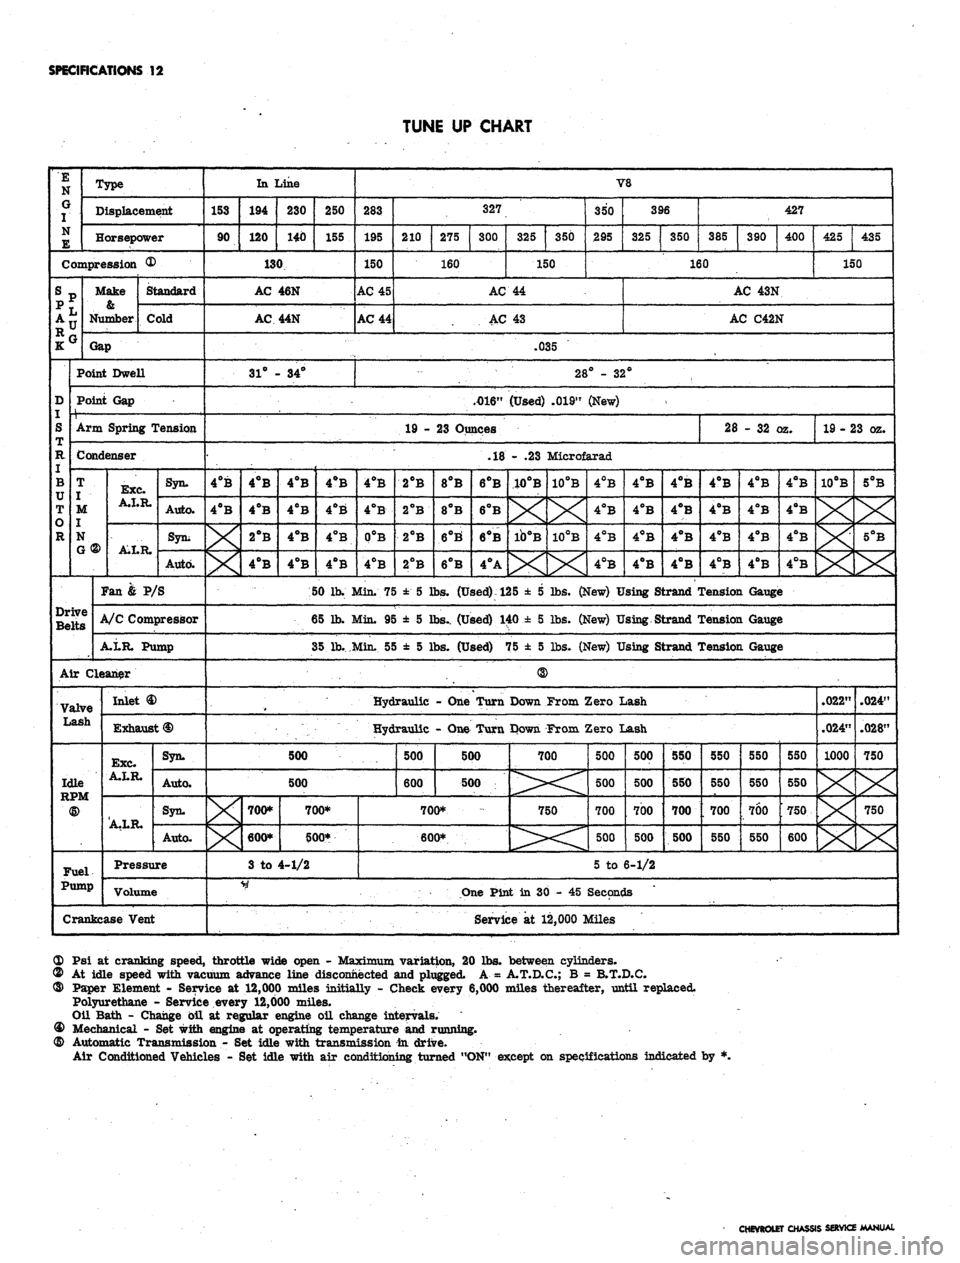
TUNE UP CHART
E
N
G
I
N
E
Type
Displacement
Horsepower
Compression ®
srp
;•
D
S
R
I
B
TT
T
o
R
Make
0.
Number
Standard
Cold
Gap
Point Dwell
Point Gap
1 ,
Arm Spring Tension
Condenser
T
I
M
j
N
G ®
Drive
Belts
Exc.
A.I.R.
AXR.
Syn.
Auto.
Syn;
Auto.
Fan & P/S
A/C Compressor
A.LR. Pump
Air Cleaner
Valve
Lash
Idle
<§>
Fuel.
Pump
Inlet
Exhaust
<§)
Exc.
A.LR.
A.LR.
Syn.
Auto.
Syn.
Auto.
Pressure
Volume
Crankcase Vent
In Line
153
90
194
120
230
140
250
155
130
AC
AC
31° -
46N
44N
• 34°
V8
283
195
150
AC 45
AC 44
327
210
275
300
160
325
350
150
350
295
396
325
350
427
385
390
400
160
AC 44
AC 43
425
435
150
AC 43N
AC C42N
.035
28° - 32°
.4)16"
(Used) .019" (New)
<
19 - 23 Ounces
4°B
4°B
4°B
4°B
2°B
4°B
4°B
4°B
4°B
4°B
28
- 32 (
yz.
19 - 23 oz.
.18 - .23 Microfarad
4°B
4°B
4°B
4ftB
4°B
4°B
0°B
4°B
50 lb. Min. 75
65 Jh. Min. 95
35 lb..Min. 5£
500
2°B
2°B
2°B
2°B
8PB
8°B
6°B'
6°B
6°B
6°B
6°B
4°A
10°B
X
ib°B
X
10PB
X
10°B
X
4°B
4°B
4°B
4°B
4°B
4°B
4°B
4°B
4°B
4°B
4°B
4°B
± 5 lbs.
(Used):
125 ± 5 lbs. (New) Using Strand '
± 5 lbs.. (Used) 140 ± 5 lbs. (New) Using Strand '
>
± 5 lbs. (Used) 75 ± 5 lbs. (New) Using Strand r
Hydraulic - One Turn Down From Zero Lash
Hydraulic - One Turn Down From Zero Lash
500
X
700*
600*
3 to
700*
500*
4-1/2
500
600
500
500
700*
600*
700
750
500
500
700
500
500
500
700
500
550
550
700
500
4°B
4°B
4°B
4°B
4°B
4°B
4°B
4°B
4°B
4°B
4°B
4°B
Tension Gauge
Tension Gauge
Tension Gauge
550
550
700
550
550
550
700
550
550
550
750
600
10°B
5°B
X
X
.022"
.024"
1000
X
X
X
.024"
.028"
750
X
750
X
5 to 6-1/2
One Pint in 30 - 45 Seconds
Service at 12,000 Miles
OD Psi at cranking speed, throttle wide open - Maximum variation, 20 lbs. between cylinders.
© At idle speed with vacuum advance line disconnected and plugged. A = A.T.D.C.; B = B.T.D.C.
® Paper Element - Service at 12,000 miles initially - Check every 6,000 miles thereafter, until replaced.
Polyurethane - Service every 12,000 miles.
Oil Bath - Change oil at regular engine oil change intervals.
® Mechanical - Set with engine at operating temperature and running.
@ Automatic Transmission - Set idle with transmission in drive.
Air Conditioned Vehicles - Set idle with air conditioning turned "ON" except on specifications indicated by *.
CHEVROLET CHASSIS SERVICE MANUAL