cooling CHEVROLET CAMARO 1967 1.G Chassis Service Manual
[x] Cancel search | Manufacturer: CHEVROLET, Model Year: 1967, Model line: CAMARO, Model: CHEVROLET CAMARO 1967 1.GPages: 659, PDF Size: 114.24 MB
Page 546 of 659

ELECTRICAL-BODY AND CHASSIS 12-34
5. To replace, reverse the removal procedure.
SPEEDOMETER REPLACEMENT
1.
Remove instrument cluster as previously described
in this section.
2.
Remove clock set shaft knob.
3.
Remove eight screws securing cluster housing to
bezel trim panel. Separate parts carefully observing
stack up of parts.
4.
Remove two screws securing speedometer head to
rear of cluster housing.
NOTE:
Servicing of the speedometer head
should be performed by an authorized AC Speed-
ometer Service Station.
5. To install, reverse the removal procedure..
SPEEDOMETER CABLE
Replacement or Lubricatibn
1.
Disconnect the speedometer cable from the speed-
ometer head. Remove the old cable by pulling it out
from speedometer end of conduit.
NOTE:
If old cable is broken it may be neces-
sary to remove lower piece from transmission
end of conduit.
2.
Lubricate the lower 3/4 of cable with speedometer
cable lubricant and push the cable into the conduit.
Connect the upper end to the speedometer head and
road test vehicle for proper speedometer operation.
INDICATOR LIGHT REPLACEMENT
To replace any indicator or cluster bulb, unsnap the
proper socket from rear of instrument cluster, remove
and replace bulb, and reinsert unit into rear of cluster
housing.
OIL PRESSURE INDICATOR
If the light does not come on when the ignition switch
is turned on, or if the light comes on and remains on
after the engine is started, one or more of the following
conditions is indicated:
• Low oil pressure
• High engine temperature
• Defective wiring or switch
Switch Replacement
1.
Disconnect wiring harness connector from sender
unit terminal (located in block above starter on
L-6 engines and at left front of distributor on V-8
engines).
2.
Remove sender unit, replace with new unit, and
; check operation.
GENERATOR INDICATOR
1.
Ignition on, engine not running and telltale light off.
a. Indicator bulb burned out, replace bulb.
b.
Open circuit or loose connection in the telltale
light circuit.
2.
Telltale light stays on after engine is started.
a. If indicator light does not go out at engine idle
speed, refer to Charging Systems under Engine
Electrical, Section 6Y.
TEMPERATURE (COOLING SYSTEM) INDICATOR
The temperature indicator circuit consists of two re-
motely located units, indicator gauge and engine sender
unit. The indicator gauge on all models uses a single
red light to indicate an overheated engine condition.
Engine Sender Unit Replacement
1.
Drain engine cooling system to a level below unit.
2.
Remove sender unit (located in the inlet manifold
near water pump housing on V-8 engines and in the
cylinder head near an exhaust port on L-6 engines)
and replace with new unit.
3.
Refill cooling system and check operation of unit.
CORVETTE INSTRUMENTS AND GAUGES
INDEX
Page
General Description ., 12-34
Service Operations . 12-35
Instrument Cluster ., 12-35
Fuel Gauge 12-35
Speedometer/Tachometer Service. 12-35
Temperature Gauge 12-35
Ammeter/Oil Pressure Gauges 12-35
GENERAL DESCRIPTION
All Corvette instruments and gauges are conveniently
located in the dash-mounted cluster. The entire cluster
is removable to permit servicing of the various instru-
ments and gauges. The indicator and cluster illuminating
bulbs may be replaced without removing the cluster from
the panel.
Regular maintenance is not required on the instrument
cluster or its components other than maintaining clean
and keeping the speedometer and tachometer cables
properly lubricated.
CHEVROLET CHASSIS SERVICE MANUAL
Page 550 of 659

ELECTRICAL-BODY AND CHASSIS 12-38
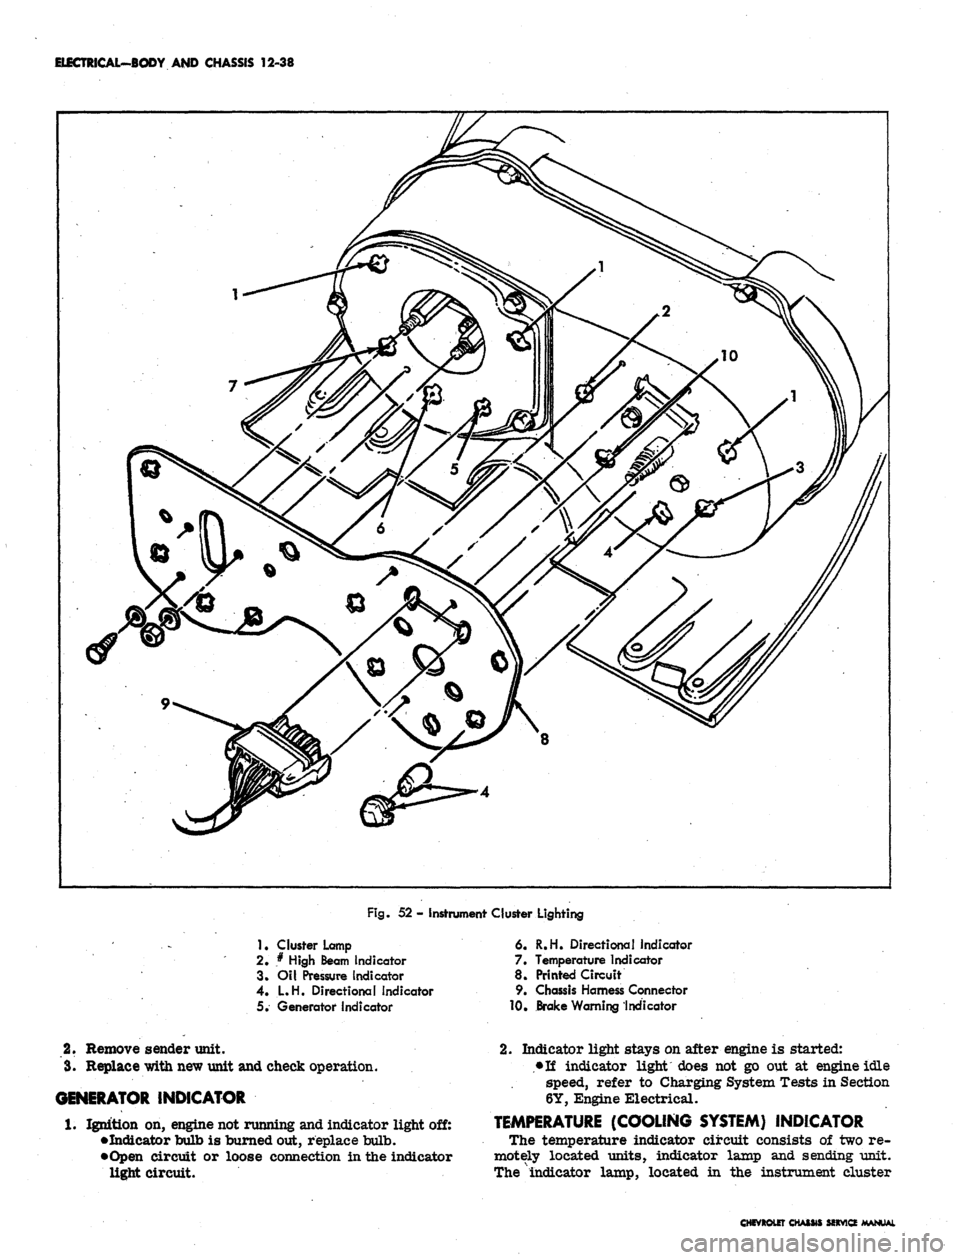
Fig.
52 - Instrument Cluster Lighting
1
• Cluster Lamp
2.
* High Beam Indicator
3. Oil Pressure Indicator
4.
L.H. Directional Indicator
5. Generator indicator
6. R.H. Directional indicator
7. Temperature Indicator
8. Printed Circuit
9. Chassis Harness Connector
10,
Brake Warning Indicator
2.
Remove sender unit.
3.
Replace with new unit and check operation.
GENERATOR INDICATOR
1.
Ignition on, engine not running and indicator light off:
•Indicator bulb is burned out, replace bulb.
•Open circuit or loose connection in the indicator
light circuit.
2.
Indicator light stays on after engine is started:
•Ti indicator light does not go out at engine idle
speed, refer to Charging System Tests in Section
6Y, Engine Electrical.
TEMPERATURE (COOLING SYSTEM) INDICATOR
The temperature indicator circuit consists of two re-
motely located units, indicator lamp and sending unit.
The "indicator lamp, located in the instrument cluster
CHfVROtEr CHASM SfXVICf
Page 552 of 659

ELECTRICAL-BODY AND CHASSIS 12-40
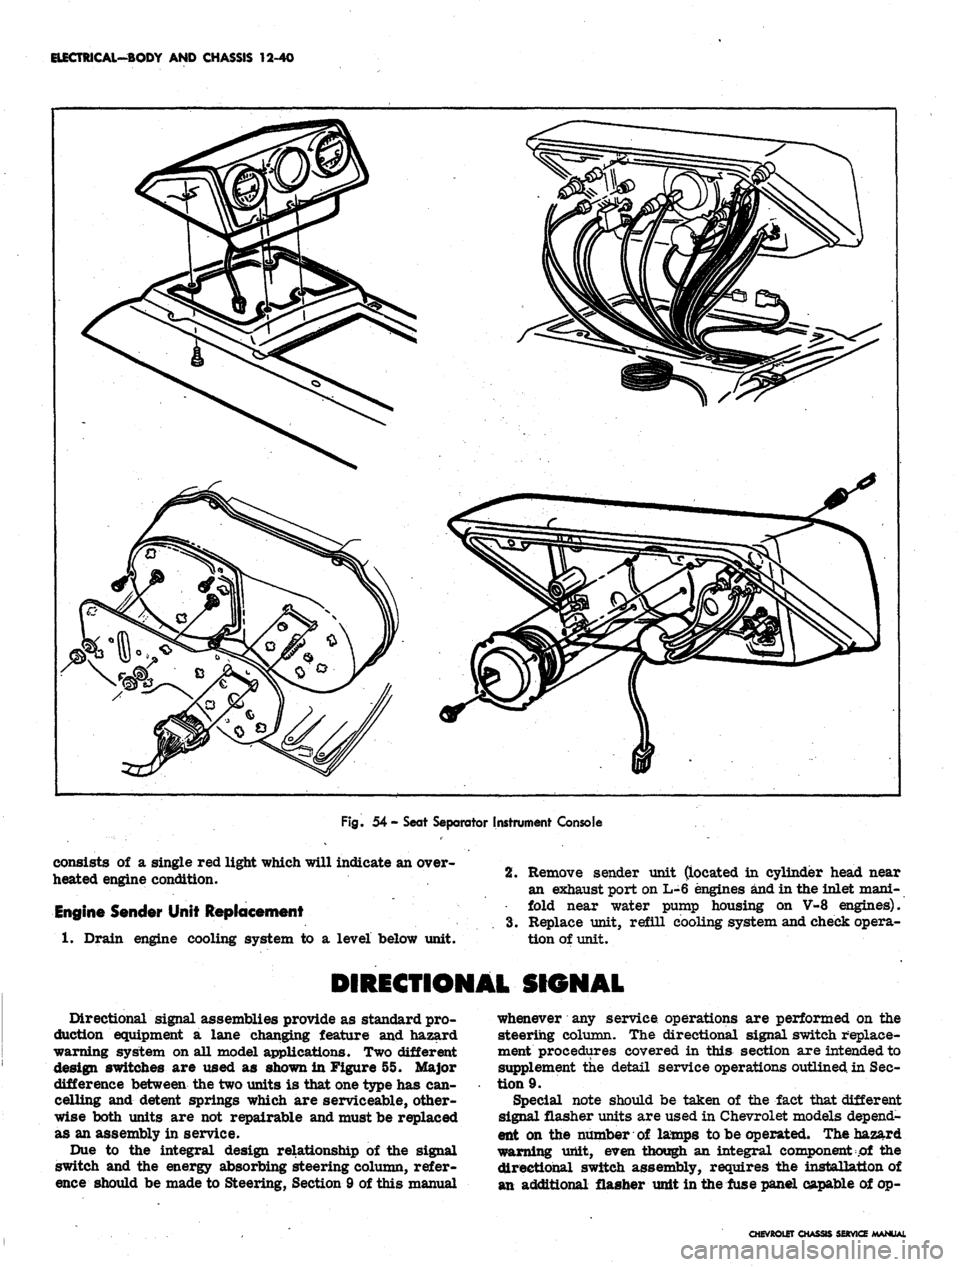
Fig.
54 - Seat Separator Instrument Console
consists of a single red light which will indicate an over-
heated engine condition.
Engine Sender Unit Replacement
1.
Drain engine cooling system to a level below unit.
2.
Remove sender unit (located in cylinder head near
an exhaust port on L-6 engines and in the inlet mani-
fold near water pump housing on V-8 engines).
3.
Replace unit, refill cooling system and check opera-
tion of unit.
DIRECTIONAL SIGNAL
Directional signal assemblies provide as standard pro-
duction equipment a lane changing feature and hazard
warning system on all model applications. Two different
design switches are used as shown in Figure 55. Major
difference between the two units is that one type has can-
celling and detent springs which are serviceable, other-
wise both units are not repairable and must be replaced
as an assembly in service.
Due to the integral design relationship of the signal
switch and the energy absorbing steering column, refer-
ence should be made to Steering, Section 9 of this manual
whenever any service operations are performed on the
steering column. The directional signal switch replace-
ment procedures covered in this section are intended to
supplement the detail service operations outlined in Sec-
tion 9.
Special note should be taken of the fact that different
signal flasher units are used in Chevrolet models depend-
ent on the number of lamps to be operated. The hazard
warning unit, even though an integral component of the
directional switch assembly, requires the installation of
an additional flasher unit in the fuse panel capable of op-
CHEVROtET CHASSIS SERVICE MANUAL
Page 594 of 659

SECTION 13
RADIATOR AND GRILLE
INDEX
Page Page
General Description 13-1 Repairs 13-4
Radiator and Shroud-All Vehicles (Except Corvette) . . . . 13-1 Installation 13-4
Removal 13-1 Grille Assembly - Chevy II 13-4
Installation 13-1 Removal . 13-4
Radiator and Fan Shroud - Corvette . . . . 13-1 Repairs 13-5
Fan Shroud Replacement 13-1 Installation . 13-5
Aluminum Radiator 13-1 Grille Assembly - Corvette 13-5
Copper Radiator . 13-1 Removal . . . . 13-5
Grille Assembly - Chevrolet 13-2 Installation ....*... 13-5
Removal 13-2 Grille Assembly - Caxnaro 13-5
Repairs 13-3 Removal 13-5
Installation 13-3 Repairs . 13-6
Grille Assembly - Chevelle 13-3 Installation . . 13-6
Removal 13-.Q
GENERAL DESCRIPTION
Radiator assemblies are attached by cap screws either the radiator and shroud are basically the same for each
to the radiator support or radiator shroud, depending on vehicle,
the engine installation of each vehicle. The Camaro fan
Shroud is mounted in two bottom slots and secured by one NOTE: Refer to the Fisher Body Service Man-
bolt at the top. Removal and installation procedures for ual for Body, Section IX for Sheet Metal, Section
14 for Bumpers, and Section 1A for Air Condi-
tioning information when required.
SERVICE OPERATIONS
RADIATOR
AND
SHROUD—ALL VEHICLES
NOTE: Reach upper two shroud bolts from top,
(EXCEPT CORVETTE)
between hood and radiator support. Reach lower
4 by reaching around front edge of open hood.
Removal
1.
Drain radiator. 4.- Remove shroud carefully (tilt rearward, then lift up
2.
Disconnect inlet and outlet radiator hoses, and Pow- to clear fan blades).
erglide cooler lines if vehicle is so equipped. 5. Reverse procedure to install, fill cooling system and
3.
Remove radiator and shroud attaching screws and lift check for leaks.
radiator and shroud out of vehicle.
Aluminum Radiator
Installation
NOTE:
Refer to Figures 1 through 5 for radi- Removal and Installation
ator fan and shroud assembled positions for each 1. Remove shroud as previously outlined.
vehicle. Reverse removal procedures, fill cool- 2. Disconnect lower raciiator hose at either end.
ing system and check for leaks. 3. Remove radiator upper mount bracket bolts and
bracket, then lift radiator from vehicle.
RADIATOR AND FAN SHROUD-CORVETTE 4. Reverse procedure to install.
Fan Shroud Replacement (Fig. 4) Copper Radiator
1.
Drain radiator and open hood. (Install a bolt in hole
of hood support bracket for safety purposes.) Removal and Installation
2.
Disconnect upper radiator hose and supply tank hose 1. Remove hood panel assembly after scribing bracket
at radiator connection. location.
3.
Remove shroud bolts. 2. Drain radiator and disconnect radiator hoses.
CHEVROLET CHASSIS SERVICE MANUAL