weight CHEVROLET CAMARO 1967 1.G Chassis Service Manual
[x] Cancel search | Manufacturer: CHEVROLET, Model Year: 1967, Model line: CAMARO, Model: CHEVROLET CAMARO 1967 1.GPages: 659, PDF Size: 114.24 MB
Page 405 of 659
CLUTCH AND TRANSMISSIONS 7-46
17 18 19 20 21 22
Fig.
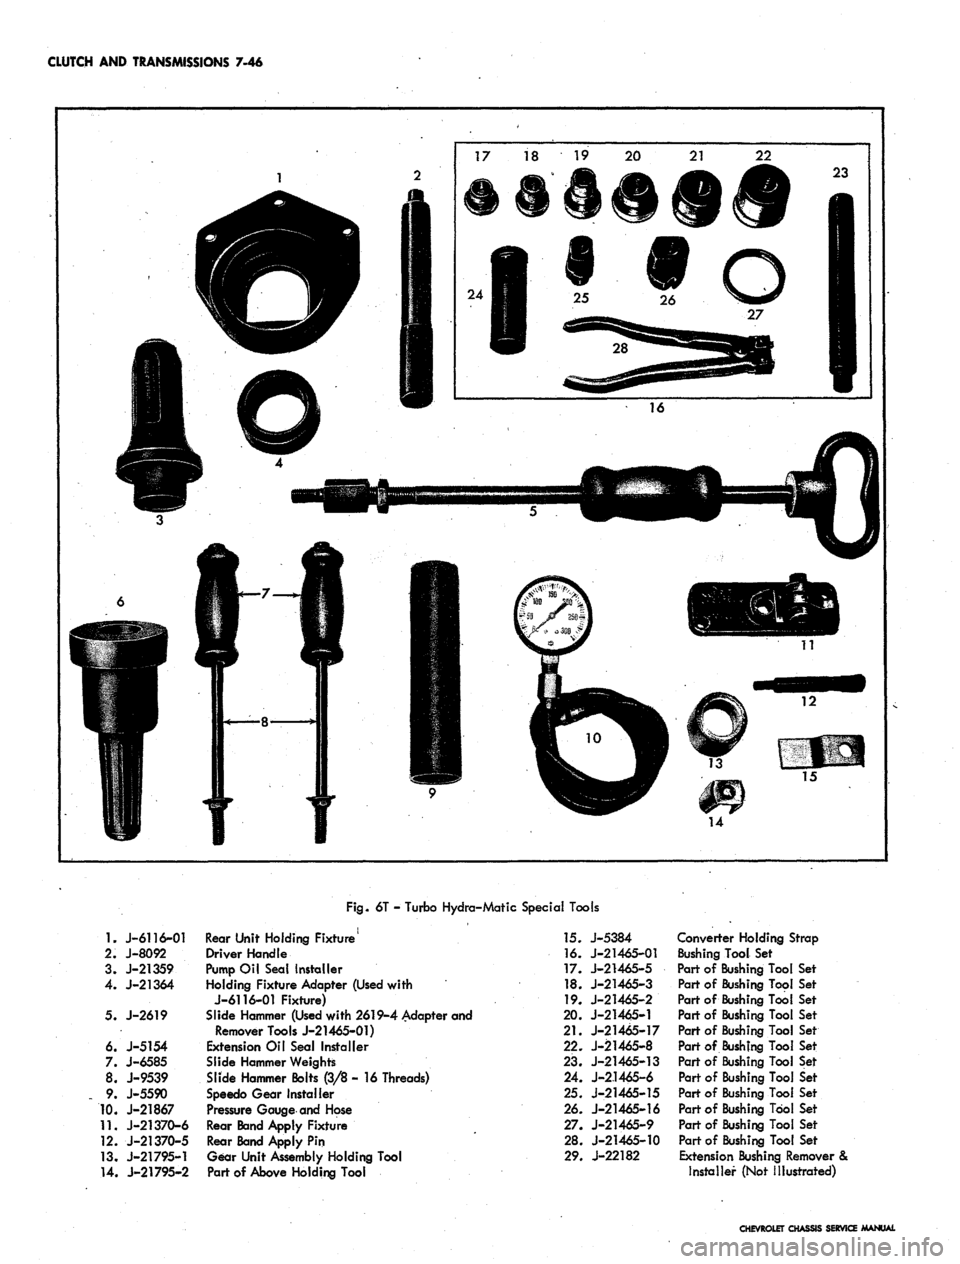
6T - Turbo Hydra-Matic Special Tools
1.
J-6116-01
2.
J-8092
3. J-21359
4.
J-21364
5. J-2619
6. J-5154
7. J-6585
8. J-9539
9.
J-5590
10.
J-21867
11.
J-21370-6
12.
J-21370-5
13.
J-21795-1
14.
J-21795-2
Rear Unit Holding Fixture
Driver Handle
Pump Oil Seal Installer
Holding Fixture Adapter (Used with
J-6116-01 Fixture)
Slide Hammer (Used with 2619-4 Adapter and
Remover Tools J-21465-01)
Extension Oil Seal Installer
Slide Hammer Weights
Slide Hammer Bolts (3/8 - 16 Threads)
Speedo Gear Installer
Pressure Gauge and Hose
Rear Band Apply Fixture
Rear Band Apply Pin
Gear Unit Assembly Holding Tool
Part of Above Holding Tool
]5. J-5384
16.
J-21465-01
17.
J-21465-5
18.
J-21465-3
19.
J-21465-2
20.
J-21465-1
21.
J-21465-17
22.
J-21465-8
23.
J-21465-13
24.
J-2.1465-6
25.
J-21465-15
26.
J-21465-16
27.
J-21465-9
28.
J-21465-10
29.
J-22182
Converter Holding Strap
Bushing Tool Set
Part of Bushing Tool Set
Part of Bushing Tool Set
Part of Bushing Tool Set
Part of Bushing Tool Set
Part of Bushing Tool Set
Part of Bushing Tool Set
Part of Bushing Tool Set
Part of Bushing Tool Set
Part of Bushing Tool Set
Part of Bushing Tool Set
Part of Bushing Tool Set
Part of Bushing Tool Set
Extension Bushing Remover &
Installer (Not Illustrated)
CHEVROLET CHASSIS SERVICE MANUAL
Page 483 of 659
WHEELS AND TIRES 10-3
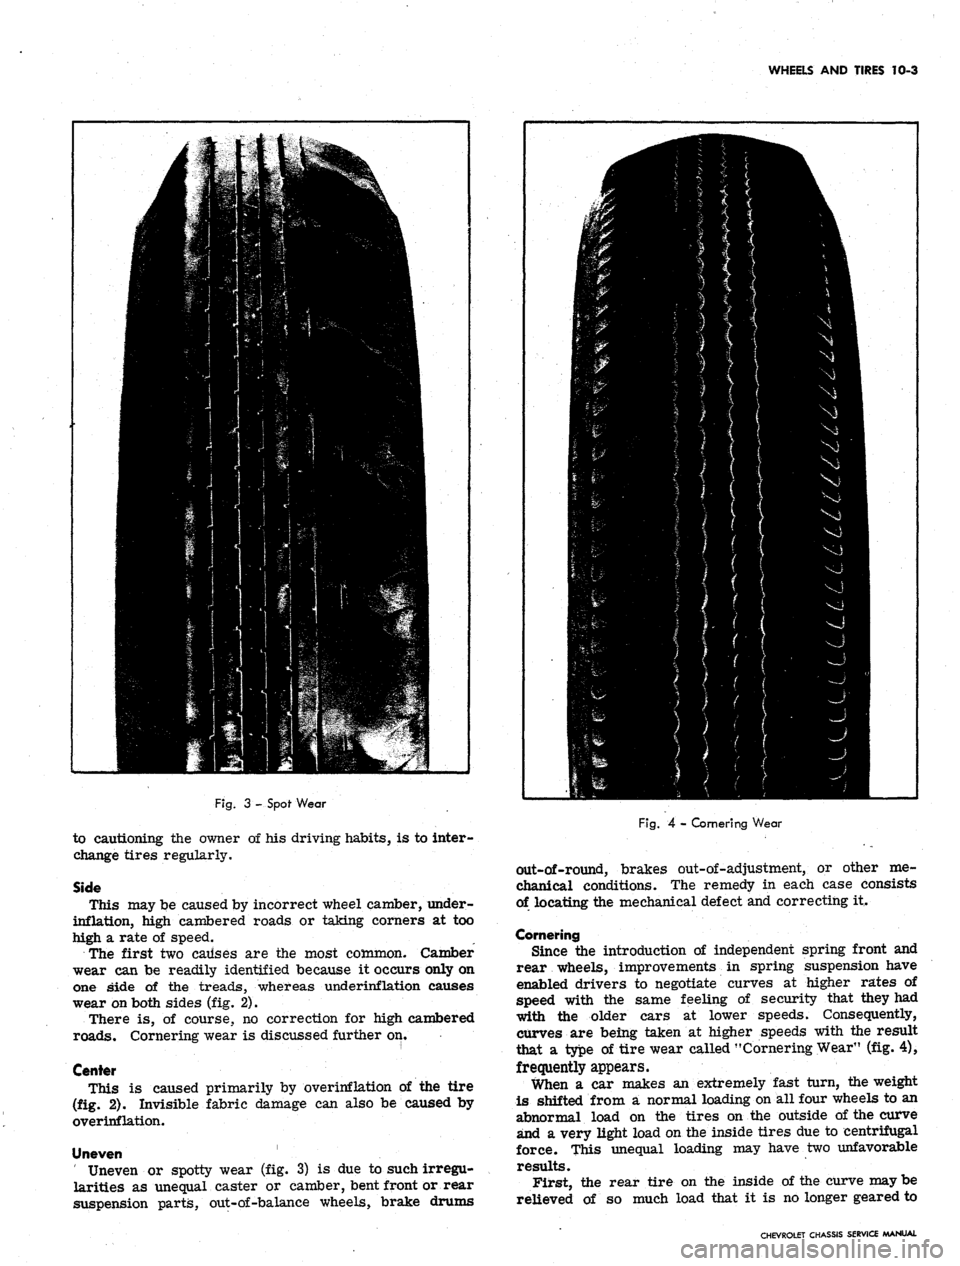
Fig.
3 - Spof Wear
to cautioning the owner of his driving habits, is to inter-
change tires regularly.
Side
This may be caused by incorrect wheel camber, under-
inflation, high cambered roads or taking corners at too
high a rate of speed.
The first two causes are the most common. Camber
wear can be readily identified because it occurs only on
one side of the treads, whereas underinflation causes
wear on both sides (fig. 2).
There is, of course, no correction for high cambered
roads.
Cornering wear is discussed further on.
Center
This is caused primarily by overinflation pf the tire
(fig. 2). Invisible fabric damage can also be caused by
overinflation.
Uneven
Uneven or spotty wear (fig. 3) is due to such irregu-
larities as unequal caster or camber, bent front or rear
suspension parts, out-of-balance wheels, brake drums
Fig.
4 - Cornering Wear
out-of-round, brakes out-of-adjustment, or other me-
chanical conditions. The remedy in each case consists
of locating the mechanical defect and correcting it.
Cornering
Since the introduction of independent spring front and
rear wheels, improvements in spring suspension have
enabled drivers to negotiate curves at higher rates of
speed with the same feeling of security that they had
with the older cars at lower speeds. Consequently,
curves are being taken at higher speeds with the result
that a type of tire wear called "Cornering Wear" (fig. 4),
frequently appears.
When a car makes an extremely fast turn, the weight
is shifted from a normal loading on all four wheels to an
abnormal load on the tires on the outside of the curve
and a very light load on the inside tires due to centrifugal
force. This unequal loading may have two unfavorable
results.
First, the rear tire on the inside of the curve may be
relieved of so much load that it is no longer geared to
CHEVROLET CHASSIS SERVICE MANUAL
Page 484 of 659
WHEELS AND TIRES 10-4
the road and it slips, grinding off the tread on the inside
half of the tire at an excessive rate. This type of tire
shows much the same appearance of tread wear as tire
wear caused by negative camber.
Second, the transfer of weight may also over-load the
outside tires so much that they are laterally distorted
resulting in excessive wear on the outside half of the
tire producing a type of wear like that caused by ex-
cessive positive camber.
Cornering wear can be most easily distinguished from
abnormal camber wear by the rounding of the outside
shoulder or edge of the tire and by the roughening of the
tread surface which denotes abrasion.
Cornering wear often produces a fin or raised portion
along the inside edge of each row in the tread pattern.
In some cases this fin is almost as pronounced as a
toe-in fin, and in others, it tapers into a row of tread
blocks to such an extent that the tire has a definite step
wear appearance.
The only remedy for cornering wear is proper in-
struction of owners.
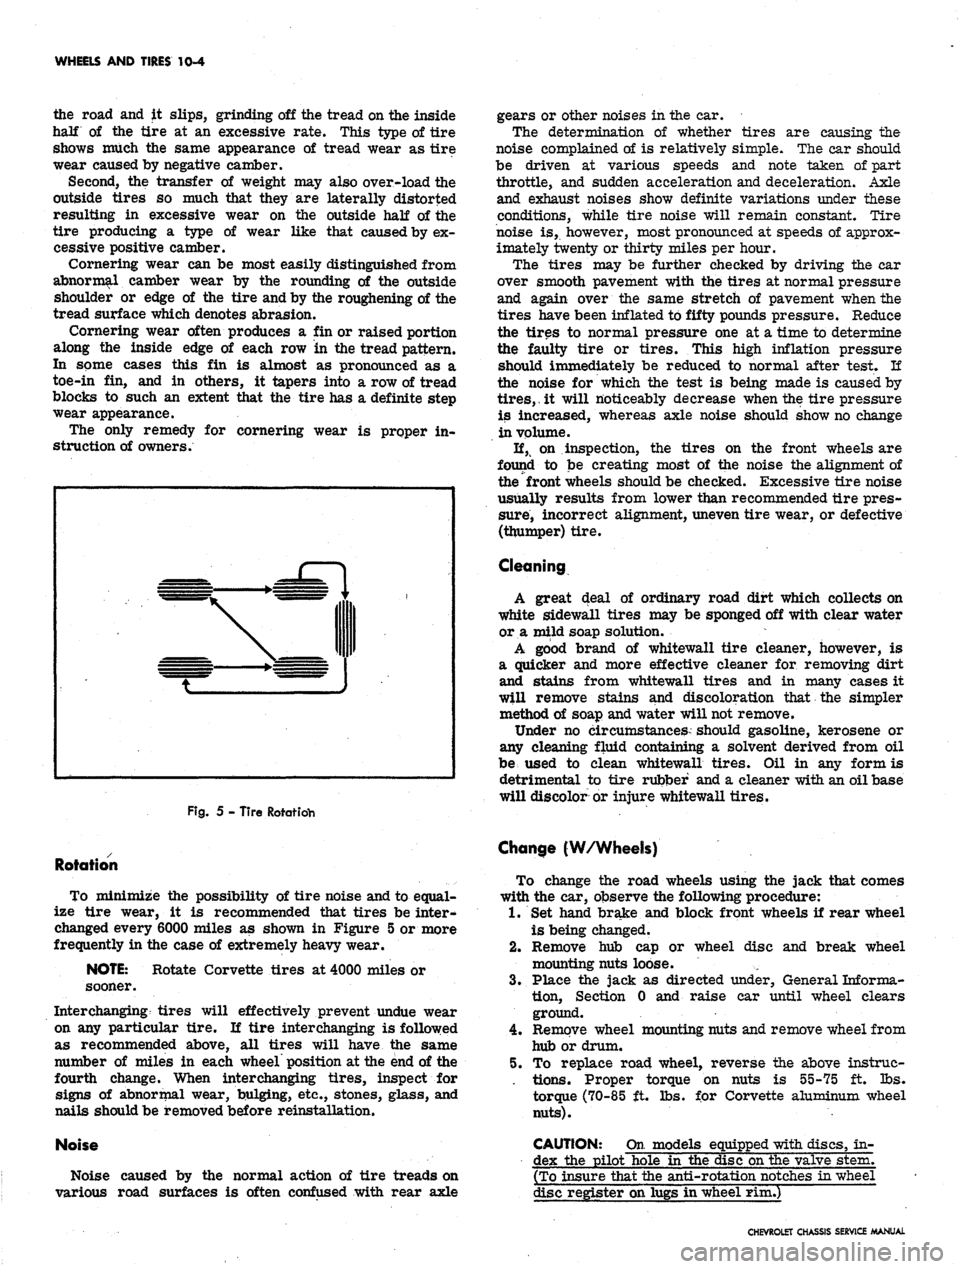
Fig.
5 - Tire Rotatidh
Rotation
To minimize the possibility of tire noise and to equal-
ize tire wear, it is recommended that tires be inter-
changed every 6000 miles as shown in Figure 5 or more
frequently in the case of extremely heavy wear.
NOTE:
Rotate Corvette tires at 4000 miles or
sooner.
Interchanging tires will effectively prevent undue wear
on any particular tire. II tire interchanging is followed
as recommended above, all tires will have the same
number of miles in each wheel position at the end of the
fourth change. When interchanging tires, inspect for
signs of abnormal wear, bulging, etc., stones, glass, and
nails should be removed before reinstallation.
Noise
Noise caused by the normal action of tire treads on
various road surfaces is often confused with rear axle
gears or other noises in the car.
The determination of whether tires are causing the
noise complained of is relatively simple. The car should
be driven at various speeds and note taken of part
throttle, and sudden acceleration and deceleration. Axle
and exhaust noises show definite variations under these
conditions, while tire noise will remain constant. Tire
noise is, however, most pronounced at speeds of approx-
imately twenty or thirty miles per hour.
The tires may be further checked by driving the ear
over smooth pavement with the tires at normal pressure
and again over the same stretch of pavement when the
tires have been inflated to fifty pounds pressure. Reduce
the tires to normal pressure one at a time to determine
the faulty tire or tires. This high inflation pressure
should immediately be reduced to normal after test. If
the noise for which the test is being made is caused by
tires,.
it will noticeably decrease when the tire pressure
is increased, whereas axle noise should show no change
in volume.
If, on inspection, the tires on the front wheels are
found to be creating most of the noise the alignment of
the front wheels should be checked. Excessive tire noise
usually results from lower than recommended tire pres-
sure, incorrect alignment, uneven tire wear, or defective
(thumper) tire.
Cleaning
A great deal of ordinary road dirt which collects on
white sidewall tires may be sponged off with clear water
or a mild soap solution.
A good brand of whitewall tire cleaner, however, is
a quicker and more effective cleaner for removing dirt
and stains from whitewall tires and in many cases it
will remove stains and discoloration that the simpler
method of soap and water will not remove.
Under no circumstances should gasoline, kerosene or
any cleaning fluid containing a solvent derived from oil
be used to clean whitewall tires. Oil in any form is
detrimental to tire rubber and a cleaner with an oil base
will discolor or injure whitewall tires.
Change (W/Wheels)
To change the road wheels using the jack that comes
with the car, observe the following procedure:
1.
Set hand brake and block front wheels if rear wheel
is being changed.
2.
Remove hub cap or wheel disc and break wheel
mounting nuts loose.
3.
Place the jack as directed tinder, General Informa-
tion,
Section 0 and raise car until wheel clears
ground.
4.
Remove wheel mounting nuts and remove wheel from
hub or drum.
5. To replace road wheel, reverse the above instrue-
. tions. Proper torque on nuts is 55-75 ft. lbs.
torque (70-85 ft. lbs. for Corvette aluminum wheel
nuts).
CAUTION: On models equipped with discs, in-
dex the pilot hole in the disc on the valve stem.
(To insure that the anti-rotation notches in wheel
disc register on lugs in wheel rim.)
CHEVROLET CHASSIS SERVICE MANUAL
Page 485 of 659
WHEELS AND TIRES 10-5
WHEELS
The wheel and tire assembly should be removed from
vehicles equipped with disc brakes to properly perform
balancing operations. This is necessary due to drag of
the spring loaded brake shoes on the disc.
Static Balancing (W/Tire)
Static Balance (still balance) is the equal distribution
of weight of the wheel and tire assembly about the axis
of rotation so that the assembly has no tendency to rotate
by
itself.
Static unbalance causes the pounding action of
the front wheels that is called "tramp".
To correct static unbalance (front and rear): The
quickest and best methods to correct static unbalance
are through the use of wheel balancers which are com-
mercially available. Refer to the Information and in-
structions included with these balaricers.
Dynamic Balancing (W/Tire)
Dynamic Balance (running balance) requires the wheel
to be not only in static balance, but balanced and running
smoothly while turning on an axis which runs through the
centerline of the wheel and tire perpendicular to the axis
of rotation.
The quickest and best methods of testing and correcting
dynamic unbalance are by the use of dynamic wheel
balancers which are commercially available. These bal-
ancers include all necessary information on where and
how the balancing weights should be placed. The follow-
ing information, however, will help in the correction of
dynamic balance.
NOTE:
Before attempting to balance the
wheels, check to be certain that no foreign
matter has been trapped in the wheel ventila-
tion slots or in the accessory wheel discs. This
is especially important if the vehicle has been
run in soft mud and then parked in freezing
weather.
When a wheel that is statically unbalanced is dynam-
ically in balance the dynamic balance can be retained
while correcting "the static balance by installing the cor-
rective weights so that half of the weight required is
placed on the inner edge of the rim and the other half
on the outer edge of the rim.
Dynamic unbalance can be corrected without destroying
static balance by installing weights so half of weight
required for dynamic balance is placed on the rim op-
posite the heavy point, while the other half is placed 180°
away and on the opposite side of the rim.
NOTE:
Vehicles with wire wheel covers should
have the wheels balanced with the wire wheel
covers installed on the wheels.
Run Out (W/OTire)
The wheels should not run out (wobble) more than
1/16" as measured on the side of the rim at the base
of the tire. Excessive run-out is the result of a bent
wheel, an improperly mounted wheel, worn knuckle bear-
ings or steering connections. These parts should be
checked for correct adjustment, proper alignment and
wear whenever excessive run-out is encountered.
The wheels should also run concentric with the steering
knuckle spindle within 1/16 inch as measured on the tire
bead seat of the rim with the tire removed.
Wheel run-out, eccentricity and balance are closely
associated with steering and front wheel alignment.
Further information on these subjects will be found under
"Suspension".
Cleaning Aluminum Wheels
Do not use wire brush or abrasive cleaners when
cleaning wheels. Use only cleaners that will not react
with aluminum.
SERVICE OPERATIONS
TIRES
Removal
Dismounting tubeless tires presents no problems if the
correct procedures are used and the following precau-
tions observed.
1.
Remove the valve cap and valve core. Let out all the
air.
2.
Press the inner side of the tire into the rim well.
Use bead loosening tool or if regular tire irons are
used, take particular care not to injure or tear the
sealing ribs on the bead.
CAUTION: Never use tire irons with sharp
edges or corners.
3.
Using tire irons on the opposite side, remove bead,
taking small "bites" around the rim.
4.
Turn the tire over, and use two tire irons, one be-
tween the rim flange and the bead to pry the rim
upward, the other iron to pry outward between the
bead seat and the bead.
Installation
Extreme care must be exercised to prevent injury to
the sealing bead and circumferential bead when forcing
tire over rim.
1.
Apply a light film of Ruglyde or other suitable rubber
lubricant to sealing bead of tire.
NOTE:
The use of excessive lubrication may
lead to rim slippage and subsequent breaking of
air seal.
2.
Carefully mount the outer bead in usual manner by
using tire irons, taking small "bites" around rim,
being careful not to injure the tire bead.
CAUTION: DO NOT use a hammer, as damage
to the bead will result.
3.
Install the inner bead in the same manner.
NOTE:
If a seal cannot be effected in the fore-
going manner with the rush of air it can be
, accomplished by applying to the circumference
of the tire a tire mounting band or heavy sash
cord and tightening with the use of a tire iron.
On tire mounting machines, bouncing the tire
assembly is not required. The tire should be
CHEVROLET CHASSIS SERVICE MANUAL
Page 486 of 659
WHEELS AND TIRES
10-6
lifted on the rim to force the top tire bead
against the top rim flange. The weight of the
tire will seat the bottom bead.
Repair
When a tire loses all or most of its air pressure,
particularly when driving at high legal speeds on today1 s
super-highways, recommended procedure is to remove it
from the wheel for complete inspection to be sure no
tire damage has occurred. Punctured tires should be
removed from the wheel and permanently repaired from
the inside.
Externally applied plug type repairs should be con-?
sidered temporary and the tire should be permanently
repaired as soon as possible.
Hot Patch Method
It is essential to thoroughly clean and remove all
foreign matter from the hole left by the puncturing-object
without enlarging the injury and then follow the manu-
facturer's instructions for vulcanizing the patch.
Rubber Plug Methods
There are several types of rubber plugs--some are
inserted from the inside of the tire; others are inserted
from the outside of the tire without demounting the tire
from the rim.
When using the plug method be sure to clean and
lubricate the hole with repair cement before inserting
the plug. Your tire supplier has available complete kits
containing materials, tools and detailed instructions for
making repairs with plugs. Follow instructions in the kit
you use.
Cold Patch Method
(Self Vulcanizing Type)
In this method it is essential to thoroughly clean and
remove all foreign matter from the hole left by the
puncturing object without enlarging the injury; also on
the inside of the tire, buff an area large enough for the
patch. Follow the manufacturer1 s instructions for appli-
cation of the special cement and self-vulcanizing cold
patch.
Pressure Gun Method
Several types of pressure guns are available. Consult
your tire supplier for materials and instructions.
Tire Installation Safety Precautions
When tires are mounted on dirty or corroded rims, or
when they are not properly centered on rims, the tire
bead may "bind" on the rim, and refuse to seat. Allowing
pressure to continue to build up within the assembly in
an attempt to seat the tire bead is a DANGEROUS PRAC-
TICE which can result in a broken tire bead, and serious
injury to the serviceman.
1.
Make sure that rim flanges and bead ledge (espe-
cially hump and radius) areas are smooth and clean.
Remove any oxidized rubber, dried soap solution,
rust, heavy paint, etc. with a wire brush, or, in ex-
treme cases, a file.
2.
Lubricate tire beads, rim flanges, and bead ledge
areas with a liberal amount of thin vegetable oil
soap solution, or approved rubber lubricant,
3.
Insure that air pressure build-up during the bead
seating process is not allowed to exceed 40 pounds
pressure. If beads have not seated by the time pres-
sure reaches 40 pounds, assembly should be deflated,
re-positioned on rim, re-lubricated and re-inflated.
4.
Make sure valve core is inserted in valve stem
prior to inflating.
5.
Use an extension gauge with clip on chuck so air
pressure build-up can be closely watched and so
that you can stand well back from the assembly
during the bead seating process.
WHEELS
Valve Assembly
Replace
NOTE: Always use new valve assembly when
replacing.
1.
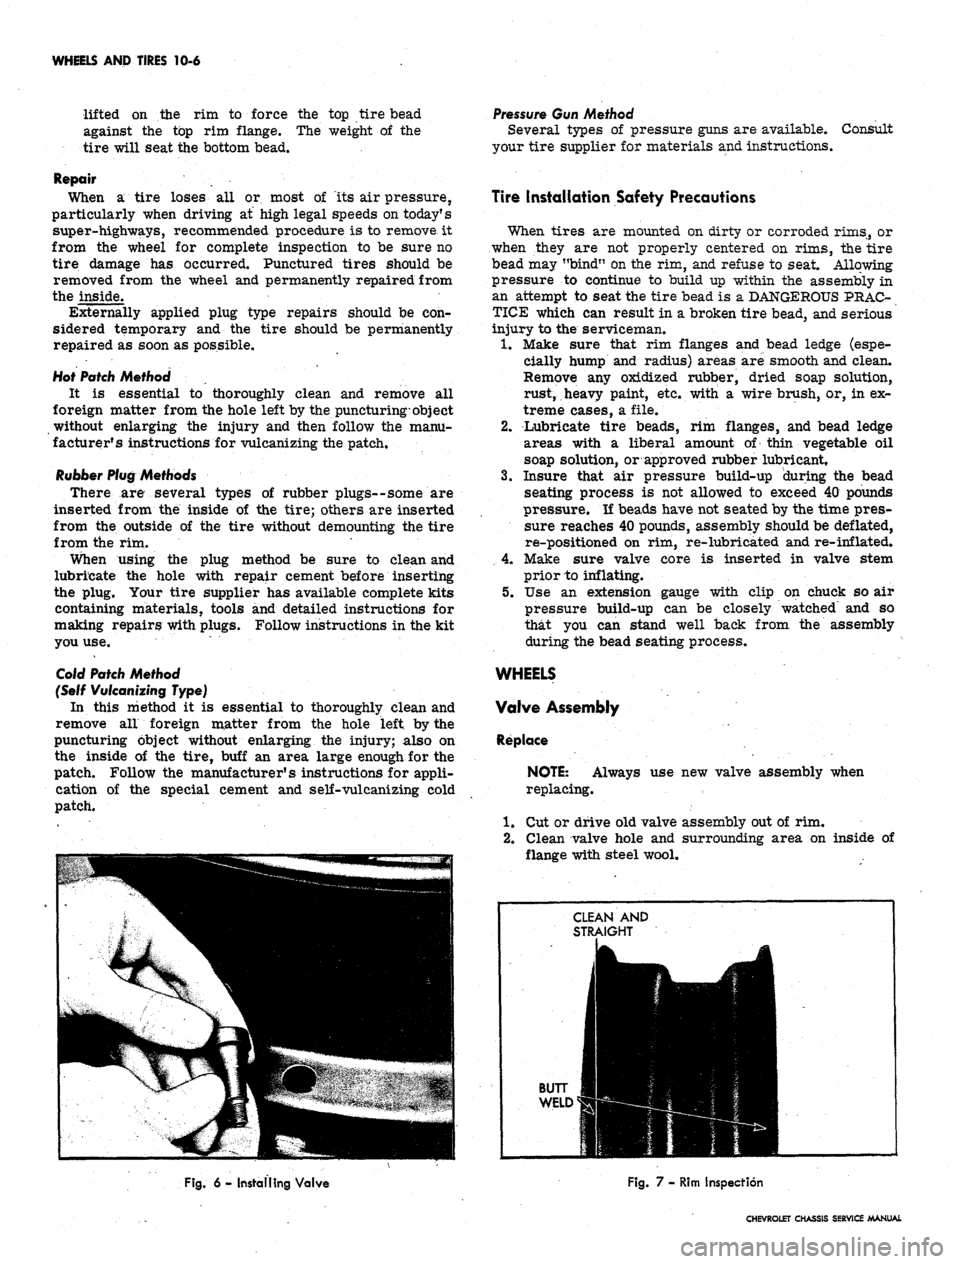
Cut or drive old valve assembly out of rim.
2.
Clean valve hole and surrounding area on inside of
flange with steel wool.
Fig. 6 - Installing Valve
Fig. 7 - Rim Inspection
CHEVROLET CHASSIS SERVICE MANUAL
Page 623 of 659
ACCESSORIES 15-14
Deflate system through service valve and disconnect
line at pressure regulator valve. Install test gauge on
regulator valve high pressure fitting.
Inflate system through service valve to maximum
available pressure.
NOTE: If available pressure is less than 140
psi,
start engine to build-up reservoir to this
pressure.
Regulated pressure should build-up to and hold
steady at 100-130 psi on test gauge.
Check regulated pressure by momentarily (not more
than one second) depressing valve core on test gauge
arid observe gauge reading.
If regulated pressure now reads less than 100 psi,
replace regulator assembly.
If regulated pressure exceeds 130 psi, replace regu-
lator assembly.
Control Valve Test
Exhaust (Superlifts Inflated)
1.
Disconnect control valve lever from link.
2.
Hold lever down in exhaust position until Superlifts
deflate or for a minimum of 18 seconds.
3.
If Superlifts deflate, perform Intake Check.
4.
If Superlifts do not deflate, remove exhaust adapter
from control valve and hold lever down as in Step 2.
Replace adapter, O-ring and filter if this deflates
Superlifts.
5.
Replace control valve if none of the above steps solve
problem.
Intake (Reservoir Pressure 125 psi Minimum)
1.
Disconnect overtravel lever from link.
2.
Hold lever up in intake position until Superlifts in-
Fig.
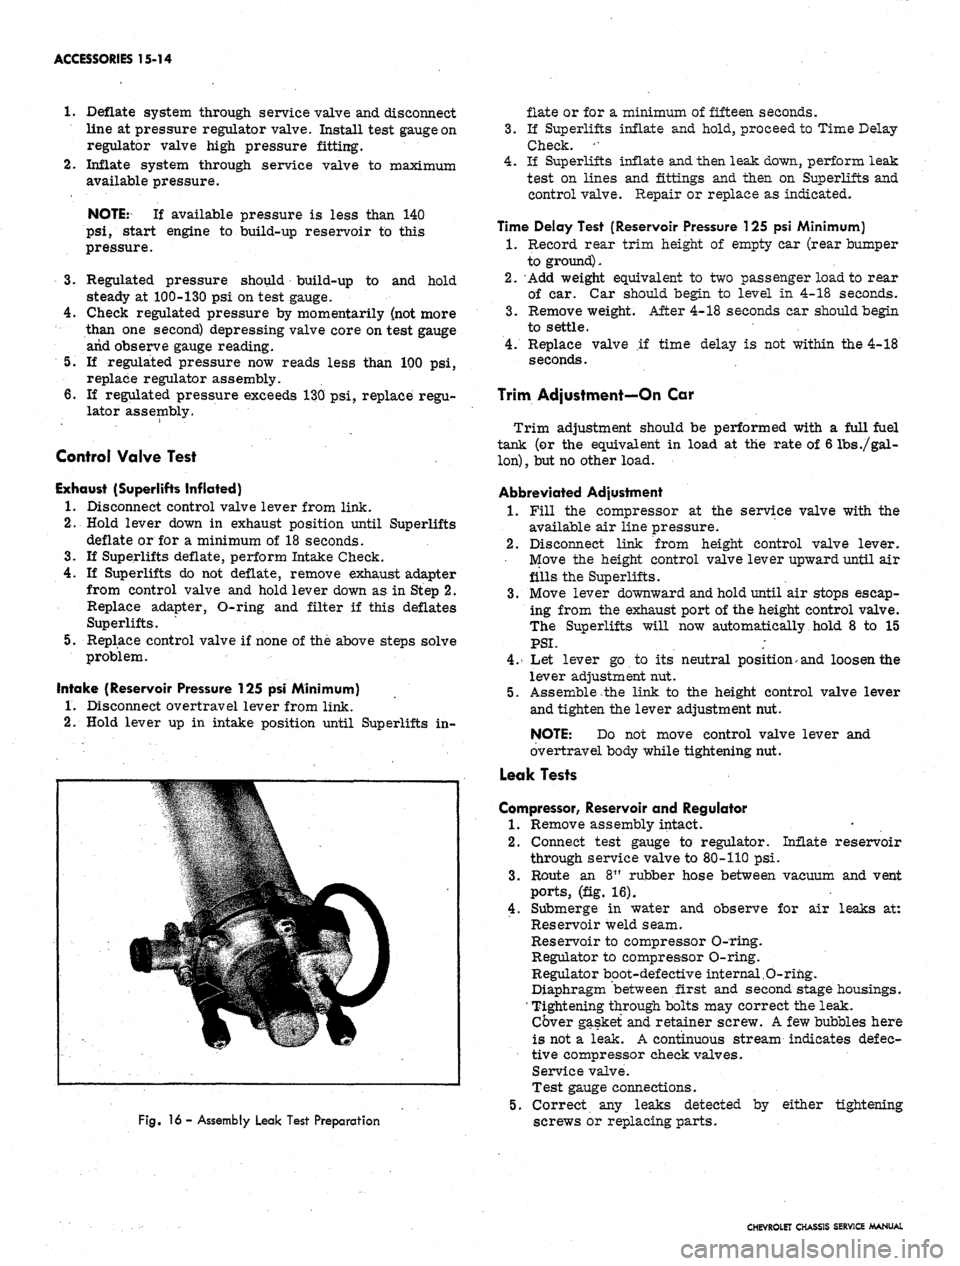
16 - Assembly Leak Test Preparation
flate or for a minimum of fifteen seconds.
3.
If Superlifts inflate and hold, proceed to Time Delay
Check. '•
4.
If Superlifts inflate and then leak down, perform leak
test on lines and fittings and then on Superlifts and
control valve. Repair or replace as indicated.
Time Delay Test (Reservoir Pressure 125 psi Minimum)
1.
Record rear trim height of empty car (rear bumper
to ground).
2.
Add weight equivalent to two passenger load to rear
of car. Car should begin to level in 4-18 seconds.
3.
Remove weight. After 4-18 seconds car should begin
to settle.
4.
Replace valve if time delay is not within the 4-18
seconds.
Trim Adjustment—On Car
Trim adjustment should be performed with a full fuel
tank (or the equivalent in load at the rate of 6 lbs
./gal-
lon)
,
but no other load.
Abbreviated Adjustment
1.
Fill the compressor at the service valve with the
available air line pressure.
2.
Disconnect link from height control valve lever.
Move the height control valve lever upward until air
fills the Superlifts.
3.
Move lever downward and hold until air stops escap-
ing from the exhaust port of the height control valve.
The Superlifts will now automatically hold 8 to 15
PSI.
;
4.
Let lever go to its neutral position> and loosen the
lever adjustment nut.
5.
Assemble the link to the height control valve lever
and tighten the lever adjustment nut.
NOTE: Do not move control valve lever and
overtravel body while tightening nut.
Leak Tests
Compressor, Reservoir and Regulator
1.
Remove assembly intact.
2.
Connect test gauge to regulator. Inflate reservoir
through service valve to 80-110 psi.
3.
Route an 8" rubber hose between vacuum and vent
ports,
(fig. 16).
4.
Submerge in water and observe for air leaks at:
Reservoir weld seam.
Reservoir to compressor O-ring.
Regulator to compressor O-ring.
Regulator boot-defective internal.O-rihg.
Diaphragm between first and second stage housings.
' Tightening through bolts may correct the leak.
Cover gasket and retainer screw. A few bubbles here
is not a leak. A continuous stream indicates defec-
tive compressor check valves.
Service valve.
Test gauge connections.
5.
Correct any leaks detected by either tightening
screws or replacing parts.
CHEVROLET CHASSIS SERVICE MANUAL
Page 628 of 659
SPECIFICATIONS
HEATING
AND AIR
CONDITIONING
SECTION
1A
Compressor
Make Frigidaire
Type
. 6
Cylinder Axial
Displacement
Four-Season
12.6
Cu.
In.
Universal
and
Ail-Weather
.... .10.8 Cu. In.
Rotation Clockwise
Compressor Suction
and
Discharge
Connector Bolt Torque
.......
25 ft lbs.
Compressor Clutch Coil
Ohms
(at
80°F.).
4.18-4.38
Amps
(at
80°F.)
2.86 @ 12
Volts
Torques
Rear Head
to
SheU Stud
Nut 23 lb. ft
Shaft Mounting
Nut 15 lb. ft
Belt Tension.
See
Tune-Up Chart
System Capacities
Refrigerant
R-12
Four-Season
and
Comfortron
Systems.
............
3 lbs., 12 oz.
Universal Systems
Chevrolet, Chevelle,
and
Camaro.
... 3 lbs.
Chevy
n 2 lbs. 8 oz.
All-Weather System
2 lbs. 8 oz.
Compressor
Oil 525
Viscosity
All Systems
11 oz.
Fuses
Comfortron Systems
.
Four-Season Systems
.
Universal Systems
. .
All-Weather System.
.
Fuse
Block
25
amp.
25
amp.
25
amp.
25
amp.
In
Line
30
amp.
30
amp.
20
amp.
20
amp.
SECTION
3
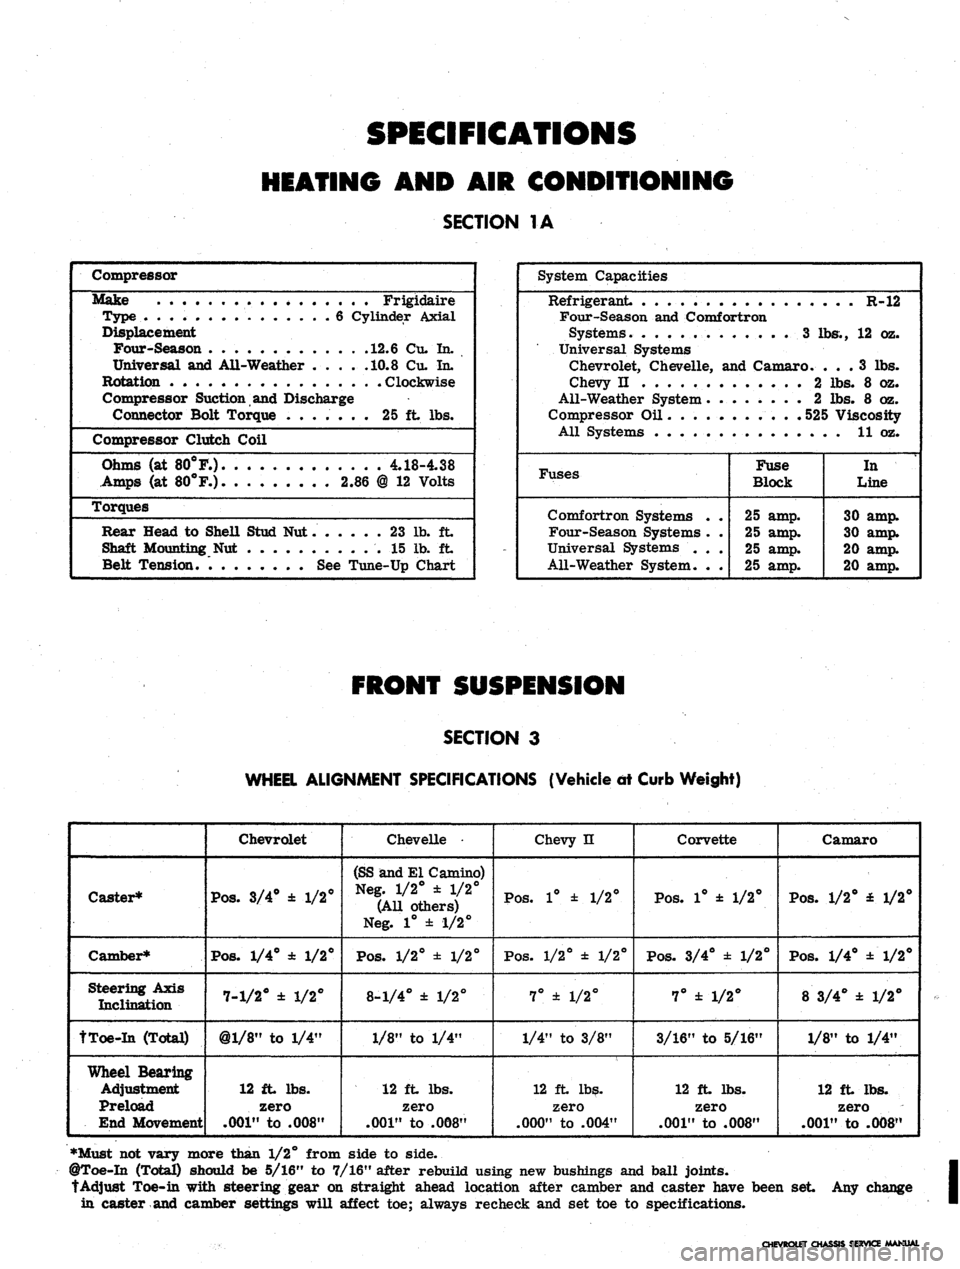
WHEEL ALIGNMENT SPECIFICATIONS (Vehicle
dt
Curb Weight)
Caster*
Camber*
Steering Axis
Inclination
tToe-In (Total)
Wheel Bearing
Adjustment
Preload
End Movement
Chevrolet
Pos.
3/4° ± 1/2°
Pos.
1/4° ± 1/2°
7-1/2° ± 1/2°
@l/8"
to 1/4"
12 ft lbs.
zero
.001"
to .008"
Chevelle •
(SS and El Camino)
Neg. 1/2° ± 1/2°
(All others)
Neg. 1° ± 1/2°
Pos.
1/2° ± 1/2°
8-1/4° ± 1/2°
1/8" to 1/4"
12 ft lbs.
zero
.001"
to .008"
Chevy n
Pos.
1° ± 1/2°
Pos.
1/2° ± 1/2°
7° ± 1/2°
1/4" to 3/8"
12 ft lbs.
zero
.000"
to .004"
Corvette
Pos.
1° ± 1/2°
Pos.
3/4° ± 1/2°
7° ± 1/2°
3/16" to 5/16"
12 ft lbs.
zero
.001"
to .008"
Camaro
Pos.
1/2° £ 1/2°
Pos.
1/4° ±1/2°
8 3/4° ± 1/2°
1/8" to 1/4"
12 ft lbs.
zero
.001"
to .008"
•Must not vary more than 1/2° from side to side.
@Toe-In (Total) should be 5/16" to 7/16" after rebuild using new bushings and ball joints.
tAdjust Toe-in with steering gear on straight ahead location after camber and caster have been set Any change
in caster and camber settings will affect toe; always recheck and set toe to specifications.
LET CHASSIS SERVICE MANUAL
Page 631 of 659
SPECIFICATIONS
4
Stabilizer Shaft
Bracket to Frame
Bracket to Torque Arm
Link Bushings
Rebound Bumper to Frame
Crossmember to Frame
Crossmember to Carrier
Carrier Front Support
to Crossmember
Front Bolt
Rear Bolt
Drive Spindle Nut
Drive Spindle Support
to Torque Arm
Strut Rod
to Spindle Support
Bracket to Carrier
Camber Cam
Torque Arm Pivot
Spring Link Bolt to
Torque Arm
Wheel Alignment #
Camber (Degrees)
Toe-in (Total)
Chevrolet
Chevelle
Chevy II
I
Cama.ro
j Corvette
i
|
120
1
120
25
j
. ' 20
25
!
60
\
65
!
50*
50
100*
30
80*
45
65
50
Install nut to expose hole (Corvette
then insert cotter pin. only)
-
Neg.
1/2° ± 1/2°
1/32" to 3/32"
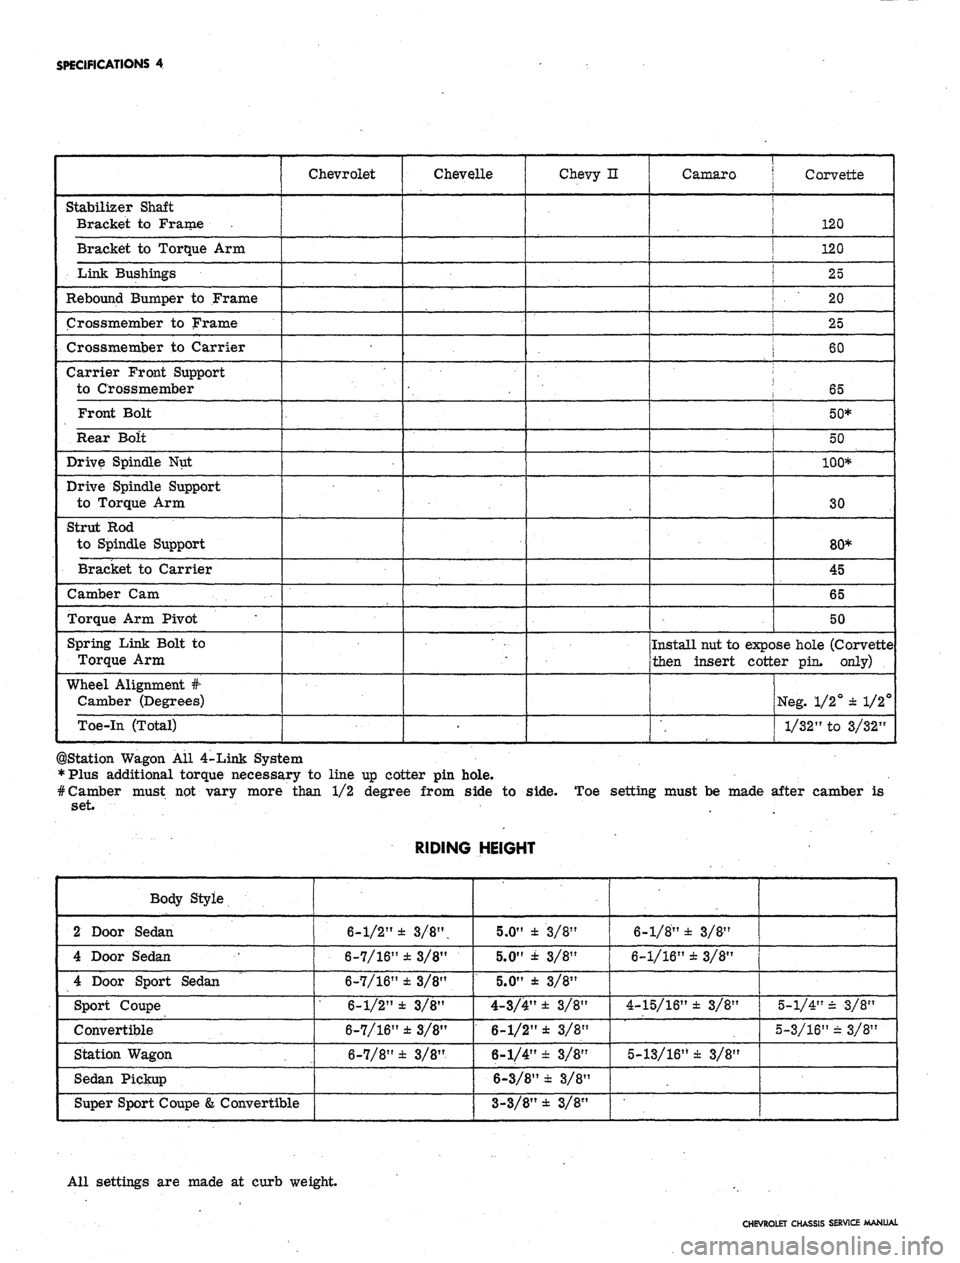
©Station Wagon All 4-Link System
•Plus additional torque necessary to line up cotter pin hole.
# Camber must not vary more than 1/2 degree from side to
set.
side.
Toe setting must be made after camber is
RIDING
HEIGHT
Body Style
2 Door Sedan
4 Door Sedan
4 Door Sport Sedan
Sport Coupe
Convertible
Station Wagon
Sedan Pickup
Super Sport Coupe
&
Convertible
6-1/2"
6-7/16"
6-7/16"
6-1/2"
6-7/16"
6-7/8"
± 3/8".
±3/8"
±3/8"
± 3/8"
± 3/8"
± 3/8"
5.0" ±
5.0" ±
5.0" ±
4-3/4"
6-1/2"
6-1/4"
6-3/8"
3-3/8"
3/8"
3/8"
3/8"
± 3/8"
± 3/8"
± 3/8"
± 3/8"
± 3/8"
6-1/8"
6-1/16'
4-15/16'
5-13/16
± 3/8"
± 3/8"
1
± 3/8"
*
± 3/8"
5-1/4"
± 3/8"
5-3/16" ± 3/8"
All settings are made at curb weight.
CHEVROLET
CHASSIS SERVICE MANUAL