steering wheel CHEVROLET CAMARO 1967 1.G Chassis Repair Manual
[x] Cancel search | Manufacturer: CHEVROLET, Model Year: 1967, Model line: CAMARO, Model: CHEVROLET CAMARO 1967 1.GPages: 659, PDF Size: 114.24 MB
Page 553 of 659

ELECTRICAL-BODY AND CHASSIS 12-41
HAZARD WARNING
SWITCHES
Fig.
55- Directional Signal Switches
erating six to eight lamps simultaneously depending ve-
hicle series and model.
DIRECTIONAL SIGNAL SWITCH REPLACEMENT
All steering columns except tilt and telescoping.
Chevrolet, Chevelle, Chevy II and Camaro (Fig. 56)
1.
Disconnect battery ground cable.
2.
Disconnect signal switch wiring from chassis har-
ness at multiple connector under instrument panel.
3.
Remove steering wheel assembly as outlined in Sec-
tion 9, Steering.
4.
Remove shift lever roll pin and shift lever from
column (if applicable).
5. Push in hazard warning switch knob and unscrew
knob.
Remove switch lever arm.
6. On Chevy U and Camaro models equipped with auto-
matic transmission remove column mounted dial in-
dicator housing and lamp assembly (if applicable).
7. Remove mast jacket lower trim cover retaining
screws and remove trim cover(s).
8. On Chevrolet and Chevelle models equipped with
automatic transmission loosen set screw and remove
quadrant dial pointer (if applicable).
9. Remove retaining
"C"
ring from upper steering shaft
using snap ring remover Tool J-22569 (Refer to
Steering, Section 9). Slide thrust and wave washers
from steering shaft.
10.
Loosen three signal switch mounting screws until
assembly can be rotated counterclockwise.
NOTE:
Do not remove three screws from as-
sembly until unit is on the bench.
11.
Rotate switch assembly counterclockwise and pull
unit from top of mast jacket. Allow unit to hang
from end of column.
Fig.
56 - Standard Steering Column
CHEVROLET CHASSIS SERVICE
Page 555 of 659

ELECTRICAL-BODY AND CHASSIS 12-43
23.
Install
MCtT
ring over steering shaft using snap ring
installer J-22659 (refer to Section 9).
NOTE: Be sure retaining ring is completely
seated into groove.
24.
Install dial pointer on Chevrolet and Chevelle models
equipped with automatic transmission (if applicable).
25.
Install dial indicator and lamp assembly on Camaro
and Chevy n models equipped with automatic
transmission.
26.
Install mast jacket lower trim covers (if applicable).
27.
Install hazard warning knob and turn signal lever.
28.
Install shift lever.
29.
Install steering wheel.
30.
Install multiple connector to switch wiring using old
harness for wire color guide and connect to body
harness connector.
31.
Connect battery ground cable and check operation of
assembly.
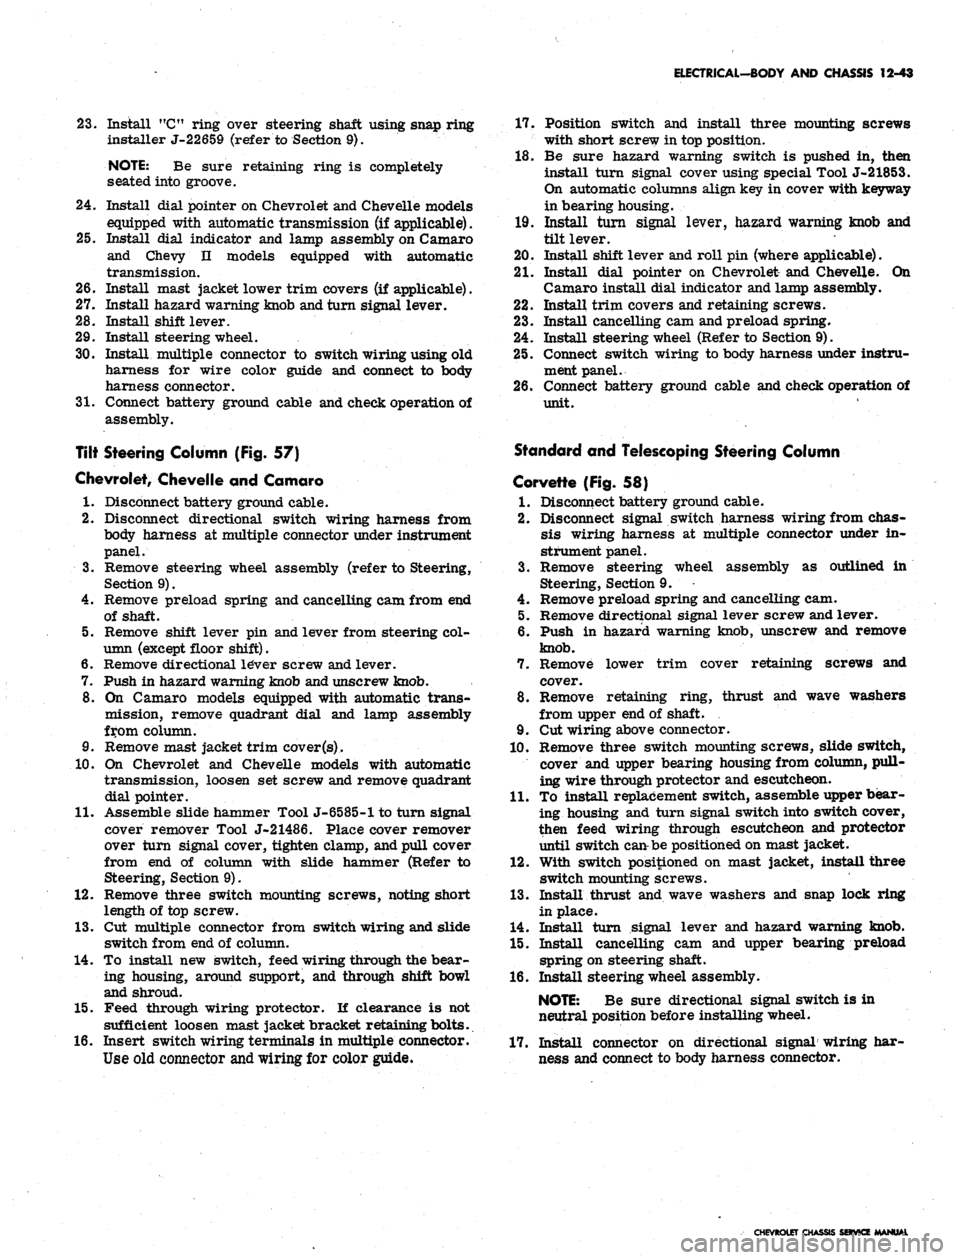
Tilt Steering Column (Fig. 57)
Chevrolet, Chevelle and Camaro
1.
Disconnect battery ground cable.
2.
Disconnect directional switch wiring harness from
body harness at multiple connector under instrument
panel.
3.
Remove steering wheel assembly (refer to Steering,
Section 9).
4.
Remove preload spring and cancelling cam from end
of shaft.
5.
Remove shift lever pin and lever from steering col-
umn (except floor shift).
6. Remove directional le*ver screw and lever.
7.
Push in hazard warning knob and unscrew knob.
8. On Camaro models equipped with automatic trans-
mission, remove quadrant dial and lamp assembly
from column.
9. Remove mast jacket trim cover
(s).
10.
On Chevrolet and Chevelle models with automatic
transmission, loosen set screw and remove quadrant
dial pointer.
11.
Assemble slide hammer Tool J-6585-1 to turn signal
cover remover Tool J-21486. Place cover remover
over turn signal cover, tighten clamp, and pull cover
from end of column with slide hammer (Refer to
Steering, Section 9).
12.
Remove three switch mounting screws, noting short
length of top screw.
13.
Cut multiple connector from switch wiring and slide
switch from end of column.
14.
To install new switch, feed wiring through the bear-
ing housing, around support, and through shift bowl
and shroud.
15.
Feed through wiring protector. If clearance is not
sufficient loosen mast jacket bracket retaining bolts.
16.
Insert switch wiring terminals in multiple connector.
Use old connector
and
wiring for color guide.
17.
Position switch and install three mounting screws
with short screw in top position.
18.
Be sure hazard warning switch is pushed in, then
install turn signal cover using special Tool J-21853.
On automatic columns align key in cover with keyway
in bearing housing.
19.
Install turn signal lever, hazard warning knob and
tilt lever.
20.
Install shift lever and roll pin (where applicable).
21.
Install dial pointer on Chevrolet and Chevelle. On
Camaro install dial indicator and lamp assembly.
22.
Install trim covers and retaining screws.
23.
Install cancelling cam and preload spring.
24.
Install steering wheel (Refer to Section 9).
25.
Connect switch wiring to body harness under instru-
ment panel.
26.
Connect battery ground cable and check operation of
unit.
Standard and Telescoping Steering Column
Corvette (Fig. 58)
1.
Disconnect battery ground cable.
2.
Disconnect signal switch harness wiring from chas-
sis wiring harness at multiple connector under in-
strument panel.
3.
Remove steering wheel assembly as outlined in
Steering, Section 9.
4.
Remove preload spring and cancelling cam.
5.
Remove directional signal lever screw and lever.
6. Push in hazard warning knob, unscrew and remove
knob.
7.
Remove lower trim cover retaining screws and
cover.
8. Remove retaining ring, thrust and wave washers
from upper end of shaft.
9. Cut wiring above connector.
10.
Remove three switch mounting screws, slide switch,
cover and upper bearing housing from column, pull-
ing wire through protector and escutcheon.
11.
To install replacement switch, assemble upper bear-
ing housing and turn signal switch into switch cover,
then feed wiring through escutcheon and protector
until switch can be positioned on mast jacket.
12.
With switch positioned on mast jacket, install three
switch mounting screws.
13.
Install thrust and wave washers and snap lock ring
in place.
14.
Install turn signal lever and hazard warning knob.
15.
Install cancelling cam and upper bearing preload
spring on steering shaft.
16.
Install steering wheel assembly.
NOTE:
Be sure directional signal switch is in
neutral position before installing wheel.
17.
Install connector on directional signal wiring har-
ness and connect to body harness connector.
CHEVROLET CHASSIS SERVICE
Page 628 of 659

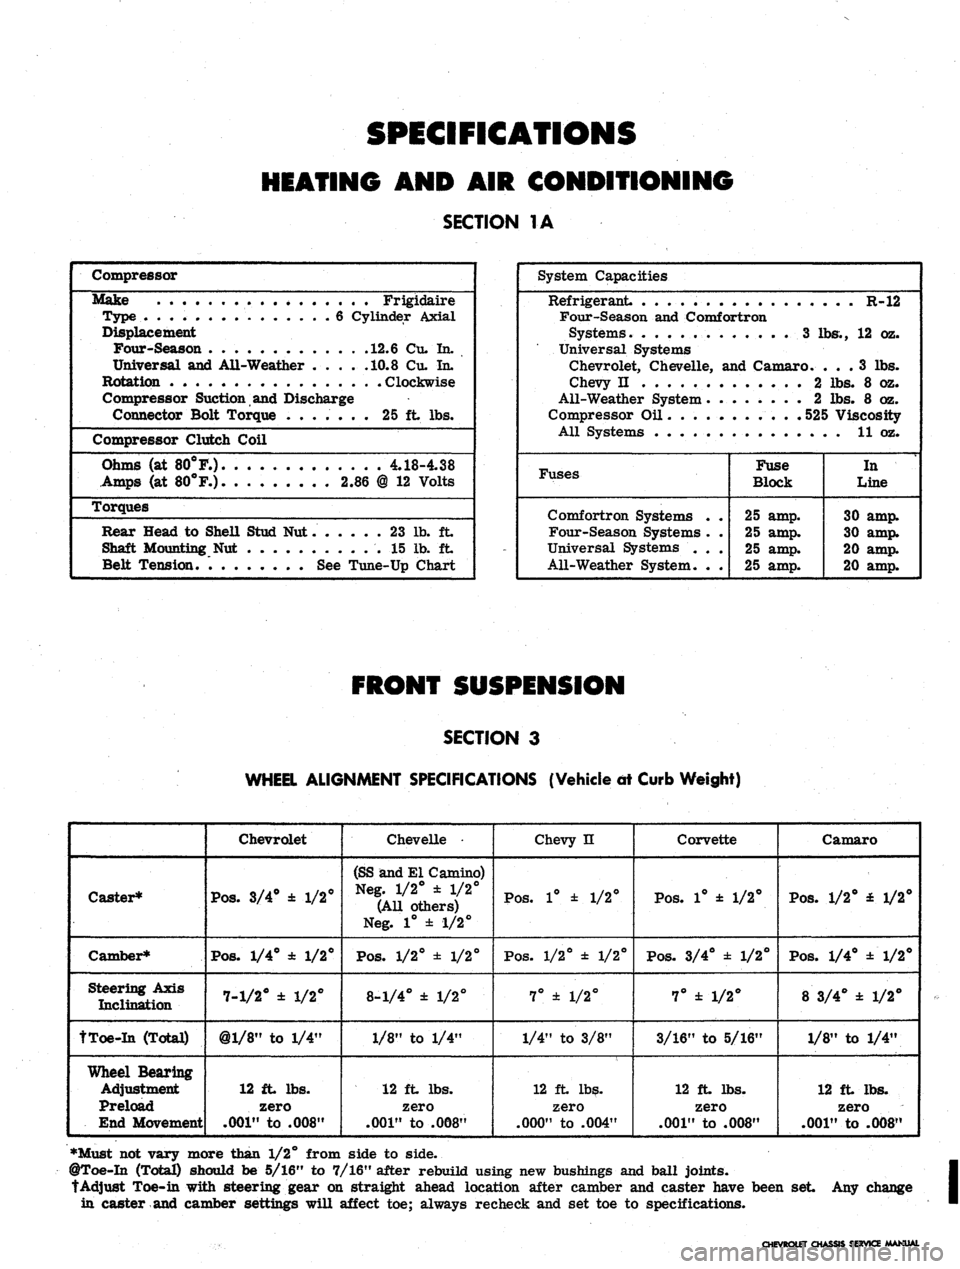
SPECIFICATIONS
HEATING
AND AIR
CONDITIONING
SECTION
1A
Compressor
Make Frigidaire
Type
. 6
Cylinder Axial
Displacement
Four-Season
12.6
Cu.
In.
Universal
and
Ail-Weather
.... .10.8 Cu. In.
Rotation Clockwise
Compressor Suction
and
Discharge
Connector Bolt Torque
.......
25 ft lbs.
Compressor Clutch Coil
Ohms
(at
80°F.).
4.18-4.38
Amps
(at
80°F.)
2.86 @ 12
Volts
Torques
Rear Head
to
SheU Stud
Nut 23 lb. ft
Shaft Mounting
Nut 15 lb. ft
Belt Tension.
See
Tune-Up Chart
System Capacities
Refrigerant
R-12
Four-Season
and
Comfortron
Systems.
............
3 lbs., 12 oz.
Universal Systems
Chevrolet, Chevelle,
and
Camaro.
... 3 lbs.
Chevy
n 2 lbs. 8 oz.
All-Weather System
2 lbs. 8 oz.
Compressor
Oil 525
Viscosity
All Systems
11 oz.
Fuses
Comfortron Systems
.
Four-Season Systems
.
Universal Systems
. .
All-Weather System.
.
Fuse
Block
25
amp.
25
amp.
25
amp.
25
amp.
In
Line
30
amp.
30
amp.
20
amp.
20
amp.
SECTION
3
WHEEL ALIGNMENT SPECIFICATIONS (Vehicle
dt
Curb Weight)
Caster*
Camber*
Steering Axis
Inclination
tToe-In (Total)
Wheel Bearing
Adjustment
Preload
End Movement
Chevrolet
Pos.
3/4° ± 1/2°
Pos.
1/4° ± 1/2°
7-1/2° ± 1/2°
@l/8"
to 1/4"
12 ft lbs.
zero
.001"
to .008"
Chevelle •
(SS and El Camino)
Neg. 1/2° ± 1/2°
(All others)
Neg. 1° ± 1/2°
Pos.
1/2° ± 1/2°
8-1/4° ± 1/2°
1/8" to 1/4"
12 ft lbs.
zero
.001"
to .008"
Chevy n
Pos.
1° ± 1/2°
Pos.
1/2° ± 1/2°
7° ± 1/2°
1/4" to 3/8"
12 ft lbs.
zero
.000"
to .004"
Corvette
Pos.
1° ± 1/2°
Pos.
3/4° ± 1/2°
7° ± 1/2°
3/16" to 5/16"
12 ft lbs.
zero
.001"
to .008"
Camaro
Pos.
1/2° £ 1/2°
Pos.
1/4° ±1/2°
8 3/4° ± 1/2°
1/8" to 1/4"
12 ft lbs.
zero
.001"
to .008"
•Must not vary more than 1/2° from side to side.
@Toe-In (Total) should be 5/16" to 7/16" after rebuild using new bushings and ball joints.
tAdjust Toe-in with steering gear on straight ahead location after camber and caster have been set Any change
in caster and camber settings will affect toe; always recheck and set toe to specifications.
LET CHASSIS SERVICE MANUAL
Page 629 of 659

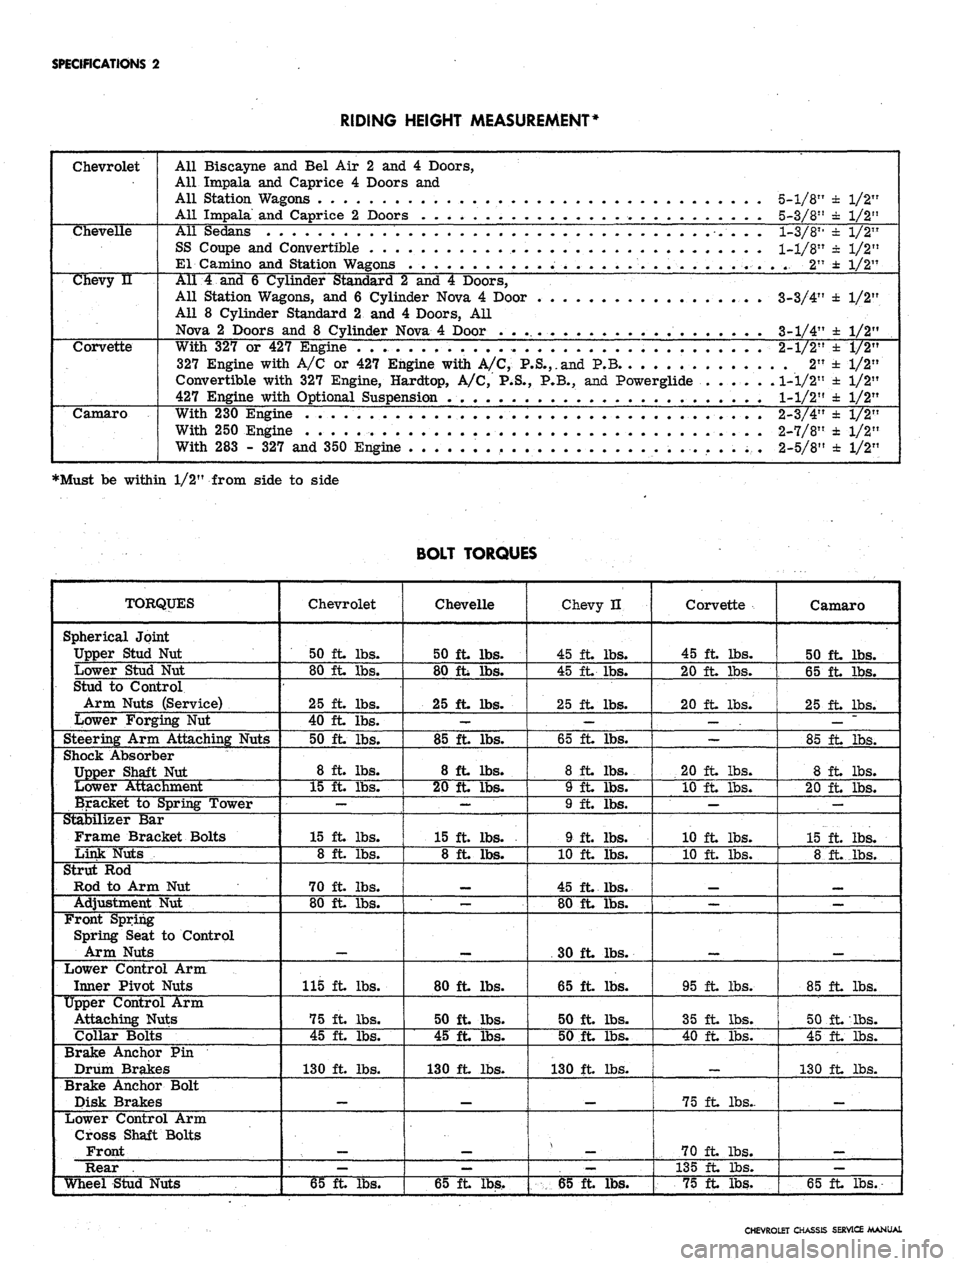
SPECIFICATIONS
2
RIDING HEIGHT MEASUREMENT*
Chevrolet
All Biscayne
and Bel Air 2 and 4
Doors,
All Impala
and
Caprice
4
Doors
and
All Station Wagons
. . . .
All Impala
and
Caprice
2
Doors
. . . . .
5-1/8"
± 1/2"
5-3/8"
± 1/2"
Chevelle
All Sedans
SS Coupe
and
Convertible
El Camino
and
Station W*
1-3/811
± 1/2"
1-1/8"
± 1/2"
..
2" ± 1/2"
Chevy
u
All
4 and 6
Cylinder Standard
2 and 4
Doors,
All Station Wagons,
and 6
Cylinder Nova
4
Door
All
8
Cylinder Standard
2 and 4
Doors,
All
Nova
2
Doors
and 8
Cylinder Nova
4
Door
. . .
3-3/4'
3-1/4'
±
1/2'
±
1/2'
Corvette
With
327 or 427
Engine
. . . .
327 Engine with
A/C or 427
Engine with
A/C,
P.S.,.and
P.B
Convertible with
327
Engine, Hardtop,
A/C, P.S., P.B., and
Powerglide
427 Engine with Optional Suspension
.
2-1/2"
.
2"
1-1/2"
1-1/2"
±
1/2"
±1/2"
±
1/2"
±
1/2"
Camaro
With
230
Engine
..... . . .
With
250
Engine
.... ...
With
283 - 327 and
350 Engine
2-3/4"
2-7/8"
2-5/8"
± 1/2"
± 1/2"
± 1/2"
•Must be within 1/2" from side to side
BOLT TORQUES
TORQUES
Spherical Joint
Upper Stud
Nut
Lower Stud
Nut
Stud
to
Control
Arm Nuts (Service)
Lower Forging
Nut
Steering
Arm
Attaching Nuts
Shock Absorber
Upper Shaft
Nut
Lower Attachment
Bracket
to
Spring Tower
Stabilizer
Bar
Frame Bracket Bolts
Link Nuts
Strut
Rod
Rod
to Arm Nut
Adjustment
Nut
Front Spring
Spring Seat
to
Control
Arm Nuts
Lower Control
Arm
Inner Pivot Nuts
Upper Control Arm
Attaching Nuts
Collar Bolts
Brake Anchor Pin
Drum Brakes
Brake Anchor Bolt
Disk Brakes
Lower Control Arm
Cross Shaft Bolts
Front
Rear .
Wheel Stud Nuts
Chevrolet
50 ft. lbs.
80 ft lbs.
25 ft. lbs.
40 ft. lbs.
50 ft. lbs.
8 ft. lbs.
15 ft. lbs.
—
15 ft lbs.
8 ft. lbs.
70 ft lbs.
80 ft lbs.
115 ft lbs.
75 ft lbs.
45 ft lbs.
130 ft lbs.
—
65 ft lbs.
Chevelle
50 ft lbs.
80 ft lbs.
25 ft. lbs.
—
85 ft lbs.
8 ft lbs.
20 ft lbs.
—
15 ft lbs.
8 ft lbs.
—
80 ft lbs.
50 ft. lbs.
45 ft. lbs.
130 ft lbs.
—
65 ft lbs.
Chevy H
45 ft lbs.
45 ft lbs.
25 ft lbs.
—
65 ft. lbs.
8 ft lbs.
9 ft lbs.
9 ft. lbs.
9 ft. lbs.
10 ft. lbs.
45 ft lbs.
80 ft lbs.
30 ft lbs.
65 ft lbs.
50 ft. lbs.
50 ft lbs.
130 ft lbs.
_
—
65 ft lbs.
Corvette
45 ft lbs.
20 ft lbs.
20 ft lbs.
—
20 ft lbs.
10 ft lbs.
—
10 ft lbs.
10 ft. lbs.
—
95 ft lbs.
35 ft lbs.
40 ft lbs.
75 ft lbs..
70 ft lbs.
135 ft lbs.
75 ft lbs.
Camaro
50 ft lbs.
65 ft lbs.
25 ft lbs.
—
85 ft lbs.
8 ft lbs.
20 ft lbs.
.
—
15 ft. lbs.
8 ft._lbs.
_
85 ft lbs.
50 ft lbs.
45 ft lbs.
130 ft lbs.
_
—
65 ft lbs.
CHEVROLET CHASSIS SERVICE MANUAL
Page 647 of 659

SPECIFICATIONS 20
TORQUE CHART
Steering Gear Mounting
Bolts
Pitman Shaft Nut
Steering Wheel Nut
Steering Wheel Nut-Tilt
Steering Coupling Nuts
Steering Coupling Clamp
Bolts
Tie Rod End Nut
Tie Rod Clamp Nut
Idler Arm Mounting Nut
Steering Wheel to
Hub (Wood)
Steering Damper Bracket
Frame Nut
Steering Damper Bracket
Relay End Nut
Steering Damper to
Bracket Nut
Steering Damper Bracket
Relay Rod Bolt
Power Steering Pump
Pulley
Power Steering Mounting
Bolt
Power Steering Mounting
Nut
Power Cylinder to Relay
Rod Nut
Power Cylinder to Frame
Bracket
Control Valve to Pitman
Arm
Control Valve Clamp
Bolt
Steering Shaft to Gear
Clamp Nut
Chevrolet
70 lb. ft.
Chevelle'
70 lb. ft.
Chevy H
30 lb. ft.
Camaro
68 lb. ft.
Corvette
30 lb. ft.
140 lb. ft.
^ . 35 lb. ft.
1 lb. in.
1 lb. in.
18 lb. ft.
30 lb. ft.
—
—
1 lb. in.
—
18 lb. ft.
30 lb. ft.
—
35 lb. ft.
130 lb. in.
40 lb. ft.
25 lb. in.
—
— •
—
.—
—
—
v —
—
-
—
—
—
—
25 lb. in.
—
—
—
18 lb. ft.
25 lb. ft.
30 lb. ft.
25 lb. ft.
60 lb. ft.
20 lb. ft.
25 lb. ft.
— .
• ' —
, —
—
-
—
, .p-
—
-
45 lb. ft.
30 lb. ft.
45 lb. ft.
20 lb. ft.
35 lb. ft. .
—•
—
—
45 lb. ft.
25 lb. ft.
.
45 lb. ft.
20 lb. ft.
—
CHEVROLET CHASSIS SERVICE MANUAL