automatic transmission CHEVROLET CAMARO 2020 Get To Know Guide
[x] Cancel search | Manufacturer: CHEVROLET, Model Year: 2020, Model line: CAMARO, Model: CHEVROLET CAMARO 2020Pages: 361, PDF Size: 3.27 MB
Page 7 of 361
Chevrolet Camaro Owner Manual (GMNA-Localizing-U.S./Canada/Mexico-
13556304) - 2020 - CRC - 9/3/19
6 Introduction
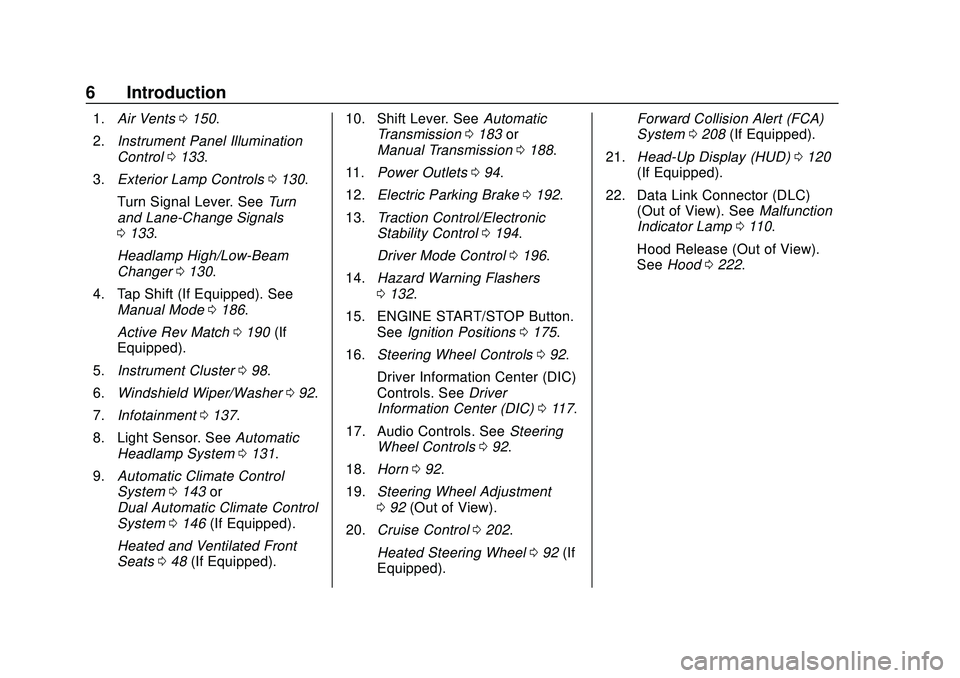
1.Air Vents 0150.
2. Instrument Panel Illumination
Control 0133.
3. Exterior Lamp Controls 0130.
Turn Signal Lever. See Turn
and Lane-Change Signals
0 133.
Headlamp High/Low-Beam
Changer 0130.
4. Tap Shift (If Equipped). See Manual Mode 0186.
Active Rev Match 0190 (If
Equipped).
5. Instrument Cluster 098.
6. Windshield Wiper/Washer 092.
7. Infotainment 0137.
8. Light Sensor. See Automatic
Headlamp System 0131.
9. Automatic Climate Control
System 0143 or
Dual Automatic Climate Control
System 0146 (If Equipped).
Heated and Ventilated Front
Seats 048 (If Equipped). 10. Shift Lever. See
Automatic
Transmission 0183 or
Manual Transmission 0188.
11. Power Outlets 094.
12. Electric Parking Brake 0192.
13. Traction Control/Electronic
Stability Control 0194.
Driver Mode Control 0196.
14. Hazard Warning Flashers
0132.
15. ENGINE START/STOP Button. SeeIgnition Positions 0175.
16. Steering Wheel Controls 092.
Driver Information Center (DIC)
Controls. See Driver
Information Center (DIC) 0117.
17. Audio Controls. See Steering
Wheel Controls 092.
18. Horn 092.
19. Steering Wheel Adjustment
092 (Out of View).
20. Cruise Control 0202.
Heated Steering Wheel 092 (If
Equipped). Forward Collision Alert (FCA)
System
0208 (If Equipped).
21. Head-Up Display (HUD) 0120
(If Equipped).
22. Data Link Connector (DLC) (Out of View). See Malfunction
Indicator Lamp 0110.
Hood Release (Out of View).
See Hood 0222.
Page 22 of 361
Chevrolet Camaro Owner Manual (GMNA-Localizing-U.S./Canada/Mexico-
13556304) - 2020 - CRC - 9/3/19
Keys, Doors, and Windows 21
WhenQis pressed on the power
door lock switch while the door is
open, a chime will sound three
times indicating delayed locking is
active.
The doors will lock automatically
five seconds after all doors are
closed. If a door is reopened before
that time, the five-second timer will
reset when all doors are closed
again.
Press
Qon the door lock switch
again or press
Qon the RKE
transmitter to lock the doors
immediately.
This feature can also be
programmed. See Vehicle
Personalization 0125.
Automatic Door Locks
When the doors are closed, the
ignition is on, and the shift lever is
moved out of P (Park) for automatic
transmissions, or the vehicle speed
is above 13 km/h (8 mph) for
manual transmissions, the doors
will lock. To unlock the doors:
.
Press
Kon a power door lock
switch.
. If equipped with an automatic
transmission, shift the
transmission into P (Park).
. If equipped with a manual
transmission, turn the vehicle off
when parked.
Automatic door locking cannot be
disabled. Automatic door unlocking
can be enabled through vehicle
personalization. See Vehicle
Personalization 0125.
Lockout Protection
If the vehicle is on or in ACC/
ACCESSORY and the power door
lock switch is pressed with the
driver door open, all the doors will
lock and only the driver door will
unlock.
If the vehicle is off and locking is
requested while a door is open,
when all doors are closed the
vehicle will check for RKE
transmitters inside. If an RKE transmitter is detected and the
number of RKE transmitters inside
has not reduced, the driver door will
unlock and the horn will chirp three
times.
Lockout Protection can be manually
overridden with the driver door open
by pressing and holding
Qon the
power door lock switch.
Open Door Anti-Lockout
If Open Door Anti-Lockout has been
turned on and the vehicle is off, the
driver door is open, and locking is
requested, all the doors will lock and
the driver door will remain unlocked.
The Open Door Anti-Lockout feature
can be turned on or off. See Vehicle
Personalization 0125.
Page 23 of 361
Chevrolet Camaro Owner Manual (GMNA-Localizing-U.S./Canada/Mexico-
13556304) - 2020 - CRC - 9/3/19
22 Keys, Doors, and Windows
Doors
Trunk
{Warning
Exhaust gases can enter the
vehicle if it is driven with the
liftgate, trunk/hatch open, or with
any objects that pass through the
seal between the body and the
trunk/hatch or liftgate. Engine
exhaust contains carbon
monoxide (CO) which cannot be
seen or smelled. It can cause
unconsciousness and even death.
If the vehicle must be driven with
the liftgate, or trunk/hatch open:. Close all of the windows.
. Fully open the air outlets on
or under the instrument
panel.
. Adjust the climate control
system to a setting that
brings in only outside air
(Continued)
Warning (Continued)
and set the fan speed to the
highest setting. See
“Climate Control Systems”
in the Index.
. If the vehicle has a power
liftgate, disable the power
liftgate function.
For more information about
carbon monoxide, see Engine
Exhaust 0182.
Trunk Release
To open the trunk from outside of
the vehicle:
.
Press
Xtwice quickly on the
Remote Keyless Entry (RKE)
transmitter.
. Press the touch pad in the area
above the license plate after
unlocking all doors. .
For Keyless Access, press the
touch pad in the area above the
license plate when the
transmitter is within 1 m (3 ft) of
the rear of the vehicle.
For automatic transmissions, the
vehicle must be in P (Park). For
manual transmissions, the vehicle
must be off, or stationary with the
parking brake set.
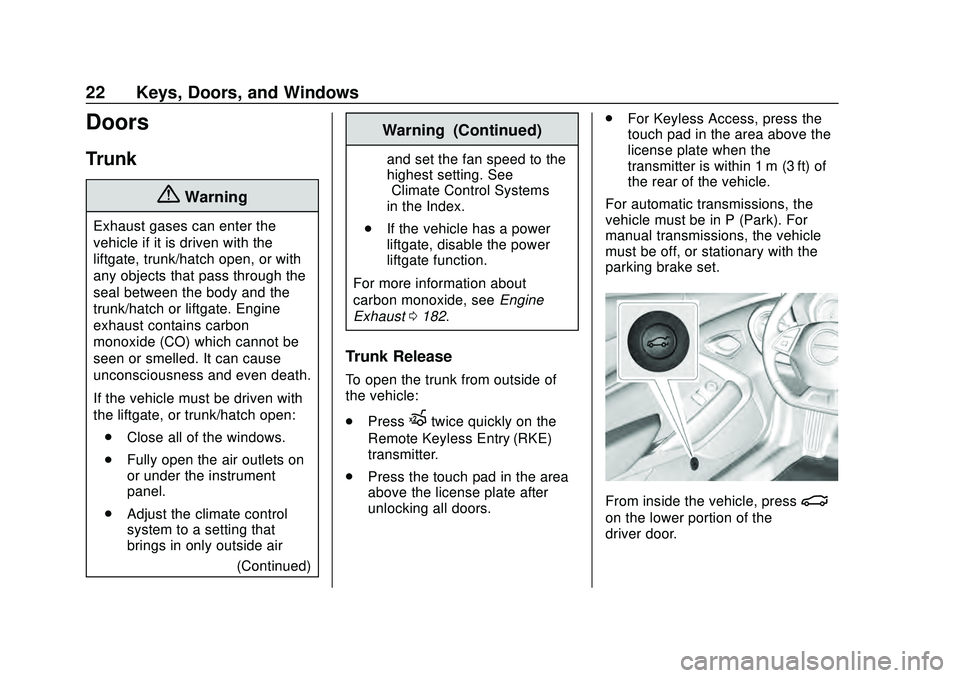
From inside the vehicle, press|
on the lower portion of the
driver door.
Page 47 of 361
Chevrolet Camaro Owner Manual (GMNA-Localizing-U.S./Canada/Mexico-
13556304) - 2020 - CRC - 9/3/19
46 Seats and Restraints
2. Adjust all available memoryfeatures to the desired driving
position.
3. Press and release SET; a beep will sound.
4. Immediately press and hold the 1 or 2 memory button matching
the above DIC welcome
message until two beeps
sound.
If too much time passes
between releasing SET and
pressing 1, the memory
position will not be saved and
two beeps will not sound.
Repeat Steps 3 and 4.
1 or 2 corresponds to the driver
number. See “Identifying Driver
Number” previously in this
section.
5. Repeat Steps 1–4 for a second driver using 1 or 2.
To save the position for
Band
Seat Exit Memory features, repeat
Steps 1–4 using
B. This saves the
position for getting out of the
vehicle. Save preferred memory feature
positions to both 1 and 2 if you are
the only driver.
Manually Recalling Memory
Positions
Press and hold 1, 2, or
Bto recall
the previously saved memory
positions if you are driver 1 or 2
identified in the DIC welcome
message.
To stop Manual Memory recall
movement, release 1, 2, or
Bor
press any of the following controls:
. Power seat
. Memory SET
. Power mirror, with the driver or
passenger side mirror selected
. Power steering wheel,
if equipped
Seat Entry Memory
The vehicle identifies the number of
the current driver ’s RKE transmitter
(1–8). See Remote Keyless Entry
(RKE) System Operation 08. If the
RKE transmitter is 1 or 2, and Seat Entry Memory is enabled in vehicle
personalization, the positions saved
to the same memory button number
1 or 2 are automatically recalled
when the vehicle is turned on,
or turned from off to ACC/
ACCESSORY. RKE transmitters 3–8
will not provide automatic memory
recalls.
To turn Seat Entry Memory on or off,
see
“Vehicle Personalization
Settings” previously in this section
and Vehicle Personalization 0125.
If equipped with an automatic
transmission, the shift lever must be
in P (Park) to start Seat Entry
Memory recall. Seat Entry Memory
recall will complete if the vehicle is
shifted out of P (Park) prior to
reaching the saved memory
position.
If equipped with a manual
transmission, the parking brake
must be set to start Seat Entry
Memory recall. Seat Entry Memory
recall will complete if the parking
brake is released prior to reaching
the saved memory position.
Page 128 of 361
Chevrolet Camaro Owner Manual (GMNA-Localizing-U.S./Canada/Mexico-
13556304) - 2020 - CRC - 9/3/19
Instruments and Controls 127
Reverse Tilt Mirror
When on, both the driver and
passenger, driver, or passenger
outside mirrors will tilt downward
when the vehicle is shifted to
R (Reverse) to improve visibility of
the ground near the rear wheels.
They will return to their previous
driving position when the vehicle is
shifted out of R (Reverse) or the
engine is turned off.
Touch Off, On - Driver and
Passenger, On - Driver, or On -
Passenger.
Lighting
Touch and the following may
display:
.Ambient Lighting
. Vehicle Locator Lights
. Exit Lighting
Ambient Lighting
This setting allows the selection of
available colors for the ambient
lighting in the vehicle. The Link to Drive Mode option will
change the ambient lighting to
match the color being used in the
instrument cluster based on the
setting of the drive mode button.
This feature can be turned off or on.
Vehicle Locator Lights
This setting flashes the vehicle’
s
headlamps when
Kis pressed on
the Remote Keyless Entry (RKE)
transmitter.
Touch Off or On.
Exit Lighting
This setting specifies how long the
headlamps stay on after the vehicle
is turned off and exited.
Touch Off, 30 Seconds, 60 Seconds,
or 120 Seconds.
Power Door Locks
Touch and the following may
display:
. Open Door Anti Lock Out
. Auto Door Unlock
. Delayed Door Lock Open Door Anti Lock Out
This setting prevents the driver door
from locking when the door is open.
If this setting is on, the Delayed
Door Lock menu will not be
available.
Touch Off or On.
Auto Door Unlock
This allows selection of which of the
doors will automatically unlock when
the vehicle is shifted into P (Park)
with an automatic transmission or
when the vehicle is turned off with a
manual transmission.
Select Off, All Doors, or Driver Door.
Delayed Door Lock
When on, this feature will delay the
locking of the doors. To override the
delay, press the power door lock
switch on the door.
Touch Off or On.
Remote Lock, Unlock, Start
Touch and the following may
display:
.
Remote Unlock Light Feedback
Page 132 of 361
Chevrolet Camaro Owner Manual (GMNA-Localizing-U.S./Canada/Mexico-
13556304) - 2020 - CRC - 9/3/19
Lighting 131
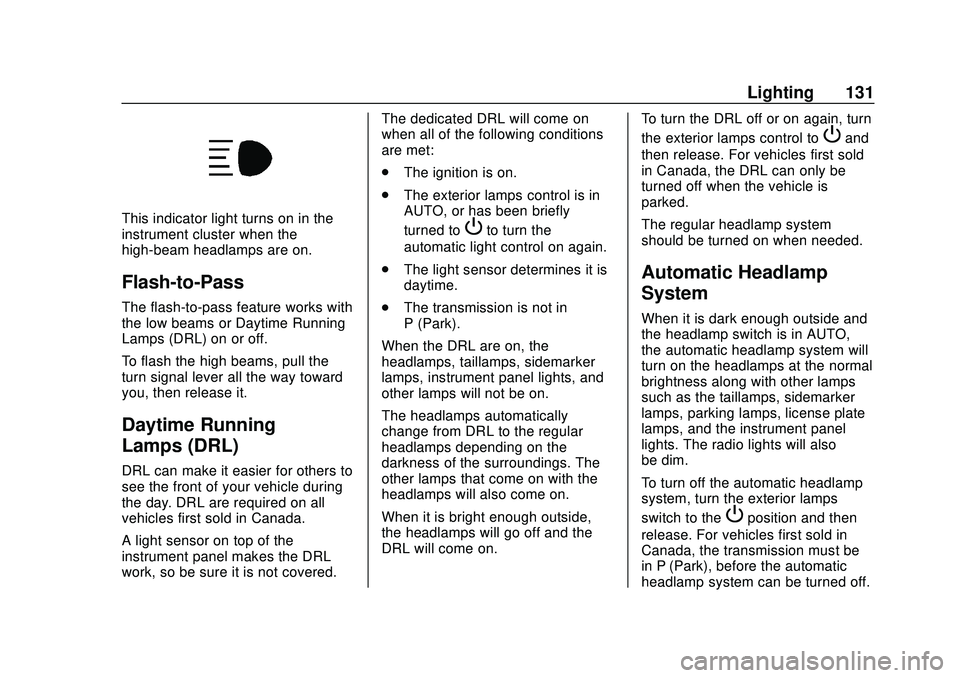
This indicator light turns on in the
instrument cluster when the
high-beam headlamps are on.
Flash-to-Pass
The flash-to-pass feature works with
the low beams or Daytime Running
Lamps (DRL) on or off.
To flash the high beams, pull the
turn signal lever all the way toward
you, then release it.
Daytime Running
Lamps (DRL)
DRL can make it easier for others to
see the front of your vehicle during
the day. DRL are required on all
vehicles first sold in Canada.
A light sensor on top of the
instrument panel makes the DRL
work, so be sure it is not covered.The dedicated DRL will come on
when all of the following conditions
are met:
.
The ignition is on.
. The exterior lamps control is in
AUTO, or has been briefly
turned to
Pto turn the
automatic light control on again.
. The light sensor determines it is
daytime.
. The transmission is not in
P (Park).
When the DRL are on, the
headlamps, taillamps, sidemarker
lamps, instrument panel lights, and
other lamps will not be on.
The headlamps automatically
change from DRL to the regular
headlamps depending on the
darkness of the surroundings. The
other lamps that come on with the
headlamps will also come on.
When it is bright enough outside,
the headlamps will go off and the
DRL will come on. To turn the DRL off or on again, turn
the exterior lamps control to
Pand
then release. For vehicles first sold
in Canada, the DRL can only be
turned off when the vehicle is
parked.
The regular headlamp system
should be turned on when needed.
Automatic Headlamp
System
When it is dark enough outside and
the headlamp switch is in AUTO,
the automatic headlamp system will
turn on the headlamps at the normal
brightness along with other lamps
such as the taillamps, sidemarker
lamps, parking lamps, license plate
lamps, and the instrument panel
lights. The radio lights will also
be dim.
To turn off the automatic headlamp
system, turn the exterior lamps
switch to the
Pposition and then
release. For vehicles first sold in
Canada, the transmission must be
in P (Park), before the automatic
headlamp system can be turned off.
Page 135 of 361

Chevrolet Camaro Owner Manual (GMNA-Localizing-U.S./Canada/Mexico-
13556304) - 2020 - CRC - 9/3/19
134 Lighting
Interior Lamps
Interior Spectrum Lighting
If equipped, this feature allows the
color of the interior lighting in the
vehicle to be chosen.
To access, press
{on the
infotainment controls, then touch
AMBIENT LIGHTING to display the
settings screen.
Touch to select from the following:
OFF : Turns the feature off.
LIGHT STRIPS : Turns on standard
mode. Touch the light strip color to
select a color for the interior lighting.
DEMO MODE : When the shift lever
is in P (Park) (automatic
transmission) or the park brake is
applied (manual transmission),
touch to turn the feature on in colors
chosen by the vehicle. When the
shift lever is not in P (Park) or the
park brake is not applied, the
interior color will default to the last
active color selected in light
strips mode. LINK TO DRIVE MODE :
The light
color is matched to the color being
used for the drive mode.
Reading Lamps
The reading lamps are in the
overhead console. The lamps go on
when a door is opened. When the
doors are closed, press
mornto
turn on each lamp.
Lighting Features
Entry Lighting
Some exterior lamps and interior
lamps turn on briefly at night, or in
areas with limited lighting, when
K
is pressed on the Remote Keyless
Entry (RKE) transmitter. When a
door is opened, the interior lamps
come on. They stay on for about
20 seconds. When all of the doors
have been closed or the ignition is
turned on, they gradually fade out.
This feature can be changed. See
“Vehicle Locator Lights” under
Vehicle Personalization 0125.
Exit Lighting
Some exterior lamps and interior
lights come on at night, or in areas
with limited lighting, when the driver
door is opened after the ignition is
turned off. The interior lamps come
on after the ignition is turned off.
The exterior lamps and interior
lamps remain on for a set amount of
time, then automatically turn off.
Page 141 of 361

Chevrolet Camaro Owner Manual (GMNA-Localizing-U.S./Canada/Mexico-
13556304) - 2020 - CRC - 9/3/19
140 Infotainment System
Delete Recording :Touch to delete
the video. A confirmation screen
displays. Touch Yes to delete or No
to cancel.
Pause/Play : Touch to play or
pause the video. The button will
change when touched.
/: Touch to display the previous
screen.
Exit : Touch to exit the current
display.
Choose Video Overlay
Touch Choose Video Overlay to
display the menu.
Select one:
. No Overlay
. Sport .
Track
. Performance Timing
No Overlay:
No vehicle data displays on top of
the recorded video. Vehicle data is
still available with the video when
accessed in the toolbox software.
Sport:
Displays these vehicle metrics:
. Vehicle Speed: Up to three digits
are displayed in km/h or MPH
depending on vehicle settings.
. Engine Rotations Per Minute
(RPMs): The vertical line and
triangle show current RPMs. As
the RPMs increase, the backfill
follows. .
Transmission State (Current
Gear): Automatic and manual
transmissions display 1, 2, etc.
. Lateral G-Force Graphic: Left
and Right G-Forces are
displayed. The graphic fills to the
left or the right depending on the
measure value. The measured
G-Force displays as a number at
the top of the graphic.
. Event Odometer: This displays
the distance driven since the
recording began.
Track:
Displays these vehicle metrics:
. Vehicle Speed: Same as Sport.
Page 153 of 361
Chevrolet Camaro Owner Manual (GMNA-Localizing-U.S./Canada/Mexico-
13556304) - 2020 - CRC - 9/3/19
152 Driving and Operating
Driving and
Operating
Driving Information
Driving for Better FuelEconomy . . . . . . . . . . . . . . . . . . . . 153
Distracted Driving . . . . . . . . . . . . 153
Defensive Driving . . . . . . . . . . . . . 154
Drunk Driving . . . . . . . . . . . . . . . . . 154
Control of a Vehicle . . . . . . . . . . . 155
Braking . . . . . . . . . . . . . . . . . . . . . . . 155
Steering . . . . . . . . . . . . . . . . . . . . . . 155
Off-Road Recovery . . . . . . . . . . . 156
Loss of Control . . . . . . . . . . . . . . . 156
Track Events and Competitive Driving . . . . . . . . . . . . . . . . . . . . . . 157
Driving on Wet Roads . . . . . . . . 167
Hill and Mountain Roads . . . . . 167
Winter Driving . . . . . . . . . . . . . . . . 168
If the Vehicle Is Stuck . . . . . . . . 169
Vehicle Load Limits . . . . . . . . . . . 170
Starting and Operating
New Vehicle Break-In . . . . . . . . . 174
Ignition Positions . . . . . . . . . . . . . 175
Starting the Engine . . . . . . . . . . . 176
Engine Heater . . . . . . . . . . . . . . . . 178 Retained Accessory
Power (RAP) . . . . . . . . . . . . . . . . 179
Shifting Into Park . . . . . . . . . . . . . 180
Shifting out of Park . . . . . . . . . . . 180
Parking (Manual Transmission) . . . . . . . . . . . . . . . 181
Parking over Things That Burn . . . . . . . . . . . . . . . . . . . 181
Active Fuel Management . . . . . 181
Extended Parking . . . . . . . . . . . . 182
Engine Exhaust
Engine Exhaust . . . . . . . . . . . . . . 182
Running the Vehicle While Parked . . . . . . . . . . . . . . . . . . . . . . 183
Automatic Transmission
Automatic Transmission . . . . . . 183
Manual Mode . . . . . . . . . . . . . . . . . 186
Manual Transmission
Manual Transmission . . . . . . . . . 188
Active Rev Match . . . . . . . . . . . . . 190
Brakes
Antilock BrakeSystem (ABS) . . . . . . . . . . . . . . . 191
Electric Parking Brake . . . . . . . . 192
Brake Assist . . . . . . . . . . . . . . . . . . 193
Hill Start Assist (HSA) . . . . . . . . 194
Ride Control Systems
Traction Control/Electronic Stability Control . . . . . . . . . . . . . 194
Driver Mode Control . . . . . . . . . . 196
Competitive Driving Mode (SS, ZL1 and 1LE
Models Only) . . . . . . . . . . . . . . . . 200
Limited-Slip Rear Axle . . . . . . . . 202
Cruise Control
Cruise Control . . . . . . . . . . . . . . . . 202
Driver Assistance Systems
Driver Assistance Systems . . . 205
Assistance Systems for Parking or Backing . . . . . . . . . . 206
Forward Collision Alert (FCA) System . . . . . . . . . . . . . . . . . . . . . . 208
Side Blind Zone Alert (SBZA) . . . . . . . . . . . . . . . . 210
Lane Change Alert (LCA) . . . . . 211
Fuel
Top Tier Fuel . . . . . . . . . . . . . . . . . 213
Recommended Fuel (3.6L V6 Engine) . . . . . . . . . . . . . . . . . . 213
Recommended Fuel (2.0L L4 Turbo Engine and 6.2L
V8 Engine) . . . . . . . . . . . . . . . . . . 213
Recommended Fuel (6.2L V8 Supercharged Engine) . . . . . . 214
Page 159 of 361

Chevrolet Camaro Owner Manual (GMNA-Localizing-U.S./Canada/Mexico-
13556304) - 2020 - CRC - 9/3/19
158 Driving and Operating
Warning (Continued)
resulting in a crash. See
Capacities and Specifications
0320 for wheel nut torque
specifications.
Engine Oil
Caution
If you use the vehicle for racing or
other competitive driving, the
engine may use more oil than it
would with normal use. Low oil
levels can damage the engine.
For information on how to add oil,
seeEngine Oil 0229.
Be sure to check the oil level
often during racing or other
competitive driving and keep the
level at or near the upper mark
that shows the proper operating
range on the engine oil dipstick. 3.6L (LGX) V6 Engine
Change the engine oil to 0W-40 or
5W-40 that meets the dexos2
specification. If this oil is not
available, the following oil can be
used as an alternative: Valvoline
SYNPOWER MST 5W-40.
For LS/LT 1LE, add 0.9 L (1.0 qt) of
oil over the nominal fill level for a
track event. After the competitive
driving, remove the excess oil so
that the level on the dipstick is not
above the upper mark that shows
the proper operating range.
During track usage, do not follow
the Engine Oil Life System status.
Change the engine oil after four
hours of accumulative track usage.
Fuel
Use premium unleaded gasoline
with a posted octane rating of 93 at
a track event. Unleaded gasoline
with a posted octane rating of
91 may be used, but performance
will be degraded.
Automatic Transmission Fluid
Have the transmission fluid set to
the track specific oil level prior to
track usage. Transmission fluid
should be changed after every
15 hours of track usage. Any
transmission level set or change
should be performed at your dealer.
Manual Transmission Fluid
Manual transmission fluid should be
changed after every 15 hours of
track usage.
Rear Axle Fluid
Axles must have 2 400 km
(1,500 mi) before being used in
track driving.
The rear axle fluid temperatures
may be higher than when driving in
severe conditions. Drain and refill
with new fluid after the first racing or
competitive driving event, and then
after every 24 hours of racing or
competitive driving. See
Recommended Fluids and
Lubricants
0315.