battery replacement CHEVROLET CRUZE 2018 Owner's Manual
[x] Cancel search | Manufacturer: CHEVROLET, Model Year: 2018, Model line: CRUZE, Model: CHEVROLET CRUZE 2018Pages: 404, PDF Size: 4.64 MB
Page 34 of 404
Chevrolet Cruze Owner Manual (GMNA-Localizing-U.S./Canada/Mexico-
11348462) - 2018 - crc - 5/15/17
Keys, Doors, and Windows 33
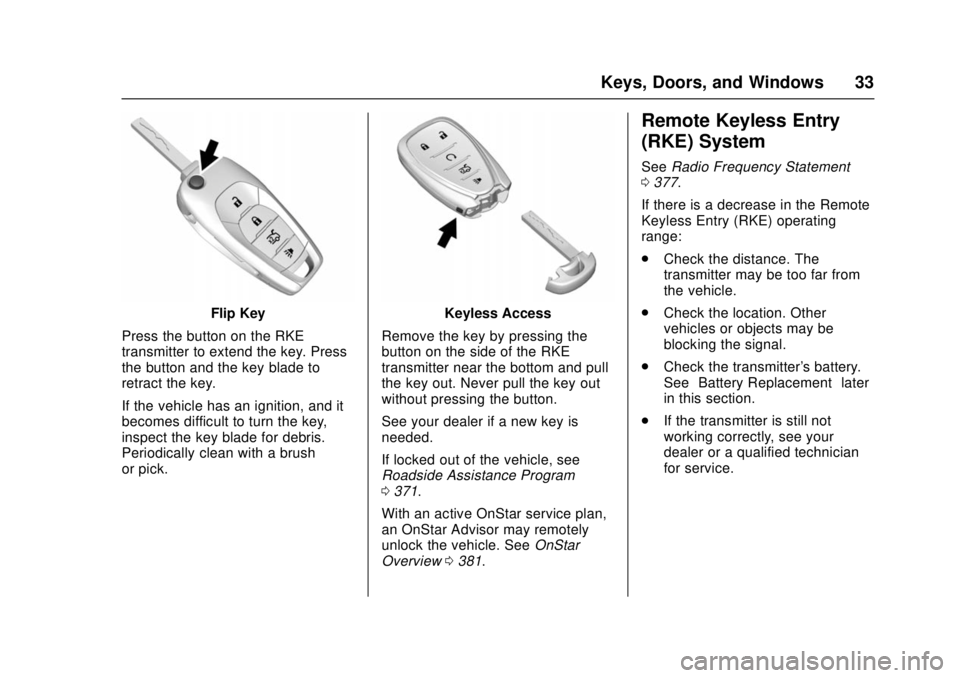
Flip Key
Press the button on the RKE
transmitter to extend the key. Press
the button and the key blade to
retract the key.
If the vehicle has an ignition, and it
becomes difficult to turn the key,
inspect the key blade for debris.
Periodically clean with a brush
or pick.Keyless Access
Remove the key by pressing the
button on the side of the RKE
transmitter near the bottom and pull
the key out. Never pull the key out
without pressing the button.
See your dealer if a new key is
needed.
If locked out of the vehicle, see
Roadside Assistance Program
0 371.
With an active OnStar service plan,
an OnStar Advisor may remotely
unlock the vehicle. See OnStar
Overview 0381.
Remote Keyless Entry
(RKE) System
See Radio Frequency Statement
0 377.
If there is a decrease in the Remote
Keyless Entry (RKE) operating
range:
. Check the distance. The
transmitter may be too far from
the vehicle.
. Check the location. Other
vehicles or objects may be
blocking the signal.
. Check the transmitter's battery.
See “Battery Replacement” later
in this section.
. If the transmitter is still not
working correctly, see your
dealer or a qualified technician
for service.
Page 36 of 404
Chevrolet Cruze Owner Manual (GMNA-Localizing-U.S./Canada/Mexico-
11348462) - 2018 - crc - 5/15/17
Keys, Doors, and Windows 35
keys no longer work. Any remaining
keys will need to be reprogrammed.
Each vehicle can have up to eight
keys matched to it.
Programming with Two
Recognized Keys (Key
Vehicles Only)
This procedure is for adding a
transmitter, not replacing a
transmitter. To program:1. Insert the original, already programmed key in the ignition
and turn the ignition on.
2. Turn the ignition off, and remove the key.
3. Quickly, within five seconds, insert the second original
already programmed key in the
ignition and turn the ignition on.
4. Turn the ignition off, and remove the key.
5. Insert the new key to be programmed and turn the
ignition on within five seconds.
The security light will turn off
once the key has been
programmed. 6. Repeat Steps 1–5 if additional
keys are to be programmed.
If a key is lost or damaged, see your
dealer to have a new key made.
Programming without Two
Recognized Keys (Key
Vehicles Only)
Program a new key to the vehicle
when a recognized key is not
available. Canadian regulations
require that owners see their dealer.
If two currently recognized keys are
not available, follow this procedure
to program the first key.
This procedure will take
approximately 30 minutes to
complete for the first key. The
vehicle must be off and all of the
keys you wish to program must be
with you. 1. Insert the new vehicle key into the ignition.
2. Turn the ignition on. The security light will come on.
3. Wait 10 minutes until the security light turns off.
4. Turn the ignition off. 5. Repeat Steps 2–4 two more
times. After the third time, turn
the ignition on; the key is
learned and all previously
known keys will no longer work
with the vehicle.
6. To learn a second key, turn the ignition off, insert the second
key to be learned, and turn the
ignition on.
After two keys are learned,
remaining keys can be learned by
following the procedure in
“Programming with Two Recognized
Keys (Key Vehicles Only).”
Battery Replacement
Replace the battery if the REPLACE
BATTERY IN REMOTE KEY
message displays in the DIC.
Caution
When replacing the battery, do
not touch any of the circuitry on
the transmitter. Static from your
body could damage the
transmitter.
Page 40 of 404
Chevrolet Cruze Owner Manual (GMNA-Localizing-U.S./Canada/Mexico-
11348462) - 2018 - crc - 5/15/17
Keys, Doors, and Windows 39
Remote No Longer in Vehicle Alert
If the vehicle is on with a door open,
and then all doors are closed, the
vehicle will check for RKE
transmitters inside. If an RKE
transmitter is not detected, the DIC
will display NO REMOTE
DETECTED and the horn will chirp
three times. This occurs only once
each time the vehicle is driven. To
turn on or off seeVehicle
Personalization 0145.
Keyless Trunk Opening
Press the touch pad on the rear of
the trunk above the license plate to
open the trunk when the RKE
transmitter is in range.
Key Access
To access a vehicle with a dead
transmitter battery, see Door Locks
0 44.
Programming Transmitters to
the Vehicle
Only RKE transmitters programmed
to the vehicle will work. If a
transmitter is lost or stolen, a
replacement can be purchased and programmed through your dealer.
The vehicle can be reprogrammed
so that lost or stolen transmitters no
longer work. Any remaining
transmitters will need to be
reprogrammed. Each vehicle can
have up to eight transmitters
matched to it.
Programming with Recognized
Transmitters (Keyless Access
Vehicles Only)
A new transmitter can be
programmed to the vehicle when
there are two recognized
transmitters. To program, the vehicle
must be off and all of the
transmitters, both currently
recognized and new, must be
with you.
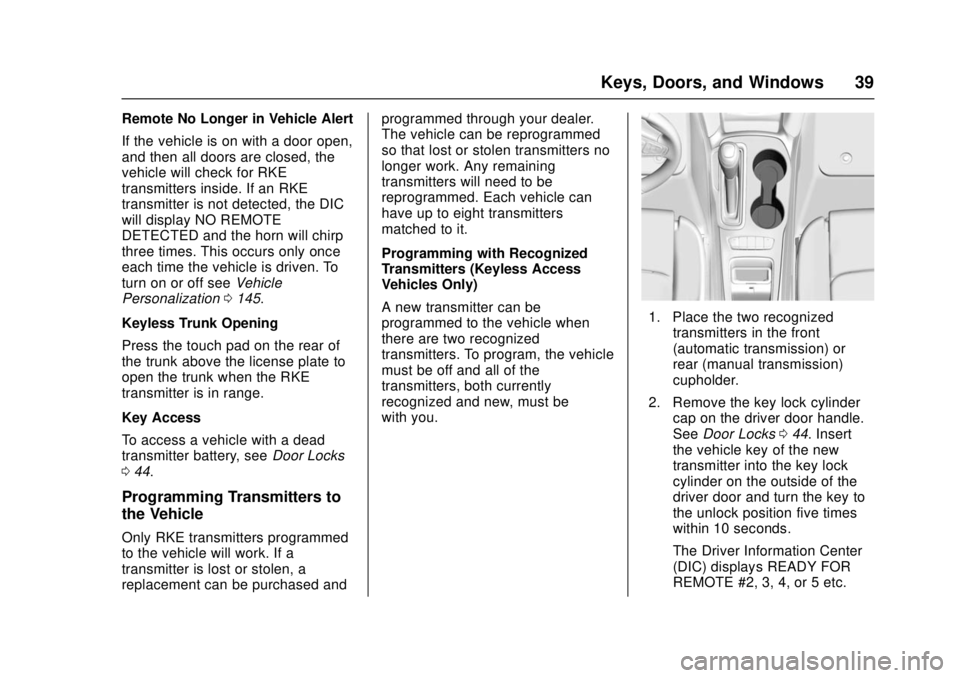
1. Place the two recognized
transmitters in the front
(automatic transmission) or
rear (manual transmission)
cupholder.
2. Remove the key lock cylinder cap on the driver door handle.
See Door Locks 044. Insert
the vehicle key of the new
transmitter into the key lock
cylinder on the outside of the
driver door and turn the key to
the unlock position five times
within 10 seconds.
The Driver Information Center
(DIC) displays READY FOR
REMOTE #2, 3, 4, or 5 etc.
Page 42 of 404
Chevrolet Cruze Owner Manual (GMNA-Localizing-U.S./Canada/Mexico-
11348462) - 2018 - crc - 5/15/17
Keys, Doors, and Windows 41
5. Press ENGINE START/STOP.When the transmitter is learned
the DIC will show that it is
ready to program the next
transmitter.
6. Remove the transmitter from the cupholder and press
Kor
Qon the transmitter.
To program additional
transmitters, repeat Steps 4–6.
When all additional transmitters
are programmed, press and
hold ENGINE START/STOP for
12 seconds to exit
programming mode.
7. Return the vehicle key back into the transmitter.
Starting the Vehicle with a Low
Transmitter Battery
If the transmitter battery is weak or if
there is interference with the signal
when trying to start the vehicle, the
DIC may display NO REMOTE
DETECTED or NO REMOTE KEY
WAS DETECTED PLACE KEY IN
TRANSMITTER POCKET THEN
START YOUR VEHICLE. The REPLACE BATTERY IN REMOTE
KEY message may also be
displayed at this time.
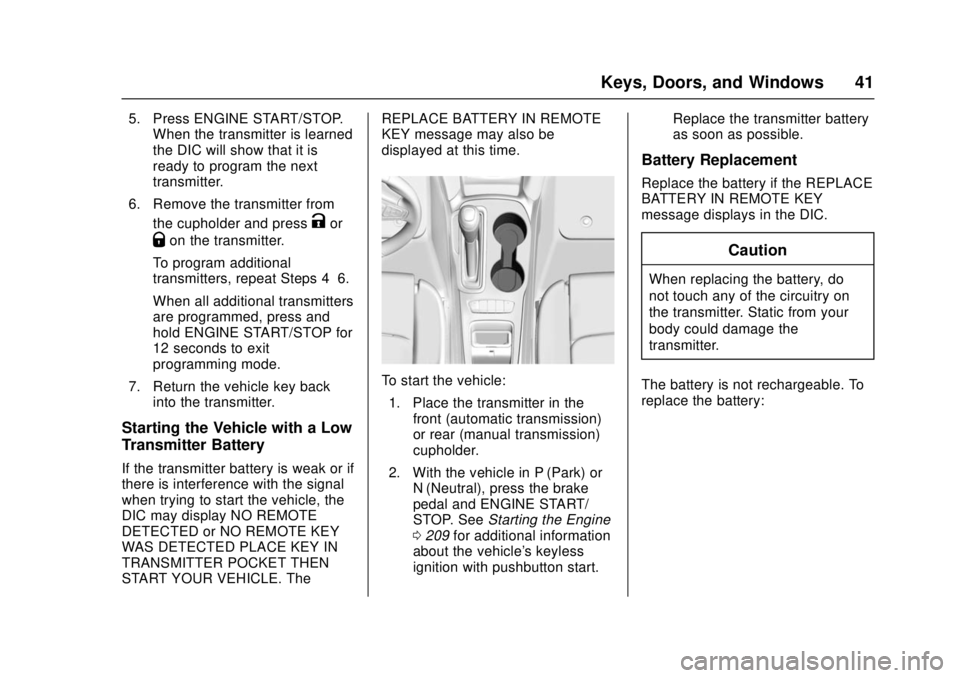
To start the vehicle:
1. Place the transmitter in the front (automatic transmission)
or rear (manual transmission)
cupholder.
2. With the vehicle in P (Park) or N (Neutral), press the brake
pedal and ENGINE START/
STOP. See Starting the Engine
0 209 for additional information
about the vehicle's keyless
ignition with pushbutton start. Replace the transmitter battery
as soon as possible.
Battery Replacement
Replace the battery if the REPLACE
BATTERY IN REMOTE KEY
message displays in the DIC.
Caution
When replacing the battery, do
not touch any of the circuitry on
the transmitter. Static from your
body could damage the
transmitter.
The battery is not rechargeable. To
replace the battery:
Page 87 of 404
Chevrolet Cruze Owner Manual (GMNA-Localizing-U.S./Canada/Mexico-
11348462) - 2018 - crc - 5/15/17
86 Seats and Restraints
{Warning
For up to 10 seconds after the
vehicle is turned off and the
battery is disconnected, an airbag
can still inflate during improper
service. You can be injured if you
are close to an airbag when it
inflates. Avoid yellow connectors.
They are probably part of the
airbag system. Be sure to follow
proper service procedures, and
make sure the person performing
work for you is qualified to do so.
Adding Equipment to the
Airbag-Equipped Vehicle
Adding accessories that change the
vehicle's frame, bumper system,
height, front end, or side sheet
metal may keep the airbag system
from working properly. The
operation of the airbag system can
also be affected by changing any
parts of the front seats, seat belts,
airbag sensing and diagnostic
module, steering wheel, instrument
panel, inner door seals including thespeakers, any of the airbag
modules, ceiling or pillar garnish
trim, overhead console, front
sensors, side impact sensors,
or airbag wiring.
Your dealer and the service manual
have information about the location
of the airbag sensors, sensing and
diagnostic module, and airbag
wiring.
In addition, the vehicle has a
passenger sensing system for the
front outboard passenger position,
which includes sensors that are part
of the passenger seat. The
passenger sensing system may not
operate properly if the original seat
trim is replaced with non-GM
covers, upholstery, or trim; or with
GM covers, upholstery, or trim
designed for a different vehicle. Any
object, such as an aftermarket seat
heater or a comfort-enhancing pad
or device, installed under or on top
of the seat fabric, could also
interfere with the operation of the
passenger sensing system. This
could either prevent proper
deployment of the passenger
airbag(s) or prevent the passengersensing system from properly
turning off the passenger airbag(s).
See
Passenger Sensing System
0 81.
If the vehicle has rollover roof-rail
airbags, see Different Size Tires
and Wheels 0314 for additional
important information.
If you have to modify your vehicle
because you have a disability and
have questions about whether the
modifications will affect the vehicle's
airbag system, or if you have
questions about whether the airbag
system will be affected if the vehicle
is modified for any other reason, call
Customer Assistance. See
Customer Assistance Offices 0369.Airbag System Check
The airbag system does not need
regularly scheduled maintenance or
replacement. Make sure the airbag
readiness light is working. See
Airbag Readiness Light 0128.
Page 145 of 404
Chevrolet Cruze Owner Manual (GMNA-Localizing-U.S./Canada/Mexico-
11348462) - 2018 - crc - 5/15/17
144 Instruments and Controls
Vehicle Messages
Messages displayed on the DIC
indicate the status of the vehicle or
some action that may be needed to
correct a condition. Multiple
messages may appear one after
another.
The messages that do not require
immediate action can be
acknowledged and cleared by
pressing
V. The messages that
require immediate action cannot be
cleared until that action is
performed.
All messages should be taken
seriously; clearing the message
does not correct the problem.
If a SERVICE message appears,
see your dealer.
Follow the instructions given in the
messages. The system displays
messages regarding the following
topics:
. Service Messages
. Fluid Levels
. Vehicle Security .
Brakes
. Ride Control Systems
. Driver Assistance Systems
. Cruise Control
. Lighting and Bulb Replacement
. Wiper/Washer Systems
. Doors and Windows
. Seat Belts
. Airbag Systems
. Engine and Transmission
. Tire Pressure
. Battery
Engine Power Messages
ENGINE POWER IS REDUCED
This message displays when the
vehicle's propulsion power is
reduced. Reduced propulsion power
can affect the vehicle's ability to
accelerate. If this message is on,
but there is no observed reduction
in performance, proceed to your
destination. The performance may
be reduced the next time the vehicle
is driven. The vehicle may be driven while this message is on, but
maximum acceleration and speed
may be reduced. Anytime this
message stays on, or displays
repeatedly, the vehicle should be
taken to your dealer for service as
soon as possible.
Vehicle Speed Messages
SPEED LIMITED TO XXX
KM/H (MPH)
This message shows that the
vehicle speed has been limited to
the speed displayed. The limited
speed is a protection for various
propulsion and vehicle systems,
such as lubrication, thermal,
suspension, Teen Driver if
equipped, or tires.
Page 259 of 404
Chevrolet Cruze Owner Manual (GMNA-Localizing-U.S./Canada/Mexico-
11348462) - 2018 - crc - 5/15/17
258 Vehicle Care
Vehicle Care
General Information
General Information . . . . . . . . . . 259
California Proposition65 Warning . . . . . . . . . . . . . . . . . 259
California Perchlorate Materials Requirements . . . . . 260
Accessories and Modifications . . . . . . . . . . . . . . . . 260
Vehicle Checks
Doing Your OwnService Work . . . . . . . . . . . . . . . 260
Hood . . . . . . . . . . . . . . . . . . . . . . . . . 261
Engine Compartment Overview . . . . . . . . . . . . . . . . . . . . 262
Engine Oil . . . . . . . . . . . . . . . . . . . . 265
Engine Oil Life System . . . . . . . 268
Automatic Transmission Fluid . . . . . . . . . . . . . . . . . . . . . . . . 269
Manual Transmission Fluid . . . 270
Hydraulic Clutch . . . . . . . . . . . . . . 270
Engine Air Cleaner/Filter . . . . . . 270
Cooling System . . . . . . . . . . . . . . 272
Engine Overheating . . . . . . . . . . 275
Washer Fluid . . . . . . . . . . . . . . . . . 276
Brakes . . . . . . . . . . . . . . . . . . . . . . . 277
Brake Fluid . . . . . . . . . . . . . . . . . . . 278
Battery - North America . . . . . . 279 Fuel Filter . . . . . . . . . . . . . . . . . . . . 280
Starter Switch Check . . . . . . . . . 280
Automatic Transmission Shift
Lock Control Function
Check . . . . . . . . . . . . . . . . . . . . . . . 281
Ignition Transmission Lock Check . . . . . . . . . . . . . . . . . . . . . . . 281
Park Brake and P (Park) Mechanism Check . . . . . . . . . . 281
Wiper Blade Replacement . . . . 282
Gas Strut(s) . . . . . . . . . . . . . . . . . . 283
Headlamp Aiming
Headlamp Aiming . . . . . . . . . . . . 284
Bulb Replacement
Bulb Replacement . . . . . . . . . . . . 284
Halogen Bulbs . . . . . . . . . . . . . . . . 284
High Intensity Discharge (HID) Lighting . . . . . . . . . . . . . . . . . . . . . 285
Headlamps and Front Turn Signal . . . . . . . . . . . . . . . . . . . . . . . 285
Taillamps and Back-Up Lamps . . . . . . . . . . . . . . . . . . . . . . 286
License Plate Lamp (Liftgate Models) . . . . . . . . . . . . . . . . . . . . . 289
Electrical System
Electrical System Overload . . . 290
Fuses and Circuit Breakers . . . 290
Engine Compartment FuseBlock . . . . . . . . . . . . . . . . . . . . . . . . 291 Instrument Panel Fuse
Block . . . . . . . . . . . . . . . . . . . . . . . . 295
Wheels and Tires
Tires . . . . . . . . . . . . . . . . . . . . . . . . . . 298
All-Season Tires . . . . . . . . . . . . . . 298
Winter Tires . . . . . . . . . . . . . . . . . . 299
Low-Profile Tires . . . . . . . . . . . . . 299
Tire Sidewall Labeling . . . . . . . . 300
Tire Designations . . . . . . . . . . . . . 302
Tire Terminology andDefinitions . . . . . . . . . . . . . . . . . . 302
Tire Pressure . . . . . . . . . . . . . . . . . 305
Tire Pressure for High-Speed Operation . . . . . . . . . . . . . . . . . . . 306
Tire Pressure Monitor System . . . . . . . . . . . . . . . . . . . . . . 307
Tire Pressure Monitor Operation . . . . . . . . . . . . . . . . . . . 308
Tire Inspection . . . . . . . . . . . . . . . . 311
Tire Rotation . . . . . . . . . . . . . . . . . . 311
When It Is Time for New Tires . . . . . . . . . . . . . . . . . . . . . . . . 312
Buying New Tires . . . . . . . . . . . . . 313
Different Size Tires and Wheels . . . . . . . . . . . . . . . . . . . . . . 314
Uniform Tire Quality Grading . . . . . . . . . . . . . . . . . . . . . 315
Wheel Alignment and Tire Balance . . . . . . . . . . . . . . . . . . . . . 316
Wheel Replacement . . . . . . . . . . 316
Page 280 of 404
Chevrolet Cruze Owner Manual (GMNA-Localizing-U.S./Canada/Mexico-
11348462) - 2018 - crc - 5/15/17
Vehicle Care 279
{Warning
If too much brake fluid is added, it
can spill on the engine and burn,
if the engine is hot enough. You
or others could be burned, and
the vehicle could be damaged.
Add brake fluid only when work is
done on the brake/clutch
hydraulic system.
When the brake/clutch fluid falls to a
low level, the brake warning light
comes on. See Brake System
Warning Light 0132.
Brake fluid absorbs water over time
which degrades the effectiveness of
the brake fluid. Replace brake fluid
at the specified intervals to prevent
increased stopping distance. See
Maintenance Schedule 0350.
What to Add
Use only GM approved DOT 3
brake fluid from a clean, sealed
container. See Recommended
Fluids and Lubricants 0359.
{Warning
The wrong or contaminated brake
fluid could result in damage to the
brake system. This could result in
the loss of braking leading to a
possible injury. Always use the
proper GM approved brake fluid.
Caution
If brake fluid is spilled on the
vehicle's painted surfaces, the
paint finish can be damaged.
Immediately wash off any painted
surface.
Battery - North America
The original equipment battery is
maintenance free. Do not remove
the cap and do not add fluid.
Refer to the replacement number on
the original battery label when a
new battery is needed. Some vehicles are equipped with an
Absorbant Glass Mat (AGM) 12-volt
battery. Installation of a standard
12-volt battery will result in reduced
battery life. When using a 12-volt
battery charger, some chargers
have an AGM battery setting on the
charger. If available, use the AGM
setting on the charger when
charging an AGM battery. Follow the
charger manufacture's instructions.
{Warning
WARNING:
Battery posts,
terminals, and related
accessories contain lead and lead
compounds, chemicals known to
the State of California to cause
cancer and birth defects or other
reproductive harm. Batteries also
contain other chemicals known to
the State of California to cause
cancer. WASH HANDS AFTER
HANDLING. For more information
go to www.P65Warnings.ca.gov/
passenger-vehicle.
Page 281 of 404
Chevrolet Cruze Owner Manual (GMNA-Localizing-U.S./Canada/Mexico-
11348462) - 2018 - crc - 5/15/17
280 Vehicle Care
SeeCalifornia Proposition
65 Warning 0259 and the back
cover.
Vehicle Storage
{Warning
Batteries have acid that can burn
you and gas that can explode.
You can be badly hurt if you are
not careful. See Jump Starting -
North America 0333 for tips on
working around a battery without
getting hurt.
Infrequent Usage: Remove the
black, negative (−) cable from the
battery to keep the battery from
running down.
Extended Storage: Remove the
black, negative (−) cable from the
battery or use a battery trickle
charger.
Fuel Filter
The fuel filter is under the vehicle on
the driver side in front of the left rear
tire. For replacement of the filter,
see Fuel Filter Replacement
(Diesel) 0254. Also see
Maintenance Schedule 0350 for
recommended draining and
replacement intervals.
Starter Switch Check
{Warning
When you are doing this
inspection, the vehicle could
move suddenly. If the vehicle
moves, you or others could be
injured.
1. Before starting this check, be sure there is enough room
around the vehicle.
2. Apply both the parking brake and the regular brake.
Do not use the accelerator
pedal, and be ready to turn off
the engine immediately if it
starts.
3. For automatic transmission vehicles, try to start the engine
in each gear. The vehicle
should start only in P (Park) or
N (Neutral). If the vehicle starts
in any other position, contact
your dealer for service.
Page 358 of 404
Chevrolet Cruze Owner Manual (GMNA-Localizing-U.S./Canada/Mexico-
11348462) - 2018 - crc - 5/15/17
Service and Maintenance 357
.To avoid break-down or failure to
start the vehicle, maintain a
battery with full cranking power.
. Trained dealer technicians have
the diagnostic equipment to test
the battery and ensure that the
connections and cables are
corrosion-free.
Belts
. Belts may need replacing if they
squeak or show signs of
cracking or splitting.
. Trained dealer technicians have
access to tools and equipment
to inspect the belts and
recommend adjustment or
replacement when necessary.
. A message may indicate when
scheduled maintenance on the
timing belt and other
components is required.
Brakes
Brakes stop the vehicle and are
crucial to safe driving.
. Signs of brake wear may include
chirping, grinding, or squealing
noises, or difficulty stopping. .
Trained dealer technicians have
access to tools and equipment
to inspect the brakes and
recommend quality parts
engineered for the vehicle.
Fluids
Proper fluid levels and approved
fluids protect the vehicle’s systems
and components. See
Recommended Fluids and
Lubricants 0359 for GM approved
fluids.
. Engine oil and windshield
washer fluid levels should be
checked at every fuel fill.
. Instrument cluster lights may
come on to indicate that fluids
may be low and need to be
filled.
Hoses
Hoses transport fluids and should
be regularly inspected to ensure
that there are no cracks or leaks.
With a multi-point inspection, your
dealer can inspect the hoses and
advise if replacement is needed. Lamps
Properly working headlamps,
taillamps, and brake lamps are
important to see and be seen on
the road.
.
Signs that the headlamps need
attention include dimming, failure
to light, cracking, or damage.
The brake lamps need to be
checked periodically to ensure
that they light when braking.
. With a multi-point inspection,
your dealer can check the lamps
and note any concerns.
Shocks and Struts
Shocks and struts help aid in control
for a smoother ride.
. Signs of wear may include
steering wheel vibration, bounce/
sway while braking, longer
stopping distance, or uneven
tire wear.
. As part of the multi-point
inspection, trained dealer
technicians can visually inspect
the shocks and struts for signs