headlamp CHEVROLET EXPRESS PASSANGER 2007 1.G User Guide
[x] Cancel search | Manufacturer: CHEVROLET, Model Year: 2007, Model line: EXPRESS PASSANGER, Model: CHEVROLET EXPRESS PASSANGER 2007 1.GPages: 458, PDF Size: 2.62 MB
Page 289 of 458
Electrical System........................................ 393
Add-On Electrical Equipment..................... 393
Headlamp Wiring....................................... 393
Windshield Wiper Fuses............................ 393Fuses and Circuit Breakers....................... 393
Floor Console Fuse Block......................... 394
Engine Compartment Fuse Block............... 395
Capacities and Speci�cations.................... 398
Section 5 Service and Appearance Care
289
Page 340 of 458
Bulb Replacement
For the proper type of replacement bulbs, see
Replacement Bulbs on page 344.
For any bulb changing procedure not listed in
this section, contact your dealer.
Halogen Bulbs
{CAUTION:
Halogen bulbs have pressurized gas
inside and can burst if you drop or
scratch the bulb. You or others could be
injured. Be sure to read and follow the
instructions on the bulb package.
Headlamps
To remove the headlamp assembly from the
vehicle and access the bulbs:
1. Open the hood. SeeHood Release on
page 300for more information.
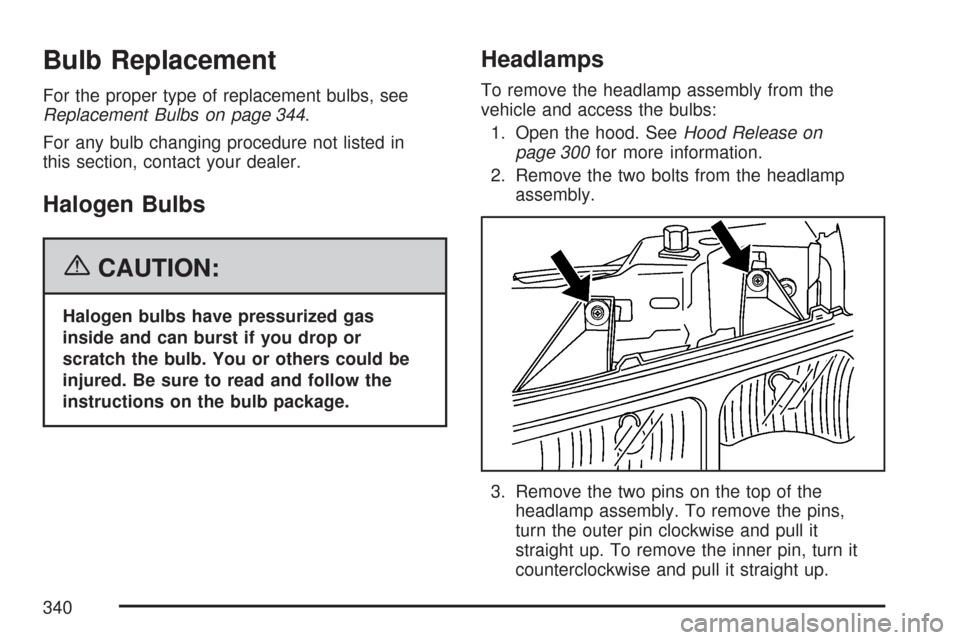
2. Remove the two bolts from the headlamp
assembly.
3. Remove the two pins on the top of the
headlamp assembly. To remove the pins,
turn the outer pin clockwise and pull it
straight up. To remove the inner pin, turn it
counterclockwise and pull it straight up.
340
Page 341 of 458
4. Lift the inboard side of the headlamp to
release the inboard tab from the radiator
support.
5. Lift the outboard side of the headlamp to
release the outboard tab from the radiator
support.
6. Lower the headlamp to allow the vertical
adjustor to clear the tie bar.
7. Turn the headlamp forward and upward to
remove it from the grille.
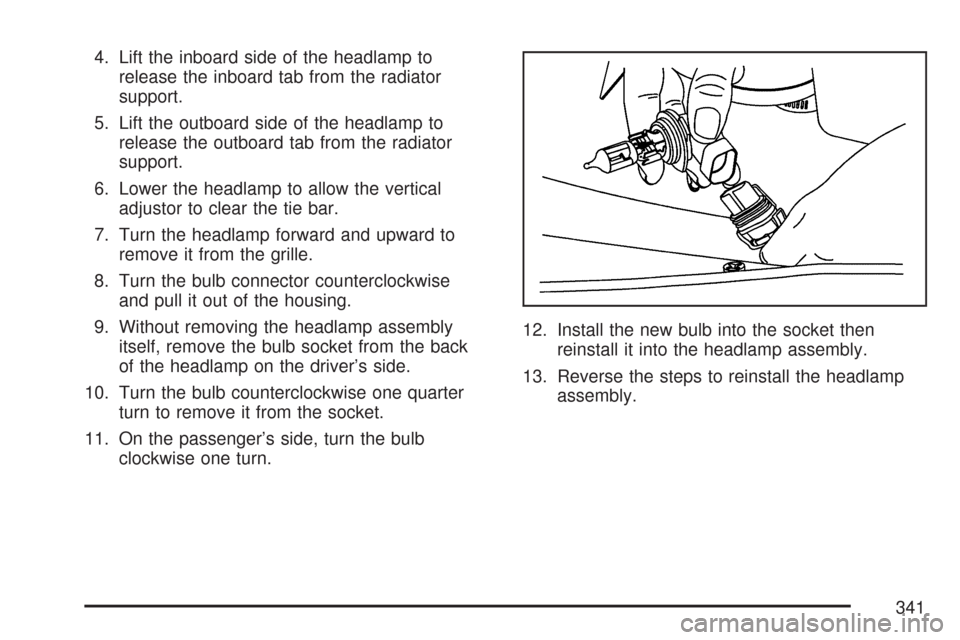
8. Turn the bulb connector counterclockwise
and pull it out of the housing.
9. Without removing the headlamp assembly
itself, remove the bulb socket from the back
of the headlamp on the driver’s side.
10. Turn the bulb counterclockwise one quarter
turn to remove it from the socket.
11. On the passenger’s side, turn the bulb
clockwise one turn.12. Install the new bulb into the socket then
reinstall it into the headlamp assembly.
13. Reverse the steps to reinstall the headlamp
assembly.
341
Page 344 of 458
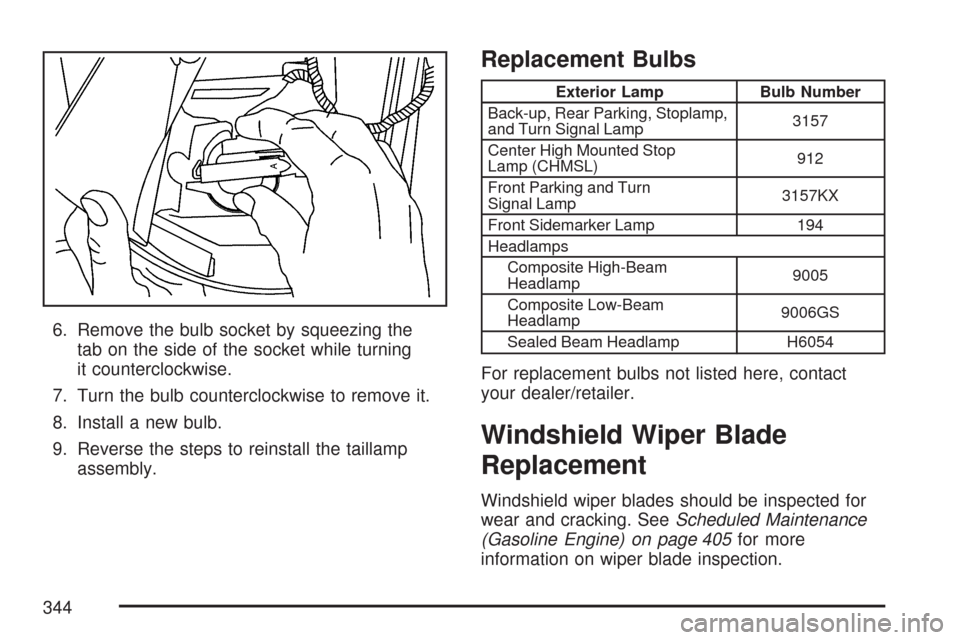
6. Remove the bulb socket by squeezing the
tab on the side of the socket while turning
it counterclockwise.
7. Turn the bulb counterclockwise to remove it.
8. Install a new bulb.
9. Reverse the steps to reinstall the taillamp
assembly.
Replacement Bulbs
Exterior Lamp Bulb Number
Back-up, Rear Parking, Stoplamp,
and Turn Signal Lamp3157
Center High Mounted Stop
Lamp (CHMSL)912
Front Parking and Turn
Signal Lamp3157KX
Front Sidemarker Lamp 194
Headlamps
Composite High-Beam
Headlamp9005
Composite Low-Beam
Headlamp9006GS
Sealed Beam Headlamp H6054
For replacement bulbs not listed here, contact
your dealer/retailer.
Windshield Wiper Blade
Replacement
Windshield wiper blades should be inspected for
wear and cracking. SeeScheduled Maintenance
(Gasoline Engine) on page 405for more
information on wiper blade inspection.
344
Page 363 of 458
If you need to replace any of your wheels,
wheel bolts or wheel nuts, replace them only with
new GM original equipment parts. This way,
you will be sure to have the right wheel, wheel
bolts and wheel nuts for your vehicle.
{CAUTION:
Using the wrong replacement wheels,
wheel bolts, or wheel nuts on your vehicle
can be dangerous. It could affect the
braking and handling of your vehicle,
make your tires lose air and make you
lose control. You could have a collision
in which you or others could be injured.
Always use the correct wheel, wheel bolts,
and wheel nuts for replacement.
Notice:The wrong wheel can also cause
problems with bearing life, brake cooling,
speedometer or odometer calibration,
headlamp aim, bumper height, vehicle ground
clearance, and tire or tire chain clearance
to the body and chassis.Whenever a wheel, wheel bolt or wheel nut is
replaced on a dual wheel setup, check the wheel
nut torque after 100, 1,000 and 6,000 miles
(160, 1 600 and 10 000 km) of driving. For proper
torque, see “Wheel Nut Torque” underCapacities
and Speci�cations on page 398.
SeeChanging a Flat Tire on page 366for more
information.Used Replacement Wheels
{CAUTION:
Putting a used wheel on your vehicle is
dangerous. You cannot know how it has
been used or how far it has been driven.
It could fail suddenly and cause a crash.
If you have to replace a wheel, use a
new GM original equipment wheel.
363
Page 393 of 458
Electrical System
Add-On Electrical Equipment
Notice:Do not add anything electrical to your
vehicle unless you check with your dealer
�rst. Some electrical equipment can damage
your vehicle and the damage would not
be covered by your warranty. Some add-on
electrical equipment can keep other
components from working as they should.
Your vehicle has an air bag system. Before
attempting to add anything electrical to your
vehicle, seeServicing Your Airbag-Equipped
Vehicle on page 96.
Headlamp Wiring
The headlamp wiring is protected by fuses in the
engine compartment fuse block. An electrical
overload will cause the lamps to flicker on and off,
or in some cases to remain off. If this happens,
have your headlamp wiring checked right away.
Windshield Wiper Fuses
The windshield wiper motor is protected by a
circuit breaker and a fuse. If the motor overheats
due to heavy snow, etc., the wiper will stop
until the motor cools. Although the circuit is
protected from electrical overload, overload due
to heavy snow, etc., may cause wiper linkage
damage. Always clear ice and heavy snow from
the windshield before using the windshield wipers.
If the overload is caused by some electrical
problem and not snow, etc., be sure to get it fixed.
Fuses and Circuit Breakers
The wiring circuits in your vehicle are protected
from short circuits by a combination of fuses
and circuit breakers. This greatly reduces
the chance of fires caused by electrical problems.
Look at the silver-colored band inside the fuse.
If the band is broken or melted, replace the fuse.
Be sure you replace a bad fuse with a new
one of the identical size and rating.
393
Page 397 of 458
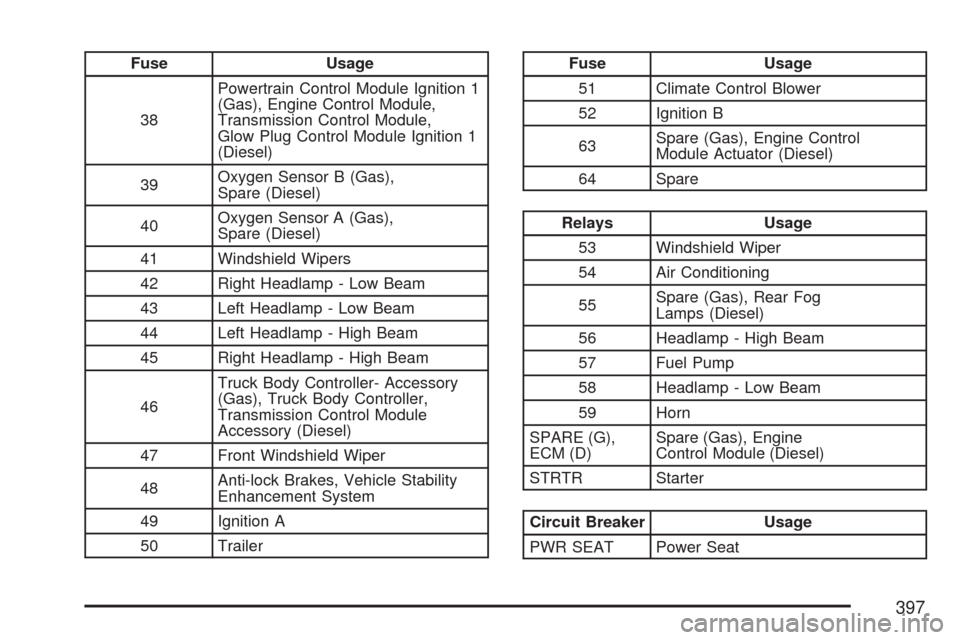
Fuse Usage
38Powertrain Control Module Ignition 1
(Gas), Engine Control Module,
Transmission Control Module,
Glow Plug Control Module Ignition 1
(Diesel)
39Oxygen Sensor B (Gas),
Spare (Diesel)
40Oxygen Sensor A (Gas),
Spare (Diesel)
41 Windshield Wipers
42 Right Headlamp - Low Beam
43 Left Headlamp - Low Beam
44 Left Headlamp - High Beam
45 Right Headlamp - High Beam
46Truck Body Controller- Accessory
(Gas), Truck Body Controller,
Transmission Control Module
Accessory (Diesel)
47 Front Windshield Wiper
48Anti-lock Brakes, Vehicle Stability
Enhancement System
49 Ignition A
50 TrailerFuse Usage
51 Climate Control Blower
52 Ignition B
63Spare (Gas), Engine Control
Module Actuator (Diesel)
64 Spare
Relays Usage
53 Windshield Wiper
54 Air Conditioning
55Spare (Gas), Rear Fog
Lamps (Diesel)
56 Headlamp - High Beam
57 Fuel Pump
58 Headlamp - Low Beam
59 Horn
SPARE (G),
ECM (D)Spare (Gas), Engine
Control Module (Diesel)
STRTR Starter
Circuit Breaker Usage
PWR SEAT Power Seat
397
Page 446 of 458
Audio System.............................................. 187
AM-FM Radio.......................................... 190
Care of Your Cassette Tape Player.......... 224
Care of Your CD Player........................... 226
Care of Your CDs.................................... 225
Chime Level Adjustment........................... 226
Fixed Mast Antenna................................. 226
Radio with Cassette and CD.................... 198
Radio with CD......................................... 193
Radio with Six-Disc CD............................ 211
Setting the Time with Radio Data
Systems (RDS)..................................... 189
Setting the Time without Radio Data
Systems (RDS)..................................... 189
Theft-Deterrent Feature............................ 223
Understanding Radio Reception............... 224
Automatic Transmission
Fluid........................................................ 309
Operation................................................. 125
B
Battery........................................................ 329
Run-Down Protection............................... 158
Before Leaving on a Long Trip.................... 252Brake
Emergencies............................................ 235
Parking.................................................... 128
Brakes........................................................ 325
System Warning Light.............................. 175
Braking....................................................... 232
Braking in Emergencies............................... 235
Break-In, New Vehicle................................. 119
Bulb Replacement....................................... 340
Center High-Mounted Stoplamp
(CHMSL).............................................. 342
Front Turn Signal, Sidemarker and
Parking Lamps..................................... 342
Halogen Bulbs......................................... 340
Headlamps............................................... 340
Replacement Bulbs.................................. 344
Taillamps.................................................. 343
Buying New Tires........................................ 358
C
Calibration................................................... 134
California Fuel............................................. 293
California Proposition 65 Warning................ 291
Canadian Owners........................................... 3
446
Page 449 of 458

Driving
At Night................................................... 244
City.......................................................... 249
Defensive................................................. 228
Drunken................................................... 229
Freeway................................................... 250
Hill and Mountain Roads.......................... 254
In Rain and on Wet Roads...................... 246
Rocking Your Vehicle to Get it Out.......... 260
Winter...................................................... 256
Dual Tire Operation..................................... 355
E
EDR ............................................................ 441
Electrical System
Add-On Equipment................................... 393
Engine Compartment Fuse Block............. 395
Floor Console Fuse Block........................ 394
Fuses and Circuit Breakers...................... 393
Headlamp Wiring..................................... 393
Windshield Wiper Fuses........................... 393
Engine
Air Cleaner/Filter...................................... 308
Change Engine Oil Light.......................... 183
Check and Service Engine Soon Light..... 178
Coolant.................................................... 312Engine (cont.)
Coolant Heater......................................... 123
Coolant Temperature Gage...................... 178
Drive Belt Routing.................................... 418
Engine Compartment Overview................ 302
Exhaust................................................... 132
Fan Noise................................................ 323
Fuel Regulator......................................... 123
Oil ........................................................... 303
Oil Life System........................................ 306
Overheating............................................. 315
Reduced Power Light............................... 184
Running While Parked............................. 133
Starting.................................................... 122
Entry Lighting.............................................. 158
Event Data Recorders................................. 442
Exit Lighting................................................ 158
Extender, Safety Belt..................................... 40
Exterior Lamps............................................ 155
F
Filter
Engine Air Cleaner................................... 308
Finish Damage............................................ 389
Fixed Mast Antenna.................................... 226
Flashers, Hazard Warning........................... 146
449
Page 450 of 458
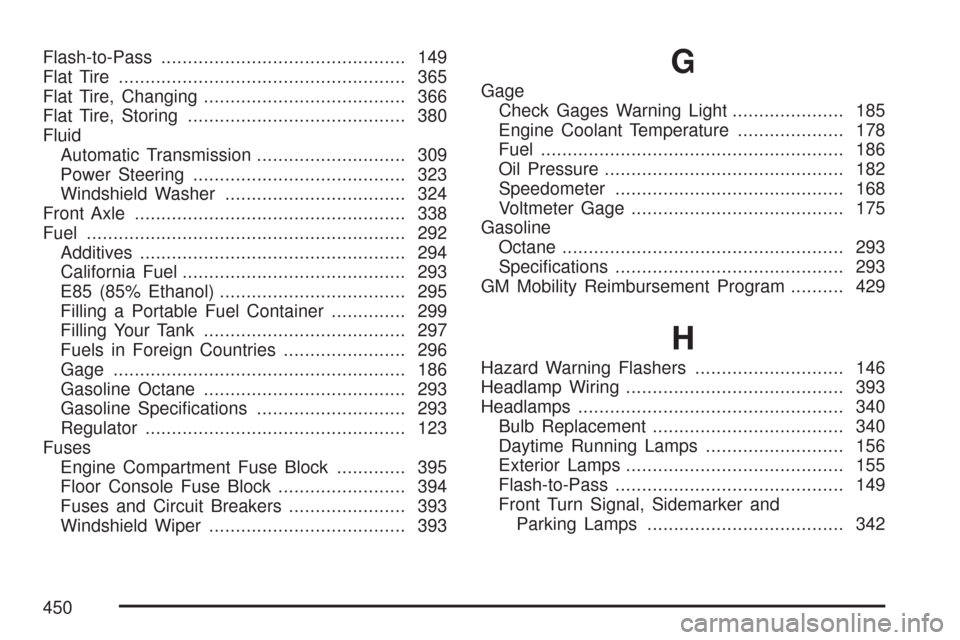
Flash-to-Pass.............................................. 149
Flat Tire...................................................... 365
Flat Tire, Changing...................................... 366
Flat Tire, Storing......................................... 380
Fluid
Automatic Transmission............................ 309
Power Steering........................................ 323
Windshield Washer.................................. 324
Front Axle................................................... 338
Fuel............................................................ 292
Additives.................................................. 294
California Fuel.......................................... 293
E85 (85% Ethanol)................................... 295
Filling a Portable Fuel Container.............. 299
Filling Your Tank...................................... 297
Fuels in Foreign Countries....................... 296
Gage....................................................... 186
Gasoline Octane...................................... 293
Gasoline Specifications............................ 293
Regulator................................................. 123
Fuses
Engine Compartment Fuse Block............. 395
Floor Console Fuse Block........................ 394
Fuses and Circuit Breakers...................... 393
Windshield Wiper..................................... 393G
Gage
Check Gages Warning Light..................... 185
Engine Coolant Temperature.................... 178
Fuel......................................................... 186
Oil Pressure............................................. 182
Speedometer........................................... 168
Voltmeter Gage........................................ 175
Gasoline
Octane..................................................... 293
Specifications........................................... 293
GM Mobility Reimbursement Program.......... 429
H
Hazard Warning Flashers............................ 146
Headlamp Wiring......................................... 393
Headlamps.................................................. 340
Bulb Replacement.................................... 340
Daytime Running Lamps.......................... 156
Exterior Lamps......................................... 155
Flash-to-Pass........................................... 149
Front Turn Signal, Sidemarker and
Parking Lamps..................................... 342
450