wheel size CHEVROLET SILVERADO 2010 2.G Owners Manual
[x] Cancel search | Manufacturer: CHEVROLET, Model Year: 2010, Model line: SILVERADO, Model: CHEVROLET SILVERADO 2010 2.GPages: 626, PDF Size: 4.8 MB
Page 135 of 626
deployment of the passenger airbag(s) or prevent
the passenger sensing system from properly turning
off the passenger airbag(s). SeePassenger Sensing
System on page 2‑86.
If you have any questions about this, you should
contact Customer Assistance before you modify
your vehicle. The phone numbers and addresses for
Customer Assistance are in Step Two of the
Customer Satisfaction Procedure in this manual.
See Customer Satisfaction Procedure on page 8‑2.
If the vehicle has rollover roof-rail airbags, see
Different Size Tires and Wheels
on page 6‑85for
additional important information.
Q: What if I added a snow plow? Will it keep the airbags from working properly?
A: We have designed our airbag systems to work
properly under a wide range of conditions, including
snow plowing with vehicles that have the optional
Snow Plow Prep Package (RPO VYU). But do not
change or defeat the snow plow's “tripping
mechanism.” If you do, it can damage your snow
plow and your vehicle, and it may cause an airbag
inflation. Q: Because I have a disability, I have to get my
vehicle modified. How can I find out whether this
will affect my airbag system?
A: If you have questions, call Customer Assistance.
The phone numbers and addresses for Customer
Assistance are in Step Two of the Customer
Satisfaction Procedure in this manual. See
Customer Satisfaction Procedure on page 8‑2.
In addition, your dealer and the service manual have
information about the location of the airbag sensors,
sensing and diagnostic module and airbag wiring.
2-93
Page 446 of 626
Section 6 Service and Appearance Care
Bulb Replacement. . . . . . . . . . . . . . . . . . . . . . . . . . . . . . . . 6-57
Halogen Bulbs . . . . . . . . . . . . . . . . . . . . . . . . . . . . . . . . . 6-57
Headlamps . . . . . . . . . . . . . . . . . . . . . . . . . . . . . . . . . . . . 6-57
Center High-Mounted Stoplamp (CHMSL) and Cargo Lamp . . . . . . . . . . . . . . . . . . . . . . . . . . . . . . . . . 6-58
Pickup Box Identification and Fender Marker Lamps . . . . . . . . . . . . . . . . . . . . . . . . . . . . . . . . . . . . . . . 6-59
Taillamps, Turn Signal, Stoplamps and Back-up Lamps . . . . . . . . . . . . . . . . . . . . . . . . . . . . . . . . . . . . . . . 6-60
License Plate Lamp . . . . . . . . . . . . . . . . . . . . . . . . . . . . 6-62
Replacement Bulbs . . . . . . . . . . . . . . . . . . . . . . . . . . . . 6-62
Windshield Wiper Blade Replacement . . . . . . . . . . .6-63
Tires . . . . . . . . . . . . . . . . . . . . . . . . . . . . . . . . . . . . . . . . . . . . . . . 6-64
Tire Sidewall Labeling . . . . . . . . . . . . . . . . . . . . . . . . . 6-65
Tire Terminology and Definitions . . . . . . . . . . . . . . . 6-70
Inflation - Tire Pressure . . . . . . . . . . . . . . . . . . . . . . . . 6-73
High-Speed Operation . . . . . . . . . . . . . . . . . . . . . . . . . 6-74
Dual Tire Operation . . . . . . . . . . . . . . . . . . . . . . . . . . . . 6-75
Tire Pressure Monitor System . . . . . . . . . . . . . . . . . 6-75
Tire Pressure Monitor Operation . . . . . . . . . . . . . . . 6-76
Tire Inspection and Rotation . . . . . . . . . . . . . . . . . . . 6-80
When It Is Time for New Tires . . . . . . . . . . . . . . . . . 6-82
Buying New Tires . . . . . . . . . . . . . . . . . . . . . . . . . . . . . . 6-83
Different Size Tires and Wheels . . . . . . . . . . . . . . . 6-85 Uniform Tire Quality Grading . . . . . . . . . . . . . . . . . . . 6-85
Wheel Alignment and Tire Balance . . . . . . . . . . . . 6-87
Wheel Replacement . . . . . . . . . . . . . . . . . . . . . . . . . . . 6-87
Tire Chains . . . . . . . . . . . . . . . . . . . . . . . . . . . . . . . . . . . . 6-89
If a Tire Goes Flat . . . . . . . . . . . . . . . . . . . . . . . . . . . . . 6-89
Changing a Flat Tire . . . . . . . . . . . . . . . . . . . . . . . . . . . 6-90
Removing the Spare Tire and Tools . . . . . . . . . . . . 6-92
Removing the Flat Tire and Installing the
Spare Tire . . . . . . . . . . . . . . . . . . . . . . . . . . . . . . . . . . . 6-97
Secondary Latch System . . . . . . . . . . . . . . . . . . . . . 6-103
Storing a Flat or Spare Tire and Tools . . . . . . . . 6-106
Spare Tire . . . . . . . . . . . . . . . . . . . . . . . . . . . . . . . . . . . . 6-109
Appearance Care . . . . . . . . . . . . . . . . . . . . . . . . . . . . . . . . 6-110
Interior Cleaning . . . . . . . . . . . . . . . . . . . . . . . . . . . . . 6-110
Fabric/Carpet . . . . . . . . . . . . . . . . . . . . . . . . . . . . . . . . . 6-111
Leather . . . . . . . . . . . . . . . . . . . . . . . . . . . . . . . . . . . . . . . 6-112
Instrument Panel, Vinyl, and Other Plastic Surfaces . . . . . . . . . . . . . . . . . . . . . . . . . . . . . . . . . . . . 6-112
Care of Safety Belts . . . . . . . . . . . . . . . . . . . . . . . . . . 6-112
Weatherstrips . . . . . . . . . . . . . . . . . . . . . . . . . . . . . . . . . 6-113
Washing Your Vehicle . . . . . . . . . . . . . . . . . . . . . . . . 6-113
Cleaning Exterior Lamps/Lenses . . . . . . . . . . . . . 6-113
Finish Care . . . . . . . . . . . . . . . . . . . . . . . . . . . . . . . . . . . 6-114
Windshield and Wiper Blades . . . . . . . . . . . . . . . . . 6-114
6-2
Page 509 of 626
Notice:If the vehicle has low‐profile tires, they
are more susceptible to damage from road
hazards or curb impact than standard profile
tires. Tire and/or wheel assembly damage can
occur when coming into contact with road
hazards like, potholes, or sharp edged objects,
or when sliding into a curb. The vehicle
warranty does not cover this type of damage.
Keep tires set to the correct inflation pressure
and, when possible avoid contact with curbs,
potholes, and other road hazards.
Tire Sidewall Labeling
Useful information about a tire is molded into the
sidewall. The following illustrations are examples
of a typical P‐Metric and a LT‐Metric tire sidewall.
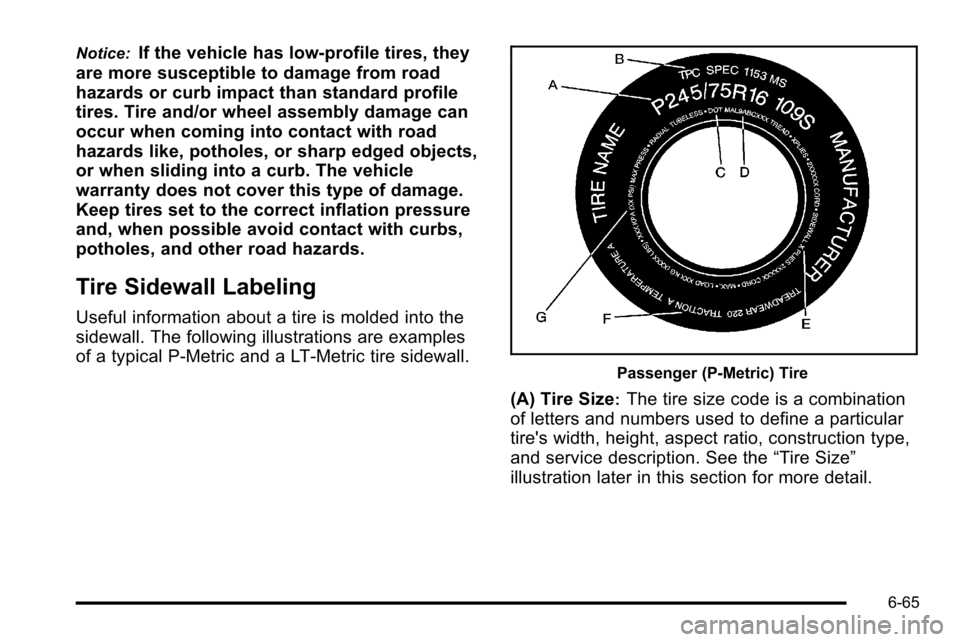
Passenger (P‐Metric) Tire
(A) Tire Size:The tire size code is a combination
of letters and numbers used to define a particular
tire's width, height, aspect ratio, construction type,
and service description. See the “Tire Size”
illustration later in this section for more detail.
6-65
Page 512 of 626
(F) Tire Ply Material:The type of cord and
number of plies in the sidewall and under the
tread.
(G) Single Tire Maximum Load
:Maximum load
that can be carried and the maximum pressure
needed to support that load when used as a
single. For information on recommended tire
pressure see Inflation - Tire Pressure
on page 6‑73
andLoading the Vehicleon page 5‑29.
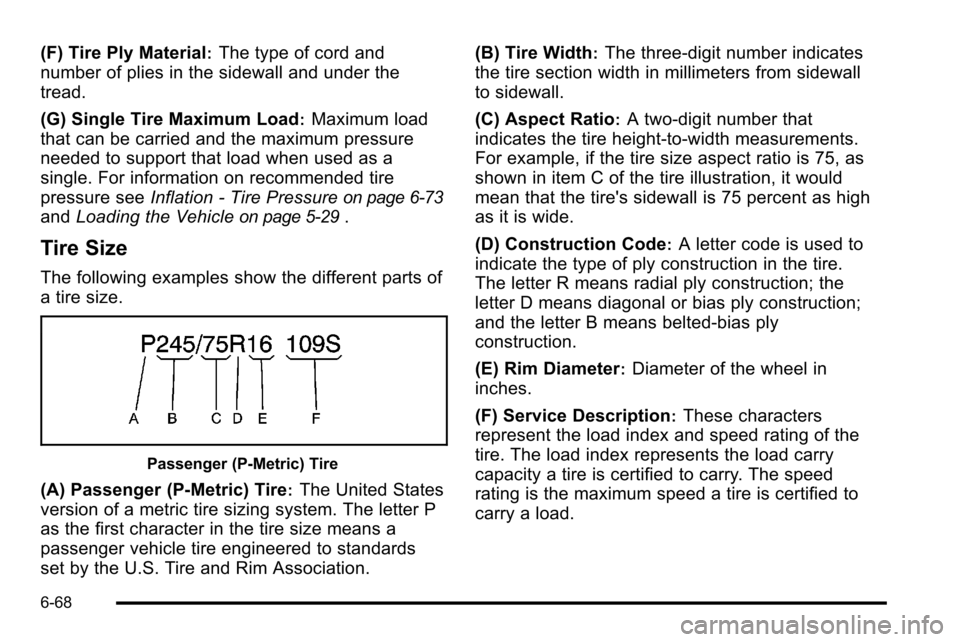
Tire Size
The following examples show the different parts of
a tire size.
Passenger (P‐Metric) Tire
(A) Passenger (P‐Metric) Tire:The United States
version of a metric tire sizing system. The letter P
as the first character in the tire size means a
passenger vehicle tire engineered to standards
set by the U.S. Tire and Rim Association. (B) Tire Width
:The three‐digit number indicates
the tire section width in millimeters from sidewall
to sidewall.
(C) Aspect Ratio
:A two‐digit number that
indicates the tire height‐to‐width measurements.
For example, if the tire size aspect ratio is 75, as
shown in item C of the tire illustration, it would
mean that the tire's sidewall is 75 percent as high
as it is wide.
(D) Construction Code
:A letter code is used to
indicate the type of ply construction in the tire.
The letter R means radial ply construction; the
letter D means diagonal or bias ply construction;
and the letter B means belted‐bias ply
construction.
(E) Rim Diameter
:Diameter of the wheel in
inches.
(F) Service Description
:These characters
represent the load index and speed rating of the
tire. The load index represents the load carry
capacity a tire is certified to carry. The speed
rating is the maximum speed a tire is certified to
carry a load.
6-68
Page 513 of 626
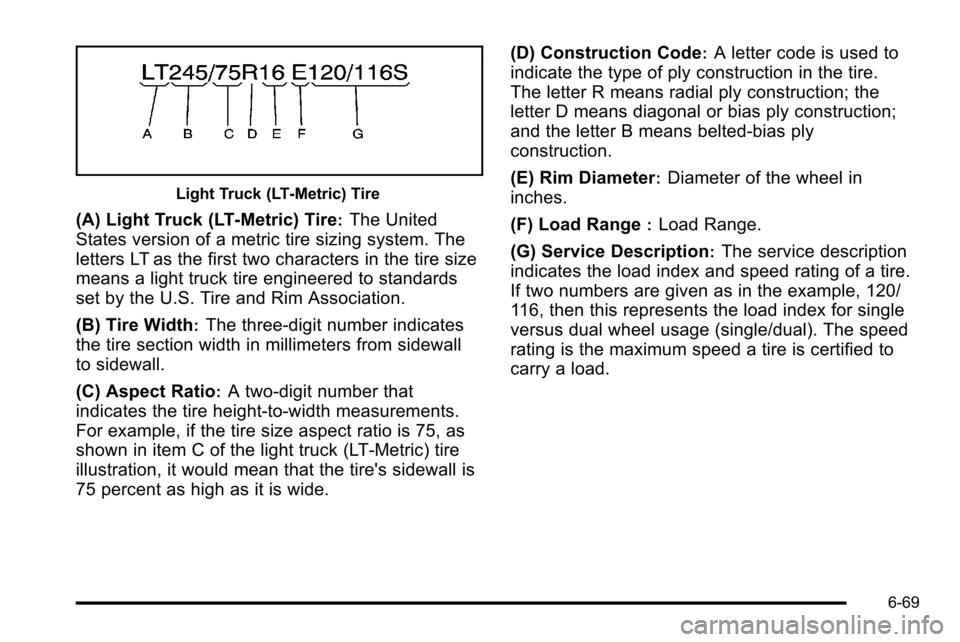
Light Truck (LT‐Metric) Tire
(A) Light Truck (LT‐Metric) Tire:The United
States version of a metric tire sizing system. The
letters LT as the first two characters in the tire size
means a light truck tire engineered to standards
set by the U.S. Tire and Rim Association.
(B) Tire Width
:The three‐digit number indicates
the tire section width in millimeters from sidewall
to sidewall.
(C) Aspect Ratio
:A two‐digit number that
indicates the tire height‐to‐width measurements.
For example, if the tire size aspect ratio is 75, as
shown in item C of the light truck (LT‐Metric) tire
illustration, it would mean that the tire's sidewall is
75 percent as high as it is wide. (D) Construction Code
:A letter code is used to
indicate the type of ply construction in the tire.
The letter R means radial ply construction; the
letter D means diagonal or bias ply construction;
and the letter B means belted‐bias ply
construction.
(E) Rim Diameter
:Diameter of the wheel in
inches.
(F) Load Range
:Load Range.
(G) Service Description
:The service description
indicates the load index and speed rating of a tire.
If two numbers are given as in the example, 120/
116, then this represents the load index for single
versus dual wheel usage (single/dual). The speed
rating is the maximum speed a tire is certified to
carry a load.
6-69
Page 519 of 626
When you end this high‐speed driving, return the tires to
the cold inflation pressure shown on the Tire and
Loading Information label. SeeLoading the Vehicle
on
page 5‑29and Inflation - Tire Pressure on page 6‑73.
Dual Tire Operation
When the vehicle is new, or whenever a wheel, wheel
bolt or wheel nut is replaced, check the wheel nut
torque after 100, 1,000 and 6,000 miles (160, 1 600 and
10 000 km) of driving. For proper torque and wheel nut
tightening information, see Removing the Spare Tire
and Tools on page 6‑92.
The outer tire on a dual wheel setup generally wears
faster than the inner tire. Your tires will wear more
evenly and last longer if you rotate the tires periodically,
see Tire Inspection and Rotation
on page 6‑80. Also
see Scheduled Maintenance on page 7‑3.
{WARNING:
If you operate your vehicle with a tire that is badly
underinflated, the tire can overheat. An
overheated tire can lose air suddenly or catch fire.
You or others could be injured. Be sure all tires
(including the spare) are properly inflated. See
Inflation - Tire Pressure
on page 6‑73, for
information on proper tire inflation.
Tire Pressure Monitor System
The Tire Pressure Monitor System (TPMS) uses radio
and sensor technology to check tire pressure levels.
The TPMS sensors monitor the air pressure in your
vehicle's tires and transmit tire pressure readings to a
receiver located in the vehicle.
Each tire, including the spare (if provided), should be
checked monthly when cold and inflated to the inflation
pressure recommended by the vehicle manufacturer on
the vehicle placard or tire inflation pressure label. (If
your vehicle has tires of a different size than the size
indicated on the vehicle placard or tire inflation pressure
label, you should determine the proper tire inflation
pressure for those tires.)
As an added safety feature, your vehicle has been
equipped with a tire pressure monitoring system
(TPMS) that illuminates a low tire pressure telltale when
one or more of your tires is significantly under‐inflated.
Accordingly, when the low tire pressure telltale
illuminates, you should stop and check your tires as
soon as possible, and inflate them to the proper
pressure. Driving on a significantly under‐inflated tire
causes the tire to overheat and can lead to tire failure.
6-75
Page 528 of 626
GM recommends replacing tires in sets of four (or six if
your vehicle has dual rear wheels). This is because
uniform tread depth on all tires will help keep your
vehicle performing most like it did when the tires were
new. Replacing less than a full set of tires can affect the
braking and handling performance of your vehicle. See
Tire Inspection and Rotation
on page 6‑80for
information on proper tire rotation.
{WARNING:
Mixing tires could cause you to lose control
while driving. If you mix tires of different
sizes, brands, or types (radial and
bias-belted tires) the vehicle may not handle
properly, and you could have a crash. Using
tires of different sizes, brands, or types may
also cause damage to your vehicle. Be sure
to use the correct size, brand, and type of
tires on your vehicle's wheels.
{WARNING:
If you use bias-ply tires on the vehicle, the
wheel rim flanges could develop cracks after
many miles of driving. A tire and/or wheel
could fail suddenly, causing a crash. Use
only radial-ply tires with the wheels on the
vehicle.
If you must replace your vehicle's tires with those that
do not have a TPC Spec number, make sure they are
the same size, load range, speed rating, and
construction type (radial and bias‐belted tires) as your
vehicle's original tires.
Vehicles that have a tire pressure monitoring system
could give an inaccurate low‐pressure warning if
non‐TPC Spec rated tires are installed on your vehicle.
Non‐TPC Spec rated tires may give a low‐pressure
warning that is higher or lower than the proper warning
level you would get with TPC Spec rated tires. See Tire
Pressure Monitor System on page 6‑75.
Your vehicle's original equipment tires are listed on the
Tire and Loading Information label. See Loading the
Vehicle
on page 5‑29, for more information about the
Tire and Loading Information label and its location on
your vehicle.
6-84
Page 529 of 626
Different Size Tires and Wheels
If you add wheels or tires that are a different size than
your original equipment wheels and tires, this could
affect the way your vehicle performs, including its
braking, ride and handling characteristics, stability, and
resistance to rollover. Additionally, if your vehicle has
electronic systems such as anti‐lock brakes, rollover
airbags, traction control, and electronic stability control,
the performance of these systems can be affected.
{WARNING:
If you add different sized wheels, your vehicle
may not provide an acceptable level of
performance and safety if tires not recommended
for those wheels are selected. You may increase
the chance that you will crash and suffer serious
injury. Only use GM specific wheel and tire
systems developed for your vehicle, and have
them properly installed by a GM certified
technician.
See Buying New Tires
on page 6‑83andAccessories
and Modificationson page 6‑4for additional
information.
Uniform Tire Quality Grading
Quality grades can be found where applicable on
the tire sidewall between tread shoulder and
maximum section width. For example:
Treadwear 200 Traction AA
Temperature A
The following information relates to the system
developed by the United States National Highway
Traffic Safety Administration (NHTSA), which
grades tires by treadwear, traction, and
temperature performance. This applies only to
vehicles sold in the United States. The grades are
molded on the sidewalls of most passenger car
tires. The Uniform Tire Quality Grading (UTQG)
system does not apply to deep tread, winter-type
snow tires, space-saver, or temporary use spare
tires, tires with nominal rim diameters of
10 to 12 inches (25 to 30 cm), or to some
limited-production tires.
6-85
Page 533 of 626
Tire Chains
{WARNING:
If your vehicle has dual wheels or P265/65R18,
P275/55R20 or LT265/70R17 size tires, do not
use tire chains. They can damage your vehicle
because there is not enough clearance. Tire
chains used on a vehicle without the proper
amount of clearance can cause damage to the
brakes, suspension, or other vehicle parts. The
area damaged by the tire chains could cause you
to lose control of your vehicle and you or others
may be injured in a crash.
Use another type of traction device only if its
manufacturer recommends it for use on your
vehicle and tire size combination and road
conditions. Follow that manufacturer's
instructions. To help avoid damage to your
vehicle, drive slowly, readjust, or remove the
device if it is contacting your vehicle, and do not
spin your vehicle's wheels.
If you do find traction devices that will fit, install
them on the rear tires.Notice:
If your vehicle does not have dual wheels
and has a tire size other than P265/65R18, P275/
55R20 or LT265/70R17, use tire chains only where
legal and only when you must. Use chains that are
the proper size for your tires. Install them on the
tires of the rear axle. Do not use chains on the tires
of the front axle. Tighten them as tightly as possible
with the ends securely fastened. Drive slowly and
follow the chain manufacturer's instructions. If you
can hear the chains contacting your vehicle, stop
and retighten them. If the contact continues, slow
down until it stops. Driving too fast or spinning the
wheels with chains on will damage your vehicle.
If a Tire Goes Flat
It is unusual for a tire to blowout while you are driving,
especially if you maintain your vehicle's tires properly.
If air goes out of a tire, it is much more likely to leak out
slowly. But if you should ever have a blowout, here are
a few tips about what to expect and what to do:
If a front tire fails, the flat tire creates a drag that pulls
the vehicle toward that side. Take your foot off the
accelerator pedal and grip the steering wheel firmly.
Steer to maintain lane position, and then gently brake to
a stop well out of the traffic lane.
6-89
Page 553 of 626
3. Assemble the wheel blocks (B) and jack (G)together with the wing nut (A) and retaining
bolt (H).
4. Position the jack (G) in the mounting bracket (F). Position the holes in the base of the jack (G) onto
the pin in the mounting bracket (F).
5. Return them to their original location in the vehicle. For more information, refer to Removing the Spare
Tire and Tools
on page 6‑92for more information.
Spare Tire
Your vehicle, when new, had a fully-inflated spare tire.
A spare tire may lose air over time, so check its inflation
pressure regularly. See Inflation - Tire Pressure
on
page 6‑73and Loading the Vehicleon page 5‑29for
information regarding proper tire inflation and loading
your vehicle. For instruction on how to remove, install or
store a spare tire, see Removing the Flat Tire and
Installing the Spare Tire
on page 6‑97and Storing a
Flat or Spare Tire and Tools on page 6‑106. Notice:
If the vehicle has four-wheel drive and the
different size spare tire is installed on the vehicle,
do not drive in four-wheel drive until you can have
your flat tire repaired and/or replaced. You could
damage the vehicle, and the repair costs would not
be covered by your warranty. Never use four-wheel
drive when the different size spare tire is installed
on the vehicle.
Your vehicle may have a different size spare tire than
the road tires originally installed on your vehicle. This
spare tire was developed for use on your vehicle, so it
is all right to drive on it. If your vehicle has four-wheel
drive and the different size spare tire is installed, keep
the vehicle in two-wheel drive.
After installing the spare tire on your vehicle, you should
stop as soon as possible and make sure the spare tire
is correctly inflated. Have the damaged or flat road tire
repaired or replaced as soon as you can and installed
back onto your vehicle. This way, the spare tire will be
available in case you need it again.
Do not mix tires and wheels of different sizes, because
they will not fit. Keep your spare tire and its wheel
together. If your vehicle has a spare tire that does not
match your vehicle's original road tires and wheels in
size and type, do not include the spare in the tire
rotation.
6-109