ECO mode CHEVROLET TAHOE 2007 3.G User Guide
[x] Cancel search | Manufacturer: CHEVROLET, Model Year: 2007, Model line: TAHOE, Model: CHEVROLET TAHOE 2007 3.GPages: 634, PDF Size: 3.18 MB
Page 165 of 634
To adjust for compass variance, do the following:
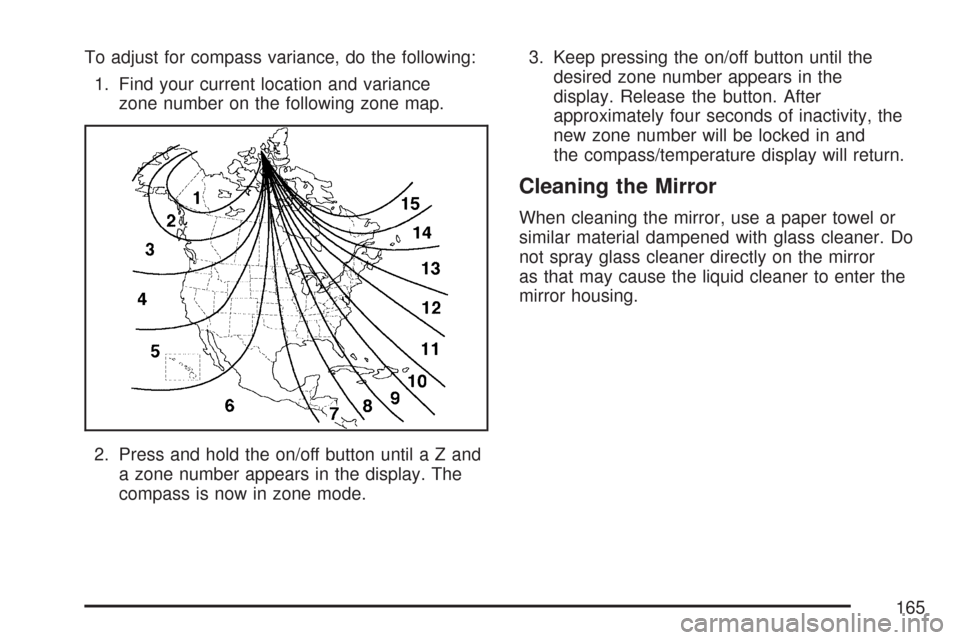
1. Find your current location and variance
zone number on the following zone map.
2. Press and hold the on/off button untilaZand
a zone number appears in the display. The
compass is now in zone mode.3. Keep pressing the on/off button until the
desired zone number appears in the
display. Release the button. After
approximately four seconds of inactivity, the
new zone number will be locked in and
the compass/temperature display will return.
Cleaning the Mirror
When cleaning the mirror, use a paper towel or
similar material dampened with glass cleaner. Do
not spray glass cleaner directly on the mirror
as that may cause the liquid cleaner to enter the
mirror housing.
165
Page 181 of 634
Gate Operator and Canadian
Programming
Canadian radio-frequency laws require transmitter
signals to time out or quit after several seconds
of transmission. This may not be long enough
for Universal Home Remote to pick up the signal
during programming. Similarly, some U.S. gate
operators are manufactured to time out in
the same manner.
If you live in Canada, or you are having difficulty
programming a gate operator or garage door
opener by using the “Programming Universal
Home Remote” procedures, regardless of where
you live, replace Step 3 under “Programming
Universal Home Remote” with the following:
Continue to press and hold the Universal Home
Remote button while you press and release every
two seconds (cycle) the hand-held transmitter
button until the frequency signal has been
successfully accepted by the Universal Home
Remote. The Universal Home Remote indicator
light will �ash slowly at �rst and then rapidly.
Proceed with Step 4 under “Programming
Universal Home Remote” to complete.
Using Universal Home Remote
Press and hold the appropriate Universal Home
Remote button for at least half of a second.
The indicator light will come on while the signal is
being transmitted.
Erasing Universal Home Remote
Buttons
To erase programming from the three Universal
Home Remote buttons do the following:
1. Press and hold down the two outside buttons
until the indicator light begins to �ash, after
20 seconds. Do not hold the two outside
buttons for longer than 30 seconds.
2. Release both buttons.
The Universal Home Remote is now in the training
(learning) mode and can be programmed at any
time beginning with Step 2 under “Programming
Universal Home Remote” shown earlier in
this section.
Individual buttons cannot be erased, but they can
be reprogrammed. See “Reprogramming a
Single Universal Home Remote Button” following
this section.
181
Page 183 of 634
Do not use this system with any garage door
opener that does not have the stop and reverse
feature. This includes any garage door opener
model manufactured before April 1, 1982.
Read the instructions completely before attempting
to program the transmitter. Because of the steps
involved, it may be helpful to have another
person available to assist you in programming the
transmitter.
Be sure to keep the original remote control
transmitter for use in other vehicles, as well as, for
future programming. You only need the original
remote control transmitter for Fixed Code
programming. It is also recommended that upon
the sale or lease termination of the vehicle,
the programmed buttons should be erased for
security purposes. See “Erasing Universal Home
Remote Buttons” later in this section.When programming a garage door, it is advised to
park outside of the garage. Be sure that people
and objects are clear of the garage door or
security device you are programming.
Programming Universal Home
Remote — Rolling Code
Most garage door openers sold after 1996 are
Rolling Code units.
Programming a garage door opener involves
time-sensitive actions, so read the entire procedure
before you begin. If you do not follow these
actions, the device will time out and you will have
to repeat the procedure.
183
Page 187 of 634
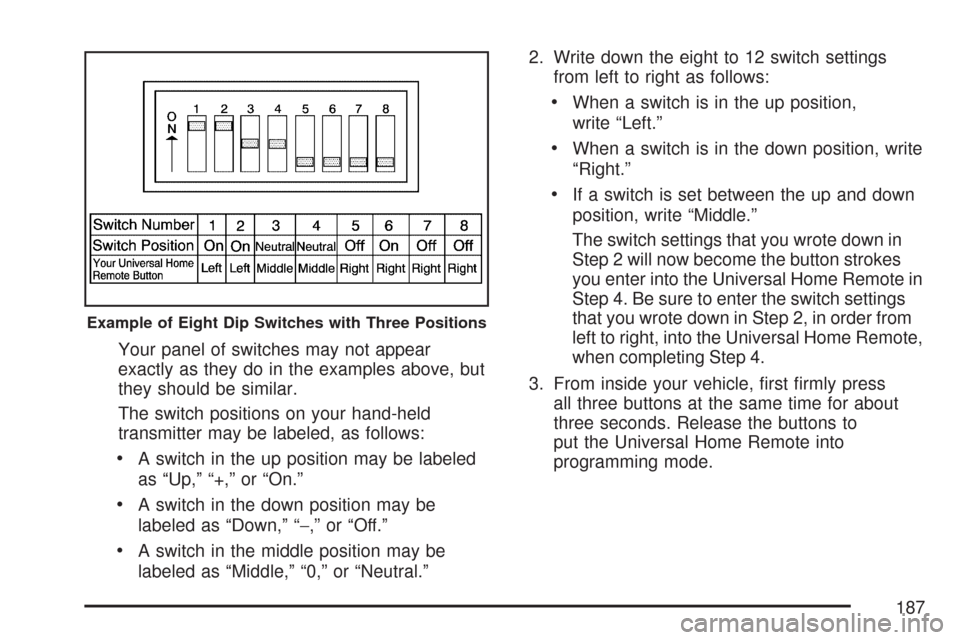
Your panel of switches may not appear
exactly as they do in the examples above, but
they should be similar.
The switch positions on your hand-held
transmitter may be labeled, as follows:
A switch in the up position may be labeled
as “Up,” “+,” or “On.”
A switch in the down position may be
labeled as “Down,” “−,” or “Off.”
A switch in the middle position may be
labeled as “Middle,” “0,” or “Neutral.”2. Write down the eight to 12 switch settings
from left to right as follows:
When a switch is in the up position,
write “Left.”
When a switch is in the down position, write
“Right.”
If a switch is set between the up and down
position, write “Middle.”
The switch settings that you wrote down in
Step 2 will now become the button strokes
you enter into the Universal Home Remote in
Step 4. Be sure to enter the switch settings
that you wrote down in Step 2, in order from
left to right, into the Universal Home Remote,
when completing Step 4.
3. From inside your vehicle, �rst �rmly press
all three buttons at the same time for about
three seconds. Release the buttons to
put the Universal Home Remote into
programming mode.
Example of Eight Dip Switches with Three Positions
187
Page 206 of 634
L(Windshield Washer):SeeWindshield
Washer on page 209.
5(Rear Wiper Delay):SeeRear Window
Wiper/Washer on page 210.
Z(Rear Wiper):SeeRear Window
Wiper/Washer on page 210.
=(Rear Wiper Wash):SeeRear Window
Wiper/Washer on page 210.
Turn and Lane-Change Signals
The turn signal has two upward (for right) and two
downward (for left) positions. These positions allow
you to signal a turn or a lane change.
To signal a turn, move the lever all the way up or
down. When the turn is �nished, the lever will return
automatically.
To signal a lane change, raise or lower the lever for
less than one second until the arrow starts to �ash.
This will cause the turn signals to automatically
�ash three times. It will �ash six times if tow-haul
mode is active. Holding the turn signal lever for
more than one second will cause the turn signals to
�ash until you release the lever. The lever will
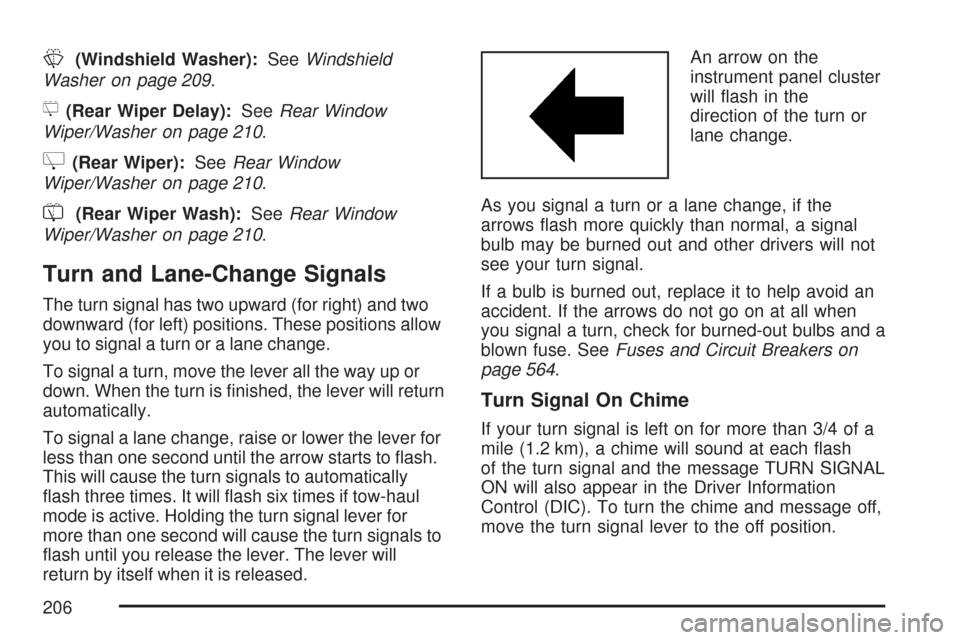
return by itself when it is released.An arrow on the
instrument panel cluster
will �ash in the
direction of the turn or
lane change.
As you signal a turn or a lane change, if the
arrows �ash more quickly than normal, a signal
bulb may be burned out and other drivers will not
see your turn signal.
If a bulb is burned out, replace it to help avoid an
accident. If the arrows do not go on at all when
you signal a turn, check for burned-out bulbs and a
blown fuse. SeeFuses and Circuit Breakers on
page 564.
Turn Signal On Chime
If your turn signal is left on for more than 3/4 of a
mile (1.2 km), a chime will sound at each �ash
of the turn signal and the message TURN SIGNAL
ON will also appear in the Driver Information
Control (DIC). To turn the chime and message off,
move the turn signal lever to the off position.
206
Page 228 of 634
To change the current mode, select one of the
following:
H(Vent):This mode directs air to the instrument
panel outlets.
)(Bi-Level):This mode directs half of the air to
the instrument panel outlets and to the �oor
outlets. The �ow can be divided between vent and
�oor outlets depending upon where the knob is
placed between the settings. A little air is directed
towards the windshield and side window outlets.
Cooler air is directed to the upper outlets and
warmer air to the �oor outlets.
6(Floor):This mode directs most of the air to
the �oor outlets, with some of the air directed
to the windshield, side window outlets, and second
row �oor outlets. In this mode, the system will
automatically select outside air. Recirculation
cannot be selected when in Floor Mode.The right knob can also be used to select defog or
defrost mode. For more information, see
“Defogging and Defrosting” later in this section.
By positioning the right knob between two modes,
a combination of those two modes is selected.
The air conditioning compressor will be on unless
the outside temperature is close to freezing.
9(Fan):Turn the left knob clockwise or
counterclockwise to increase or decrease the fan
speed. Turn the knob all the way counterclockwise
to turn the front system off.
?(Recirculation):Press this button to turn the
recirculation mode on. When the button is pressed,
an indicator light will come on.
This mode keeps outside air from entering the
vehicle. It can be used to reduce outside air and
prevent odors from entering your vehicle.
Recirculation may also help cool the air inside your
vehicle more quickly once the temperature inside
the vehicle is less than the outside temperature.
228
Page 232 of 634
Passenger’s Side Temperature Control
The passenger’s temperature buttons can be used
to change the temperature of the air coming
through the system on the passenger’s side of the
vehicle. The temperature can be adjusted even
if the system is turned off. This is possible
since outside air will always �ow through the
system as the vehicle is moving forward unless it
is set to recirculation mode. See “Recirculation”
later in this section.
Press the + or−buttons to increase or decrease
the cabin temperature. The passenger side
display will show the temperature setting
decreasing or increasing.
The passenger’s temperature setting can be set to
match the driver’s temperature setting by pressing
the PASS button and turning off the PASS indicator.
When the passenger’s temperature setting is set
different than the driver’s setting, the indicator on
the PASS button will illuminate and both the driver’s
side and passenger’s side temperature displays will
be shown.
Automatic Operation
AUTO (Automatic):When automatic operation is
active the system will control the inside
temperature, the air delivery, and the fan speed.
Use the steps below to place the entire system in
automatic mode:
1. Press the AUTO button.
When AUTO is selected, the display will
change to show the current temperature(s)
and AUTO will be lit on the display. The
current delivery mode and fan speed will also
be displayed for approximately 5 seconds.
When AUTO is selected, the air conditioning
operation and air inlet will be automatically
controlled. The air conditioning compressor will
run when the outside temperature is over
about 40°F (4°C). The air inlet will normally be
set to outside air. If it is hot outside, the air
inlet may automatically switch to recirculate
inside air to help quickly cool down your
vehicle. The light on the button will illuminate
in recirculation.
232
Page 234 of 634
Manual Operation
You may manually adjust the air delivery mode or
fan speed.
y9 z(Fan):The buttons with the fan symbols
allow you to manually adjust the fan speed.
Press the up arrow to increase fan speed and the
down arrow to decrease fan speed.
Pressing one of these buttons when the system is
off will turn the system on. Pressing one of
these buttons when in automatic control will place
the fan under manual control. The fan setting
will remain displayed and the AUTO light will turn
off. The air delivery mode will remain under
automatic control.
yNz(Mode):Press the mode up and down
buttons to manually change the direction of
the air�ow in your vehicle. Repeatedly press the
button until the desired mode appears on the
display. Pressing one of these buttons when the
system is off will change air delivery mode without
turning the system on. Pressing one of these
buttons when in automatic control will place the
mode under manual control.The air delivery mode setting will be displayed and
the AUTO light will turn off. The fan will remain
under automatic control.
H(Vent):This setting will deliver air to the
instrument panel outlets.
)(Bi-Level):This mode directs half of the air to
the instrument panel outlets and half to the �oor
outlets. The �ow can be divided between vent and
�oor outlets depending upon where the knob is
placed between the settings. A little air is directed
towards the windshield and side window outlets.
Cooler air is directed to the upper outlets and
warmer air to the �oor outlets.
6(Floor):This mode directs most of the air to
the �oor outlets, with some of the air directed
to the windshield, side window outlets, and second
row �oor outlets. In this mode, the system will
automatically select outside air.
-(Defog):See “Defogging and Defrosting” later
in this section.
234
Page 240 of 634
Mode Knob
The right knob on the control panel allows you to
choose the direction of air delivery.
H(Vent):This setting directs the air through the
headliner outlets.
)(Bi-Level):Air is delivered through the �oor
outlets as well as the headliner outlets. The
rear system �oor outlets are located directly behind
the second row seats. The �ow can be divided
between vent and �oor outlets depending
upon where the knob is placed between the
settings.
6(Floor):This setting directs most of the air
through the �oor outlets. The rear system
�oor outlets are located directly behind the second
row seats.
Rear Air Conditioning and Heating
System and Electronic Climate
Controls
If your vehicle has this system, the rear heat and
air conditioning controls are integrated with the
rear seat audio controls located in the center
console. The system can be controlled from the
front controls as well as the rear controls.
To turn the system on, press the AUX button on
the front climate control system, an indicator will be
lit. Pressing the AUX button the �rst time will
turn the rear system on in a mimic mode. In this
mode, the air�ow in the rear will be approximately
the same direction, temperature, and fan speed
as the front. Pressing the AUX button again
will turn the rear system and the indicator off.
If the rear controls are adjusted, the system will
enter a rear independent mode. Air�ow in the rear
will then be directed according to the settings of
rear controls. The rear system can be turned off by
pressing the AUX button on the front climate
control system and the indicator will turn off.
If the indicator in the front AUX button is off, the
rear system is off.
240
Page 242 of 634
+/−(Increase/Decrease Temperature):These
buttons select the temperature of the air �owing into
the passenger area. Press the + button for warmer
air and press the−button for cooler air.
N(Mode):Press the mode button to manually
change the direction of the air�ow in your vehicle.
Repeatedly press the button until the desired
mode appears on the display. Multiple presses will
cycle through the delivery selections.
Warning Lights, Gages, and
Indicators
This part describes the warning lights and gages on
your vehicle. The pictures help to locate them.
Warning lights and gages can signal that something
is wrong before it becomes serious enough to
cause an expensive repair or replacement. Paying
attention to the warning lights and gages could also
save you or others from injury.Warning lights come on when there may be or is a
problem with one of your vehicle’s functions. As
the details show on the next few pages, some
warning lights come on brie�y when you start the
engine just to let you know they are working. If
you are familiar with this section, you should
not be alarmed when this happens.
Gages can indicate when there may be or is a
problem with one of your vehicle’s functions. Often
gages and warning lights work together to let
you know when there is a problem with your
vehicle.
When one of the warning lights comes on and
stays on as you are driving, or when one of
the gages shows there may be a problem, check
the section that tells you what to do about it.
Please follow this manual’s advice. Waiting to do
repairs can be costly and even dangerous. So
please get to know your vehicle’s warning
lights and gages. They can be a big help.
Your vehicle also has a Driver Information Center
(DIC) that works along with warning lights and
gages. SeeDIC Warnings and Messages
on page 270for more information.
242