remote control CHEVROLET TAHOE 2007 3.G Owner's Manual
[x] Cancel search | Manufacturer: CHEVROLET, Model Year: 2007, Model line: TAHOE, Model: CHEVROLET TAHOE 2007 3.GPages: 634, PDF Size: 3.18 MB
Page 341 of 634
To use the auxiliary inputs of the RSE system,
connect an external auxiliary device to the
color-coded A/V jacks and turn both the auxiliary
device and the video screen power on. If the
video screen is in the DVD player mode, pressing
the AUX (auxiliary) button on the remote control
switches the video screen from the DVD
player mode to the auxiliary device. The radio can
listen to the audio of the connected auxiliary
device by sourcing to auxiliary. SeeRadio with CD
and DVD (MP3) on page 305for more information.
How to Change the RSE Video Screen
Settings
The screen display mode (normal, full, and zoom),
screen brightness, and setup menu language
can be changed from the on screen setup menu.
To change any feature, do the following:
1. Press the display menu button on the remote
control.
2. Use the remote control menu navigation
arrows and the enter button to use the
setup menu.
3. Press the display menu button again to
remove the setup menu from the screen.
Audio Output
Audio from the DVD player or auxiliary inputs may
be heard through the following possible sources:
Wireless Headphones
Vehicle Speakers
Vehicle wired headphone jacks on the rear
seat audio system, if your vehicle has this
feature.
The RSE system always transmits the audio
signal to the wireless headphones, if there is audio
available. See “Headphones” earlier in this
section for more information.
The DVD player is capable of outputting audio to
the wired headphone jacks on the RSA system,
if your vehicle has this feature. The DVD
player may be selected as an audio source on the
RSA system. SeeRear Seat Audio (RSA) on
page 348for more information.
341
Page 342 of 634
When a device is connected to the A/V jacks, or
the radio’s auxiliary input jack, if your vehicle
has this feature, the rear seat passengers are able
to hear audio from the auxiliary device through
the wireless or wired headphones. The front seat
passengers are able to listen to playback from
this device through the vehicle speakers by
selecting AUX as the source on the radio.
Video Screen
The video screen is located in the RSE overhead
console.
To use the video screen, do the following:
1. Push the release button located on the RSE
overhead console.
2. Turn the screen to the desired position.
When the video screen is not in use, push it up
into its locked position.If a DVD is playing and the screen is raised to its
locked position, the screen remains on, this is
normal, and the DVD continues to play through the
previous audio source. Use the remote control
power button or eject the disc to turn off the
screen.
The RSE overhead console contains the infrared
receivers for the wireless headphones and the
infrared receivers for the remote control. They are
located at the rear of the console.
Notice:Avoid directly touching the video
screen, as damage may occur. See “Cleaning
the Video Screen” later in this section for
more information.
342
Page 343 of 634
Remote Control
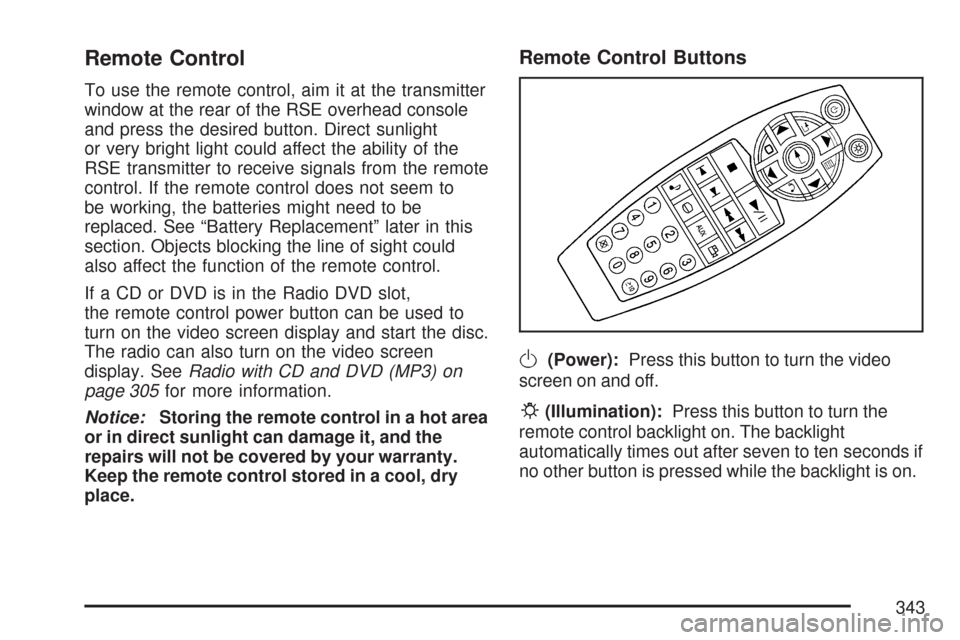
To use the remote control, aim it at the transmitter
window at the rear of the RSE overhead console
and press the desired button. Direct sunlight
or very bright light could affect the ability of the
RSE transmitter to receive signals from the remote
control. If the remote control does not seem to
be working, the batteries might need to be
replaced. See “Battery Replacement” later in this
section. Objects blocking the line of sight could
also affect the function of the remote control.
If a CD or DVD is in the Radio DVD slot,
the remote control power button can be used to
turn on the video screen display and start the disc.
The radio can also turn on the video screen
display. SeeRadio with CD and DVD (MP3) on
page 305for more information.
Notice:Storing the remote control in a hot area
or in direct sunlight can damage it, and the
repairs will not be covered by your warranty.
Keep the remote control stored in a cool, dry
place.
Remote Control Buttons
O(Power):Press this button to turn the video
screen on and off.
P(Illumination):Press this button to turn the
remote control backlight on. The backlight
automatically times out after seven to ten seconds if
no other button is pressed while the backlight is on.
343
Page 346 of 634
Battery Replacement
To change the remote control batteries, do the
following:
1. Remove the battery compartment door
located on the bottom of the remote control.
2. Replace the two batteries in the compartment.
Make sure that they are installed correctly,
using the diagram on the inside of the battery
compartment.
3. Close the battery door securely.
If the remote control is to be stored for a long
period of time, remove the batteries and keep them
in a cool, dry place.
Problem Recommended Action
No power. The ignition might not be
turned on or in accessory.
The picture does not �ll the
screen. There are black
borders on the top and
bottom or on both sides or
it looks stretched out.Check the display mode
settings in the setup menu
by pressing the display
menu button on the remote
control.
In auxiliary mode, the
picture moves or scrolls.Check the auxiliary input
connections at both
devices.
The remote control does
not work.Check to make sure there
is no obstruction between
the remote control and the
transmitter window.
Check the batteries to
make sure they are not
dead or installed
incorrectly.
After stopping the player,
I push Play but sometimes
the DVD starts where I left
off and sometimes at the
beginning.If the stop button was
pressed one time, the DVD
player resumes playing
where the DVD was
stopped. If the stop button
was pressed two times
the DVD player begins to
play from the beginning of
the DVD.
346
Page 376 of 634
Traveling to Remote Areas
It makes sense to plan your trip, especially when
going to a remote area. Know the terrain and plan
your route. You are much less likely to get bad
surprises. Get accurate maps of trails and terrain.
Try to learn of any blocked or closed roads.
It is also a good idea to travel with at least one
other vehicle. If something happens to one
of them, the other can help quickly.
Does your vehicle have a winch? If so, be sure to
read the winch instructions. In a remote area, a
winch can be handy if you get stuck. But you will
want to know how to use it properly.
Getting Familiar with Off-Road Driving
It is a good idea to practice in an area that is
safe and close to home before you go into
the wilderness. Off-road driving does require some
new and different skills. Here is what we mean.
Tune your senses to different kinds of signals.
Your eyes, for example, need to constantly sweep
the terrain for unexpected obstacles. Your ears
need to listen for unusual tire or engine sounds.With your arms, hands, feet, and body, you will
need to respond to vibrations and vehicle bounce.
Controlling your vehicle is the key to successful
off-road driving. One of the best ways to
control your vehicle is to control your speed. Here
are some things to keep in mind. At higher
speeds:
You approach things faster and you have less
time to scan the terrain for obstacles.
You have less time to react.
You have more vehicle bounce when you
drive over obstacles.
You will need more distance for braking,
especially since you are on an unpaved
surface.
376
Page 565 of 634
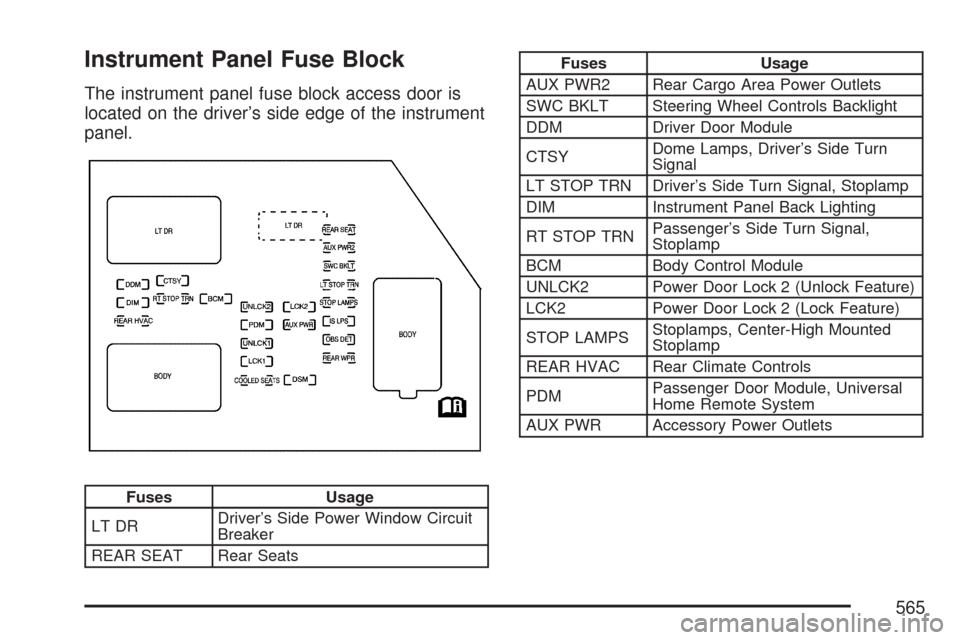
Instrument Panel Fuse Block
The instrument panel fuse block access door is
located on the driver’s side edge of the instrument
panel.
Fuses Usage
LT DRDriver’s Side Power Window Circuit
Breaker
REAR SEAT Rear Seats
Fuses Usage
AUX PWR2 Rear Cargo Area Power Outlets
SWC BKLT Steering Wheel Controls Backlight
DDM Driver Door Module
CTSYDome Lamps, Driver’s Side Turn
Signal
LT STOP TRN Driver’s Side Turn Signal, Stoplamp
DIM Instrument Panel Back Lighting
RT STOP TRNPassenger’s Side Turn Signal,
Stoplamp
BCM Body Control Module
UNLCK2 Power Door Lock 2 (Unlock Feature)
LCK2 Power Door Lock 2 (Lock Feature)
STOP LAMPSStoplamps, Center-High Mounted
Stoplamp
REAR HVAC Rear Climate Controls
PDMPassenger Door Module, Universal
Home Remote System
AUX PWR Accessory Power Outlets
565
Page 632 of 634
Split Bench Seat (60/40)............................... 20
StabiliTrak®System..................................... 363
StabiliTrak®Indicator Light........................... 252
Starting Your Engine................................... 141
Steering...................................................... 367
Steering Wheel Controls, Audio................... 351
Steering Wheel, Tilt Wheel.......................... 204
Storage Areas
Cargo Management System..................... 194
Center Console Storage Area................... 190
Cupholder(s)............................................ 190
Glove Box................................................ 190
Luggage Carrier....................................... 191
Rear Seat Armrest................................... 192
Rear Storage Area................................... 192
Stuck in Sand, Mud, Ice, or Snow............... 404
Sun Visors.................................................. 134
Sunroof....................................................... 197
System Identi�cation, Universal Home
Remote System....................................... 177
T
Tachometer................................................. 244
Taillamps
Turn Signal, Stoplamps and
Back-up Lamps..................................... 502Theft-Deterrent, Radio................................. 350
Theft-Deterrent Systems.............................. 135
Content Theft-Deterrent............................ 135
PASS-Key
®III+........................................ 137
PASS-Key®III+ Operation........................ 137
Third Row Seat............................................. 33
Tilt Wheel.................................................... 204
Time, Setting.............................291, 292, 293
Tire
Pressure Light.......................................... 253
Tires........................................................... 507
Aluminum or Chrome-Plated Wheels,
Cleaning............................................... 559
Buying New Tires..................................... 524
Chains..................................................... 530
Changing a Flat Tire................................ 532
Cleaning.................................................. 560
Different Size........................................... 526
If a Tire Goes Flat................................... 531
In�ation - Tire Pressure............................ 515
Inspection and Rotation............................ 521
Installing the Spare Tire........................... 537
Pressure Monitor System ......................... 516
Removing the Flat Tire............................. 537
Removing the Spare Tire and Tools......... 533
Secondary Latch System ......................... 543
632
Page 633 of 634
Tires (cont.)
Spare Tire................................................ 552
Storing a Flat or Spare Tire and Tools......... 547
Tire Sidewall Labeling.............................. 508
Tire Terminology and De�nitions............... 512
Uniform Tire Quality Grading.................... 527
Wheel Alignment and Tire Balance........... 528
Wheel Replacement................................. 528
When It Is Time for New Tires................. 523
Tow/Haul Mode........................................... 149
Tow/Haul Mode Light................................... 259
Towing
Recreational Vehicle................................. 418
Towing a Trailer....................................... 422
Your Vehicle............................................. 417
Traction
StabiliTrak
®System................................. 363
Trailer
Recommendations.................................... 440
Transmission
Fluid, Automatic....................................... 466
Transmission Operation, Automatic.............. 145
Trip Odometer............................................. 244
Turn and Lane-Change Signals................... 206
Turn Signal/Multifunction Lever.................... 205
U
Ultrasonic Rear Parking Assist (URPA)........ 222
Understanding Radio Reception................... 352
Uniform Tire Quality Grading....................... 527
Universal Home Remote System................. 178
Operation........................................178, 182
System Identi�cation................................ 177
V
Vehicle
Control..................................................... 360
Damage Warnings....................................... 5
Loading.................................................... 407
Symbols...................................................... 5
Vehicle Customization, DIC......................... 280
Vehicle Data Collection and Event Data
Recorders................................................ 609
Vehicle Identi�cation
Number (VIN).......................................... 562
Service Parts Identi�cation Label.............. 563
Ventilation Adjustment.................................. 238
Visors.......................................................... 134
Voltmeter Gage........................................... 249
633