turn signal CHEVROLET TRAVERSE 2021 Owner's Guide
[x] Cancel search | Manufacturer: CHEVROLET, Model Year: 2021, Model line: TRAVERSE, Model: CHEVROLET TRAVERSE 2021Pages: 369, PDF Size: 8.12 MB
Page 240 of 369

Chevrolet Traverse Owner Manual (GMNA-Localizing-U.S./Canada/Mexico-
14637844) - 2021 - CRC - 3/26/21
Driving and Operating 239
LCA displays may not come on when
passing a vehicle quickly, for a stopped
vehicle, or when towing a trailer. The LCA
detection zones that extend back from the
side of the vehicle do not move further back
when a trailer is towed. Use caution while
changing lanes when towing a trailer. LCA
may alert to objects attached to the vehicle,
such as a trailer, bicycle, or object extending
out to either side of the vehicle. Attached
objects may also interfere with the
detection of vehicles. This is normal system
operation; the vehicle does not need service.
LCA may not always alert the driver to
vehicles in the next lane over, especially in
wet conditions or when driving on sharp
curves. The system does not need to be
serviced. The system may light up due to
guardrails, signs, trees, shrubs, and other
non-moving objects. This is normal system
operation; the vehicle does not need service.
LCA may not operate when the LCA sensors
in the left or right corners of the rear
bumper are covered with mud, dirt, snow,
ice, or slush, or in heavy rainstorms. For
cleaning instructions, see "Washing the
Vehicle" underExterior Care0314. If the DIC
still displays the system unavailable message after cleaning both sides of the
vehicle toward the rear corners of the
vehicle, see your dealer.
If the LCA displays do not light up when
moving vehicles are in the side blind zone or
are rapidly approaching this zone and the
system is clean, the system may need
service. Take the vehicle to your dealer.
Radio Frequency Information
See
Radio Frequency Statement 0346.
Lane Keep Assist (LKA)
If equipped, LKA may help avoid crashes due
to unintentional lane departures. This
system uses a camera to detect lane
markings between 60 km/h (37 mph) and
180 km/h (112 mph). It may assist by gently
turning the steering wheel if the vehicle
approaches a detected lane marking. It may
also provide a Lane Departure Warning
(LDW) alert if the vehicle crosses a detected
lane marking. LKA can be overridden by
turning the steering wheel. This system is
not intended to keep the vehicle centered in
the lane. LKA will not assist and alert if the
turn signal is active in the direction of lane
departure, or if it detects that you are
accelerating, braking or actively steering.
{Warning
The LKA system does not continuously
steer the vehicle. It may not keep the
vehicle in the lane or give a Lane
Departure Warning (LDW) alert, even if a
lane marking is detected.
The LKA and LDW systems may not:
.Provide an alert or enough steering
assist to avoid a lane departure or
crash.
.Detect lane markings under poor
weather or visibility conditions. This
can occur if the windshield or
headlamps are blocked by dirt, snow,
or ice; if they are not in proper
condition; or if the sun shines directly
into the camera.
.Detect road edges.
.Detect lanes on winding or hilly roads.
If LKA only detects lane markings on one
side of the road, it will only assist or
provide an LDW alert when approaching
the lane on the side where it has
detected a lane marking. Even with LKA
and LDW, you must steer the vehicle. (Continued)
Page 247 of 369
Chevrolet Traverse Owner Manual (GMNA-Localizing-U.S./Canada/Mexico-
14637844) - 2021 - CRC - 3/26/21
246 Driving and Operating
Make wider turns than normal when towing,
so trailer will not go over soft shoulders,
over curbs, or strike road signs, trees,
or other objects. Always signal turns well in
advance. Do not steer or brake suddenly.
Driving on Grades
Reduce speed and shift to a lower gear
before starting down a long or steep
downhill grade. If the transmission is not
shifted down, the brakes may overheat and
result in reduced braking efficiency.
The vehicle can tow in D (Drive). Shift the
transmission to a lower gear if the
transmission shifts too often under heavy
loads and/or hilly conditions.
When towing at higher altitudes, engine
coolant will boil at a lower temperature
than at lower altitudes. If the engine is
turned off immediately after towing at high
altitude on steep uphill grades, the vehicle
could show signs similar to engine
overheating. To avoid this, let the engine
run, preferably on level ground, with the
transmission in P (Park) for a few minutes
before turning the engine off. If the
overheat warning comes on, seeEngine
Overheating 0267.
Parking on Hills
{Warning
To prevent serious injury or death,
always park your vehicle and trailer on a
level surface when possible.
When parking your vehicle and your trailer
on a hill: 1. Press the brake pedal, but do not shift into P (Park) yet. Turn the wheels into
the curb if facing downhill or into traffic
if facing uphill.
2. Have someone place chocks under the trailer wheels.
3. When the wheel chocks are in place, gradually release the brake pedal to
allow the chocks to absorb the load of
the trailer.
4. Reapply the brake pedal. Then apply the parking brake and shift into P (Park).
5. Release the brake pedal.
Leaving After Parking on a Hill
1. Apply and hold the brake pedal.
.Start the engine.
.Shift into a gear.
.Release the parking brake.
2. Let up on the brake pedal.
3. Drive slowly until the trailer is clear of the chocks.
4. Stop and have someone pick up and store the chocks.
Maintenance When Trailer Towing
The vehicle needs service more often when
used to tow trailers. See Maintenance
Schedule 0323. It is especially important to
check the engine oil, axle lubricant, belts,
cooling system, and brake system before
and during each trip.
Check periodically that all nuts and bolts on
the trailer hitch are tight.
Engine Cooling When Trailer Towing
The cooling system may temporarily
overheat during severe operating conditions.
See Engine Overheating 0267.
Page 253 of 369
Chevrolet Traverse Owner Manual (GMNA-Localizing-U.S./Canada/Mexico-
14637844) - 2021 - CRC - 3/26/21
252 Driving and Operating
Read and follow the instructions for the
trailer brakes so they are installed, adjusted,
and maintained properly.
Never attempt to tap into your vehicle's
hydraulic brake system. If you do, both the
vehicle anti-lock brakes and the trailer
brakes may not function, which could result
in a crash.
Trailer Wiring
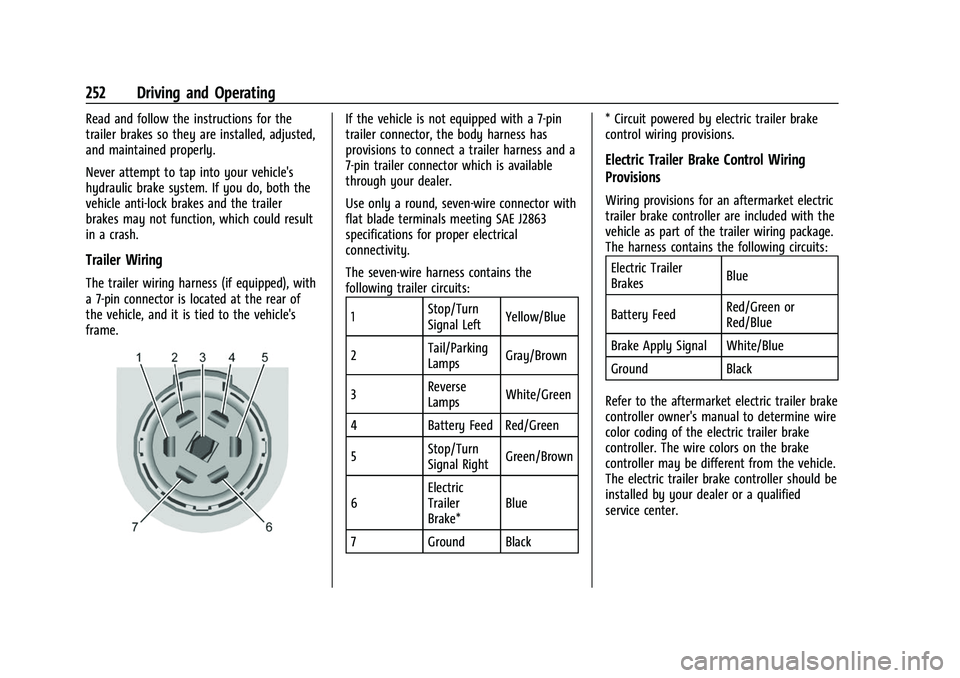
The trailer wiring harness (if equipped), with
a 7-pin connector is located at the rear of
the vehicle, and it is tied to the vehicle's
frame.
If the vehicle is not equipped with a 7-pin
trailer connector, the body harness has
provisions to connect a trailer harness and a
7-pin trailer connector which is available
through your dealer.
Use only a round, seven-wire connector with
flat blade terminals meeting SAE J2863
specifications for proper electrical
connectivity.
The seven-wire harness contains the
following trailer circuits:1 Stop/Turn
Signal Left Yellow/Blue
2 Tail/Parking
Lamps Gray/Brown
3 Reverse
Lamps White/Green
4 Battery Feed Red/Green
5 Stop/Turn
Signal Right Green/Brown
6 Electric
Trailer
Brake* Blue
7 Ground Black * Circuit powered by electric trailer brake
control wiring provisions.
Electric Trailer Brake Control Wiring
Provisions
Wiring provisions for an aftermarket electric
trailer brake controller are included with the
vehicle as part of the trailer wiring package.
The harness contains the following circuits:
Electric Trailer
Brakes Blue
Battery Feed Red/Green or
Red/Blue
Brake Apply Signal White/Blue
Ground Black
Refer to the aftermarket electric trailer brake
controller owner's manual to determine wire
color coding of the electric trailer brake
controller. The wire colors on the brake
controller may be different from the vehicle.
The electric trailer brake controller should be
installed by your dealer or a qualified
service center.
Page 254 of 369
Chevrolet Traverse Owner Manual (GMNA-Localizing-U.S./Canada/Mexico-
14637844) - 2021 - CRC - 3/26/21
Driving and Operating 253
If equipped, there are four blunt cut wires
inside the front driver side instrument panel.
It will be necessary to have a technician
connect the 12-volt power to the engine
compartment fuse block.
Trailer Lamps
Always check all trailer lamps are working at
the beginning of each trip, and periodically
on longer trips.
Turn Signals When Towing a Trailer
When properly connected, the trailer turn
signals will illuminate to indicate the vehicle
is turning, changing lanes, or stopping.
When towing a trailer, the arrows on the
instrument cluster will illuminate even if the
trailer is not properly connected or the bulbs
are burned out.
Tow/Haul Mode
For instructions on how to enter Tow/Haul
mode, seeDriver Mode Control 0215.
Tow/Haul assists when pulling a heavy
trailer or a large or heavy load. See Tow/
Haul Mode 0210.
Tow/Haul Mode is designed to be most
effective when the vehicle and trailer
combined weight is at least 75% of the vehicle's Gross Combined Weight Rating
(GCWR). See
“Weight of the Trailer” under
Trailer Towing 0247.
Tow/Haul Mode is most useful when pulling
a heavy trailer or a large or heavy load:
.through rolling terrain
.in stop-and-go traffic
.in busy parking lots
Operating the vehicle in Tow/Haul Mode
when lightly loaded or not towing will not
cause damage; however, it is not
recommended and may result in unpleasant
engine and transmission driving
characteristics and reduced fuel economy.
Trailer Sway Control (TSC)
Vehicles with StabiliTrak/Electronic Stability
Control (ESC) have a Trailer Sway Control
(TSC) feature. Trailer sway is unintended
side-to-side motion of a trailer while towing.
If the vehicle is towing a trailer and the TSC
detects that sway is increasing, the vehicle
brakes are selectively applied at each wheel,
to help reduce excessive trailer sway.
If equipped with the Integrated Trailer Brake
Control (ITBC) system, and the trailer has an
electric brake system, StabiliTrak/ESC may
also apply the trailer brakes.
If TSC is enabled, the Traction Control
System (TCS)/StabiliTrak/ESC warning light
will flash on the instrument cluster. Reduce
vehicle speed by gradually removing your
foot from the accelerator. If trailer sway
continues, StabiliTrak/ESC can reduce engine
torque to help slow the vehicle. TSC will not
function if StabiliTrak/ESC is turned off. See
Traction Control/Electronic Stability Control
0 214.
{Warning
Trailer sway can result in a crash and in
serious injury or death, even if the
vehicle is equipped with TSC.
If the trailer begins to sway, reduce
vehicle speed by gradually removing your
foot from the accelerator. Then pull over
to check the trailer and vehicle to help
correct possible causes, including an
improperly or overloaded trailer,
(Continued)
Page 256 of 369
Chevrolet Traverse Owner Manual (GMNA-Localizing-U.S./Canada/Mexico-
14637844) - 2021 - CRC - 3/26/21
Vehicle Care 255
Vehicle Care
General Information
General Information . . . . . . . . . . . . . . . . . . . 256
California Proposition 65 Warning . . . . . 256
California Perchlorate MaterialsRequirements . . . . . . . . . . . . . . . . . . . . . . . . 256
Accessories and Modifications . . . . . . . . . 256
Vehicle Checks
Doing Your Own Service Work . . . . . . . . . 257
Hood . . . . . . . . . . . . . . . . . . . . . . . . . . . . . . . . . . 257
Engine Compartment Overview . . . . . . . . 259
Engine Oil . . . . . . . . . . . . . . . . . . . . . . . . . . . . . 260
Engine Oil Life System . . . . . . . . . . . . . . . . 262
Automatic Transmission Fluid . . . . . . . . . 262
Engine Air Filter Life System . . . . . . . . . . 263
Engine Air Cleaner/Filter . . . . . . . . . . . . . . 263
Cooling System . . . . . . . . . . . . . . . . . . . . . . . 264
Engine Overheating . . . . . . . . . . . . . . . . . . . 267
Washer Fluid . . . . . . . . . . . . . . . . . . . . . . . . . . 268
Brakes . . . . . . . . . . . . . . . . . . . . . . . . . . . . . . . . 268
Brake Fluid . . . . . . . . . . . . . . . . . . . . . . . . . . . . 269
Battery - North America . . . . . . . . . . . . . . . 270
All-Wheel Drive . . . . . . . . . . . . . . . . . . . . . . . . 271
Park Brake and P (Park) Mechanism Check . . . . . . . . . . . . . . . . . . . . . . . . . . . . . . . . 271
Wiper Blade Replacement . . . . . . . . . . . . . . 271
Windshield Replacement . . . . . . . . . . . . . . . 272
Gas Strut(s) . . . . . . . . . . . . . . . . . . . . . . . . . . . . 273
Headlamp Aiming
Front Headlamp Aiming . . . . . . . . . . . . . . . 274
Bulb Replacement
Bulb Replacement . . . . . . . . . . . . . . . . . . . . . 274
High Intensity Discharge (HID) Lighting . . . . . . . . . . . . . . . . . . . . . . . . . . . . . 274
LED Lighting . . . . . . . . . . . . . . . . . . . . . . . . . . . 274
Headlamps, Front Turn Signal, and Sidemarker . . . . . . . . . . . . . . . . . . . . . . . . . . 274
License Plate Lamp . . . . . . . . . . . . . . . . . . . . 275
Electrical System
High Voltage Devices and Wiring . . . . . . 275
Electrical System Overload . . . . . . . . . . . . 276
Fuses and Circuit Breakers . . . . . . . . . . . . . 276
Engine Compartment Fuse Block . . . . . . . 277
Instrument Panel Fuse Block . . . . . . . . . . 280
Rear Compartment Fuse Block . . . . . . . . . 282
Wheels and Tires
Tires . . . . . . . . . . . . . . . . . . . . . . . . . . . . . . . . . . 284
All-Season Tires . . . . . . . . . . . . . . . . . . . . . . . . 285
Winter Tires . . . . . . . . . . . . . . . . . . . . . . . . . . . 285
Tire Sidewall Labeling . . . . . . . . . . . . . . . . . 285
Tire Designations . . . . . . . . . . . . . . . . . . . . . . 287
Tire Terminology and Definitions . . . . . . 288
Tire Pressure . . . . . . . . . . . . . . . . . . . . . . . . . . 290
Tire Pressure for High-Speed Operation . . . . . . . . . . . . . . . . . . . . . . . . . . . . 291
Tire Pressure Monitor System . . . . . . . . . 292 Tire Pressure Monitor Operation . . . . . . 293
Tire Inspection . . . . . . . . . . . . . . . . . . . . . . . . 296
Tire Rotation . . . . . . . . . . . . . . . . . . . . . . . . . . 296
When It Is Time for New Tires . . . . . . . . 297
Buying New Tires . . . . . . . . . . . . . . . . . . . . . 298
Different Size Tires and Wheels . . . . . . . 299
Uniform Tire Quality Grading . . . . . . . . . 299
Wheel Alignment and Tire Balance . . . . 301
Wheel Replacement . . . . . . . . . . . . . . . . . . . 301
Tire Chains . . . . . . . . . . . . . . . . . . . . . . . . . . . . 301
If a Tire Goes Flat . . . . . . . . . . . . . . . . . . . . . 302
Tire Changing . . . . . . . . . . . . . . . . . . . . . . . . . 303
Compact Spare Tire . . . . . . . . . . . . . . . . . . . 308
Jump Starting
Jump Starting - North America . . . . . . . . 309
Towing the Vehicle
Towing the Vehicle . . . . . . . . . . . . . . . . . . . . 311
Recreational Vehicle Towing . . . . . . . . . . . 312
Appearance Care
Exterior Care . . . . . . . . . . . . . . . . . . . . . . . . . . . 314
Interior Care . . . . . . . . . . . . . . . . . . . . . . . . . . . 317
Floor Mats . . . . . . . . . . . . . . . . . . . . . . . . . . . . 320
Page 275 of 369

Chevrolet Traverse Owner Manual (GMNA-Localizing-U.S./Canada/Mexico-
14637844) - 2021 - CRC - 3/26/21
274 Vehicle Care
Headlamp Aiming
Front Headlamp Aiming
Headlamp aim has been preset and should
need no further adjustment.
If the vehicle is damaged in a crash, the
headlamp aim may be affected.
If adjustment to the headlamps is necessary,
see your dealer.
Bulb Replacement
For the proper type of replacement bulbs,
or any bulb changing procedure not listed in
this section, contact your dealer.
Caution
Do not replace incandescent bulbs with
aftermarket LED replacement bulbs. This
can cause damage to the vehicle electrical
system.
High Intensity Discharge (HID)
Lighting
{Warning
The High Intensity Discharge (HID)
lighting system operates at a very high
voltage. If you try to service any of the
system components, you could be
seriously injured. Have your dealer or a
qualified technician service them.
After an HID headlamp bulb has been
replaced, the beam might be a slightly
different shade than it was originally. This is
normal.
LED Lighting
This vehicle has several LED lamps. For
replacement of any LED lighting assembly,
contact your dealer.
Headlamps, Front Turn Signal,
and Sidemarker
The headlamp is either an HID or an LED.
See “High Intensity Discharge (HID) Lighting”
and “LED Lighting” earlier in this section.
Driver Side Shown, Passenger Side Similar
1. Sidemarker Bulb
2. Front Turn Signal
To replace the front turn signal or
sidemarker:
1. Open the hood. See Hood0257.
2. Locate the bulb socket on the headlamp assembly.
3. Turn the bulb socket counterclockwise to remove it from the headlamp assembly.
4. Pull the bulb straight out from the socket.
5. Push the new bulb into the socket and reinstall the socket into the headlamp
assembly by turning it clockwise.
Page 293 of 369
Chevrolet Traverse Owner Manual (GMNA-Localizing-U.S./Canada/Mexico-
14637844) - 2021 - CRC - 3/26/21
292 Vehicle Care
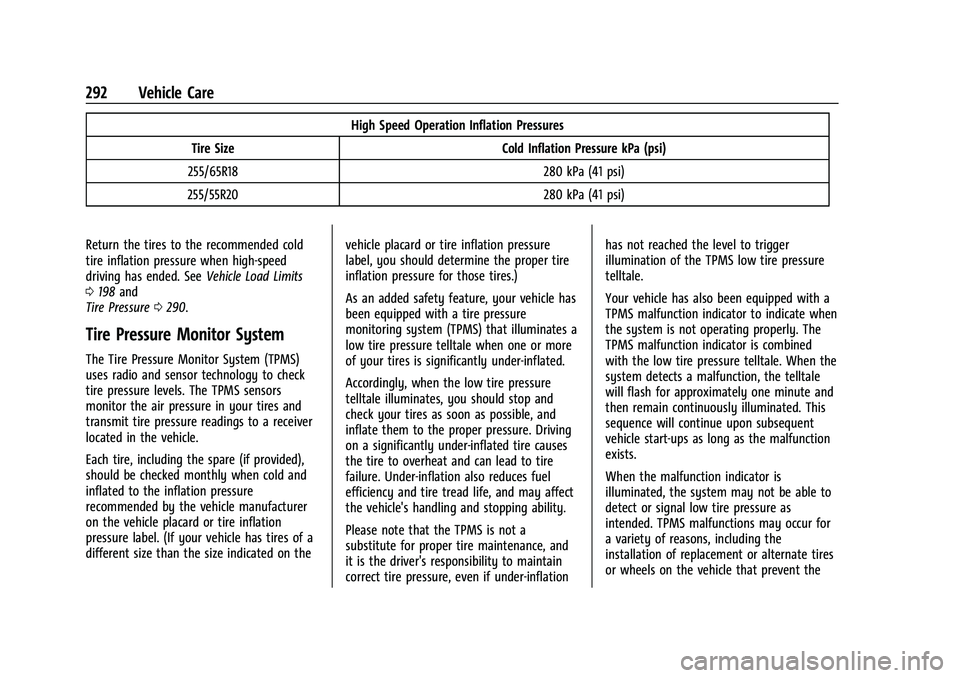
High Speed Operation Inflation Pressures
Tire Size Cold Inflation Pressure kPa (psi)
255/65R18 280 kPa (41 psi)
255/55R20 280 kPa (41 psi)
Return the tires to the recommended cold
tire inflation pressure when high-speed
driving has ended. See Vehicle Load Limits
0 198 and
Tire Pressure 0290.
Tire Pressure Monitor System
The Tire Pressure Monitor System (TPMS)
uses radio and sensor technology to check
tire pressure levels. The TPMS sensors
monitor the air pressure in your tires and
transmit tire pressure readings to a receiver
located in the vehicle.
Each tire, including the spare (if provided),
should be checked monthly when cold and
inflated to the inflation pressure
recommended by the vehicle manufacturer
on the vehicle placard or tire inflation
pressure label. (If your vehicle has tires of a
different size than the size indicated on the vehicle placard or tire inflation pressure
label, you should determine the proper tire
inflation pressure for those tires.)
As an added safety feature, your vehicle has
been equipped with a tire pressure
monitoring system (TPMS) that illuminates a
low tire pressure telltale when one or more
of your tires is significantly under-inflated.
Accordingly, when the low tire pressure
telltale illuminates, you should stop and
check your tires as soon as possible, and
inflate them to the proper pressure. Driving
on a significantly under-inflated tire causes
the tire to overheat and can lead to tire
failure. Under-inflation also reduces fuel
efficiency and tire tread life, and may affect
the vehicle's handling and stopping ability.
Please note that the TPMS is not a
substitute for proper tire maintenance, and
it is the driver's responsibility to maintain
correct tire pressure, even if under-inflationhas not reached the level to trigger
illumination of the TPMS low tire pressure
telltale.
Your vehicle has also been equipped with a
TPMS malfunction indicator to indicate when
the system is not operating properly. The
TPMS malfunction indicator is combined
with the low tire pressure telltale. When the
system detects a malfunction, the telltale
will flash for approximately one minute and
then remain continuously illuminated. This
sequence will continue upon subsequent
vehicle start-ups as long as the malfunction
exists.
When the malfunction indicator is
illuminated, the system may not be able to
detect or signal low tire pressure as
intended. TPMS malfunctions may occur for
a variety of reasons, including the
installation of replacement or alternate tires
or wheels on the vehicle that prevent the
Page 295 of 369
Chevrolet Traverse Owner Manual (GMNA-Localizing-U.S./Canada/Mexico-
14637844) - 2021 - CRC - 3/26/21
294 Vehicle Care
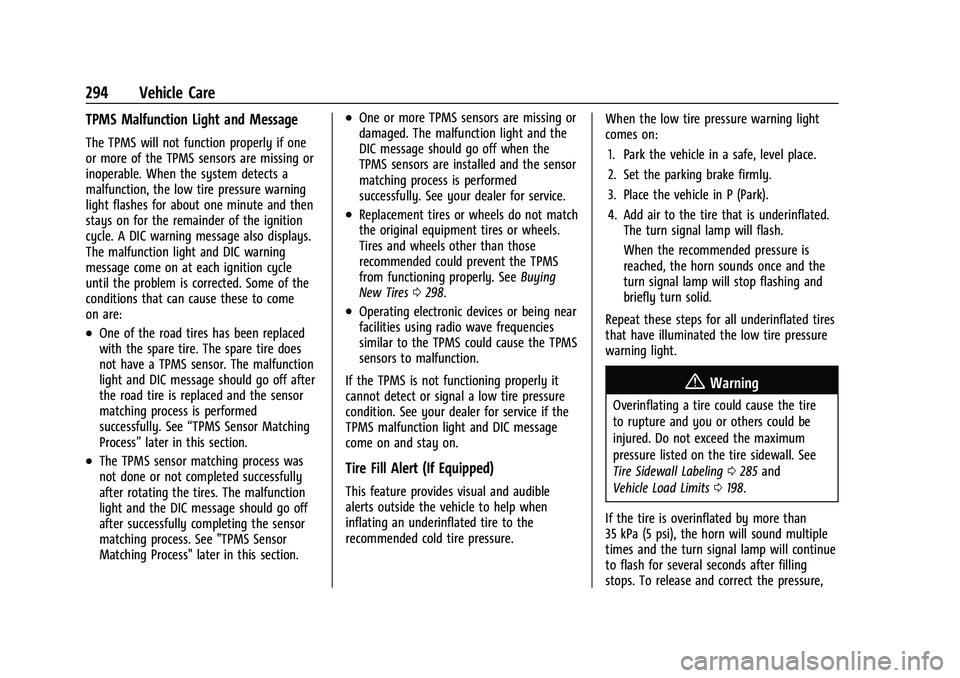
TPMS Malfunction Light and Message
The TPMS will not function properly if one
or more of the TPMS sensors are missing or
inoperable. When the system detects a
malfunction, the low tire pressure warning
light flashes for about one minute and then
stays on for the remainder of the ignition
cycle. A DIC warning message also displays.
The malfunction light and DIC warning
message come on at each ignition cycle
until the problem is corrected. Some of the
conditions that can cause these to come
on are:
.One of the road tires has been replaced
with the spare tire. The spare tire does
not have a TPMS sensor. The malfunction
light and DIC message should go off after
the road tire is replaced and the sensor
matching process is performed
successfully. See“TPMS Sensor Matching
Process” later in this section.
.The TPMS sensor matching process was
not done or not completed successfully
after rotating the tires. The malfunction
light and the DIC message should go off
after successfully completing the sensor
matching process. See "TPMS Sensor
Matching Process" later in this section.
.One or more TPMS sensors are missing or
damaged. The malfunction light and the
DIC message should go off when the
TPMS sensors are installed and the sensor
matching process is performed
successfully. See your dealer for service.
.Replacement tires or wheels do not match
the original equipment tires or wheels.
Tires and wheels other than those
recommended could prevent the TPMS
from functioning properly. See Buying
New Tires 0298.
.Operating electronic devices or being near
facilities using radio wave frequencies
similar to the TPMS could cause the TPMS
sensors to malfunction.
If the TPMS is not functioning properly it
cannot detect or signal a low tire pressure
condition. See your dealer for service if the
TPMS malfunction light and DIC message
come on and stay on.
Tire Fill Alert (If Equipped)
This feature provides visual and audible
alerts outside the vehicle to help when
inflating an underinflated tire to the
recommended cold tire pressure. When the low tire pressure warning light
comes on:
1. Park the vehicle in a safe, level place.
2. Set the parking brake firmly.
3. Place the vehicle in P (Park).
4. Add air to the tire that is underinflated. The turn signal lamp will flash.
When the recommended pressure is
reached, the horn sounds once and the
turn signal lamp will stop flashing and
briefly turn solid.
Repeat these steps for all underinflated tires
that have illuminated the low tire pressure
warning light.
{Warning
Overinflating a tire could cause the tire
to rupture and you or others could be
injured. Do not exceed the maximum
pressure listed on the tire sidewall. See
Tire Sidewall Labeling 0285 and
Vehicle Load Limits 0198.
If the tire is overinflated by more than
35 kPa (5 psi), the horn will sound multiple
times and the turn signal lamp will continue
to flash for several seconds after filling
stops. To release and correct the pressure,
Page 296 of 369
Chevrolet Traverse Owner Manual (GMNA-Localizing-U.S./Canada/Mexico-
14637844) - 2021 - CRC - 3/26/21
Vehicle Care 295
while the turn signal lamp is still flashing,
briefly press the center of the valve stem.
When the recommended pressure is reached,
the horn sounds once.
If the turn signal lamp does not flash within
15 seconds after starting to inflate the tire,
the tire fill alert has not been activated or is
not working.
If the hazard warning flashers are on, the
tire fill alert visual feedback will not work
properly.
The TPMS will not activate the tire fill alert
properly under the following conditions:
.There is interference from an external
device or transmitter.
.The air pressure from the inflation device
is not sufficient to inflate the tire.
.There is a malfunction in the TPMS.
.There is a malfunction in the horn or turn
signal lamps.
.The identification code of the TPMS
sensor is not registered to the system.
.The battery of the TPMS sensor is low.If the tire fill alert does not operate due to
TPMS interference, move the vehicle about
1 m (3 ft) back or forward and try again.
If the tire fill alert feature is not working,
use a tire pressure gauge.
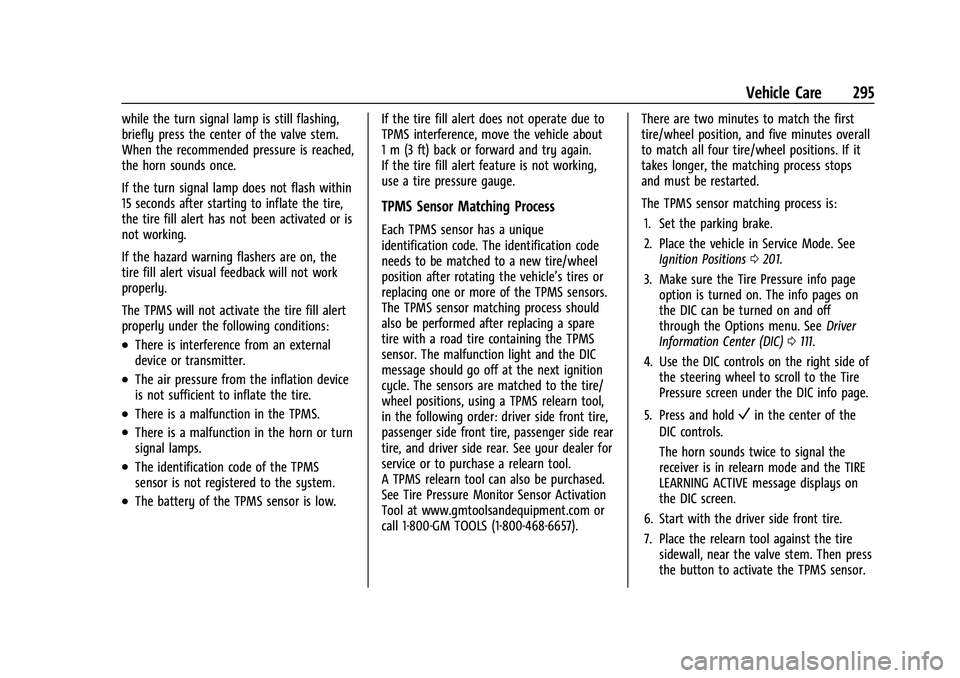
TPMS Sensor Matching Process
Each TPMS sensor has a unique
identification code. The identification code
needs to be matched to a new tire/wheel
position after rotating the vehicle’s tires or
replacing one or more of the TPMS sensors.
The TPMS sensor matching process should
also be performed after replacing a spare
tire with a road tire containing the TPMS
sensor. The malfunction light and the DIC
message should go off at the next ignition
cycle. The sensors are matched to the tire/
wheel positions, using a TPMS relearn tool,
in the following order: driver side front tire,
passenger side front tire, passenger side rear
tire, and driver side rear. See your dealer for
service or to purchase a relearn tool.
A TPMS relearn tool can also be purchased.
See Tire Pressure Monitor Sensor Activation
Tool at www.gmtoolsandequipment.com or
call 1-800-GM TOOLS (1-800-468-6657). There are two minutes to match the first
tire/wheel position, and five minutes overall
to match all four tire/wheel positions. If it
takes longer, the matching process stops
and must be restarted.
The TPMS sensor matching process is:
1. Set the parking brake.
2. Place the vehicle in Service Mode. See Ignition Positions 0201.
3. Make sure the Tire Pressure info page option is turned on. The info pages on
the DIC can be turned on and off
through the Options menu. See Driver
Information Center (DIC) 0111.
4. Use the DIC controls on the right side of the steering wheel to scroll to the Tire
Pressure screen under the DIC info page.
5. Press and hold
Vin the center of the
DIC controls.
The horn sounds twice to signal the
receiver is in relearn mode and the TIRE
LEARNING ACTIVE message displays on
the DIC screen.
6. Start with the driver side front tire.
7. Place the relearn tool against the tire sidewall, near the valve stem. Then press
the button to activate the TPMS sensor.
Page 350 of 369
Chevrolet Traverse Owner Manual (GMNA-Localizing-U.S./Canada/Mexico-
14637844) - 2021 - CRC - 3/26/21
OnStar 349
OnStar
OnStar Overview
OnStar Overview . . . . . . . . . . . . . . . . . . . . . . 349
OnStar Services
Emergency . . . . . . . . . . . . . . . . . . . . . . . . . . . . 350
Security . . . . . . . . . . . . . . . . . . . . . . . . . . . . . . . 350
OnStar Additional Information
OnStar Additional Information . . . . . . . . 350
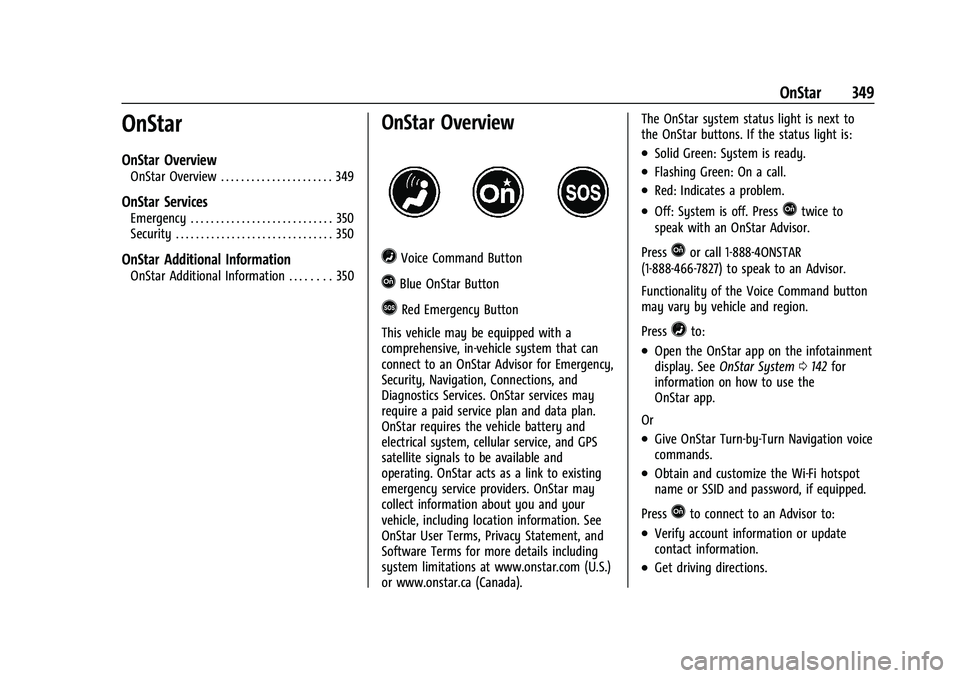
OnStar Overview
=Voice Command Button
QBlue OnStar Button
>Red Emergency Button
This vehicle may be equipped with a
comprehensive, in-vehicle system that can
connect to an OnStar Advisor for Emergency,
Security, Navigation, Connections, and
Diagnostics Services. OnStar services may
require a paid service plan and data plan.
OnStar requires the vehicle battery and
electrical system, cellular service, and GPS
satellite signals to be available and
operating. OnStar acts as a link to existing
emergency service providers. OnStar may
collect information about you and your
vehicle, including location information. See
OnStar User Terms, Privacy Statement, and
Software Terms for more details including
system limitations at www.onstar.com (U.S.)
or www.onstar.ca (Canada). The OnStar system status light is next to
the OnStar buttons. If the status light is:
.Solid Green: System is ready.
.Flashing Green: On a call.
.Red: Indicates a problem.
.Off: System is off. PressQtwice to
speak with an OnStar Advisor.
Press
Qor call 1-888-4ONSTAR
(1-888-466-7827) to speak to an Advisor.
Functionality of the Voice Command button
may vary by vehicle and region.
Press
=to:
.Open the OnStar app on the infotainment
display. See OnStar System 0142 for
information on how to use the
OnStar app.
Or
.Give OnStar Turn-by-Turn Navigation voice
commands.
.Obtain and customize the Wi-Fi hotspot
name or SSID and password, if equipped.
Press
Qto connect to an Advisor to:
.Verify account information or update
contact information.
.Get driving directions.