service indicator CHRYSLER 300 2015 2.G User Guide
[x] Cancel search | Manufacturer: CHRYSLER, Model Year: 2015, Model line: 300, Model: CHRYSLER 300 2015 2.GPages: 180, PDF Size: 30.54 MB
Page 18 of 180
•TheAdvancedFrontAirBagswillnotdeployinallfrontalcollisions,includingsomethatmayproduce substantial vehicle damage — for example, some pole collisions, truck underrides, andangle offset collisions.
•Ontheotherhand,dependingonthetypeandlocationofimpact,AdvancedFrontAirBagsmay deploy in crashes with little vehicle front-end damage but that produce a severe initialdeceleration.
•Becauseairbagsensorsmeasurevehicledecelerationovertime,vehiclespeedanddamagebythemselves are not good indicators of whether or not an air bag should have deployed.
•Seatbeltsarenecessaryforyourprotectioninallcollisions,andalsoareneededtohelpkeep
you in position, away from an inflating air bag.
•Theairbagsmustbereadytoinflateforyourprotectioninacollision.TheOccupantRestraintController (ORC) monitors the internal circuits and interconnecting wiring associated with airbag system electrical components.
•TheORCturnsontheAirBagWarningLightintheinstrumentpanelforapproximatelyfourto eight seconds for a self-check when the ignition switch is first turned to the ON/RUNposition. After the self-check, the Air Bag Warning Light will turn off. If the ORC detects amalfunction in any part of the system, it turns on the Air Bag Warning Light, either momen-tarily or continuously. A single chime will sound to alert you if the light comes on again afterinitial startup.
•TheORCmonitorsthereadinessoftheelectronicpartsoftheairbagsystemwhenevertheignition switch is in the START or ON/RUN position. If the ignition switch is in the OFFposition or in the ACC position, the air bag system is not on and the air bags will not inflate.
•IftheAirBagWarningLightintheinstrumentpanelisnotonduringthefourtoeightsecondswhen the ignition switch is first turned to the ON/RUN position, stays on, or turns on whiledriving, have the vehicle serviced by an authorized service center immediately.
NOTE:
If the speedometer, tachometer, or any engine related gauges are not working, the Occupant
Restraint Controller (ORC ) may also be disabled. In this condition the air bags may not be ready
to inflate for your protection. Have an authorized dealer service the air bag system immediately.
•Afteranycollision,thevehicleshouldbetakentoanauthorizeddealerimmediately.
•Donotdriveyourvehicleaftertheairbagshave deployed. If you are involved in anothercollision, the air bags will not be in place to protect you.
•Ifitisnecessarytomodifytheairbagsystemforpersonswithdisabilities,contactyourauthorized dealer.
•Referto“SupplementalRestraintSystem(SRS)”in“ThingsToKnowBeforeStartingYour
Ve h i c l e ” i n t h e O w n e r ' s M a n u a l o n t h e D V D f o r f u r t h e r i n f o r m a t i o n .
GETTING STARTED
16
Page 128 of 180

ROADSIDE ASSISTANCE
Dial toll-free 1-800-521-2779 for U.S. Residents or 1-800-363-4869 for Canadian Residents.
•Provideyourname,vehicleidentificationnumber,licenseplatenumber,andyourlocation,
including the telephone number from which you are calling.
• Briefly describe the nature of the problem and answer a few simple questions.
•Youwillbegiventhenameoftheserviceproviderandanestimatedtimeofarrival.Ifyoufeel
you are in an “unsafe situation”, please let us know. With your consent, we will contact local
police or safety authorities.
INSTRUMENT CLUSTER WARNING LIGHTS
–ElectronicStabilityControl(ESC)Activation/Malfunction
Indicator Light
The “ESC Activation/Malfunction Indicator Light” in the instrument cluster will come on when
the ignition switch is turned to the ON/RUN position. It should go out with the engine running.
If the “ESC Activation/Malfunction Indicator Light” comes on continuously with the engine
running, a malfunction has been detected in the ESC system.
If this light remains on after several ignition cycles,andthevehiclehasbeendrivenseveralmiles
(kilometers) at speeds greater than 30 mph (48 km/h), we recommend you drive to the nearest
service center and have the vehicle serviced immediately.
–TirePressureMonitoringSystem(TPMS)Light
Each tire, including the spare (if provided), should be checked monthly when cold and inflated to
the inflation pressure recommended by the vehicle manufacturer on the vehicle placard or tire
inflation pressure label. (If your vehicle has tires of a different size than the size indicated on the
vehicle placard or tire inflation pressure label, you should determine the proper tire inflation
pressure for those tires).
As an added safety feature, your vehicle has been equipped with a tire pressure monitoring
system (TPMS) that illuminates a low tire pressure telltale when one or more of your tires is
significantly under-inflated. Accordingly, when the low tire pressure telltale illuminates, you
should stop and check your tires as soon as possible and inflate them to the proper pressure.
Driving on a significantly under-inflated tire causes the tire to overheat and can lead to tire failure.
Under-inflation also reduces fuel efficiency and tire tread life and may affect the vehicle’s
handling and stopping ability.
IF THE LIGHT STARTS FLASHING INDICATING A LOW TIRE PRESSURE, ADJUST
THE AIR PRESSURE IN THE LOW TIRE TO THE AIR PRESSURE SHOWN ON THE
VEHICLE PLACARD OR TIRE INFLATION PRESSURE LABEL LOCATED ON THE
DRIVER'S DOOR.
WHAT TO DO IN EMERGENCIES
126
Page 129 of 180
NOTE:
AFTER INFLATION, THE VEHICLE MAY NEED TO BE DRIVEN FOR 20 MINUTES
BEFORE THE FLASHING LIGHT WILL TURN OFF.
Please note that the TPMS is not a substitute for proper tire maintenance, and it is the driver’s
responsibility to maintain correct tire pressure, even if under-inflation has not reached the level to
trigger illumination of the TPMS low tire pressure telltale.
Yo u r v e h i c l e h a s a l s o b e e n e q u i p p e d w i t h a T P M S m a l f u n c t i o n i n d i c a t o r t o i n d i c a t e w h e n t h e
system is not operating properly. The TPMS malfunction indicator is combined with the low tire
pressure telltale.
When the system detects a malfunction, the telltale will flash for approximately one minute and
then remain continuously illuminated. This sequence will continue upon subsequent vehicle
start-ups as long as the malfunction exists. When the malfunction indicator is illuminated, the
system may not be able to detect or signal low tire pressure as intended. TPMS malfunctions may
occur for a variety of reasons, including the installation of replacement or alternate tires or wheels
on the vehicle that prevent the TPMS from functioning properly. Always check the TPMS
malfunction telltale after replacing one or more tires or wheels on your vehicle to ensure that the
replacement or alternate tires and wheels allow the TPMS to continue to function properly.
NOTE:
Tire pressures change by approximately 1 psi (7 kPa) per 12° F (7° C) of air temperature change.
Keep this in mind when checking tire pressure inside a garage, especially in the Winter. Example:
If garage temperature is 68°F (20°C), and the outside temperature is 32°F (0°C), then the cold
tire inflation pressure should be increased by 3 psi (21 kPa), which equals 1 psi (7 kPa) for every
12°F (7°C) for this outside temperature condition.
CAUTION!
The TPMS has been optimized for the original equipment tires and wheels. TPMS pressures
and warning have been established for the tire size equipped on your vehicle. Undesirable
system operation or sensor damage may result when using replacement equipment that is not
of the same size, type, and/or style. Aftermarket wheels can cause sensor damage. Do not use
tire sealant from a can, or balance beads if your vehicle is equipped with a TPMS, as damage
to the sensors may result.
–EngineTemperatureWarningLight
This light warns of an overheated engine condition.
If the light turns on or flashes continuously while driving, safely pull over and stop the vehicle. If
the A/C system is on, turn it off. Also, shift the transmission into NEUTRAL and idle the vehicle.
If the temperature reading does not return to normal, turn the engine off immediately.
We r e c o m m e n d t h a t y o u d o n o t o p e r a t e t h e v e h i c l e o r e n g i n e d a m a g e w i l l o c c u r. H a v e t h e
vehicle serviced immediately.
WHAT TO DO IN EMERGENCIES
127
Page 130 of 180
WARNING!
Ahotenginecoolingsystemisdangerous.Youorotherscouldbebadlyburnedbysteamor
boiling coolant.
–BrakeWarningLight
This light monitors various brake functions, including brake fluid level and parking brake appli-
cation. If the brake light turns on, it may indicate that the parking brake is applied, that the brake
fluid level is low, or that there is a problem with the anti-lock brake system reservoir.
If the light remains on when the parking brake has been disengaged, and the fluid level is at the
full mark on the master cylinder reservoir, it indicates a possible brake hydraulic system malfunc-
tion or that a problem with the Brake Booster has been detected by the Anti-Lock Brake System
(ABS)/Electronic Stability Control (ESC) system. In this case, the light will remain on until the
condition has been corrected. If the problem is related to the brake booster, the ABS pump will
run when applying the brake, and a brake pedal pulsation may be felt during each stop.
The dual brake system provides a reserve braking capacity in the event of a failure to a portion of
the hydraulic system. A leak in either half of the dual brake system is indicated by the Brake
Wa r n i n g L i g h t , w h i c h w i l l t u r n o n w h e n t h e b r a k e f l u i d l e v e l i n t h e m a s t e r c y l i n d e r h a s d r o p p e d
below a specified level. The light will remain on until the cause is corrected.
Ve h i c l e s e q u i p p e d w i t h t h e A n t i - L o c k B r a k e S y s t e m ( A B S ) a r e a l s o e q u i p p e d w i t h E l e c t r o n i c
Brake Force Distribution (EBD). In the event of an EBD failure, the Brake Warning Light will turn
on along with the ABS Light. Immediate repair to the ABS system is required.
Operation of the Brake Warning Light can be checked by turning the ignition switch from the
OFF position to the ON/RUN position. The light should illuminate for approximately two
seconds. The light should then turn off unless the parking brake is applied or a brake fault is
detected. If the light does not illuminate, have the light inspected by an authorized dealer.
The light also will turn on when the parking brake is applied with the ignition switch in the
ON/RUN position.
NOTE:
This light shows only that the parking brake is applied. It does not show the degree of brake
application.
WARNING!
Driving a vehicle with the red brake light on is dangerous. Part of the brake system may have
failed. It will take longer to stop the vehicle. You could have a collision. Have the vehicle
checked immediately.
Malfunction Indicator Light (MIL)
Certain conditions, such as a poor fuel quality, etc., may illuminate the MIL after engine start. The
vehicle should be serviced if the light stays on through several typical driving cycles. In most
situations, the vehicle will drive normally and not require towing.
WHAT TO DO IN EMERGENCIES
128
Page 131 of 180
If the MIL flashes when the engine is running, serious conditions may exist that could lead to
immediate loss of power or severe catalytic converter damage. We recommend you do not
operate the vehicle. Have the vehicle serviced immediately.
–ElectronicStabilityControl(ESC)OFFIndicatorLight
This light indicates the Electronic Stability Control (ESC) is off.
Charging System Light
This light shows the status of the electrical charging system. If the charging system light remains
on, it means that the vehicle is experiencing a problem with the charging system.
We r e c o m m e n d y o u d o n o t c o n t i n u e d r i v i n g i f t h e c h a r g i n g s y s t e m l i g h t i s o n . H a v e t h e v e h i c l e
serviced immediately.
–OilPressureWarningLight
This light indicates low engine oil pressure. If the light turns on while driving, stop the vehicle and
shut off the engine as soon as possible. A chime will sound when this light turns on.
We r e c o m m e n d y o u d o n o t o p e r a t e t h e v e h i c l e o r e n g i n e d a m a g e w i l l o c c u r. H a v e t h e v e h i c l e
serviced immediately.
–Anti-LockBrake(ABS)Light
This light monitors the Anti-Lock Brake System (ABS).
If the light is not on during starting, stays on or turns on while driving, we recommend you contact
the nearest authorized dealer and have the vehicle serviced immediately.
–ElectronicThrottleControl(ETC)IndicatorLight
This light informs you of a problem with the system.
If a problem is detected, the light will come on while the engine is running. Cycle the ignition
when the vehicle has completely stopped and the shift lever is placed in the PARK position; the
light should turn off.
If the light remains lit with the engine running, your vehicle will usually be drivable. However, see
an authorized dealer immediately. If the light is flashing when the engine is running, immediate
service is required, and you may experience reduced performance, an elevated/rough idle or
engine stall, and your vehicle may require towing.
–AirBagWarningLight
If the light is not on during starting, stays on, or turns on while driving, have the vehicle serviced
by an authorized dealer immediately.
SERVICE AWD SYSTEM Message
If the SERVICE AWD SYSTEM warning message appears after engine start up, or during
driving, it means the AWD system is not functioning properly. We recommend you do not
operate the vehicle. Have the vehicle serviced immediately.
WHAT TO DO IN EMERGENCIES
129
Page 154 of 180
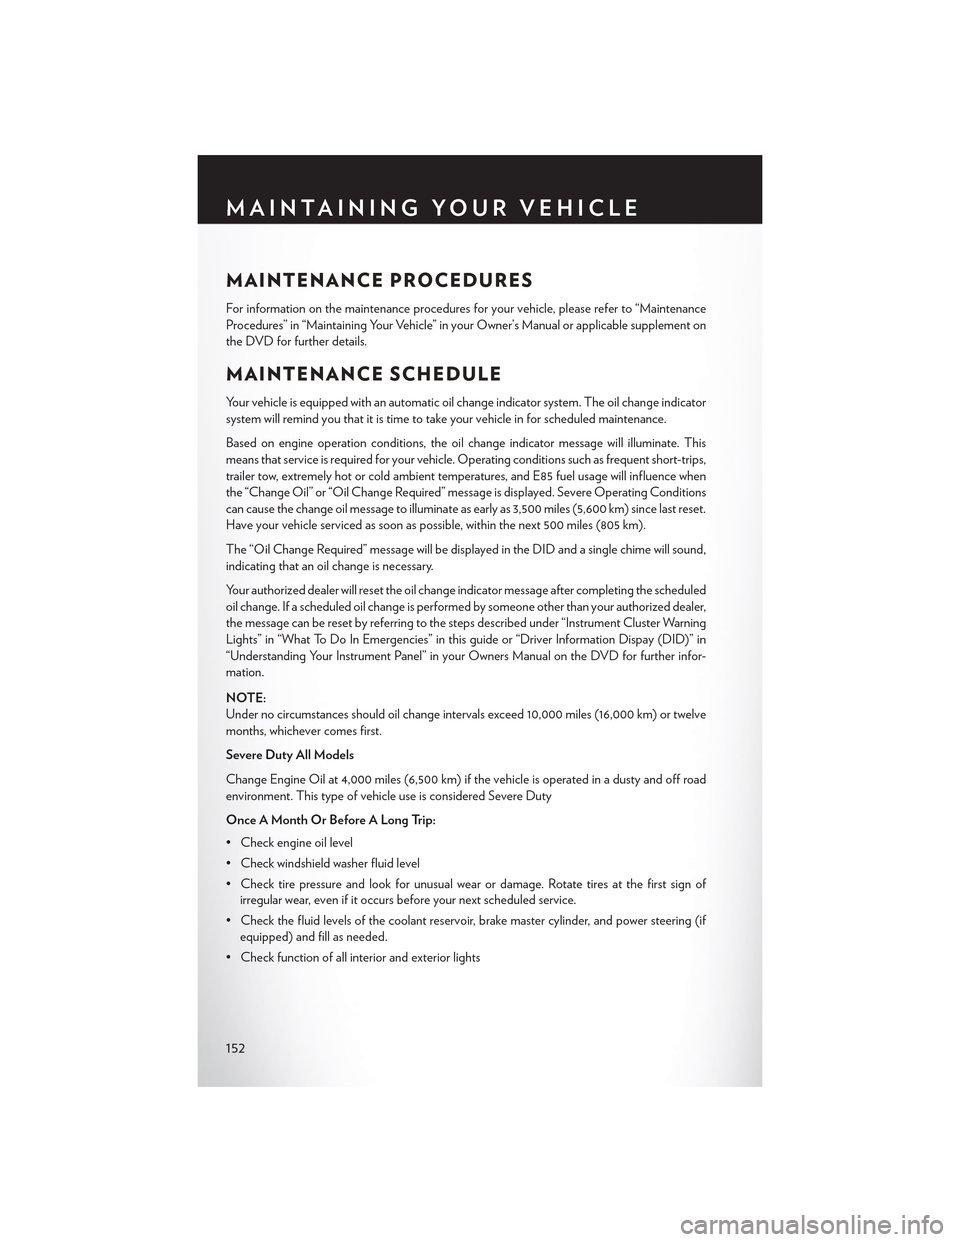
MAINTENANCE PROCEDURES
For information on the maintenance procedures for your vehicle, please refer to “Maintenance
Procedures” in “Maintaining Your Vehicle” in your Owner’s Manual or applicable supplement on
the DVD for further details.
MAINTENANCE SCHEDULE
Yo u r v e h i c l e i s e q u i p p e d w i t h a n a u t o m a t i c o i l c h a n g e i n d i c a t o r s y s t e m . T h e o i l c h a n g e i n d i c a t o r
system will remind you that it is time to take your vehicle in for scheduled maintenance.
Based on engine operation conditions, the oil change indicator message will illuminate. This
means that service is required for your vehicle. Operating conditions such as frequent short-trips,
trailer tow, extremely hot or cold ambient temperatures, and E85 fuel usage will influence when
the “Change Oil” or “Oil Change Required” message is displayed. Severe Operating Conditions
can cause the change oil message to illuminate as early as 3,500 miles (5,600 km) since last reset.
Have your vehicle serviced as soon as possible, within the next 500 miles (805 km).
The “Oil Change Required” message will be displayed in the DID and a single chime will sound,
indicating that an oil change is necessary.
Your authorized dealer will reset the oil change indicator message after completing the scheduled
oil change. If a scheduled oil change is performed by someone other than your authorized dealer,
the message can be reset by referring to the steps described under “Instrument Cluster Warning
Lights” in “What To Do In Emergencies” in this guide or “Driver Information Dispay (DID)” in
“Understanding Your Instrument Panel” in your Owners Manual on the DVD for further infor-
mation.
NOTE:
Under no circumstances should oil change intervals exceed 10,000 miles (16,000 km) or twelve
months, whichever comes first.
Severe Duty All Models
Change Engine Oil at 4,000 miles (6,500 km) if the vehicle is operated in a dusty and off road
environment. This type of vehicle use is considered Severe Duty
Once A Month Or Before A Long Trip:
•Checkengineoillevel
•Checkwindshieldwasherfluidlevel
• Check tire pressure and look for unusual wear or damage. Rotate tires at the first sign of
irregular wear, even if it occurs before your next scheduled service.
•Checkthefluidlevelsofthecoolantreservoir,brakemastercylinder,andpowersteering(if
equipped) and fill as needed.
• Check function of all interior and exterior lights
MAINTAINING YOUR VEHICLE
152
Page 155 of 180
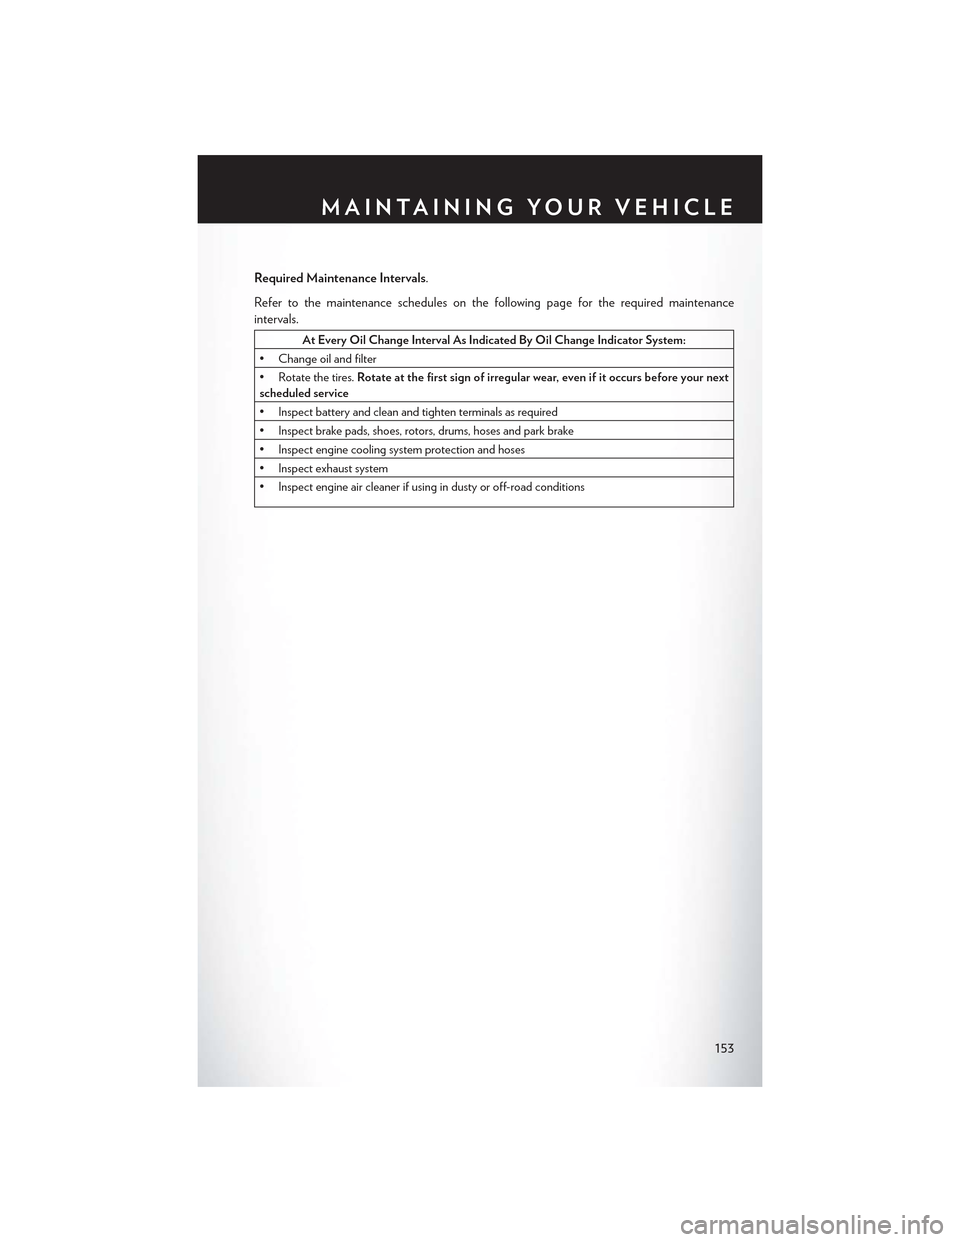
Required Maintenance Intervals.
Refer to the maintenance schedules on the following page for the required maintenance
intervals.
At Every Oil Change Interval As Indicated By Oil Change Indicator System:
• Change oil and filter
• Rotate the tires.Rotate at the first sign of irregular wear, even if it occurs before your nextscheduled service
•Inspectbatteryandcleanandtightenterminalsasrequired
•Inspectbrakepads,shoes,rotors,drums,hosesandparkbrake
•Inspectenginecoolingsystemprotectionandhoses
•Inspectexhaustsystem
•Inspectengineaircleanerifusingindustyoroff-roadconditions
MAINTAINING YOUR VEHICLE
153
Page 168 of 180

REPLACEMENT BULBS
All of the interior bulbs are glass wedge base or glass cartridge types. Aluminum base bulbs arenot approved and should not be used for replacement.
Interior Bulbs
Bulb Number
Rear Courtesy/Reading LampsW5W
Rear Compartment (Trunk) Lamp562
Overhead Console Reading Lamps578
Visor Vanity LampsA6220
Glove Box Lamp – If Equipped194
Door Courtesy562
Shift Indicator LampJKLE14140
Optional Door Map Pocket/CupholderLED (Serviced at Authorized Dealer)
For lighted switches, see your authorized dealer for replacement instructions.
Exterior Bulbs
Bulb Number
Low Beam/High Beam (Bi-Halogen Headlamp)HIR2LL
Low Beam/High Beam (Bi-Xenon Headlamp) D3S (Serviced at Authorized Dealer)
Front Turn Signal LampPSY24WSV
Front Park LampLED (Serviced at Authorized Dealer)
Daytime Running LampLED (Serviced at Authorized Dealer)
Front Fog Lamp – If EquippedLED (Serviced at Authorized Dealer)
Front Sidemarker LampLED (Serviced at Authorized Dealer)
Rear Tail/Stop/Turn LampLED (Serviced at Authorized Dealer)
Rear Sidemarker LampLED (Serviced at Authorized Dealer)
Backup LampLED (Serviced at Authorized Dealer)
Center High Mount Stop Lamp (CHMSL) LED (Serviced at Authorized Dealer)
LicenseLED (Serviced at Authorized Dealer)
Rear Fog Lamp – If EquippedLED (Serviced at Authorized Dealer)
MAINTAINING YOUR VEHICLE
166
Page 175 of 180
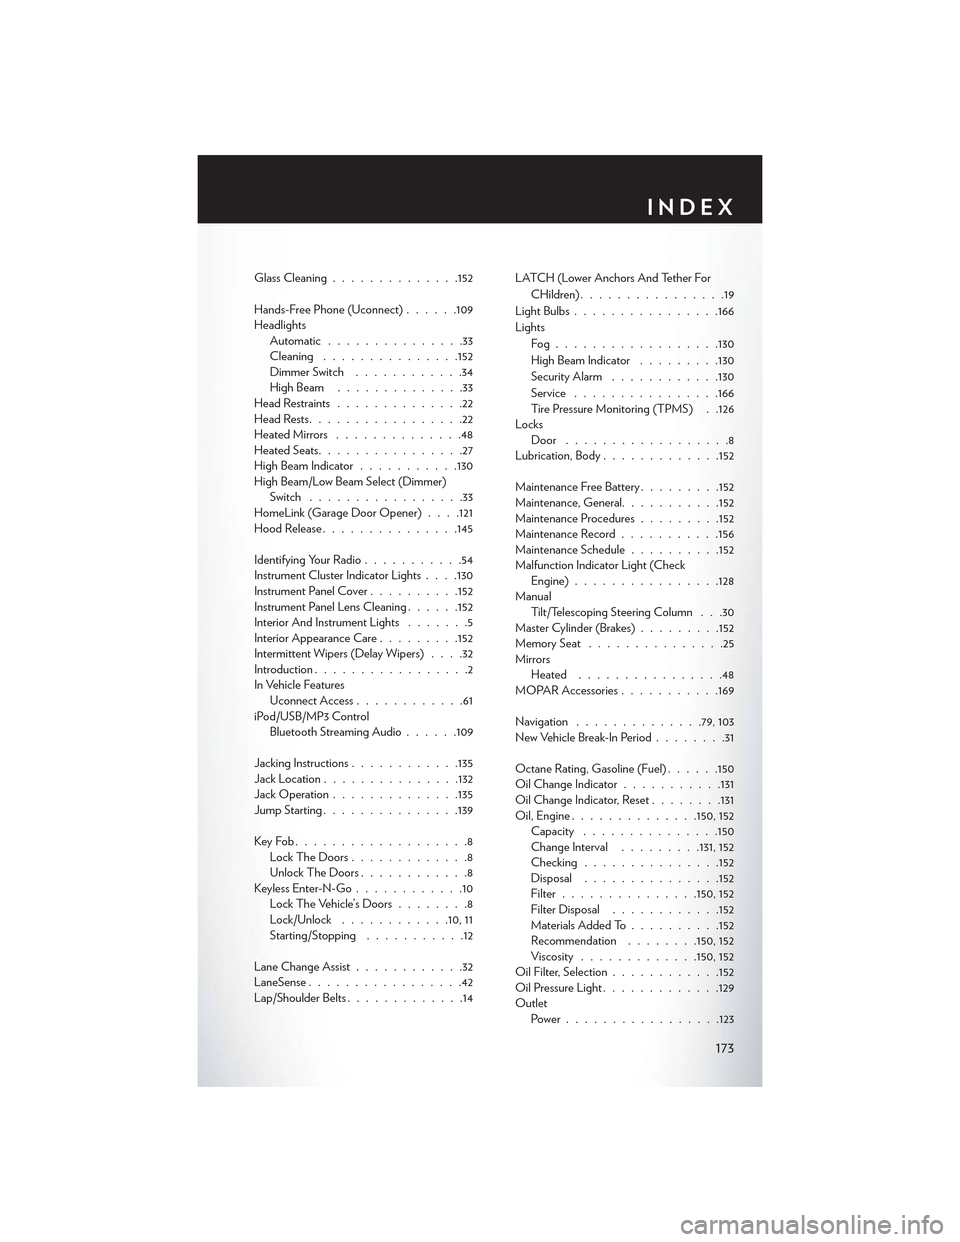
Glass Cleaning..............152
Hands-Free Phone (Uconnect)......109HeadlightsAutomatic...............33Cleaning...............152Dimmer Switch............34High Beam . . . . . . . . . . . . . .33Head Restraints..............22Head Rests.................22Heated Mirrors..............48Heated Seats................27High Beam Indicator...........130High Beam/Low Beam Select (Dimmer)Switch.................33HomeLink (Garage Door Opener) . . . .121Hood Release...............145
Identifying Your Radio...........54Instrument Cluster Indicator Lights . . . .130Instrument Panel Cover..........152Instrument Panel Lens Cleaning......152Interior And Instrument Lights.......5Interior Appearance Care.........152Intermittent Wipers (Delay Wipers)....32Introduction.................2In Vehicle FeaturesUconnect Access............61iPod/USB/MP3 ControlBluetooth Streaming Audio......109
Jacking Instructions............135Jack Location...............132Jack Operation..............135Jump Starting...............139
Key Fob . . . . . . . . . . . . . . . . . . .8Lock The Doors.............8Unlock The Doors............8Keyless Enter-N-Go............10Lock The Vehicle’s Doors........8Lock/Unlock............10, 11Starting/Stopping...........12
Lane Change Assist............32LaneSense.................42Lap/Shoulder Belts.............14
LATCH (Lower Anchors And Tether For
CHildren)................19
Light Bulbs................166
Lights
Fog . . . . . . . . . . . . . . . . ..130
High Beam Indicator.........130
SecurityAlarm............130
Service................166Tire Pressure Monitoring (TPMS) . .126LocksDoor . . . . . . . . . . . . . . . . . .8Lubrication, Body.............152
Maintenance Free Battery.........152Maintenance, General...........152Maintenance Procedures.........152Maintenance Record...........156Maintenance Schedule..........152Malfunction Indicator Light (CheckEngine)................128ManualTilt/Telescoping Steering Column . . .30Master Cylinder (Brakes).........152Memory Seat...............25MirrorsHeated................48MOPAR Accessories...........169
Navigation..............79, 103New Vehicle Break-In Period........31
Octane Rating, Gasoline (Fuel)......150Oil Change Indicator...........131Oil Change Indicator, Reset........131Oil, Engine..............150, 152Capacity...............150Change Interval.........131, 152Checking...............152Disposal...............152Filter...............150, 152Filter Disposal............152Materials Added To..........152Recommendation........150, 152Viscosity.............150, 152Oil Filter, Selection............152Oil Pressure Light.............129OutletPower . . . . . . . . . . . . . . . ..123
INDEX
173