ESP CHRYSLER PACIFICA 2008 1.G Owners Manual
[x] Cancel search | Manufacturer: CHRYSLER, Model Year: 2008, Model line: PACIFICA, Model: CHRYSLER PACIFICA 2008 1.GPages: 457, PDF Size: 6.7 MB
Page 25 of 457

2. Remove and replace the battery. Avoid touching the
new battery with your fingers. Skin oils may cause
battery deterioration. If you touch a battery, clean it with
rubbing alcohol.
3. To reassemble the transmitter case, snap the two
halves together. Make sure there is an even ªgapº be-
tween the two halves. Test transmitter operation.
General Information
This device complies with part 15 of the FCC rules and
RSS 210 of Industry Canada. Operation is subject to the
following conditions:
²This device may not cause harmful interference.
²This device must accept any interference received, includ-
ing interference that may cause undesired operation.
NOTE:Changes or modifications not expressly ap-
proved by the party responsible for compliance could
void the user's authority to operate the equipment.
If your Remote Keyless Entry transmitter fails to operate
from a normal distance, check for these two conditions.
1. A weak battery in the transmitter. The expected life of
the battery is a minimum of three years.
2. Closeness to a radio transmitter such as a radio station
tower, airport transmitter, and some mobile or CB radios.
Separating Transmitter Halves
THINGS TO KNOW BEFORE STARTING YOUR VEHICLE 25
2
Page 57 of 457

inflate, it signals the inflators on the crash side of the
vehicle. A quantity of nontoxic gas is generated to
inflate the window bag. The inflating window bag
pushes the outside edge of the headliner out of the
way and covers the window. The airbag inflates in
about 30 milliseconds (about one quarter of the time it
takes to blink your eyes) with enough force to injure
you if you are not belted and seated properly, or if
items are positioned in the area where the window bag
inflates. This especially applies to children. The win-
dow bag is only about 3
1¤2inches (9 cm) thick when it
is inflated.
²When the ORC and the impact sensors detect a
collision requiring theDriver Inflatable Knee Blocker
Ð If Equipped,signals the inflator unit. A quantity of
nontoxic gas is generated to inflate the Driver Inflat-
able Knee Blocker. The Driver Inflatable Knee Blocker
inflates rearward towards the driver's knees to helpprotect the knees and position you for the best inter-
action with the front airbag. The Driver Inflatable
Knee Blocker fully inflates in about 50 milliseconds,
this is only about half of the time it takes you to blink
your eyes. It then quickly deflates while helping to
protect the driver's knees.
²TheKnee Impact Bolstershelp protect the knees, and
position everyone for the best interaction with the
front airbag.
²If your vehicle contains a Passenger Airbag Disable
indicator light, it will be equipped with theOccupant
Classification System (OCS).The OCS system will
classify an occupant into a size category based on
sensor readings from within the seat cushion. Occu-
pants should try to remain in a normally seated
position. If the occupant's weight is transferred to
THINGS TO KNOW BEFORE STARTING YOUR VEHICLE 57
2
Page 63 of 457

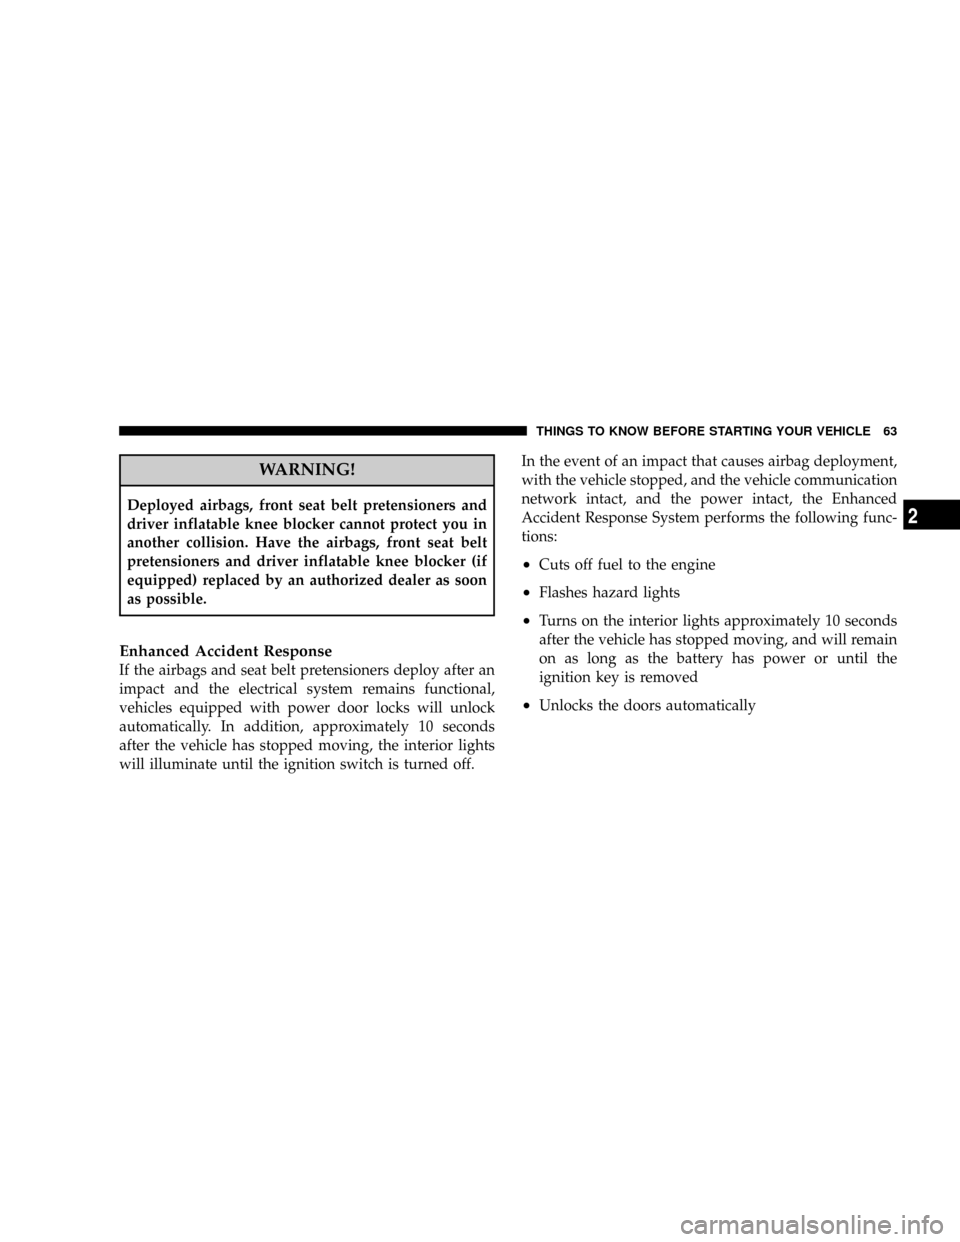
WARNING!
Deployed airbags, front seat belt pretensioners and
driver inflatable knee blocker cannot protect you in
another collision. Have the airbags, front seat belt
pretensioners and driver inflatable knee blocker (if
equipped) replaced by an authorized dealer as soon
as possible.
Enhanced Accident Response
If the airbags and seat belt pretensioners deploy after an
impact and the electrical system remains functional,
vehicles equipped with power door locks will unlock
automatically. In addition, approximately 10 seconds
after the vehicle has stopped moving, the interior lights
will illuminate until the ignition switch is turned off.In the event of an impact that causes airbag deployment,
with the vehicle stopped, and the vehicle communication
network intact, and the power intact, the Enhanced
Accident Response System performs the following func-
tions:
²Cuts off fuel to the engine
²Flashes hazard lights
²Turns on the interior lights approximately 10 seconds
after the vehicle has stopped moving, and will remain
on as long as the battery has power or until the
ignition key is removed
²Unlocks the doors automatically
THINGS TO KNOW BEFORE STARTING YOUR VEHICLE 63
2
Page 84 of 457

NTo Vary The Speed Setting...............145
NTo Accelerate For Passing...............146
mGarage Door Opener Ð If Equipped.........146
NProgramming HomeLinkt...............147
NCanadian Programming/Gate Programming . . 150
NUsing HomeLinkt.....................151
NReprogramming a Single HomeLinkt
Buttons............................151
NSecurity............................151
NTroubleshooting Tips...................152
NGeneral Information...................152
mAnti-Lock Brake System (ABS).............153
mElectronic Brake Control System -
ABS/TCS/BAS/ESP.....................154NTraction Control System (TCS)............154
NBrake Assist System (BAS)...............154
NESP (Electronic Stability Program).........155
mAdjustable Pedals Ð If Equipped...........159
mRear Park Sense System Ð If Equipped.......160
NRear Park Assist Sensors................161
NRear Park Assist Warning Display.........162
NEnable/Disable The Rear Park Assist System Ð
If Equipped.........................165
NService The Rear Park Assist System........165
NCleaning The Rear Park Assist System......166
mRear Camera Ð If Equipped...............166
mOverhead Console Ð If Equipped...........168
84 UNDERSTANDING THE FEATURES OF YOUR VEHICLE
Page 88 of 457

Outside Mirror Ð Passenger's Side
Adjust the convex outside mirror so you can just see the
side of your vehicle in the portion of the mirror closest to
the vehicle. This type of mirror will give a much wider
view to the rear, and especially of the lane next to your
vehicle.
WARNING!
Vehicles and other objects seen in the right side
convex mirror will look smaller and farther away
than they really are. Relying too much on your right
side mirror could cause you to collide with another
vehicle or other object.
Use your inside mirror when judging the size or
distance of a vehicle seen in this convex mirror.
Power Remote-Control Mirrors
Use the mirror select switch, located on the driver's door
trim panel above the power window switches, to adjust
the view obtained in the outside mirrors.
Power Mirror Switches
88 UNDERSTANDING THE FEATURES OF YOUR VEHICLE
Page 94 of 457

²System will prompt you to say the number you want
call.
²For example, you can say9234-567-8901.9The phone
number that you enter must be of valid length and
combination. Based on the country in which the ve-
hicle was purchased, the UConnectŸ limits the user
from dialing invalid combination of numbers. For
example, in USA, 234-567-890 is nine digits long,
which is not a valid USA phone number - the closest
valid phone number has ten digits.
²The UConnectŸ system will confirm the phone num-
ber and then dial. The number will appear in the
display of certain radios.
Call by Saying a Name
²
Press the ªPhoneº button to begin.
²After the9Ready9prompt and the following beep, say
ªDialº or Call.9
²System will prompt you to say the name of the person
you want call.
²After the9Ready9prompt and the following beep, say
the name of the person you want to call. For example,
you can say9John Doe,9where John Doe is a previ-
ously stored name entry in the UConnectŸ phone-
book. Refer to9Add Names to Your UConnectŸ
Phonebook,9to learn how to store a name in the
phonebook.
²The UConnectŸ system will confirm the name and
then dial the corresponding phone number, which
may appear in the display of certain radios.
Add Names to Your UConnectŸ Phonebook
NOTE:Adding names to phonebook is recommended
when vehicle is not in motion.
²Press the ªPhoneº button to begin.
94 UNDERSTANDING THE FEATURES OF YOUR VEHICLE
Page 101 of 457

²After the9Ready9prompt and the following beep, say
the name of the language you wish to switch to
(English, Espanol, or Francais, if so equipped).
²Continue to follow the system prompts to complete
language selection.
After selecting one of the languages, all prompts and
voice commands will be in that language.
NOTE:After every UConnectŸ language change op-
eration, only the language specific 32-name phonebook is
usable. The paired phone name is not language specific
and usable across all languages.
Emergency Assistance
If you are in an emergency and the mobile phone is
reachable:
²Pick up the phone and manually dial the emergency
number for your area.If the phone is not reachable and the UConnectŸ system
is operational, you may reach the emergency number as
follows:
²Press the 'Phone' button to begin.
²After the9Ready9prompt and the following beep, say
9Emergency9and the UConnectŸ system will instruct
the paired cellular phone to call the emergency num-
ber. This feature is only supported in the USA.
NOTE:The emergency number dialed is based on the
Country where the vehicle is purchased (911 for USA and
Canada and 060 for Mexico). The number dialed may not
be applicable with the available cellular service and area.
The UConnectŸ system does slightly lower your chances
of successfully making a phone call as to that for the cell
phone directly.
Your phone must be turned on and paired to the UCon-
nectŸ system to allow use of this vehicle feature in
UNDERSTANDING THE FEATURES OF YOUR VEHICLE 101
3
Page 102 of 457

emergency situations when the cell phone has network
coverage and stays paired to the UConnectŸ system.
Towing Assistance
If you need towing assistance,
²Press the 'Phone' button to begin.
²After the9Ready9prompt and the following beep, say
9Towing Assistance.9
NOTE:The Towing Assistance number dialed is based
on the Country where the vehicle is purchased (1-800-
528-2069 for USA, 1-877-213-4525 for Canada, 55-14-3454
for Mexico city and 1-800-712-3040 for outside Mexico
city in Mexico).
Please refer to the 24-Hour ªTowing Assistanceº cover-
age details in the Warranty information booklet and on
the 24±Hour Towing Assistance Card.
Paging
To learn how to page, refer to9Working with Automated
Systems.9Paging works properly except for pagers of
certain companies which time-out a little too soon to
work properly with the UConnectŸ system.
Voice Mail Calling
To learn how to access your voice mail, refer to9Working
with Automated Systems.9
Working with Automated Systems
This method is designed to be used in instances where
one generally has to press numbers on the cellular phone
keypad while navigating through an automated tele-
phone system.
You can use your UConnectŸ system to access a voice-
mail system or an automated service, such as, paging
service or automated customer service. Some services
require immediate response selection, in some instances,
that may be too quick for use of UConnectŸ system.
102 UNDERSTANDING THE FEATURES OF YOUR VEHICLE
Page 113 of 457

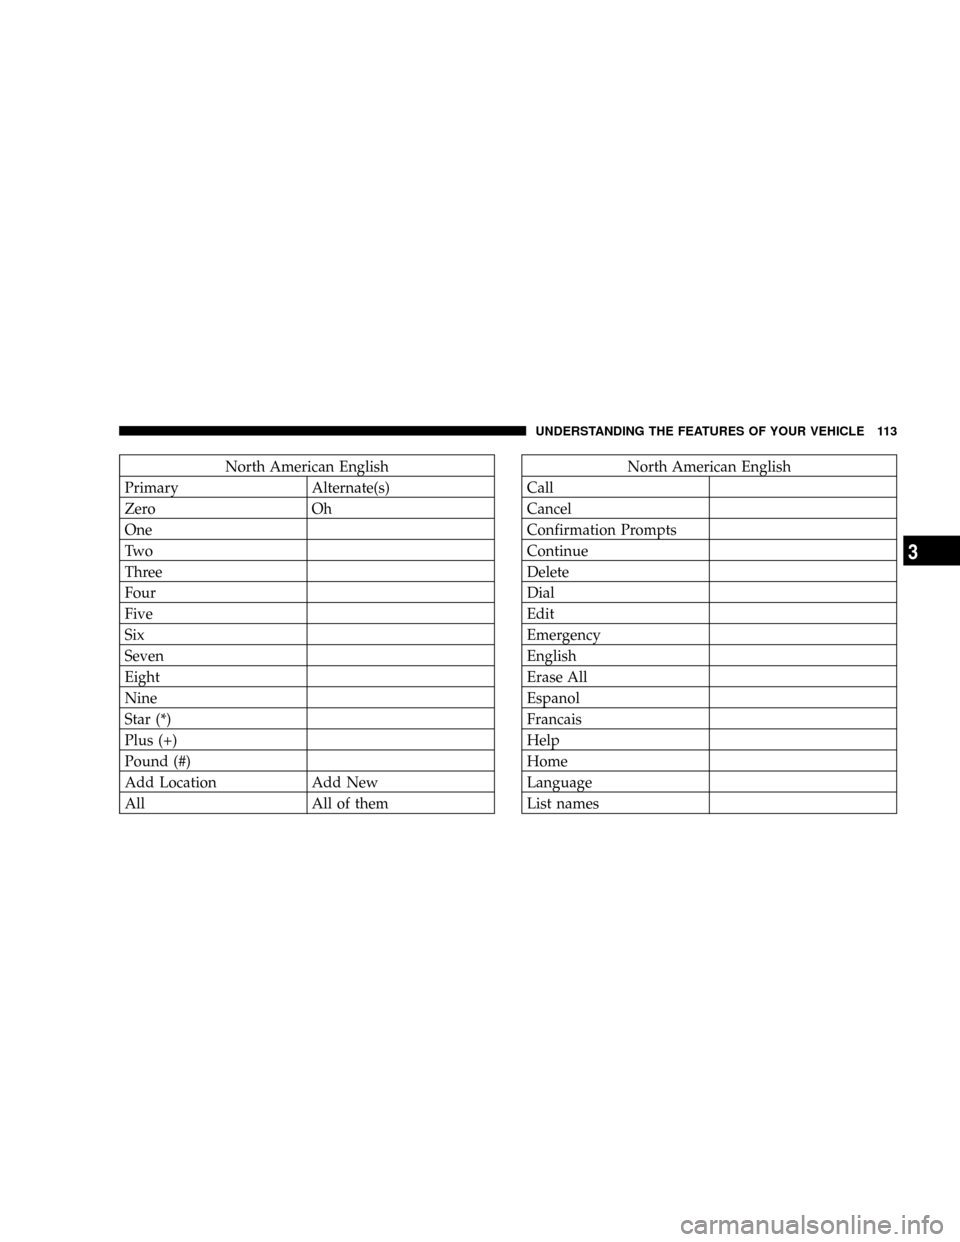
North American English
Primary Alternate(s)
Zero Oh
One
Tw o
Three
Four
Five
Six
Seven
Eight
Nine
Star (*)
Plus (+)
Pound (#)
Add Location Add New
All All of themNorth American English
Call
Cancel
Confirmation Prompts
Continue
Delete
Dial
Edit
Emergency
English
Erase All
Espanol
Francais
Help
Home
Language
List names
UNDERSTANDING THE FEATURES OF YOUR VEHICLE 113
3
Page 152 of 457

To do this, press and hold the two outside buttons for 20
seconds until the EVIC message statesªCHANNELS
CLEARED.ºNote that all channels will be erased. Indi-
vidual channels cannot be erased.
The HomeLinktUniversal Transceiver is disabled when
the Vehicle Theft Alarm is active.
Troubleshooting Tips
If you are having trouble programming HomeLinkt, here
are some of the most common solutions:
²Replace the battery in the original transmitter.
²Press the Learn Button on the Garage Door Opener to
complete the training for Rolling Code.
²Did you unplug the device for training, and remember
to plug it back in?If you are have any problems, or require assistance,
please call toll-free 1±800±355±3515 or, on the Internet at
www.HomeLink.com for information or assistance.
General Information
This device complies with FCC rules part 15 and Industry
Canada RSS-210. Operation is subject to the following
two conditions:
1. This device may not cause harmful interference
2. This device must accept any interference that may be
received including interference that may cause undesired
operation
NOTE:The transmitter has been tested and it complies
with FCC and IC rules. Changes or modifications not
expressly approved by the party responsible for compli-
ance could void the user 's authority to operate the
device.
152 UNDERSTANDING THE FEATURES OF YOUR VEHICLE