Remote start CHRYSLER PACIFICA HYBRID 2021 User Guide
[x] Cancel search | Manufacturer: CHRYSLER, Model Year: 2021, Model line: PACIFICA HYBRID, Model: CHRYSLER PACIFICA HYBRID 2021Pages: 401, PDF Size: 26.88 MB
Page 71 of 401

GETTING TO KNOW YOUR VEHICLE69
Mist
Push the lever upward to the MIST position and
release for a single wiping cycle.
NOTE:The Mist feature does not activate the washer
pump; therefore, no washer fluid will be sprayed on
the windshield. The wash function must be used in
order to spray the windshield with washer fluid.
For information on wiper care and replacement,
see Ú page 337.
RAIN SENSING WIPERS — IF EQUIPPED
This feature senses rain or snowfall on the
windshield and automatically activates the wipers.
Rotate the end of the windshield wiper lever to one
of the four detent positions to activate this feature.
The sensitivity of the system is adjustable from the
windshield wiper lever. Wiper sensitivity position
1 is the least sensitive, and wiper sensitivity
position 4 is the most sensitive.
NOTE:
The Rain Sensing feature will not operate when
the wiper switch is in the low or high position.
The Rain Sensing feature may not function prop -
erly when ice or dried saltwater is present on the
windshield.
Use of Rain-X or products containing wax or sili-
cone may reduce rain sensor performance.
The Rain Sensing feature can be turned on and
off through the Uconnect system Ú page 189.
The Rain Sensing system has protective features
for the wiper blades and arms. It will not operate
under the following conditions:
Low Temperature Wipe Inhibit — The Rain
Sensing feature will not operate when the igni -
tion is first placed in the ON position, when the
vehicle is stationary and the outside tempera -
ture is below 32°F (0°C), unless the wiper
control on the windshield wiper lever is moved,
the vehicle speed becomes greater than 3 mph
(5 km/h) or the outside temperature rises
above freezing.
Neutral Wipe Inhibit — The Rain Sensing
feature will not operate when the ignition is ON,
when the transmission gear selector is in the
NEUTRAL position and the vehicle speed is less
than 3 mph (5 km/h), unless the wiper control
on the windshield wiper lever is moved, the
vehicle speed is greater than 3 mph (5 km/h) or the gear selector is moved out of the NEUTRAL
position.
Remote Start Mode Inhibit — On vehicles
equipped with the Remote Start system, Rain
Sensing wipers are not operational when the
vehicle is in the Remote Start mode. Once the
operator is in the vehicle and has placed the
ignition switch in the ON/RUN position, rain
sensing wiper operation can resume, if it has
been selected, and no other inhibit conditions
(mentioned previously) exist.
REAR WIPER AND WASHER
Rear Window Wiper Operation
Rotate the windshield wiper lever center ring
upwards to operate one of two modes for the rear
window wiper:
First detent — intermittent mode.
Second detent — continuous mode.
Rear Window Washer Operation
Pushing the windshield wiper lever forward
activates the rear window washer. If the lever is
pushed while on the intermittent setting, the
wipers will turn on and operate for several wipe
cycles after the lever is released, and then resume
the intermittent interval previously selected. If the
lever is pushed while the wipers are in the off
position, the wipers will operate several wipe
cycles, then turn off.
2
21_RUP_OM_EN_USC_t.book Page 69
Page 197 of 401
MULTIMEDIA195
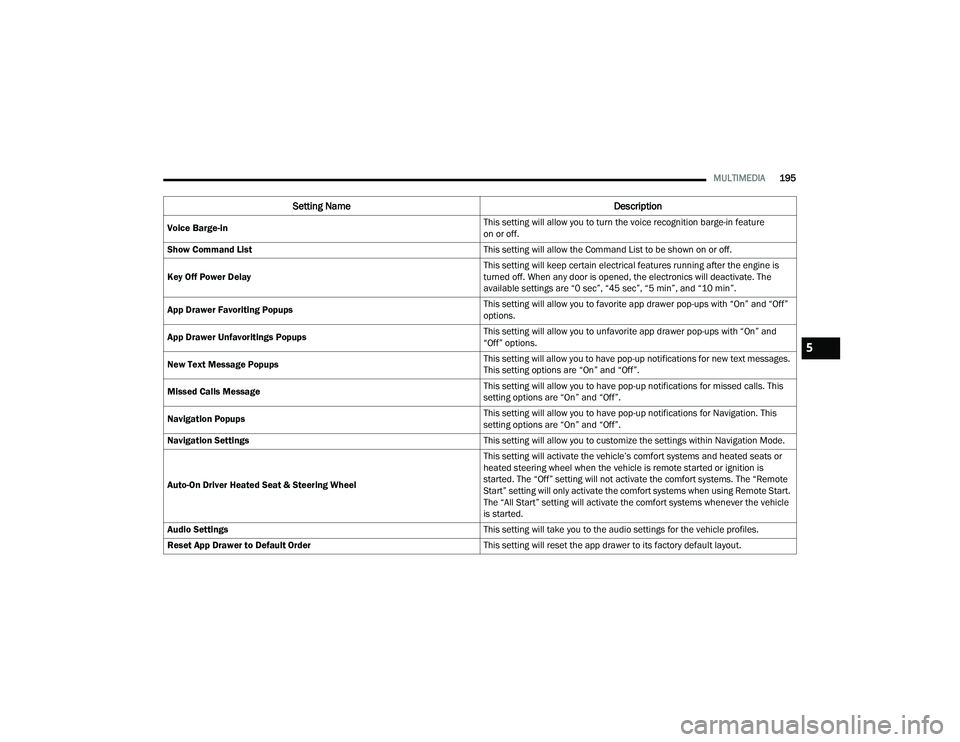
Voice Barge-in This setting will allow you to turn the voice recognition barge-in feature
on or off.
Show Command List This setting will allow the Command List to be shown on or off.
Key Off Power Delay This setting will keep certain electrical features running after the engine is
turned off. When any door is opened, the electronics will deactivate. The
available settings are “0 sec”, “45 sec”, “5 min”, and “10 min”.
App Drawer Favoriting Popups This setting will allow you to favorite app drawer pop-ups with “On” and “Off”
options.
App Drawer Unfavoritings Popups This setting will allow you to unfavorite app drawer pop-ups with “On” and
“Off” options.
New Text Message Popups This setting will allow you to have pop-up notifications for new text messages.
This setting options are “On” and “Off”.
Missed Calls Message This setting will allow you to have pop-up notifications for missed calls. This
setting options are “On” and “Off”.
Navigation Popups This setting will allow you to have pop-up notifications for Navigation. This
setting options are “On” and “Off”.
Navigation Settings This setting will allow you to customize the settings within Navigation Mode.
Auto-On Driver Heated Seat & Steering Wheel This setting will activate the vehicle’s comfort systems and heated seats or
heated steering wheel when the vehicle is remote started or ignition is
started. The “Off” setting will not activate the comfort systems. The “Remote
Start” setting will only activate the comfort systems when using Remote Start.
The “All Start” setting will activate the comfort systems whenever the vehicle
is started.
Audio Settings This setting will take you to the audio settings for the vehicle profiles.
Reset App Drawer to Default Order This setting will reset the app drawer to its factory default layout.
Setting NameDescription
5
21_RUP_OM_EN_USC_t.book Page 195
Page 207 of 401
MULTIMEDIA205
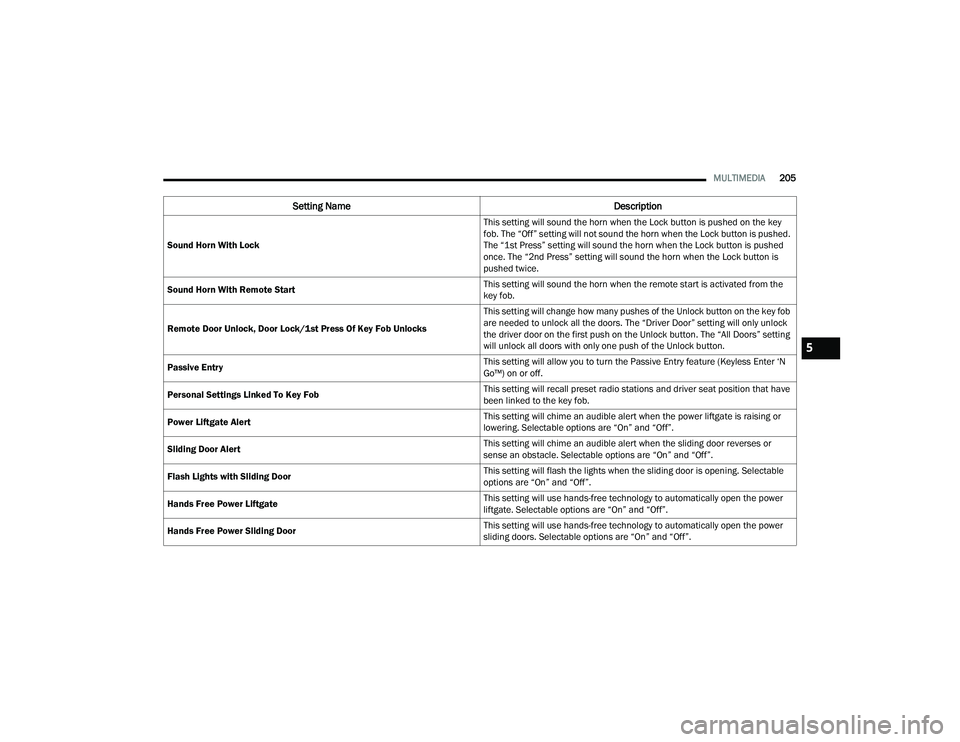
Sound Horn With Lock This setting will sound the horn when the Lock button is pushed on the key
fob. The “Off” setting will not sound the horn when the Lock button is pushed.
The “1st Press” setting will sound the horn when the Lock button is pushed
once. The “2nd Press” setting will sound the horn when the Lock button is
pushed twice.
Sound Horn With Remote Start This setting will sound the horn when the remote start is activated from the
key fob.
Remote Door Unlock, Door Lock/1st Press Of Key Fob Unlocks This setting will change how many pushes of the Unlock button on the key fob
are needed to unlock all the doors. The “Driver Door” setting will only unlock
the driver door on the first push on the Unlock button. The “All Doors” setting
will unlock all doors with only one push of the Unlock button.
Passive Entry This setting will allow you to turn the Passive Entry feature (Keyless Enter ‘N
Go™) on or off.
Personal Settings Linked To Key Fob This setting will recall preset radio stations and driver seat position that have
been linked to the key fob.
Power Liftgate Alert This setting will chime an audible alert when the power liftgate is raising or
lowering. Selectable options are “On” and “Off”.
Sliding Door Alert This setting will chime an audible alert when the sliding door reverses or
sense an obstacle. Selectable options are “On” and “Off”.
Flash Lights with Sliding Door This setting will flash the lights when the sliding door is opening. Selectable
options are “On” and “Off”.
Hands Free Power Liftgate This setting will use hands-free technology to automatically open the power
liftgate. Selectable options are “On” and “Off”.
Hands Free Power Sliding Door This setting will use hands-free technology to automatically open the power
sliding doors. Selectable options are “On” and “Off”.
Setting Name
Description
5
21_RUP_OM_EN_USC_t.book Page 205
Page 208 of 401
206MULTIMEDIA
Seats & Comfort
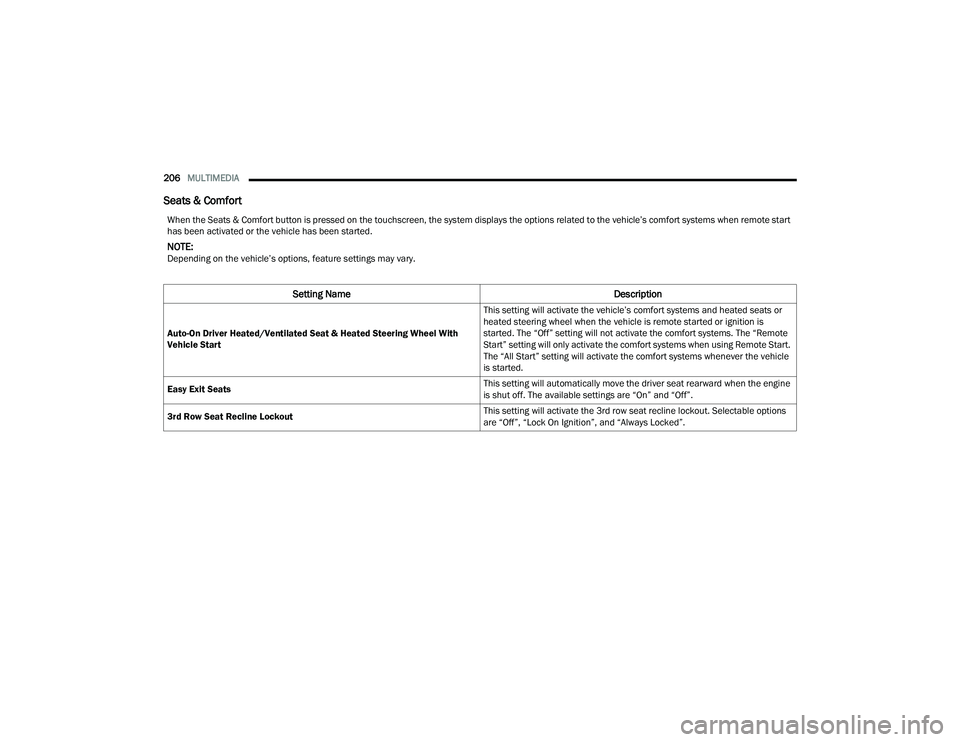
When the Seats & Comfort button is pressed on the touchscreen, the system displays the options related to the vehicle’s comfort systems when remote start
has been activated or the vehicle has been started.
NOTE:Depending on the vehicle’s options, feature settings may vary.
Setting Name Description
Auto-On Driver Heated/Ventilated Seat & Heated Steering Wheel With
Vehicle Start This setting will activate the vehicle’s comfort systems and heated seats or
heated steering wheel when the vehicle is remote started or ignition is
started. The “Off” setting will not activate the comfort systems. The “Remote
Start” setting will only activate the comfort systems when using Remote Start.
The “All Start” setting will activate the comfort systems whenever the vehicle
is started.
Easy Exit Seats This setting will automatically move the driver seat rearward when the engine
is shut off. The available settings are “On” and “Off”.
3rd Row Seat Recline Lockout This setting will activate the 3rd row seat recline lockout. Selectable options
are “Off”, “Lock On Ignition”, and “Always Locked”.
21_RUP_OM_EN_USC_t.book Page 206
Page 216 of 401
214MULTIMEDIA
UCONNECT THEATER — UCONNECT 5/5 NAV
WITH 10.1-INCH DISPLAY (IF EQUIPPED)
UCONNECT THEATER OVERVIEW
Your Uconnect Theater is designed to give your
family years of enjoyment.
There are multiple ways to interact with your
Uconnect Theater system:
Play your favorite CDs, DVDs, or Blu-ray™ Discs
Plug and play a variety of standard video games
or devices into the HDMI port
Listen to audio over the wireless headphones
Plug and play a variety of devices into the Video
USB port
Plug in standard headphones to listen to audio
Project your mobile phone or tablet screen onto
the rear Uconnect Theater touchscreens
Please review this Owner's Manual to become
familiar with its features and operation.
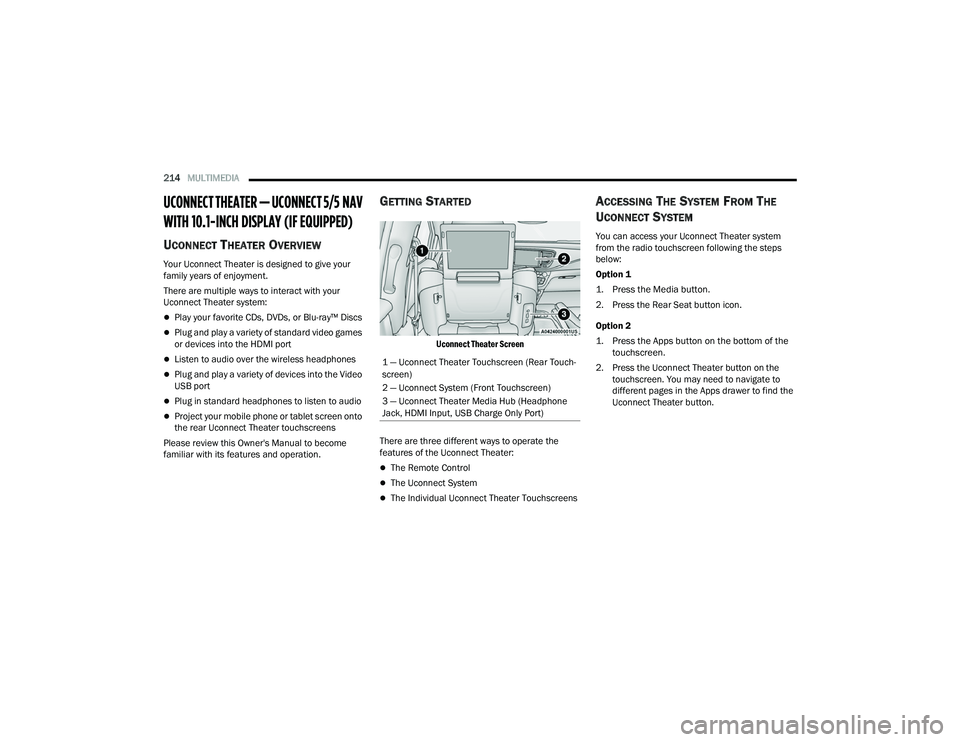
GETTING STARTED
Uconnect Theater Screen
There are three different ways to operate the
features of the Uconnect Theater:
The Remote Control
The Uconnect System
The Individual Uconnect Theater Touchscreens
ACCESSING THE SYSTEM FROM THE
U
CONNECT SYSTEM
You can access your Uconnect Theater system
from the radio touchscreen following the steps
below:
Option 1
1. Press the Media button.
2. Press the Rear Seat button icon.
Option 2
1. Press the Apps button on the bottom of the
touchscreen.
2. Press the Uconnect Theater button on the touchscreen. You may need to navigate to
different pages in the Apps drawer to find the
Uconnect Theater button.
1 — Uconnect Theater Touchscreen (Rear Touch
-
screen)
2 — Uconnect System (Front Touchscreen)
3 — Uconnect Theater Media Hub (Headphone
Jack, HDMI Input, USB Charge Only Port)
21_RUP_OM_EN_USC_t.book Page 214
Page 217 of 401
MULTIMEDIA215
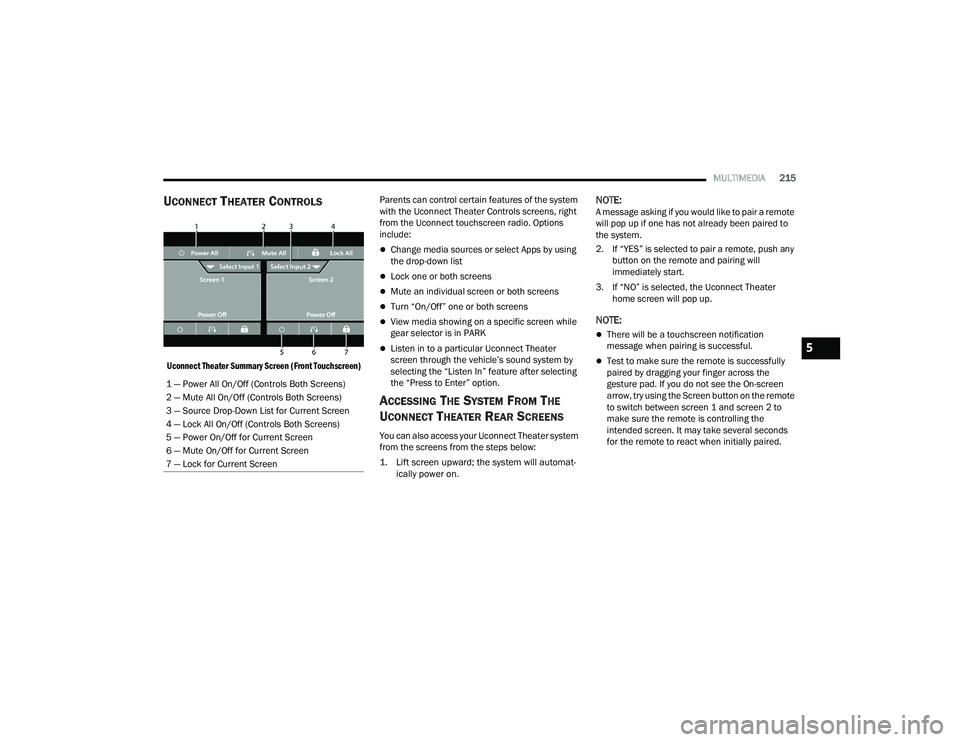
UCONNECT THEATER CONTROLS
Uconnect Theater Summary Screen (Front Touchscreen)
Parents can control certain features of the system
with the Uconnect Theater Controls screens, right
from the Uconnect touchscreen radio. Options
include:
Change media sources or select Apps by using
the drop-down list
Lock one or both screens
Mute an individual screen or both screens
Turn “On/Off” one or both screens
View media showing on a specific screen while
gear selector is in PARK
Listen in to a particular Uconnect Theater
screen through the vehicle’s sound system by
selecting the “Listen In” feature after selecting
the “Press to Enter” option.
ACCESSING THE SYSTEM FROM THE
U
CONNECT THEATER REAR SCREENS
You can also access your Uconnect Theater system
from the screens from the steps below:
1. Lift screen upward; the system will automat-
ically power on.
NOTE:A message asking if you would like to pair a remote
will pop up if one has not already been paired to
the system.
2. If “YES” is selected to pair a remote, push any button on the remote and pairing will
immediately start.
3. If “NO” is selected, the Uconnect Theater home screen will pop up.
NOTE:
There will be a touchscreen notification
message when pairing is successful.
Test to make sure the remote is successfully
paired by dragging your finger across the
gesture pad. If you do not see the On-screen
arrow, try using the Screen button on the remote
to switch between screen 1 and screen 2 to
make sure the remote is controlling the
intended screen. It may take several seconds
for the remote to react when initially paired.
1 — Power All On/Off (Controls Both Screens)
2 — Mute All On/Off (Controls Both Screens)
3 — Source Drop-Down List for Current Screen
4 — Lock All On/Off (Controls Both Screens)
5 — Power On/Off for Current Screen
6 — Mute On/Off for Current Screen
7 — Lock for Current Screen
5
21_RUP_OM_EN_USC_t.book Page 215
Page 221 of 401
MULTIMEDIA219
General Settings
To change source card order, select “Source Card
Reorder”, then press and hold source card on the
touchscreen, and drag and drop in desired order.
You can also adjust settings such as:
Brightness
Media port lighting on and off
Clock on and off
NOTE:System information can also be displayed under
General Settings.
Remote Settings
Under this setting, you can access the following:
Manage Remotes (this allows you to unpair
remotes)
Pair Remote
Remote sensitivity (this adjusts the speed and
sensitivity of cursor on screen when using
gesture pad) Ú page 387.
PLAY A DVD/BLU-RAY™ OR USB
M
EDIA FILE FROM UCONNECT SYSTEM
1. Insert a Blu-ray™ Disc or DVD disc into the
disc player with the label facing up, or insert a
USB drive into rear Video USB port.
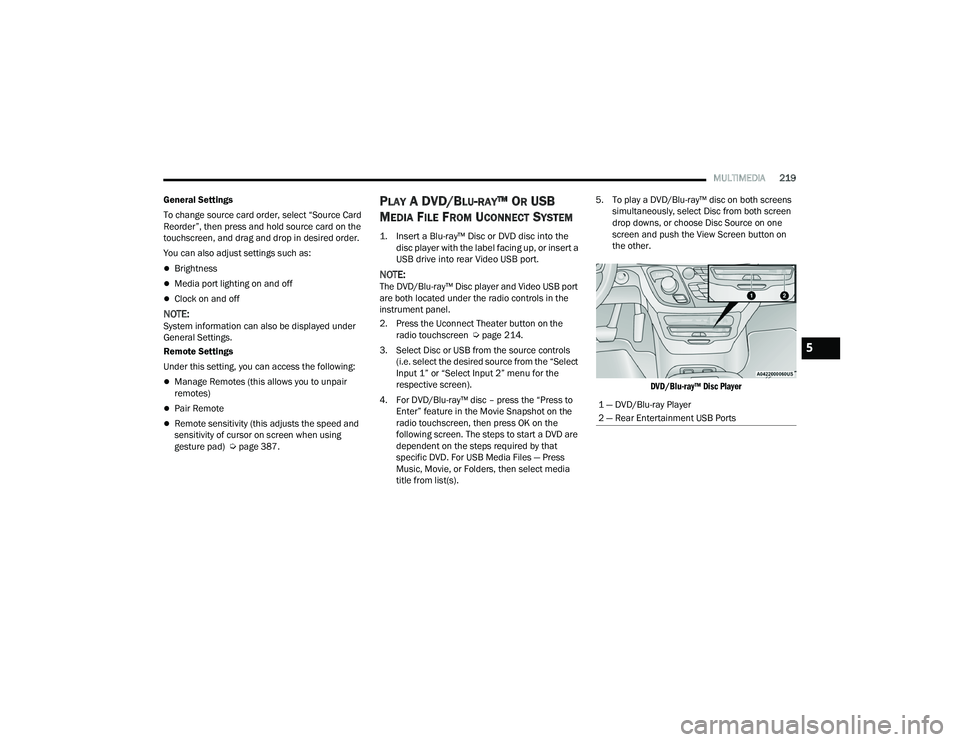
NOTE:The DVD/Blu-ray™ Disc player and Video USB port
are both located under the radio controls in the
instrument panel.
2. Press the Uconnect Theater button on the radio touchscreen Ú page 214.
3. Select Disc or USB from the source controls (i.e. select the desired source from the “Select
Input 1” or “Select Input 2” menu for the
respective screen).
4. For DVD/Blu-ray™ disc – press the “Press to Enter” feature in the Movie Snapshot on the
radio touchscreen, then press OK on the
following screen. The steps to start a DVD are
dependent on the steps required by that
specific DVD. For USB Media Files — Press
Music, Movie, or Folders, then select media
title from list(s). 5. To play a DVD/Blu-ray™ disc on both screens
simultaneously, select Disc from both screen
drop downs, or choose Disc Source on one
screen and push the View Screen button on
the other.
DVD/Blu-ray™ Disc Player
1 — DVD/Blu-ray Player
2 — Rear Entertainment USB Ports
5
21_RUP_OM_EN_USC_t.book Page 219
Page 232 of 401
230MULTIMEDIA
Compressed Audio Files (MP3, WMA and AAC)
The Blu-ray™ Disc player is capable of playing MP3
(MPEG-1 Audio Layer 3), WMA (Windows Media
Audio) files and AAC (Advanced Audio Coding) from
a CD Data disc (usually a CD-R or CD-RW) or DVD
Data disc (usually a DVD-R or DVD-RW).
The Blu-ray™ Disc player always uses the file
extension to determine the audio format, so
MP3 files must always end with the extension
“.mp3” or “.MP3” and WMA files must always
end with the extension “.wma” or “.WMA” and
AAC files must always end with the extension
and “.aac” or “.AAC” or “m4a”. To prevent incor -
rect playback, do not use these extensions for
any other types of files.
For MP3 files, ID3v1, ID3v2 tag data (such as
artist name, track title, album, etc.) are
supported.
Any file that is copy protected (such as those
downloaded from many online music stores) will
not play. The Blu-ray™ player will automatically
skip the file and begin playing the next available
file.
Other compression formats such as MP3 Pro,
Ogg Vorbis, and ATRAC3 will not play. The
Blu-ray™ player will automatically skip the file
and begin playing the next available file.
If you are creating your own files, the recom -
mended fixed bit rate for MP3 files is between
32 and 320Kbps and the recommended fixed
bit rate for WMA files is between 16 and
192Kbps. Variable bit rates are also supported.
For both formats, the recommended sample
rate is either 44.1kHz or 48kHz.
To change the current file, use the remote
control “Seek Forward” or “Seek Back” buttons
to return to the start of the current or previous
file.
AAC (MPEG-4 AAC, Low Complexity Profile)
support.
AAC HE v1 (AAC High Efficiency v1 aka.
AAC/MPEG4v2 AAC+) support.
HE-AAC v1, v2 support. Disc Errors
If the Blu-ray™ Disc player is unable to read the
disc, a "Disc Error" message is displayed on the
rear screen and Radio displays. A dirty, damaged,
or incompatible disc format are all potential
causes for a "Disc Error" message.
If a disc has a damaged track which results in
audible or visible errors that persists for two
seconds, the Blu-ray™ Disc player will attempt to
continue playing the disc by skipping forward one
to three seconds at a time. If the end of the disc is
reached, the Blu-ray™ Disc player will return to the
beginning of the disc and attempt to play the start
of the first track.
The Blu-ray™ Disc player may shut down during
extremely hot conditions, such as when the
vehicle’s interior temperature is above 140°F
(60°C). When this occurs, the player will display
"High Temp" and will shut off the rear seat displays
until a safe temperature is reached. This shutdown
is necessary to protect the optics of the Blu-ray™
Disc player.
21_RUP_OM_EN_USC_t.book Page 230
Page 321 of 401
IN CASE OF EMERGENCY319
3. Pull upward and remove the protective cover over the remote positive (+) battery post.
4. If using another vehicle to jump start the battery, park the vehicle within the jumper
cables reach, set the parking brake and make
sure the ignition is OFF.
JUMP STARTING PROCEDURE
Connecting The Jumper Cables
1. Connect the positive
(+) end of the jumper
cable to the remote positive (+)
post of the
vehicle with the discharged battery.
2. Connect the opposite end of the positive (+)
jumper cable to the positive (+) post of the
booster battery.
3. Connect the negative (-) end of the jumper
cable to the negative (-) post of the booster
battery.
4. Connect the opposite end of the negative (-)
jumper cable to the remote negative (-) post
near the windshield cowl (exposed metallic/
unpainted post of the discharge vehicle). 5. Start the engine in the vehicle that has the
booster battery, let the engine idle a few
minutes, and then start the engine in the
vehicle with the discharged battery.
6. Once the engine is started, follow the discon -
necting procedure below.
Disconnecting The Jumper Cables
1. Disconnect the negative
(-)
end of the jumper
cable from the remote negative post of the
vehicle with the discharged battery.
2. Disconnect the opposite end of the negative (-)
jumper cable from the negative (-) post of the
booster battery.
3. Disconnect the positive (+) end of the jumper
cable from the positive (+) post of the booster
battery.
WARNING!
Do not allow vehicles to touch each other as this
could establish a ground connection and
personal injury could result.
WARNING!
Take care to avoid the radiator cooling fan
whenever the hood is raised. It can start
anytime the ignition switch is ON. You can be
injured by moving fan blades.
Remove any metal jewelry such as rings,
watch bands and bracelets that could make
an inadvertent electrical contact. You could be
seriously injured.
Batteries contain sulfuric acid that can burn
your skin or eyes and generate hydrogen gas
which is flammable and explosive. Keep open
flames or sparks away from the battery.
WARNING!
Failure to follow this jump starting procedure
could result in personal injury or property
damage due to battery explosion.
CAUTION!
Failure to follow these procedures could result in
damage to the charging system of the booster
vehicle or the discharged vehicle.
WARNING!
Do not connect the jumper cable to the negative
(-) post of the discharged battery. The resulting
electrical spark could cause the battery to
explode and could result in personal injury.
7
21_RUP_OM_EN_USC_t.book Page 319
Page 322 of 401
320IN CASE OF EMERGENCY
4. Disconnect the opposite end of the positive (+)
jumper cable from the remote positive (+) post
of the vehicle with the discharged battery.
If frequent jump starting is required to start your
vehicle you should have the battery and charging
system inspected at an authorized dealer.
REFUELING IN EMERGENCY – IF EQUIPPED
The vehicle is equipped with a refueling funnel for
a Cap-Less Fuel System Úpage 299. If refueling is
necessary, while using an approved gas can, insert
the refueling funnel into the filler neck opening.
Take care to open both flappers with the funnel to
avoid spills.
NOTE:In certain cold conditions, ice may prevent the fuel
door from opening. If this occurs, lightly push on
the fuel door to break the ice buildup and
re-release the fuel door by pushing at the rear
center edge to unlatch.
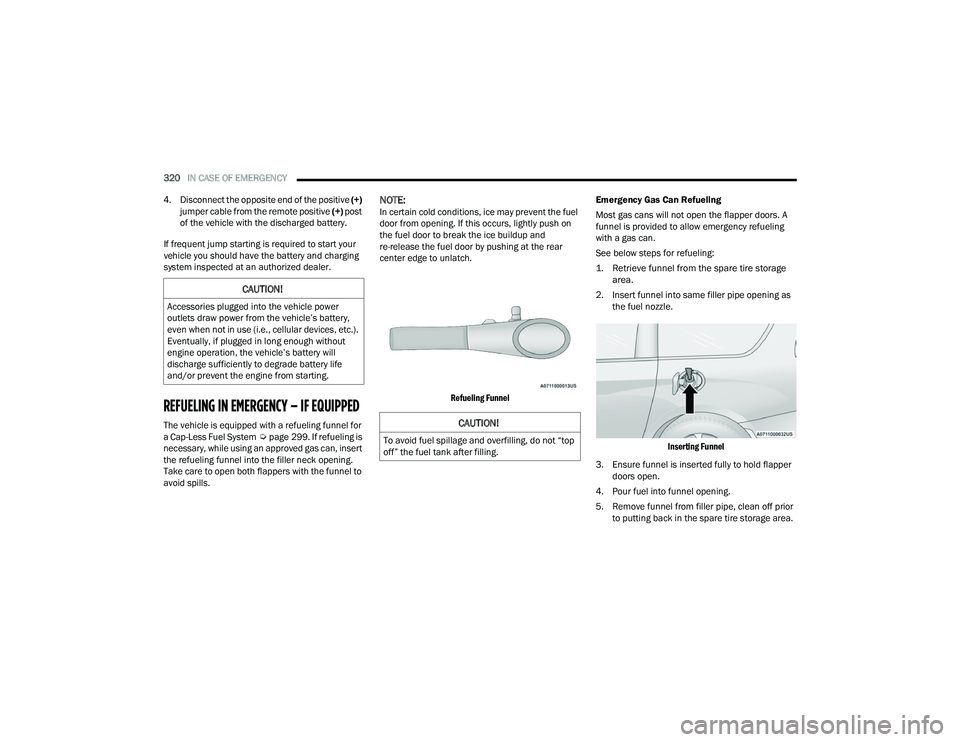
Refueling Funnel
Emergency Gas Can Refueling
Most gas cans will not open the flapper doors. A
funnel is provided to allow emergency refueling
with a gas can.
See below steps for refueling:
1. Retrieve funnel from the spare tire storage
area.
2. Insert funnel into same filler pipe opening as the fuel nozzle.
Inserting Funnel
3. Ensure funnel is inserted fully to hold flapper doors open.
4. Pour fuel into funnel opening.
5. Remove funnel from filler pipe, clean off prior to putting back in the spare tire storage area.
CAUTION!
Accessories plugged into the vehicle power
outlets draw power from the vehicle’s battery,
even when not in use (i.e., cellular devices, etc.).
Eventually, if plugged in long enough without
engine operation, the vehicle’s battery will
discharge sufficiently to degrade battery life
and/or prevent the engine from starting.
CAUTION!
To avoid fuel spillage and overfilling, do not “top
off” the fuel tank after filling.
21_RUP_OM_EN_USC_t.book Page 320