C3 voltage CHRYSLER VOYAGER 2003 Workshop Manual
[x] Cancel search | Manufacturer: CHRYSLER, Model Year: 2003, Model line: VOYAGER, Model: CHRYSLER VOYAGER 2003Pages: 2177, PDF Size: 59.81 MB
Page 423 of 2177

FRONT FOG LAMP DIAGNOSIS
CONDITION POSSIBLE CAUSES CORRECTION
FOG LAMPS ARE DIM
WITH ENGINE IDLING
OR IGNITION TURNED
OFF.1. Loose or corroded battery
cables.1. Clean and secure battery cable clamps and
posts.
2. Loose or worn generator drive
belt.2. Adjust or replace generator drive belt.
3. Charging system output too low. 3. Test and repair charging system. Refer to
Electrical, Charging,
4. Battery has insufficient charge. 4. Test battery state-of-charge. Refer to
Electrical, Battery System.
5. Battery is sulfated or shorted. 5. Load test battery. Refer to Electrical, Battery
System.
6. Poor lighting circuit Z349/Z248
ground.6. Test for voltage drop across Z349/248
ground locations. Refer to Electrical, Wiring
Information.
FOG LAMP BULBS
BURN OUT
FREQUENTLY1. Charging system output too
high.1. Test and repair charging system. Refer to
Electrical, Charging.
2. Loose or corroded terminals or
splices in circuit.2. Inspect and repair all connectors and splices.
Refer to Electrical, Wiring Information.
FOG LAMPS ARE DIM
WITH ENGINE
RUNNING ABOVE IDLE1. Charging system output too low. 1. Test and repair charging system. Refer to
Electrical, Charging.
2. Poor lighting circuit Z349/Z248
ground.2. Test for voltage drop across Z349/Z248
ground locations. Refer to Electrical, Wiring
Information.
3. High resistance in fog lamp
circuit.3. Test amperage draw of fog lamp circuit.
FOG LAMPS FLASH
RANDOMLY1. Poor lighting circuit Z349/Z248
ground.1. Test for voltage drop across Z349/Z248
ground locations. Refer to Electrical, Wiring
Information.
2. Variable resistance in fog lamp
circuit.2. Test amperage draw of fog lamp circuit.
3. Faulty fog lamp switch (part of
headlamp switch).3. Replace headlamp switch.
4. Loose or corroded terminals or
splices in circuit.4. Inspect and repair all connectors and splices.
Refer to Electrical, Wiring Information.
5. Is relay engaging properly? 5. Verify function of fog lamp relay in IPM.
6. PCI Bus Communication. 6. Verify PCI bus message (fog lamp info)
transmitted from BCM and received by FCM.
FOG LAMPS DO NOT
ILLUMINATE1. Blown fuse for fog lamp. 1. Replace fuse. Refer to Electrical, Wiring
Information.
2. No Z349/Z248 ground at fog
lamps.2. Repair circuit ground. Refer to Electrical,
Wiring Information.
3. Faulty fog lamp switch (part of
headlamp switch).3. Replace headlamp switch.
4. Broken connector terminal or
wire splice in fog lamp circuit.4. Repair connector terminal or wire splice.
5. Faulty or burned out bulb. 5. Replace bulb.
6. Is relay engaging? 6. Verify function of fog lamp relay in IPM.
7. PCI Bus Communication. 7. Verify PCI bus message (fog lamp info)
transmitted from BCM and received by FCM.
8L - 8 LAMPS/LIGHTING - EXTERIORRS
FRONT FOG LAMP (Continued)
ProCarManuals.com
Page 427 of 2177

Before damaging a trim component, verify hidden
fasteners or captured edges are not holding the com-
ponent in place.
HEADLAMP DIAGNOSIS
CONDITION POSSIBLE CAUSES CORRECTION
HEADLAMPS ARE DIM
WITH ENGINE IDLING
OR IGNITION TURNED
OFF.1. Loose or corroded battery
cables.1. Clean and secure battery cable clamps and
posts.
2. Loose or worn generator drive
belt.2. Adjust or replace generator drive belt.
3. Charging system output too low. 3. Test and repair charging system, refer to
Electrical, Charging
4. Battery has insufficient charge. 4. Test battery state-of-charge, refer to
Electrical, Battery System.
5. Battery is sulfated or shorted. 5. Load test battery, refer to Electrical, Battery
System.
6. Poor lighting circuit Z343/Z344-
ground.6. Test for voltage drop across Z343/Z344-
ground locations, refer to Electrical, Wiring
Diagram Information.
HEADLAMP BULBS
BURN OUT
FREQUENTLY.1. Integrated Power Module (IPM)
not controlling voltage.1. Test and repair Integrated Power Module.
2. Loose or corroded terminals or
splices in circuit.2. Inspect and repair all connectors and splices.
Refer to Electrical, Wiring Information.
HEADLAMPS ARE DIM
WITH ENGINE
RUNNING ABOVE IDLE.1. Charging system output too low. 1. Test and repair charging system, refer to
Electrical, Wiring Information.
2. Poor lighting circuit Z343/Z344-
ground.2. Test for voltage drop across Z343/Z344-
ground locations, refer to Electrical, Wiring
Information.
3. High resistance in headlamp
circuit.3. Test amperage draw of headlamp circuit.
HEADLAMPS FLASH
RANDOMLY1. Poor lighting circuit Z343/Z344-
ground.1. Test for voltage drop across Z343/Z344-
ground locations, refer to Electrical, Wiring
Information.
2. Variable resistance in headlamp
circuit.2. Test amperage draw of headlamp circuit.
3. Loose or corroded terminals or
splices in circuit.3. Inspect and repair all connectors and splices,
refer to Electrical, Wiring Information.
4. Faulty headlamp switch. 4. Replace headlamp switch.
8L - 12 LAMPS/LIGHTING - EXTERIORRS
HEADLAMP (Continued)
ProCarManuals.com
Page 428 of 2177

CONDITION POSSIBLE CAUSES CORRECTION
HEADLAMPS DO NOT
ILLUMINATE.1. No voltage to headlamps. 1. Repair open headlamp circuit, refer to
Electrical, Wiring Information.
2. No Z343/Z344-ground at
headlamps.2. Repair circuit ground, refer to Electrical,
Wiring Information.
3. Broken connector terminal or
wire splice in headlamp circuit.3. Repair connector terminal or wire splice.
4. Faulty or burned out bulb. 4. Replace headlamp bulb(s).
5. Body Control Module
malfunction.5. Refer to appropriate Body Control Module
diagnostics.
6. PCI Bus Communication 6. Verify messages being transmitted by BCM
and received by FCM.
7. IPM/FCM Malfunction. 7. Refer to appropriate IPM/FCM diagnostics.
HEADLAMPS ON WITH
IGNITION IN RUN, WITH
HEADLAMP SWITCH
OFF.1. Faulty headlamp switch. 1. Replace headlamp switch (review BCM
logged faults).
2. Diagnostic tool indicates (4.7 -
5.0V) on headlamp switch input to
BCM.2. Inspect and repair terminals, connectors and
open circuits.
3. PCI Bus Communication. 3. Verify messages being transmitted by BCM
and received by FCM.
REMOVAL
(1) Disconnect and isolate the battery negative
cable.
(2) Remove headlamp unit retaining screws.
(3) Remove headlamp unit to expose back of unit.
(4) Remove wiring connector from bulb.
(5) Rotate headlamp bulb retaining ring counter-
clockwise.
(6) Pull headlamp bulb and remove from headlamp
unit (Fig. 13).
INSTALLATION
(1) Install headlamp bulb to the headlamp unit.
(2) Install headlamp bulb retaining ring.
(3) Connect wiring connector to bulb.
(4) Install the headlamp unit.
(5) Install headlamp unit retaining screws.
(6) Reconnect the battery negative cable.
HEADLAMP - EXPORT
REMOVAL
(1) Disconnect and isolate the battery negative
cable.
(2) Remove the headlamp unit.
(3) Remove the cover (high beam lamp) or rubber
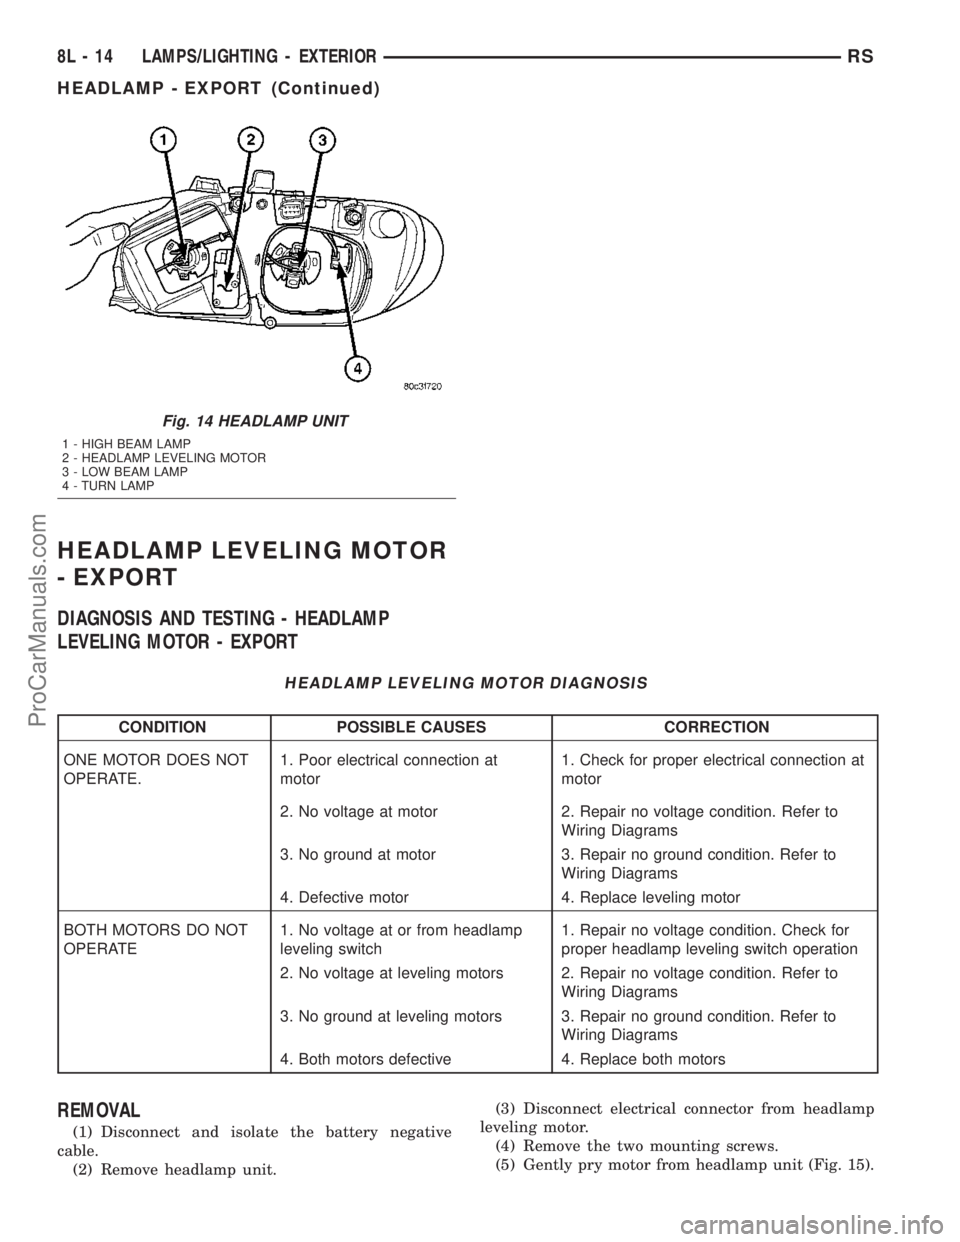
boot (low beam lamp) to access bulbs (Fig. 14).
(4) Disconnect the wire harness connector.
(5) Disengage spring clip from headlamp.
(6) Pull headlamp bulb from back of headlamp
unit.
INSTALLATION
(1) Insert headlamp bulb into headlamp unit.
(2) Engage spring clip to headlamp.
(3) Connect wire harness connector.
(4) Install the cover (high beam lamp) or rubber
boot (low beam lamp) to headlamp unit.
(5) Install the headlamp unit.
(6) Connect the battery negative cable.
Fig. 13 HEADLAMP
1 - HEADLAMP
2 - HEADLAMP UNIT
RSLAMPS/LIGHTING - EXTERIOR8L-13
HEADLAMP (Continued)
ProCarManuals.com
Page 429 of 2177
HEADLAMP LEVELING MOTOR
- EXPORT
DIAGNOSIS AND TESTING - HEADLAMP
LEVELING MOTOR - EXPORT
HEADLAMP LEVELING MOTOR DIAGNOSIS
CONDITION POSSIBLE CAUSES CORRECTION
ONE MOTOR DOES NOT
OPERATE.1. Poor electrical connection at
motor1. Check for proper electrical connection at
motor
2. No voltage at motor 2. Repair no voltage condition. Refer to
Wiring Diagrams
3. No ground at motor 3. Repair no ground condition. Refer to
Wiring Diagrams
4. Defective motor 4. Replace leveling motor
BOTH MOTORS DO NOT
OPERATE1. No voltage at or from headlamp
leveling switch1. Repair no voltage condition. Check for
proper headlamp leveling switch operation
2. No voltage at leveling motors 2. Repair no voltage condition. Refer to
Wiring Diagrams
3. No ground at leveling motors 3. Repair no ground condition. Refer to
Wiring Diagrams
4. Both motors defective 4. Replace both motors
REMOVAL
(1) Disconnect and isolate the battery negative
cable.
(2) Remove headlamp unit.(3) Disconnect electrical connector from headlamp
leveling motor.
(4) Remove the two mounting screws.
(5) Gently pry motor from headlamp unit (Fig. 15).
Fig. 14 HEADLAMP UNIT
1 - HIGH BEAM LAMP
2 - HEADLAMP LEVELING MOTOR
3 - LOW BEAM LAMP
4 - TURN LAMP
8L - 14 LAMPS/LIGHTING - EXTERIORRS
HEADLAMP - EXPORT (Continued)
ProCarManuals.com
Page 441 of 2177
LAMP BULB
VOLTAGE INDICATOR LED
* VFD = VACUUM FLUORESCENT DISPLAY
CENTER CONSOLE LAMP
SWITCH
REMOVAL
(1) Disconnect and isolate the battery negative
cable.
(2) Open console lid and remove tray.
(3) Using a flat bladed tool, pry up on the switch.
(4) Remove bulb from switch.
INSTALLATION
(1) Install bulb into switch.
(2) Push switch into console opening.
(3) Install tray and close lid.
(4) Connect battery negative cable.
CLUSTER ILLUMINATION
LAMPS
REMOVAL
(1) Remove the Instrument Cluster. Refer to Elec-
trical, Instrument Cluster, Removal.
(2) Turn over cluster and expose the illumination
bulb sockets.
(3) Identify which bulb is defective and twist it out
of the cluster using a counterclockwise motion.
INSTALLATION
(1) Install the new bulb socket into the cluster
using a clockwise motion.
(2) Install the Instrument Cluster. Refer to Electri-
cal, Instrument Cluster, Installation.
COURTESY LAMP
REMOVAL
(1) Disconnect and isolate the battery negative
cable.
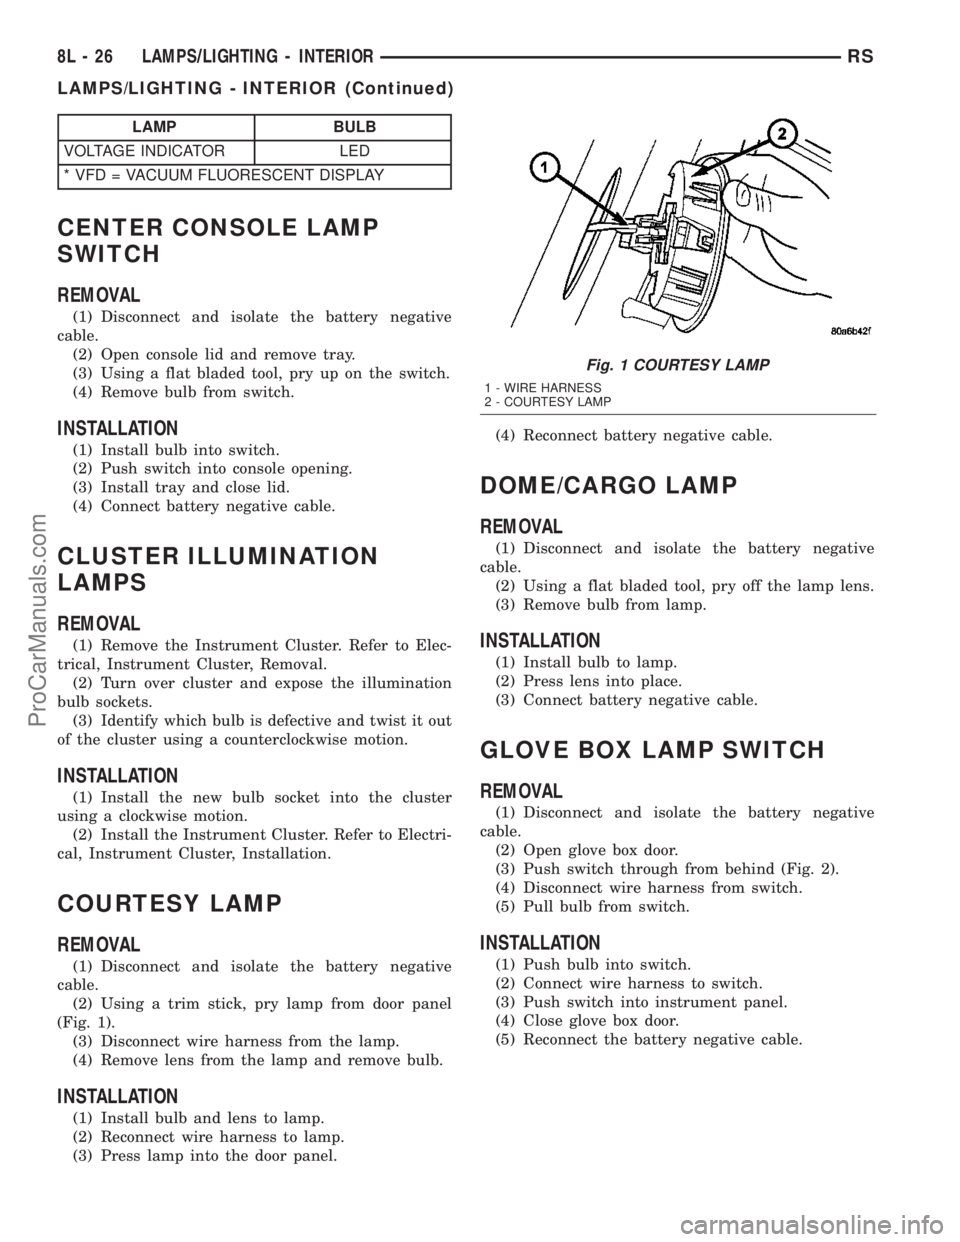
(2) Using a trim stick, pry lamp from door panel
(Fig. 1).
(3) Disconnect wire harness from the lamp.
(4) Remove lens from the lamp and remove bulb.
INSTALLATION
(1) Install bulb and lens to lamp.
(2) Reconnect wire harness to lamp.
(3) Press lamp into the door panel.(4) Reconnect battery negative cable.
DOME/CARGO LAMP
REMOVAL
(1) Disconnect and isolate the battery negative
cable.
(2) Using a flat bladed tool, pry off the lamp lens.
(3) Remove bulb from lamp.
INSTALLATION
(1) Install bulb to lamp.
(2) Press lens into place.
(3) Connect battery negative cable.
GLOVE BOX LAMP SWITCH
REMOVAL
(1) Disconnect and isolate the battery negative
cable.
(2) Open glove box door.
(3) Push switch through from behind (Fig. 2).
(4) Disconnect wire harness from switch.
(5) Pull bulb from switch.
INSTALLATION
(1) Push bulb into switch.
(2) Connect wire harness to switch.
(3) Push switch into instrument panel.
(4) Close glove box door.
(5) Reconnect the battery negative cable.
Fig. 1 COURTESY LAMP
1 - WIRE HARNESS
2 - COURTESY LAMP
8L - 26 LAMPS/LIGHTING - INTERIORRS
LAMPS/LIGHTING - INTERIOR (Continued)
ProCarManuals.com
Page 445 of 2177
also affect compass operation. If the vehicle roof
should become magnetized, the demagnetizing and
calibration procedures found in this section may be
required to restore proper compass operation.
DESCRIPTION - TEMPERATURE
All the available overhead consoles on this model
include Temperature information. The temperature
displays the outside ambient temperature in whole
degrees. The temperature display can be toggled
from Fahrenheit to Celsius by selecting the desired
U.S./Metric option from the customer programmable
features. The displayed temperature is not an instant
reading of conditions, but an average temperature. It
may take the temperature display several minutes to
respond to a major temperature change, such as driv-
ing out of a heated garage into winter temperatures.
When the ignition switch is turned to the Off posi-
tion, the last displayed temperature reading stays in
the electronic control modules (CT, CMTC, EVIC)
memory. When the ignition switch is turned to the
On position again, the electronic module will display
the memory temperature for one minute; then update
the display to the current average temperature read-
ing within five minutes.
The temperature function is supported by an ambi-
ent temperature sensor. The sensor is mounted out-
side the passenger compartment near the front and
center of the vehicle, and is hard wired to the Front
Control Module (FCM). The FCM sends temperature
status messages to the module over the J1850 PCI
data bus circuit.
Following are general descriptions of the major
components used in the overhead console. Refer to
Wiring Diagrams for complete circuit schematics.
OPERATION
Refer to the vehicle Owner's Manual for specific
operation of each overhead console and its systems.
DIAGNOSIS AND TESTING - OVERHEAD
CONSOLE
If the problem with the overhead console is an
inaccurate or scrambled display, refer toSelf-Diag-
nostic Testbelow. If the problem with the overhead
console is incorrect Vacuum Fluorescent Display
(VFD) dimming levels, use a DRB IIItscan tool and
the proper Diagnostic Procedures manual to test for
the correct dimming message inputs being received
from the Body Control Module (BCM) or Front Con-
trol Module (FCM) over the J1850 Programmable
Communications Interface (PCI) data bus circuit. If
the problem is a no-display condition, use the follow-
ing procedures. For complete circuit diagrams, refer
toOverhead Consolein the Wiring Diagrams sec-
tion of the service manual.(1) Check the fused B(+) fuse in the integrated
power module. If OK, go to Step 2. If not OK, repair
the shorted circuit or component as required and
replace the faulty fuse.
(2) Check for battery voltage at the fused B(+) fuse
in the integrated power module. If OK, go to Step 3.
If not OK, repair the open fused B(+) circuit to the
fused B(+) fuse in the integrated power module as
required.
(3) Check the fused ignition switch output (run/
start) fuse in the integrated power module. If OK, go
to Step 4. If not OK, repair the shorted circuit or
component as required and replace the faulty fuse.
(4) Turn the ignition switch to the On position.
Check for battery voltage at the fused ignition switch
output (run/start) fuse in the integrated power mod-
ule. If OK, go to Step 5. If not OK, repair the open
fused ignition switch output (run/start) circuit to the
ignition switch as required.
(5) Turn the ignition switch to the Off position.
Disconnect and isolate the battery negative cable.
Remove the overhead console. Check for continuity
between the ground circuit cavity of the roof wire
harness connector for the electronics module and a
good ground. There should be continuity. If OK, go to
Step 6. If not OK, repair the open ground circuit to
ground as required.
(6) Connect the battery negative cable. Check for
battery voltage at the fused B(+) circuit cavity of the
roof wire harness connector for the electronics mod-
ule. If OK, go to Step 7. If not OK, repair the open
fused B(+) circuit to the fused B(+) fuse in the inte-
grated power module as required.
(7)
Turn the ignition switch to the On position.
Check for battery voltage at the fused ignition switch
output (run/start) circuit cavity of the roof wire har-
ness connector for the electronics module. If OK, refer
toSelf-Diagnostic Test
later this group for further
diagnosis of the electronics module and the J1850
PCI data bus circuit. If not OK, repair the open fused
ignition switch output (run/start) circuit to the fuse
in the integrated power module as required.
SELF-DIAGNOSTIC TEST
A self-diagnostic test is used to determine that the
electronics module is operating properly, and that all
the J1850 PCI data bus messages are being received
for initial operation. Initiate the self-diagnostic test
as follows:
(1) With the ignition switch in the Off position, on
Electronic Vehicle Information Center (EVIC) and
Compass Mini-Trip Computer (CMTC) equipped vehi-
cles simultaneously depress and hold theSTEP and
the RESET buttons. On Compass Temperature
Module (CT) equipped vehicles depress theC/T and
the US/M push buttons.
8M - 2 MESSAGE SYSTEMSRS
OVERHEAD CONSOLE (Continued)
ProCarManuals.com
Page 454 of 2177
Transmitter and the EVIC module are inoperative,
refer toElectronic Vehicle Information Center
Diagnosis and Testingin this group for further
diagnosis. For complete circuit diagrams, refer to
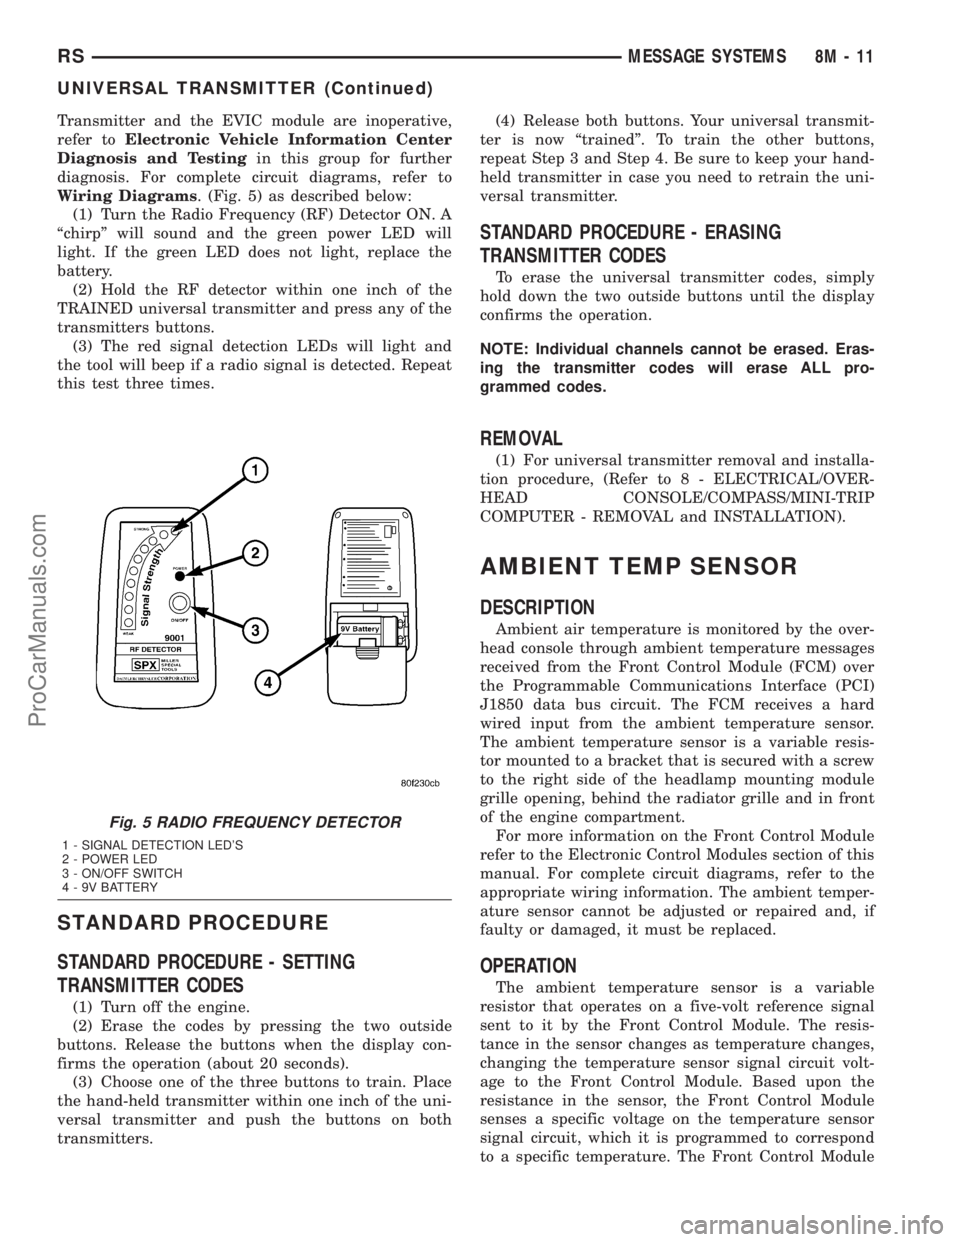
Wiring Diagrams. (Fig. 5) as described below:
(1) Turn the Radio Frequency (RF) Detector ON. A
ªchirpº will sound and the green power LED will
light. If the green LED does not light, replace the
battery.
(2) Hold the RF detector within one inch of the
TRAINED universal transmitter and press any of the
transmitters buttons.
(3) The red signal detection LEDs will light and
the tool will beep if a radio signal is detected. Repeat
this test three times.
STANDARD PROCEDURE
STANDARD PROCEDURE - SETTING
TRANSMITTER CODES
(1) Turn off the engine.
(2) Erase the codes by pressing the two outside
buttons. Release the buttons when the display con-
firms the operation (about 20 seconds).
(3) Choose one of the three buttons to train. Place
the hand-held transmitter within one inch of the uni-
versal transmitter and push the buttons on both
transmitters.(4) Release both buttons. Your universal transmit-
ter is now ªtrainedº. To train the other buttons,
repeat Step 3 and Step 4. Be sure to keep your hand-
held transmitter in case you need to retrain the uni-
versal transmitter.
STANDARD PROCEDURE - ERASING
TRANSMITTER CODES
To erase the universal transmitter codes, simply
hold down the two outside buttons until the display
confirms the operation.
NOTE: Individual channels cannot be erased. Eras-
ing the transmitter codes will erase ALL pro-
grammed codes.
REMOVAL
(1) For universal transmitter removal and installa-
tion procedure, (Refer to 8 - ELECTRICAL/OVER-
HEAD CONSOLE/COMPASS/MINI-TRIP
COMPUTER - REMOVAL and INSTALLATION).
AMBIENT TEMP SENSOR
DESCRIPTION
Ambient air temperature is monitored by the over-
head console through ambient temperature messages
received from the Front Control Module (FCM) over
the Programmable Communications Interface (PCI)
J1850 data bus circuit. The FCM receives a hard
wired input from the ambient temperature sensor.
The ambient temperature sensor is a variable resis-
tor mounted to a bracket that is secured with a screw
to the right side of the headlamp mounting module
grille opening, behind the radiator grille and in front
of the engine compartment.
For more information on the Front Control Module
refer to the Electronic Control Modules section of this
manual. For complete circuit diagrams, refer to the
appropriate wiring information. The ambient temper-
ature sensor cannot be adjusted or repaired and, if
faulty or damaged, it must be replaced.
OPERATION
The ambient temperature sensor is a variable
resistor that operates on a five-volt reference signal
sent to it by the Front Control Module. The resis-
tance in the sensor changes as temperature changes,
changing the temperature sensor signal circuit volt-
age to the Front Control Module. Based upon the
resistance in the sensor, the Front Control Module
senses a specific voltage on the temperature sensor
signal circuit, which it is programmed to correspond
to a specific temperature. The Front Control Module
Fig. 5 RADIO FREQUENCY DETECTOR
1 - SIGNAL DETECTION LED'S
2 - POWER LED
3 - ON/OFF SWITCH
4 - 9V BATTERY
RSMESSAGE SYSTEMS8M-11
UNIVERSAL TRANSMITTER (Continued)
ProCarManuals.com
Page 457 of 2177
POWER LIFTGATE SYSTEM
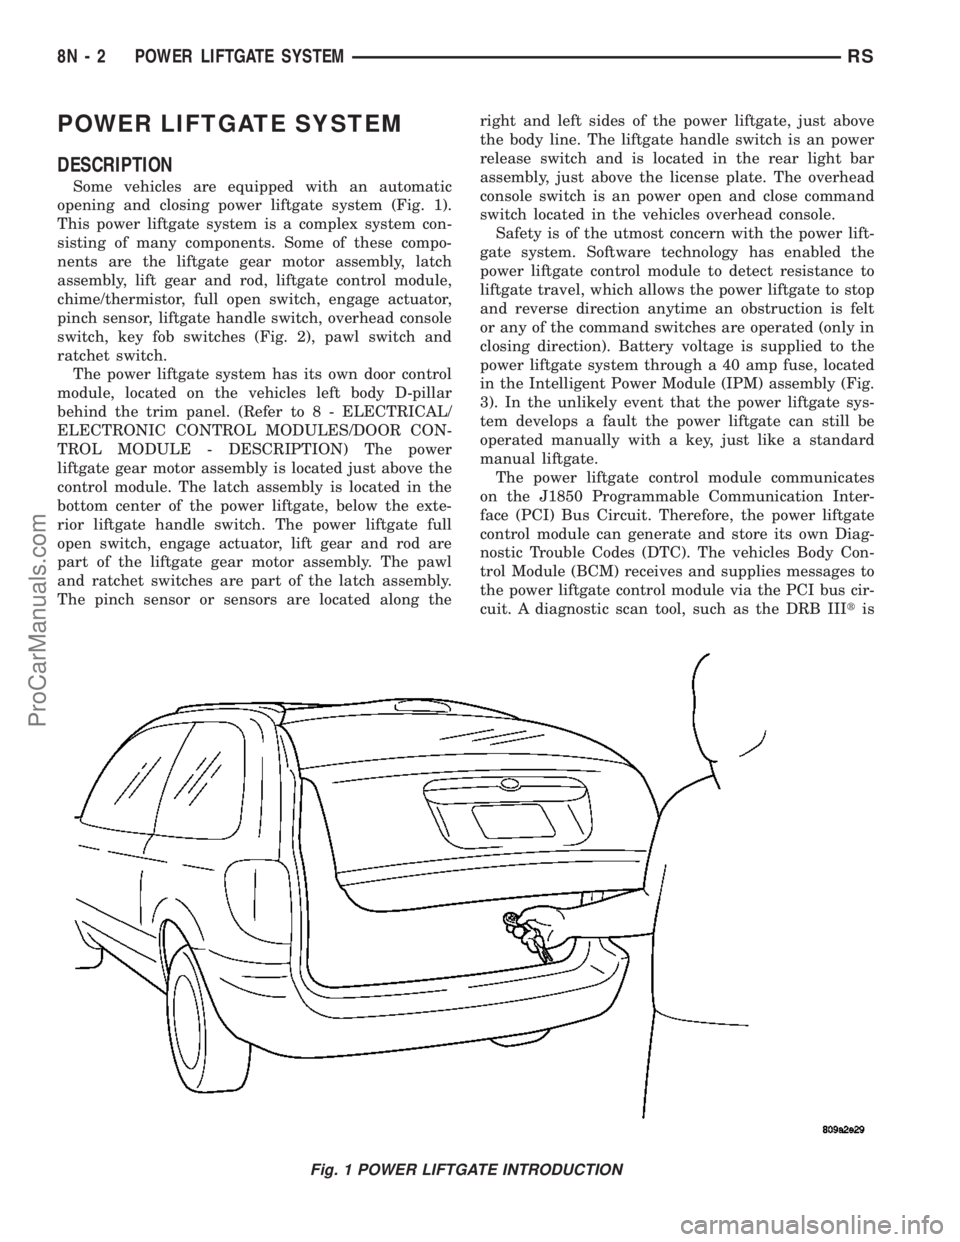
DESCRIPTION
Some vehicles are equipped with an automatic
opening and closing power liftgate system (Fig. 1).
This power liftgate system is a complex system con-
sisting of many components. Some of these compo-
nents are the liftgate gear motor assembly, latch
assembly, lift gear and rod, liftgate control module,
chime/thermistor, full open switch, engage actuator,
pinch sensor, liftgate handle switch, overhead console
switch, key fob switches (Fig. 2), pawl switch and
ratchet switch.
The power liftgate system has its own door control
module, located on the vehicles left body D-pillar
behind the trim panel. (Refer to 8 - ELECTRICAL/
ELECTRONIC CONTROL MODULES/DOOR CON-
TROL MODULE - DESCRIPTION) The power
liftgate gear motor assembly is located just above the
control module. The latch assembly is located in the
bottom center of the power liftgate, below the exte-
rior liftgate handle switch. The power liftgate full
open switch, engage actuator, lift gear and rod are
part of the liftgate gear motor assembly. The pawl
and ratchet switches are part of the latch assembly.
The pinch sensor or sensors are located along theright and left sides of the power liftgate, just above
the body line. The liftgate handle switch is an power
release switch and is located in the rear light bar
assembly, just above the license plate. The overhead
console switch is an power open and close command
switch located in the vehicles overhead console.
Safety is of the utmost concern with the power lift-
gate system. Software technology has enabled the
power liftgate control module to detect resistance to
liftgate travel, which allows the power liftgate to stop
and reverse direction anytime an obstruction is felt
or any of the command switches are operated (only in
closing direction). Battery voltage is supplied to the
power liftgate system through a 40 amp fuse, located
in the Intelligent Power Module (IPM) assembly (Fig.
3). In the unlikely event that the power liftgate sys-
tem develops a fault the power liftgate can still be
operated manually with a key, just like a standard
manual liftgate.
The power liftgate control module communicates
on the J1850 Programmable Communication Inter-
face (PCI) Bus Circuit. Therefore, the power liftgate
control module can generate and store its own Diag-
nostic Trouble Codes (DTC). The vehicles Body Con-
trol Module (BCM) receives and supplies messages to
the power liftgate control module via the PCI bus cir-
cuit. A diagnostic scan tool, such as the DRB IIItis
Fig. 1 POWER LIFTGATE INTRODUCTION
8N - 2 POWER LIFTGATE SYSTEMRS
ProCarManuals.com
Page 461 of 2177

CONDITION POSSIBLE CAUSES CORRECTION
Binding or sticking of components Establish location of binding and replace
necessary components
Wiring problems (system or vehicle) Troubleshoot using electrical schematics.
Refer to wiring diagrams
Power loss during Liftgate
operationWiring problems (system or vehicle) Troubleshoot using electrical schematics.
Refer to wiring diagrams
Low battery voltage Charge battery
Failure of Power Liftgate or Body
Control ModuleDisconnect then reconnect battery to reset
module, function liftgate, if no function
exists check for loose wire connections,
see Body Diagnostic Manual for detailed
procedures
Failure of motor assembly Check for no drive condition
No power latching in
primary and/or secondary
positionsFailure of latch assembly Check wire connections and for blown fuse
Check for foreign matter preventing the
operation of latch assembly
Troubleshoot using Body Diagnostic
Manual. Replace latch assembly, if
necessary
Binding or sticking of components Establish location of binding and replace
necessary components
Failure of Power Liftgate or Body
Control ModuleDisconnect then reconnect battery to reset
module, function liftgate, if no function
exists check for loose wire connections,
see Body Diagnostic Manual for detailed
procedures
Door seal force too high Inspect seals for damage, mis-assembly,
foreign matter or other possible obstruction
Failure of motor assembly Check for no drive condition
Latch will not fully release
from primary positionFailure of latch assembly Check wire connections and for blown fuse
Check for foreign matter or damaged
components preventing the operation of
latch assembly
Troubleshoot using body electrical
troubleshooting manual Replace latch
assembly, if necessary
Failure of outside handle switch Troubleshoot using Body Diagnostic
Manual Replace switch, if necessary
Failure of Power Liftgate or Body
Control ModuleDisconnect then reconnect battery to reset
module, function liftgate, if no function
exists check for loose wire connections,
see Body Diagnostic Manual for detailed
procedures
Binding or sticking of components Establish location of binding and replace
necessary components
8N - 6 POWER LIFTGATE SYSTEMRS
POWER LIFTGATE SYSTEM (Continued)
ProCarManuals.com
Page 462 of 2177

CONDITION POSSIBLE CAUSES CORRECTION
Key fob, Outside Handle or
overhead console switches
do not power operate
liftgateBlown Fuse Check fuse and replace
Battery voltage low Charge or replace battery in key fob or
vehicle
Failure of latch assembly Check for foreign matter preventing the
operation of latch assembly
Check wire connection
Pawl and/or ratchet switch inoperative
Replace latch if necessary
Wiring problems (system or vehicle) Troubleshoot using electrical schematics.
Refer to wiring diagrams
Failure of Body Control Module
(BCM)Check electrical connections
Refer to the Body electrical troubleshooting
guide for additional checks
Replace BCM if necessary
Failure of key fob Reprogram key fob
Replace key fob if necessary
Failure of Power Liftgate Module Disconnect then reconnect battery to reset
module, function liftgate, if no function
exists check for loose wire connections,
see Body Diagnostic Manual for detailed
procedures
Failure of liftgate motor assembly Check for foreign matter preventing the
operation of gear motor assembly
Check wire connections
Motor clutch does not engage, replace
assembly
Full open switch inoperative, replace
switch, if necessary
Troubleshoot using Body Diagnostic
Manual Replace motor, if necessary
Liftgate does not stay open Failure of liftgate prop rods Replace prop rods, if necessary
Check for broken attachments
High inside/outside opening
effortFailure of liftgate prop rods Replace prop rods, if necessary
Check for broken attachments
Gear motor did not disengage Troubleshoot using Body Diagnostic
Manual Replace components, if necessary
Binding or sticking of components Establish location of binding and replace
necessary components
RSPOWER LIFTGATE SYSTEM8N-7
POWER LIFTGATE SYSTEM (Continued)
ProCarManuals.com